Il Cronometraggio con Chip viene utilizzato per gestire le connessioni ai sistemi di cronometraggio e il flusso dei dati grezzi di cronometraggio.
Cronometraggio con Chip
La vista Cronometraggio con Chip offre una panoramica compatta dei sistemi connessi e alcune impostazioni di base per il cronometraggio dell’evento.
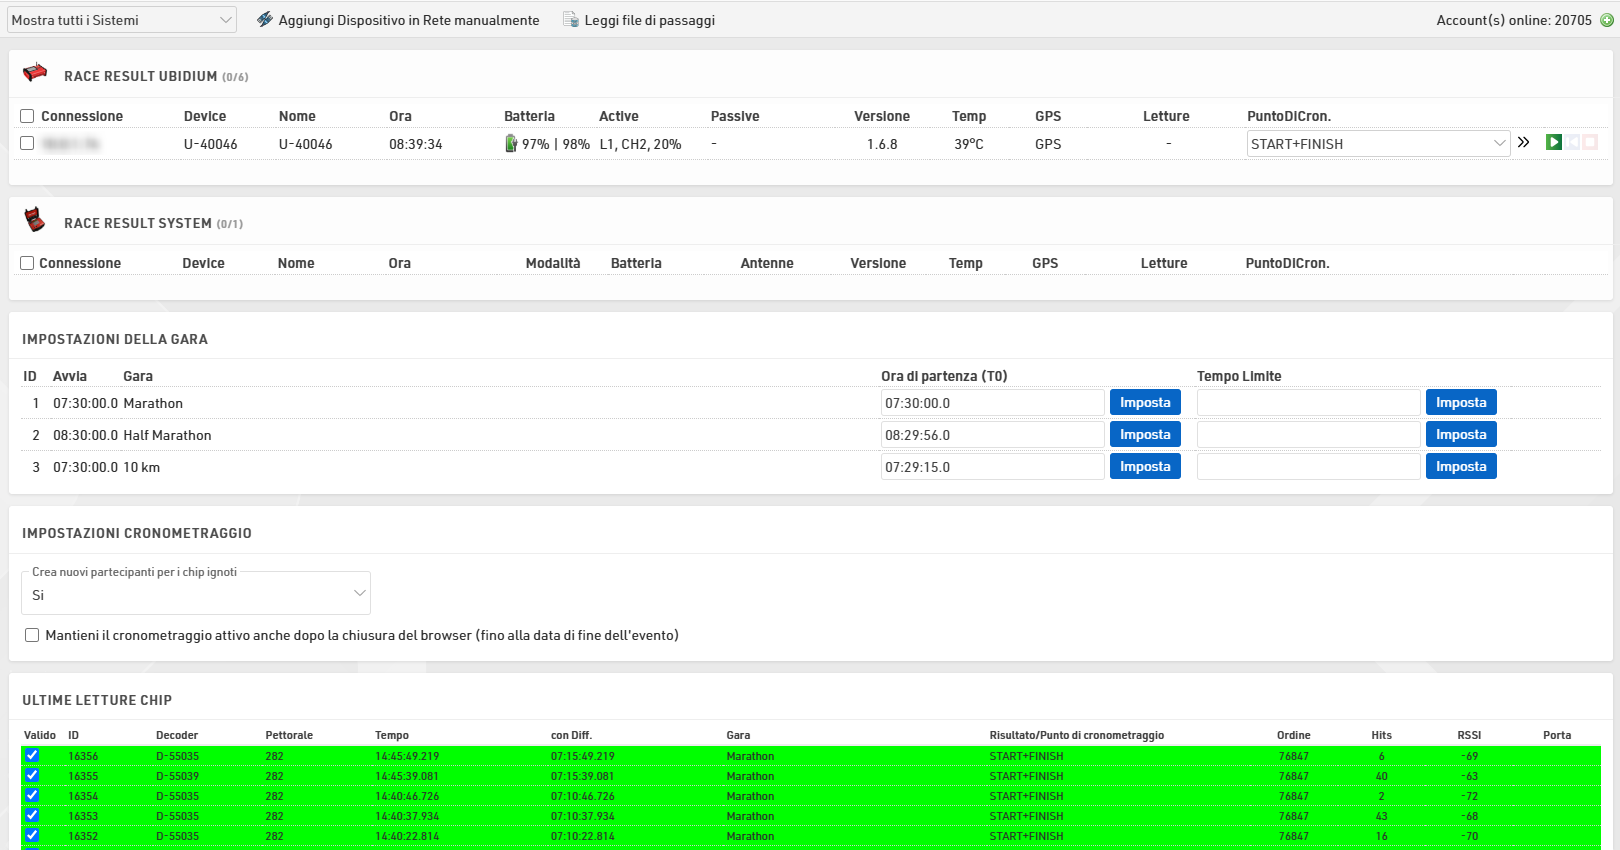
Tutti i dispositivi disponibili (tramite rete locale o online) vengono elencati automaticamente e raggruppati per tipologia. Una finestra è sempre mostrata sia per RACE RESULT Ubidium che per RACE RESULT System; ulteriori tipologie di dispositivi vengono visualizzate se disponibili in locale o online.
I sistemi possono essere filtrati per mostrare solo quelli a cui sei connesso oppure quelli entro una certa distanza, in base alle Impostazioni di Base e alla posizione GPS del sistema.
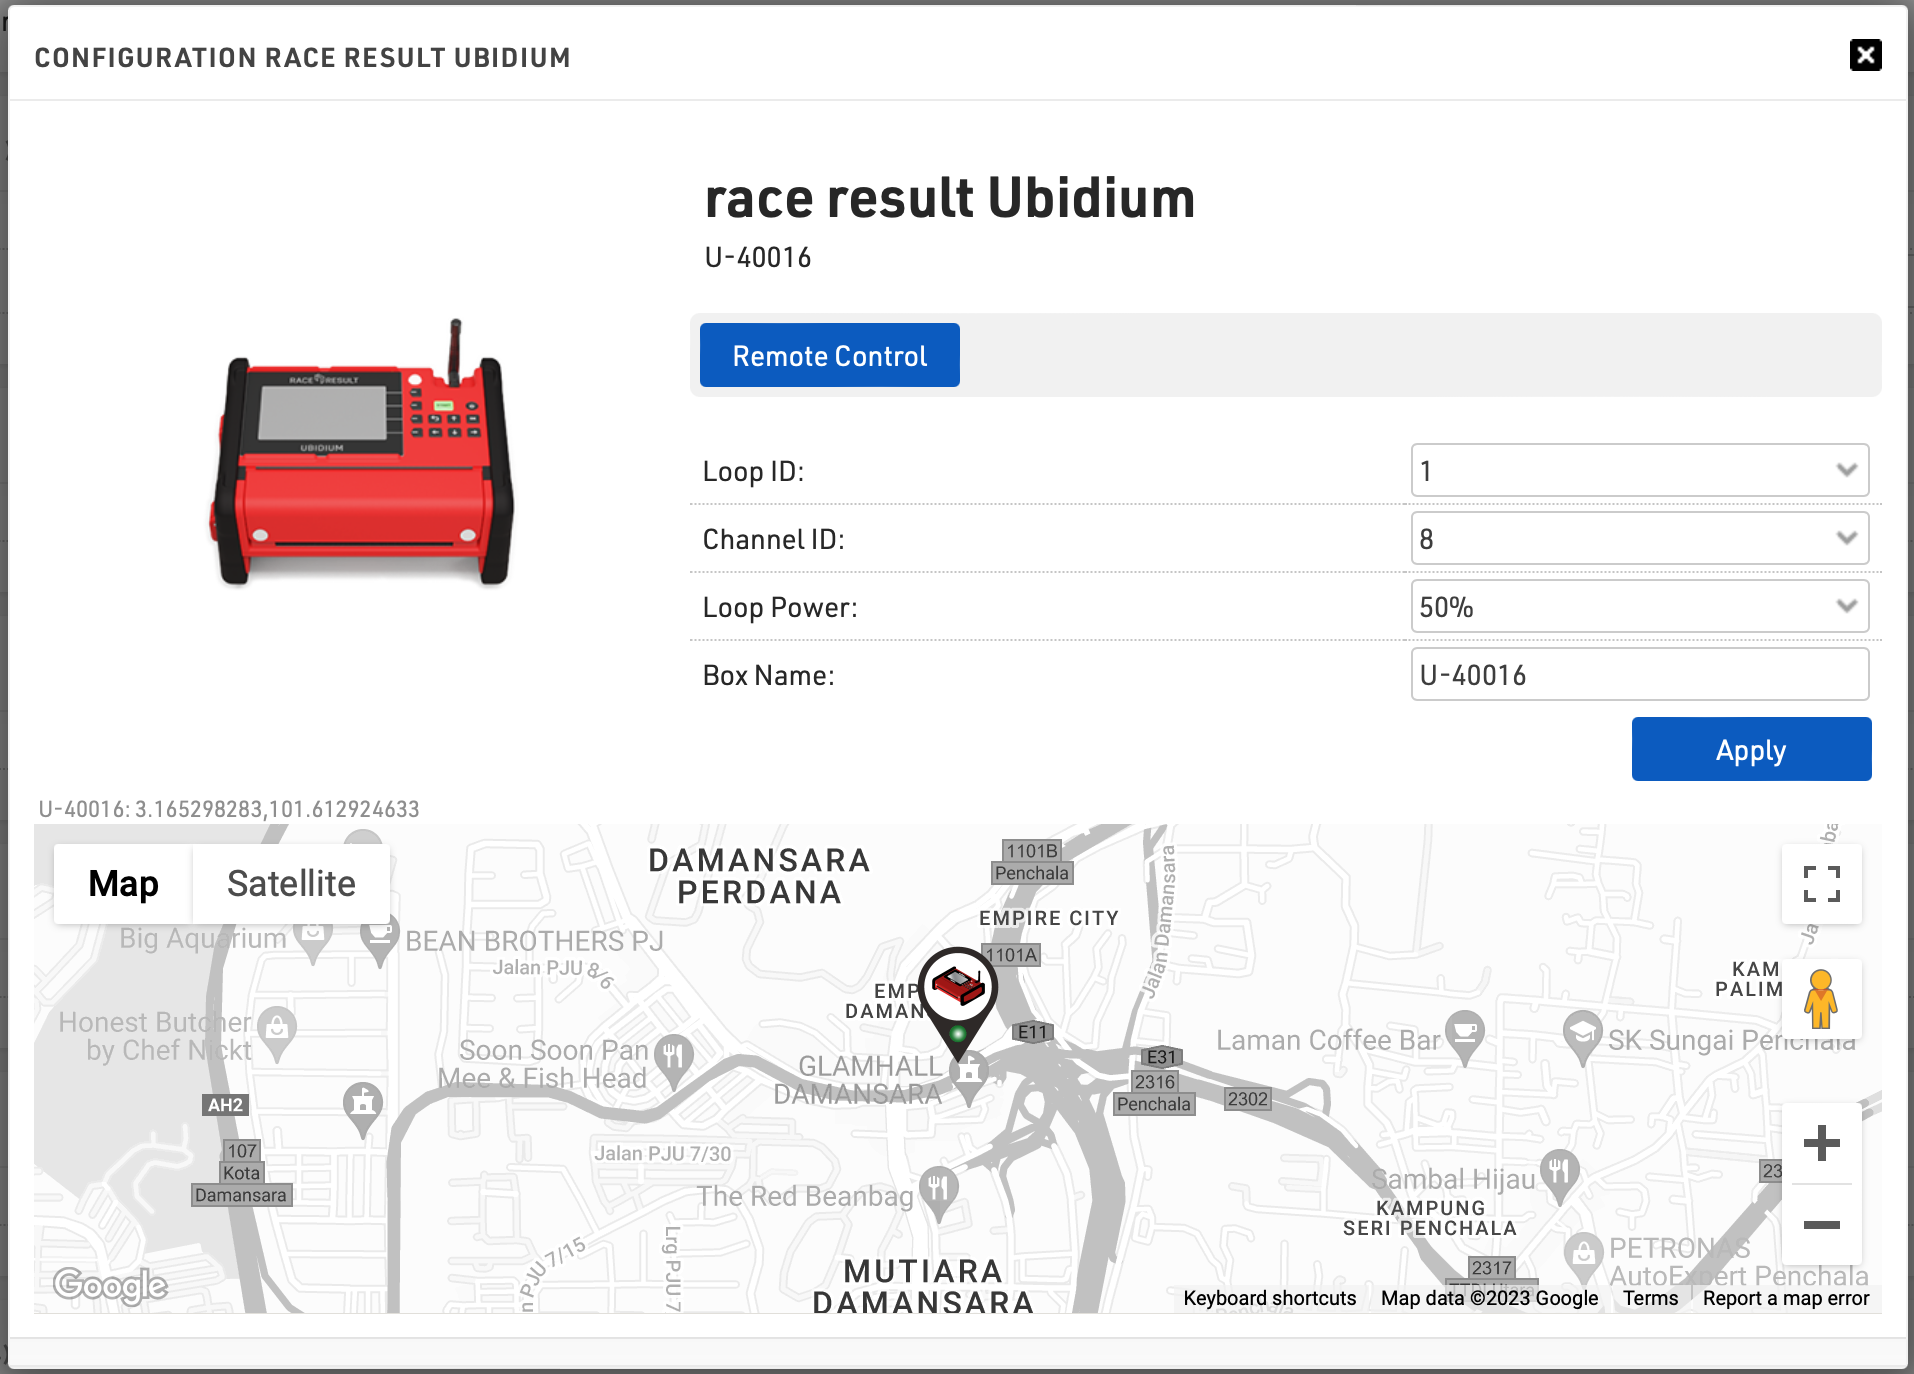
Qui vengono mostrate informazioni fondamentali sui tuoi sistemi, tra cui connessione, posizione, nome del dispositivo, orario del dispositivo, modalità del dispositivo, batteria rimanente e informazioni sulle antenne o impostazioni dei loop. Cliccando su un Device ID si aprirà inoltre la finestra di System Control con ulteriori impostazioni e funzioni di controllo del sistema.
Se un sistema riporta un errore, l’elemento interessato può essere evidenziato in rosso per segnalare il problema; gli errori vengono eliminati una volta confermati o risolti direttamente sul sistema.
Se stai effettuando il cronometraggio utilizzando il software online e desideri connetterti a un decoder in rete locale o a una USB Timing Box, sarà necessario avviare il RACE RESULT Web Server sul tuo computer, in quanto questo creerà la connessione tra il browser e i tuoi dispositivi locali.
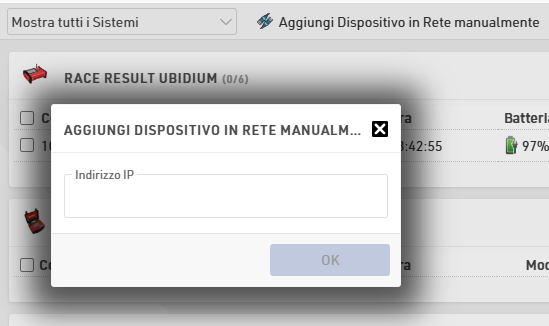
Se un sistema connesso localmente non viene mostrato, puoi cliccare su Aggiungi Dispositivo in Rete manualmente nell’angolo in alto a destra e collegarti tramite l’indirizzo IP del decoder.
È inoltre possibile importare manualmente i file di passaggi dai sistemi; consulta l’articolo sottostante per maggiori informazioni su come ottenere e gestire i file di passaggi.
La vista Chip Timing include anche una finestra degli ultimi chip letti, che si popola automaticamente con i tempi più recenti ricevuti da tutti i sistemi; le informazioni mostrate corrispondono alle colonne standard della schermata Letture Chip.
Connessione ai Sistemi
Per aprire una connessione al tuo sistema, seleziona il Punto di Cronometraggio a cui i dati devono essere assegnati oppure, se utilizzi la Selezione Automatica del Punto di Cronometraggio, puoi lasciare il campo vuoto e cliccare sul pulsante verde Play. Una volta connesso, qualsiasi dato registrato dal sistema verrà automaticamente inviato al file dell’evento. Per interrompere la ricezione dei dati da un sistema, clicca sul pulsante rosso Stop.

Per riprodurre i dati provenienti dal sistema puoi cliccare in qualsiasi momento sul pulsante blu Replay; in questo modo verranno inviati anche i dati registrati prima dell’avvio della connessione.
Nota che questi pulsanti sono completamente indipendenti dal pulsante START sul sistema: non vengono utilizzati per attivare o disattivare la modalità Timing sui Decoder RACE RESULT, ma controllano solamente se stai raccogliendo o meno dati da un dispositivo di cronometraggio.
Se il file dell’evento è online e sei connesso a decoder anch’essi online, nel caso in cui il tuo laptop perda la connessione a Internet, il modulo di cronometraggio rimarrà connesso ai sistemi di cronometraggio per un massimo di 30 minuti, a condizione che il decoder sia ancora connesso a Internet. Questo consente di continuare la raccolta dei dati di cronometraggio anche in caso di interruzione della tua connessione.
Le Impostazioni Avanzate forniscono opzioni aggiuntive per controllare i dati in ingresso.
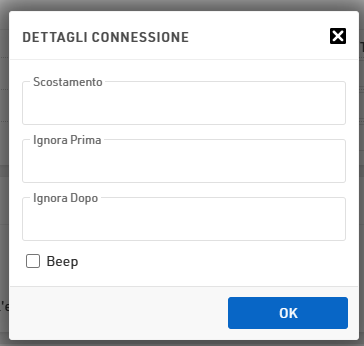
Applicando un offset, tutti i tempi verranno adattati di questo valore al momento del salvataggio nel file dell’evento (può essere positivo o negativo).
È possibile definire i valori di Ignora Prima e Ignora Dopo, che stabiliscono un intervallo di tempo entro il quale i passaggi devono essere accettati. Puoi inserire solo uno dei due o entrambi, nel formato DD:hh:mm:ss.kkk. Questa funzione viene spesso usata durante il replay di un sistema, quando si desidera considerare solo i tempi successivi a un determinato momento.
È infine possibile abilitare un beep che riprodurrà un segnale acustico nel browser ogni volta che viene ricevuto un passaggio da questa connessione.
Controllo dei Sistemi
Alcune impostazioni e altre informazioni sul sistema possono essere visualizzate/modificate facendo clic sull'ID del dispositivo nella scheda Cronometraggio. Si apre una finestra con opzioni aggiuntive a seconda del tipo di sistema e della modalità corrente. Per i sistemi dotati di GPS, la posizione GPS corrente verrà mostrata sulla mappa sottostante.
Impostazioni di Cronometraggio
Crea nuovi partecipanti per chip sconosciuti
Questo controlla il modo in cui il software gestirà i dati di cronometraggio non riconosciuti, per impostazione predefinita il software creerà un record del partecipante per qualsiasi codice transponder non riconosciuto; questo è utile se potresti avere registrazioni tardive o transponder confusi.
Puoi scegliere di disabilitarlo o di abilitarlo solo per i transponder elencati nel tuo Chip File.
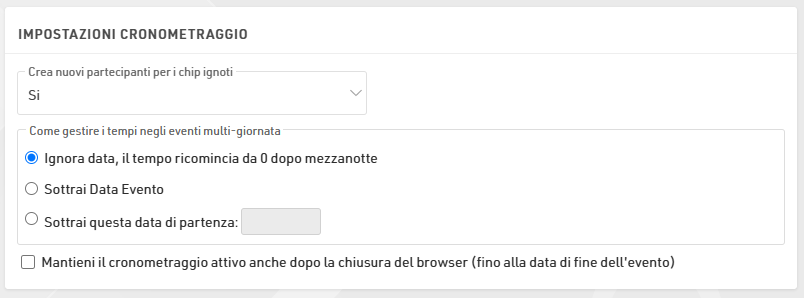
Come gestire i tempi negli eventi di più giorni
Questa impostazione viene visualizzata solo quando la data di fine nelle tue Impostazioni evento è impostata su una data diversa dalla data di inizio.
Per impostazione predefinita, tutti gli orari vengono memorizzati come valore in secondi contati a partire dalla mezzanotte, tuttavia per gli eventi di più giorni questo orario deve essere conteggiato oltre le 24 ore, quindi viene sottratto un riferimento iniziale per ottenere il tempo trascorso totale.
Questo può collegarsi alla data di inizio dell'evento, che successivamente verrà aggiornata automaticamente, o a un riferimento a una data fissa. Tieni presente che la modifica di questa impostazione non influisce sui dati di cronometraggio esistenti, se devi correggere questi dati dovrai reimportare i passaggi.
Mantieni attivo il cronometraggio dopo aver chiuso il browser
Normalmente durante il cronometraggio è necessario tenere aperto RACE RESULT 12 nel browser web per mantenere attive le connessioni ai sistemi di cronometraggio.
Per eventi di lunga durata può essere utile mantenere queste connessioni attive fino alla fine dell'evento e questo può essere abilitato utilizzando la casella di controllo Mantieni cronometraggio attivo nella parte inferiore della finestra Cronometraggio con chip/Sistemi.
Quando si utilizza questa opzione, i sistemi connessi rimarranno connessi fino alla data di fine del file evento, definita nelle Impostazioni di base.
Se lavori con sistemi offline dovrai comunque mantenere il RACE RESULT Web Server in esecuzione e quindi è necessario che il computer rimanga attivo. Si consiglia di lavorare online se si utilizza questa funzione.
Leggere un file di passaggi attraverso il modulo di Cronometraggio
La scheda dei tempi può anche leggere manualmente i file dei passaggi nel caso in cui i dati siano stati eliminati o debbano essere importati in un secondo momento.
È possibile accedere/recuperare i file trasferiti dai sistemi tramite i seguenti metodi:
- Controlli di sistema - Per i decoder attualmente disponibili tramite la scheda Cronometraggio.
- Interfaccia browser del decoder
- Esportatori di dati grezzi - È necessario impostare prima gli esportatori pertinenti
- Download via USB da un sistema
- Archivi sistemi di cronometraggio - Per i file di passaggi che sono stati caricati sui server RACE RESULT.
Per importare un file, fare clic su Leggi file passaggi in alto e seleziona il file da importare.

Dopo aver selezionato il file dei passaggi, assegna un punto di cronometraggio, quindi leggi i dati nel file premendo il pulsante verde PLAY. Il file di rilevamento verrà ora letto e importato, una volta completato il file verrà cancellato dall'elenco dei sistemi.

Sistemi
Qui è dove ti connetti e monitori i tuoi sistemi di cronometraggio RACE RESULT, tra cui Ubidium, Decoder RACE RESULT, USB Timing Box e Track Box.
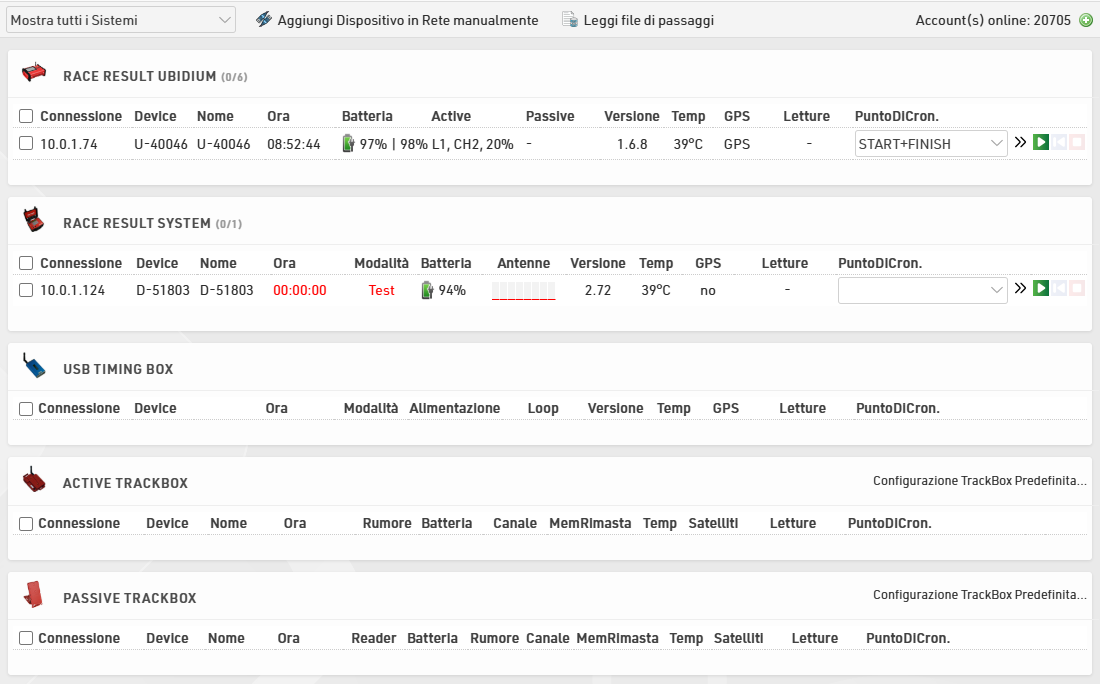
Ha la stessa funzionalità della vista principale Cronometraggio con Chip, ma è dedicata esclusivamente alla gestione dei sistemi di cronometraggio.
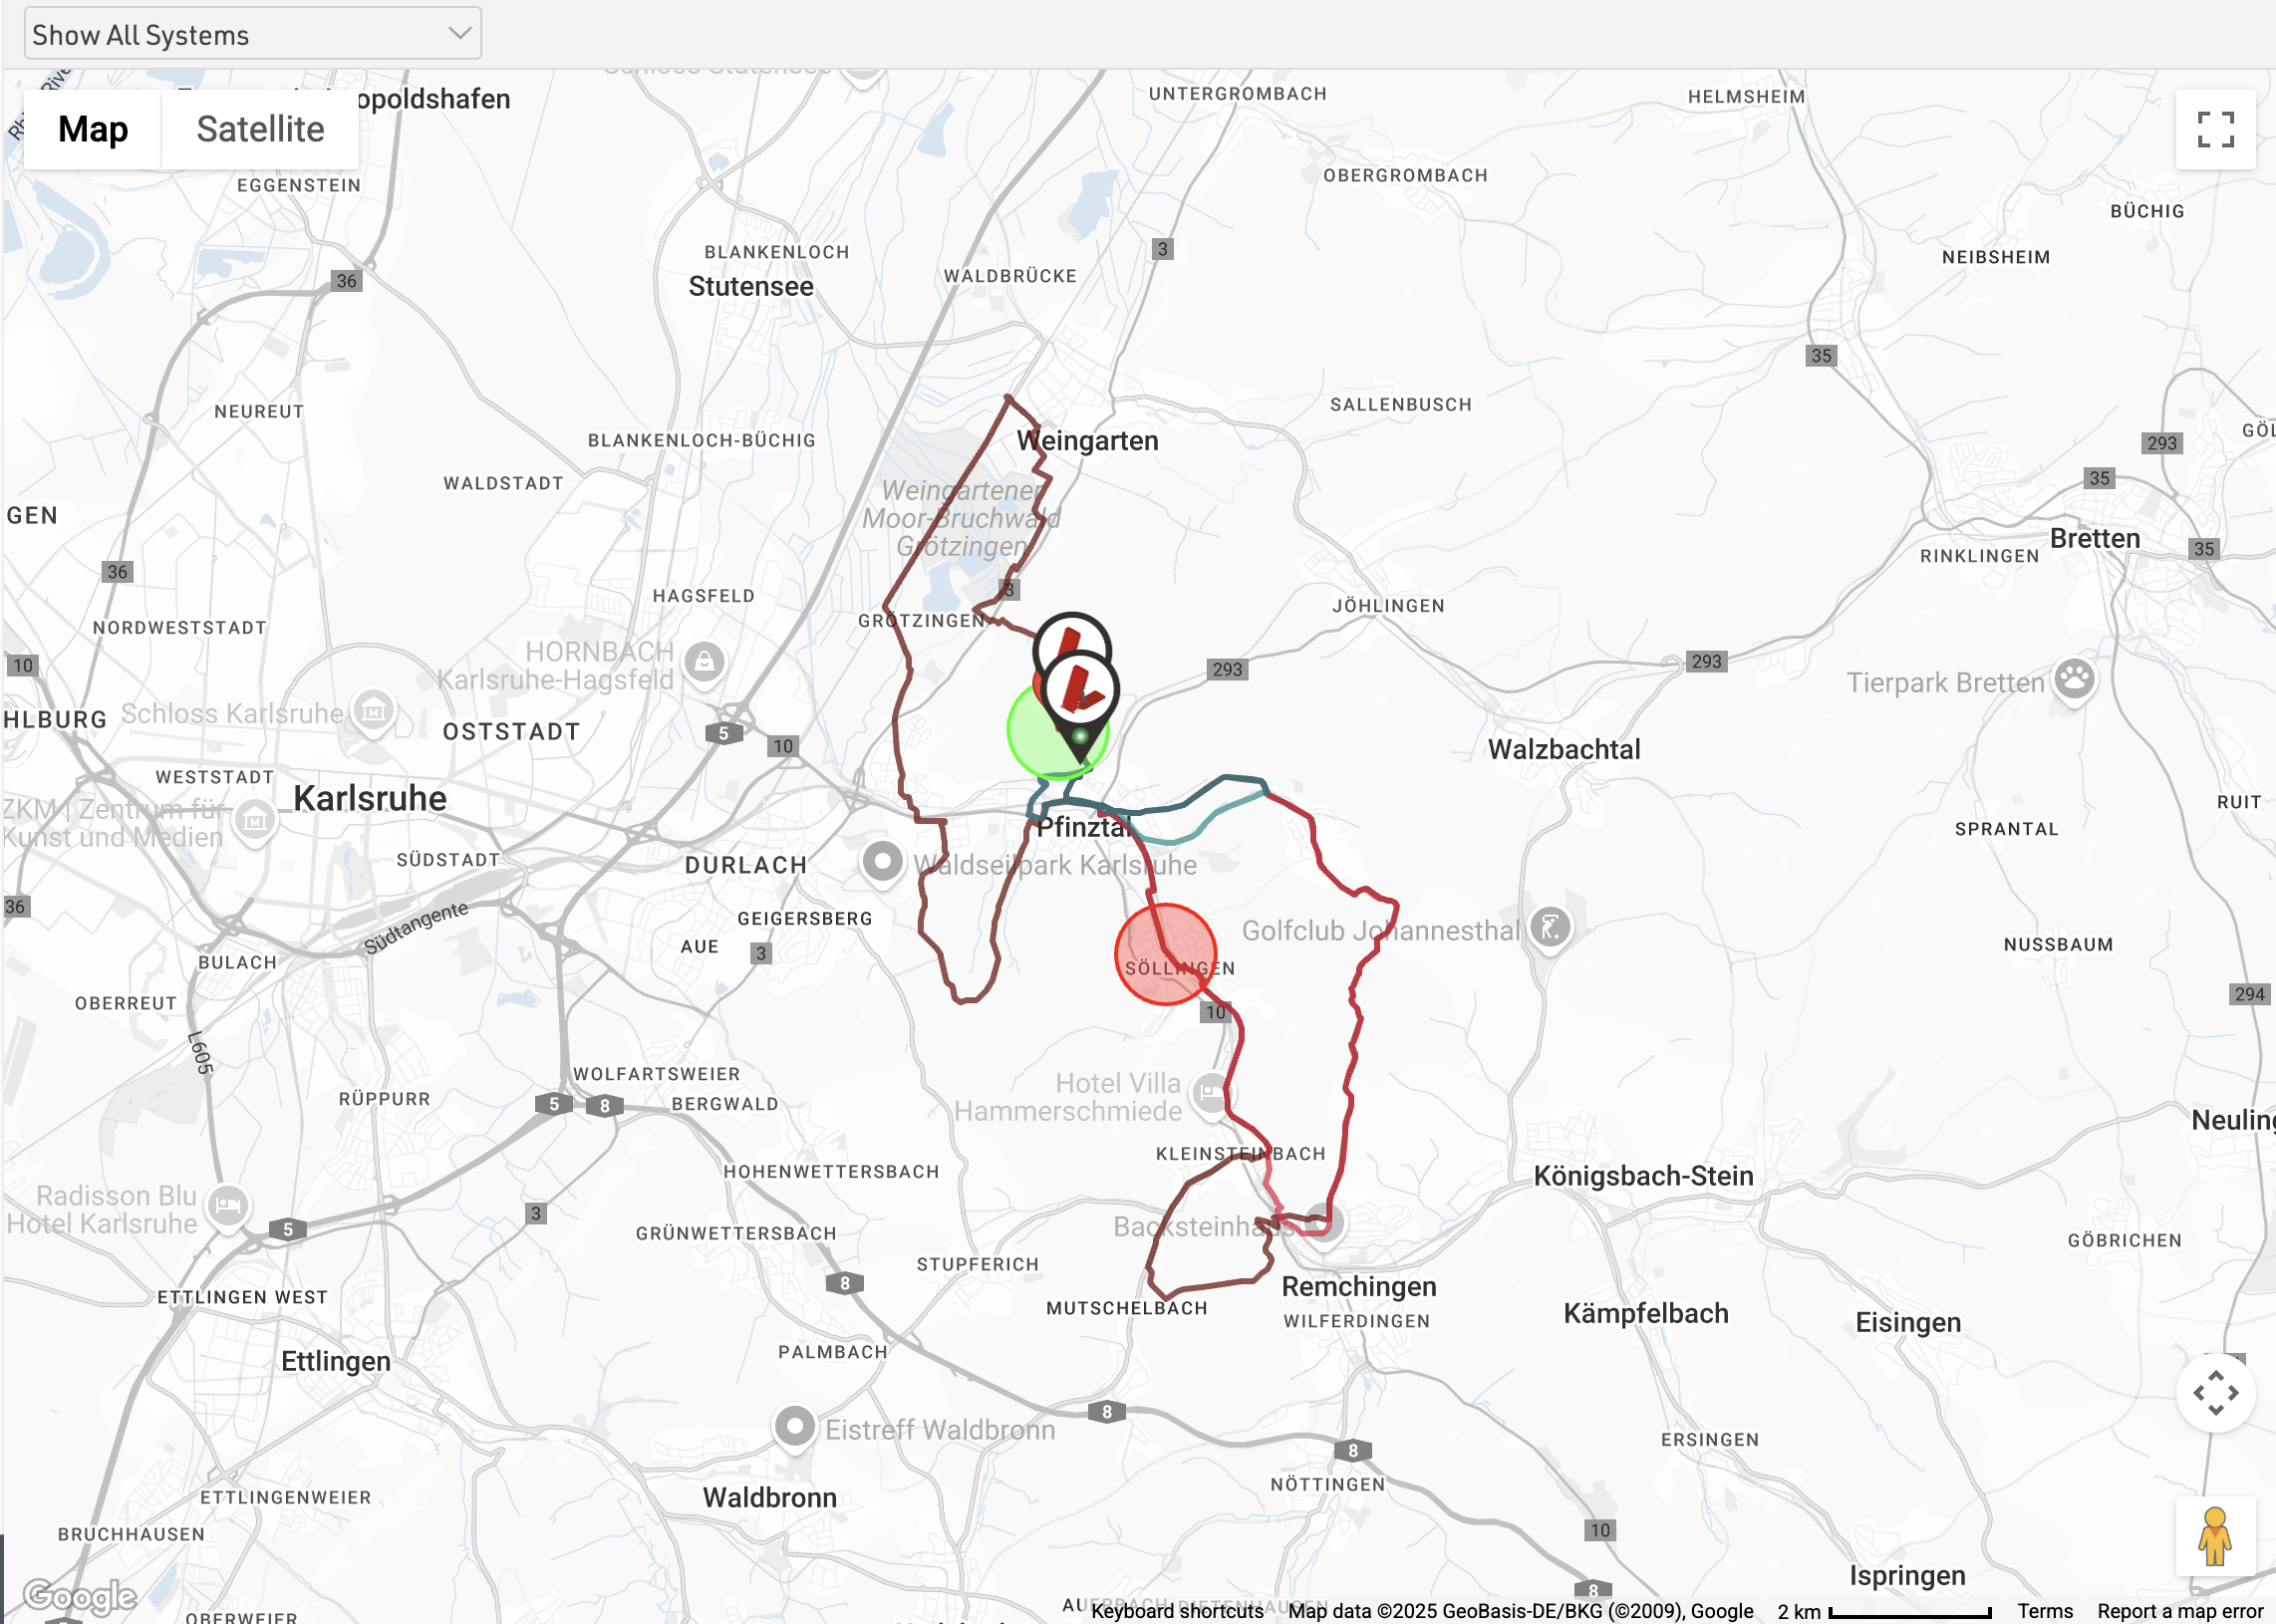
Mappa
La mappa mostrerà il tuo percorso GPX se ne hai caricato uno e la posizione dei sistemi RACE RESULT e delle Track Box che sono online e che stanno inviando dati al tuo ID cliente.
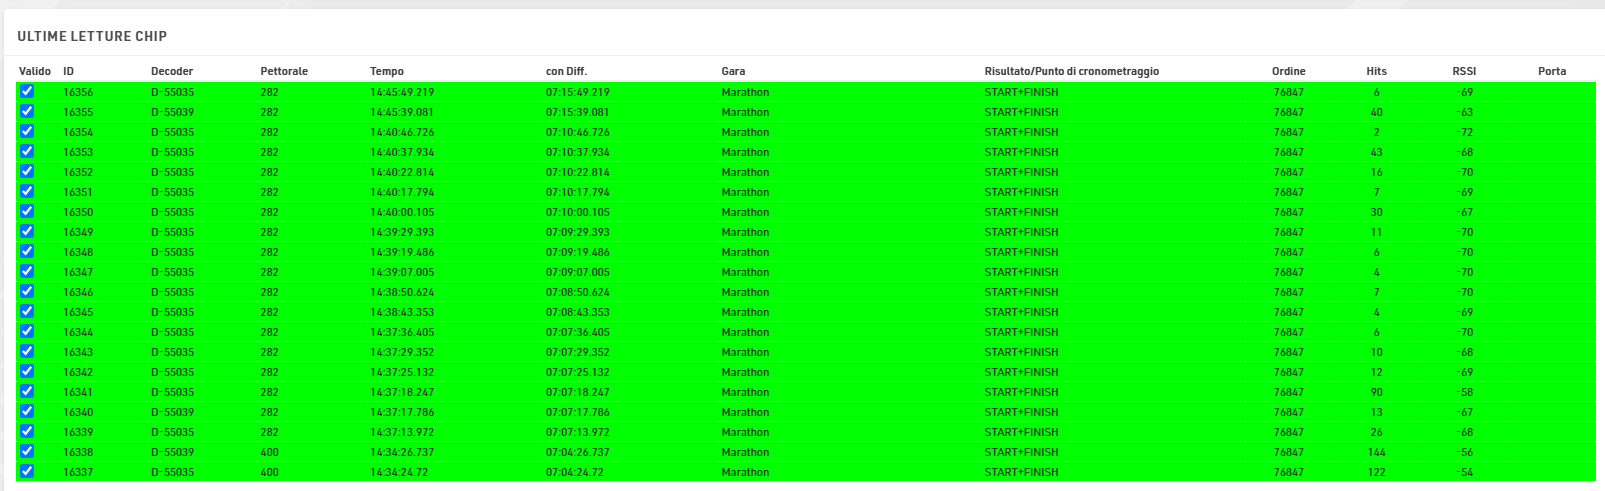
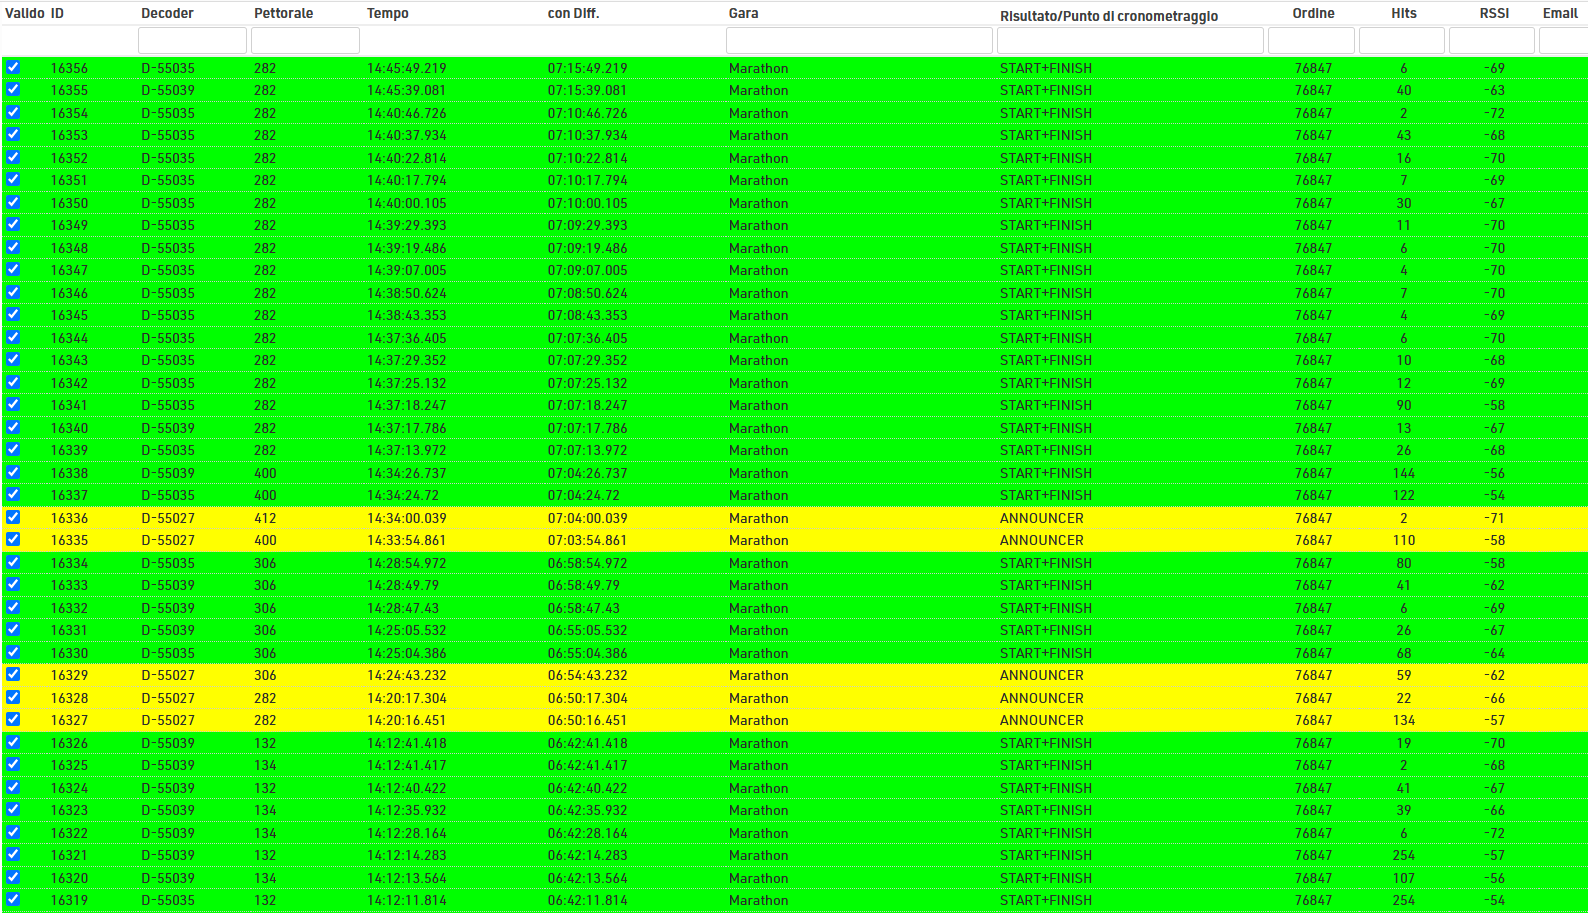
Letture Chip
Letture Chip
Puoi visualizzare tutti i tuoi Dati di Cronometraggio Grezzi dai sistemi RACE RESULT connessi nella sezione Letture Chip. Per impostazione predefinita, tutti i dati grezzi vengono ordinati in base all'orario del passaggio (gli orari ricevuti più di recente in cima).
È possibile vedere la connessione (nome del sistema), pettorale, orario (ora del giorno), orario con differenza (rispetto allo sparo), gara, risultato / punto di cronometraggio, ordine (il numero d’ordine del chip), hits (numero di volte in cui il chip è stato registrato) e RSSI (potenza della lettura del chip).
In basso a sinistra puoi selezionare e scegliere i campi che vuoi visualizzare. Durante l’esportazione, verranno sempre esportati esattamente i campi visibili al momento dell’export.
Se stai utilizzando la tecnologia attiva, verranno inoltre mostrati il Loop ID, Channel ID, Wake Up Count (WUC), Batteria e Temperatura del transponder.
Cliccando su una colonna, i dati verranno ordinati in base a quel campo: ad esempio potrai ordinare i tempi per ora del giorno, pettorale o persino per batteria (per i transponder attivi). Alcune colonne possono anche essere filtrate su valori specifici.
Maggiori informazioni su come comprendere questi dati le puoi ritrovare in Dati di Rilevamento Antenna Passiva / Dati di rilevamento sistema passivo / Dati di rilevamento sistema attivo.
SFlags in Letture Chip
La colonna SFlag nella scheda Cronometraggio contiene alcune informazioni aggiuntive sul passaggio che è stato trasmesso dal transponder. Ciò consente una più facile identificazione delle configurazioni problematiche.
I messaggi SFlag possono includere un numero prima del messaggio; questo è il numero di volte in cui l'errore si è verificato prima che il transponder fosse in grado di inviare le informazioni in transito. È possibile che più messaggi vengano visualizzati insieme se sono presenti più errori o messaggi.
Di seguito sono riportati i possibili messaggi SFlag:
| Messaggio SFlag | Spiegazione / Possibili cause | Possibili soluzioni |
| CH BUSY |
|
|
| NO ACK |
|
|
| STORE |
|
|
| DS/WARN |
|