Impostazioni Generali serve soprattutto a definire le impostazioni del file evento.

Impostazioni Evento
Impostazioni Evento Principale
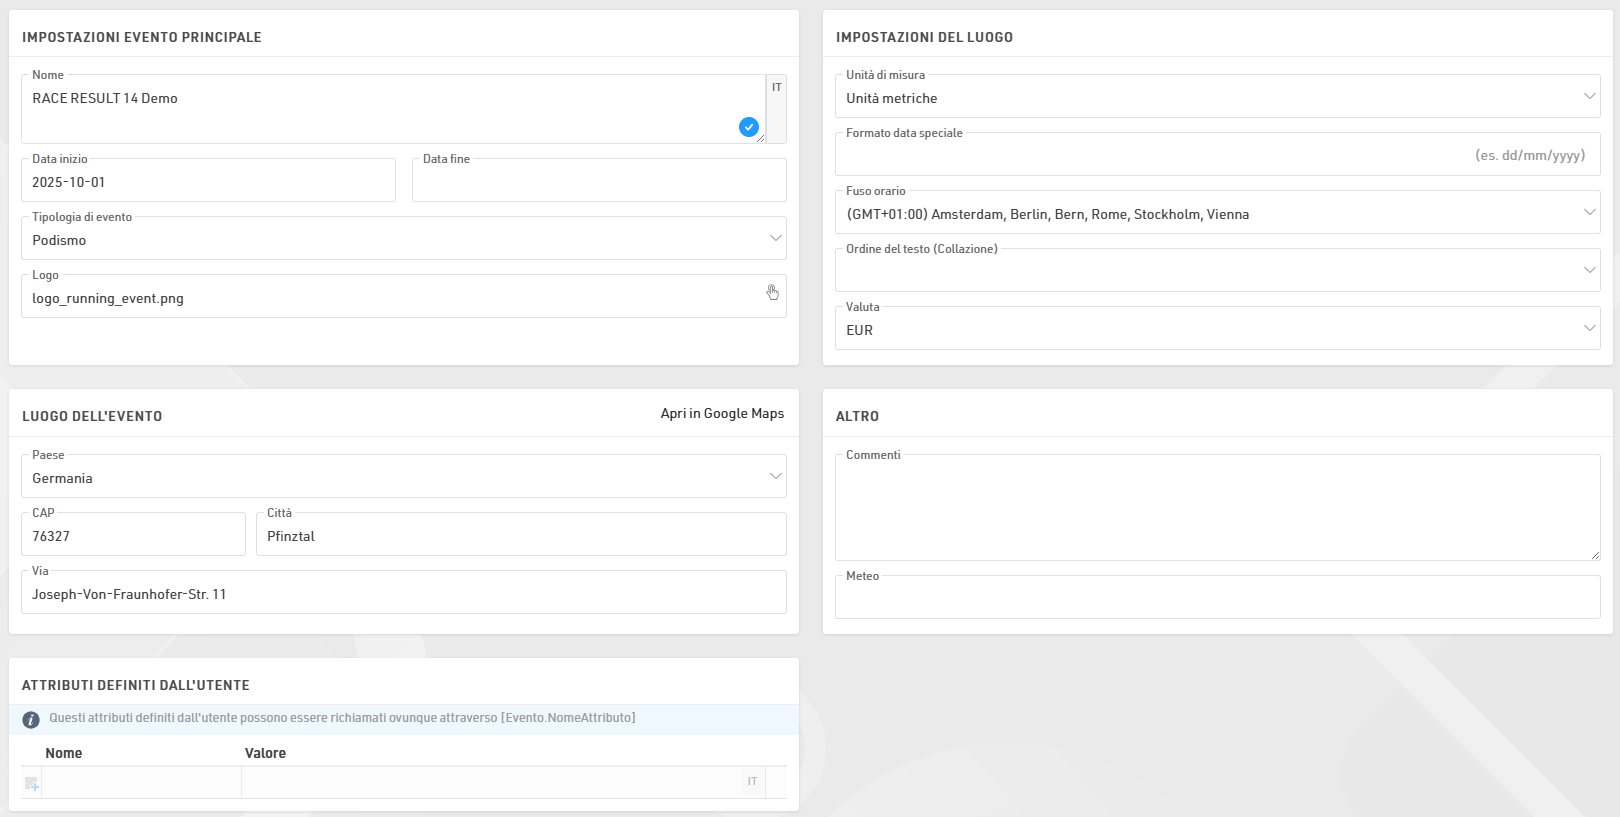
Queste sono le impostazioni di base di un evento, inclusi il nome e la data dell'evento; il tipo e il logo (150x150px) vengono utilizzati anche per l'elenco degli eventi sulla piattaforma my.raceresult.com.
Impostazioni del Luogo
Le impostazioni di localizzazione vengono utilizzate per impostare valori specifici per l'evento.
Le unità di misura determinano se i valori predefiniti devono essere mostrati/calcolati in unità metriche o imperiali, questo viene utilizzato ad esempio nell'impostazione dei tempi parziali e nelle funzioni predefinite per velocità e andatura (che restituiscono Km/h e Min/Km o Mph e Min/Miglio di conseguenza).
Il formato data speciale consente di inserire e visualizzare le date in base allo standard locale o al formato richiesto.
Il fuso orario viene utilizzato per calcolare l'ora corrente dell'evento, viene utilizzato quando si imposta una data/ora per la quale gli elementi della piattaforma online (come la registrazione) dovrebbero essere disponibili. Viene utilizzato anche per convertire gli orari UTC dei Track Box nell'ora locale corretta.
L'Ordine del testo (Collazione) consente di definire la modalità di ordinamento alfabetico poiché lingue diverse ordinano i caratteri speciali in modi diversi.
La valuta da utilizzare per calcolare le quote di iscrizione e per acquisire il pagamento tramite il modulo di registrazione.
Luogo dell'Evento
La posizione viene utilizzata dalla piattaforma my.raceresult.com per aiutare gli utenti a trovare eventi, inoltre imposta il punto centrale delle mappe per gli elementi all'interno del software.
Altro
Inserisci commenti o informazioni meteorologiche sull'evento, questi potranno essere successivamente referenziati negli elenchi di output per intestazioni e piè di pagina, in modo da poter annotare importanti modifiche all'evento che potrebbero verificarsi.
Attributi Definiti dall'Utente
Gli attributi ti consentono di definire campi personalizzati per l'evento che possono essere utilizzati ovunque utilizzando [Evento.NomeAttributo].
Gare
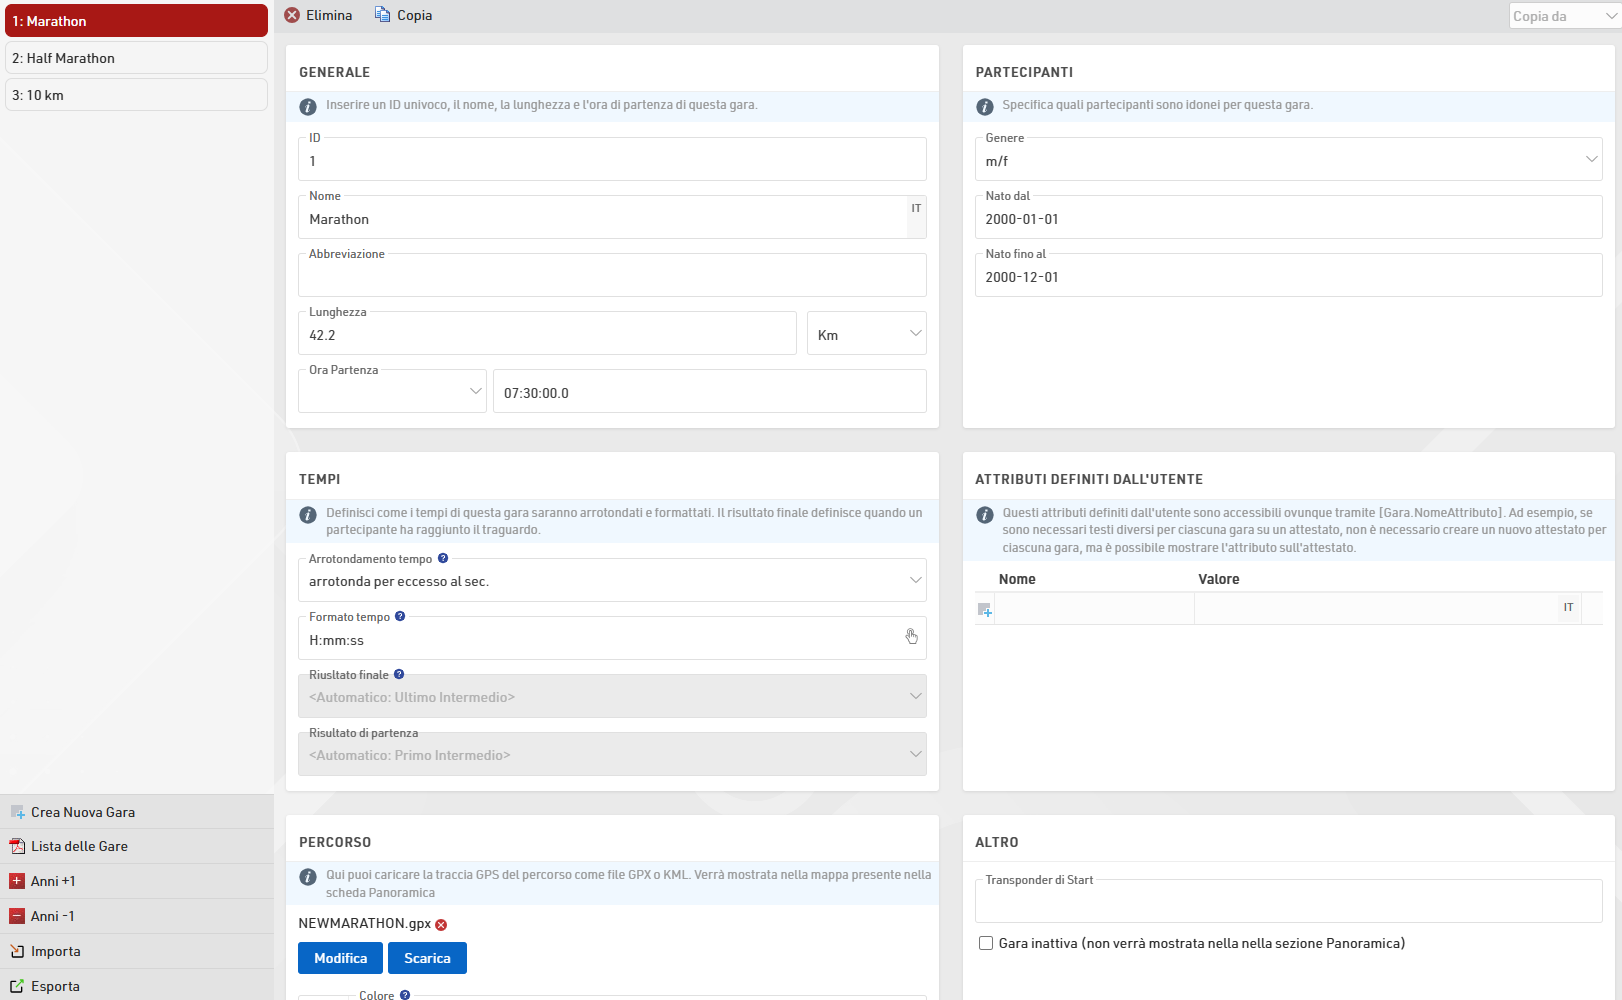
Gare vengono utilizzate per definire gruppi di partecipanti; ad esempio, in un evento podistico con una Maratona e una Mezza Maratona, ogni distanza costituirebbe una Gara unica. Ogni partecipante dell’evento dovrebbe essere assegnato a una Gara.
La creazione di una gara ha diversi effetti:
- I partecipanti di diverse gare sono generalmente classificati separatamente (ovvero c'è un primo posto per la 5km e un primo posto per la 10km).
- Definire per gara in quale ordine i partecipanti verranno classificati.
- Definire per gara come verranno arrotondati e formattati i tempi.
- Definire diverse categorie / fasce di età e quote di iscrizione per gara.
Le singole impostazioni sono spiegate di seguito:
Generale
Inseririsci semplicemente il nome, la distanza / lunghezza e l'ora di inizio della gara e assegnale un numero univoco (ID).
Partecipanti
Definisce quali partecipanti sono idonei per la gara. Questo ha i seguenti effetti:
- I partecipanti non idonei non saranno accettati nelle registrazioni online e nell'iscrizione sul posto.
- Quando inserisci un partecipante non idoneo nella Finestra Partecipanti, ti verrà mostrato un messaggio di avvertimento.
- L' analisi dei dati ti mostrerà i partecipanti non idonei.
Tempi
Queste impostazioni definiscono come verranno arrotondati e formattati di default i tempi dei partecipanti nelle loro rispettive gare. Nota che le impostazioni sulla formattazione del tempo in Impostazioni generali dei risultati avrà la priorità se settato.
Inoltre, seleziona il risultato finale. Il risultato finale sarà molto rilevante per il Punteggio, la selezione del risultato finale ha due effetti:
- I campi Tempo e TempoDecimale si riferiscono all'ora formattata/decimale nel rispettivo risultato. Ad esempio, Tempo può fare riferimento al campo Tempo2 per i partecipanti di una gara, mentre si riferisce a Tempo5 per i partecipanti di un'altra gara.
- Il campo Arrivato è vero per ogni partecipante se è stato inserito un tempo nel risultato finale corrispondente e il partecipante viene conteggiato come arrivato nella Finestra panoramica.
Attributi definiti dall'utente
Gli attributi ti permettono di definire campi personalizzati per ogni Gara e ti permettono inoltre di mostrare diversi testi per ogni Gara; puoi usare gli attributi ovunque usando [Gara.NomeAttributo].
Puoi definire attributi con lo stesso nome per Gare diverse e poi richiamare questo campo nella lista/attestato relativi.
Percorso
Carica un file GPX con il percorso o disegna il percorso sulla mappa facendo clic sul pulsante Crea percorso. I percorsi verranno mostrati su tutte le mappe in RACE RESULT 12, utile ad esempio per confermare che i sistemi di cronometraggio sono impostati nel posto giusto.
Altro
Quando il Transponder di Start viene rilevato, questo è solitamente un marker per il tuo sistema di cronometraggio poichè viene registrato come codice transponder 99999 e il suo tempo verrà salvato come Tempo di partenza (T0).
Imposta la gara in inattiva per nasconderla nella finestra Panoramica. Usa questa funzione per esempio se la gara non verrà disputata quest'anno ma il prossimo anno.
Dati Partecipanti
Uno degli aspetti più importanti nella gestione di un evento è la gestione dei dati dei partecipanti; questo include una serie di campi e funzioni predefinite, ma consente anche di memorizzare o calcolare campi e funzioni personalizzate. Per semplificare il flusso di lavoro, è possibile abilitare o disabilitare determinati campi predefiniti e controllare il loro comportamento durante la modifica tramite la Finestra Partecipanti.
Campi dati predefiniti
Qui puoi definire alcune impostazioni generali per la gestione dei dati nella finestra dei partecipanti. Puoi attivare o disattivare i campi standard e definire se questi debbono essere obbligatori o meno. Se i campi impostati come obbligatori non vengono compilati nella finestra Partecianti, verranno evidenziati con una barra rossa e verrà mostrato un avvertimento quando cercherai di salvare il partecipante. Nota che per la Registrazione Online i campi obbligatori possono essere definiti separatamente.
Assistente Input/Impostazioni
Controlla come devono essere gestiti i dati quando inserisci/modifichi i partecipanti direttamente nella finestra Partecipanti. Quando la modifica della fascia d'età è abilitata, la fascia d'età può essere modificata manualmente, il che può essere utile se si lavora con fasce d'età sovrapposte, ma tieni presente che questo verrà sovrascritto se le fasce d'età vengono ricalcolate in un secondo momento. Puoi anche disabilitare Agender se non deve essere utilizzato nel file dell'evento.
User Defined Boxes nella scheda Risultati
È possibile configurare una lista di output specifica per il partecipante, nella scheda Risultati del partecipante.
Questo può essere utile per eventi con un numero elevato di risultati, che risultano difficili da scorrere, oppure per visualizzare dati aggiuntivi non mostrati nella finestra principale del partecipante.

Numeri Pettorale
Queste impostazioni decidono come far gestire al sistema l'assegnazione dei pettorali.
Assegnazione dei numeri di pettorale
Per impostazione predefinita, quando si inserisce un nuovo partecipante verrà proposto il pettorale più alto +1. Tuttavia, ci sono altre due opzioni: il primo numero disponibile che propone il numero di pettorale più basso inutilizzato e nessuna proposta che invece ti obbliga ad inserire un numero di pettorale manualmente prima di inserire i dati del partecipante nella finestra dei partecipanti.
Se si desidera escludere determinati numeri di pettorale (perchè, per esempio, mancanti nella serie o difettosi), immetterli nella casella di input Escludi numeri. Quindi, questi non saranno proposti.
Intervalli numeri pettorali
Un Intervallo di pettorale assegna un certo intervallo di pettorali alla relativa gara. Aver inserito questi intervalli nelle varie gare avrà due principali scopi:
- Dopo aver inserito il numero di pettorale in fase di registrazione di un nuovo partecipante nella finestra Partecipanti, verrà selezionata la gara relativa a quel numero di pettorale. Per questa opzione seleziona Usa l'intervallo pettorali per proporre la gara.
- Dopo aver selezionato la gara per il nuovo partecipante inserito nella finestra Partecipanti, verrà assegnato automaticamente il primo pettorale disponibile. Per questa opzione seleziona dunque Usa l'intervallo pettorali per proporre il numero di pettorale in base alla gara selezionata.
- Puoi anche ignorare temporaneamente gli intervalli di pettorali.
Inoltre, puoi definire orari di partenza diversi per ogni intervallo di pettorali.
Visualizzazione numeri pettorale
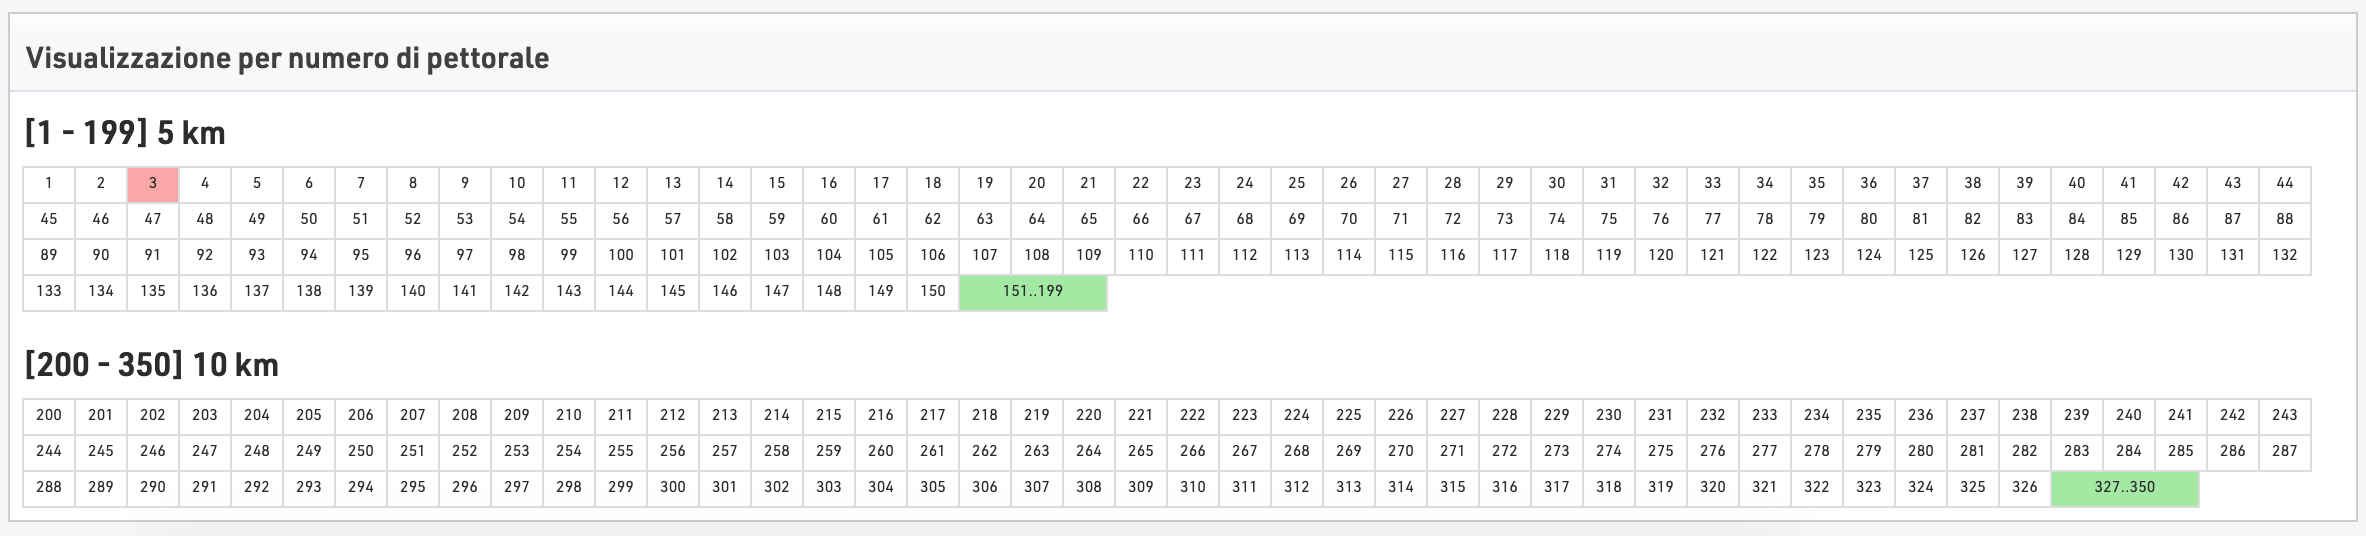
La visualizzazione dei numeri di pettorale crea una tabella con tutti i numeri disponibili per ogni Gara in accordo alle impostazioni dell'intervallo pettorali. I numeri di pettorali possono essere visualizzati in 3 colori differenti.
Bianco - Il numero è già stato assegnato
Verde - Il numero non è ancora stato assegnato, è dunque disponibile
Rosso - Il numero è stato assegnato ma la Gara dell'atleta non corrisponde alla gara assegnata a quell'intervallo di pettorali.
Campi Aggiuntivi
Se si desidera raccogliere dati aggiuntivi, è possibile definire un numero illimitato di campi aggiuntivi per memorizzare i dati dei partecipanti. I campi aggiuntivi possono essere raggruppati con etichette di gruppo personalizzate; ogni gruppo verrà visualizzato in un riquadro separato nella scheda Partecipanti.

I campi aggiuntivi richiedono un nome di campo univoco e possono avere un'etichetta separata che verrà visualizzata nella finestra partecipanti e nei moduli di registrazione.
Tipologia di Campi
Ogni campo aggiuntivo ha una tipologia che modifica le caratteristiche di input e visualizzazione del campo, ovvero il modo in cui il campo deve essere utilizzato.
| Campo di Testo | Crea una casella di testo per digitare qualsiasi valore di testo |
|
Menu a tendina |
Crea un campo a discesa per selezionare un valore predefinito tra i valori di selezione forniti. I valori di selezione devono essere inseriti come un elenco di valori separati da punto e virgola, il primo dei quali può essere vuoto per offrire l'opzione di non specificare alcun valore o per impedire la precompilazione del campo (ad esempio, ;S;M;L;XL) |
| Casella di controllo | Crea una casella di controllo per contrassegnare un valore come vero o falso, restituito come 1 o 0 |
| Numero (Intero) | Consente solo l'inserimento di numeri interi |
| Numero (Decimale) | Consente solo l'inserimento numerico di qualsiasi valore decimale |
| Data | Crea un campo di immissione data nei moduli di registrazione/chioschi, accetta solo valori di data che devono essere formattati in base alle impostazioni del formato data |
| Valuta | Consente solo l'inserimento di dati numerici con un massimo di 2 cifre decimali |
| Paese | Crea un menu a discesa precompilato con un elenco di paesi disponibili |
| Consente l'inserimento solo di indirizzi e-mail formattati correttamente | |
| Numero di telefono |
Al termine, i numeri vengono formattati solo come numeri di telefono. Ai valori inseriti senza prefisso internazionale verrà anteposto il prefisso del Paese dell'evento. |
| Transponder | I valori immessi saranno gestiti come assegnazioni di transponder al posto dei campi File Chip o Transponder predefiniti |
Impostazioni Estese
| Attivo | Se il campo è attivato e deve essere visualizzato nella finestra Partecipanti |
| Obbligatorio | Se il campo deve essere considerato obbligatorio |
| Valore predefinito | Il valore predefinito nel campo durante la creazione di nuovi partecipanti |
| Segnaposto | Un testo segnaposto visualizzato nell'input quando è vuoto |
| Lunghezza minima | La lunghezza minima del valore per il campo |
| Lunghezza massima | La lunghezza massima del valore per il campo |
Campi/Funzioni Personalizzate
La creazione di campi e funzioni personalizzati ti consente di richiamare rapidamente e facilmente dati specifici senza creare ogni volta un'espressione lunga. I campi/funzioni definiti dall'utente vengono normalmente utilizzati con altri campi dati o vengono utilizzati per restituire gli stessi valori per ogni partecipante.
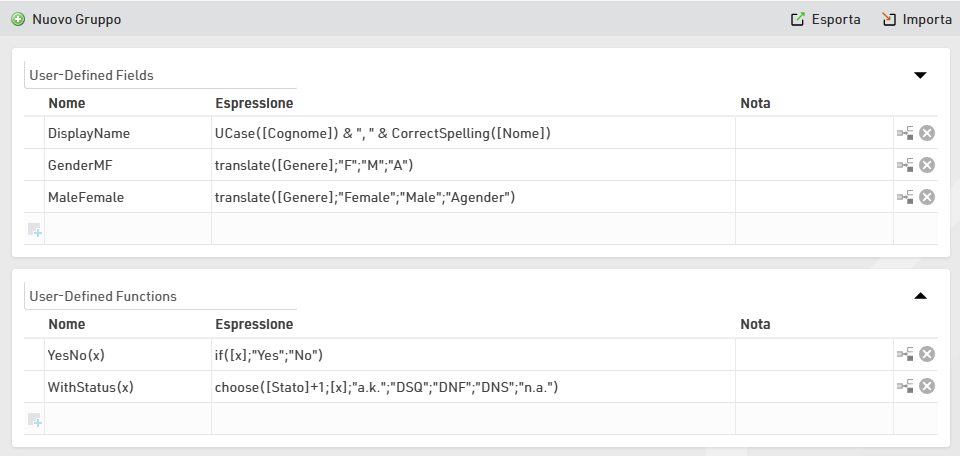
Alcuni campi predefiniti definiti dall'utente sono già disponibili quando si crea un nuovo file, come MaschioFemmina che converte [Genere] nell'etichetta di genere completa. Questi campi predefiniti possono essere aggiornati come preferisci.
Quando si creano campi definiti dall'utente, l'espressione deve essere formattata come un'Expressione di RACE RESULT 14.
Quando si scrivono funzioni che dovrebbero accettare parametri aggiuntivi, il nome del campo deve utilizzare parentesi quadre attorno a un elenco di identificatori separati da punto e virgola (ad esempio Funzione(x;y) crea una funzione con 2 parametri x e y).
È possibile accedere ai parametri all'interno della funzione racchiudendoli tra parentesi quadre (ad esempio [x] e [y]).
Archivi
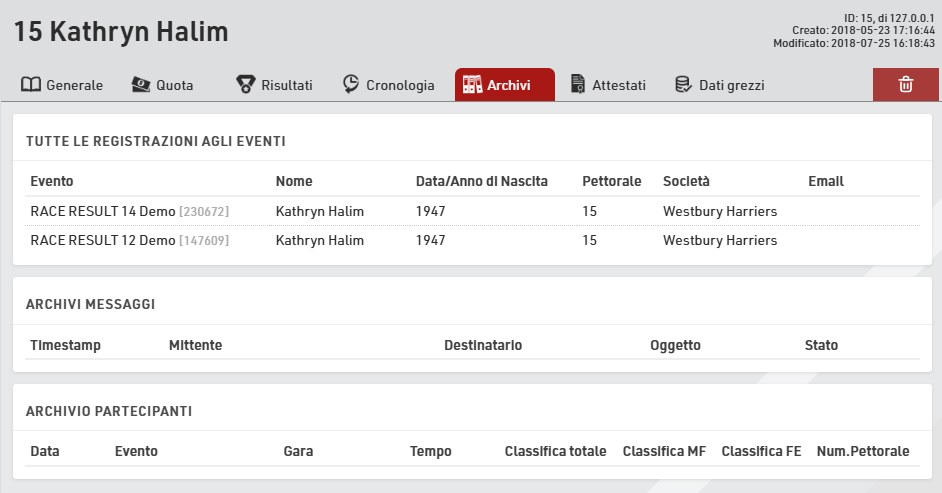
Utilizzando gli Archivi, puoi accedere ai dati degli eventi precedenti nella Finestra Partecipanti:
- Quando si inserisce manualmente un nuovo partecipante, verranno suggeriti i record degli Archivi, in modo da poter importare il record inclusi gli attributi dagli Archivi.
- I risultati degli eventi precedenti saranno disponibili nella scheda Archivi.
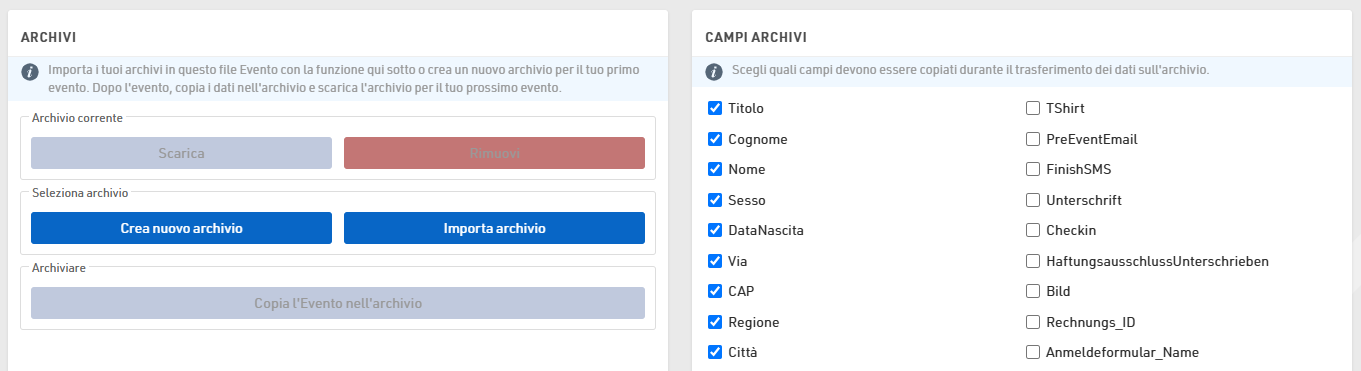
Procedura per l'utilizzo degli archivi
Dopo l'evento, vai alle impostazioni degli Archivi nella finestra principale. Quando utilizzi la funzione archivi per la prima volta, crea un nuovo file di archivio e quindi scrivi i dati al suo interno (pulsante Copia evento negli archivi).
Per l'evento dell'anno prossimo puoi creare una copia del file dell'evento che includerà ancora il file di archivio.
Se disponi già di un file evento per il prossimo evento, puoi procedere come segue:
- Apri l'evento dell'anno scorso e crea un nuovo file di archivio nella finestra principale. Copia i dati dell'evento nel nuovo file di archivio e poi scaricalo sul tuo PC locale.
- Apri l'evento del prossimo anno e importa il file di archivio dal tuo PC locale. Se è già presente un file di archivio nel nuovo evento, è necessario prima eliminarlo.
Categorie/Fasce di Età
Una fascia di età (breve FE) è un gruppo di atleti con all'incirca la stessa età. Di solito, gli eventi hanno classifiche per fascia d'età, cioè gli atleti di ciascun gruppo verranno classificati indipendentemente dagli atleti di altri gruppi.
Puoi usare la Fascia di età come Categoria poichè il significato è il medesimo!
Quando crei un nuovo File evento, verranno impostati automaticamente i gruppi di età predefiniti che possono essere modificati in base alle tue esigenze.
Importare fasce di età
Attraverso il pulsante Importa hai la possibilità di importare fasce di età da diverse sorgenti. Per esempio è possibile caricare fasce di età standard o importare fasce di età da un file creato tramite il comando Esporta.
Se avessi fatto una copia del file evento dell'anno precedente, puoi regolare le fasce d'età con le funzioni Modifica-> Anni +1 e Anni -1.
Se hai bisogno di fasce di età diverse per gare diverse, attiva l'opzione Fasce di età separate per gara in Impostazioni generali. Inserisci fasce di età diverse per ciascuna gara o importale da un'altra gara con la funzione Importa-> Dalla gara e apporta successivamente le modifiche necessarie.
Secondo/Terzo set di Fasce di Età
Forse è necessario impostare due o tre fasce di età diverse in modo che a ciascun partecipante vengano assegnate due o tre fasce di età. La seconda fascia d'età può essere utilizzata per una classifica aggiuntiva come una classifica combinata dove ad esempio le fasce di età M40, M45 e M50 sono combinate nella fascia di età Masters.
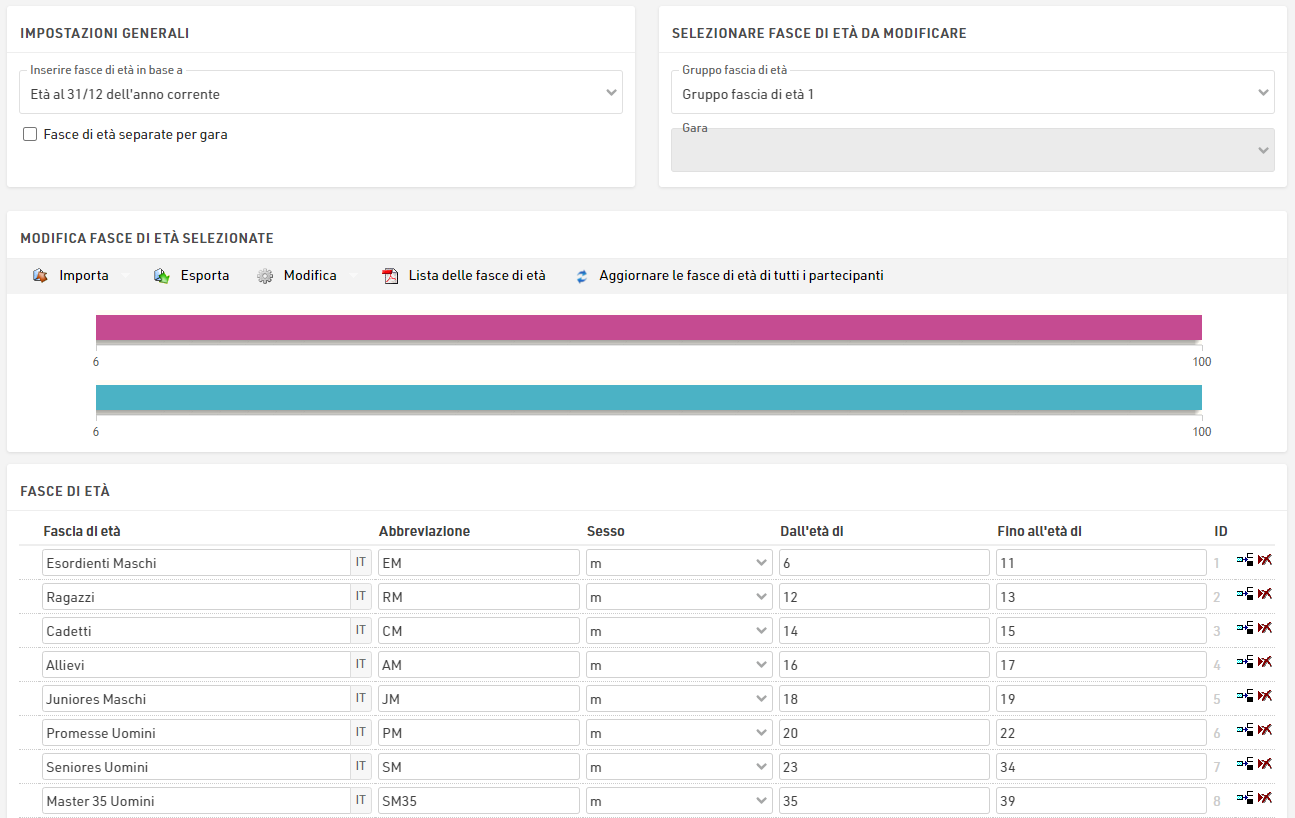
Inserire fasce di Età in base a:
Dovrai definire in base a quali criteri assegnerai le fasce d'età, questo solitamente dipenderà dal tipo di evento che stai cronometrando. In Inserire fasce di età in base a puoi selezionare:
Data di nascita - Le fasce di età sono impostate da un intervallo di date definito anziché da intervalli di età.
Età al giorno dell'evento - Età dei partecipanti il giorno dell'evento impostato nelle Impostazioni di base dell'evento.
Età al 12/31 (anno precedente) - Età al 31 dicembre dell'anno precedente.
Età al 12/31 (anno corrente) - Età al 31 dicembre dell'anno corrente.
Età ad una data arbitraria - Età in una data specifica, da definire di seguito.
Aggiornare le fasce di Età
Nella finestra Participanti, la fascia di età verrà assegnata automaticamente, in base al sesso e alla data di nascita. Tuttavia, è possibile modificare manualmente la fascia di età, se necessario. Ecco perché le fasce di età non verranno aggiornate automaticamente quando si modificano le impostazioni della fascia di età.
Per aggiornare le fasce di età assegnate dopo aver modificato le impostazioni delle fasce di età, fai clic su Aggiorna le fasce di età di tutti i partecipanti.
Suggerimenti Utili
Accesso alle fasce di Età
Sulle liste e attestati puoi accedere al nome della fascia di età selezionata per il partecipante attraverso i campi [Categoria.Nome] / [Categoria1.Nome] (e [Categoria2.Nome], [Categoria3.Nome]).
Si è scelto di usare il termine "categoria" perchè più generico e più corto in fase di digitazione. Come già detto all'inizio, Categoria e Fascia di età indicano il medesimo concetto.
Ordinamento delle fasce di Età
Spesso le fasce di età devono essere distribuite in un determinato ordine, ad esempio perché una fascia di età è la prima ad essere premiata nella cerimonia di premiazione. Pertanto è possibile modificare l'ordine delle fasce di età spostando l'icona della freccia a sinistra nella posizione desiderata. L'ordine delle fascie di età influenza i campi [Categoria1.OrdinePosizione] ([Categoria2.OrdinePosizione], [Categoria3.OrdinePosizione]) che creano numeri crescenti in base all'ordine di inserimento nelle impostazioni della fascia di età. Questi campi possono essere utilizzati per l'ordinamento nelle liste. Anche la lista di default Result List AG usa questa procedura.
Abbreviazione Fascia di età
A parte il nome per la fascia d'età puoi anche inserire un'abbreviazione. Se non ti è rimasto spazio a sufficienza nella lista, puoi usare l'abbreviazione usando [Categoria.NomeCorto] / [Categoria1.NomeCorto] ([Categoria2.NomeCorto], [Categoria3.NomeCorto]).
ID Fascia di Età
Ogni fascia d'età ha un ID univoco che non cambia se viene cambiato il nome della fascia di età. Può essere raggiunto attraverso il campo [Categoria.ID] / [Categoria1.ID] ([Categoria2.ID], [Categoria3.ID]).
L'ID della fascia di età è adatto per il raggruppamento nel calcolo delle classifiche in quanto le fasce di età si distinguono anche se hanno lo stesso nome. Se imposti due fasce con il nome Bambini (rispettivamente per maschi e femmine) e raggruppi la classifica per Categoria.Nome, maschi e femmine saranno classificati insieme. Invece, se usi Categoria / Categoria.ID, le due fasce di età saranno considerate separatamente.
Immagini/File
Immagini e altri file possono essere importati nel file dell’evento per essere utilizzati in altre sezioni del software, più comunemente nell’header di my.raceresult.com.
I file possono essere importati nella Impostazioni Generali ⇒ Immagini/File

I file che non sono memorizzati in nessuna cartella verranno salvati direttamente nel file dell'evento e verranno scaricati se il file dell'evento viene estratto.
I file archiviati nella cartella personale saranno disponibili in tutti i file degli eventi nel tuo account quando lavori online.
I file archiviati nella cartella comune sono archiviati online e sono accessibili a qualsiasi utente RACE RESULT, all'interno esistono alcuni flag alternativi che utilizzano l'abbreviazione Paese / Nazione Alpha-2 per il nome del file.
Per accedere ai file archiviati all'interno delle cartelle, il nome dell'immagine funziona come un sistema di archiviazione di file standard, ad esempio un'immagine denominata "header.png" archiviata all'interno della cartella comune utilizzerebbe il nome dell'immagine "common\header.png".
Consulta la nostra guida How To su come utilizzare immagini e file in diverse parti del software.
Diritti di Accesso/API Semplici
Diritti di Accesso
Un file evento appartiene sempre a un singolo account cliente e solo il proprietario dell'account può accedere alle impostazioni dei diritti di accesso per motivi di sicurezza.
Attraverso i diritti di accesso puoi concedere l'accesso ad un altro account RACE RESULT tramite nome utente o ID cliente, puoi anche controllare l'accesso a determinate aree del software per quello specifico evento.

API Semplici
API Semplici serve a rendere i dati del file evento accessibili tramite un link statico senza effettuare il login al proprio account cliente; ad esempio, può essere utilizzata per pubblicare i risultati su un altro sito web.
Le impostazioni sono accessibili tramite
Impostazioni Generali ⇒ Diritti di Accesso/API Semplici.
È sufficiente selezionare il tipo di dati che si desidera rendere accessibile e poi scegliere il nome della lista oppure inserire il nome dell’impostazione.
I dettagli per ciascun tipo di API sono riportati di seguito.

L’icona nella colonna Link conduce al link statico.
Quando si effettuano chiamate alle API, è necessario considerare che i dati vengono memorizzati in cache per un periodo compreso tra 10 e 30 secondi; pertanto, effettuare chiamate più frequenti potrebbe non aggiornare correttamente i dati.
La API Semplice applica un rate limiting di 1 chiamata al secondo per ogni URL API univoco da ciascun indirizzo univoco.
Se lo script client richiama un’API più di una volta al secondo, verrà restituito un codice di errore 406.
Se è necessario effettuare chiamate più frequenti, contattare il supporto.
Webhooks
RACE RESULT 14 può essere configurato per inviare un Webhook su determinati trigger: questi sono principalmente utilizzati per garantire la sincronizzazione dei dati tra due archivi dati separati, ad esempio se si utilizza la propria piattaforma di registrazione e si desidera garantire che i dati dei partecipanti vengano aggiornati se viene modificato nel file evento.

I Webhook sono configurabili in Impostazioni Gernerali ⇒ Diritti di accesso/API semplici.
Ciascun Webhook deve definire il trigger, l'URL di destinazione e, per alcuni trigger, è possibile definire un filtro e campi.
Una volta configurati e attivati, i Webhook verranno inviati automaticamente in base ai trigger definiti: non vi è alcun limite di tempo per la durata dell'attivazione dei Webhook.
Tutti i Webhook vengono inviati come richiesta POST, con i dati nel corpo POST come JSON; per impostazione predefinita il corpo conterrà sempre ID evento, ID Webhook, timestamp e valori aggiuntivi dipendenti dal trigger utilizzato.
Una chiamata si considera inviata con successo se viene ricevuto un codice di risposta <500: anche se il codice di stato è un codice di errore, questo viene considerato ricevuto dalla destinazione. Se una chiamata non riesce, il server tenterà di inviarla nuovamente con un ritardo maggiore tra l'una e l'altra chiamata o fino al raggiungimento del limite della coda del server: solo a questo punto il messaggio verrà eliminato.
I Webhook vengono inviati dal SES che esegue il file dell'evento; se stai cronometrando offline, anche con l'inoltro online abilitato, i webhook verranno inviati solo dal tuo SES locale.
Triggers
Nuovo partecipante
Quando viene aggiunto un nuovo partecipante, sia questo aggiunto attraverso l'importazione di partecipanti, la registrazione online, la registrazione in loco o direttamente tramite la finestra dei partecipanti, viene inviata una chiamata.
È possibile applicare un filtro per inviare il Webhook solo se un determinato filtro è VERO, ad esempio se un partecipante ha selezionato un'opzione specifica durante la registrazione.
Il corpo del POST può anche includere qualsiasi campo definito come un elenco di valori separati da punto e virgola.
Aggiornamento partecipante
Simile al trigger del nuovo partecipante, l'aggiornamento del partecipante verrà inviato ogni volta che i campi dati di un record del partecipante vengono modificati: questo non succede se vengono invece effettuate modifiche agli intermedi, ai calcoli dei risultati o ai campi definiti dall'utente.
Un filtro può essere applicato anche agli aggiornamenti dei partecipanti e il corpo del POST può essere configurato per includere anche i campi.
Nuovo dato grezzo
Il nuovo trigger di dati grezzi verrà inviato ogni volta che viene aggiunto un nuovo record di dati non elaborati: il record è collegato a un record del partecipante in modo che sia possibile definire facoltativamente un filtro e campi da includere nel corpo del POST.
Quando si utilizzano i nuovi dati grezzi, si consiglia di collegare il filtro ad un risultato specifico o al risultato finale, ad esempio, inviando il Webhook solo se il partecipante ha terminato la sua corsa. Tutti i calcoli che dipendono dal record di dati grezzi verranno completati per primi, quindi verrà inviato anche se quel tempo viene utilizzato per il risultato specifico che stai guardando.
Cambio Impostazioni
Questo vale per tutte le impostazioni del file di evento che vengono modificate: questo include ad esempio tutte le impostazioni presenti nelle sottosezioni di Evento, Cronometraggio con Chip e Impostazioni Punteggio presenti nella Finestra Principale, negli aggiornamenti agli elenchi di output, nelle impostazioni my.rr e altro.
Poiché le impostazioni si applicano al file dell'evento e non al record del partecipante, non è possibile filtrarlo o includere campi aggiuntivi. Il corpo del post includerà il ModJobID nel campo Valori, per consentirti di tenere traccia delle modifiche.
L'ID ModJob è un numero intero che rappresenta l'ultimo ciclo di calcolo eseguito dal SES. Ogni volta che qualcosa viene modificato in un file evento, viene eseguito un lavoro univoco che calcola cosa dovrebbe essere aggiornato nel database. Questo ID aumenterà per ogni modifica, non importa quanto grande o piccola.
Tutti i cambiamenti
Tutte le modifiche indicano qualsiasi modifica al file dell'evento.
Poiché tutte le modifiche si applicano al file Evento e non a un record del partecipante, non è possibile filtrare o includere campi aggiuntivi. Il corpo del post includerà il ModJobID nel campo Valori per consentirti di tenere traccia delle modifiche.