


The article below is a simplified step-by-step guide for new users to get started using RACE RESULT 14 online with a RACE RESULT Passive system. This article will guide you through your first race, but it will not teach you "how" to time a race. To properly learn how to time a race, please begin by fully reading through our Getting Started guide in the Knowledge Base.
The following guide is based on our standard template provided with RACE RESULT 14. It is designed to show how to set up a simple 5/10K loop running race.
Prerequisites
- A laptop computer capable of running RACE RESULT 14. Laptop Computer Recommendations
- Your login credentials for raceresult.com
- Ubidium timing system, powered/charged
- Your participant data file
Depending on your chosen connection method in step 9, you might need these things
- Ethernet cable
- An Ethernet jack on your laptop
- SIM card
Step 1 - Log in and create a new event file
- Navigate to events.raceresult.com
- Log in using your account number/username and password
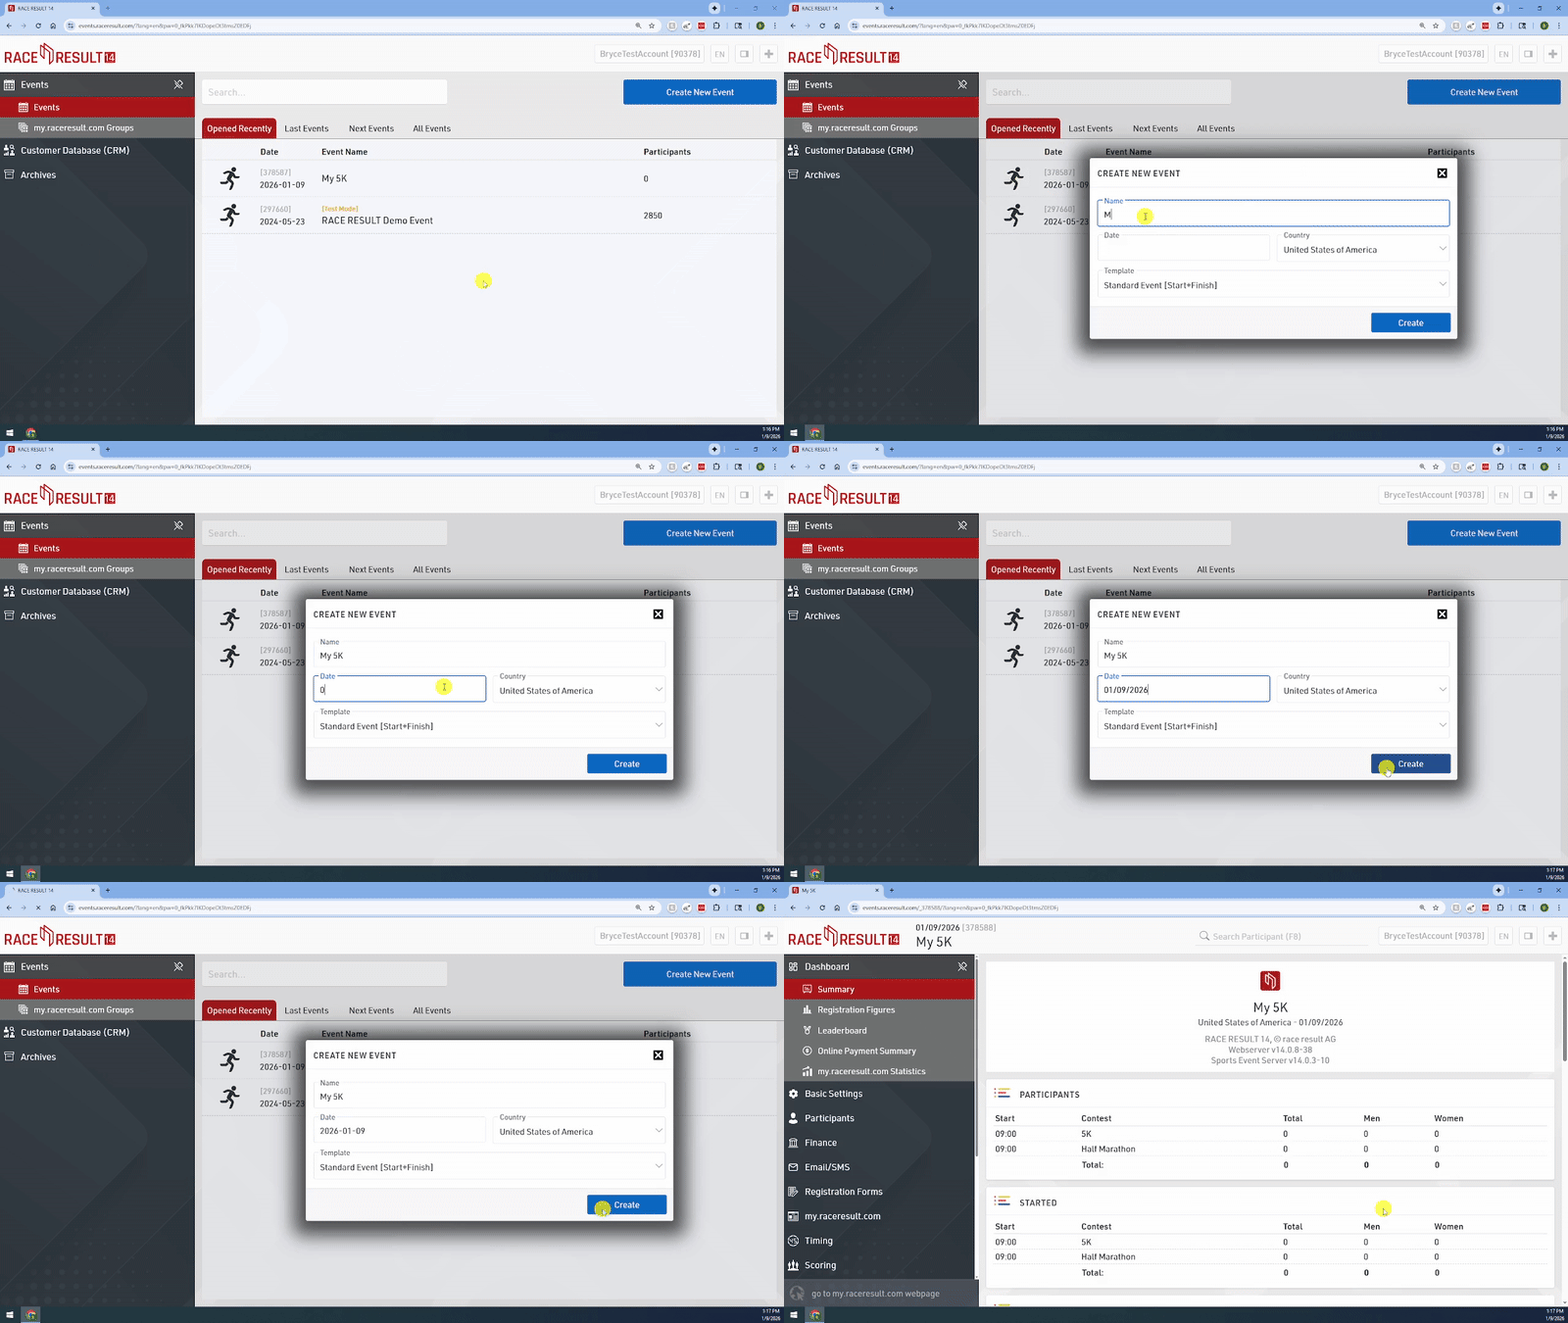
- Click Create New Event. Enter the name of the event, date, and then press Create
- Once the event is loaded in the Web Server, click the Open Event button, which will open the event file in your web browser.
Step 2 - Activation mode & credits
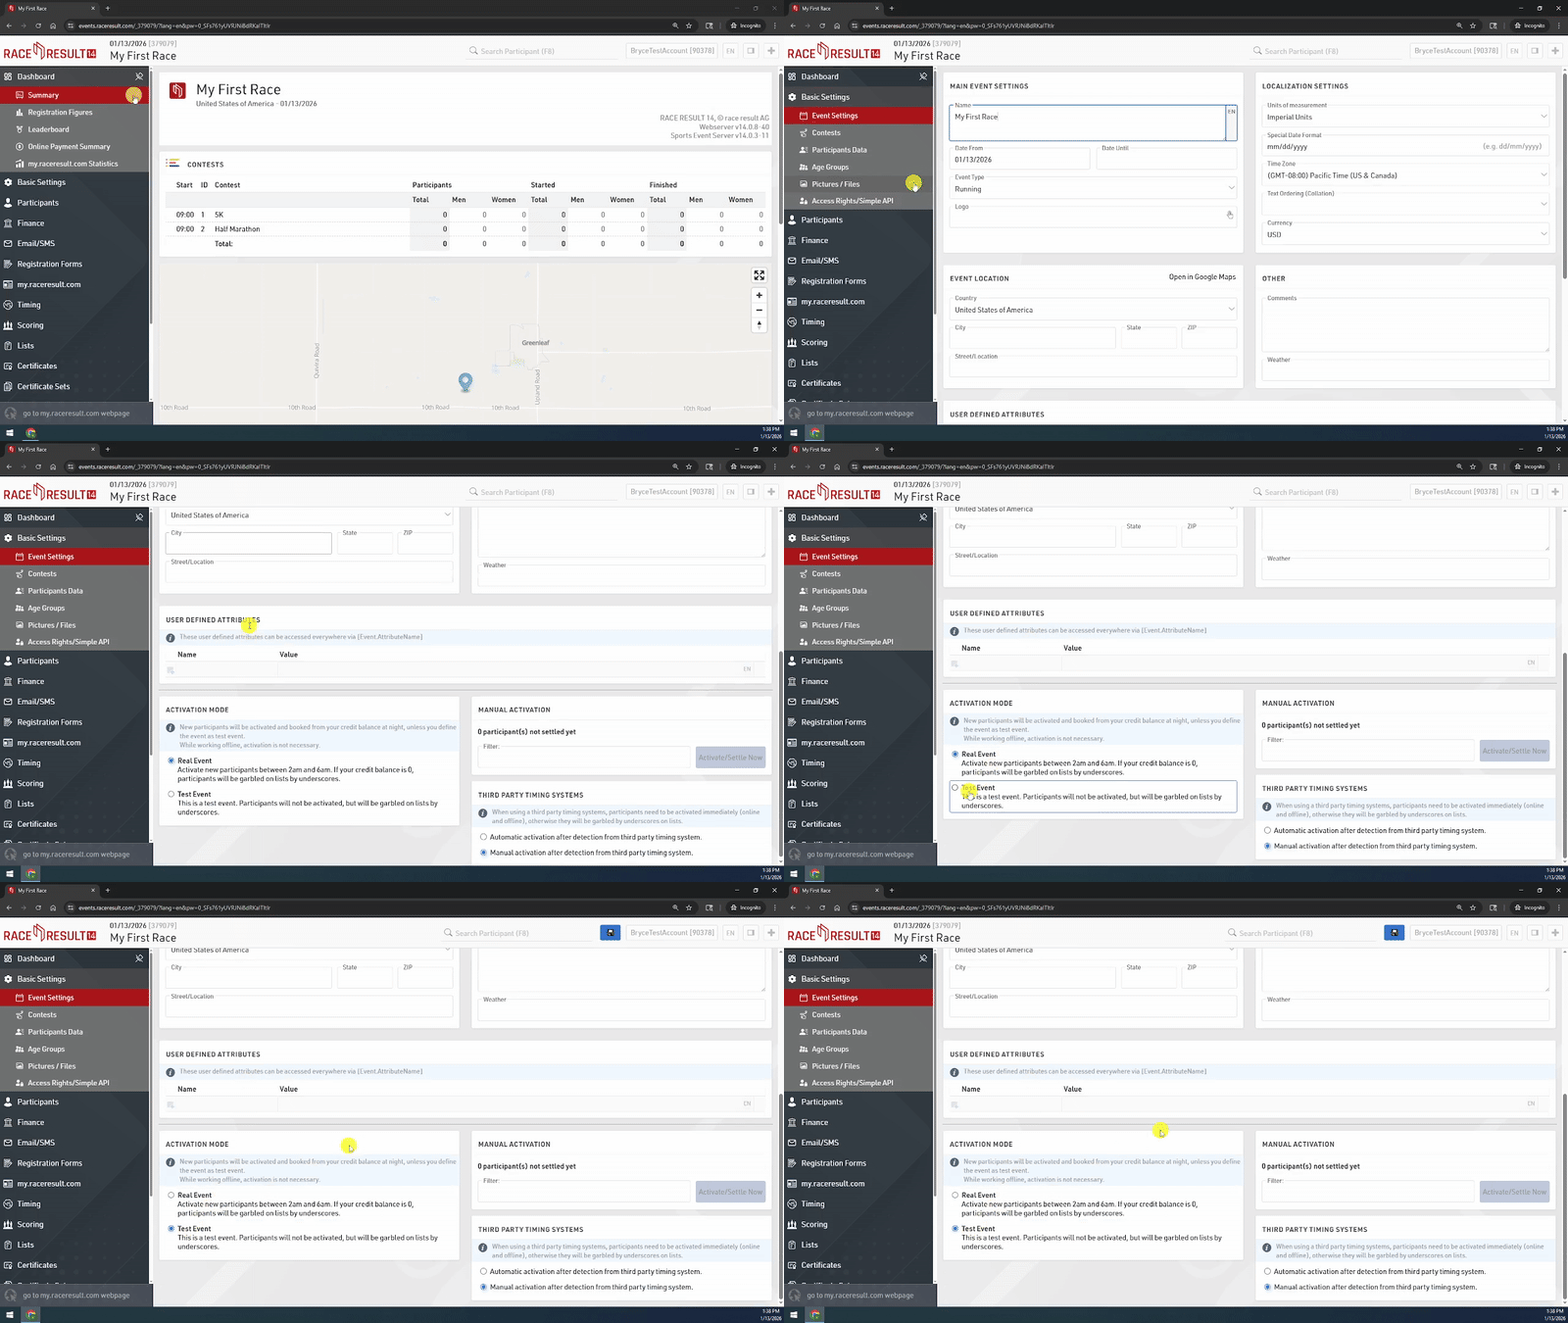
- Before starting to build a new event file, it is best to switch to the Activation Mode to Test Event.
- Basic Settings > Event Settings > Activation Mode> Test Event
- It prevents participants from automatically activating, which might use up credits before you are ready.
You need 1 Credit per participant per event. Please make sure you have enough credits before race day: How to Buy Credits
Step 3 - Setting Timezone
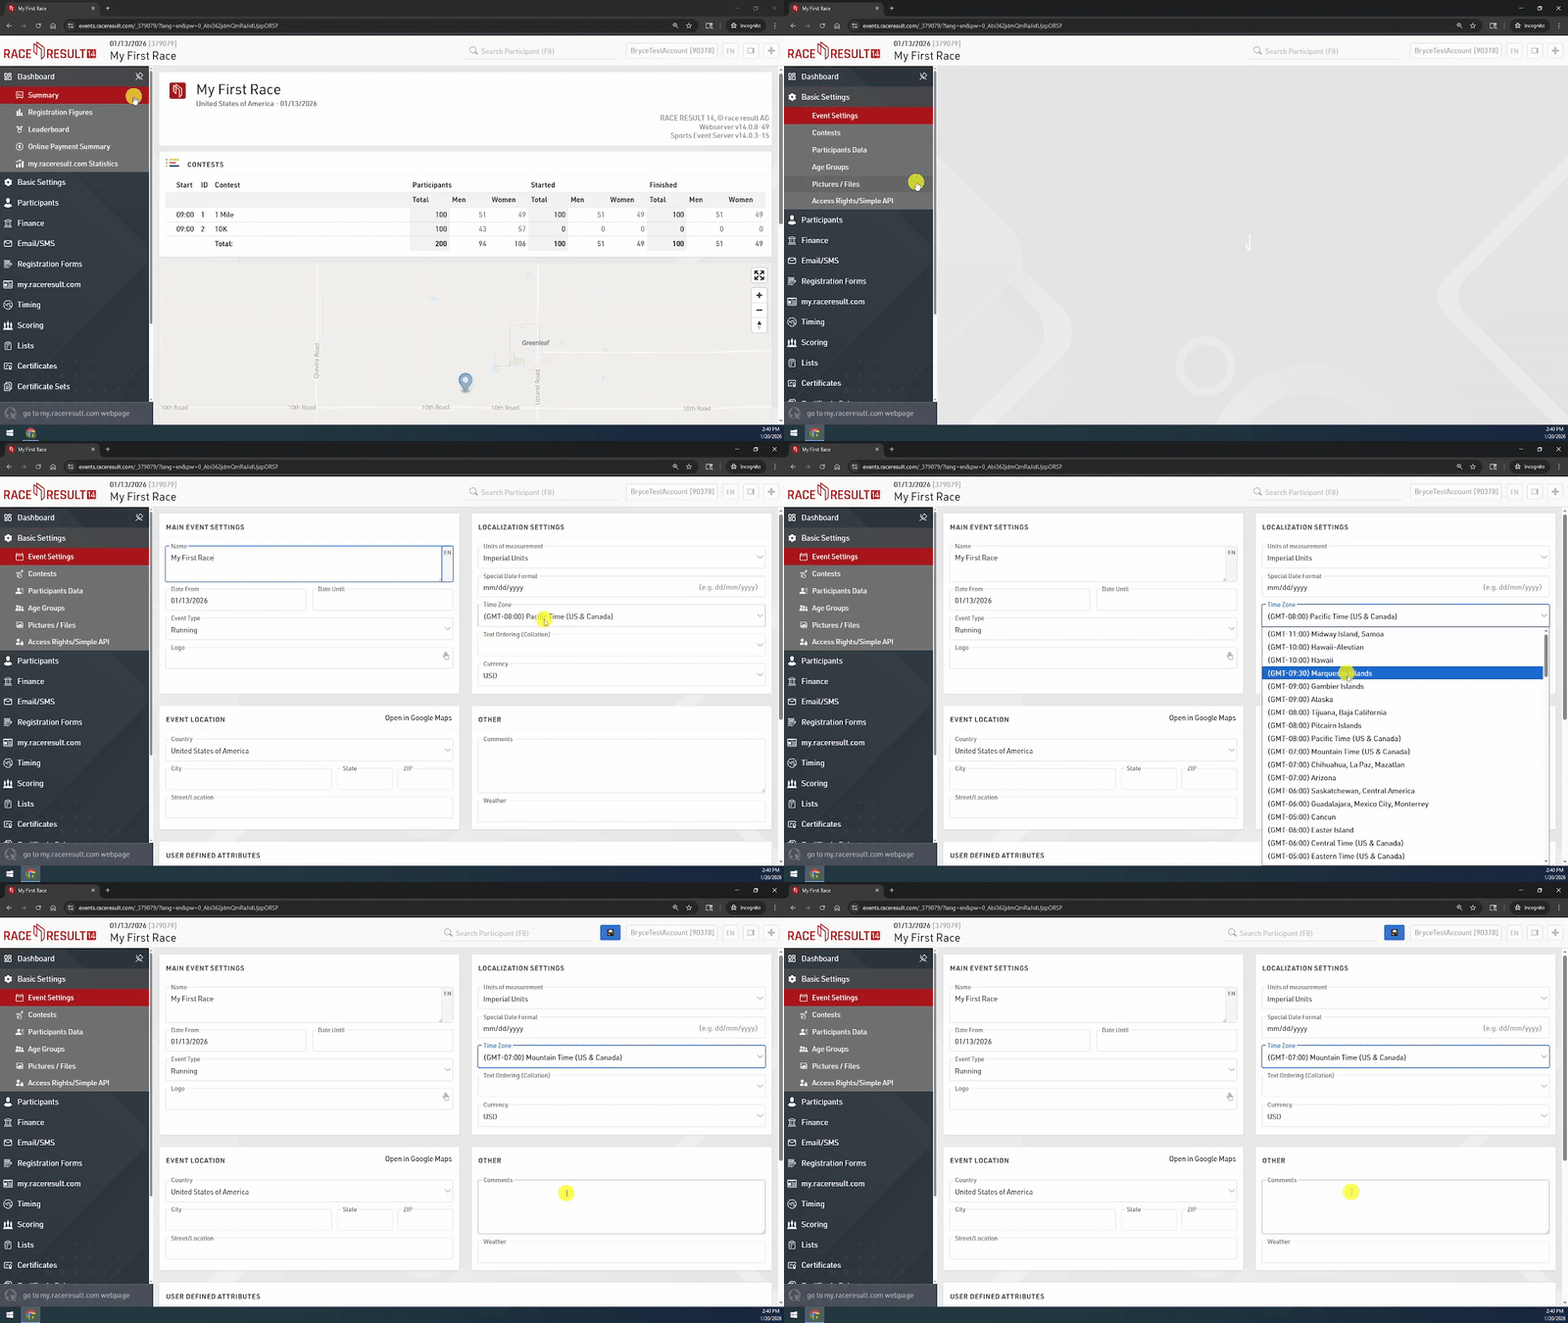
- It is important to set the timezone in your event file, especially if you are using Track Boxes, as this is how the software knows how to correctly offset the time for these devices.
- Basic Settings > Event Settings > Time Zone.
Step 4 - Configure timing settings
- Rename or add Contests as necessary. Delete unnecessary Contests.
- Make sure to set the Finish and Start results to Automatic under Times in the Contest Settings.
- Basic Settings > Contests
Step 5 - Adjusting SPLITS
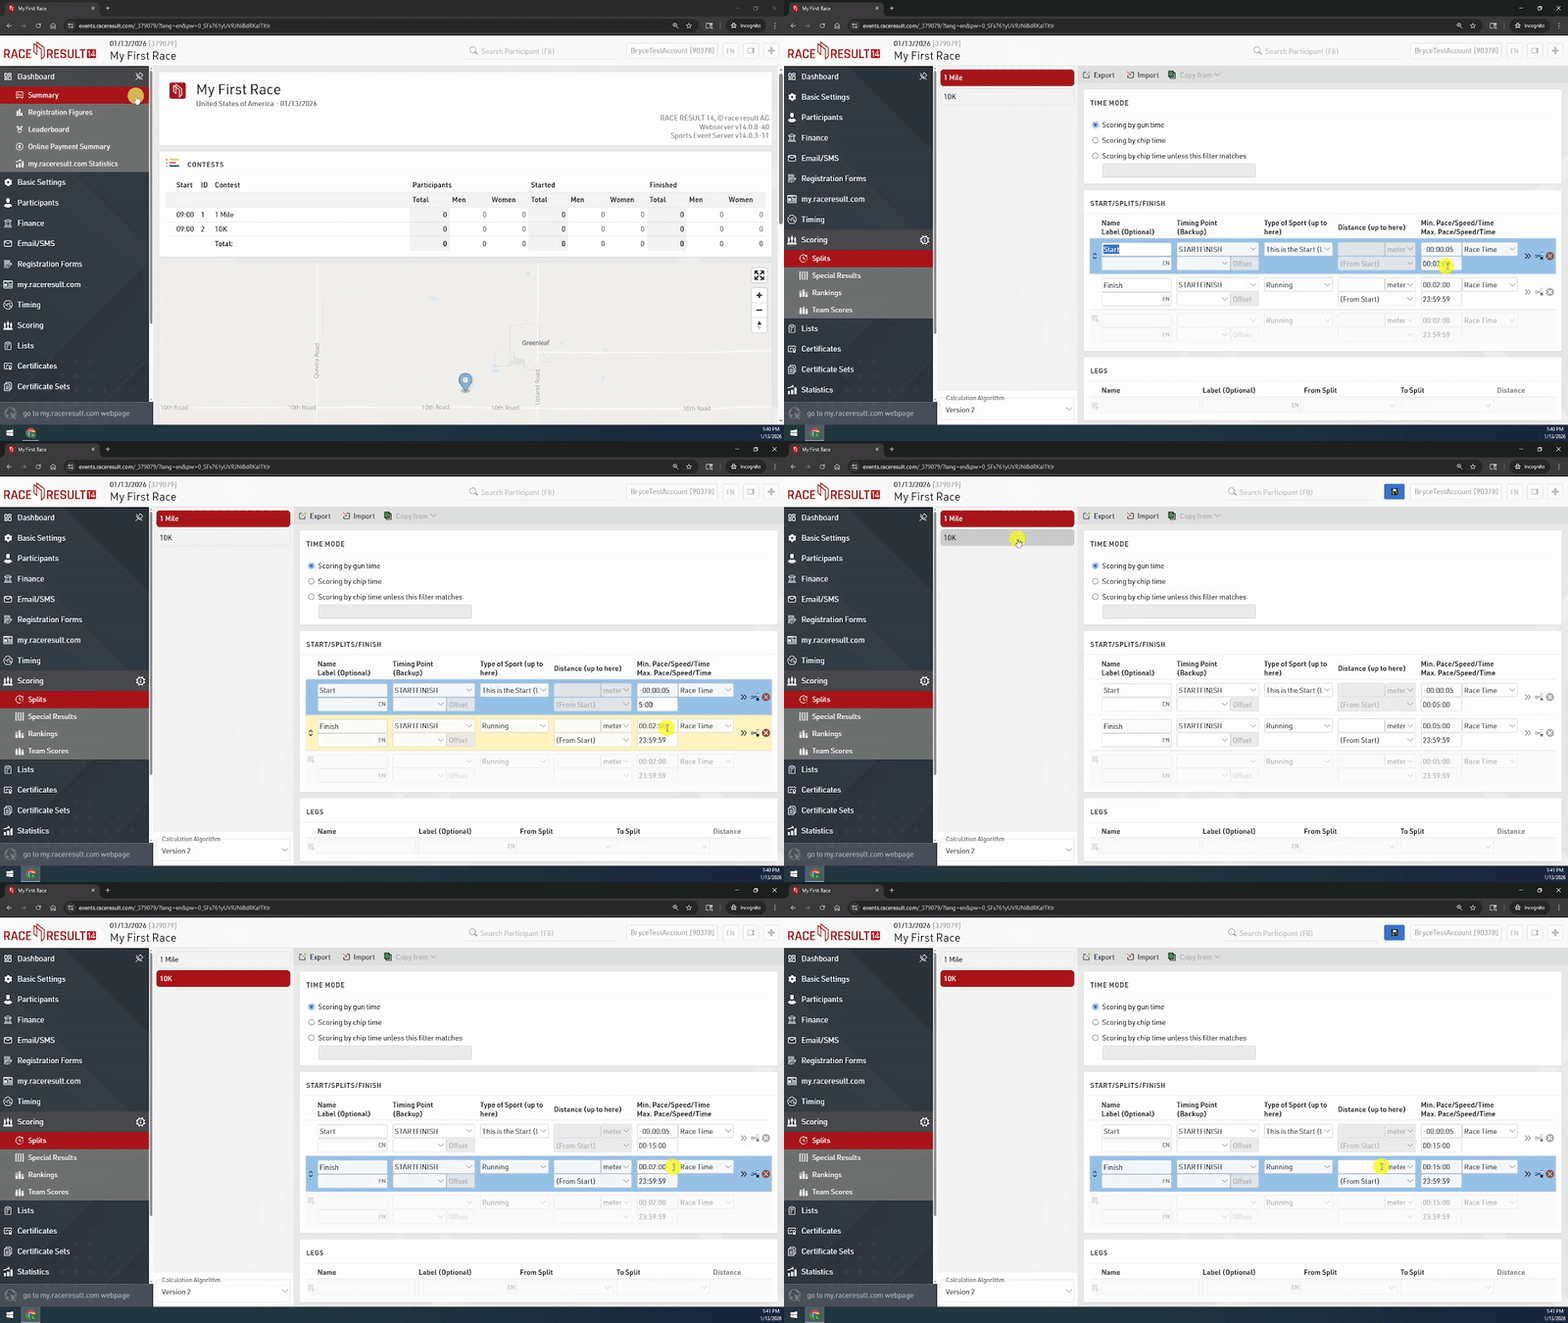
- Scoring > Splits
- The Time Mode setting defines the default scoring value, either Gun Time (T0) or Chip Time. Do you want all the participants' start time to be when you say GO (Gun Time) or when they cross the mat at Start (Chip Time)?
- Splits define your window of validity for a Chip read.

- For example, if Gun Start (T0) is 8:00:00, the last chip read seen until 08:02:00 will be considered their START. All chip reads are ignored before T0.
- Adjust the Split windows for both Start and Finish. The maximum of the Start should not overlap the minimum of the Finish.
- For a 5K, a good Max. Start Time is 00:05:00 and a good Min. Finish time is 00:10:00 - the assumption is everyone runs across the Start within 5 minutes of race start (T0), and no one will finish a 5K sooner than in 10 minutes.
- UPDATE Splits for each Contest
Step 6 - Importing Participants
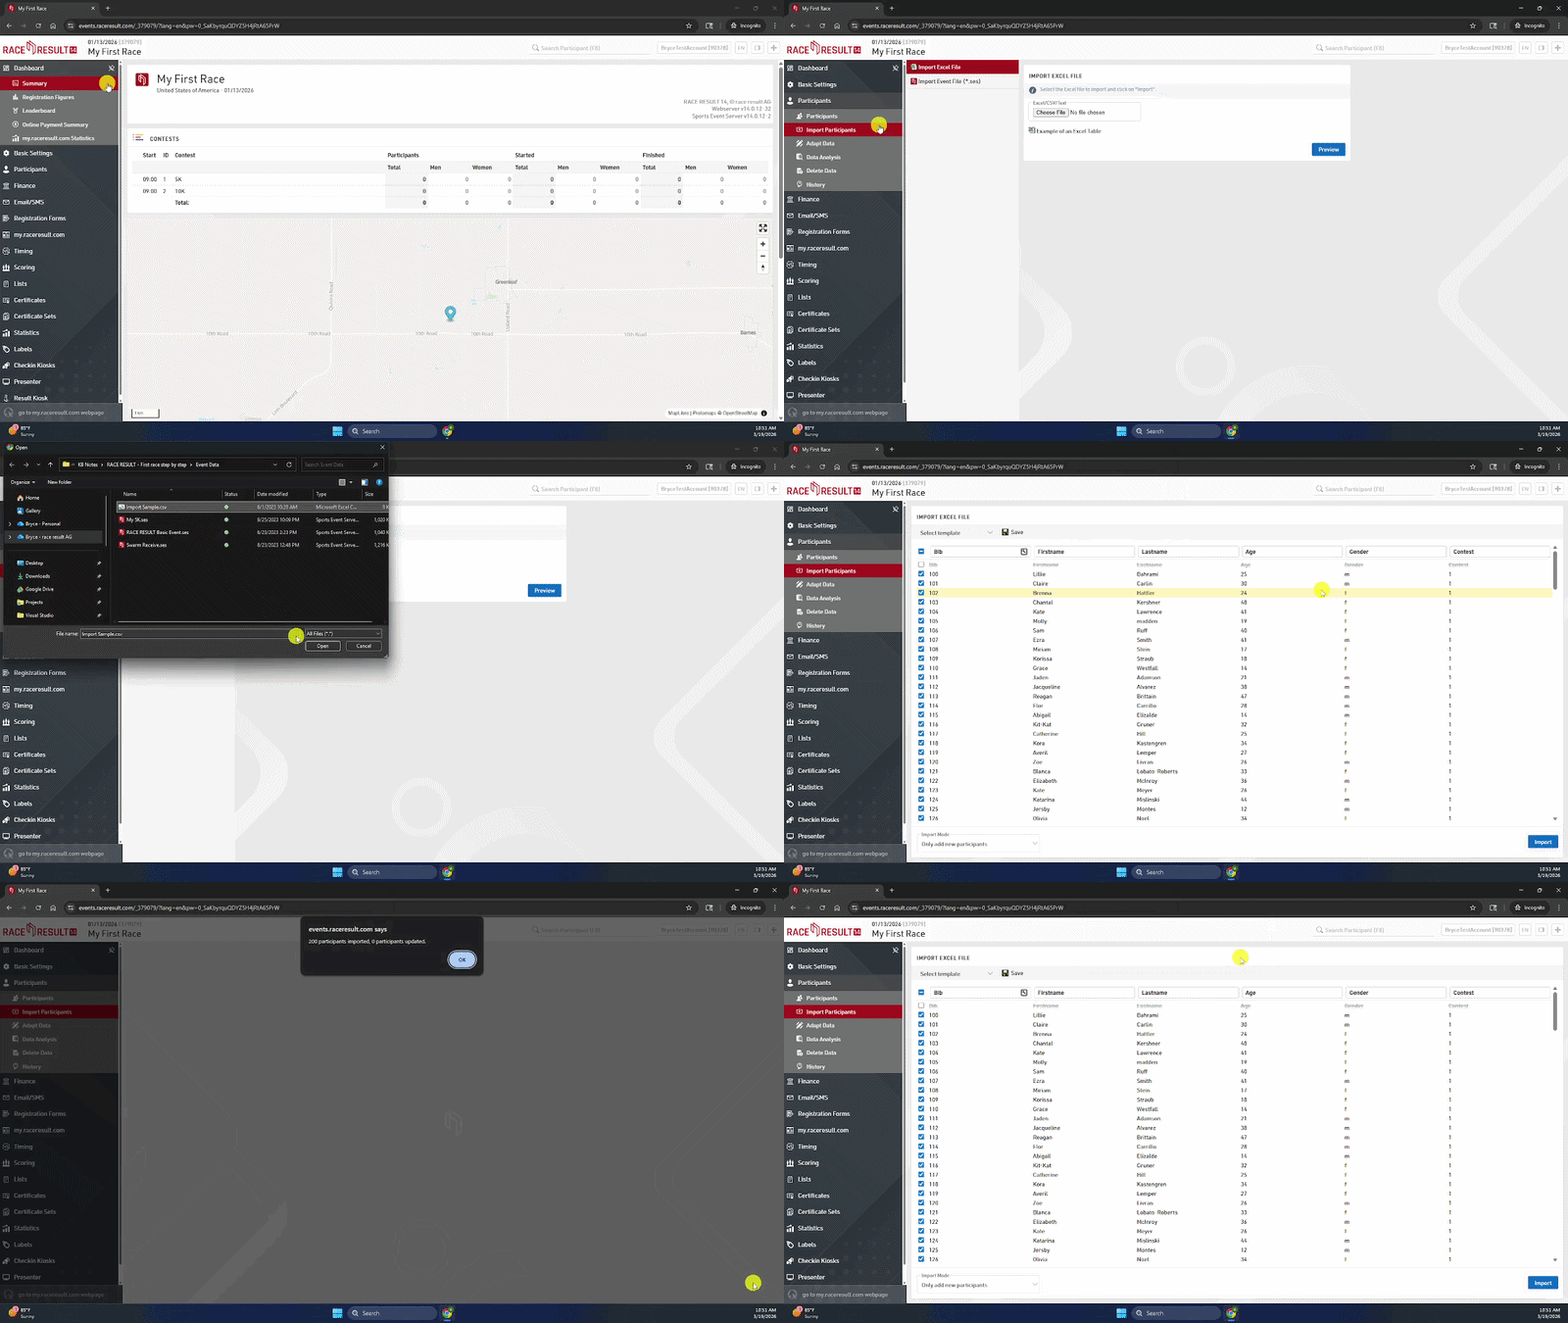
- Open your participant data file. This should be an Excel or CSV file you downloaded from your registration software. (For reference, there is a sample participant file linked at the bottom of the Import Participant menu.)
- Rename the column headings. For this event, the only required headings are Bib, FirstName, LastName, Age, Gender, and Contest. It is important that the headers are spelled correctly with no spaces in the names. DateOfBirth can be substituted for Age; however, you should never import both, only one or the other.
- Navigate to Participants > Import Participants.
- Select the file you just modified and select Preview
- The preview will give you the opportunity to verify the data you are importing. You can remap columns, remove rows, and define how custom fields are imported.
- Once verified, select Import
- You should see a confirmation message showing how many participants were imported.
Step 7 - Rankings
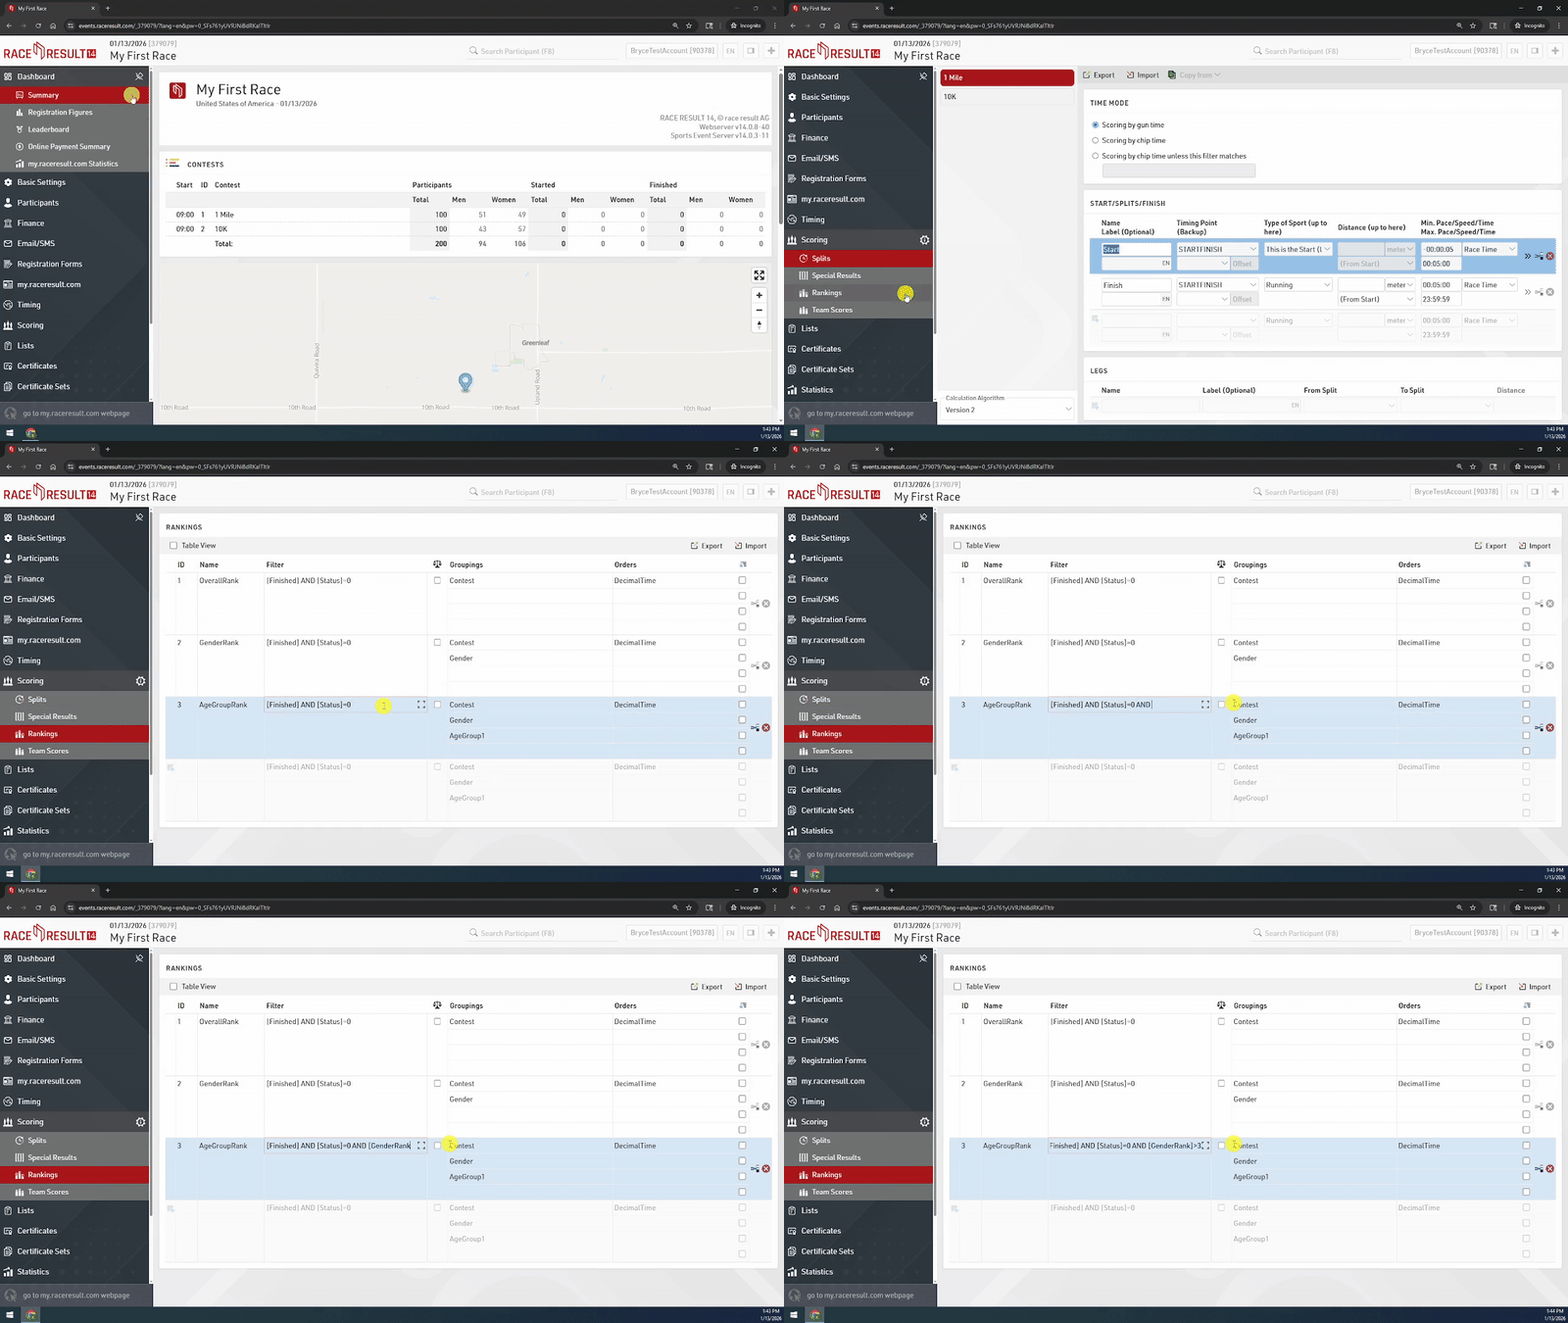
- The 3 most basic Rankings are already preconfigured: Overall, Gender, Age Group
(Optional) Remove Overall Winners from Age Group Results (Double Dipping)
-
Navigate to Scoring > Rankings.
- Modify the filter for AgeGroupRank to match one of the following options
Remove the top single Male and Female from the Age Group results
[Finished] AND [Status]=0 AND [GenderRank]>1
Remove the top three Males and Females from the Age Group results
[Finished] AND [Status]=0 AND [GenderRank]>3
Step 8 - Activate my.raceresult.com
- To publish results on my.raceresult.com, you first need to activate it.
- All three checkboxes should be enabled.
- In this section, there are menus for the various pages displayed on my.rr.com. You can modify these settings to add or remove results lists.
- Make sure to check the dates for each result page to make sure they are valid for your event.
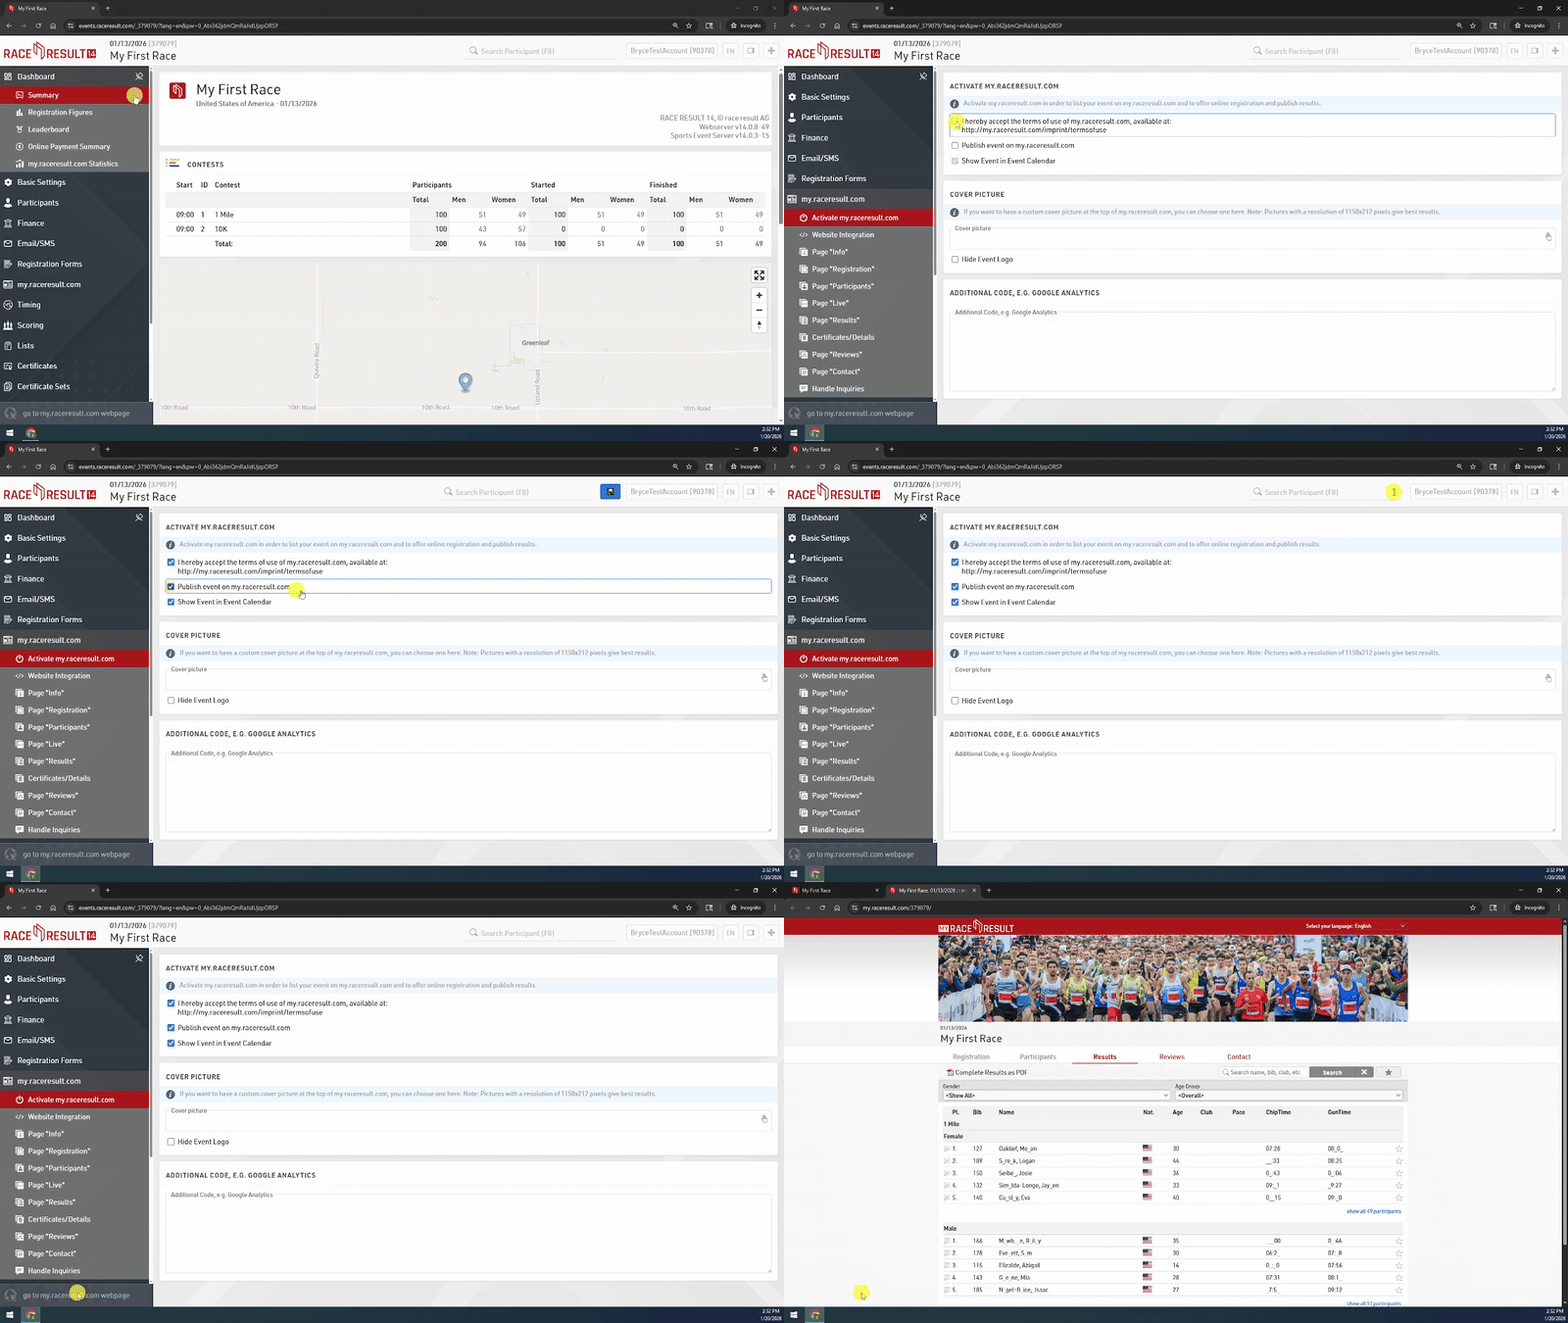
- To access the results link, you can click the go to my.raceresult.com webpage link in the bottom left of the page. This link can be shared with staff and participants or posted on your event page.
- NOTE: While the event file is in TEST MODE, participants' names & race times will be garbled with underscores. For example, you may see names like "R_ge_ S_ith." Once switched to REAL MODE, participants will 'settle' overnight and will no longer be garbled. You can also manually settle via Basic Settings > Event Settings.
Step 9 - Get hardware ready
If you have not already done so, review the Ubidium Quick Start Guide.
There are several ways to connect your Ubidium system to RR14. You need to decide if you want to connect to the Ubidium directly or through the cloud.
A direct connection will require an Ethernet connection or a WiFi connection to the Ubidium. This will require the RACE RESULT Web Server to be open and running (does not require an event file to be loaded) in order for the system to connect to any event file.
A cloud connection will require the Ubidium to have internet access, most commonly using a SIM card.
The simplest option is to use a direct connection with an Ethernet cable from the Ubidium to the Laptop.
Step 10 - Connect the hardware to RR14
- Navigate to Timing > Chip Timing.
- Your decoder should appear in the table below RACE RESULT SYSTEM.
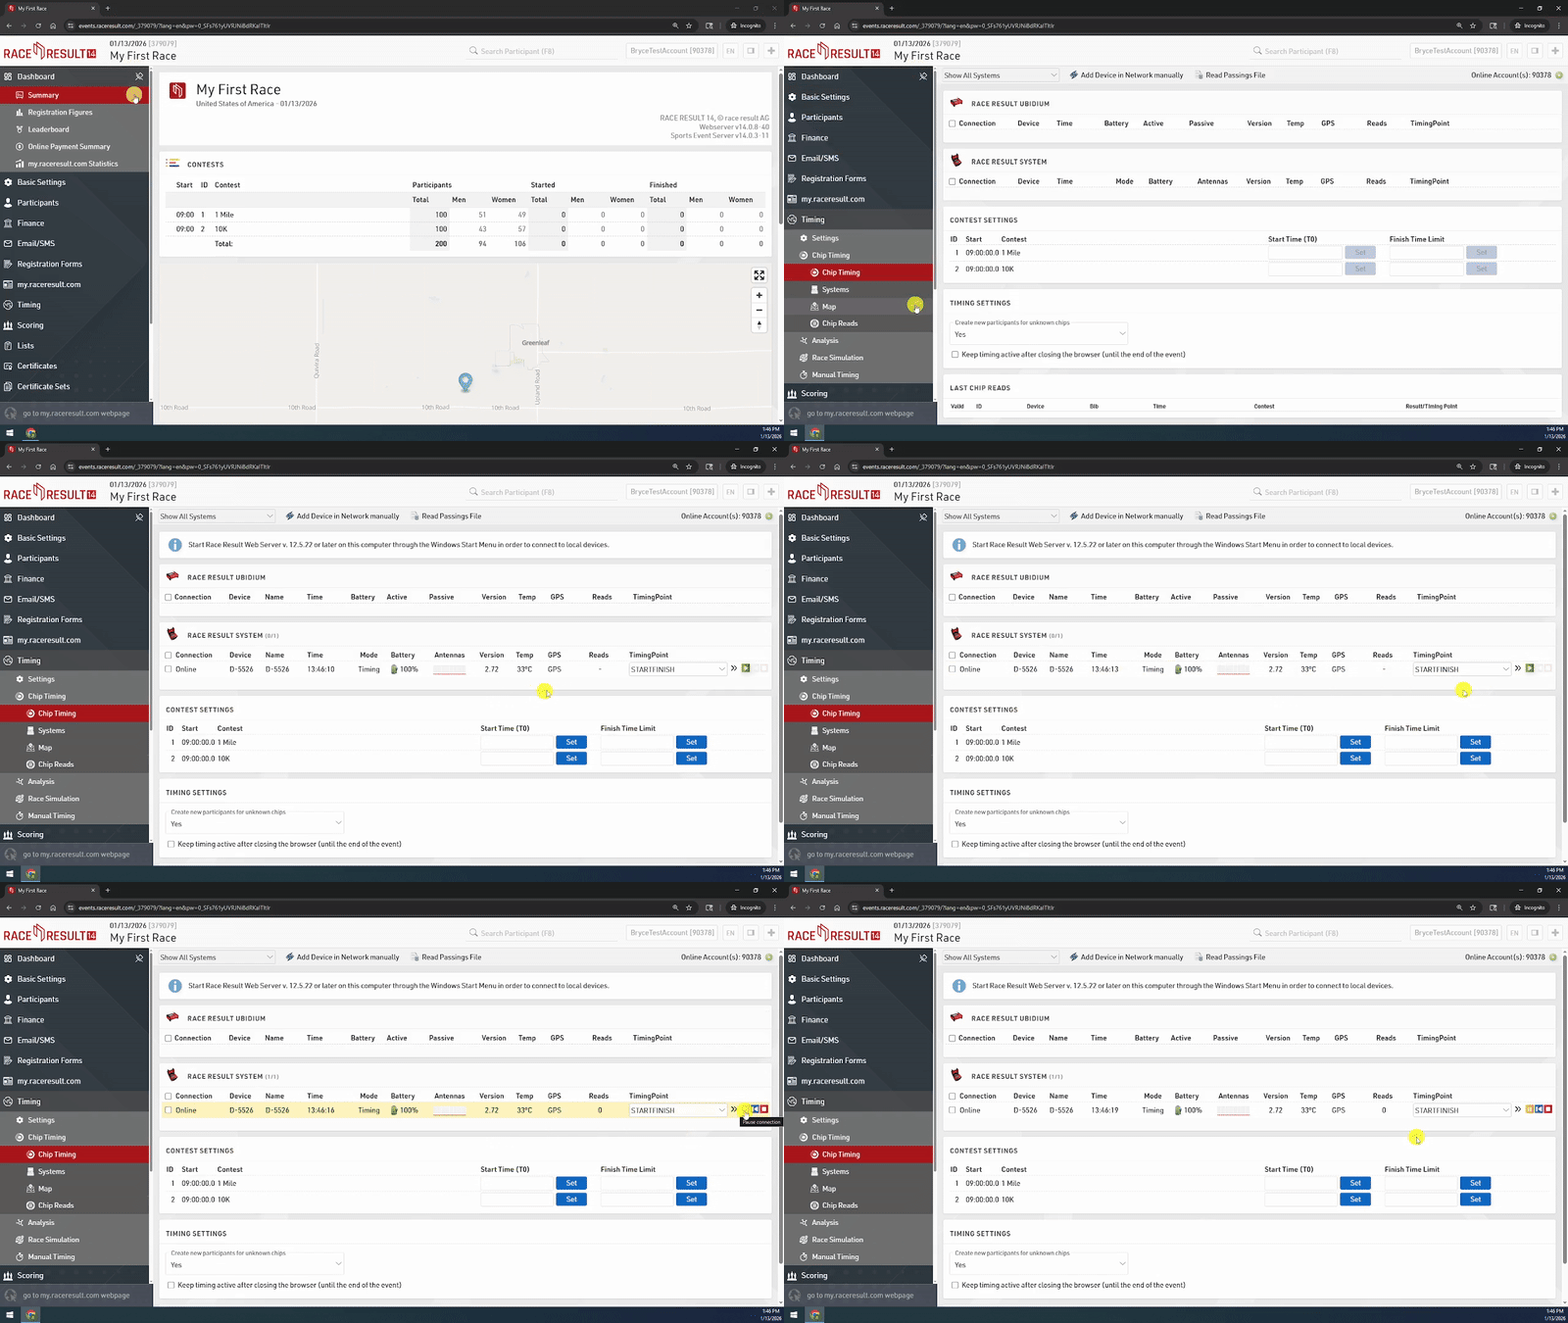
- Select the STARTFINISH Timing Point from the drop-down list in the Timing Point column.
- Press the green play button to open the connection to the decoder.
Step 11 - Time your race
Start Race
- Now you can switch to Real Event mode under Basic Settings > Event Settings > Activation Mode.
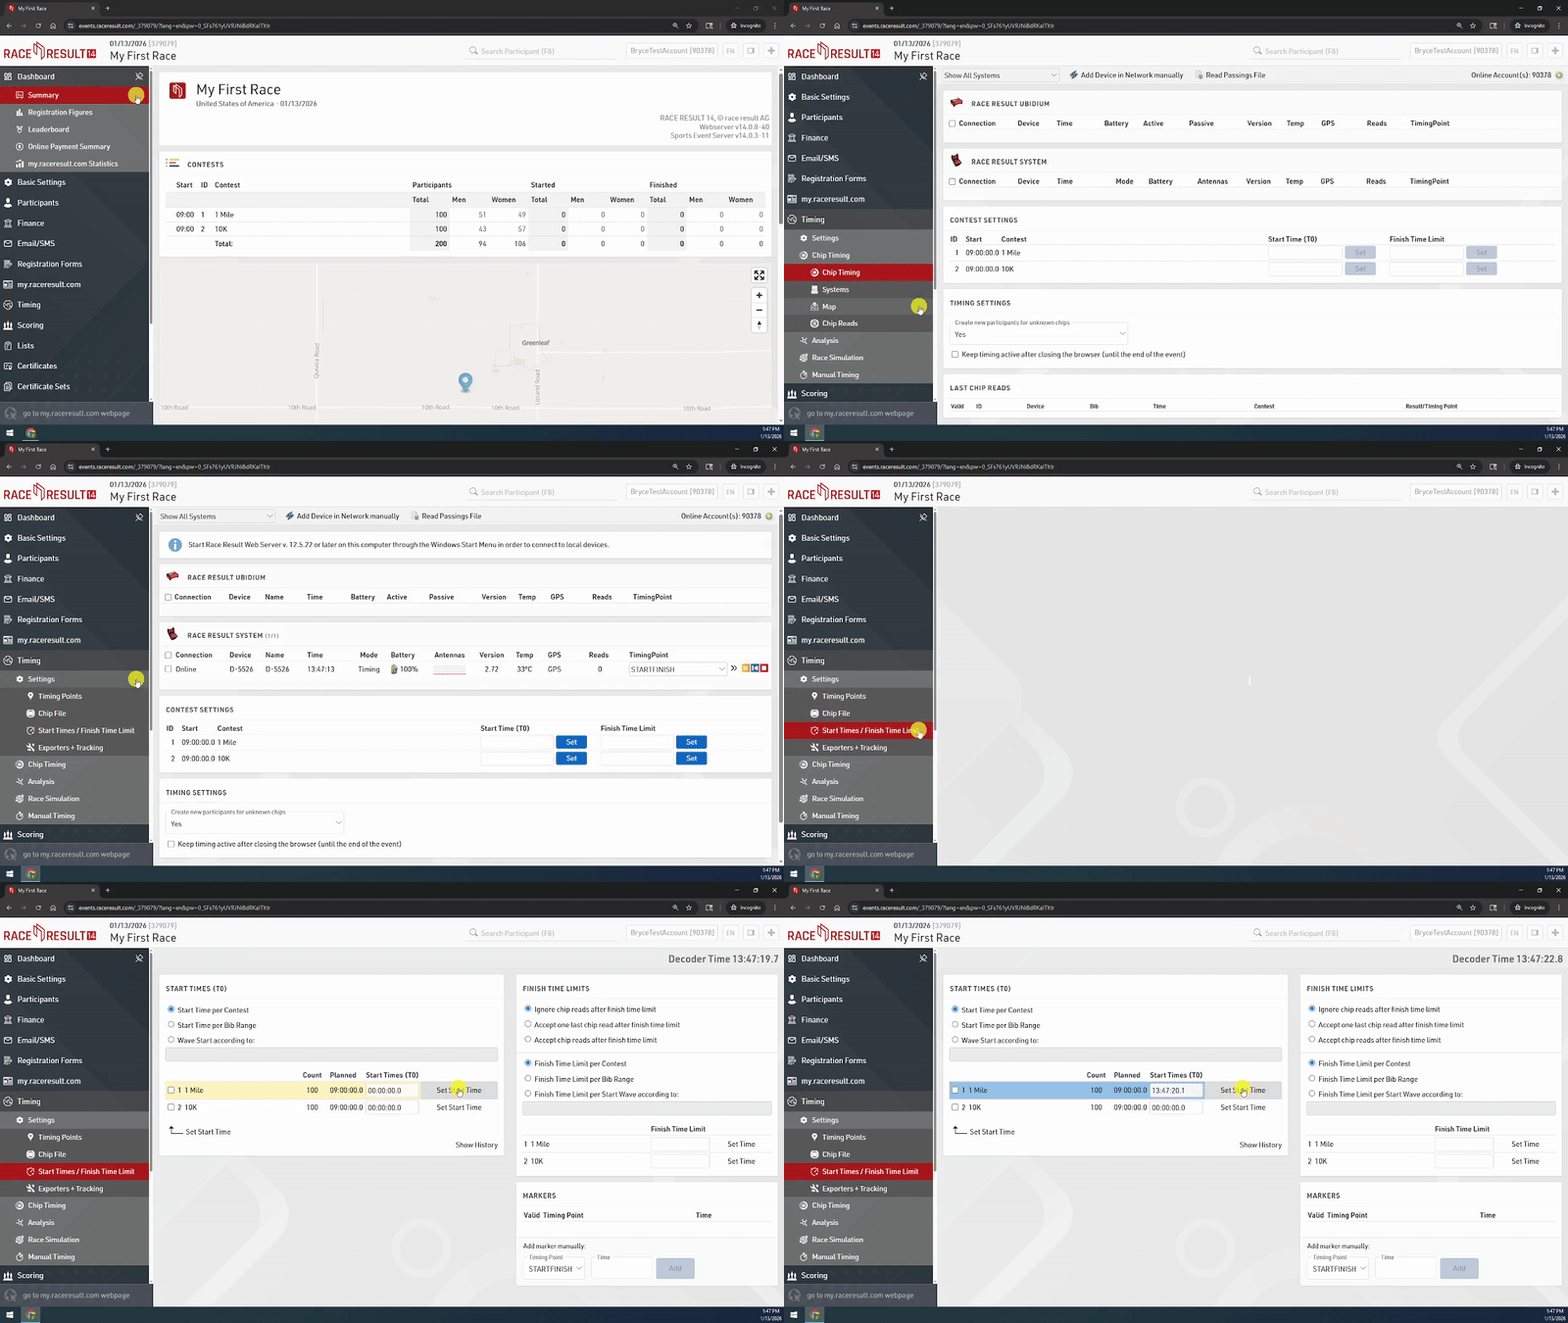
- To set a start time for each Contest, navigate to Timing > Chip Timing > Start Time T0
- The best option is pressing the Set Start Time button to the right of each contest as they start. It automatically pulls the current time of day from the decoder (seen in the top right corner) when the text is clicked.
- If you miss the start, Option Two is manually typing in the approximate start time next to each contest.
- You can also set T0 in Timing > Settings > Start Times/Finish Time Limit
Monitor Race
- It might help to have multiple tabs open for viewing multiple pages. If you ever need to open a second page, you can click the plus icon in the upper right-hand corner of the event file.
- While your race is running, you can monitor chip reads from Timing > Chip Timing > Chip Reads.
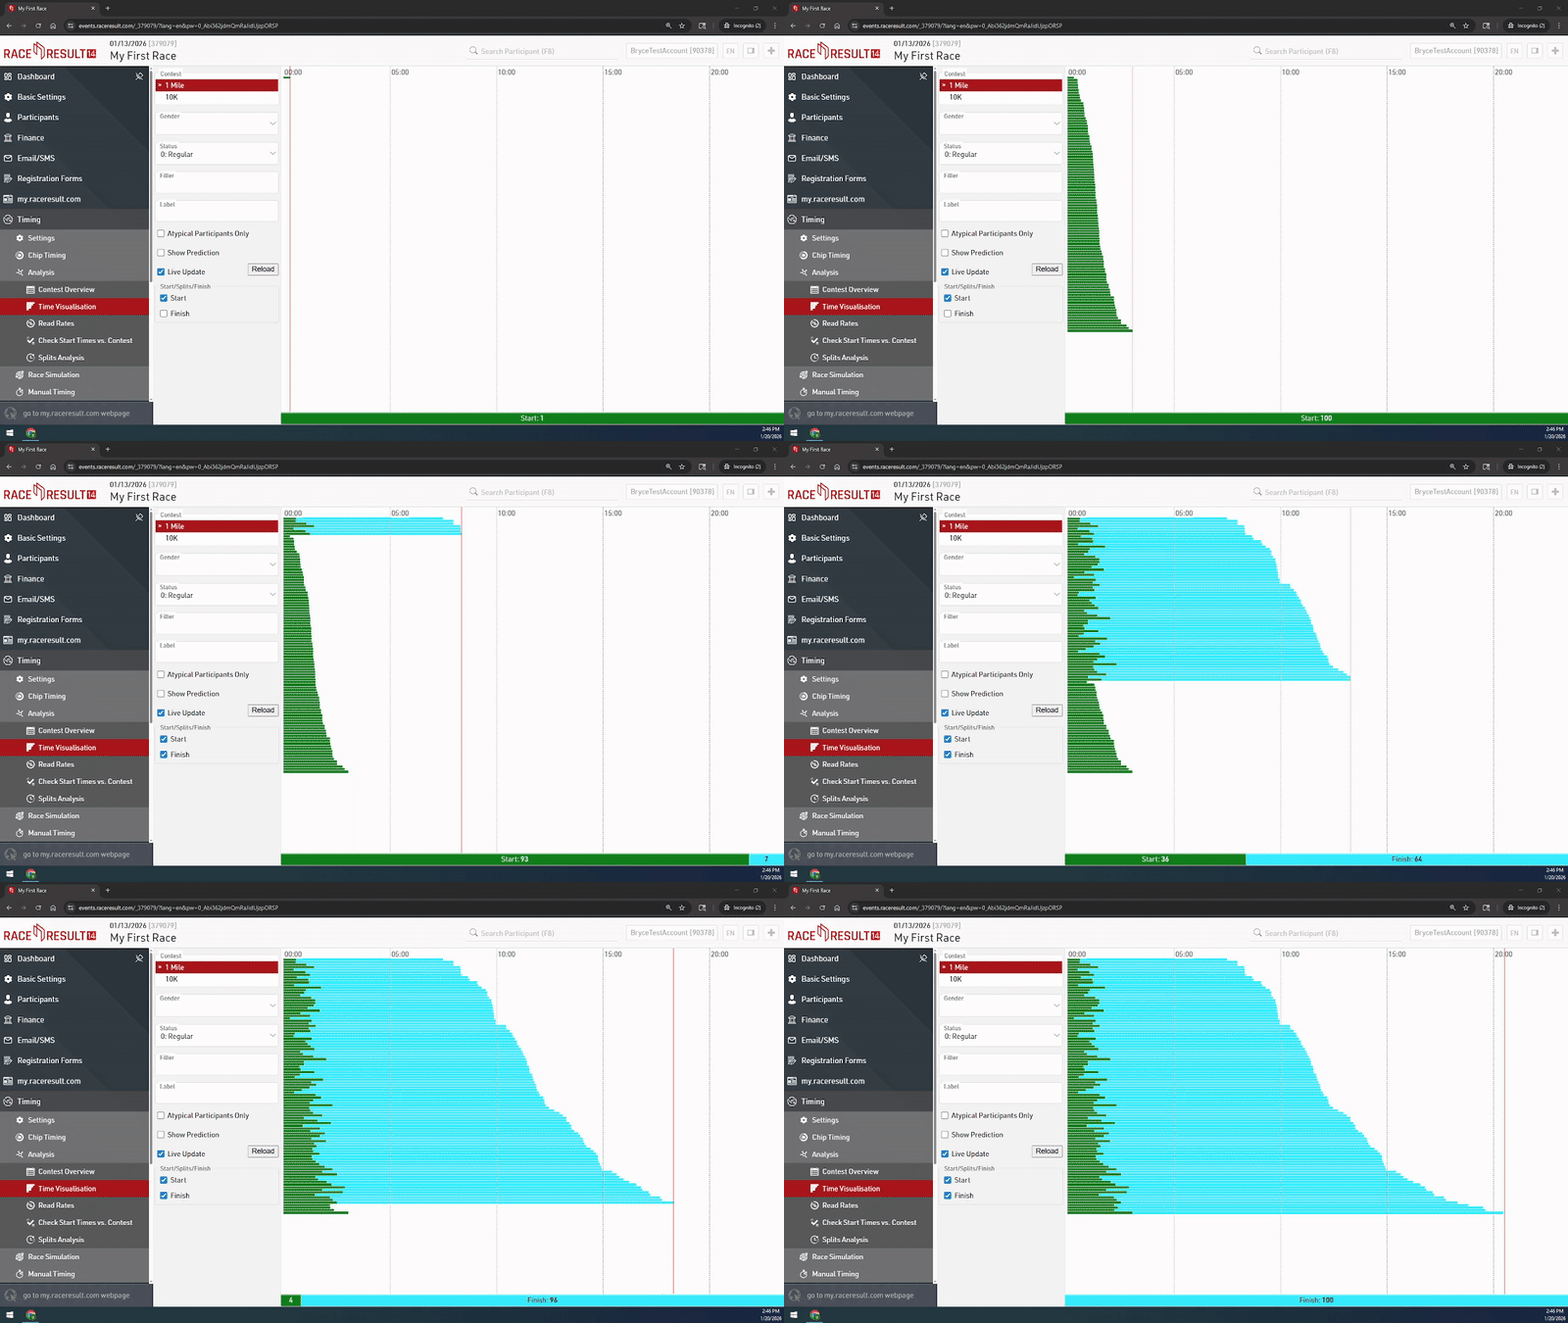
- Another great tool for monitoring a race is the Time Visualization tool. It will allow you to visualize who has finished the race and who is still on course.
- Timing > Analysis > Time Visualization
Handle Individual Participants
- You may also look at and adapt a Participant's individual times, although this should rarely be necessary. Click on a participant's name, or search by name in the search bar at the top of the page. Go to Timing Raw Data.
- On the right-hand side under 'Split' you will see which chip reads were associated with each Split time. You can also change the status of your participant (e.g., DNS, DNF, etc.). A change in Status automatically removes them from Results.

Troubleshooting
In the rare case you miss a chip read, you can easily add one manually. Start by searching for the participant in question, then open their profile on the right of the screen. Navigate to their Timing Raw Data and select the Add Missing Raw Data Entry section. Here you can type in the time of day the participant finished to enter it into the system.
Step 12 - Verify and Print Results
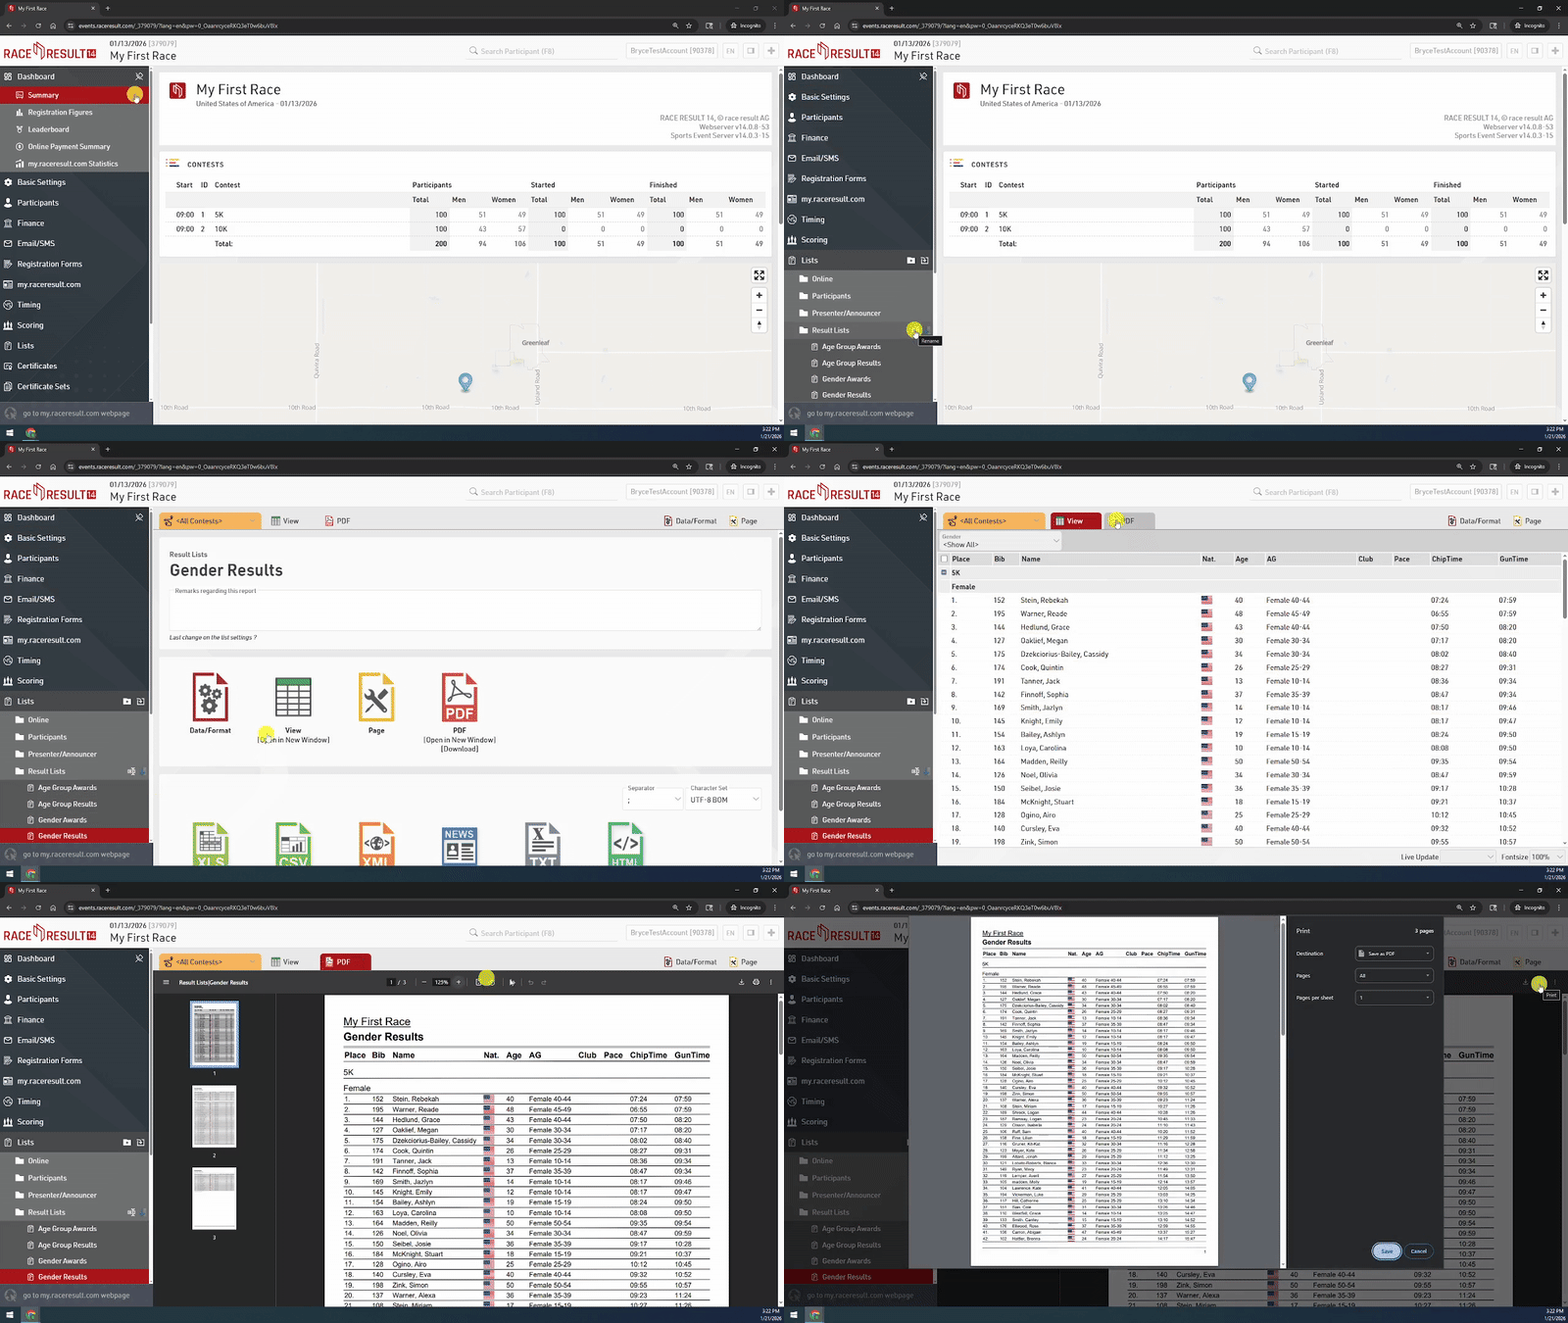
- You can review results as racers finish by navigating to Output and selecting a report from the list on the left and then clicking View. There are several pre-configured reports in the sample event file provided.
- You can either access the results link via the my.raceresult.com webpage, or you can print the PDF results by selecting a report from the list on the left and clicking PDF.
Step 13 - Pack Up after the Race
- Once the last racer has crossed the finish line, you can disconnect from your decoder by pressing the red stop button under the Timing Tab next to the decoder connection we created in Step 9.
- Next, you can press CANCEL on the decoder to stop timing (select yes on the prompt asking if you really want to stop timing). Then, press and hold the OFF button on the decoder to power off the device.
- Please turn off the Decoder BEFORE disconnecting cables
- If results have already been finalized and printed, it is safe to close the web browser, close the RACE RESULT Web Server, and power off your computer.
SUPPORT
- Timing can feel stressful if something goes wrong. A couple of things to remember:
- DO A PRACTICE RUN in TEST MODE before your event. Know what to expect.
- If the timing system is ON, all timing data can be retrieved later.
- In case of emergencies, please text (303) 390-1235 ext 3. We have a team dedicated to weekend support and will be there to help.
We hope this guide has helped get you ready for your first race. Once you have one race under your belt, we highly recommend continuing to build your timing skills by reading through the Getting Started documentation in our Knowledge Base.