Start
Events
The Event menu in RACE RESULT 14 is used to access your event files or create new ones, when working offline not all menu options will be accessible. Your most recently opened events will be shown first, or browse your last (recent), next (upcoming), or all events. Using the search bar will search across all events.
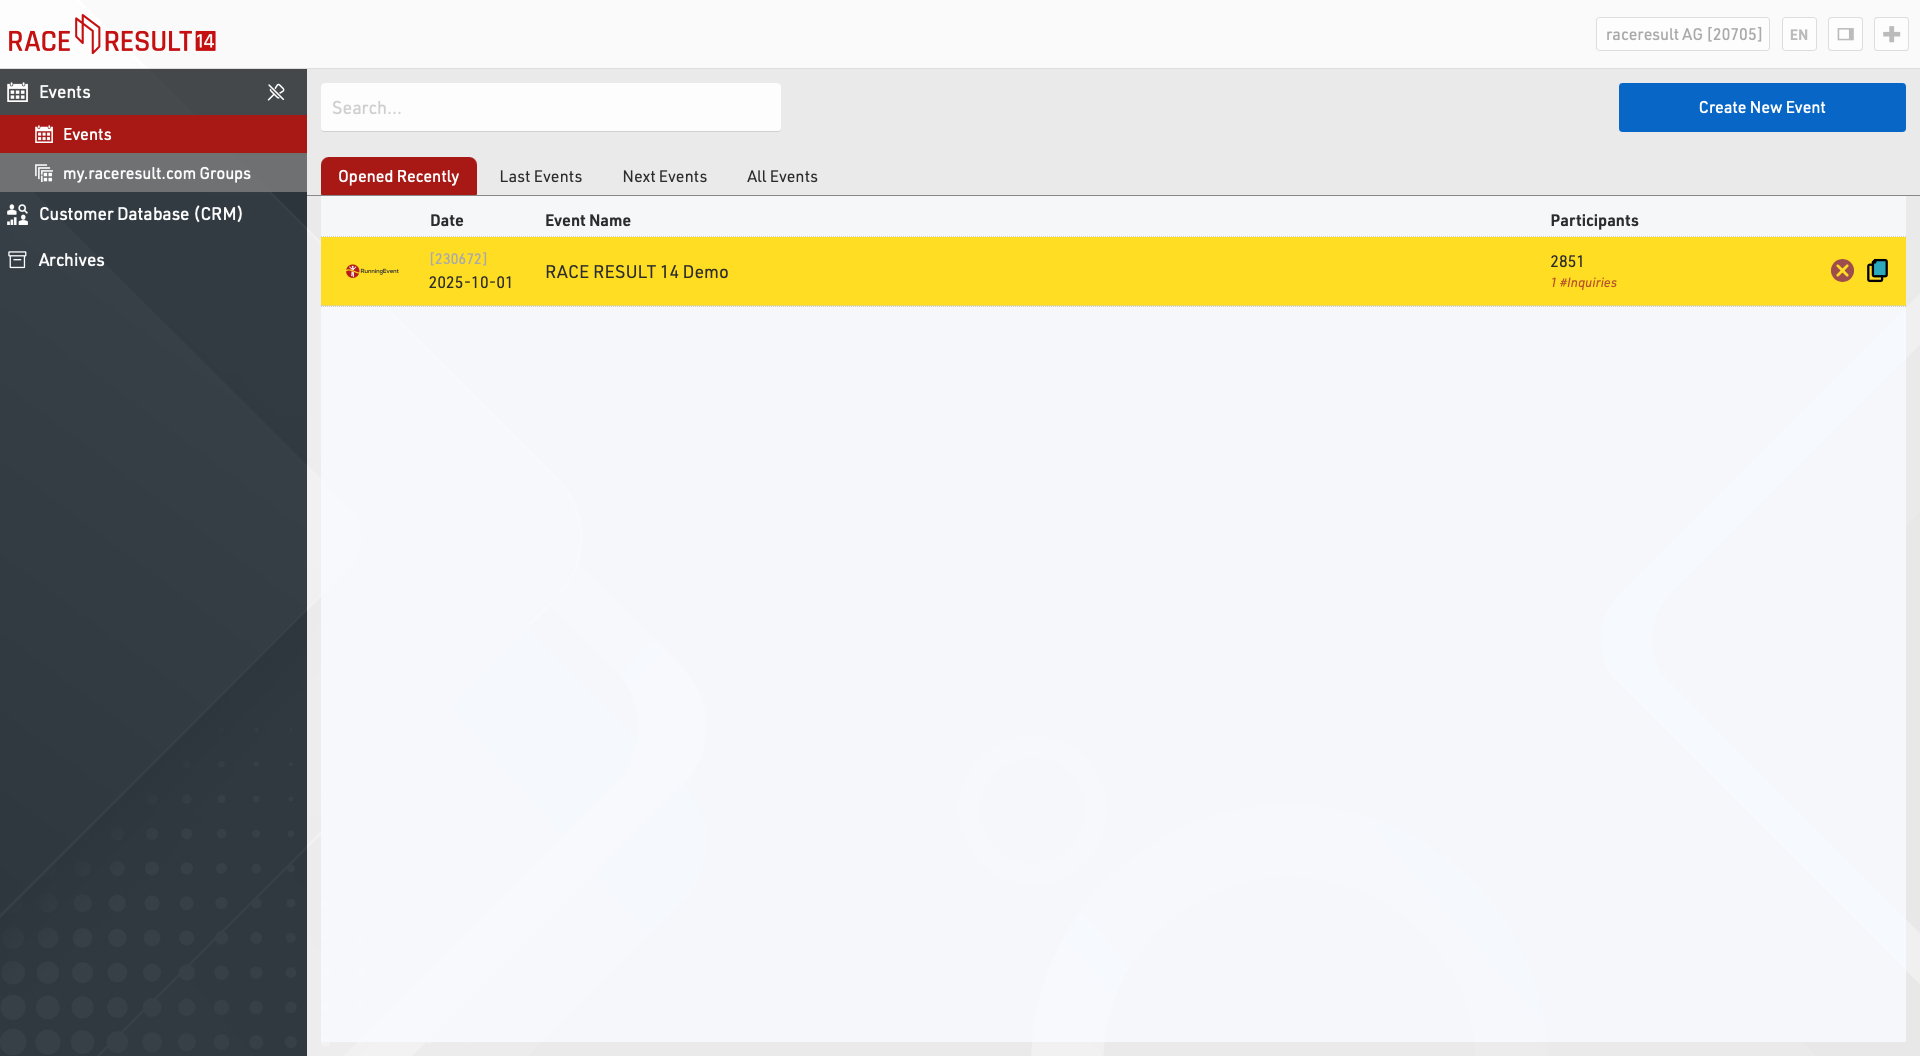
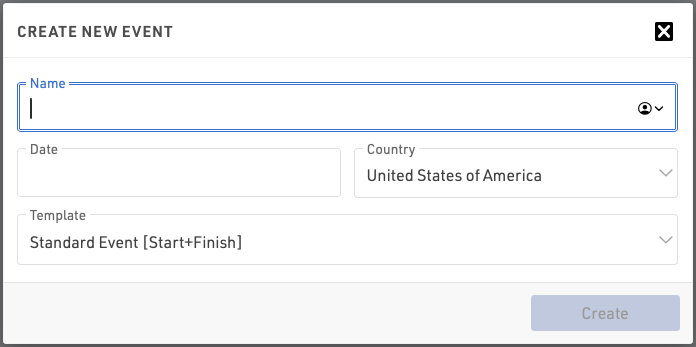
To create a new event, click on the button Create New Event, enter event name and date, select a template and click on Create (This function is only available when working online).
Offline, new event files can be created in the RACE RESULT Web Server).
To copy an event click the copy icon in the row of the original event to be copied.
To delete an event, click on the delete icon on the right (only available when working online). When deleting an event you will be asked for your login password (belonging to your customer number).
Participants Search
Using the Participants Search function you can search for participants across all your event files.
Event Groups
Event Groups is used to sort your events on my.raceresult.com into the different categories displayed. You can find more info in the Groups article.
Customer Analysis
The Customer Data Base (CRM) gives you valuable insights who your participants (customers) actually are, where and how often they race and where they are from.
Groups
The Event Groups section is located on the main page of RACE RESULT 14 online where you can create new groups and manage your existing groups.
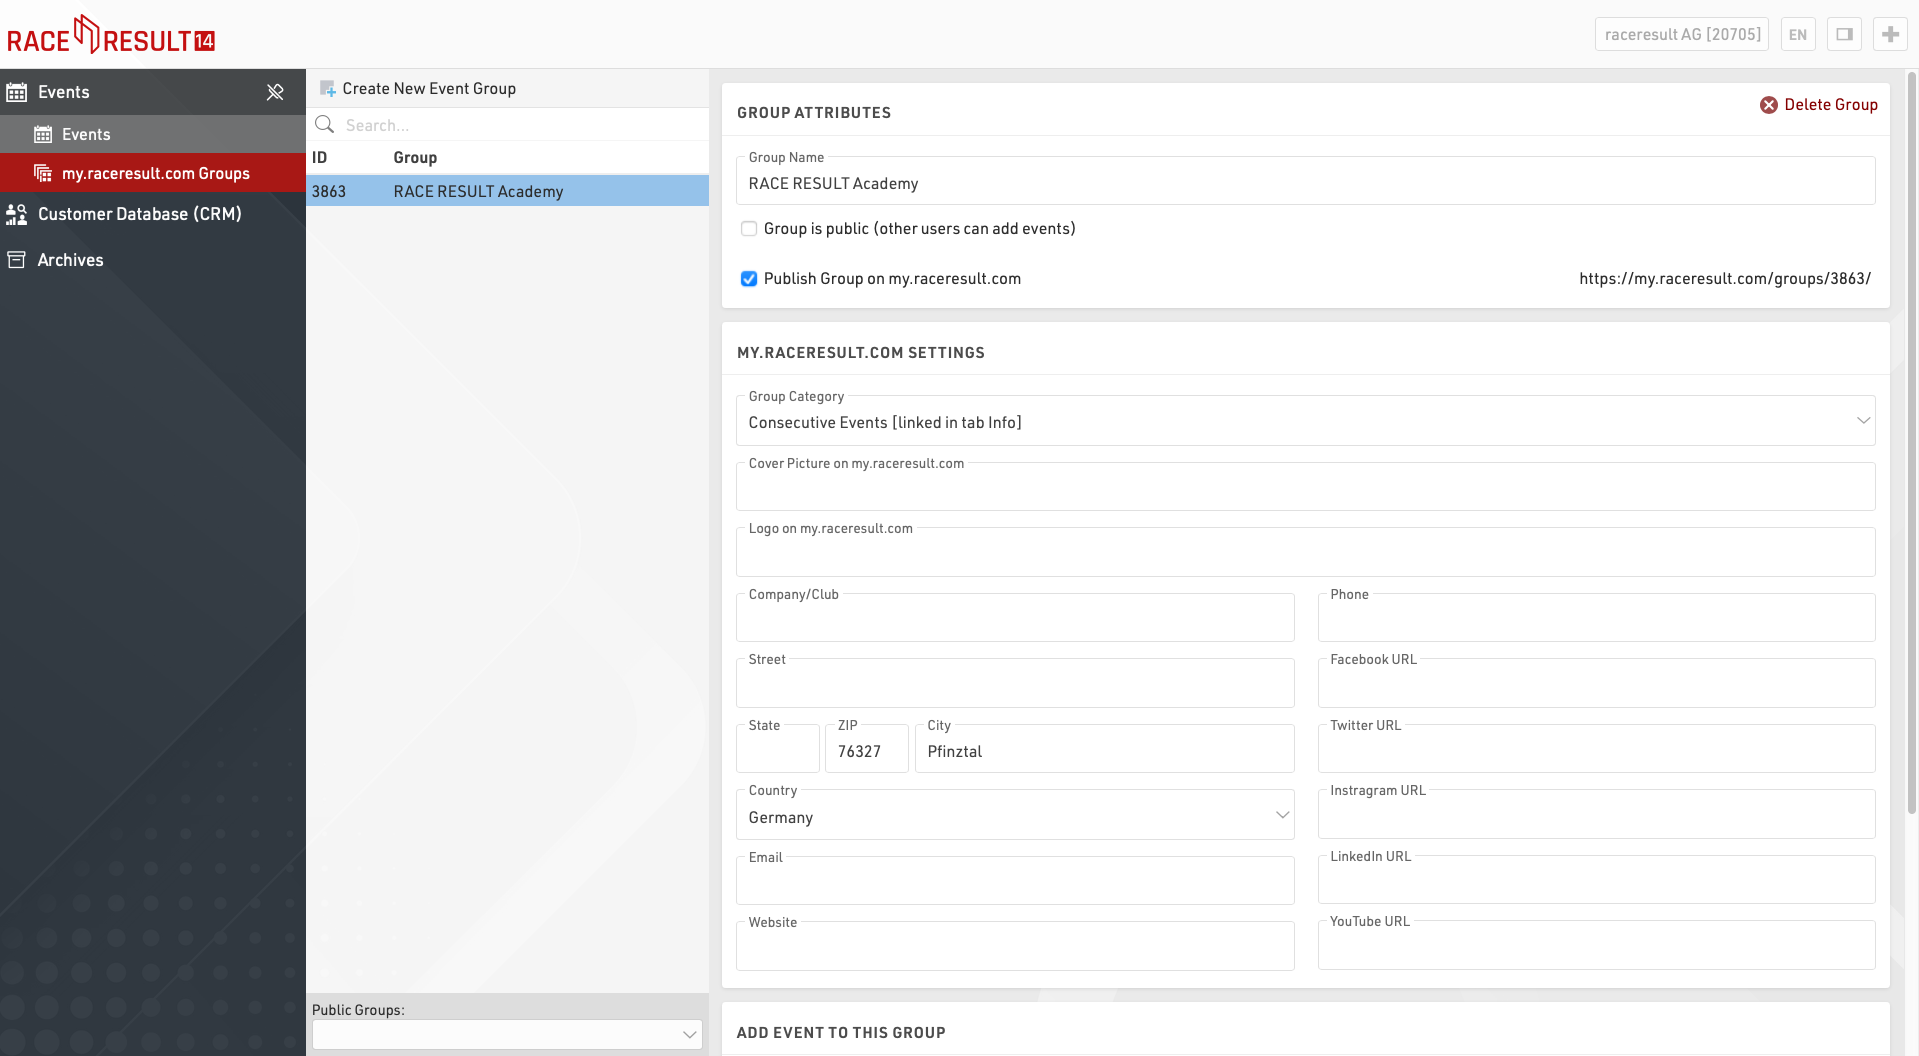
Those Groups are used to sort your events on my.raceresult.com into the different categories displayed.
Race Organizers - Clubs - Series - Timers - Topics
Please note that one event can be added to several groups and you can also create internal only groups that are not visible on my.raceresult.com.
Creating New Groups
If you create a new group, give it a meaningful name that is easy to understand.
Public Groups
You can add your events to public groups, and you can make your group available for other users of RACE RESULT 14. Please use this feature responsibly. The more effectively the events are sorted, the easier it is for users to find your events on the platform:
- Only add events to a group if it will improve or enhance the end user's (participant / spectator) experience.
- Before creating a public group, check if such a group already exists.
- If you think you need access to an existing group (club, event series, theme) then try to contact the existing timer of that group
Publish Group on my.raceresult.com
If you want the group to be listed publicly, tick the box to publish on my.raceresult.com and make sure to assign it to the relevant category. This way the group is displayed in the correct tab on my.raceresult.com and can be easily found by users.
Group Category
For the group category you have the following options:
- Event Series: If you have several events that e.g. have an overall scoring, belong to a league, cup, etc.
- Clubs: Add all events that are organized/hosted by the same club. Such a group could be easily embedded into a club website
- Other Topics: This is a category that could make sense for other timers/organizers that don't fit any of the other categories such as events within a specific region
- Timer: This category allows you as a timer to list all of your published events at once - to show prospective customers the range of your events
- Race Organizer: List all events of the same race organizer to help promote other related events
Remember, all published events are listed under "All Events" on my.raceresult.com, where participants can filter by sport, date, country, etc. Listing an event in any of the above categories is an optional additional function.
Especially for Timer groups, it may make sense to tick the box to include all of your event files in this group, whenever you create a new event, it will be added automatically.
Cover picture
Uploading a header picture will make the group page look much more attractive. The optimal size for those pictures is 1150 x 212 px. Other formats will be automatically resized. If you do not upload a picture, then a default template will be used.
Logo
Upload a logo to increase your recognition value! We suggest uploading a file with a resolution of 300 x 300 px. Other formats will be resized automatically.
Contact Information
Provide contact information relevant to the group. These fields are optional but helpful to fill. Especially providing an email address gives participants and prospects an easy way to get in touch.
Sorting Algorithm
In the background, my.raceresult scores all events according to recent user activity (i.e. number of clicks, registrations, list views and more). The more popular an event is then the higher up it will be shown on recent and upcoming events.
For groups, the algorithm sums up all event scores within each group. The more user activity within a group, the more prominently the group will be shown. This also means that the sorting may update throughout the course of a day if there are multiple popular events being run.
To further refine the experience for participants, the system also checks the browser locale and will display the results from this country first. The search field detects known locations and will sort results according to the geo-location of the event/ timer’s address. If you type Berlin, search results will be sorted according to their distance to Berlin.
Editing/Hiding Information on my.raceresult.com
Groups can easily be edited / updated, and it is advisable to keep banners and logos kept up-to-date if these do change over time, a group can be hidden from my.raceresult.com at any time by disabling the option to publish the event.
For the release of the platform, we took the liberty to upload some timer logos and to sort all existing groups to the new categories, if you feel there are greater problems then please contact support@raceresult.com.
Archives
The archives are linked to your RACE RESULT customer account and provide access to historical information, some of this information is also available through RACE RESULT 14 directly.
Timing Systems
The timing systems archives lists all systems which have ever been connected to RACE RESULT servers using your customer ID. Some basic information about the system is also shown.
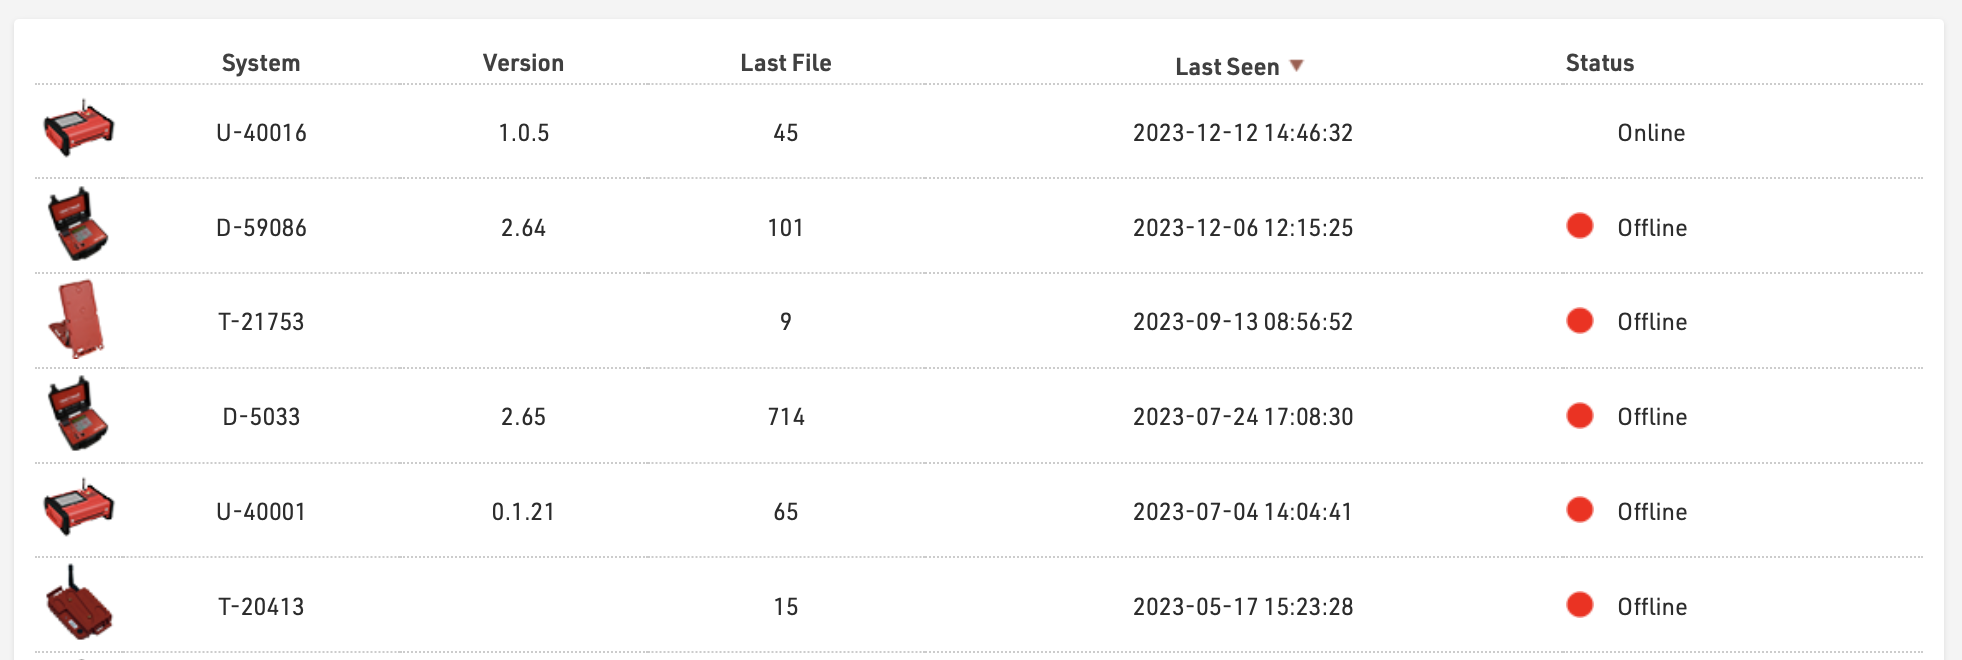
Clicking on a system will open a window which lists all the passings files which have been uploaded for that system, the map on the left side shows the GPS position of the system at the time the file was created.

Clicking on a file will download a txt file of that passings file which can then be imported manually through the RACE RESULT 14 Timing Tab if required. Clicking Last Position will zoom in to the last known position of the device (according to the device Status calls).
Email Archives
When sending Emails through RACE RESULT 14 online, either through the Email / SMS Module, Registration Forms or Raw Data Exporters then a basic copy of the email will be kept in the archives, along with the status of the email if returned from the mail server. Clicking on an item will open a preview with the full e-mail content.

SMS Archives
When sending SMS through RACE RESULT 14 online, either through the Email / SMS Module, Registration Forms or Raw Data Exporters then a basic copy of the SMS will be kept in the archives, along with the status of the SMS.

Dashboard
The Dashboard provides a quick overview of your event, in particular information about registration figures & payments.
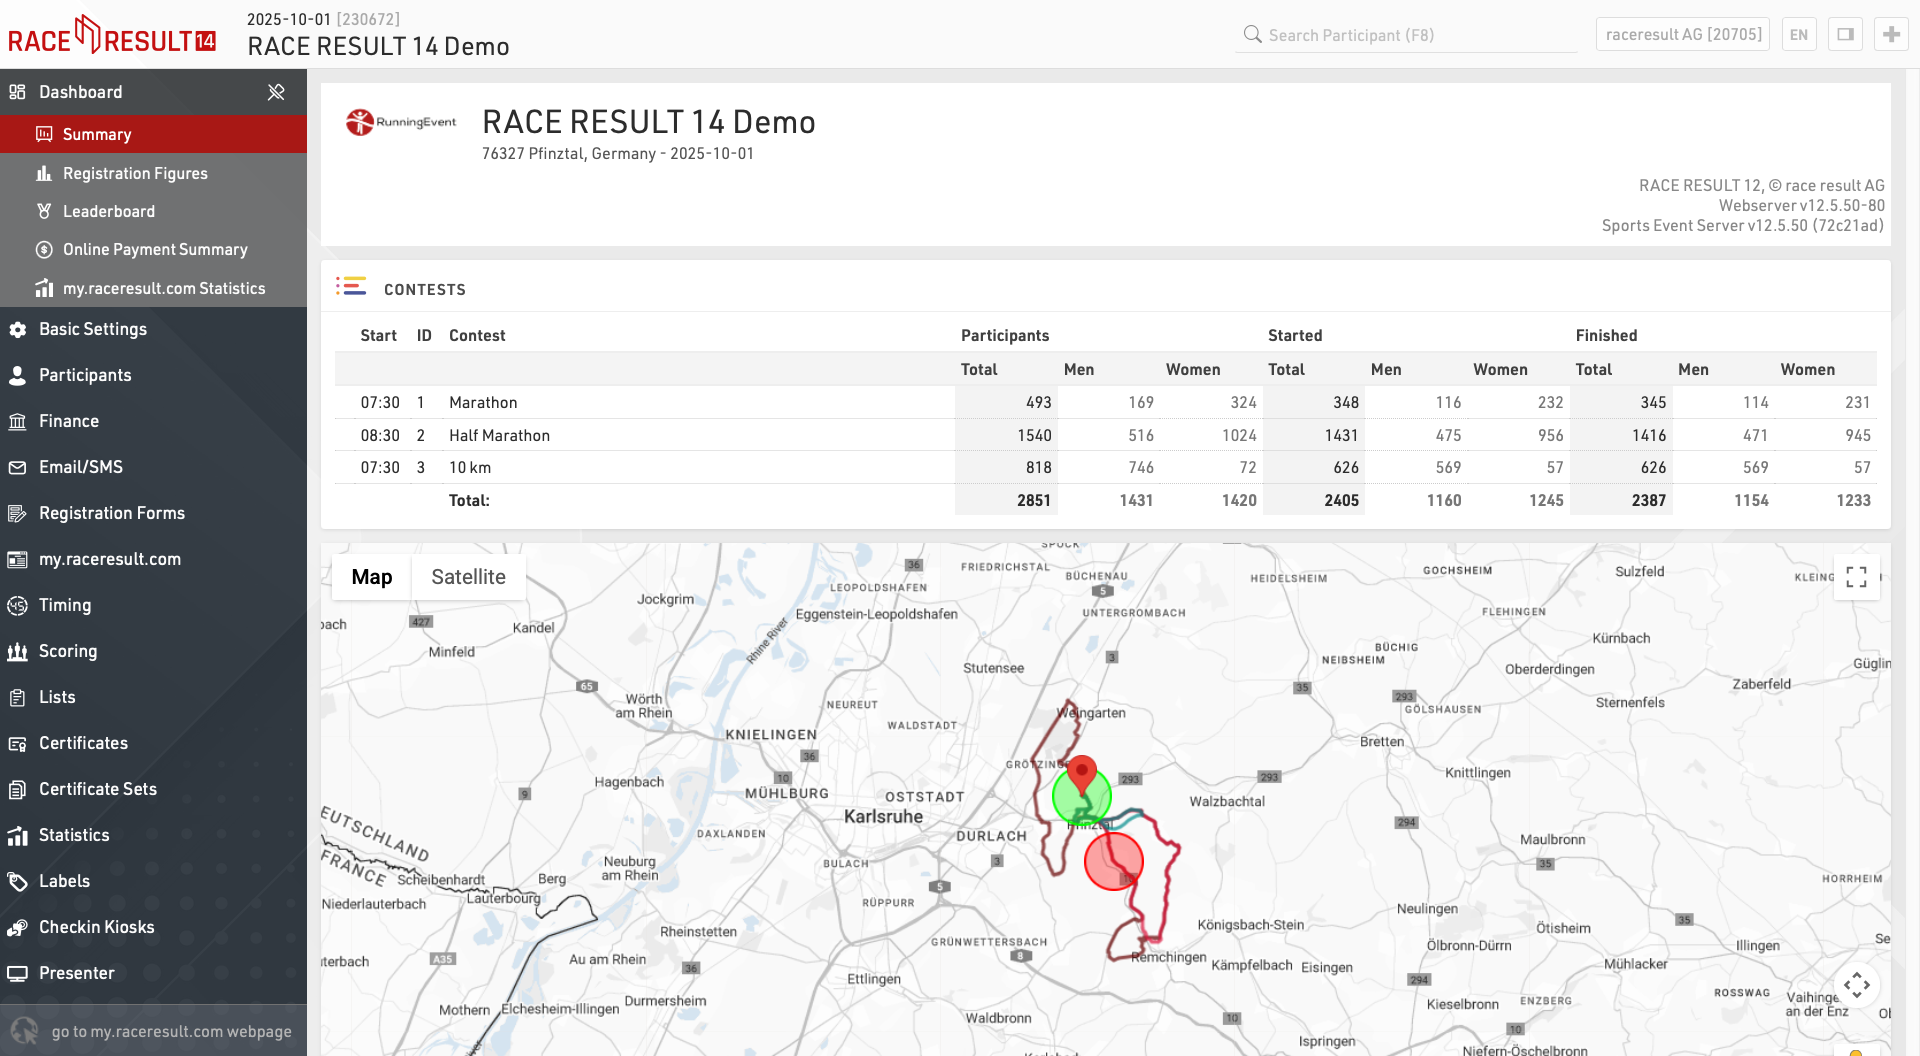
Summary
Contests
A quick summary of total participants in each Contest and how many are started/finished.
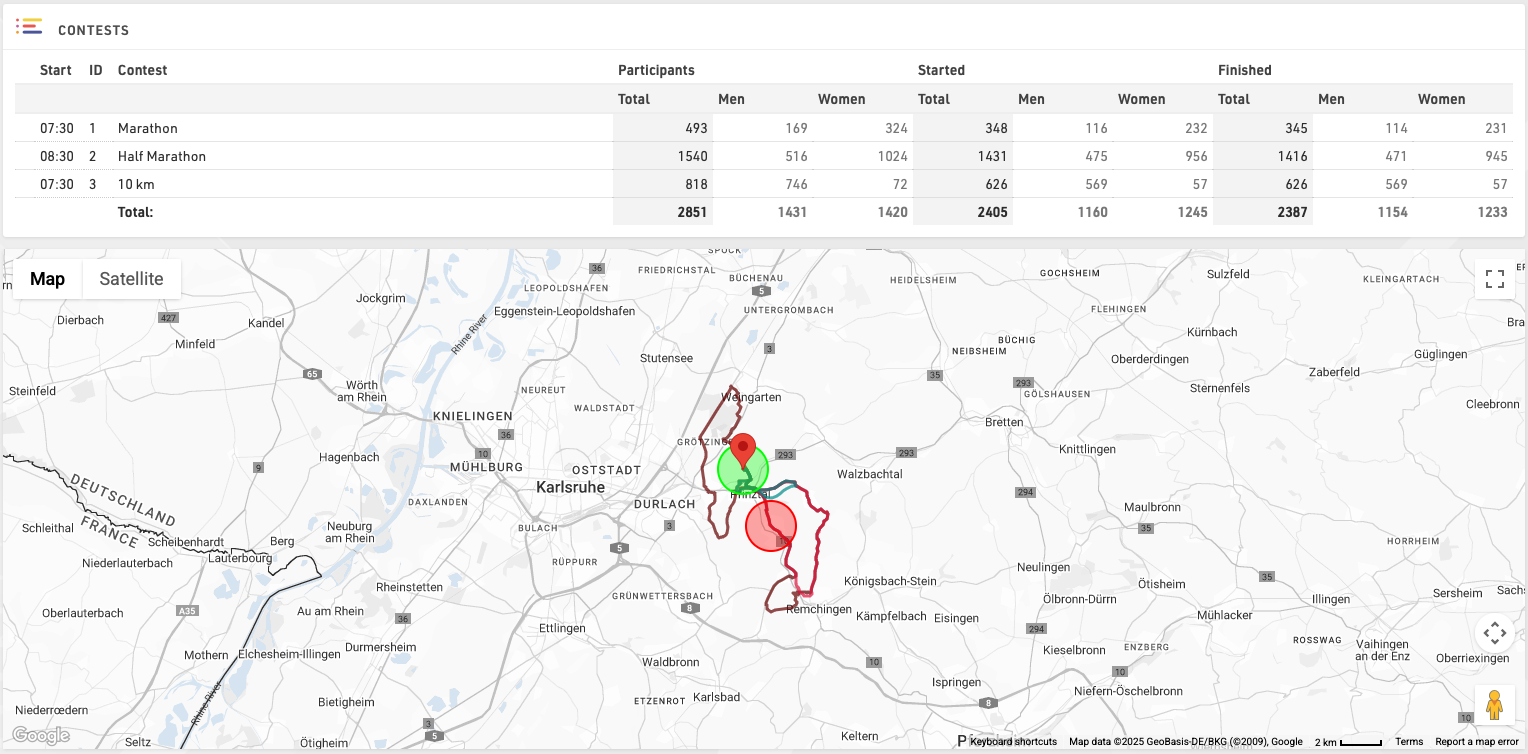
Click View Map to additionally see the GPX routes of each Contest on a map.
Overview
Technical overview of the event, in particular this will warn of any Circular References in your file which may cause errors with calculations.

Additionally you can download a copy of your event file.
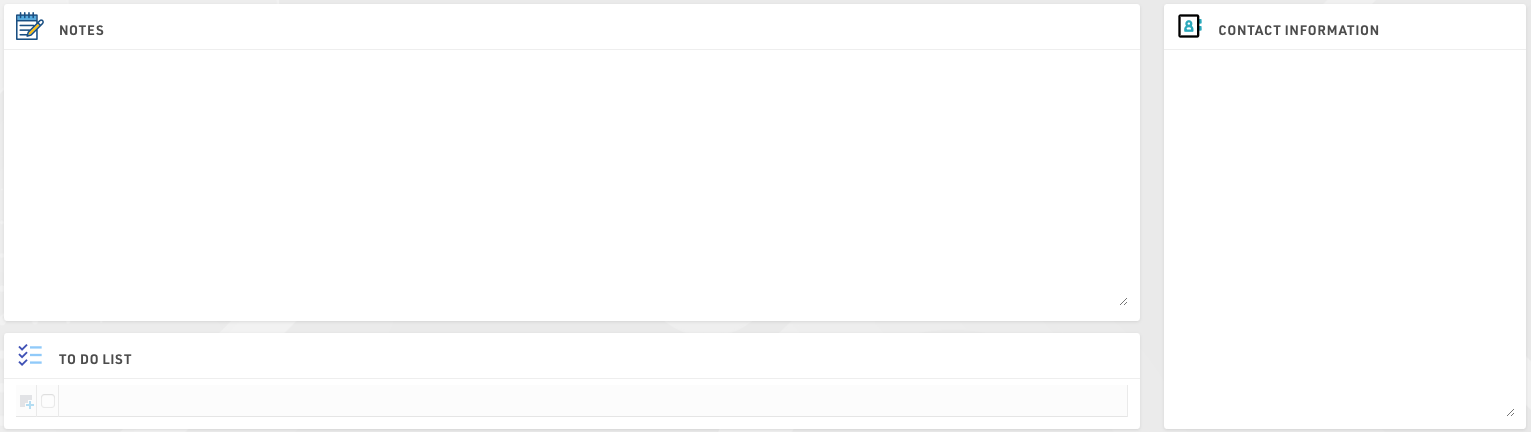
Notes / To Do List / Contact Information
Keep track of useful event specific information or create a list of tasks which need to be completed.
Registration Figures
The Registration Figures show information regarding the distribution of participants' registration before the Event Date.

The window consist of 2 sections: the Registration Chart, showing a graph with Cumulative, Day, Week and Month views, and the Registration Figures showing how many participants registered for each contest on which day, expressed as D-X where D is the event date and x is the number of days before this date.
It is also possible to Compare the registration figures with another event which is owned by the same account, useful to compare year-on-year registrations for the same event for example.
Leaderboard
The Leaderboard shows the winners or current leaders of the event. Through the settings at the bottom of the screen, you can select a Ranking and a number x so that the first x participants in each group of the ranking will be shown.

If you would like to show different columns (or use a different format), you can also select a List from which the column settings will be taken.
Enable the Auto Update checkbox to auto refresh the page every 30 seconds.
Online Payment Summary
The summary shows all transactions received through the Online Payment and a summary of the monthly payouts.
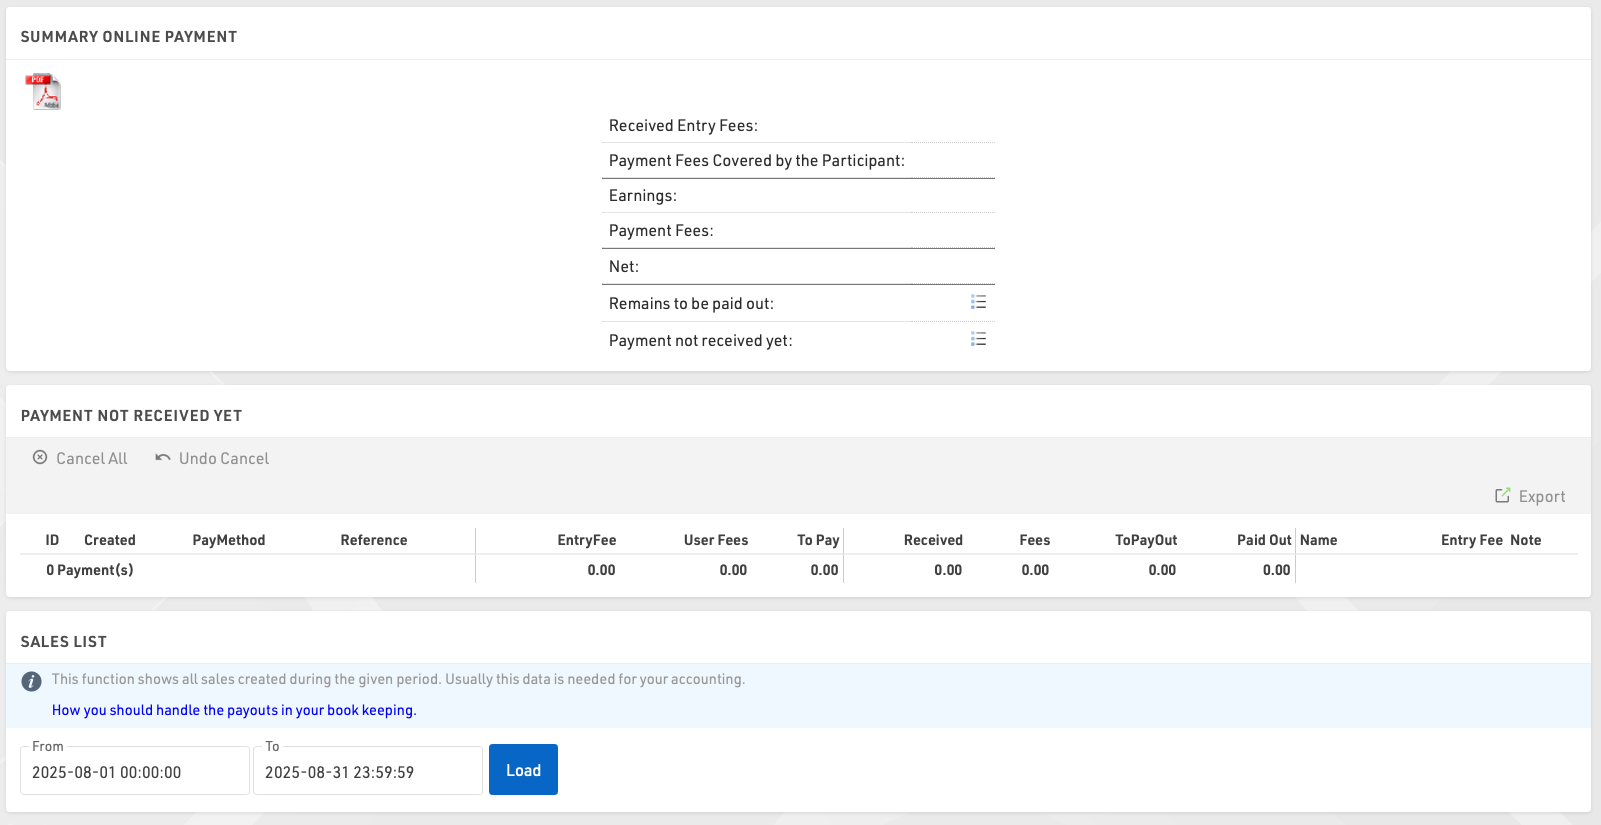
In the Online Payment Overview you can also cancel payments for deferred payments if necessary.
The Sales List allows you to generate a list of payments received in a specific time frame, usually required for accounting purposes.
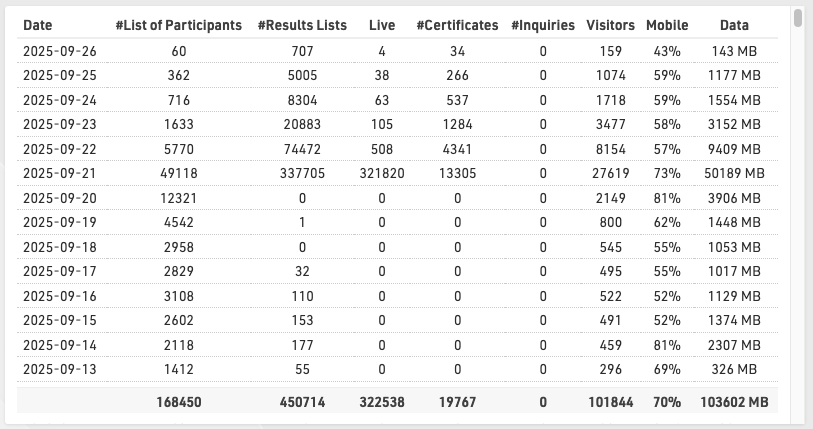
my.raceresult.com Statistics
The my.raceresult.com Statistics show daily statistics of how many lists and race certificates have been loaded. After the date of the event statistics may be grouped by month where the figures are less relevant.
Basic Settings
The Basic Settings define core settings of your event file.
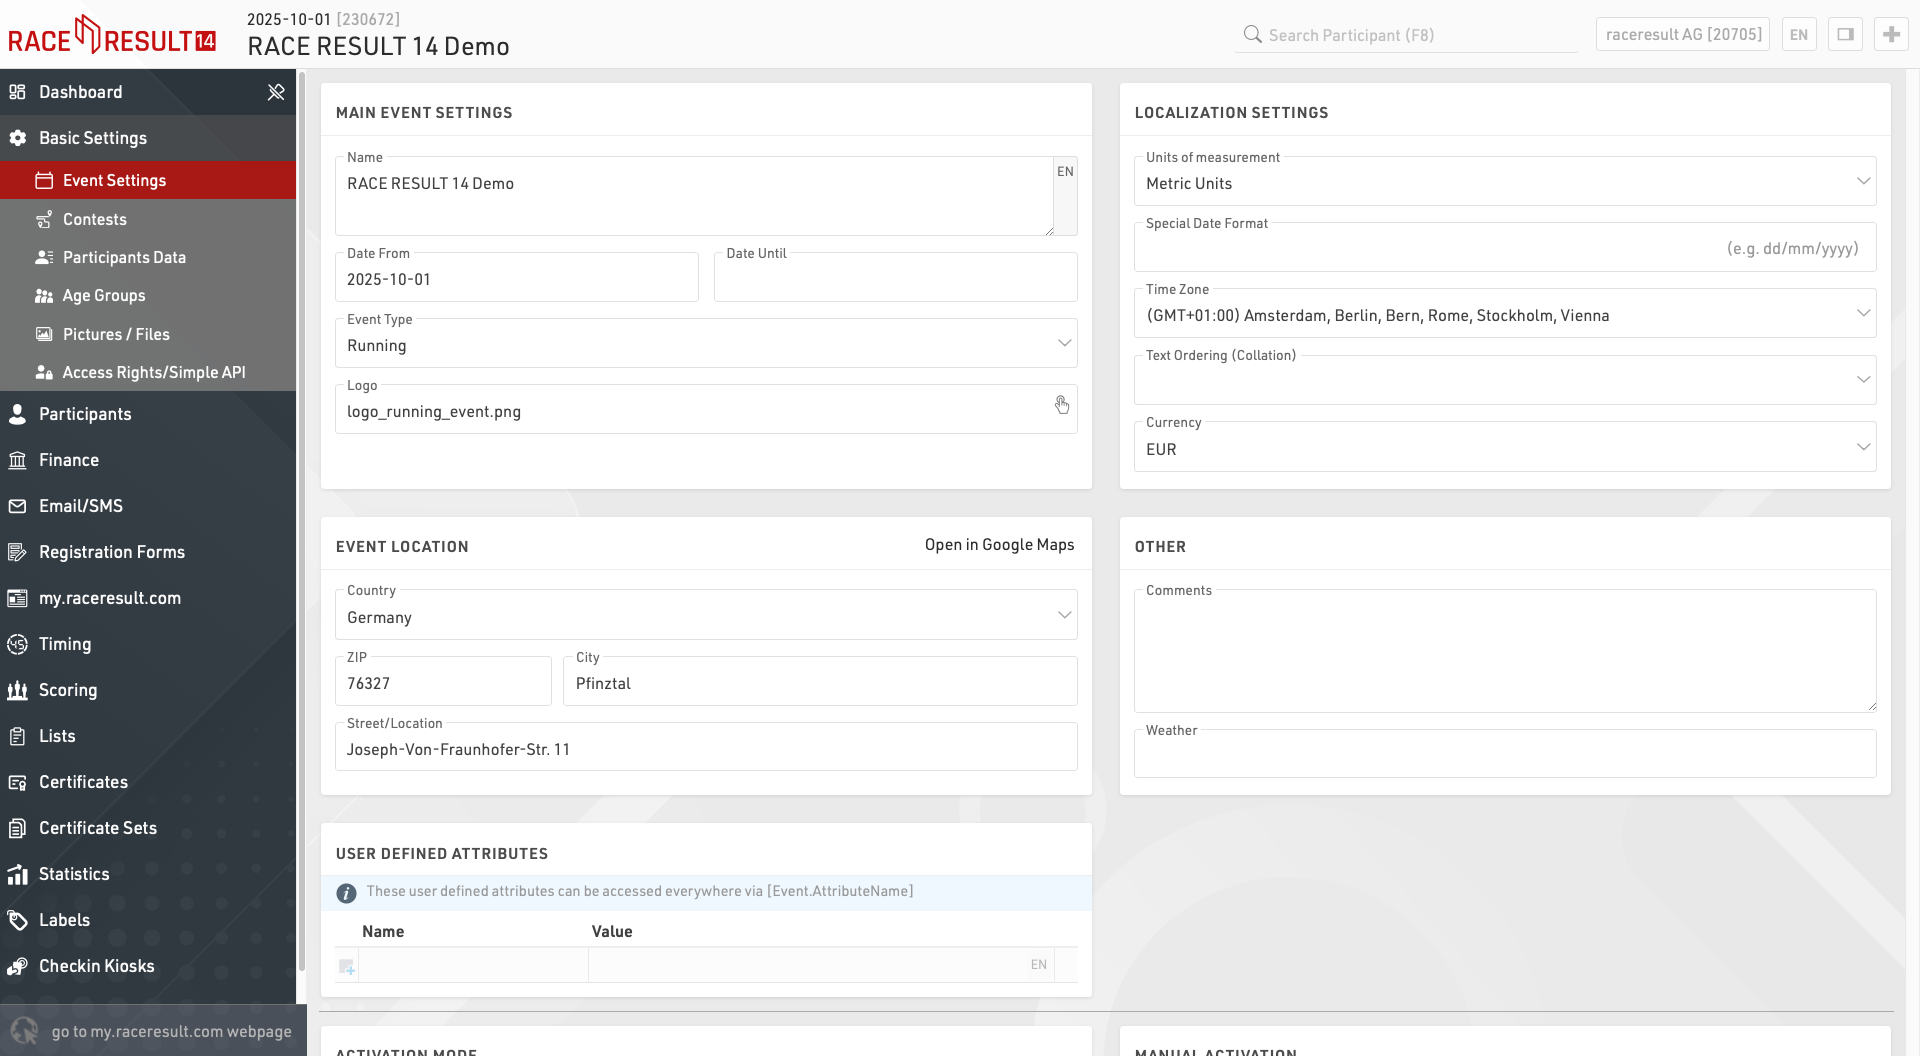
Event Settings
Main Event Settings
These are the most basic settings of an event including the Event Name and Date, the type and logo (150x150px) are used for the event listing on the my.raceresult.com platform.
Localization Settings
The localization settings are used to set specific values for the event.
Units of measurement determine whether the default values should be shown / calculated in metric or imperial units, this is used by for example the Splits setup and default functions for speed and pace (which return Km/h and Min/Km or Mph and Min/Mile accordingly).
The special date format allows you to enter and display dates according to your local standard or a required format.
Time zone is used for calculating the current time for the event, this is used when setting a date / time for which elements of the online platform (such as registration) should be available. This is also used to convert the UTC times from Track Boxes to the correct local time.
The Text Ordering (Collation) allows you to define the mode of alphabetic ordering as different languages sort special characters in different ways.
The currency which should be used to calculate entry fees and to capture payment through the registration module.
Event Location
The location is used by the my.raceresult.com platform to help users find events, it also sets the centre point of maps for elements within the software.
Other
Enter comments or weather information about the event, these can be later referenced in output lists for headers and footers so could be to note important changes to the event which may occur.
User Defined Attributes
Attributes allow you to define custom fields for the Event which can be used anywhere using [Event.AttributeName].
Contests
Contests are used to define groups of participants, for example in a running event with a Marathon and Half-Marathon, each distance would be a unique Contest. Every participant in your event should be assigned to a Contest.
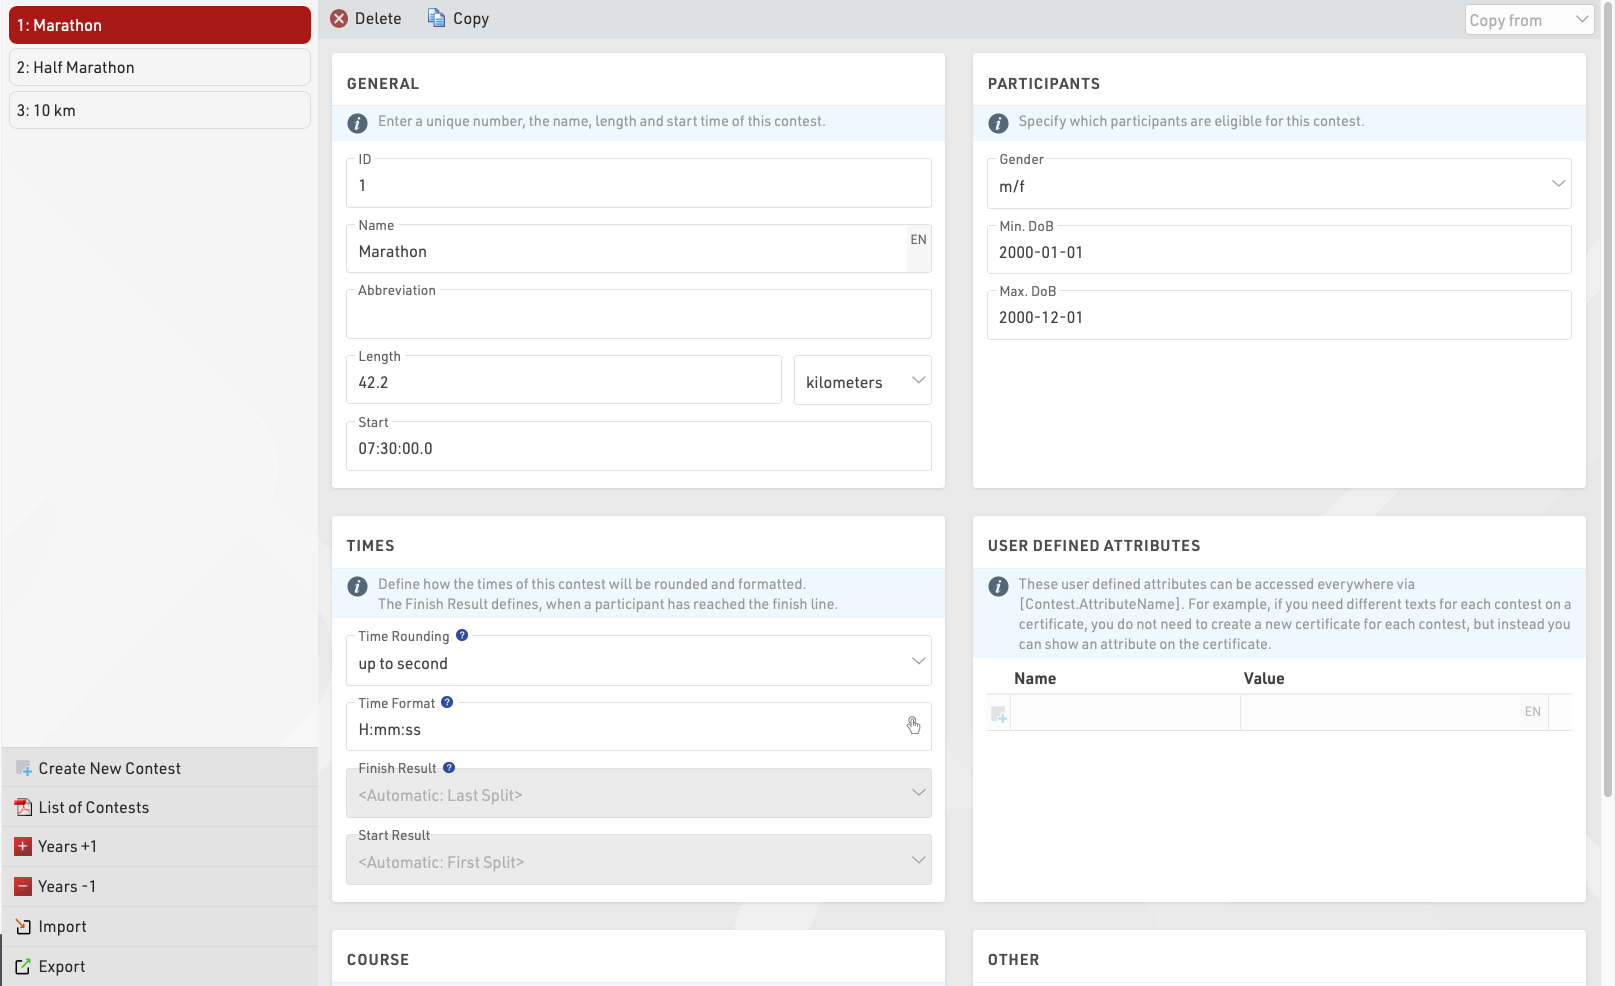
The setup of a contest has several effects:
- Participants of different contests are usually ranked separately (i.e. there is a first place for the 5k and a first place for the 10k).
- Define per contest how the times are rounded and formatted.
- Define different Age Groups and Entry Fees per contest.
The individual settings are explained in the following:
General
Simply enter the name, distance/length and start time of the contest and assign a unique number (ID).
Participants
Define which participants are eligible for the contest. This has the following effects:
- Non-eligible participants will not be accepted in the online registration and on-site registration.
- When entering a non-eligible participant in the Participants Window, a warning message will show.
- The Data Analysis will show non-eligible participants.
Times
These settings define how the times of the participants of this contest will be rounded and formatted by default. Note that the Time Format settings in General Result Settings will take priority if set.
Additionally, select the Finish Result. The Finish Result will be highly relevant for Scoring, the selection of the Finish Result has two effects:
- The fields Time and DecimalTime refer to the formatted/decimal time in the respective result. For example, Time can refer to the field Time2 for participants in one contest while it refers to Time5 for participants in another contest.
- The field Finished is true for every participant if there is a time entered into the corresponding finish result, and the participant is counted as finished in the Overview Window.
By default, Finished is used as a filter for the rankings and DecimalTime for the sorting of the rankings. In other words, the Finish Result is used for the most important scorings. When using Splits, the Finish Result can automatically use the Last Split, this will be used as either Gun Time or Chip time according to the Time Mode selected in the Splits setup for that contest.
Similarly, you can select the Start Result, if you have a timing line at the start, select to either automatically use the first Split or the result that contains the start time. The field Started will be true if the participant has a time in the start result and the participant will be counted as started in the Overview Window.
User-Defined Attributes
Attributes allow you to define custom fields for each Contest and allow you to show different texts for each Contest, you can use the Attributes anywhere using [Contest.AttributeName].
You can define attributes with the same name for different Contests and then call this field in the relevant output / certificate.
Course
Upload a GPX file with the course or draw the course on the map by clicking the Create Route button. The courses will be shown on all maps in RACE RESULT 14 which is helpful for example to validate that the timing systems are set up at the right spot.
Other
Each Contest can be assigned a specific color identifier. This color can be called on lists for dynamic formatting using Contest.Color or applied to customize my.raceresult.com result list boxes and favorites lists.
When the Start Transponder is being detected, this is usually a marker from your timing system which is recorded as a transponder code such as 99999, the time will be saved as Start Time (T0).
Set the contest to inactive to hide it in the Overview Window. Use this function for example if one contest does not take place this year, but at next year's race again.
Participants Data
One of the most important aspects of managing an event is the handling of participant data, this includes a range of default fields and functions but also allows you to store or calculate your own custom fields and functions. To simplify the work flow you can enable / disable certain default fields and also control how these fields behave when editing through the Participants Window.
Default Fields
Define some general settings for data handling in the Participants Window. Activate or deactivate standard fields and define if these are mandatory or not. If mandatory fields are not filled in the Participants Window, they are highlighted with a red bar and a warning will show when trying to save. Note that for the Online Registration mandatory fields can be defined separately.
Input Assistance / Settings
Control how data should be handled when entering/editing participants directly in the Participants window. When Age Group changeable is enabled then the Age Group can be manually changed, which can be useful if working with overlapping Age Groups - but note that this will be overridden if the Age Groups are recalculated at a later time. You can also disable Agender if that shouldn't be used throughout the event file.
User Defined Boxes in Results Tab
It is possible to set an output list to show at the top a participant window. This can be useful for events with a large number of results that are difficult to scroll through or show additional data not shown in the main participant window. 
Age Groups
An Age Group (short AG) is a group of athletes with roughly the same age. Usually, events have an age group score where the athletes of each group will be ranked independently from the athletes of other groups. Age Group definitions often vary according to the type of sport and also your local governing body regulations.
When creating a new Event File, default age groups will be set up automatically which can be changed freely according to your needs.
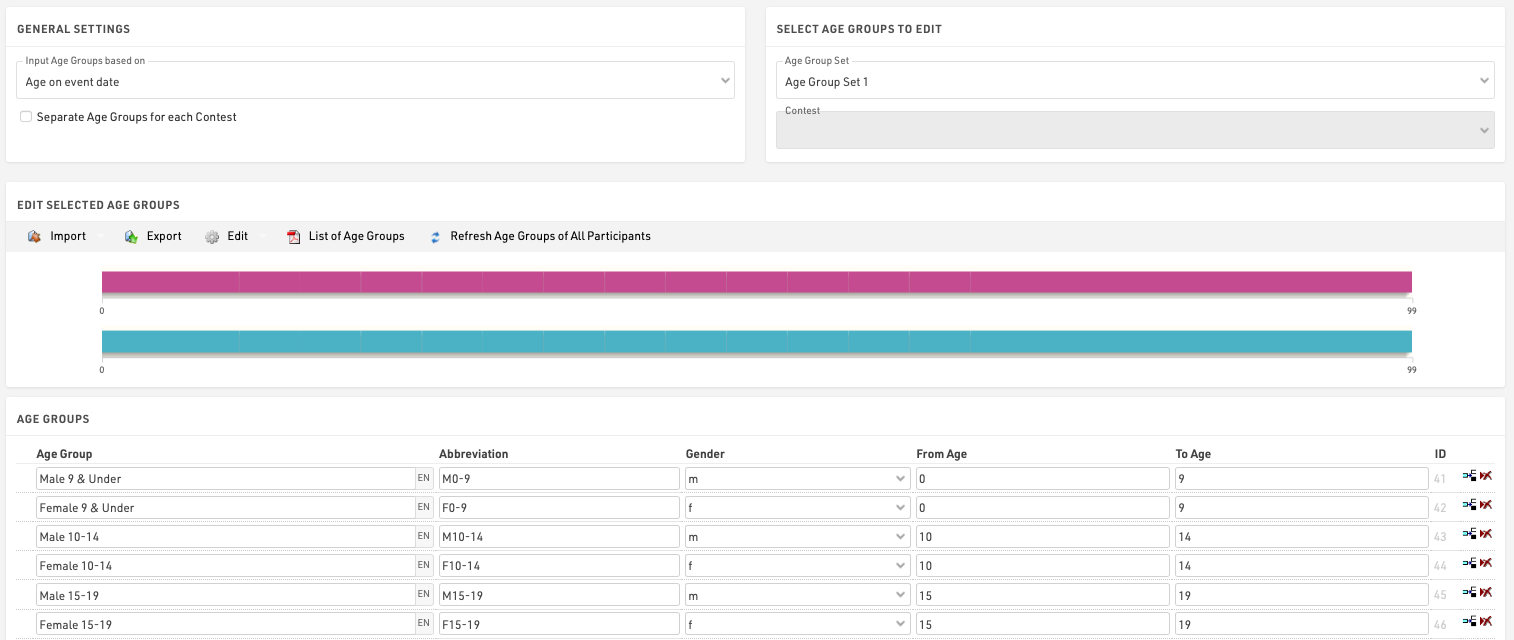
General/ Import of Age Groups
Via the Import button you have the opportunity to import age groups from different sources. For example, you can load standard age groups or import age groups from a file which you created via Export.
Should you have made a copy of the previous year's event file, you can adjust the age groups with the functions Edit->Years +1 and Years -1.
If you need different age groups for different contests, activate the option Separate Age Groups for Each Contest under General Settings. Either enter different age groups for each contest or import them with the function Import->From Contest from another contest and then make necessary changes.
Second/Third Age Group Set
Maybe it is necessary to set up two or three different age group sets so that each participant is assigned two or three age groups. The second age group can be used for an additional score like a team score where for example the age groups M40, M45 and M50 are combined in the age group Masters.
Input Age Groups Based On
You will need to define on which criteria you will enter and with which age groups are set, this will usually depend on the type of event you are timing. Under Input Age Groups Based On you can select:
Date of birth - Age groups are set by a defined date range rather than age ranges.
Age on event date - Participants' age on the day of the event set in the event Basic Settings.
Age on 12/31 (Previous Year) - Age on 31st December of the previous year.
Age on 12/31 (current year) - Age on 31st December of the current year.
Age on arbitrary date - Age on a specific date, to be defined below.
Updating Age Groups
In the Participants Window, the age group will be assigned automatically, based on gender and date of birth. However, you can manually change the age group if needed. That is why age groups will not be updated automatically, when changing the age group settings.
To update the assigned age groups after changing the age group settings, click on Refresh Age Groups of All Participants.
Useful Hints
Accessing Age Groups
On lists and certificates you can access the name of the age group selected for the participants via the fields [AgeGroup.Name] / [AgeGroup1.Name] (and [AgeGroup2.Name], [AgeGroup3.Name]).
Sorting of Age Groups
Often the age groups are to be handed out in a certain order, for example because an age group is first in the award ceremony. Therefore you can change the order of the age groups by moving the arrow icon on the left to the desired position. The order of the age groups influences the fields [AgeGroup1.OrderPos] ([AgeGroup2.OrderPos], [AgeGroup3.OrderPos]) which create ascending numbers according to the entry order in the age group settings. These fields can be used for sorting on lists. The default list Result List AG also uses this procedure.
Age Group Abbreviation
Aside from the name for the age group you can also enter an abbreviation. If not much space is left on a list, you can access it via the field [AgeGroup.NameShort] / [AgeGroup1.NameShort] ([AgeGroup2.NameShort], [AgeGroup3.NameShort]).
Age Group ID
Each age group has a unique ID which does not change if the name of the age group is changed. It can be accessed via the field [AgeGroup.ID] / [AgeGroup1.ID] ([AgeGroup2.ID], [AgeGroup3.ID]).
The age group ID is well suited for the grouping at the calculation of rankings as age groups are distinguished even if they have the same name. If you set up two groups named Kids (for boys and girls separately) and group the ranking by AgeGroup.Name, boys and girls would be ranked together. However, if you use AgeGroup / AgeGroup.ID instead, the two age groups will be ranked separately.
Pictures / Files
Images and other files can be imported into your event file for use in other parts of the software, most commonly for the my.raceresult.com header.
Files can be imported under Basic Settings ⇒ Pictures / Files

Files which are not stored in any folder will be saved directly to the event file and will be downloaded if the event file is checked out.
Files stored inside the my folder will be available across all event files under your account when working online.
Files stored inside the common folder are stored online and can be accessed by any RACE RESULT user, inside here exists some alternative flags which use the Country / Nation Alpha-2 abbreviation for the file name.
To access files stored inside folders the image name works as a standard file storage system, for example an image named "header.png" stored inside the common folder would use the image name "common\header.png".
See our How To guide on how to use your images and files in different parts of the software.
Access Rights / Simple API
Participants
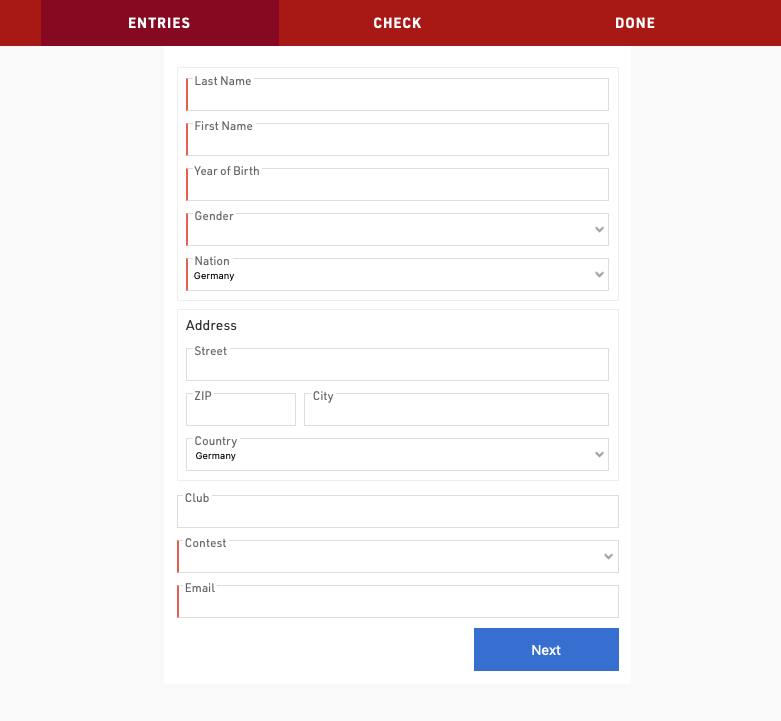
The Participants Window is used to manage all participant data within the event file.
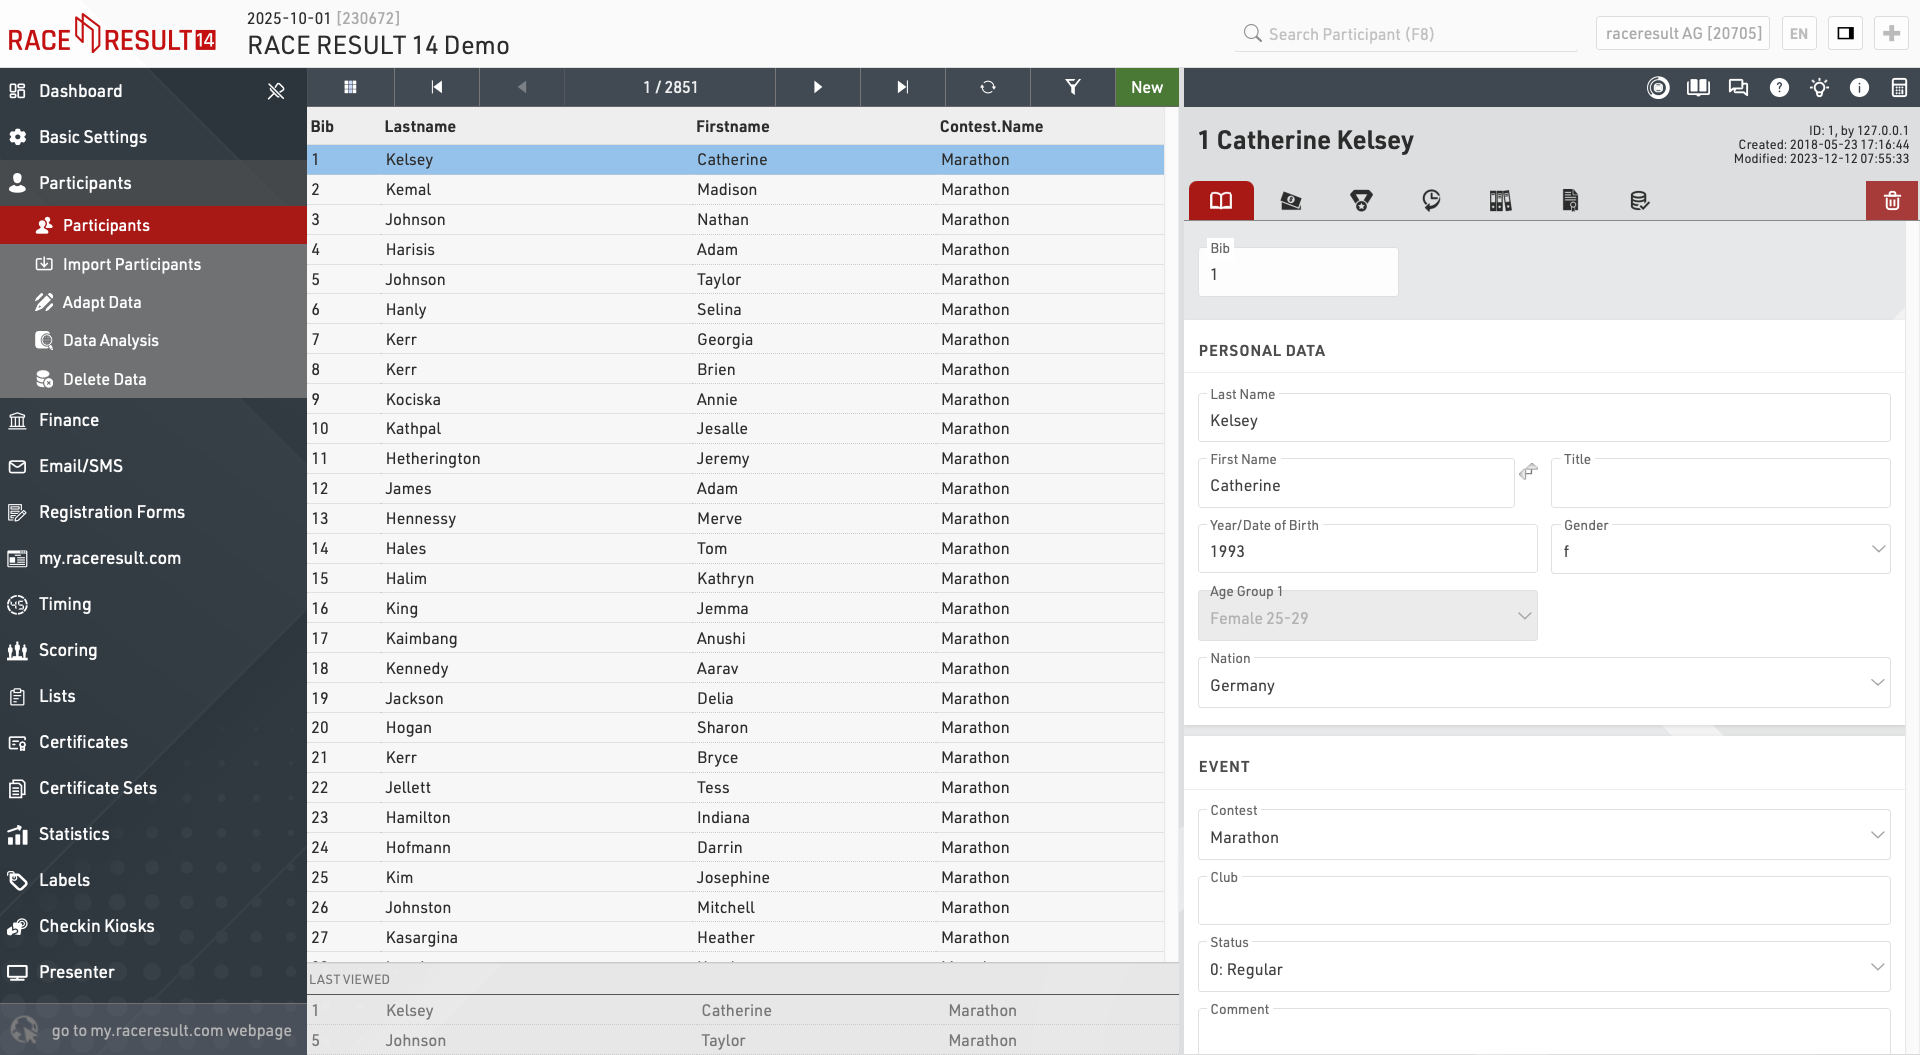
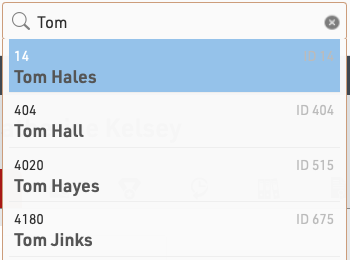
The participants window can also be accessed by using the search bar in the main navigation bar, selecting a name from the search will automatically open that participant in the main view.
View Participants
When opening the participants view a table of all participants will be shown, if you have previously opened the participant view for an individual participant then your last viewed participants will be shown below for quick access.
Clicking on a participant record from this table will open the Participant View for that participant to the right side of the table. The arrows in the top bar can be used to scroll through the participants one by one according to the current sorting of the main table view. Clicking New will immediately create a new blank participant record which will be opened in the participant view.
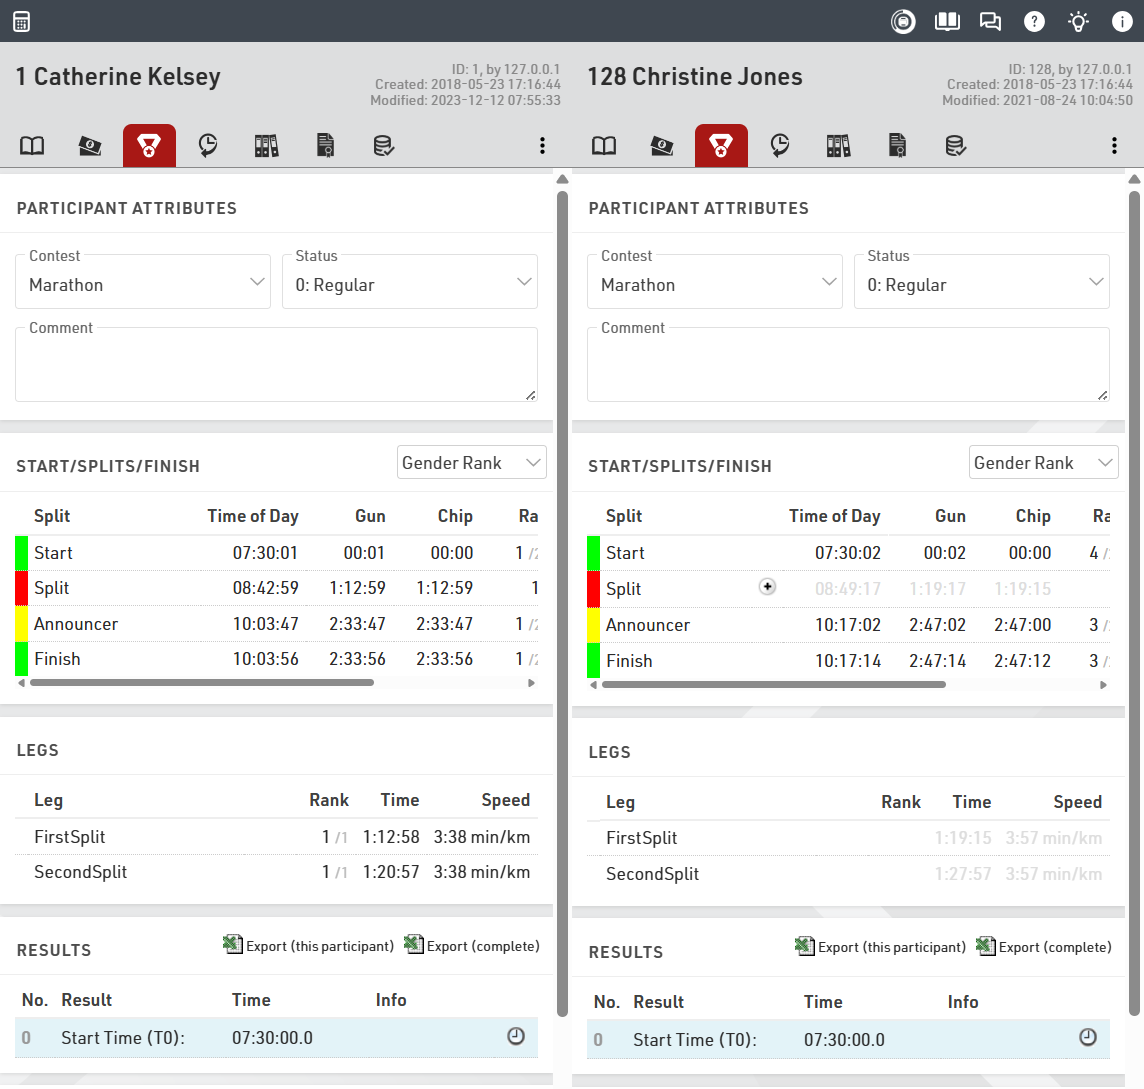
To view two participants side by side click on the first participant you want to display, and then click on the second participant while holding CTRL. You can navigate each participant view individually to compare data and times.
Note that the list of participants will be cached by the browser so when importing new participants or editing large batches of data you may need to reload the data using the reload icon in the top bar.
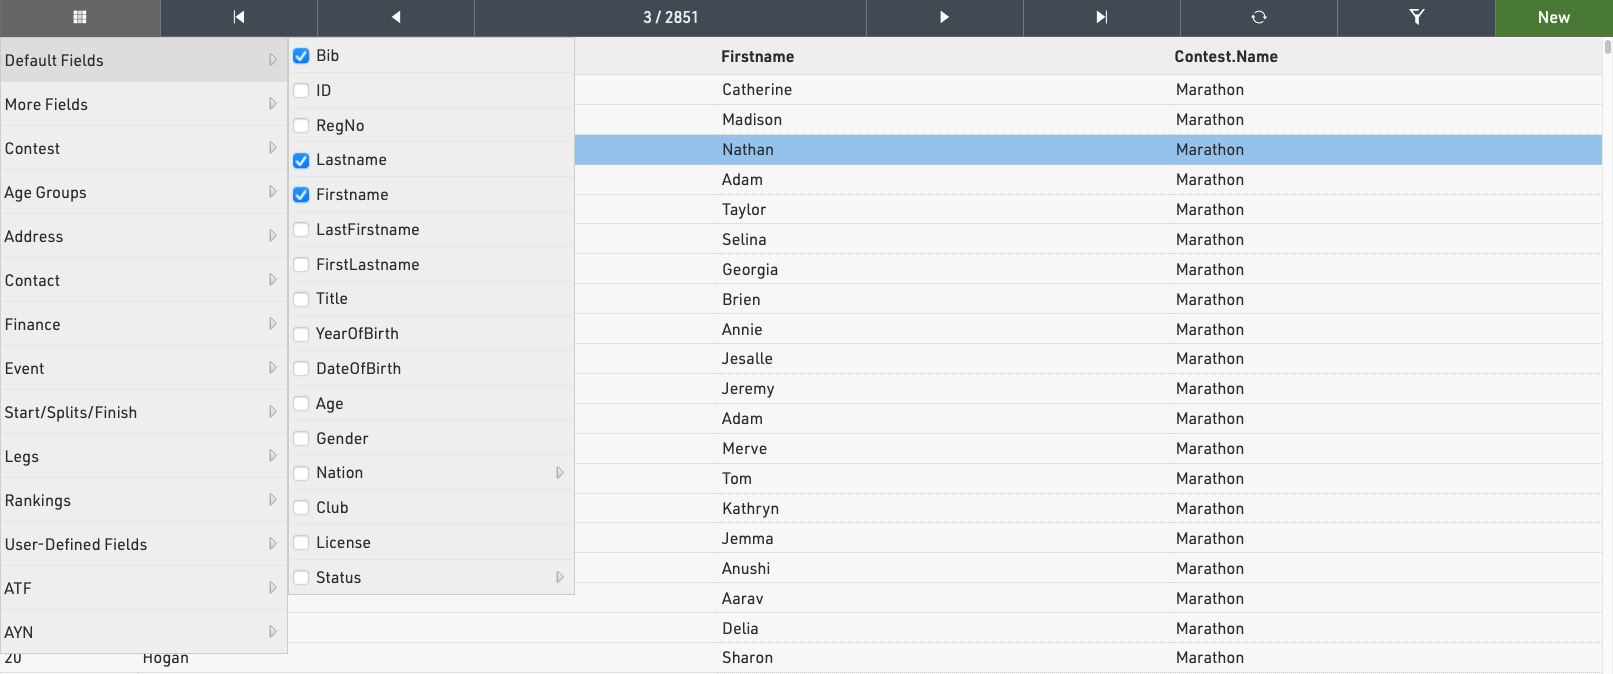
Add or remove columns to the table by clicking the grid icon in the top bar.
Sorting / Searching & Filtering
By clicking on the head of a column you can sort the table by this column. Press the same column head a second time to sort in descending order.
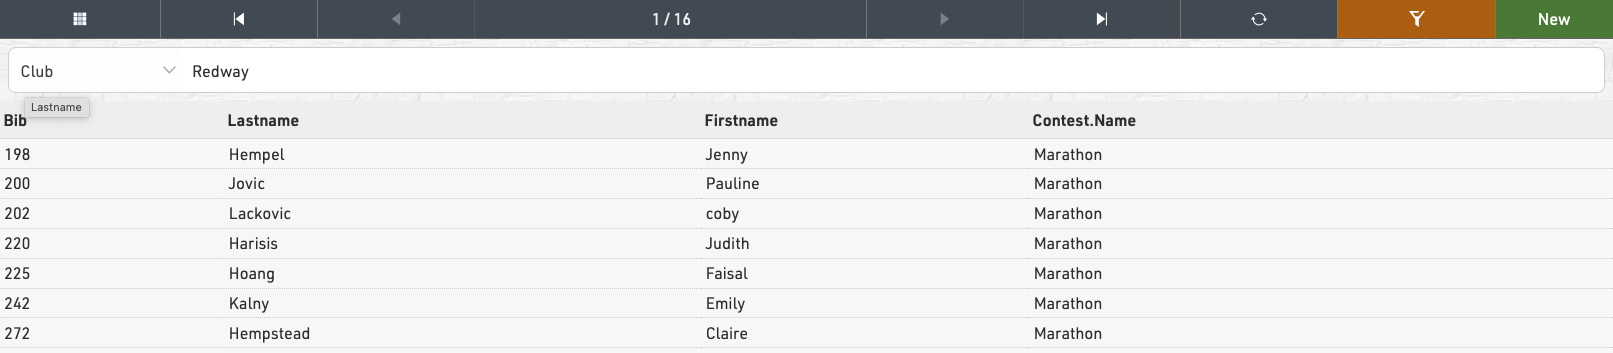
To filter the table click the filter icon in the top bar and select how you wish to filter participants, either using one of the standard fields or using any filter expression. When a filter is applied the filter button will be highlighted orange.
Import Participants
To import participants from an external source, you can import an Excel/CSV file in Participants⇒Import Participants. This tool allows you to upload Excel or CSV files and map the data directly to your event fields. To start the import select a file with the data to import on the first worksheet of the workbook. After selecting the file to import, you’ll be able to preview the data and map fields from the file to your participant database.
Best Practices:
- Include column headers in the first row. These determine which Field in the event file each column will populate. You can adjust these mappings in the preview screen. If column headers are not in the upload data, then each column will have to be mapped individually.
- An example Excel template with default fields is linked directly in the import screen. You can use this as a starting point for simple uploads.
- It is important to only import Age or DateOfBirth or YearOfBirth. If you import more than one of these fields they will conflict with each other and your data will be incorrect. More information on these fields can be found in our article YearOfBirth and DateOfBirth.
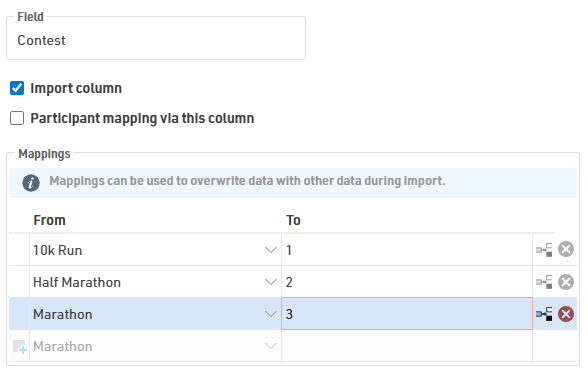
Mapping Fields

The first row from the import file with the column headers will appear at the top of the import preview. Fields that are not mapped to a current database field will display  . There are 3 options for handling these fields:
- Import as a new field: Leave the mapping blank to create a new additional field that will appear in the participant data.
- Do not import column: Uncheck the Import Column checkbox to ignore this data
- Map to an existing field: Edit the Field box and select the database field you want to match. A tooltip is available with a list of current fields.
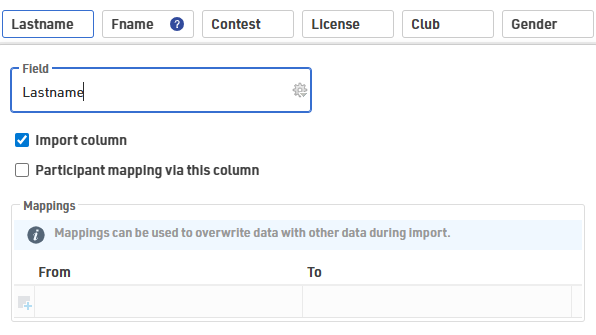
Additionally, the Mappings box allows for data manipulation prior to importing the data into the race file. This is particularly useful if your registration system’s export format doesn't perfectly match your event file's structure.
Import Modes
There are three import modes, the default mode is Only add new participants. You can change the mode in the lower-left corner of the import preview.
The setting Participants Mapping Via this column defines which record in the event file and which record in the import file correspond to each other. Usually, records are mapped by Bib, but you can also use other columns such as a participant/registration ID or First Name and Last Name combination. Mapping columns are indicated by  in the import preview.
| Mode | Description | Mapping |
| Only add new | Creates new records only. If a bib number in the file matches one already in the event, that row is skipped. | Optional |
| Update existing | Updates all records in the event file based on the selected mapping key. | Required |
| Add and update | Updates existing participants that match the selected mapping key and creates new records for all other rows in the import file. | Required |
When adding new participants, if the import file does not contain a bib number, a new bib number according to the Bib Number Settings will be assigned.However, if the import file contains the column Bib and a number is entered, this bib will be used. This means that the record will not be imported if the bib number already exists in the event file.
Additional considerations
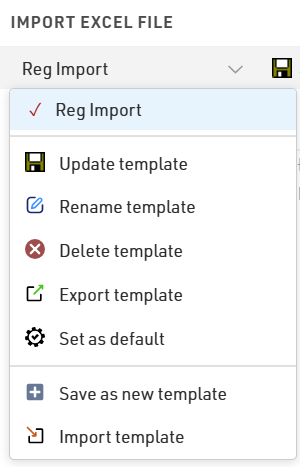
If you frequently import data in the same format, you can save your field mappings and import settings as an import template for faster future imports. Templates can be exported for use in other events or set as the default template so it will load automatically every time you preview an import.
Adapt Data
Participants ⇒ Adapt Data offers numerous functions to change data of several participants at the same time.
Data Analysis
Participants ⇒ Data Analysis offers three functions:
Delete Data
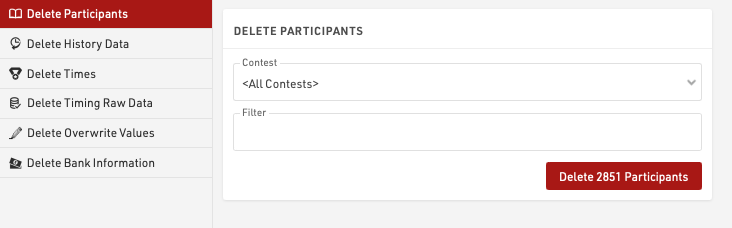
Delete data provides methods to delete large batches of data, individual participants or times can be deleted in the Participants Window.
First, select what data you would like to delete:
- Participants
- History Data
- Times (Special Results)
- Raw Timing Data
- Overwrite Values (Special Results)
- Bank Information
Then select the details (like contest), enter a filter if needed and select the Delete button.
The number of records that will be affected by the delete action will be shown. When dealing with large datasets it is recommended to create a backup first.
History
The Participant History log allows you to track, filter, and manage all modifications made to participant data. From this view, you can audit specific changes, export data for reporting, or roll back unauthorized edits.
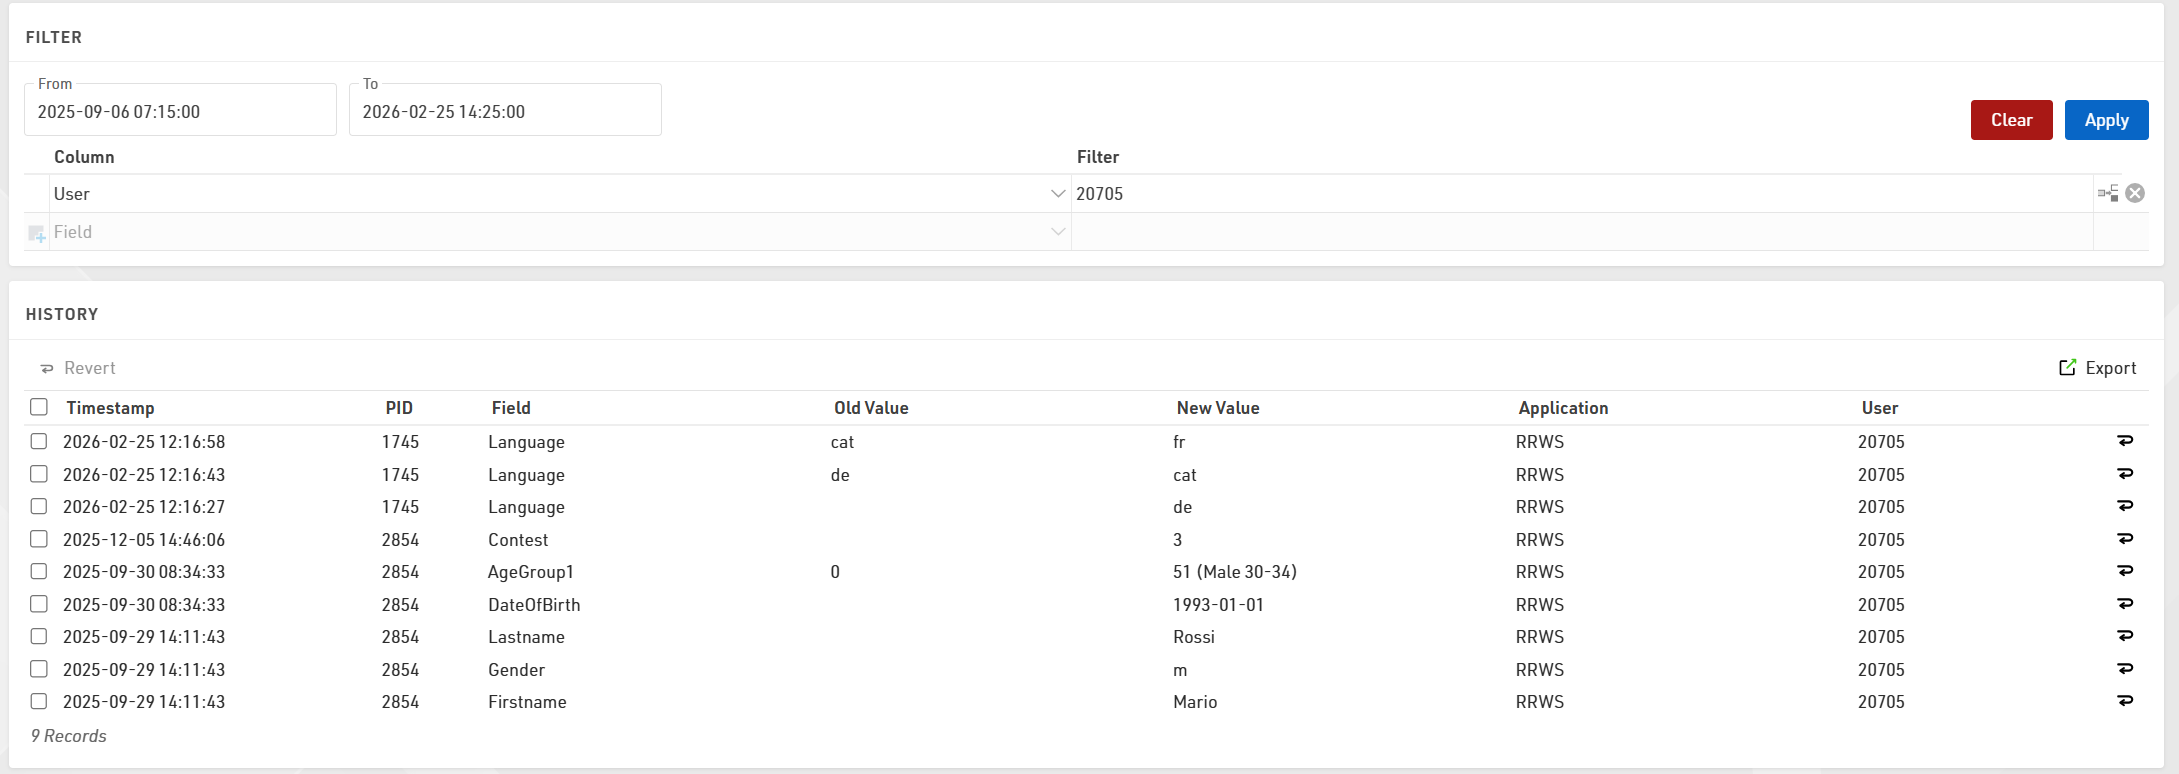
Filtering and Sorting
To locate specific records, you can sort the list by any column or apply filters using the following criteria:
- Date Range: Set From and To dates down to the minute to view changes within a specific timeframe.
- Target Data: Filter by specific Bib (PID), Field, or the exact text of the Old Value or New Value.
- Application: Filter by how the data was modified (e.g., Online, Import, or Change Form).
- User: Filter by the specific User-id that performed the update.
- Expressions: Use custom expressions for advanced data filtering.
Reverting Changes
If data was entered incorrectly, you can restore previous values directly from the history log. To undo a single change, click the Revert symbol  at the end of the specific row. To make a bulk edit, select the checkboxes for multiple rows and click the Revert button located at the top of the list.
Exporting Data
To save a copy of the history for external use, click the Export button to generate a CSV file of the currently filtered or selected view.
Finance
Entry Fees
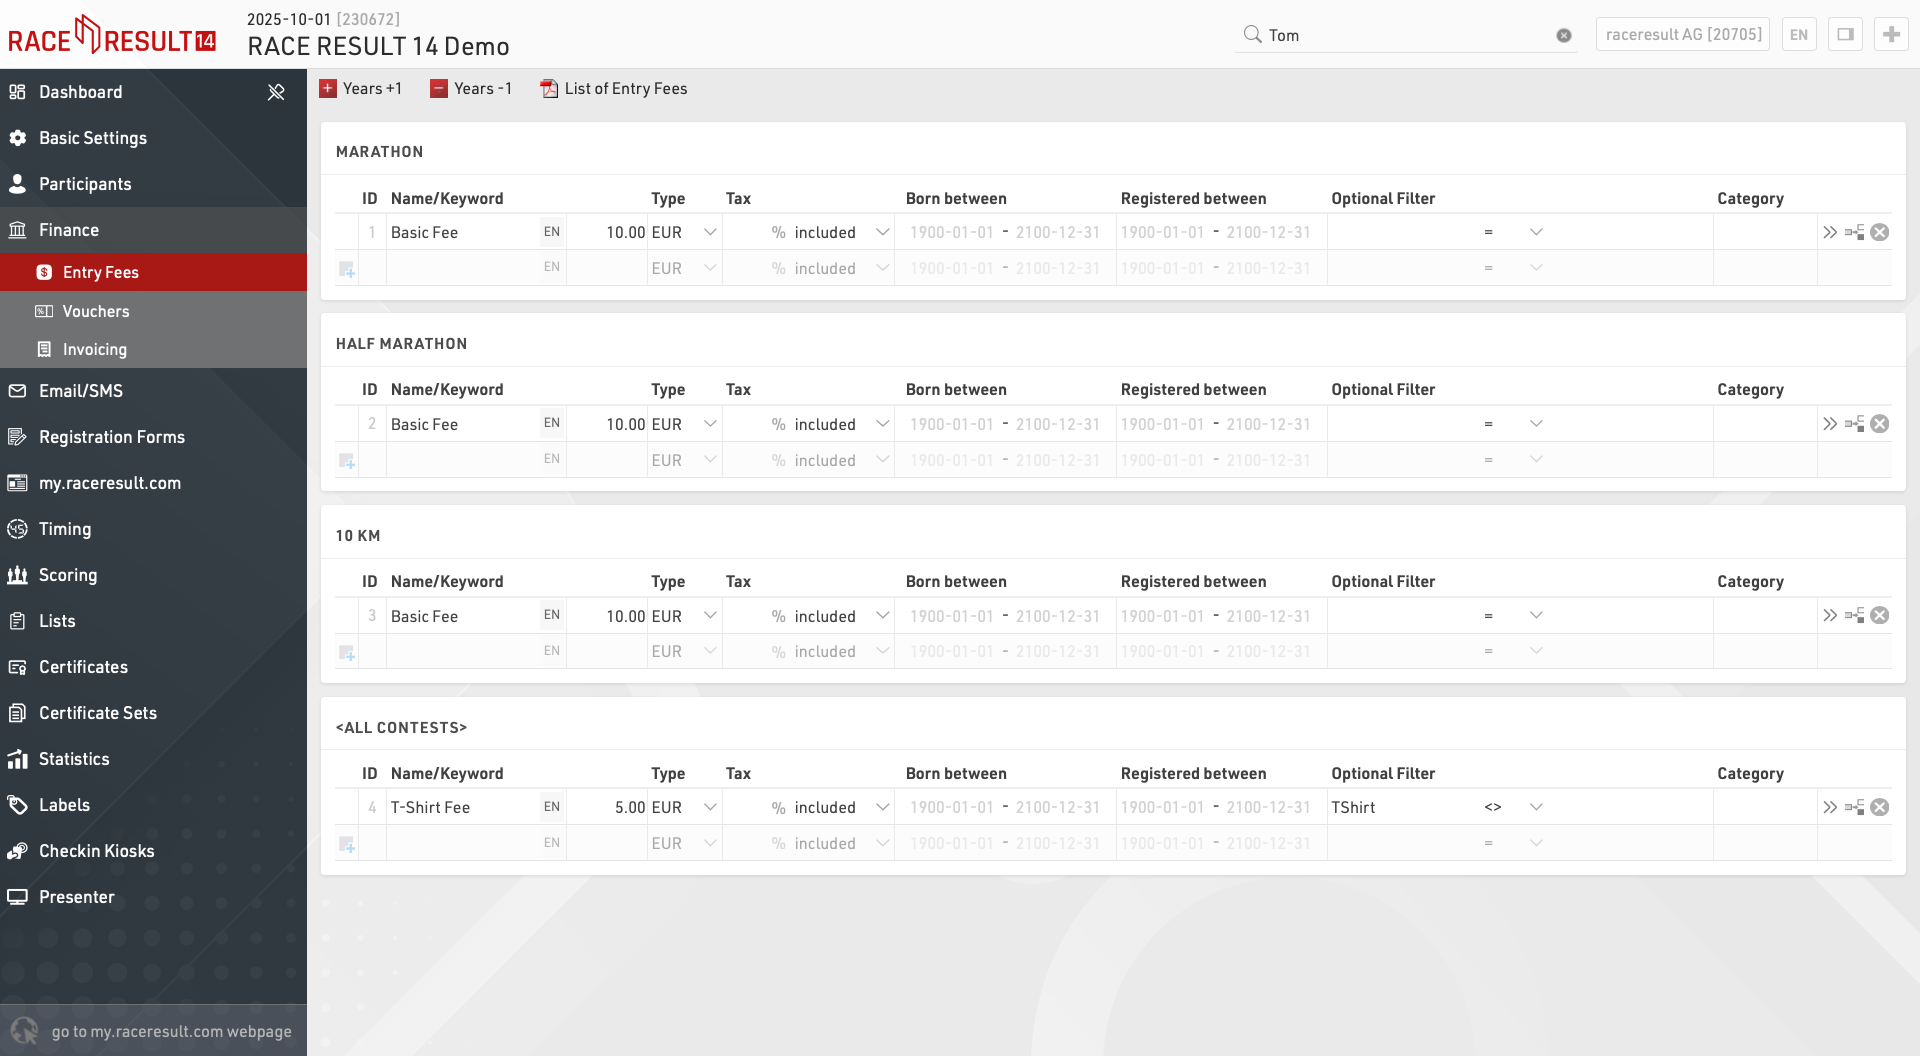
Here, any number of entry fees can be defined, either basic fees or optional fees. The final entry fee for a participant will be calculated by summing up all applying entry fees.

Enter a name or keyword for the entry fee that describes it. This name will also be shown in the online registration if this fee is applied. Then, enter the amount or select % as Type and enter a percentage. All applying entry fees in the list above will be summed up and then multiplied with the percentage.
The Tax field allows you to define how tax should be handled for a specific entry fee, you can enter any decimal value and then select whether the amount includes tax or whether this should be added on top of the value at checkout.
If the entry fees are separated by age then set the values for Born Between accordingly, if the entry fees are applicable to all participants these values can be left blank.
Similarly a date range for the entry fee can be defined, this allows for tiered pricing over different date ranges, if the entry fee is always applicable this can be left blank.
If only certain participants have to pay this entry fee, for example those who ordered a t-shirt, enter a filter which calls the Additional Field TShirt <> (empty)
Assigning a category name for the entry fee may be important for Vouchers.
Through the  More details button you can access additional settings:
- When specifying a field in Multiply with, the entry fee will be multiplied with the value in that field or expression. If an Additional Field saves the number of t-shirts ordered, the price for the t-shirt can be multiplied with the number.
- If checking Show as basic fee, optional entry fees (i.e. having a filter) will be shown on the landing page of the online registration.
Vouchers
Vouchers are frequently used to reduce the entry fee. If a voucher code is entered in the Data Field Voucher, the system will look up the amount of that voucher in the voucher table and reduce the entry fee accordingly.

When creating vouchers, you can set the following parameters:
- Code: voucher code, for example RACE2021
- Type: the amount of the voucher can be a fixed amount or a percentage value (of the entry fee). Additionally, the voucher can reduce the price to the price of the first or previous registration period.
- Amount: enter the amount or percentage value
- Category Affected: if you have defined categories for your entry fees, you can make this voucher apply only to one category. For example, the voucher could reduce the price of the base fee, but not the price for extras like a t-shirt.
- Times Usable: when selecting a number here, the voucher can be used only so many times when registering through the online registration.
- Remark: make a note, for example who received this voucher code.
In most cases you will either set up voucher codes like RACE2021 that can be used unlimited, or create many individual voucher codes like K4A7B5DJ that can be used only once. In order to generate many individual voucher codes, the Autogenerate function can help you.
Invoicing
When using online registration you may need to produce invoices for participants with their payment information for accounting purposes. An invoice is a unique and singular document containing a fixed set of data which should not change.
Invoices are not be linked to just a single participant record, they may group multiple participants together under a single invoice. Each invoice contains the data as to which specific entry fees have been linked to that invoice, this allows multiple invoices to be generated for participants for later payments or refunds if required. Invoices have their own set of fields to be used which relate to the invoice settings.
Invoices can also be generated as e-invoices in the ZUGFeRD format. It is important to note that an invoice does not necessarily have to be linked to a payment process and can therefore also be created and sent independently of online payment. One invoice could also contain several payments of different participants.
Creating and sending invoices can optionally be combined with the email confirmation, but is generally independent of the registration process. Application examples for creating and sending invoices can be found in our How To.
Email / SMS
The Email / SMS Module allows for bulk sending of Emails or SMS to participants.
You can create an arbitrary number of templates for different purposes which can be sent through the E-mail / SMS window or may be triggered through an Exporters.
The list on the left shows all templates in your event file which can be rearranged using drag & drop by clicking the free space to the left of the template name.
Templates can be further sorted into folders, to create a new folder, click the Add Folder icon in the Email/SMS Header. By clicking the folder header, the folder can be expanded / collapsed, to sort the items within a folder alphabetically, click the  icon. Empty folders will be deleted automatically when you reload the window.
Clicking the name of a template from the menu opens the settings for that template where the template can then additionally be sent from.
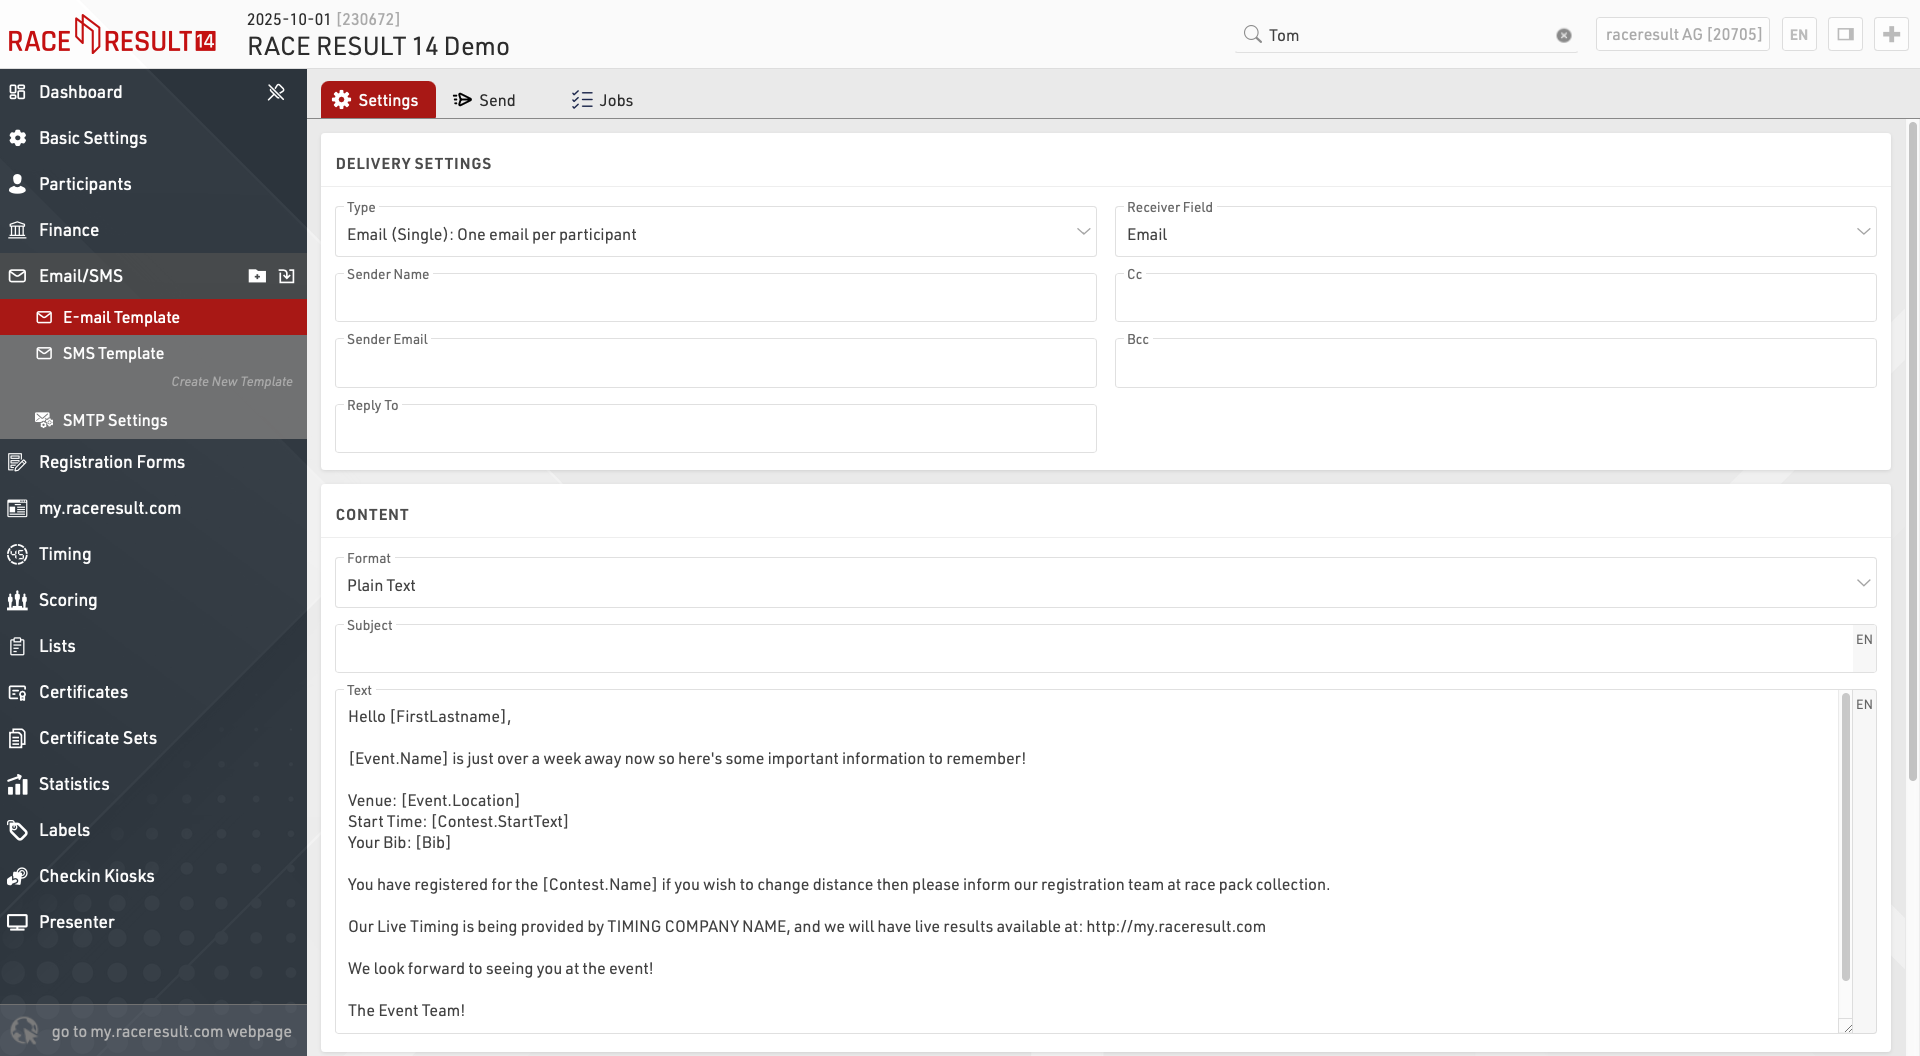
Email/SMS Templates
When creating a new template first choose the Type:
- Email (Single): will send individual emails to the participants
- Email (Group) One email per email address: will send one email per unique e-mail address in each group registration (defined by the GroupID). If multiple participants within the group are registered with the same e-mail address then the Text content will be repeated for each participant.
- Email (Group) One email per group registration: will send a single e-mail to each group registration (defined by the GroupID). If multiple e-mail addresses are present within the group then each will be included in the e-mail To. The Text content will be repeated for all participants within the group.
- SMS: to send out text messages
- Web Service Call: serves to trigger a HTTP GET request to a third party server
The available settings will depend on the template type.
More Options
Sometimes you may wish to define alternative recipient addresses for e-mails / SMS, by default the Receiver Field will be set to the standard E-mail or CellPhone fields but you can choose from any of your additional fields of type Text Field. If you want to send the same Email or SMS template to multiple recipients then you can create a semi-colon separated list of values in the field which will be used as the Receiver FIeld for the relevant template.
A Default Filter is helpful if you want to make sure that the template will be sent only to certain participants. Later when sending the messages you can still change the filter, but you cannot forget to enter the filter. So for example to make sure the template will only be sent to participants in contest 2 enter the filter:
[Contest]=2
Setting an Additional Check Box can help track to which participants a template has already been sent.
You may want to combine this function with the default filter: Set Check Box when the message was sent and use this default filter for future send jobs:
[Contest]=2 AND [CheckBoxName]=0
Sending Templates
Clicking the Send tab within a template will display the list of participants who will receive the e-mail according to the filter, the right side will also show a preview of the e-mail for each participant.
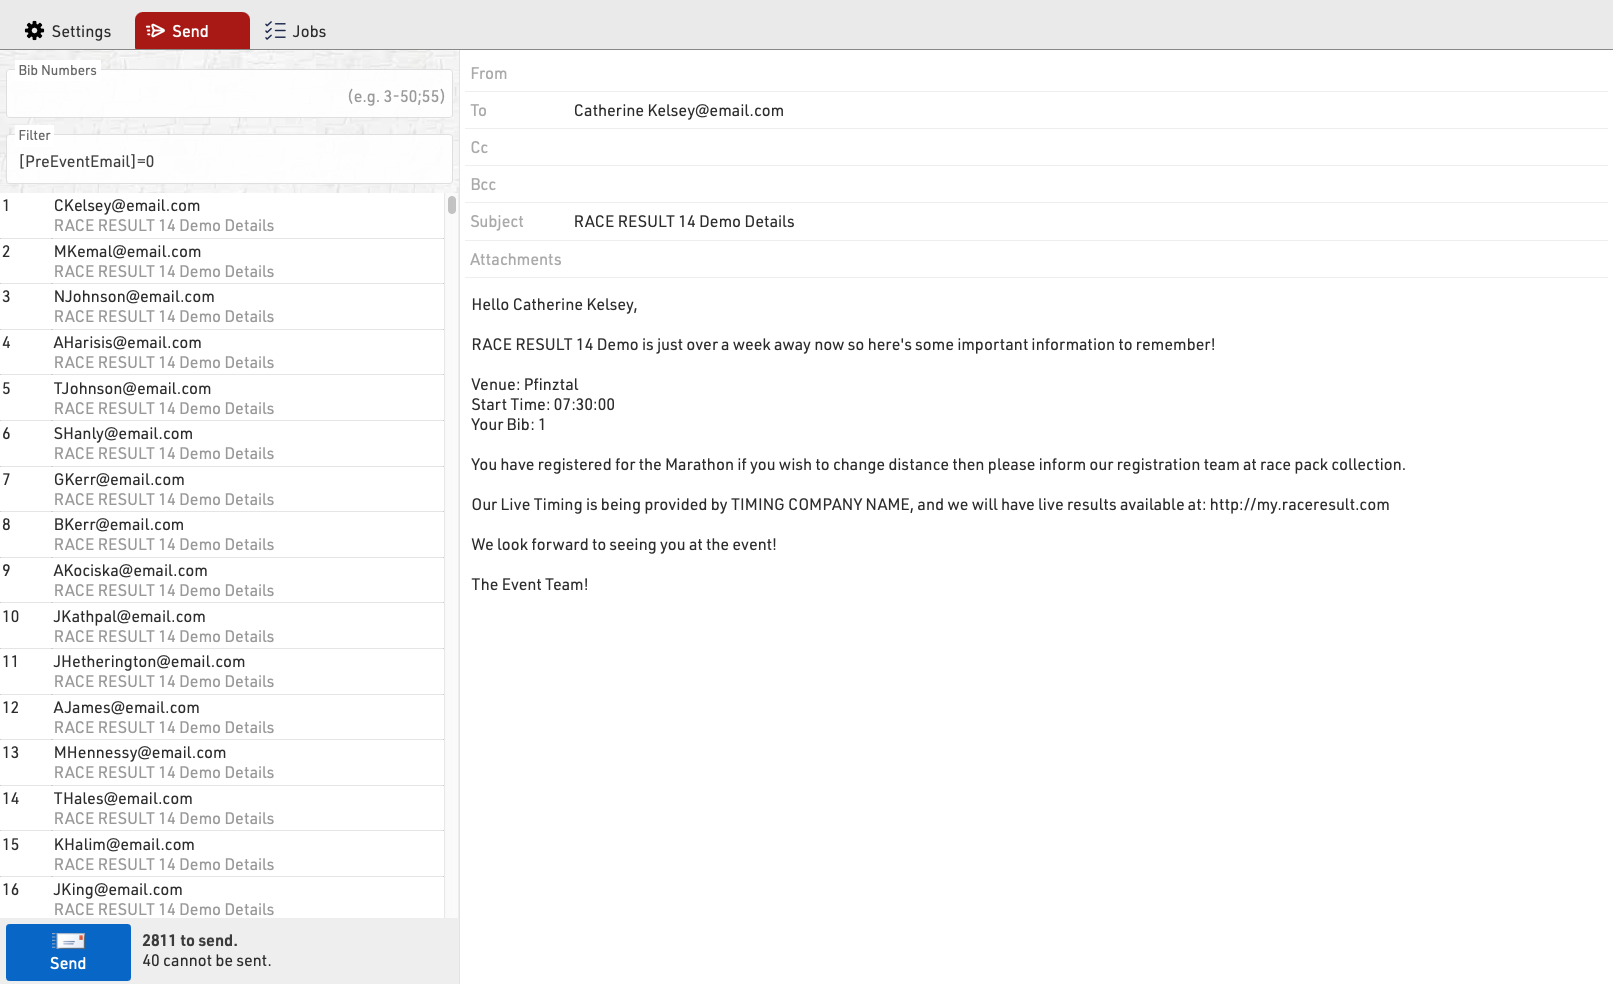
You can choose to send to specific bibs or adapt the filter before sending.
Clicking Send will create a Job which will begin sending all the e-mails, the job will show details for each e-mail. If the job receives an unknown error from the SMTP server it will stop.
SMTP Settings
When sending emails from RACE RESULT 14 you can use our servers to send a maximum of 10 emails (excluding automatic registration confirmation emails), or you can connect your own SMTP server to send a much larger amount. These SMTP settings apply to all e-mails sent through RACE RESULT 14.
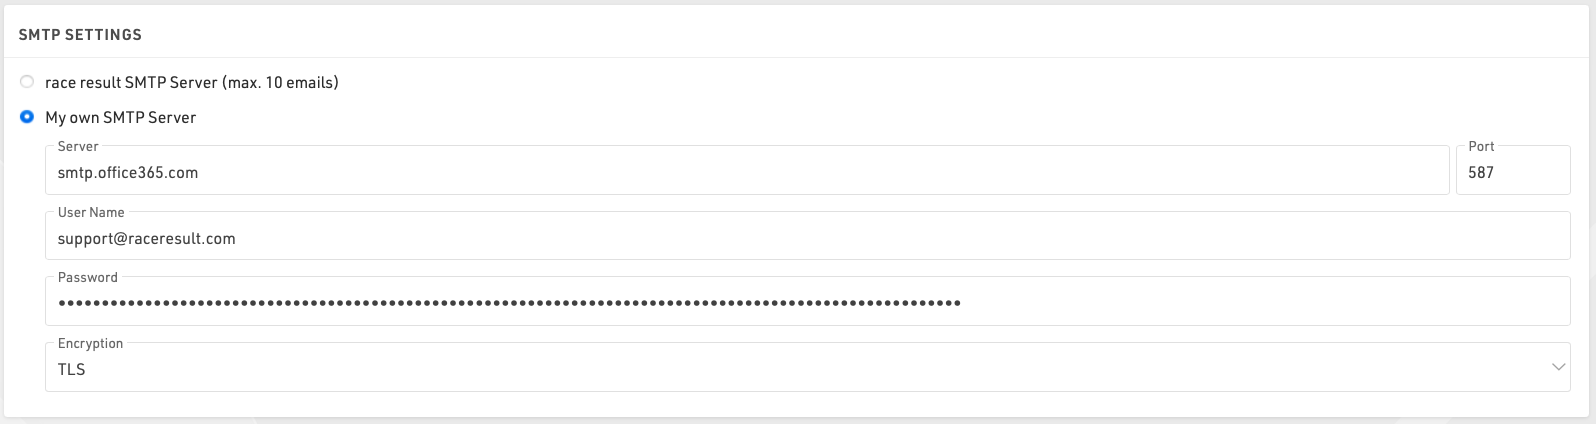
You will need to find the settings for your mail server SMTP, these are normally available from your hosting provider, normally the username will be your email address with the corresponding password, note that the password will be encrypted when saved so it cannot be copied again.
When setting up your SMTP server for the first time it is advisable to test this by sending an e-mail to yourself, this can be done in a test event by adding yourself as a participant.
Here are some common SMTP server settings. Please note that these settings change and might only be accurate up to the date this was written 3/17/2020.
Office 365 SMTP Settings
- Server address: smtp.office365.com
- Port: 587
- Encryption: TLS
Outlook SMTP Settings
- Server address: smtp-mail.outlook.com
- Port: 587
- Encryption: TLS
GoDaddy SMTP Settings Americas
- Server address: smtpout.secureserver.net
- Port: 465 or 587
- Encryption: SSL
Gmail SMTP Settings
- Server address: smtp.gmail.com
- Port: 587
- Encryption: TLS
Gmail requires an extra level of security. You will need to generate an additional password on your Gmail account in order to use a Gmail SMTP. This generated password will be used instead of your normal Google account password.
Registration Forms
Registration Forms are used to provide both online and on-site registration, this can also be extended to online self-service allowing participants to update their data directly.
The list on the left shows all registration forms in your event file which can be rearranged using drag & drop by clicking the free space to the left of the form name.
Lists can be further sorted into folders, to create a new folder, click the Add Folder icon in the Lists Header. By clicking the folder header, the folder can be expanded / collapsed, to sort the items within a folder alphabetically, click the icon. Empty folders will be deleted automatically when you reload the window.
Each registration form is fully customisable and multiple registration forms can be setup for different purposes and each form is one of four types:
- Single Registration
- Group Registration (Enter multiple registrations simultaneously)
- Single Self-Service
- Group Self-Service
To access self-service a unique URL is generated for each participant which contains a unique Key for security, the URL can be retrieved using the Changelink() function.
Each registration form will generate a unique URL which can be opened directly, or the form can be included in the my.raceresult registration page.
General Settings
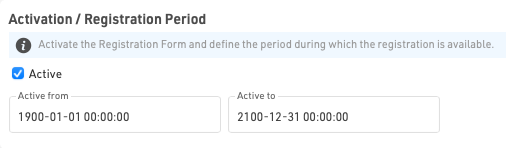
Activation / Registration Period
Define the date range for which a registration form should be available, or manually activate / de-activate a form completely.
Note that the date/time is according to the time zone of your event file.
Registration Type
Set the title and form type for the registration form.

If using a group registration then you must also define the min, max, default and increment values.

Increment is the number of new entries added when the user clicks "add registration" in the form.
When creating a self-service form (either individual or group) you can apply a filter to define for which participants the form should be available, or which participants should be included in the group.
Additionally for group self service forms you can optionally define the identity field - this is the field on which participants should be matched in order to be part of the same group, such as club if managing a club / team registration. By default this will use the GroupID.

Contest / Registration Limit
If the registration form should only be available for a specific contest then select the Contest here and optionally define a registration limit.
If All Contests is selected then the registration limit applies to the total count of participants. Note that individual contest limits can be applied in the registration form.

If you wish to exclude only certain contests from a form then this can be done using the Input Fields Extended Settings
Website Integration
Individual registration forms can be embedded directly to your own website using the integration code for each unique form.
See Website Integration for more information on embedding registration forms in your own website.
Registration Form
Each registration form can contain an arbitrary number of steps, where each step can capture / show different data.
A typical registration form will contain at least two steps, the first to capture participant data and then second as a check page to confirm the details are correct and accept any applicable terms and conditions.

Step should have a title, which is shown in the top navigation bar during the registration process. Individual steps can also have Active From / To date if certain options should only be valid for a specific time frame. Optionally the text for the "Next" button can be customized.

When navigating forward / back between steps the content to be displayed is calculated by the server, in this way the forms can dynamically calculate data. It is also possible to force a step to refresh the displayed data using the Extended Settings option.
Online Payment
Online payment allows you to capture payment directly as part of the registration, when enabled the additional steps to select and make payment will be automatically generated when the registration form is loaded.
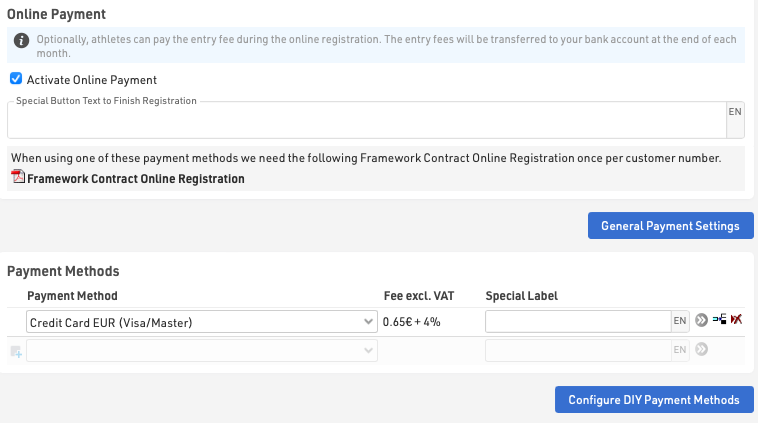
Payment Methods
RACE RESULT offers a range of payment method options through the online registration, note that not all payment methods are available in all countries.
For payments where fees are received by RACE RESULT, the Online Registration Contract is required, a link to this will be shown when a payment method requiring it is selected. These payment methods are subject to fees and payout in accordance with the contract, the fees for each method are shown in the settings.
For more information on how RACE RESULT handles the collection and payout of Entry Fees see Entry Fee Collection / Payout.
The Special Button Text to finish registration is shown for methods where the user is not redirected to a different payment page (e.g. SEPA, Wire Transfer or Cash Payments).
Instant Payment Methods
The participant makes direct payment online, normally using a credit or debit card, available for EUR, CHF, GBP, USD transactions with Europe only.
Delayed Payment Methods
The participant can make a transfer at a later date to RACE RESULT accounts in either Germany or Switzerland, these will only be marked as paid once funds are received.
DIY Payment Processing
If you have an account with a supported payment platform, then participants will make direct payment through this platform which will then be paid directly in to your account, this is entirely at your own risk. Please note that typically payment via credit card is the only supported payment method within these DIY Payment Gateways, even though they may offer a number of different payment methods.
You will need to enter details of your account according to the method selected.
The available payment methods and their charges are outlined in the article below.
Confirmation Page
The confirmation page is automatically added as a step to the end of the registration after either the last step defined in the form or the online payment if enabled.
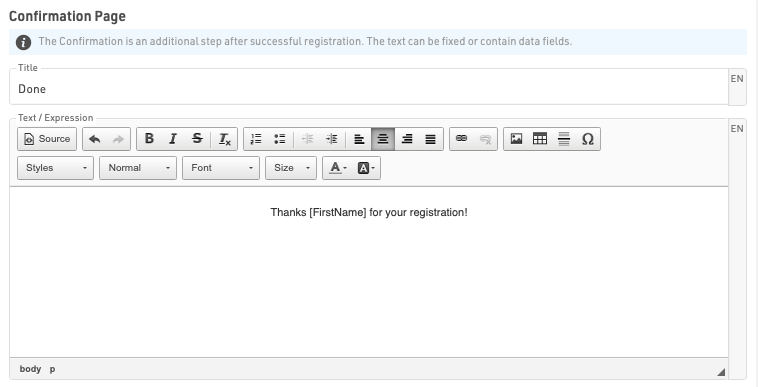
The Confirmation Page can be given a label and then allows for fully customised HTML text to be entered.
Additionally it is possible to use any fields or functions in the confirmation to display participant or event data, note that for Group Registrations, data is only shown for the first participant of the group.
A button to enter a new registration is always displayed below the confirmation by default.
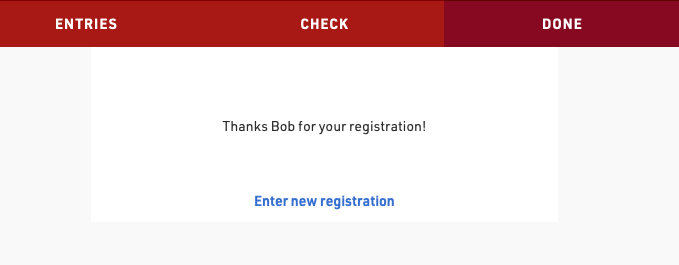
If an error occurs during the registration then this will additionally be displayed to the participant in the confirmation page.
After Save Actions
After Save Actions are triggered when a registration is completed, after either the last step in the registration form or online payment if enabled.
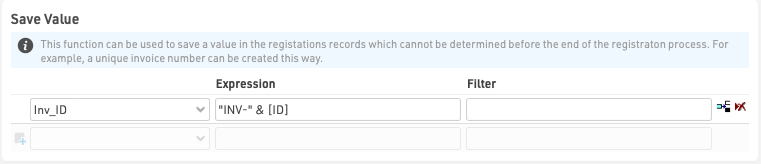
Save Value
This can be used to save a value in the registration records which cannot be determined before the end of the registration process, for example a unique invoice number or registration Identifier.
The value can be saved to any default field or additional field and should be entered as a regular Expression which can use any other fields or functions. Optionally a filter can be applied to only save this value for specific participants.
Send E-mail
Send e-mail allows sending of any pre-configured Email/SMS Template, often used as a registration confirmation. Different templates can be filtered to different participants if required, for example a group registration mail may be configured differently from a single registration.

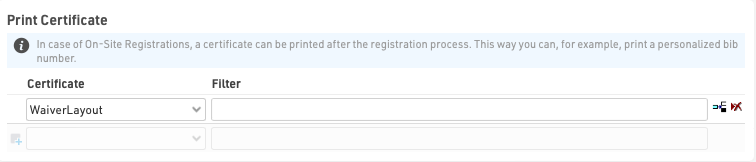
Print Certificate
This is to be used when the registration form is used for on-site registration which could be used for example to print a bib number directly after registration.
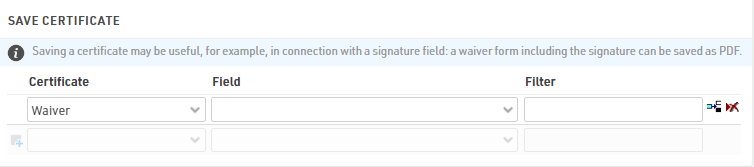
Save Certificate
Saving a certificate can be useful in connection with a signature field, where the signature on a waiver-form is saved as a PDF.
Advanced Settings
Advanced Settings are applied to all registrations through the registration form for customising behaviour or styling.
Settings
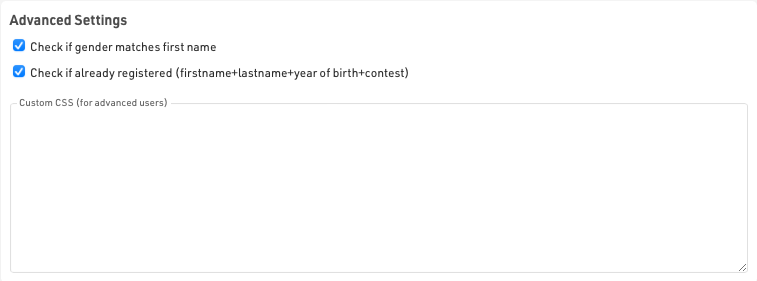
Check if gender matches first name - this will warn the user if they have potentially entered an incorrect gender based on the first name. The data used here is based on trends across all events stored on RACE RESULT servers and is not fixed in any way.
Check if already registered - only accept a registration if there is not a registration already existing with the same Firstname, Lastname, Year of Birth and in the same Contest to prevent duplicate registrations / payments.
CSS - Custom CSS that is applied to the whole page in which the registration form is loaded.
Store Additional Values
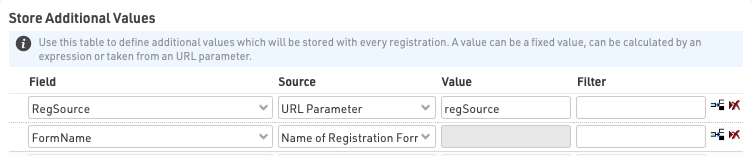
This allows capturing of specific additional data to be stored with each registration, the value can be saved to any default or additional field. Optionally a filter can be applied to only save this for specific participants. These are stored when the registration is captured, and so are saved before any after-save actions are triggered.
Additional values will only be stored when the field is not part of the regular registration form fields, if the field is included then this value will always be prioritized. Additional fields can also be used for "show if" filters.
Note that with the exception of source Expression - values should be entered as plain text, and not a RACE RESULT expression, meaning there should be no quote marks around the value for plain text.
There are a number of different sources from which data can be pulled:
| Fixed Value | A fixed text value to be stored in a field |
| Expression | Calculate a value from an Expressions to be saved |
| Max Value + 1 | Takes the current maximum value for the specified field for all registered participants, plus one |
| Max Value + 1 (Contest) | Takes the current maximum value for the specified field for registered participants in the same contest, plus one |
| URL Parameter | Stores the value of the specified URL Query Parameter |
| URL | Stores the entire URL in which the registration form was loaded from |
| Name of Registration Form | Stores the name of the registration form |
| Language | Stores the language used during the registration process, this will be the language from my.raceresult.com when using the standard online registration. Note that this is only required for special applications as the default Language field will always be stored when saving the registration data. |
| Group Registration Count | The number of participants registered in the group registration |
| Value From Login Record | Retrieves the value of the specified field for the participant record which is currently logged in, when using the my.rr login function |
General Payment Settings
The general payment settings relate to the payout of fees from RACE RESULT to you in accordance with the online registration contract.
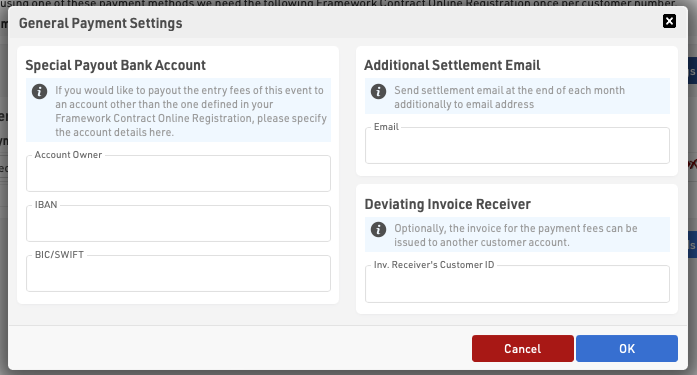
Special Payout Bank Account
Should you wish to have fees paid directly to a different account from that stated in your contract, for example the organiser for who you are acting on behalf of, you can provide the account details here.
Additional Settlement Email
The summary of payout details can additionally be sent to an e-mail address specified here.
Deviating Invoice Receiver
If the payout should be paid to a different RACE RESULT account holder you can provide their account number here.
Error Messages
If an error occurs during the saving of a registration then an e-mail will automatically be sent to you with the description of the error.
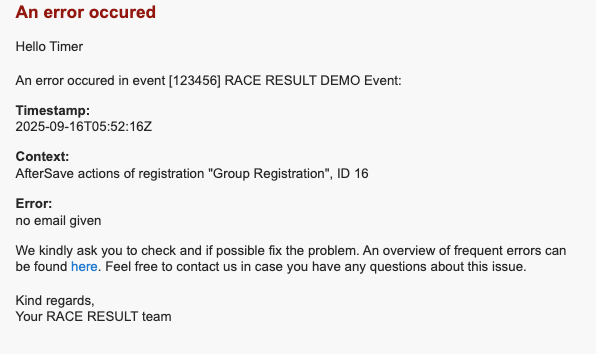
Possible causes for errors include:
- E-mail Sending Errors
- No E-mail template selected
- Invalid SMTP configuration
- Missing or invalid recipient e-mail address
- Invalid template configuration
- Mail Server errors
- After-Save actions
- Attempting to use a print action with no printer connected
- Online Payment Errors
- Invalid or missing DIY Payment gateway credentials
The content of the e-mail should indicate the cause of the error, if you do not understand what is causing the error you can contact support@raceresult.com
Some common E-mail SMTP errors are explained here.
Note:
The ID listed in the context is the ID of the participant whose registration triggered the error. Quickly identify the participant in question by using the participants view filter, for example with the expression [ID]=123.
my.raceresult.com
The my.raceresult.com page is used to configure the registration and results platform my.raceresult.com and to handle inquiries from my.raceresult.com
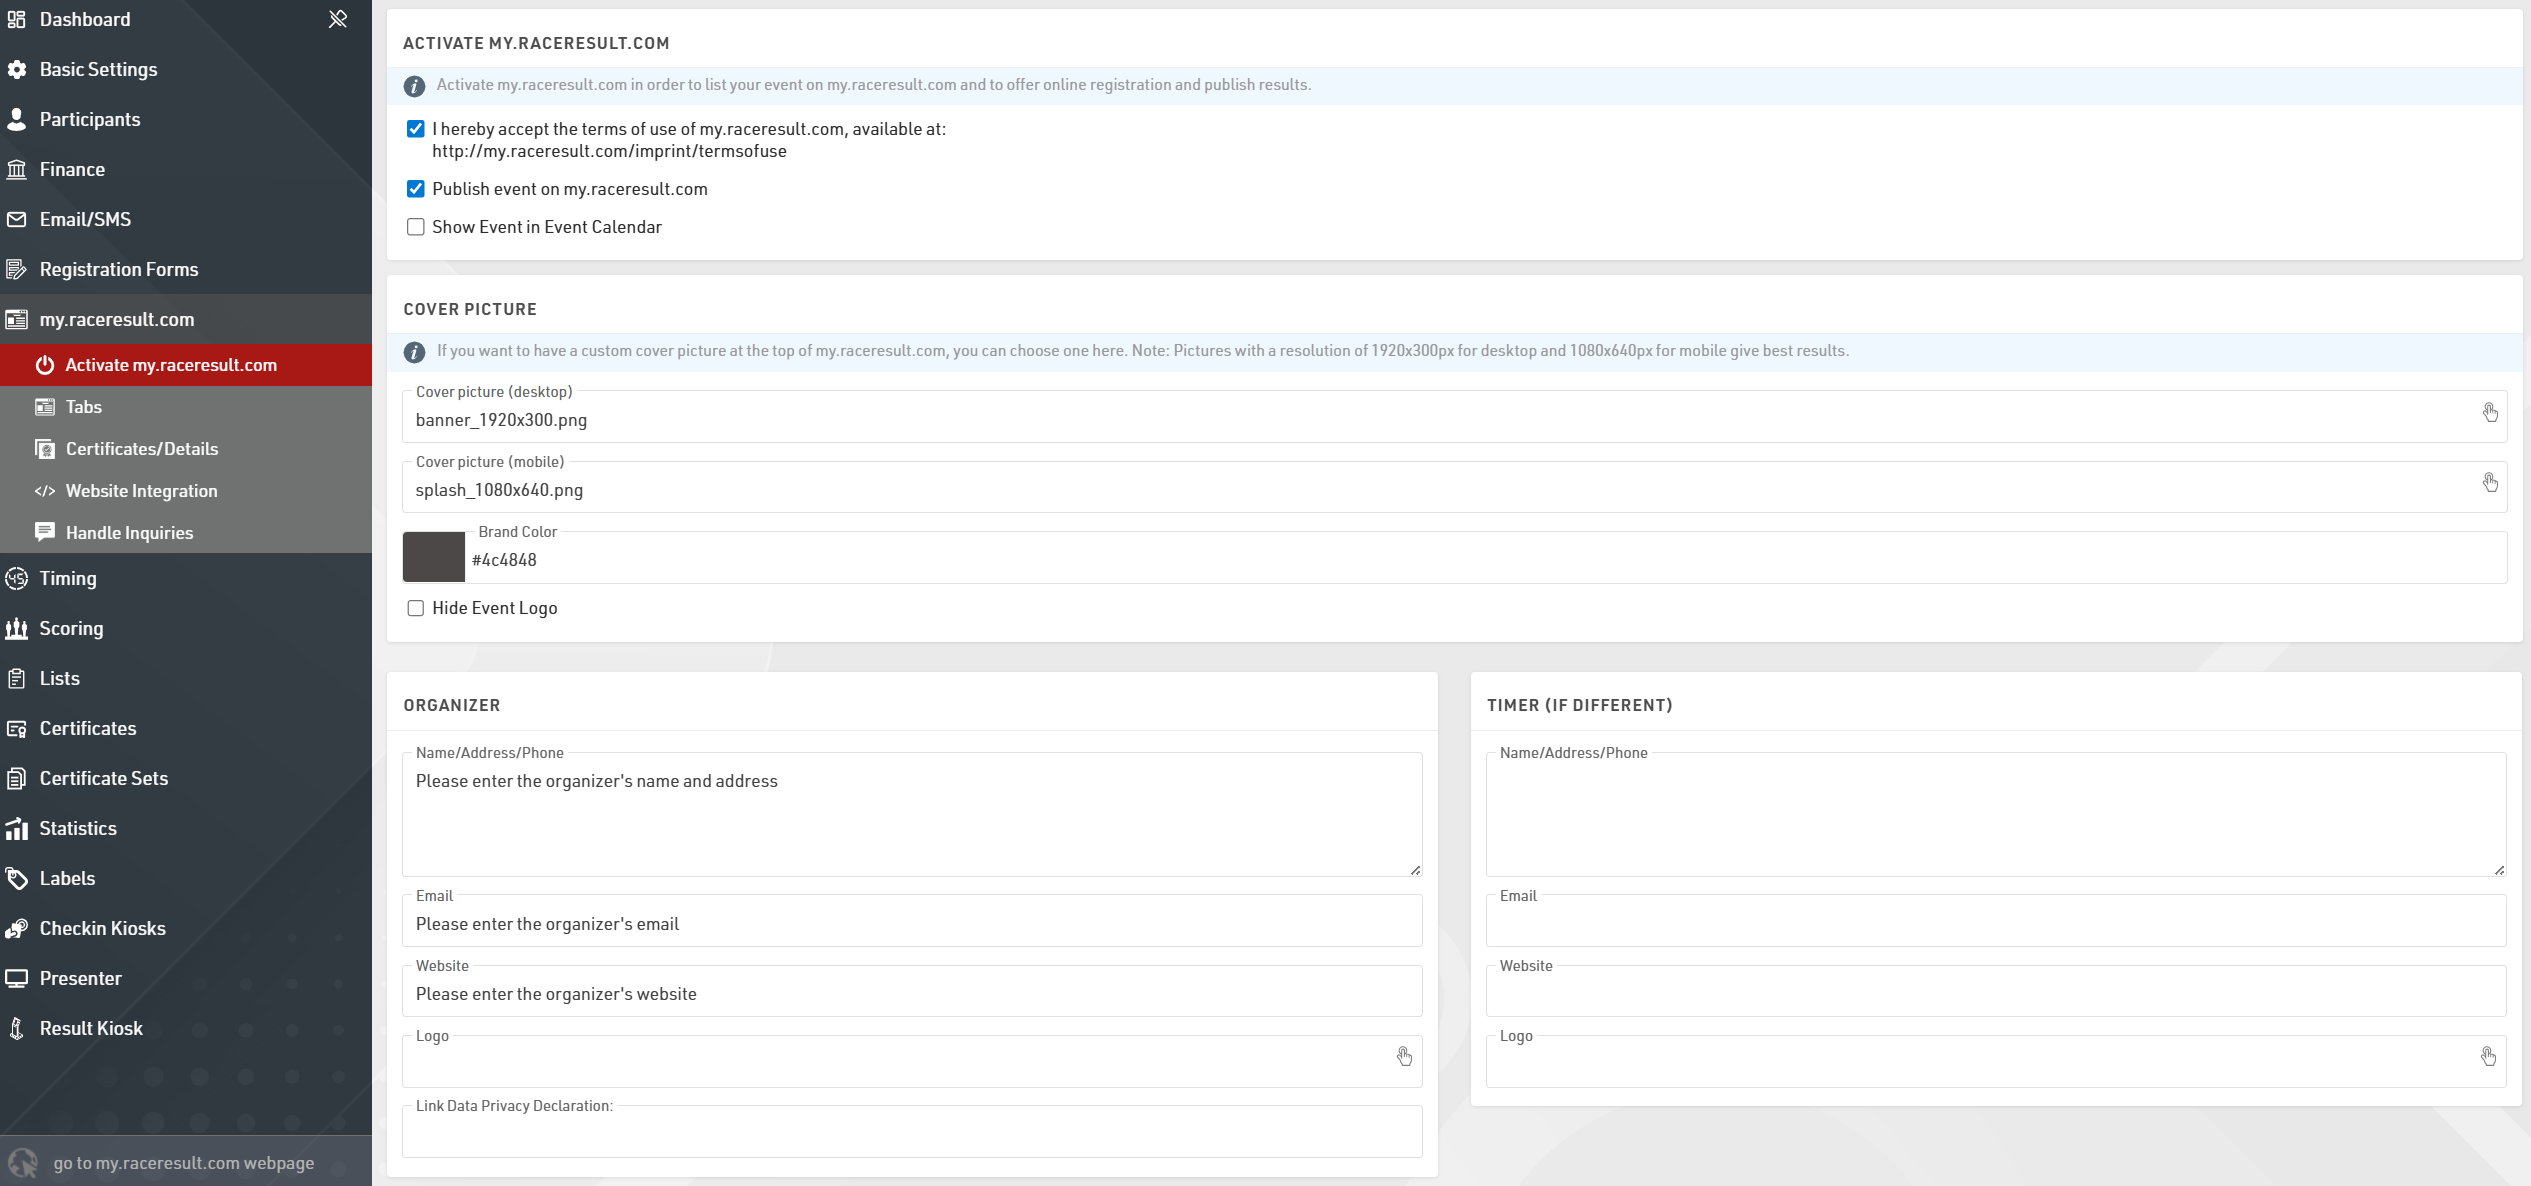
Activate my.raceresult.com
In order to show your event in the calendar on my.raceresult.com, to use the online registration, and to publish results, you need to first accept the terms of use as advertised and then publish the event using the checkboxes.

By default the event will be published in the main event calendar on my.raceresult.com, if you wish to hide it from these lists you can untick the box to show the event in the event calendar.
When viewing the event a banner is shown at the top of the page, by default a standard cover picture is used, depending on the type of event you have selected in Basic Settings > Event settings.
You can choose to upload your own banner images to use here instead. The size of the banner for desktop is 1920x300px and mobile is 1080x640px, images which do not conform to this size may be stretched or compressed in order to fit.

The color for the menu items can be defined using the Brand Color function. Best practice is to use darker colors for the Brand Color so it shows up on the lighter background. The apply contest color will use the Contest color setting to indicate the contest for results boxes and favorites on my.raceresult.com.
If you uploaded an event logo, it will display. As the event logo will overlap with the banner, you can hide it by ticking the box to "hide event logo".
Note that the cover picture is cached by your browser, if the image does not change after updating this then you may need to clear your browser cache, or alternatively try to open the page in a private/incognito window or a different browser.
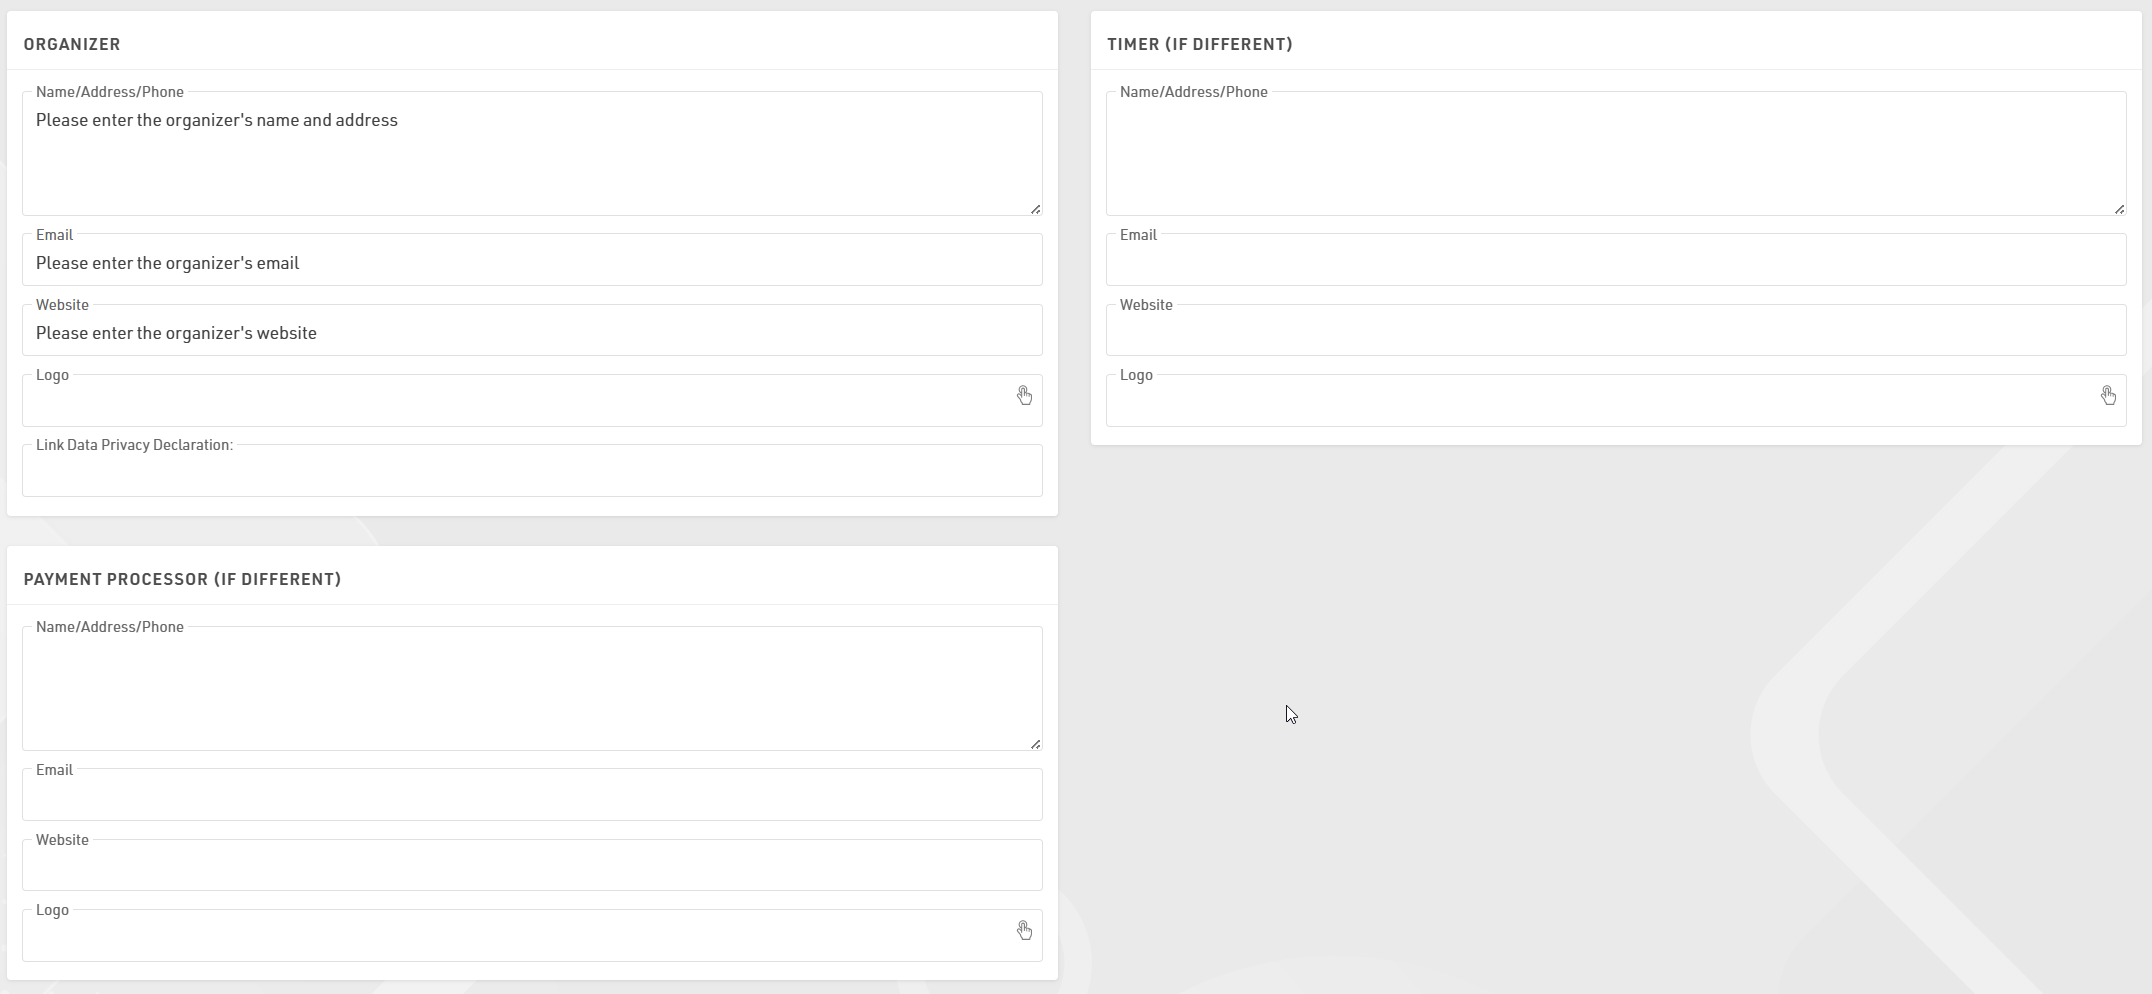
Contact information for the race director, timer, and 3rd party payment processor can be entered on this page. This information will be shown on the contact tab, which is the only tab that can not be deleted if publish is enabled.
In the Additional Features section it is possible to configure tracking via Google Analytics/ Meta Pixel on your my.raceresult.com webpage. Select the tracking platform and enter your specific ID to setup the configuration. To ensure compliance with data privacy regulations, these tools will only be active for visitors who have explicitly accepted third-party cookies via the cookie consent popup.

Tabs
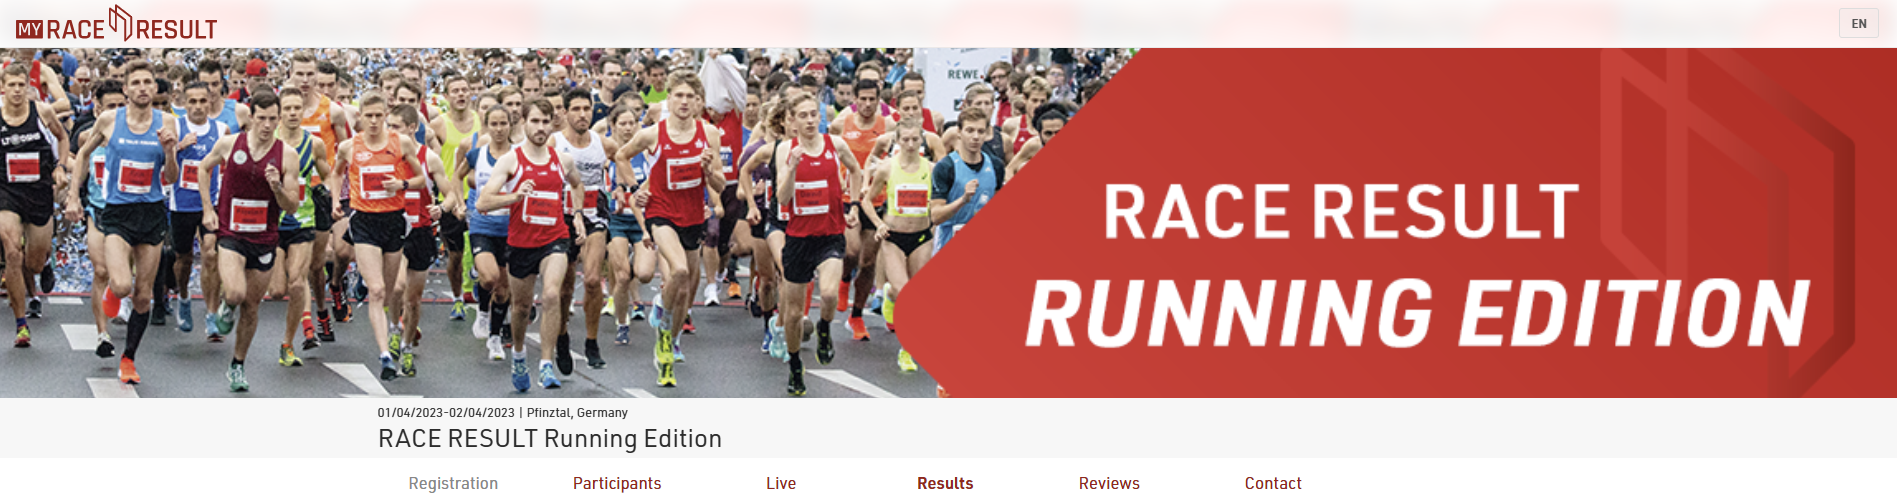
The my.raceresult.com event page has been redesigned from a fixed set of sub-pages to a more flexible tab-based system. Tabs can be set up with different names, types, and timing so you can better control the design of the event page on my.raceresult.com. Existing event files are automatically converted to this new structure. New events will populate with a standard set of default tabs, including Info, Registration, Participants, Live, Results, Reviews, and Contact. Each of these can now be moved, renamed, or scheduled independently.

Title / URL Settings
This box defines how the tab appears in the navigation menu, what template is used, and the web address.
URL Preset: Select a standard template and path. This automatically sets the tab's behavior.
Title: If you want a custom name in the menu (e.g. "See Your Times" instead of "Results"), enter it here. Translation is possible by selecting the chosen languages and adding the text. If left empty, the URL Preset name is used.
Custom URL: When using a Custom URL preset, you can define a custom url here.
General Settings
These controls manage page status and visibility. The Publish button enables the tab's public URL. Menu Visibility determines how users navigate to the tab:
- Never: Always hidden from the menu; accessible via direct link or embed.
- When Active: Visible only during Page Active From/To dates.
- Always: Always visible; appears greyed out outside of Page Active From/To dates.
Use the Page Active From / to fields to automate access to the tab based on a schedule, for example turning Registration off and Live Results on at the event start.
Adding a New Tab
When adding a new tab you first select the type of content for the tab. The new tab's template will depend on your selection. Text will use the info template and external content will embed content or video from outside sources.
Participant Views
Display individual result details with the Participant Views either as a pop-up from within a published list, or from a direct URL. Create different views for different purposes, or adjust one view with filters to match what's required.
Preview a Participant View and verify the direct URL by entering a bib and click on 'Open tab'.
General settings

Activate the view and enable Live Update to allow an instant update of information when having the Participant View open, both in the pop-up and the direct view.
The name of the view is only used internally for better overview if there are several different views and to select a view in Tabs.
Provide a meaningful and concise URL. This is used as an extension for the direct URL and must not be reused in either tabs or participant views.
Lastly, define a date range during which the view shall be active.
Elements

The elements contain all the information that shall be displayed. In here, place and structure different types of information to make up for the participant view.
Drag & Drop to change the order of single elements by clicking on the left edge of an element line.
Select one or more elements by ticking the respective boxes. This opens a tool bar and allows to copy, cut and paste elements across different Participant Views and even across different event files. Copied or cut elements will be pasted above the currently selected element. Further, selecting multiple elements at once simplifies deleting, unindenting or indenting several elements.

Indenting certain elements makes the first element of a "higher" level the parent element. All display filters such as the 'Active selection' or the 'Show If' apply to children of an element accordingly.
Type
The type defines what sort of information is shown and how it is structured. Select from different options.
Structure - structure elements define how data and information is organized.
- Box: A box puts a white background and border around the children elements. Optionally, enter a box title in the 'Data' column. Box titles support fields and hence support both normal and full-text expressions.
- Adaptive Columns: In adaptive columns all children of the same level will be displayed in a new column as long as the available width allows. If the screen is too narrow, adaptive columns will break and display elements underneath each other.
- Fixed Columns: Fixed columns will always display children of the same level side-by-side. If the screen is too narrow, elements will overlap.
- Compact Row: In a compact row all children on the same level can be placed directly next to each on the same row and positioned based on the compact row alignment setting.
Content - content elements fully customize the Participant View with any personal, or event related data.
- Text: A text element is a fixed text-only element. It does not accept expressions. Enter the text in the 'Data' column.
- Field/Expression: This supports both normal and full-text expressions and allows tailoring the view to the participant who's viewing. Optionally, add a title for this field/expression or display it as a Badge. These settings are found under 'More Details'.
- HTML: Add an HTML element for full graphical flexibility. The HTML editor opens in the 'More Details' and support expressions.
- Picture: Add a picture to the participant view and display for example a sponsor banner, or some other event related pictures.
Adv. Content - advanced content uses pre-set options. For all advanced content elements an optional checkbox to Embed in box with header under 'More Details' simplifies the setup by displaying the element in a box, with a pre-defined multilingual header. Most advanced content elements require settings from the 'More Details'.
- Splits/Legs: Display an overview of all splits and/or legs. Customize which splits/legs details shall be shown.
- Links: Publish personal links to other websites. Customize the URL by using an expression to forward participants to a custom landing page, such as their personal race photos or videos.

- List: Select a list to be shown as details. The list will be filtered to the participant currently viewed.
- Ext. photo provider: Link directly to an individual participant's event photos with one of the available integrations. Select the platform to link to, enter the platform's Event ID, and it will show samples of the first 5 photos for that participant which also link to a unique gallery for that participant. If matching is done on an alpha-numeric bib number, do so using the optional field.
- Certificates: Select which certificate sets should be published and for which contests. Enable or disable Individual sets as required. By default a preview of the certificate is shown as visible in the designer. Alternatively, upload a custom image preview to be shown instead. Similarly the name of the certificate set will be shown or define a custom label.

- Comments: Add the ability to post comments to a participant.
- Favorite: Ability to mark a participant as favorite. This is the only advanced content element that comes without a header. Instead, define whether the star shall stand by itself, or accompanied by text.
Active
Define whether an element shall be active or not. Further, distinguish between availability of an element in a popup view or direct access only.
More Details
Apply a date range under 'More Details' during which the element is active. Further, display fields dynamically, e.g. based on input in participant data, by entering any expression as a filter under 'Show If'.
Lastly, find a range of pre-set CSS styling options at the bottom. These may vary between element styling and title styling options. Element always refers to the data of this line, title refers to the title only. The title comes either from the 'Data' column or the title entered in the 'More Details' section, depending on the used element type.
Website Integration
RACE RESULT offers numerous options to embed online registration and results seamlessly in your event website.
This is done through small Javascript snippets that load the results directly into your website (no iframes). All CSS styles from your website will be applied to the online registration and results as well. Where needed, you can add CSS to fine-tune the appearance.
The Javascript code that needs to be copied and pasted to your website can be found in my.raceresult.com→Website Integration.
The below articles explain the different types of embed code in more detail.
For the results this may look like this:
<div id="divRRPublish" class="RRPublish"></div>
<script type="text/javascript" src="//my.raceresult.com/RRPublish/load.js.php?lang=en"></script>
<script type="text/javascript">
<!--
   var rrp=new RRPublish(document.getElementById("divRRPublish"), 58385, "results");
-->
</script>
<style>
   /* Add custom CSS here or elsewhere to change the design */
</style>
In the screenshot above, some of the colors of the results frame have been modified, this is done using custom CSS in the style tags.
Handle Inquiries
Athletes can file inquiries by filling out the inquiry form on the Contact page of an event on my.raceresult.com. It serves to standardize communication between participant and race director/timer.
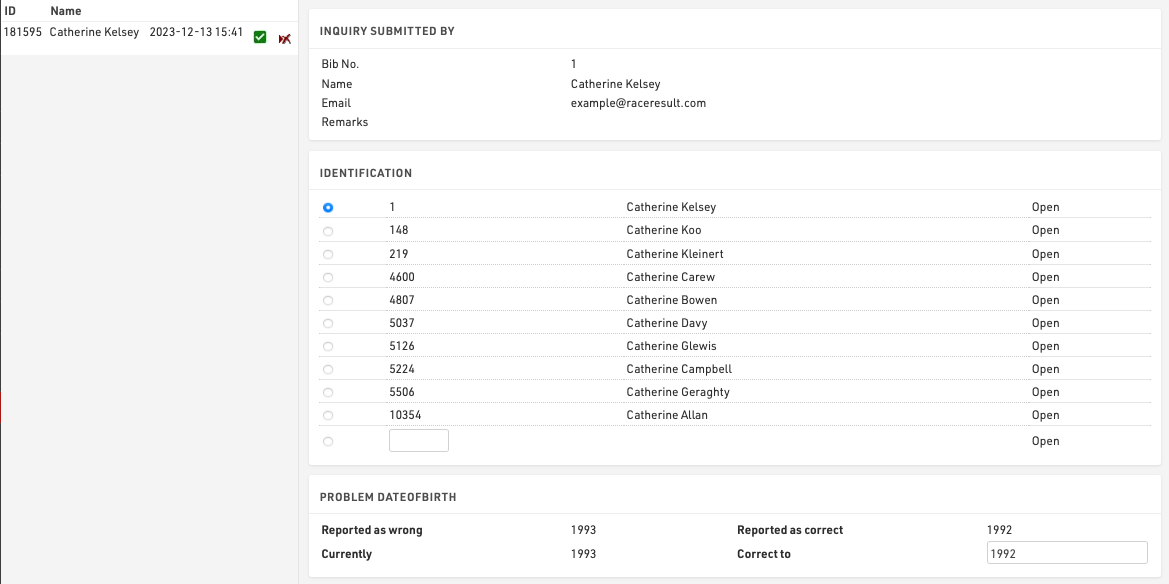
On the left side you can see all the inquiries which were submitted for this event. By clicking on an entry in the list the inquiry is shown on the right side. By clicking on the delete-icon in the list you can remove the inquiry completely or mark it as 'done' (in case you have already responded to it by email or phone).
There are five steps to handle an inquiry.
- Determine which participant sent the inquiry. Under Identification you can find some suggestions.
- The reported problems are displayed. Determine how to correct these.
- Optionally choose to send a response email and fill up the text.
- Optionally enter some notes (for internal reference)
- Click on Correct to finish editing, correct the problem and send the response email.
Timing
The Timing window contains important timing settings and the main interface for connecting to timing systems during the event.
By default the Settings page will be opened if the current date is before the start of the event, after which the Chip Timing page will be opened automatically.
Settings
The settings primarily control how raw timing data should be handled by RACE RESULT 14.
Timing Points - Each raw data record should be assigned to a timing point which identifies where it was recorded, for example the START, FINISH or your Split Timing Points on course.
Chip File - A chip file helps to identify to which participant a raw data record should be assigned.
Start Times / Finish Time Limits - The official start time (T0) to be used for timing the race, this is used by your Splits or Special Results setup to calculate race times. Optionally, a maximum time can be set.
Exporters / Forwarding - Trigger the sending of e-mails / SMS or to export/forward data to third party platforms if required.
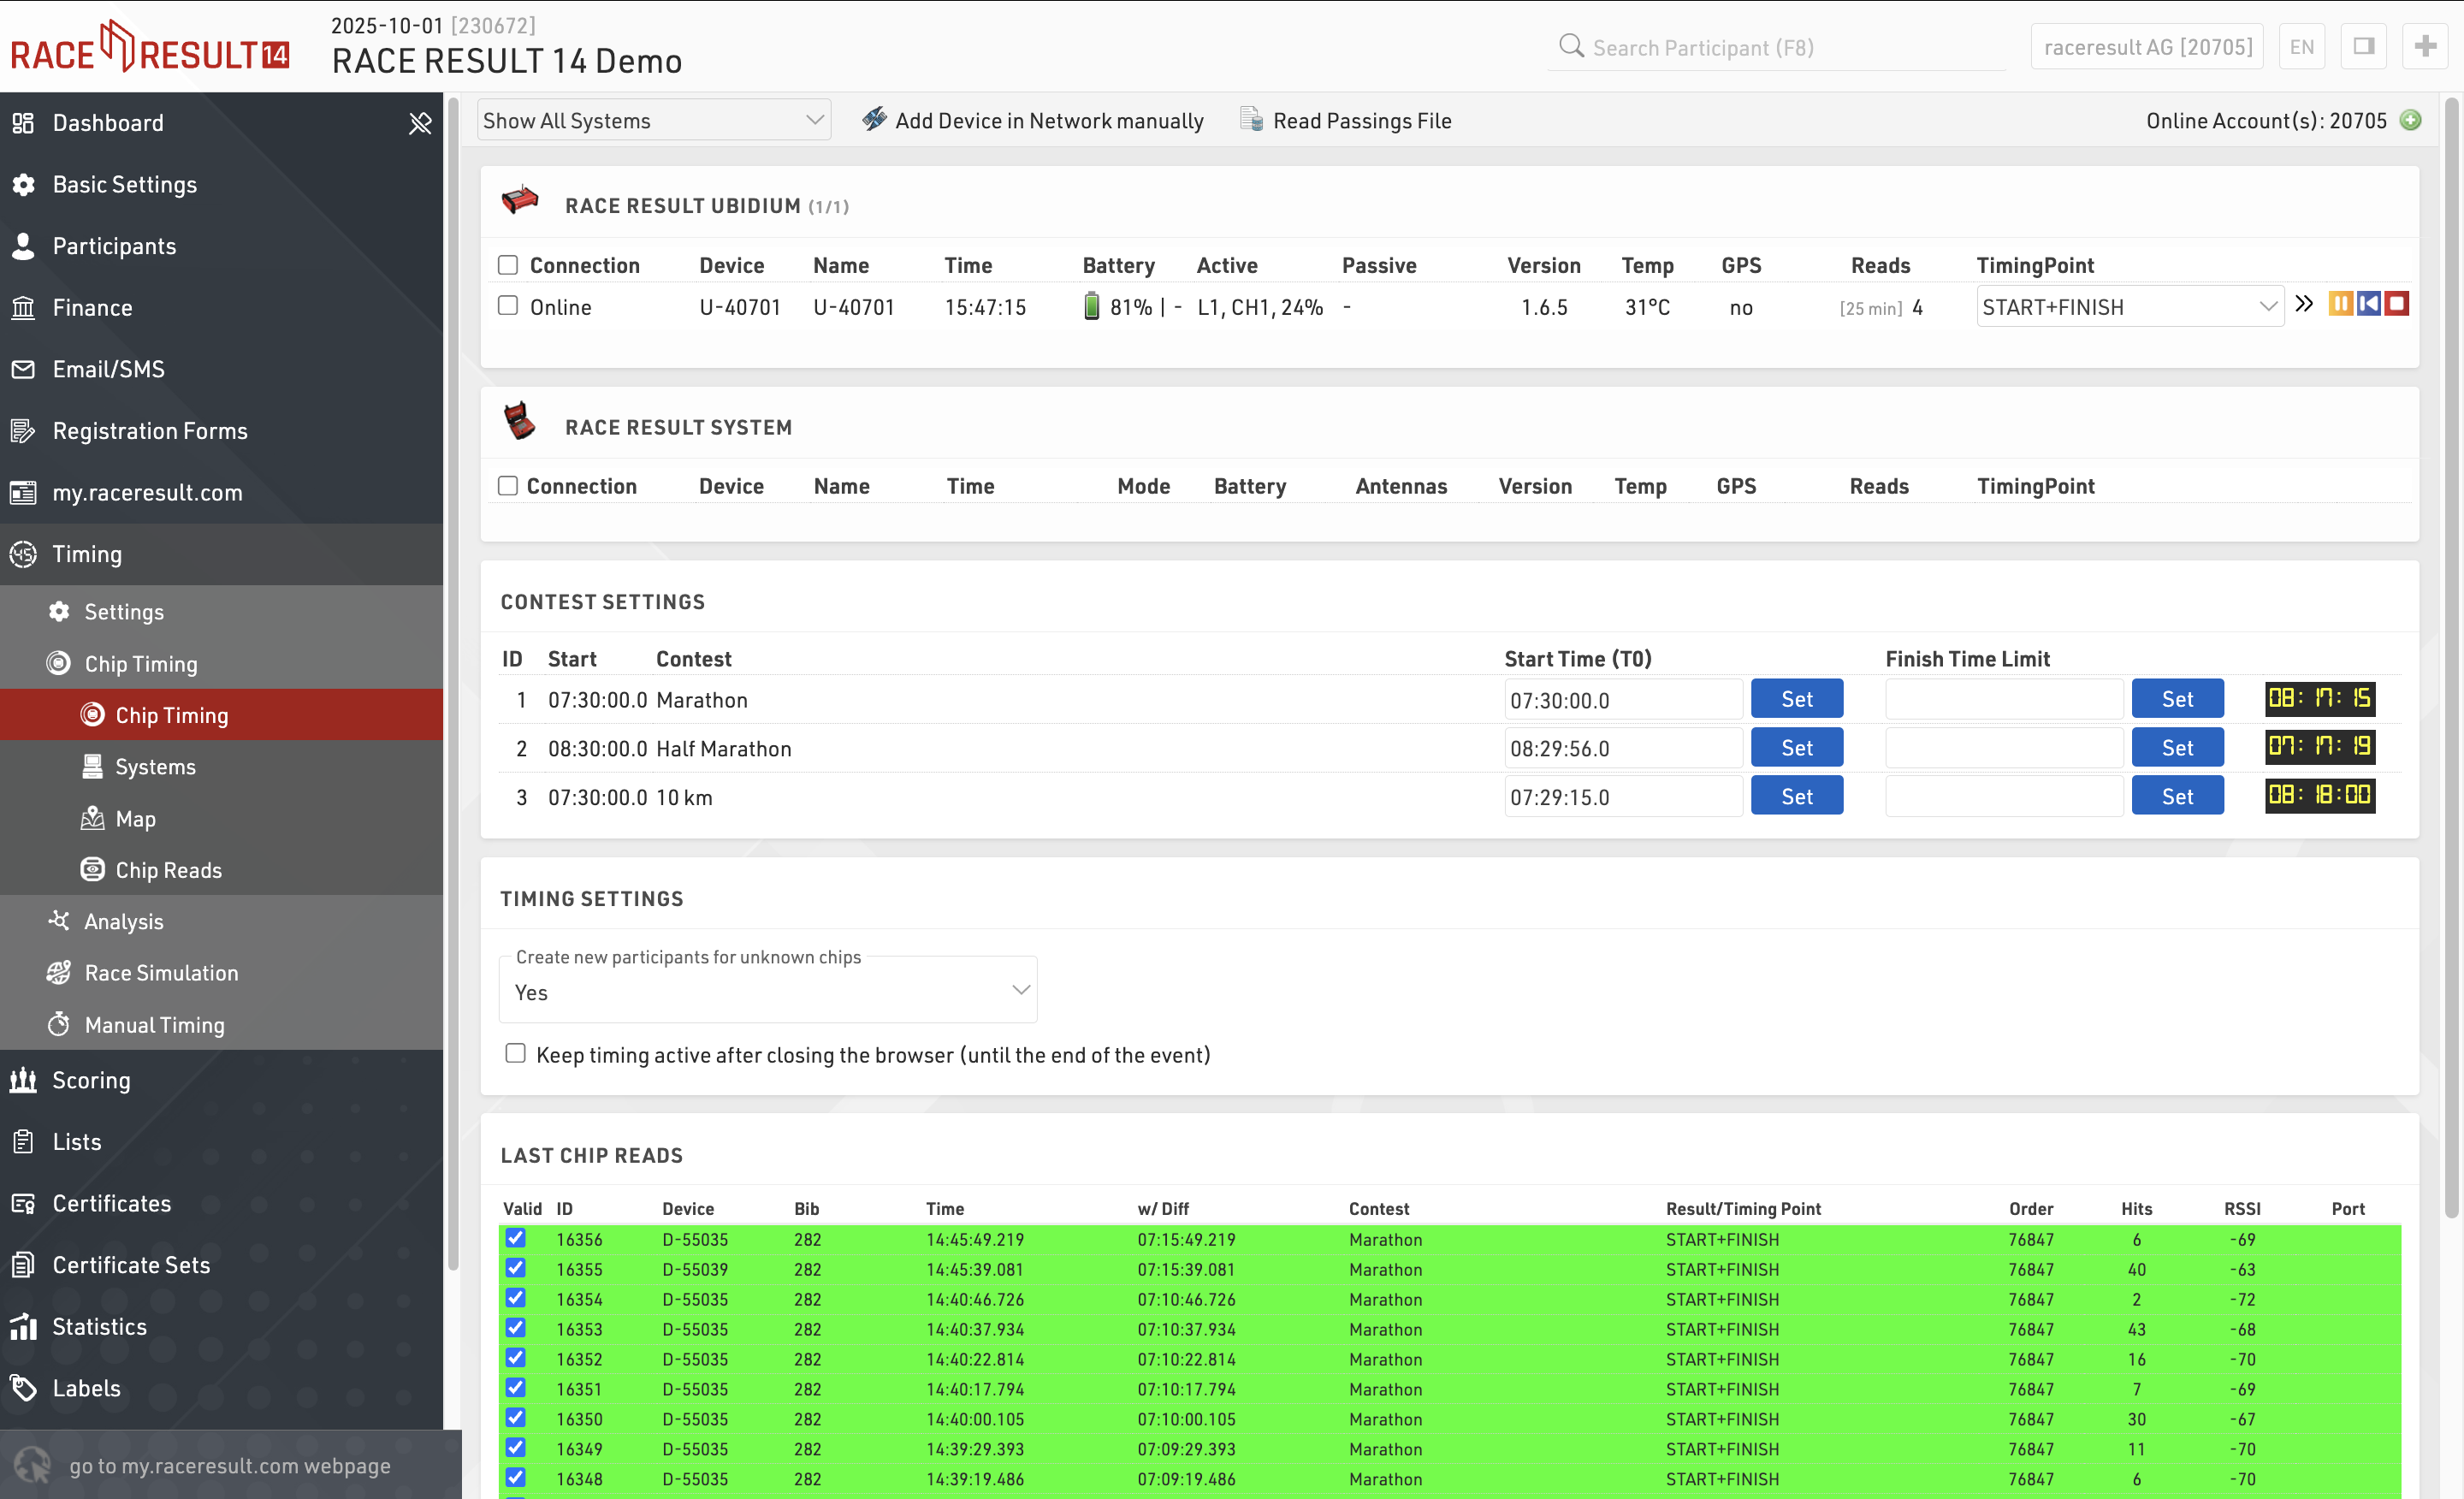
Chip Timing
Chip Timing is used to handle the connections to your timing systems and the flow of raw timing data.
Analysis
Under Analysis you will find some tools which are useful for analysing your event whilst it is ongoing, these are designed to aid you with Timing the event by identifying any erroneous data, most often caused by participant error.
Race Simulation
This tool serves to simulate the race before race day to make sure all your settings are correct. You can either generate all times all at once (so you basically get the final results after race day) or you can simulate the times live. The latter is helpful to test functions like announcer screens or result screens.
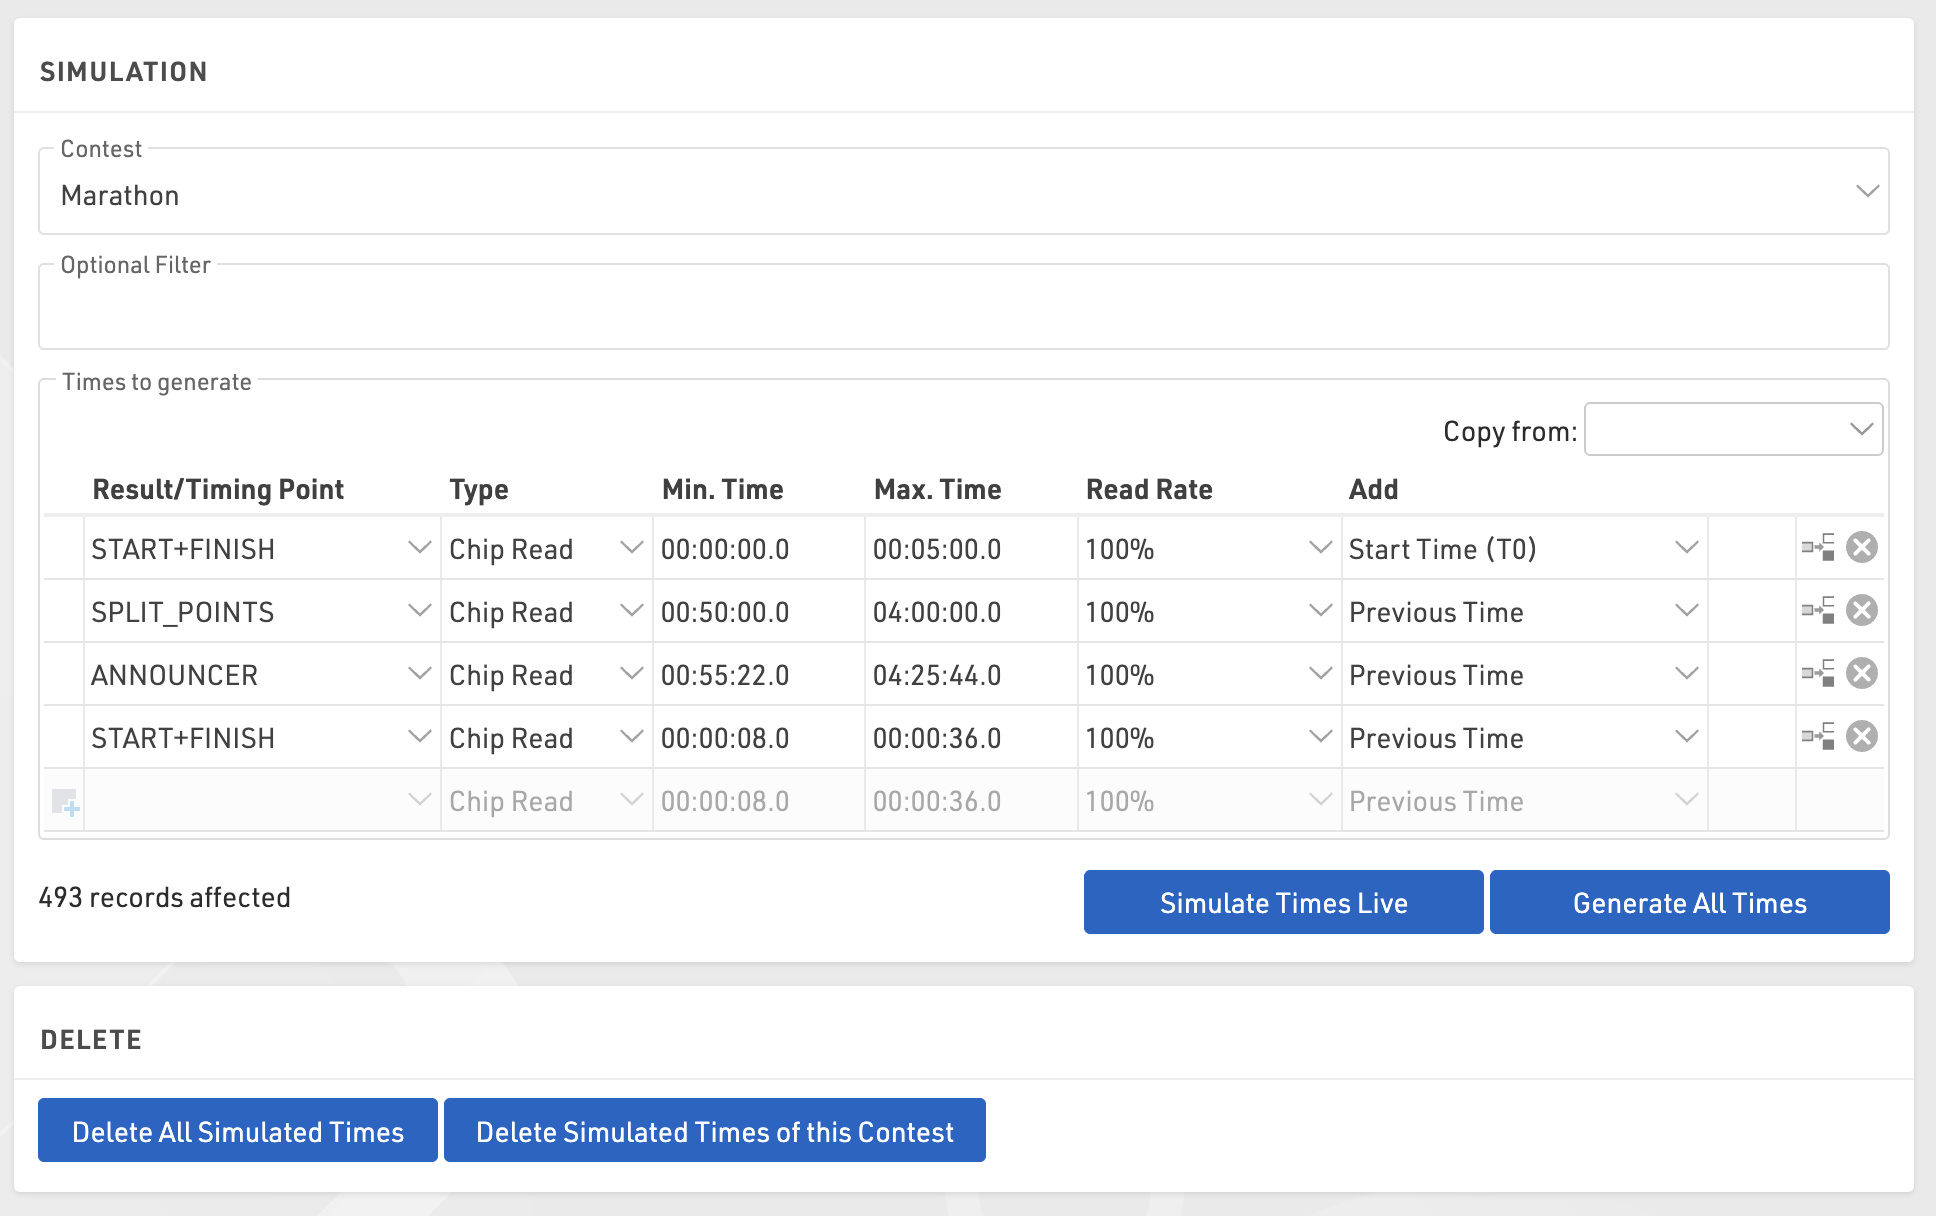
To use the function first select a contest for which times shall be generated and optionally enter a filter if not all participants shall be part of the simulation.
Manual configuration
Select which timing points should be used and enter a minimum and maximum time for each passing you want to simulate. In most cases, you will use the Add function to add the previous time in order to make sure that the time is greater than the previous time. Add T0 to your start detection. For realistic timestamps, set T0 to a realistic time as well. Your minimum/maximum time will then be the sector times. Example:
- Start: min 0:00, max 5:00, Add T0
- 10K: min 30:00, max 60:00, Add Previous Time
- 20K: min 30:00, max 60:00, Add Previous Time
- 30K: min 30:00, max 60:00, Add Previous Time
- 40K: min 30:00, max 60:00, Add Previous Time
- Finish: min 5:00, max 10:00, Add Previous Time
Copy from Splits
If you are using splits you can generate your race simulation based on the splits you configured under Scoring > Splits. To copy your split setup use the Copy from dropdown menu. Under the section labeled Splits select the contest you want to copy settings from.
Generate Times
Then click Generate All Times to generate all times all at once or Simulate Times Live to simulate the times live. In the latter case, you can see the clock running next to the button and you can also increase the speed of the clock. In most cases, you will open another browser tab or window to check the results of the live simulation while the Race Simulation tool remains open and running.
You can also select a Read Rate less than 100% if you want to simulate some missed reads at the start or if some timing points will not be passed by everyone (for example an optional timing line to donate a certain amount).
Manual Timing
The Manual Timing tool can be used to record times manually for each participant, whether as a primary split or finish time or as a manual backup. It can also be used to connect to serial devices which transmit data.
Scoring
The scoring settings define how RACE RESULT 14 uses your raw data to calculate times for each participant.
The most simple option is to use Splits which provide the quickest setup for races which follow a standard pattern, with a defined start and finish such as a point to point or a fixed number of laps. Splits will also automatically generate many of the times and ranks required for lists as well as additional / legs which may span a range of splits. Splits also generate a wide range of fields for each Split, including different time formats, ranks and pace.
For more complex races or for custom scoring methods you may need to define more advanced settings.
Special Results - Results are fields associated with a time, which can be pulled/calculated from Raw Data or calculated from Splits / other data. Results may be required for certain event types such as variable lap races.
Rankings - Checking the configuration of specific rankings, for example overall/gender/age group rank.
Team Scores - A team score will, for example, sum up the times of best three athletes of each club and create a ranking over the team time.
Note: By default, an event file already has overall/gender/age group rankings. You need to work on the rankings only if you want them to be calculated in a different way or if you want to calculate additional rankings.
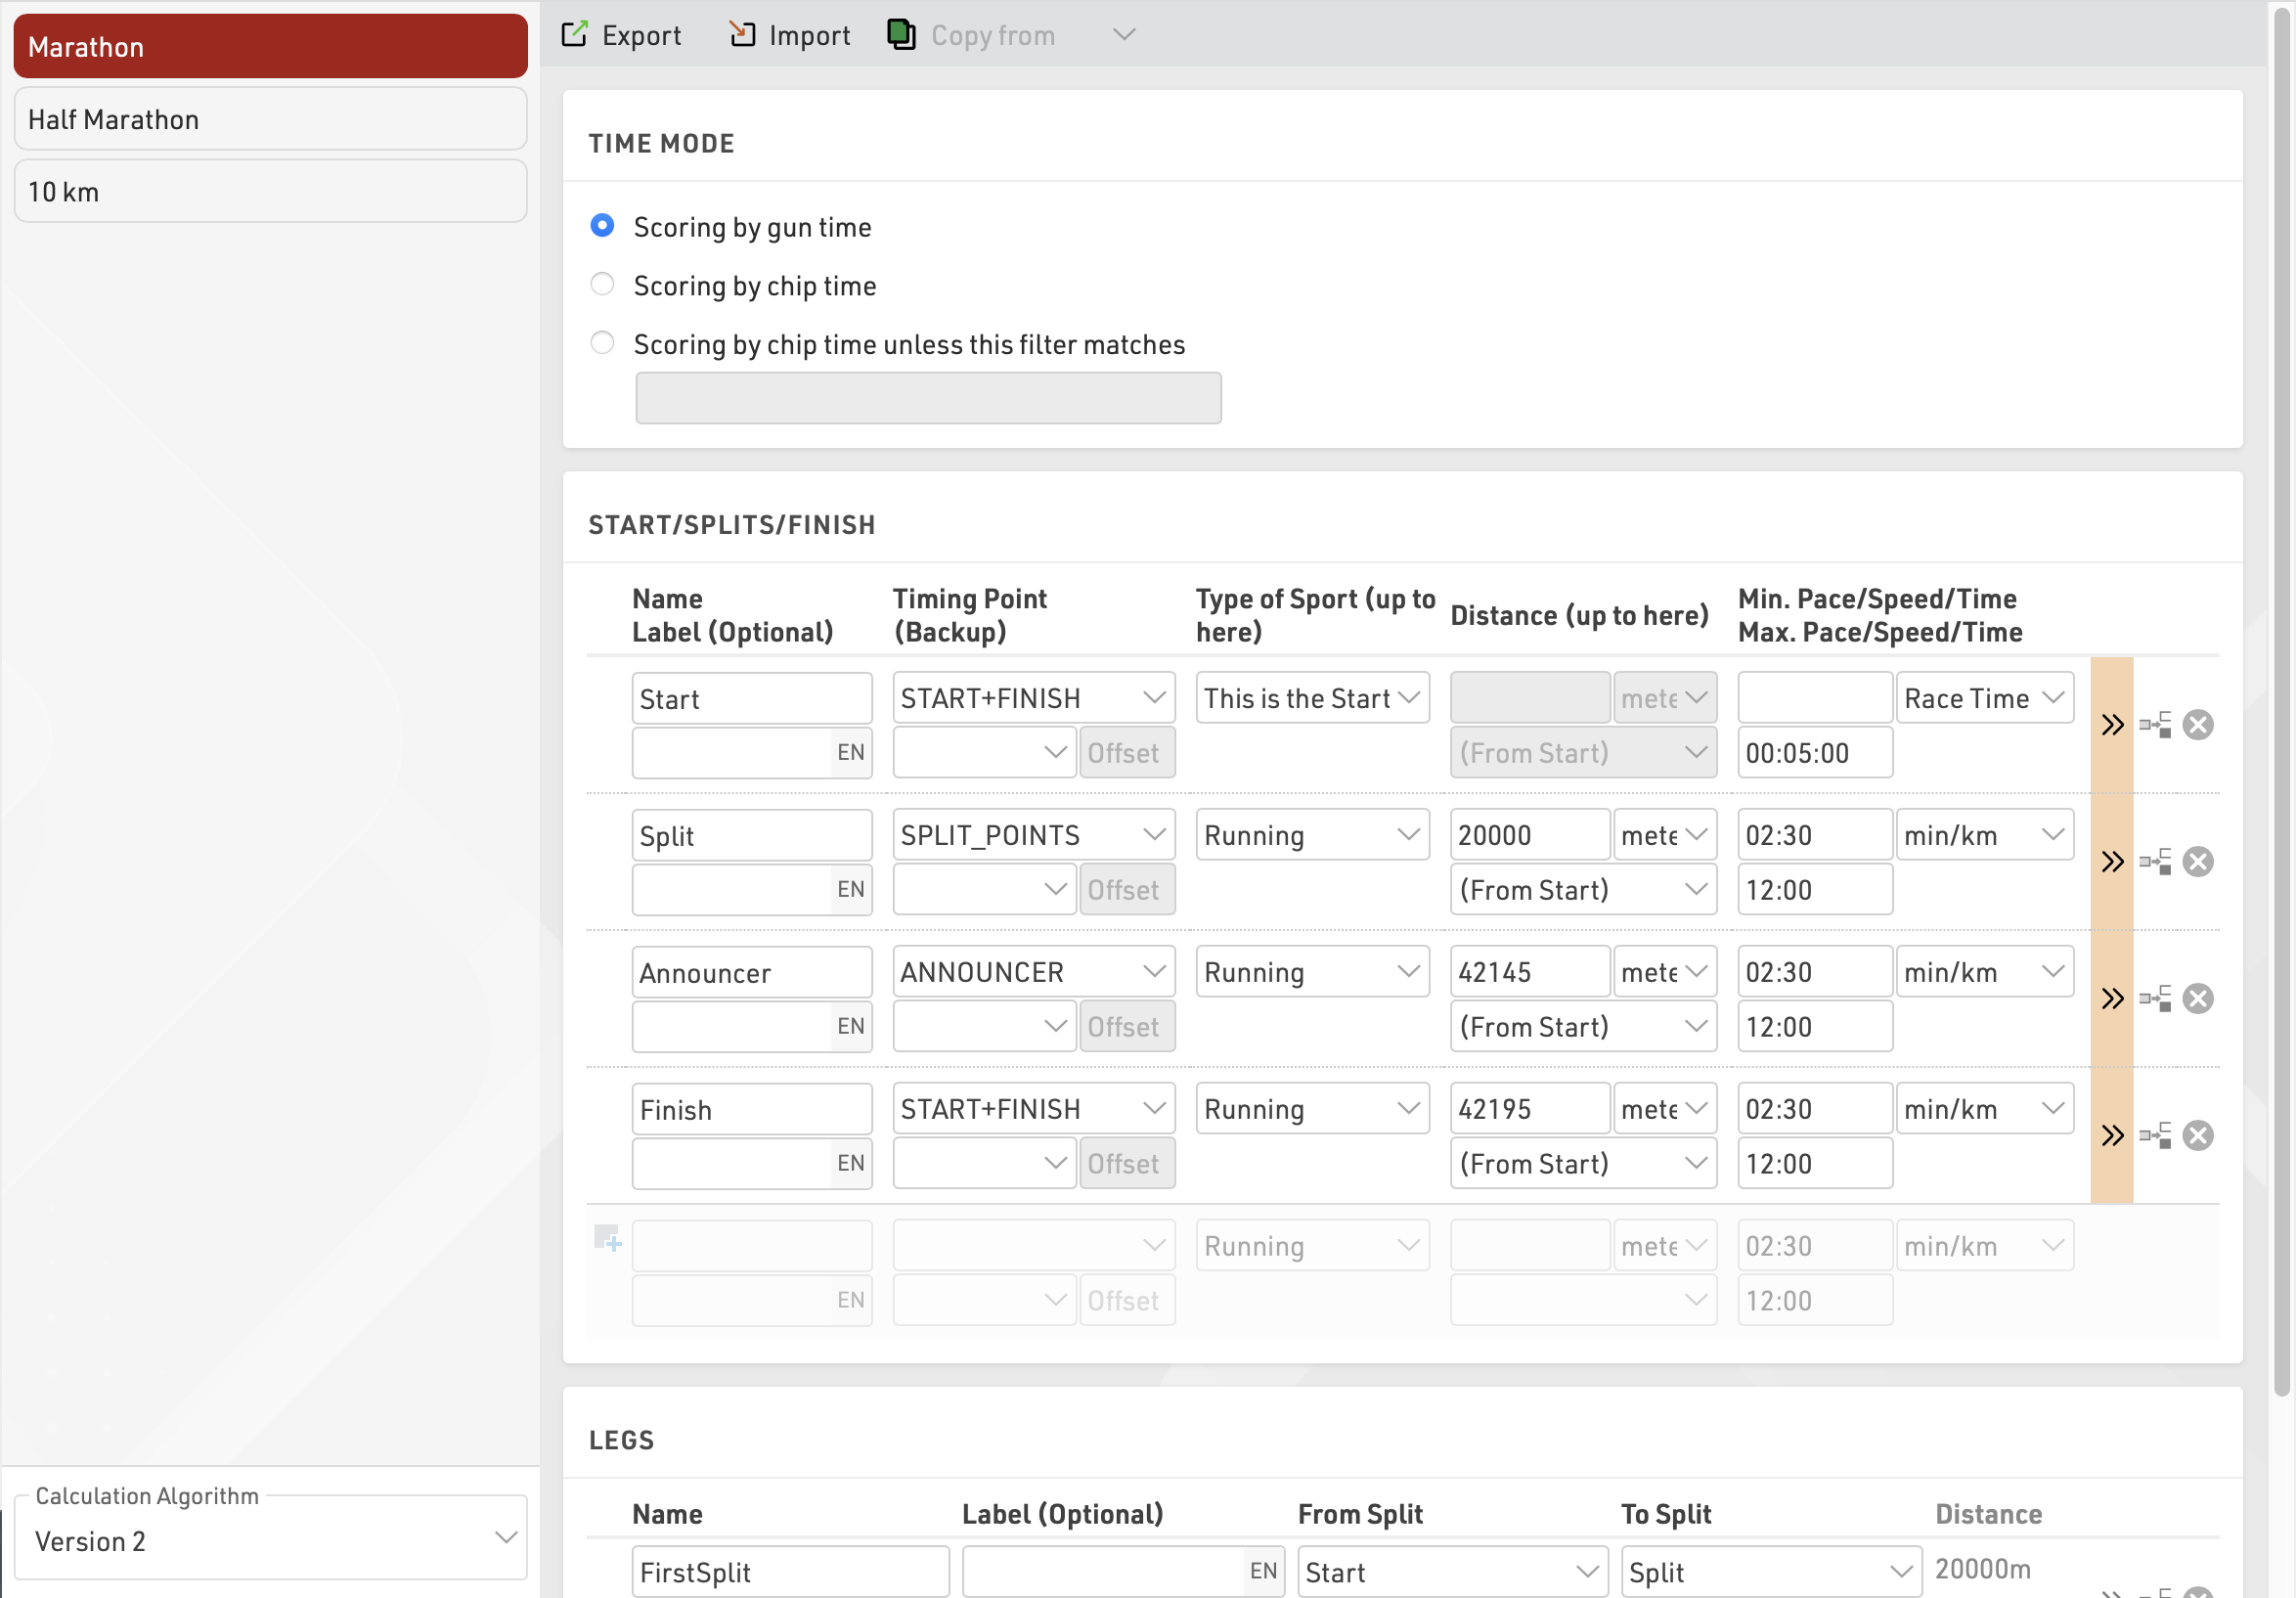
Splits
Splits are defined for each Contest individually, allowing for an easy way of adding additional timing points to a particular contest and also defining contest specific rules where appropriate. Split setup can be copied from another Contest.
Special Results
Special Results are defined with the following settings.
First, choose an ID and a name for the result. The times of the results can be accessed by either the ID or the name of the result, see Time Fields.
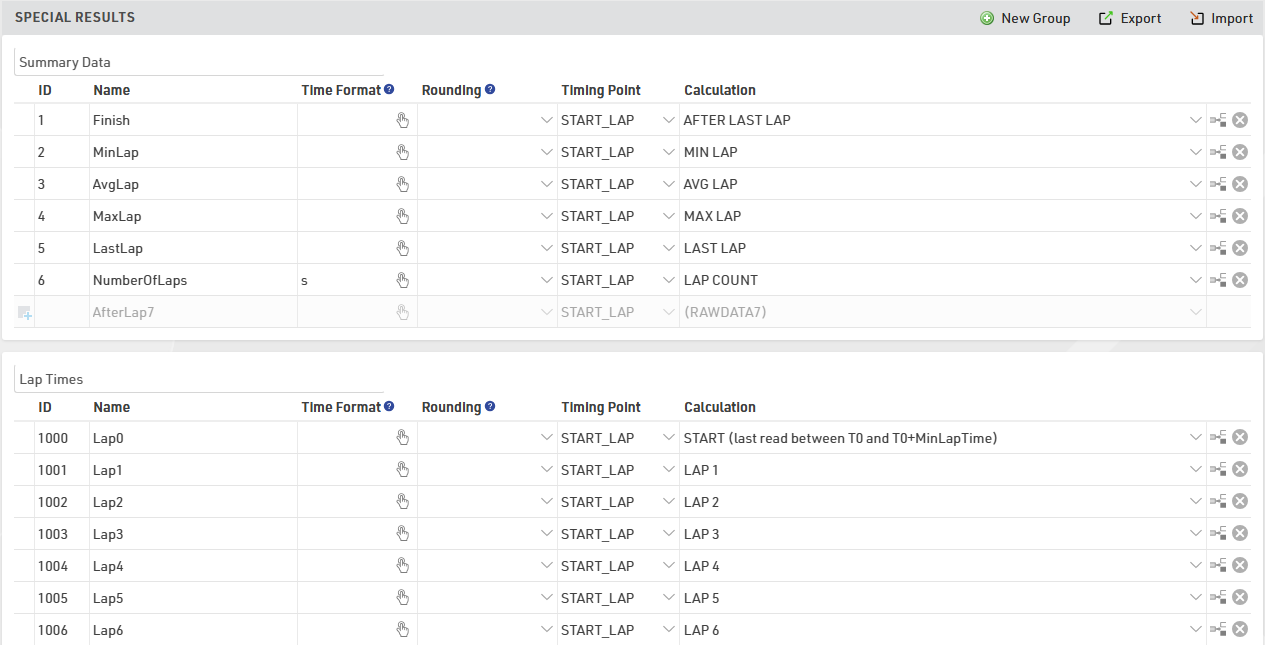
Make sure to choose your IDs wisely so that they are intuitive:
- For example save lap 1 in result 21, lap 2 in result 22, lap 3 in result 23, and so on – instead of lap 1 in result 27.
- Make sure to leave gaps in your IDs, maybe you would like to add something in between later.
- Use the low ID numbers for important results - these will be more visible in the Participants Window.
- Convention is that the result with ID 1 is the most important result, usually a Finish Time.
Next, you can optionally select a Time Format that defines how the times will be displayed, for example h:mm:ss. This time rounding will take priority over the Contest Settings, if you do not define a time format, the format from the Contest Settings will be used. Usually you would define the time format per contest and enter a time format for a result only if that result needs different formatting.
If you have results like number of laps or points, which are a numerical value instead of a time, you can use the time format: s
The same applies to the Time Rounding. If the result shall be rounded other than defined in the contest setting, select a rounding option.
It's possible for an event to have hundreds of special results. Grouping results can help organize the data for easier viewing and handling in the Participants Results Tab and Side-Bar Overview.
Rankings
Using a Ranking, ranks for all or some participants according to any kind of metrics can be calculated. These ranks can then be used in lists, certificates or in any other part of the software.
Our event templates have the three most common rankings already set up by default: an overall ranking, a gender ranking and an age group ranking. You can edit these or set up additional rankings to calculate for example a city championship. Read the sub-article below to find out how to set up your own rankings.
For each ranking these rank fields will be calculated.
Team Scores
A Team Score groups several participants (e.g. from one club) to a team and calculates values such as the sum or the average of their times, and ranks the team compared to other teams. These values can then be shown on lists, certificates or in any other part of the software.
The final result of a team score may look like this result list:
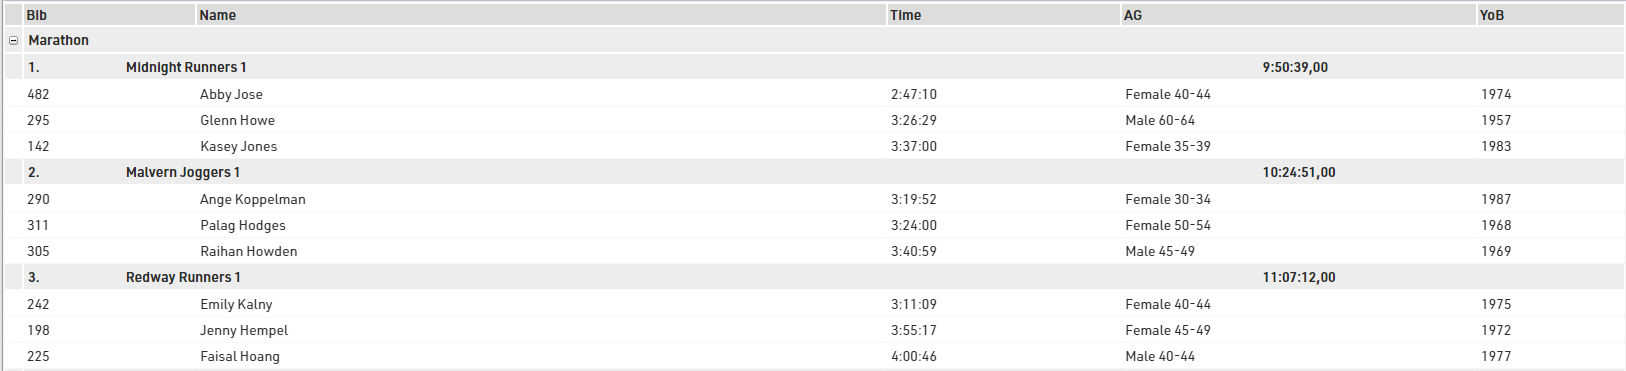
By default, a new event file has two pre-configured team scores (see Scoring ⇒Team Scores):
- Team score 1 (named "Team Score") builds teams of three per club and sums up their finish times.
- Team score 2 (named "Team Results m/f") builds teams of three men or three women per club, sums up their finish times and scores male and female teams separately.
In the window, you will find two lists ("Team Results", "Team Results m/f") which show the results of the two team scores.
In most cases either of these team scores can be used with no or minor modifications. For example, you may want to change the number of participants per team from 3 to 5.
However, if you plan on creating special team scores, you will need to dive deeper into the settings. These are described in the sub-sections.
Lists
Lists are the most important method for getting data out or RACE RESULT 14, and are used for a variety of applications - printed results, publishing online results, presenter screens, creating custom statistics lists, checklists for verifying results or any custom report you need.
The list on the left shows all lists in your event file which can be rearranged using drag & drop by clicking the free space to the left of the list name; list names highlighted in blue are published online through my.raceresult.com.
Lists can be further sorted into folders, to create a new folder, click the Add Folder icon in the Lists Header. By clicking the folder header, the folder can be expanded / collapsed, to sort the items within a folder alphabetically, click the icon. Empty folders will be deleted automatically when you reload the window.
Clicking the name of a list from the menu opens an overview page for that list.
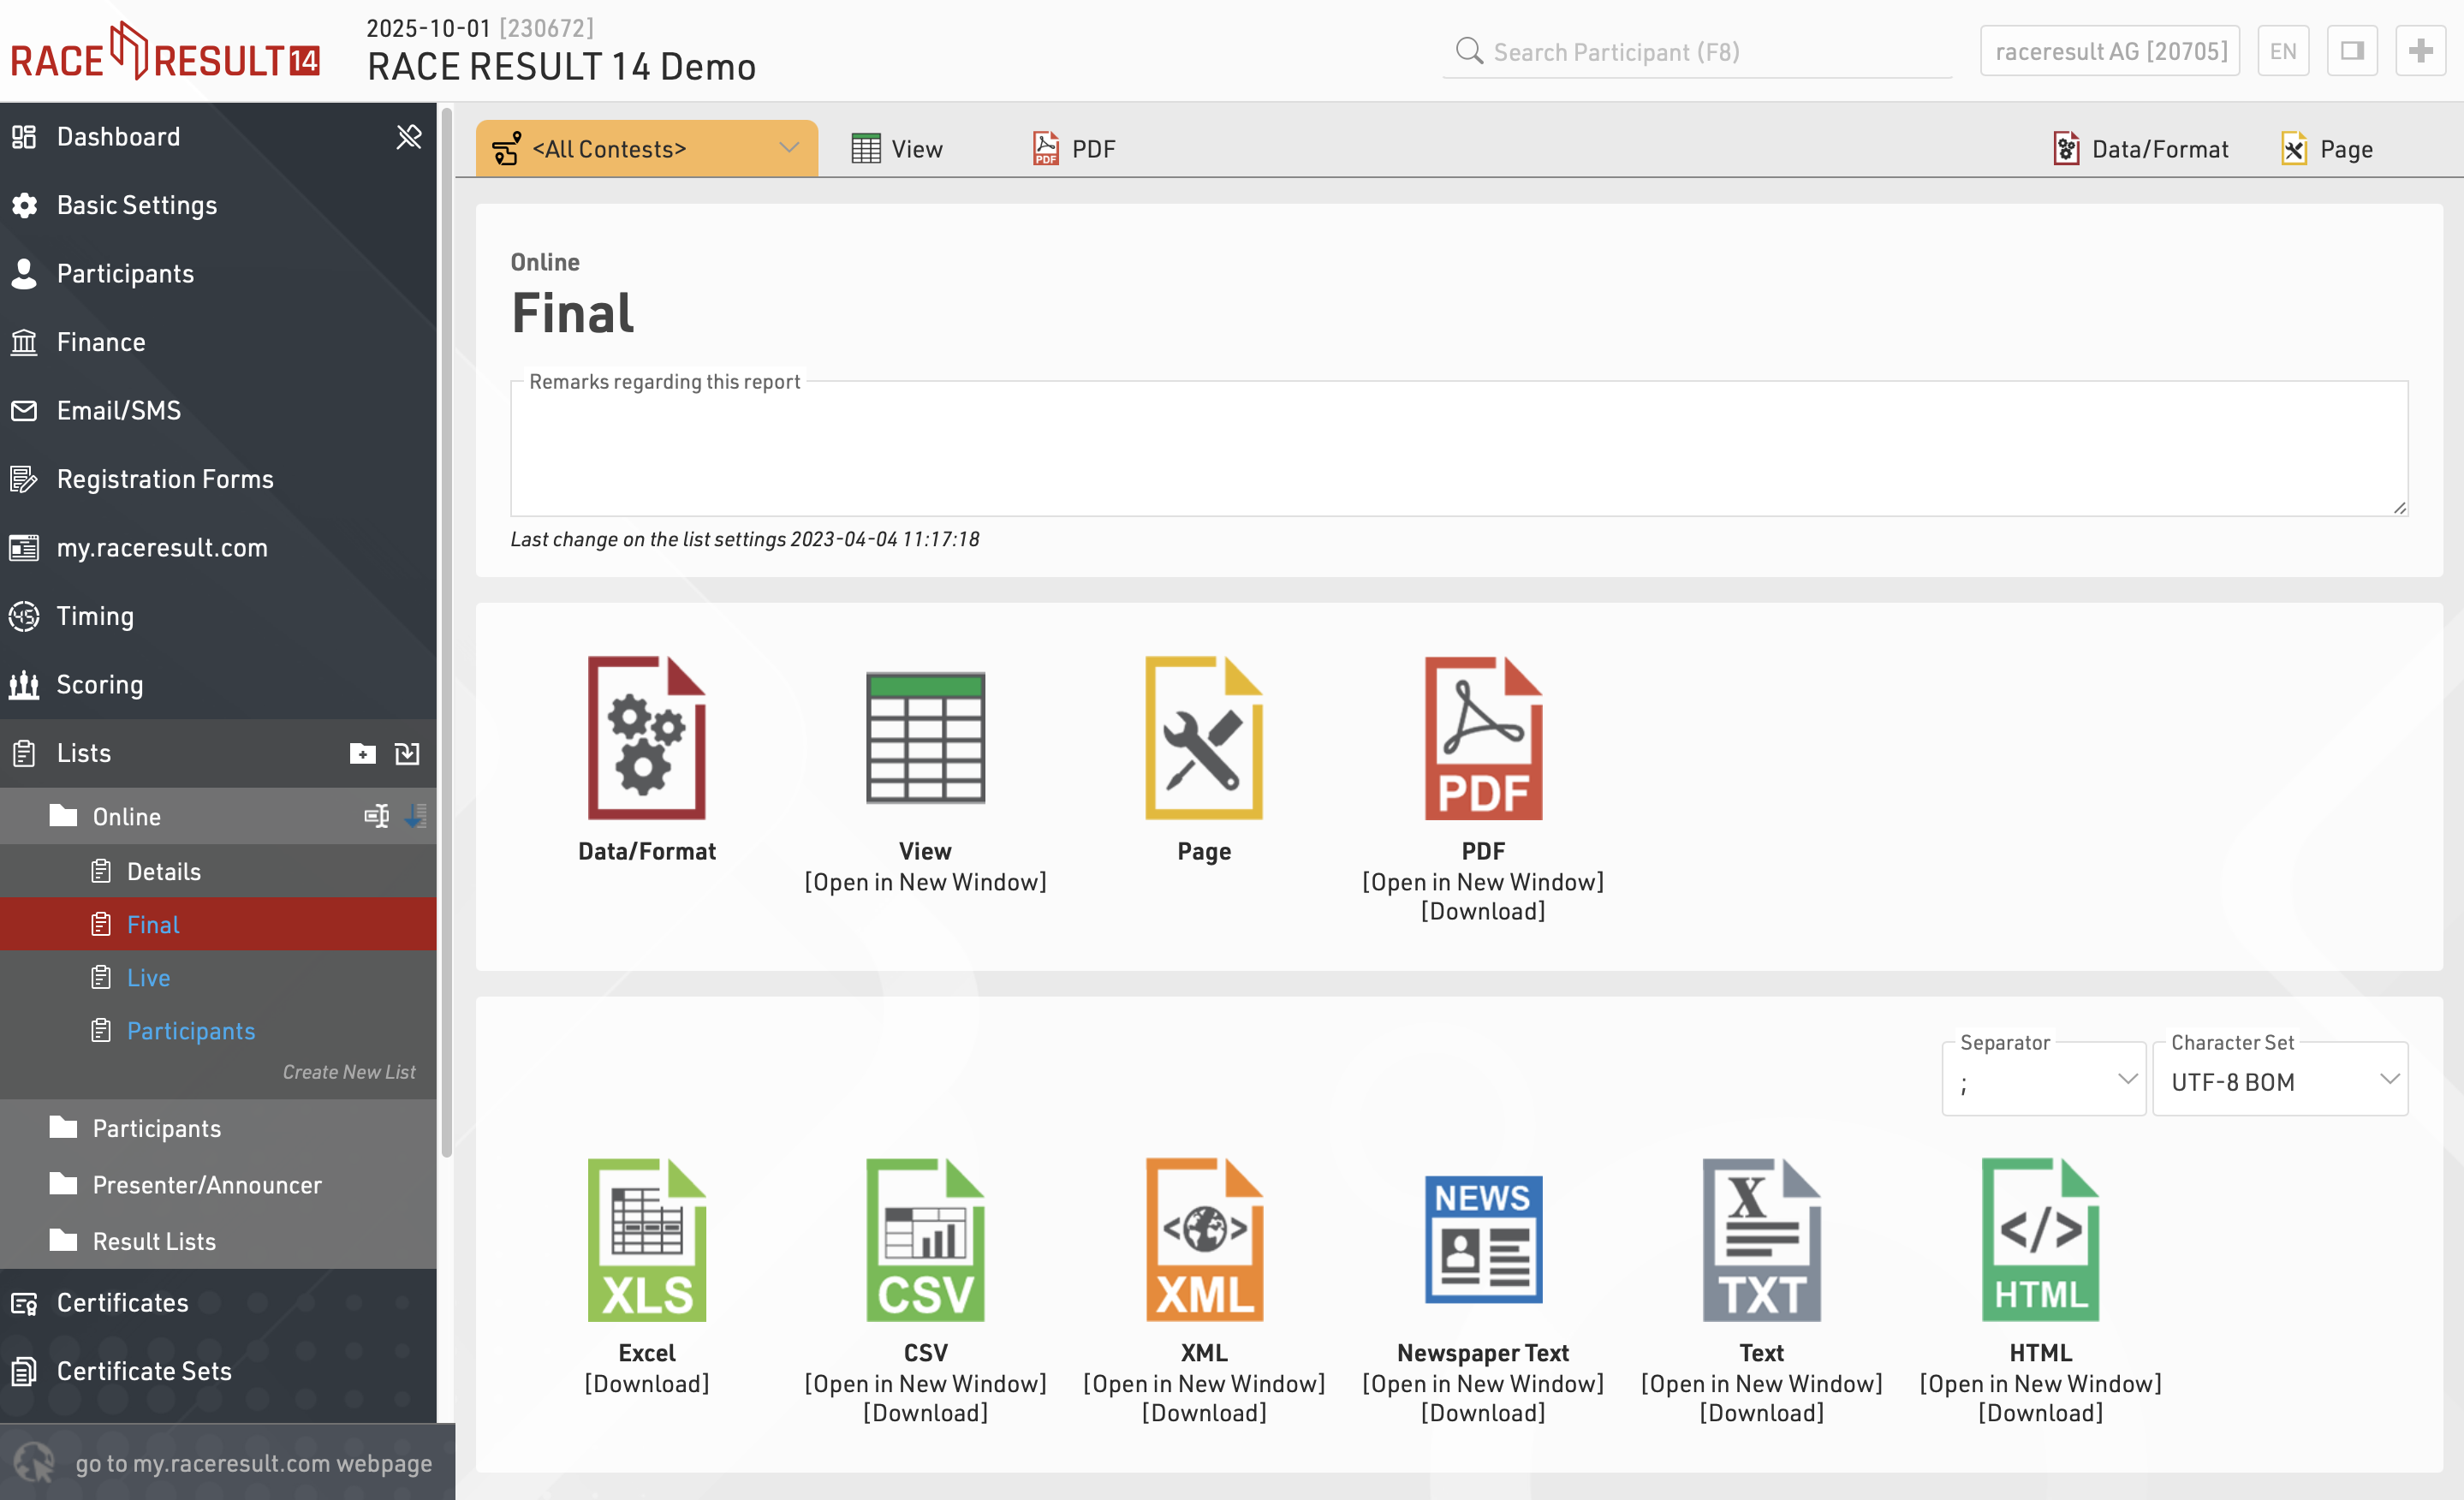
Lists show a defined set of fields for a specific set of records. The settings of a list determine:
- which participants are shown
- which data fields (columns) are shown
- how the records are sorted
- how the records are formatted
- how the page is formatted (page format, margin etc)
The settings of a list are split into the tabs Data/Format and Page. Data/Format contains all settings regarding the data shown on the list and how it is formatted, whereas the Page settings concern the general page layout and are only relevant for the PDF and HTML output form.
To view a list click the View button or tab, this can also be opened in a new window, lists can also be opened directly to the View tab by double clicking the list name from the menu. A PDF view of the list can also be previewed or downloaded.
Lists can also be exported in different formats as EXCEL, CSV, XML, TXT and HTML.
Data/Format Settings
The Data/Format Settings tab is divided into three sections: Grouping/Sorting, Fields/Columns and Filter. Each of those sections will be explained in the following. According to the settings and selections made in those sections, the participant data will be displayed in the list.
Grouping/Sorting
This section defines how the records on the list will be sorted.
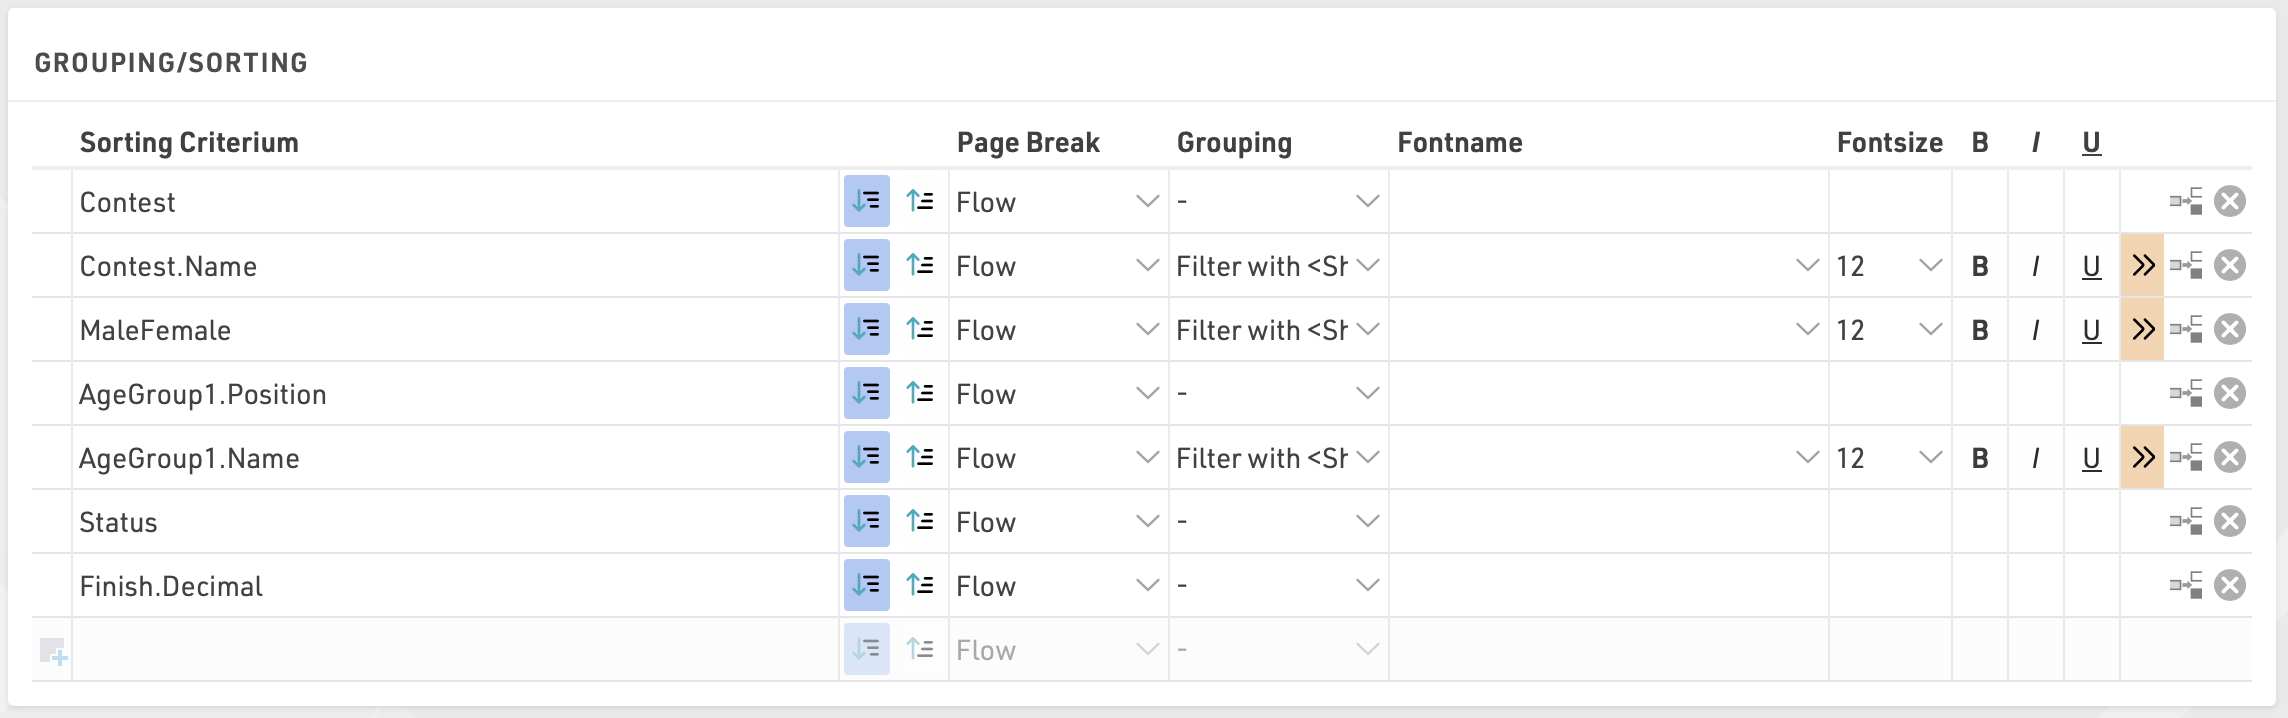
Simply select one or more fields from the Field Wizard which pops up below the input box. The list will be sorted by the first field and, if this field is not decisive, by the second, and so on. Additionally, for each field, choose if the records shall be sorted in ascending or descending order.
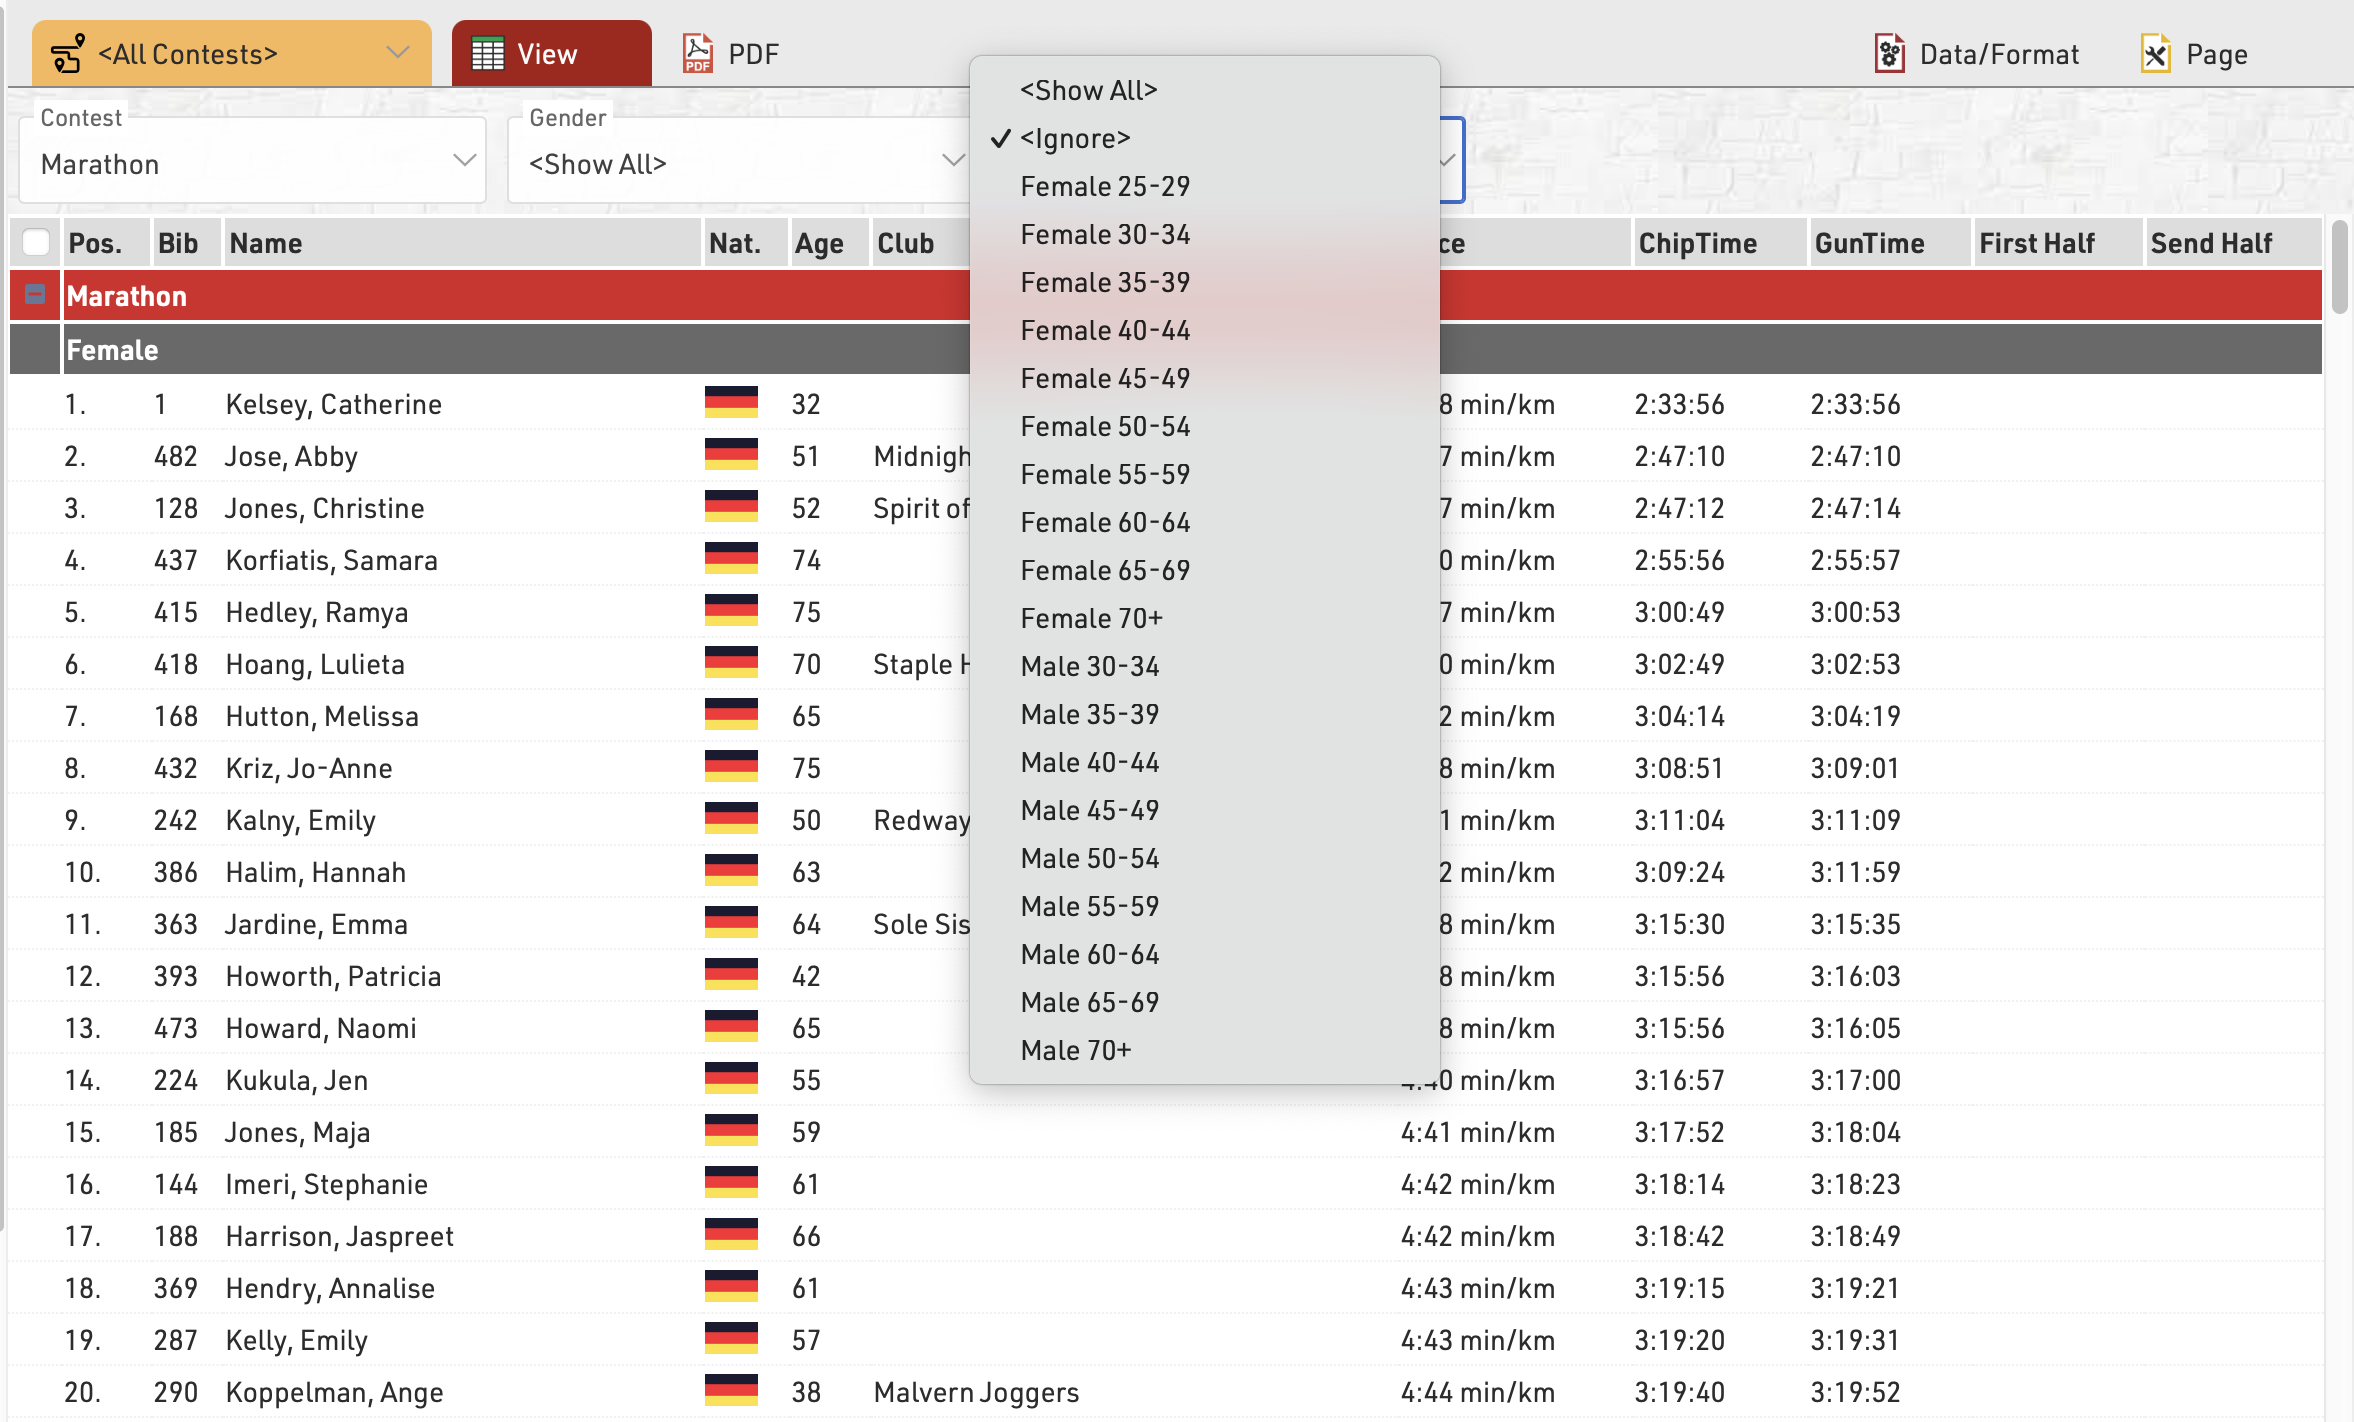
Fields can also be used as a Grouping or Filter, when used as a Grouping then a group header line will be inserted for each group value on all output types. Alternatively a list can be filtered by a group, with this setup an additional dropdown will appear in the preview and also on my.raceresult.com for each filter which can then show all groups, filter to a specific group, or ignore this level of grouping all together (if filter with ignore is selected). Filter is particularly useful for online results to make these easier to navigate / filter to the data somebody actually wants to view.
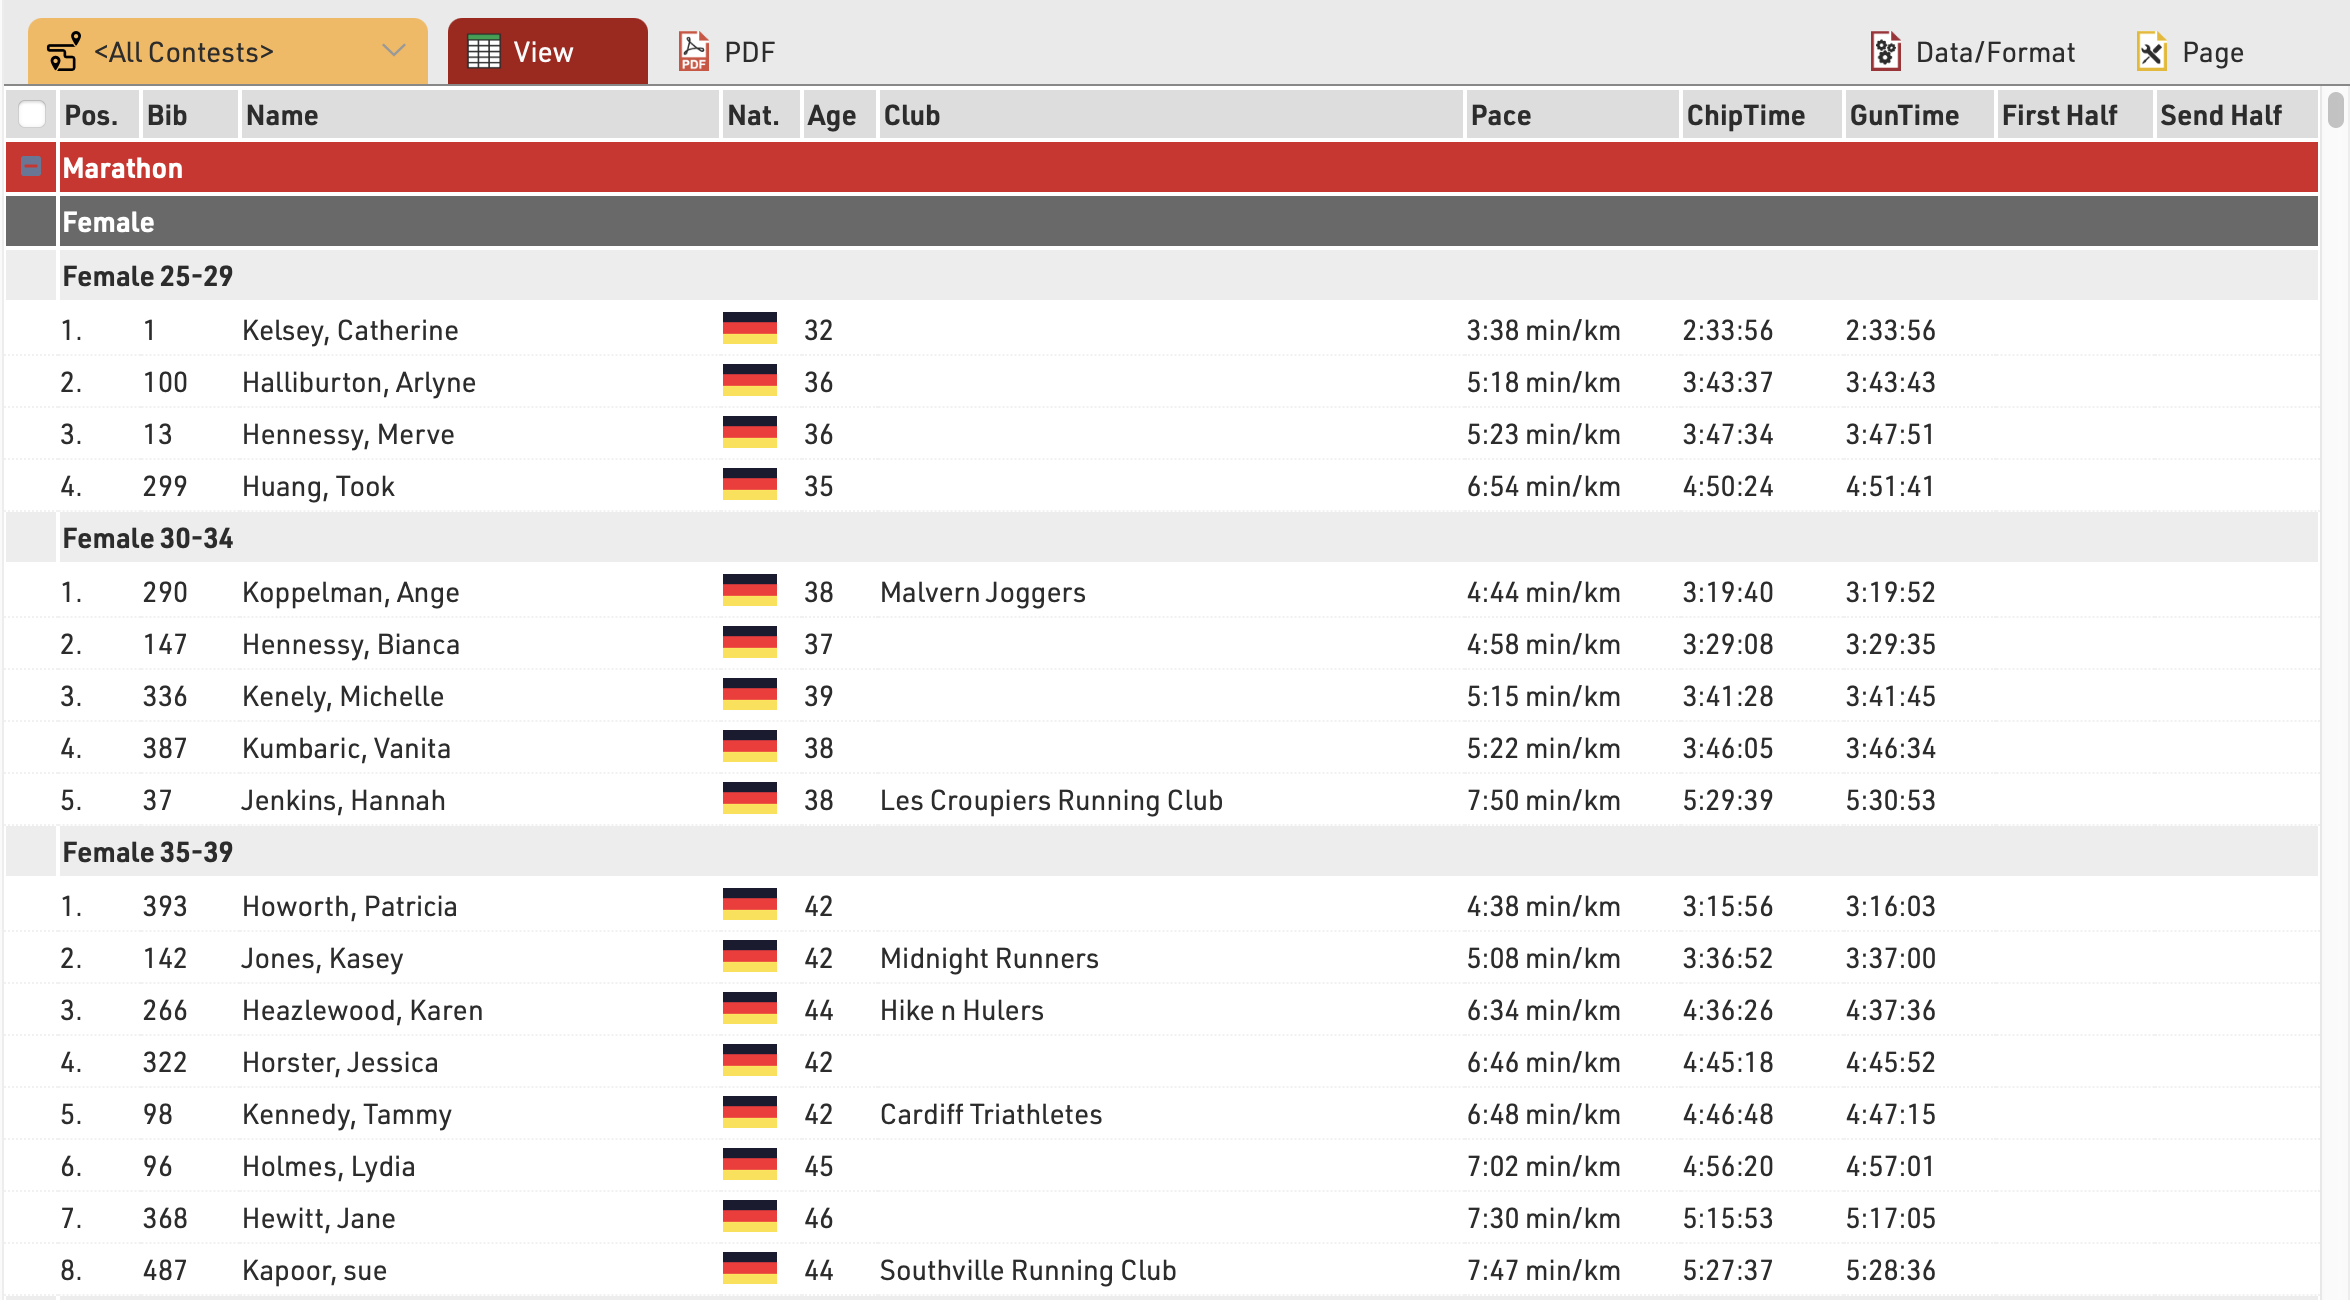
This list is grouped by contest, gender and age group:
and below the same list using a filter instead of simple grouping, where each level can be filtered using the dropdown menus.
See Grouping/Sorting Details for more details and option
Fields/Columns
In the section Fields/Columns select the fields which shall form the columns of your list.
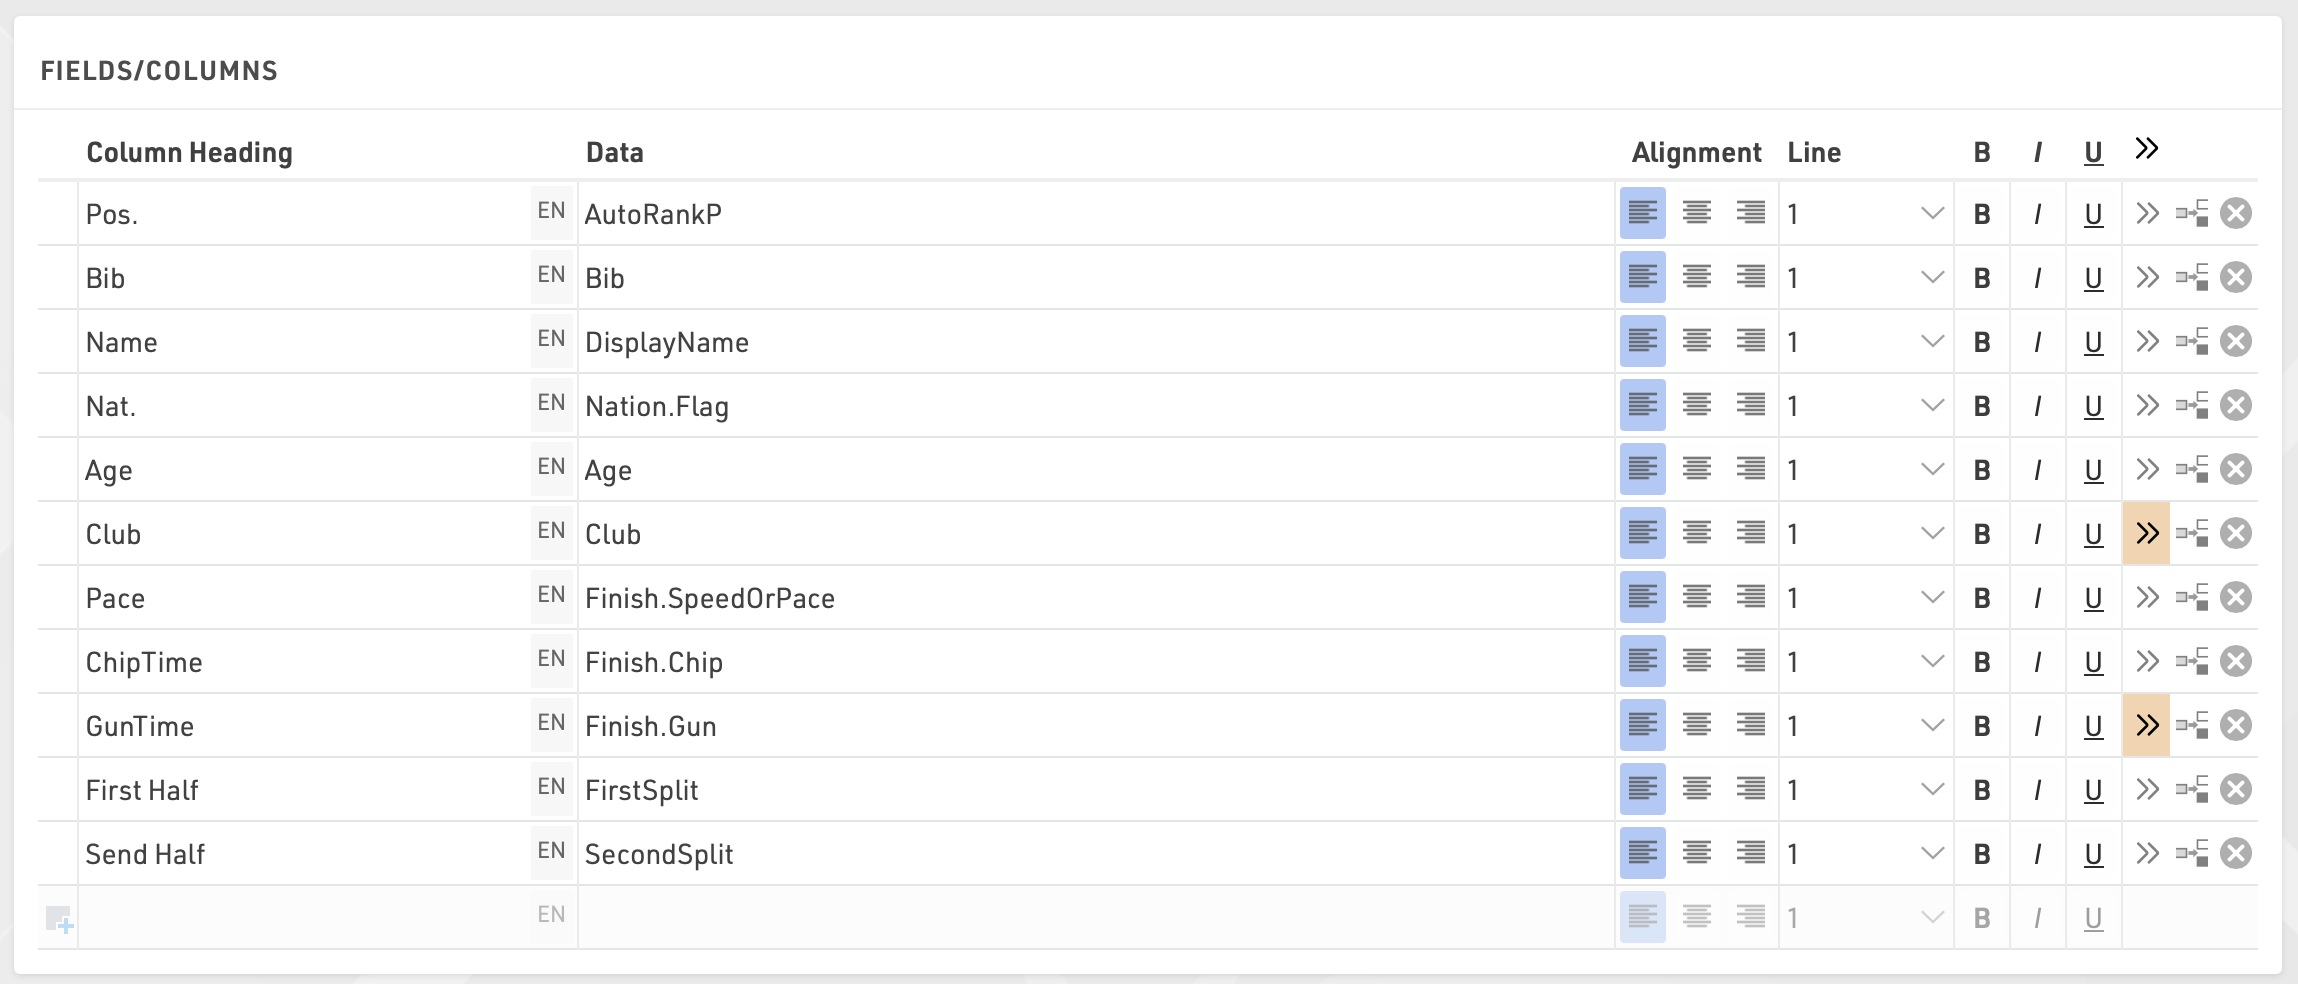
In Column Heading enter a description of the field and in Data select a field from the Field Wizard or enter an expression. For example, using an expression you can combine the fields Lastname, Firstname and YearOfBirth to: "Doe, John (70)"
The corresponding expression would be:
[DisplayName] & "(" & [YearOfBirth] & ")"
Select a line number greater than 1 to create Multi-Line Lists.
Additional formatting is available through the Extended List Column Settings.
Filter
By setting a Filter you can exclude certain records from the report. If you do not define a filter all records will be shown on the report.
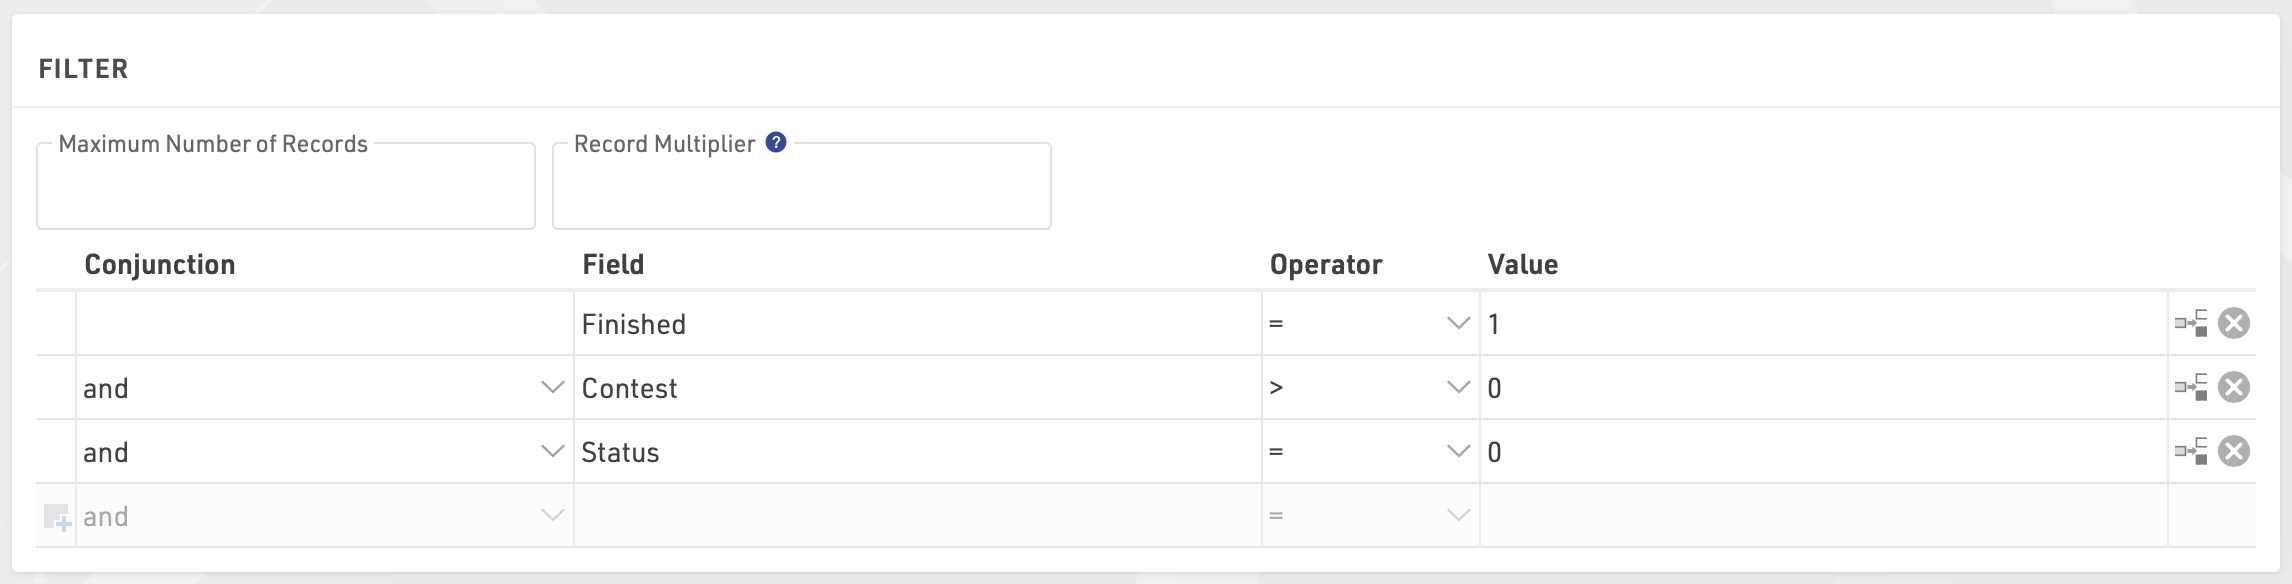
In particular, filters are important for result lists: you would like to show only those participants that have already finished. Usually, the filter will be that the rank must be greater than 0.
Instead of setting a filter, you can also limit the number of records shown on the list by setting a maximum number of records.
Besides, the Record Multiplier allows to show records more than once with different information (e.g. lap times) on a list.
View
When viewing lists there are some additional functions and shortcuts to make working with the list and participant data easier.
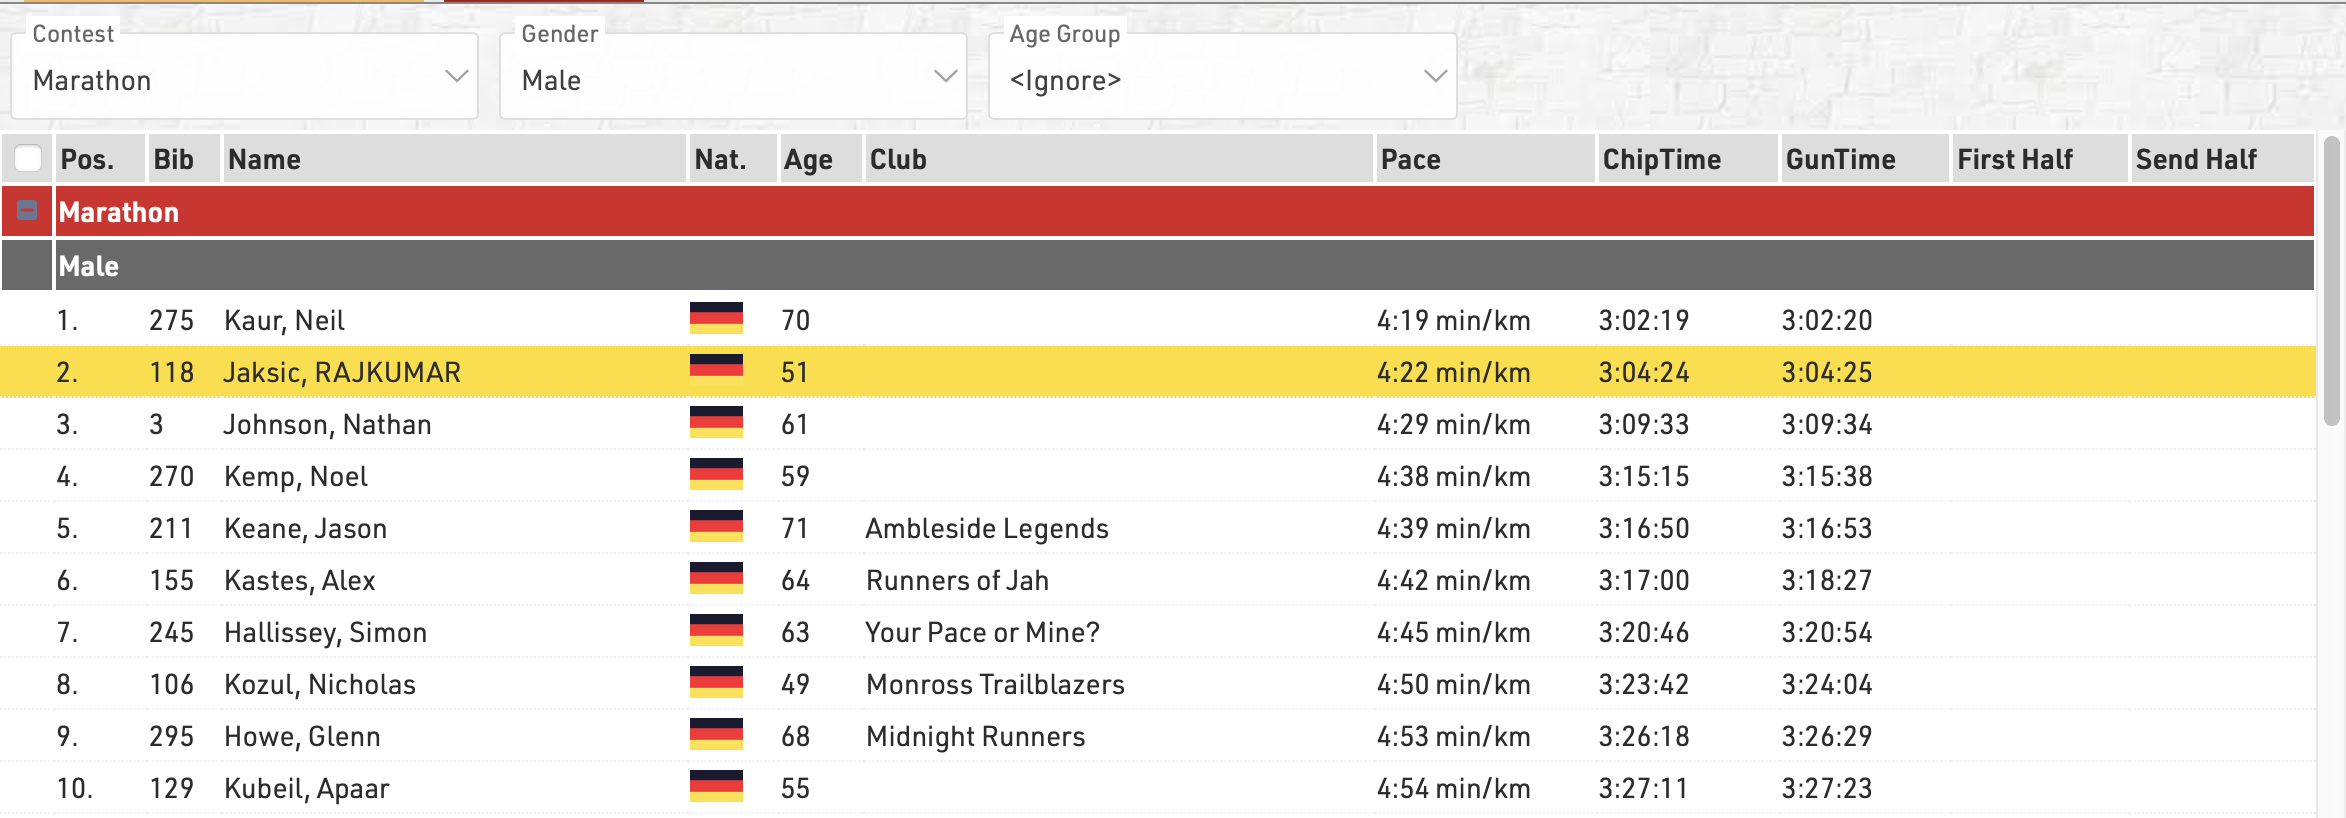
Any Filters you have applied to the list will be shown at the top of the list, allowing you to quickly filter to specific data sets. If using Groupings then the groups can be expanded or collapsed using the +/- icon at the start of the row.
Hovering over a row will highlight that entire row yellow.
Clicking on a row will open the Participants Tab directly to that participant record, if the right-side dock is open to the Participants Tab then it instead the participant record will be opened here.
Live Update allows you to set the list to automatically refresh at a pre-defined interval (from 1s to 60s), useful for monitoring specific lists during a race in an additional window.
Font size can also be adapted between 40% and 200%.
Page Settings
The settings in the Page tab are mostly relevant for the PDF output format as well as partially for the Presenter (marked with a *) and define how the records will be formatted and which additional information will be shown in the page header and footer.
Page Settings
Select here the page format, choose between portrait and landscape orientation and define the page margin in millimeters.
Multi Column
In some cases it can be helpful to split the page into several columns:
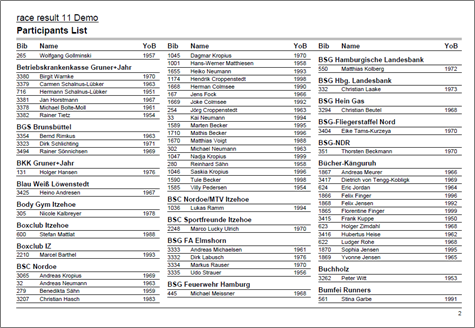
Simply define the number of columns and the column spacing in the Page settings of your list.
Background
The settings under Page Header allow you to put a picture in the top right corner of the report. However, if you require more flexibility regarding the design of the list, you can select a certificate at Design that will be shown in the background. This option gives you unlimited flexibility in designing your reports.
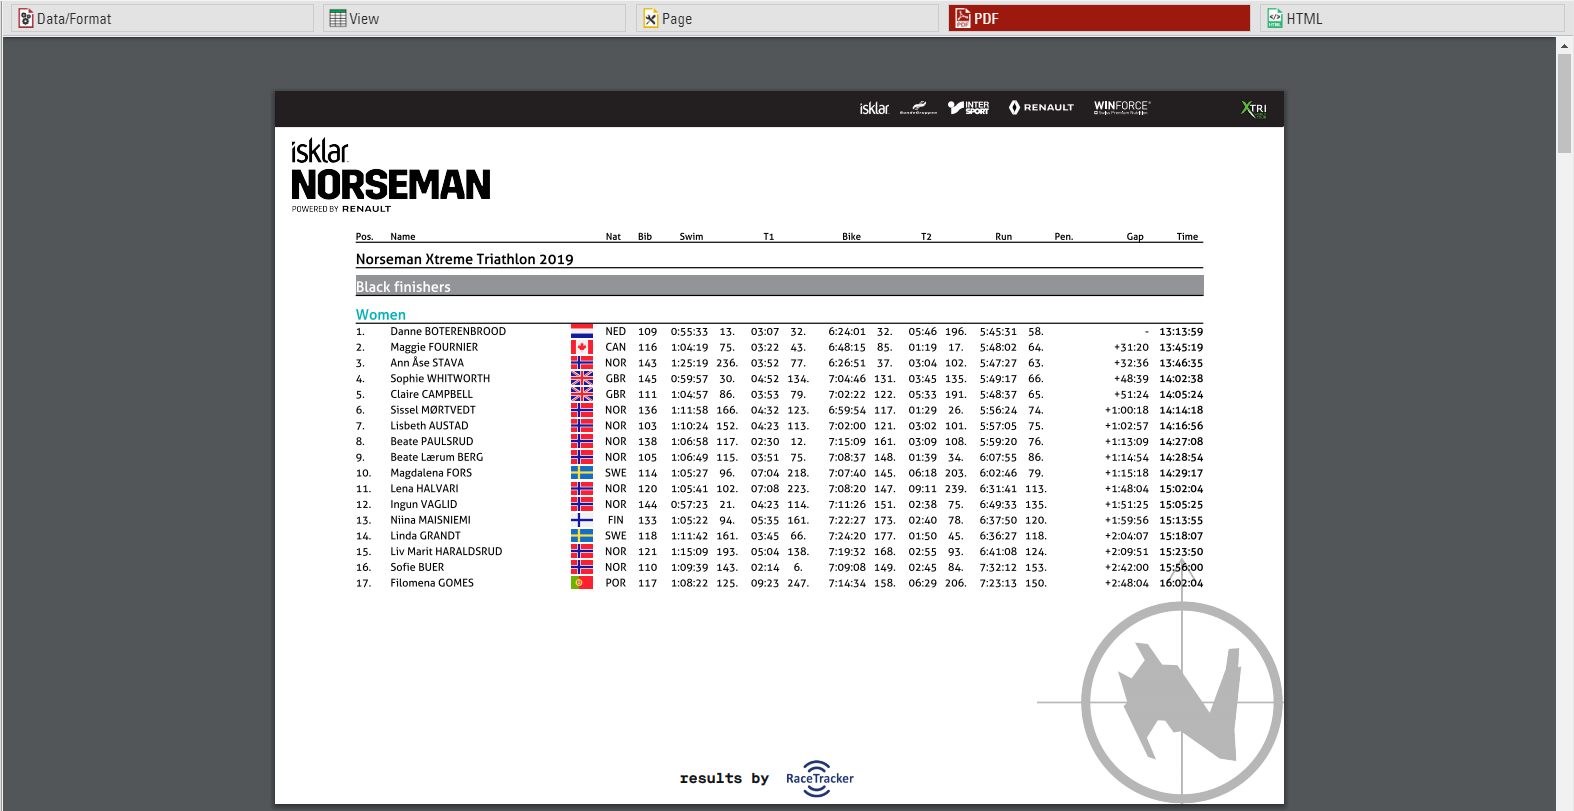
Cover sheet
Similar to the background, you can insert a certificate as an additional Cover Sheet at the beginning of your report and an additional Back Sheet at the end of the report.
Page Header
Via these settings you can add and format the following elements of the page header: two header text lines*, the column headers*, a picture (which will be shown in the top right corner) and a gray line below the two header lines.
Records *
Define here the font type and size of the data records. Additionally, define if there shall be a thin line between the records and if every other line shall have a gray background. Via the Line Spacing setting you can define the height of the records.
Hint: Probably you would like to have the same font type throughout the entire report. Therefore, simply select the font type here and leave all other font type boxes empty. The font type for the records will then also be used for the header and footer texts.
Page Footer
You can add several texts and an image to the page footer. For example enter [Page] to show the page number in the footer of your report.
List Header and Footer
Enter an additional text that will be shown at the beginning/at the end of the list.
Output Selector
The output selector is designed to allow for easier creation of results lists which may otherwise require multiple output lists and ranks to be setup. It also includes an option to always show the last result which makes live results lists even easier to setup.
When the output selector is enabled an additional filter is shown which allows the user to select which result they want to look at, there are then a few different fields which can be used to show information according to which result is selected.
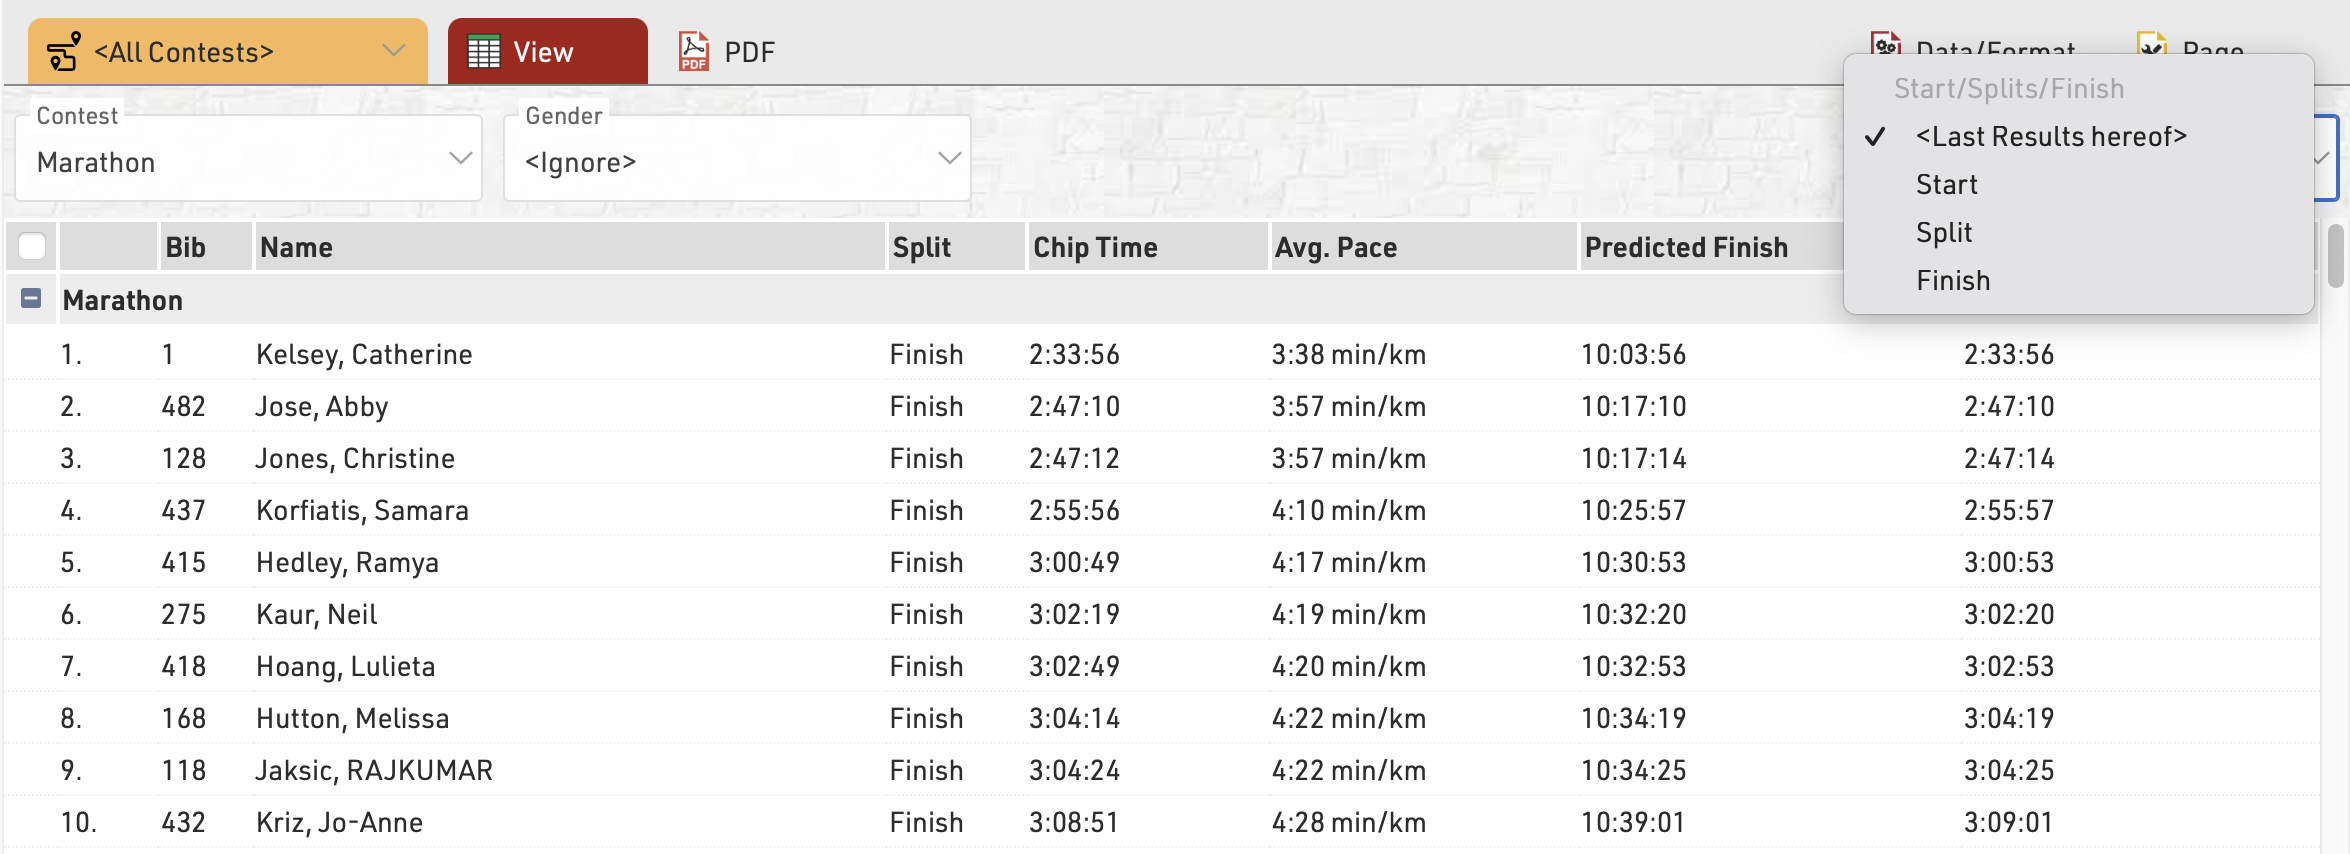
Inserting Images
Images can be inserted into Output lists, these can be useful for functions such as linking to participant photos, videos or team logos.
Images can be inserted either from the event file pictures, a user-defined function or from an external URL link.
To insert an image use the code:
"[img:ImageName.png|height:30px]"
Ensuring that "ImageName.png" is the correct name and file ending of your image.
"ImageName.png" can be replaced with either your user-defined function or the URL of the image. When replacing the image name with a UDF or other data field you need to concatenate the data field name with the rest of the string.
"[img:"&[ImageUDF]&"|height:30px]"
If no height is defined then the image will be shown in full size.
Certificate
The Certificate creates a graphical layout which can contain images, text and even data fields.
Certificates may be used for
- Layouts of Certificate Sets to generate individual participant certificates
- Background image for a List
- Cover sheet and closing page for a List
- Content of Labels
Certificates can be designed in any size format allowing them to be designed for different printer types, additionally - certificates may contain multiple pages.
The list on the left shows all certificates in your event file which can be rearranged using drag & drop by clicking the free space to the left of the list name. Certificates can be further sorted into folders, to create a new folder, click the Add Folder icon in the Certificates Header. By clicking the folder header, the folder can be expanded / collapsed, to sort the items within a folder alphabetically, click the icon. Empty folders will be deleted automatically when you reload the window.
Clicking the name of a certificate from the menu opens the layout editor for that certificate.
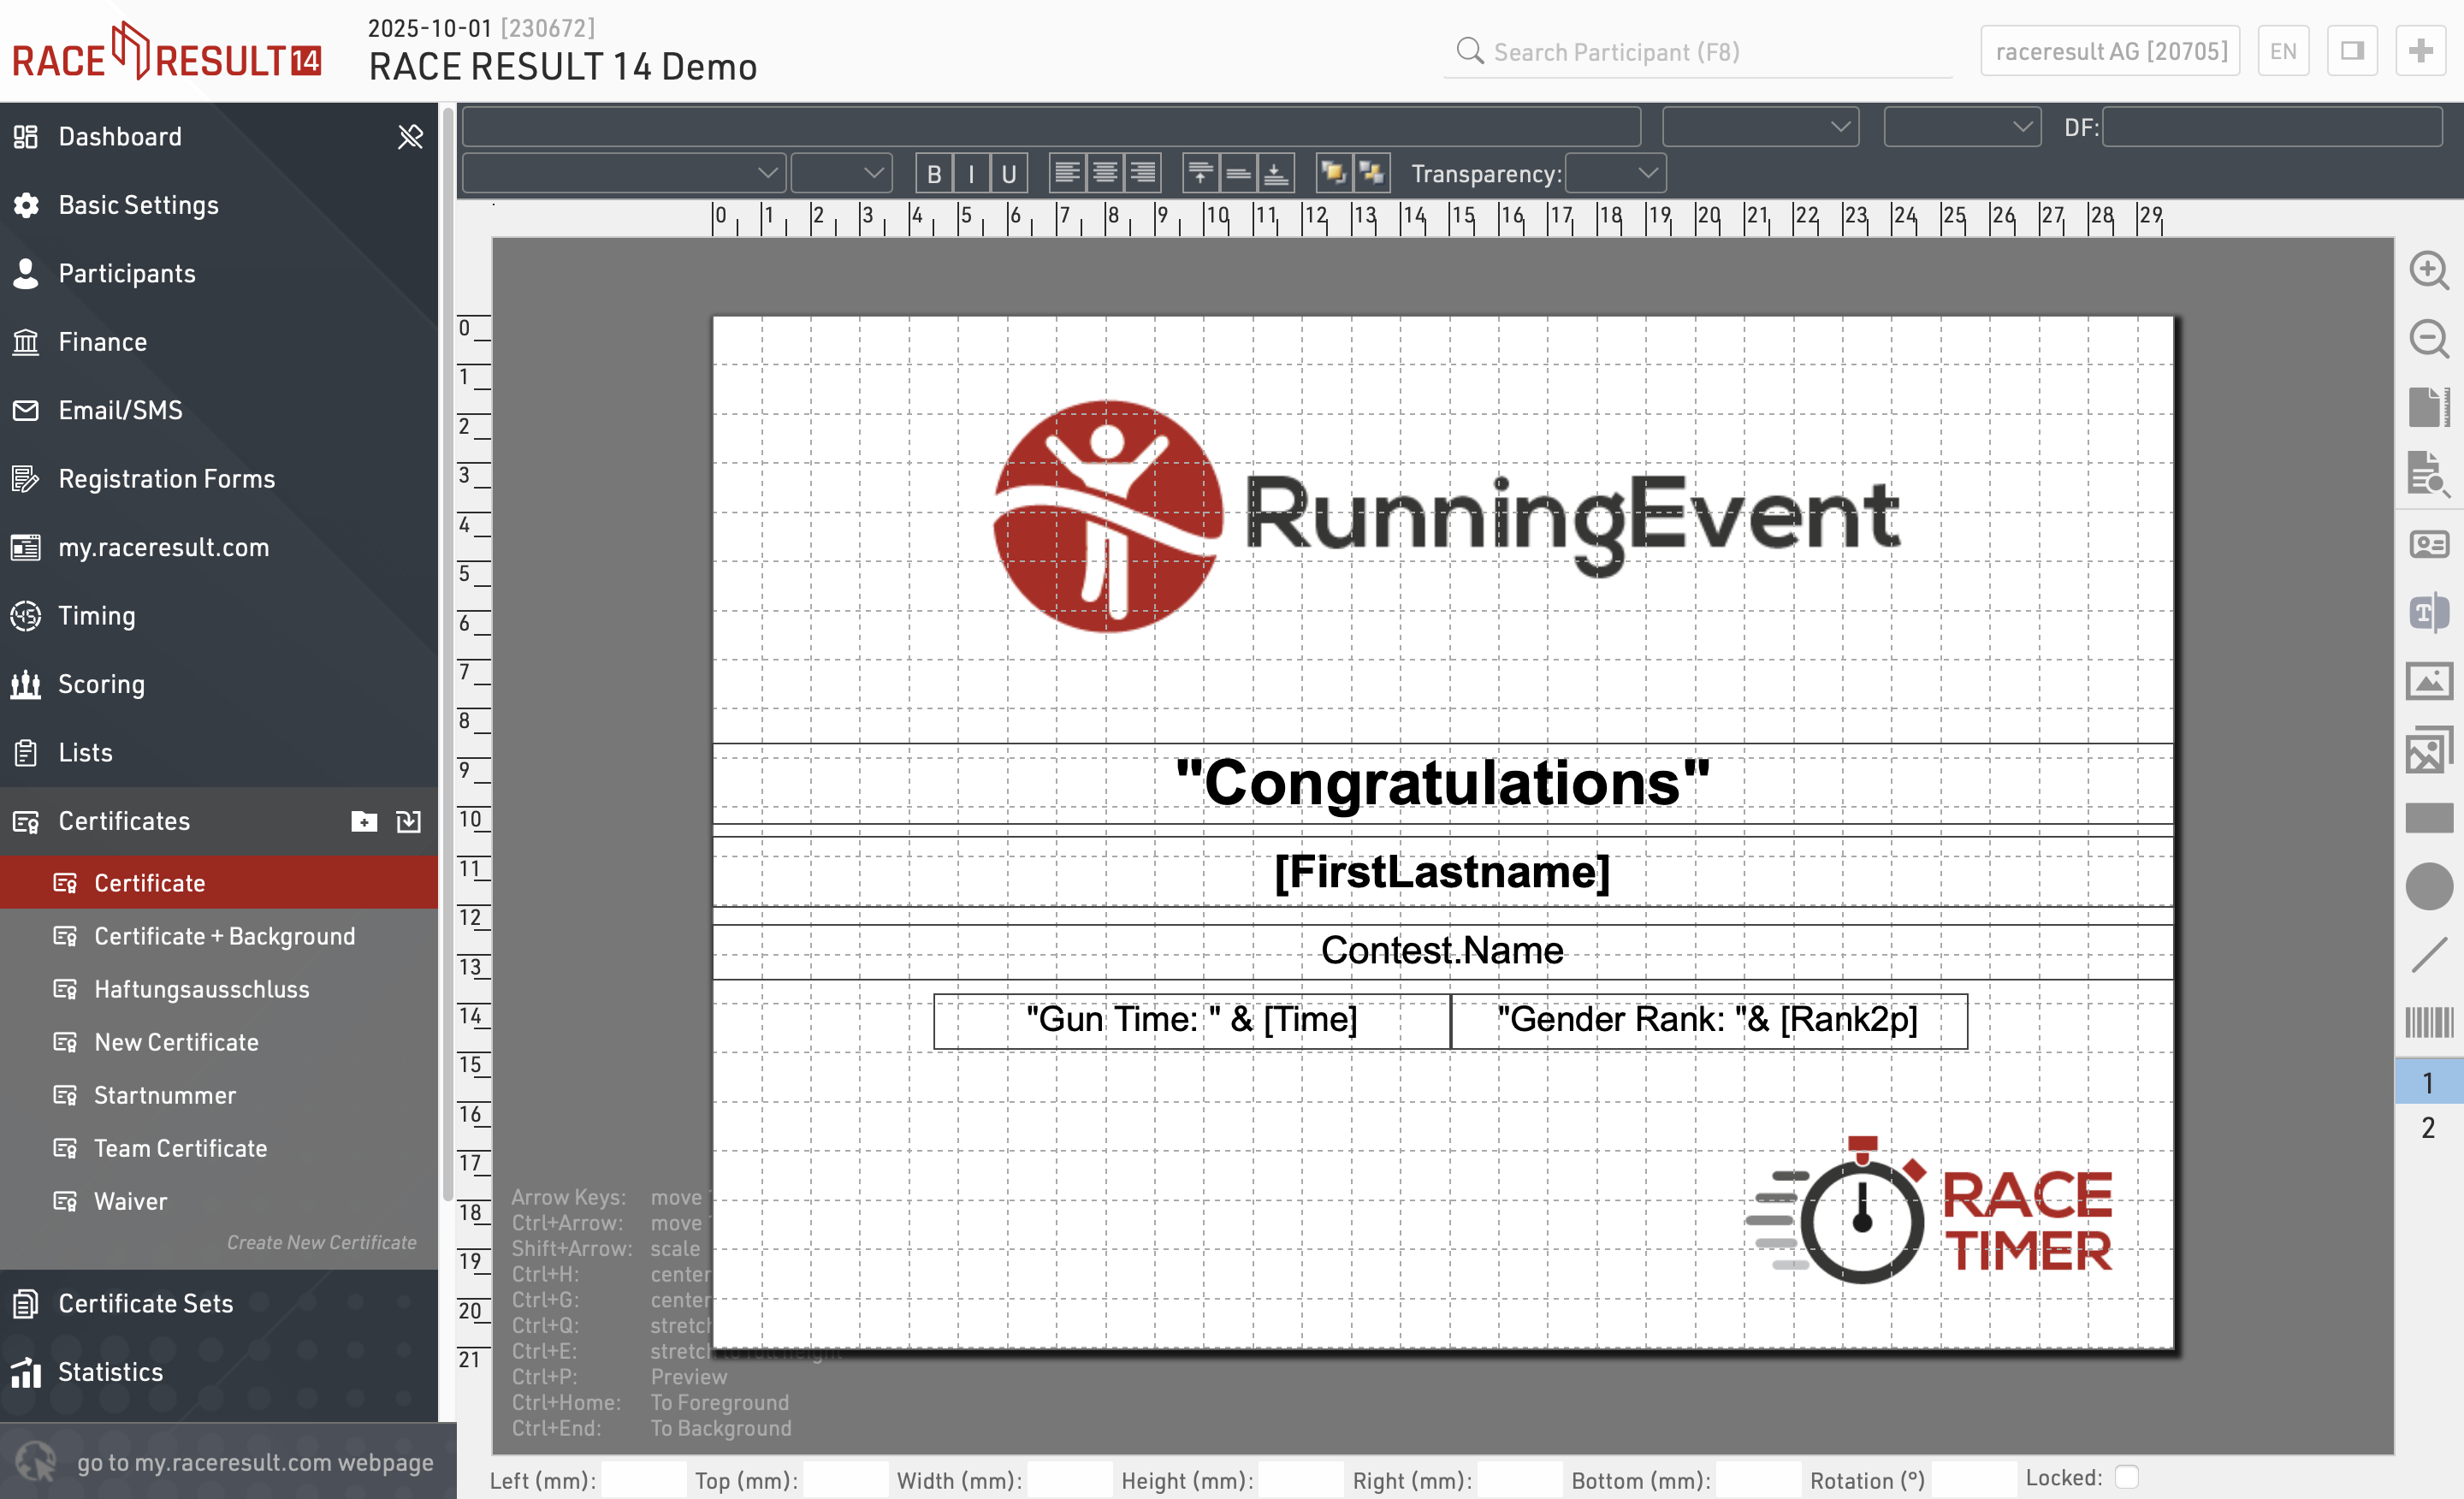
Page Settings
First, define the page size and choose between landscape and portrait orientation:
Preview
At any time you can render a real preview of the certificate for any bib number using this button:
Adding Elements
The menu on the right offers different types of elements that can be placed on the certificate:
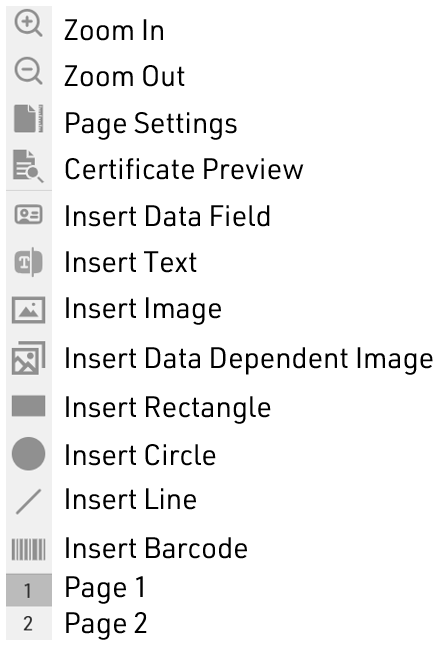
Data Field
You can enter a Field or an Expression in a Data Filed to display specific participant data. The example below displays the participant's first name.
Firstname
Using an expression you could display static text with dynamic text.
"Gender Rank: "&[GenderRank]
Text
The Text element can be used to display static text. Note, that you can not set Dynamic Formatting for text elements. Only Data Field elements can have Dynamic Formatting.
Image
The Image element can be used to display static images. When selecting this element, you will be given the option to select an image from the list of available images in your event file or from the available folders.
Data Dependent Image
The Data Dependent Image element can be used to display dynamic images using an Expression. The Expression should evaluate the name of the image, including the image extension (eg. .jpg).
For example, you can use the field Nation.Alpha2 in an expression to evaluate the name of each image file. The below would be evaluated to "flag_DE.jpg" assuming the participant was from Germany.
"flag_" & [Nation.Alpha2] & ".jpg"
Another example would be if you wanted to use a Control Function like an if() statement to determine what image to display. Here is one example
if([GenderRank] IN "1-3";"Winner.jpg";"Blank.jpg")
Shapes (Rectangle, Circle, and Line)
You can use the Rectangle, Circle, or Line options to display colored shapes. Using Dynamic Formatting, the colors can change dynamically for each participant.
Barcode/QR Code
You can encode any Field or Expression in one of the below format options.
- Barcode 39
- EAN 13
- Barcode 128
- QR Code
Element Setting Bar
Each element listed above has various settings. Not all available settings work for all elements. These settings are located at the top of the certificate window.
Top Row

The left text box is where you enter a field or expression for a given element. This is used for Data Field, Text, Image, and Data Dependent Image elements.
The two center drop-down lists pertain to team scores. This is discussed in more detail further down in this article.
The right text box labeled DF stands for Dynamic Formatting. Dynamic formatting can be used to change the formatting of an element dynamically. For example, you could change the text color depending on the participant's finishing place.
if([GenderRank] IN "1-3";"C(#ffdb4d)";"C(#000000)")
Bottom Row

The bottom row of options has standard text formatting options like bold, italics, and unlined text. There are also options for text alignment within a text box, layering options, color, text outline, and element transparency.
Aligning Elements
After adding an element to the certificate you can position and scale it on the certificate with the mouse. Alternatively, you can use the cursor keys (see keyboard codes in the bottom left corner) or use the entry fields at the bottom of the screen to position and scale the element.
Select several elements at the same time by clicking and holding your mouse button and dragging the selection rectangle over the elements.
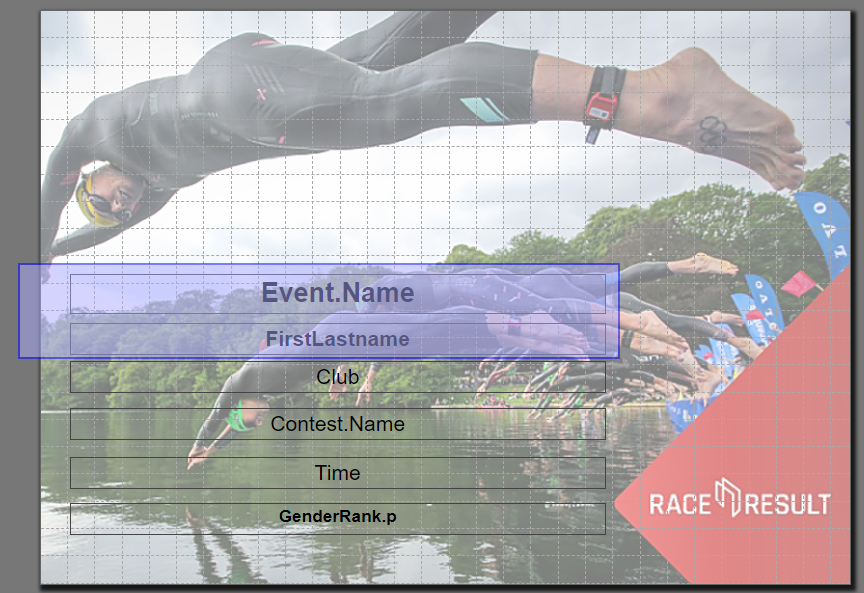
Alternatively, you can hold the Ctrl key on the keyboard and click one element after the other.
Then, these functions appear in the top left corner to align the elements:
Pages
Optionally, a certificate can include more than one page. Simply click on "2" in the toolbar on the right to access page 2. Once you have placed an element there, you can add a page 3 and so on.
Team Certificates
Certificates for teams work exactly the same as a normal certificate. Instead of the individual rank and time, you would show the team’s rank and time. If you would like to also show information on the other team members, you can simply enter the field/expression in the top left corner and then select the team score and the participant.

For example, to show the last name of the second participant of the team (according to team score 1), the system will use the field TS1.P2.Lastname. In the preview, you can see that selecting a team score/participant only helps you to set up your certificate, but internally the field name will be used.
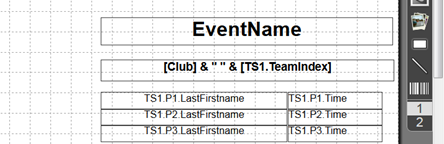
Certificate Set
Certificate Sets are used for the publishing and printing of certificates to determine for which participants a specific certificate should be generated, the complete set of certificates can be generated as a single PDF file if required.
Certificate sets make it possible to produce different certificates for different contests or subsets of participants - such as awards winners.
The list on the left shows all certificate sets in your event file which can be rearranged using drag&drop by clicking the free space to the left of the list name; certificate sets highlighted in blue are published online through my.raceresult.com.
Certificate sets can be further sorted into folders, to create a new folder, click the Add Folder icon in the Certificate Sets Header. By clicking the folder header, the folder can be expanded / collapsed, to sort the items within a folder alphabetically, click the icon. Empty folders will be deleted automatically when you reload the window.
Clicking the name of a certificate set from the menu opens an overview page for that list.
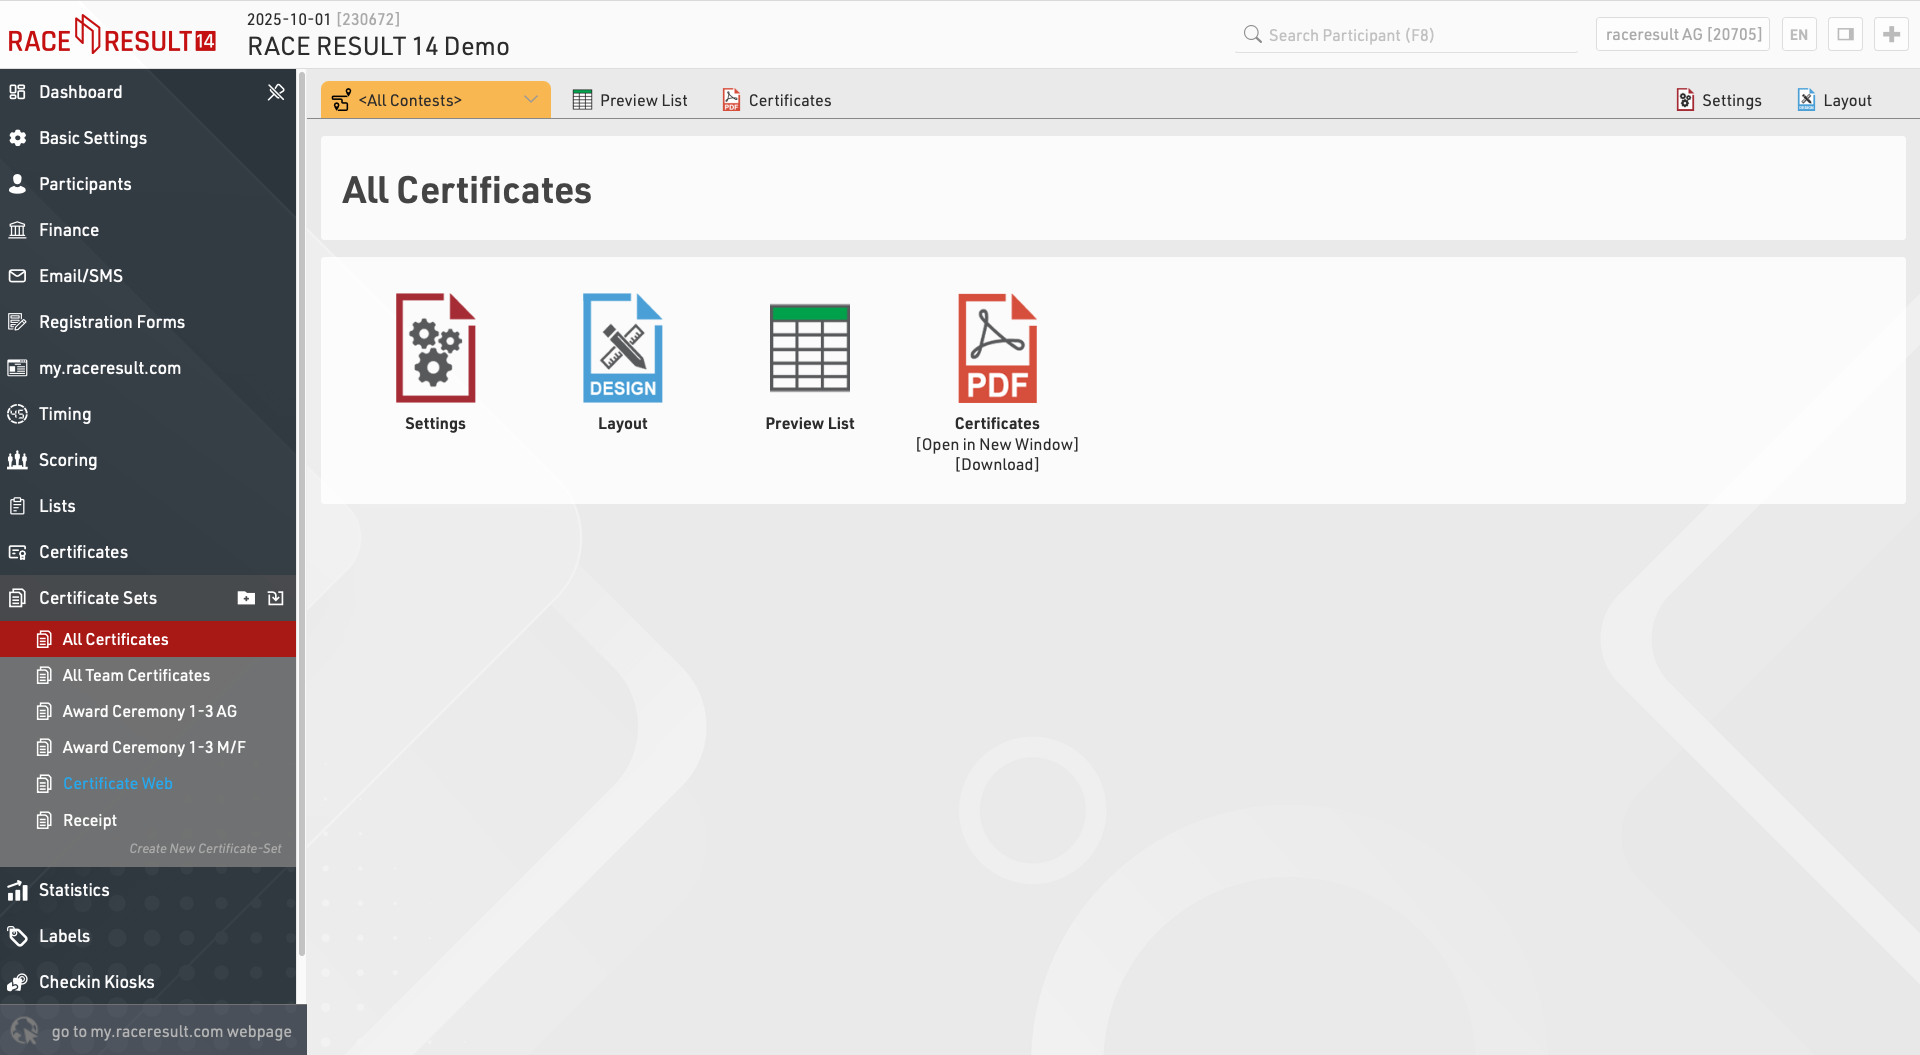
Settings
Certificate Layout
First, select the Certificate layout which should be used.
Then choose if you would like to create individual or team certificates. If you choose Team Certificate (1 per Participant), certificates will be created only for members of a team. If you select Team Certificate (1 per Team) a certificate will be printed only for the first member of each team.
For which Participant do you want to create certificates?
You can further limit for whom certificates will be printed. Oftentimes certificate sets are filtered by a rank, for example if you want to print certificates for only the best three. You can also enter a general filter.
Order of the Certificates
Determine in what order the certificates will be created.
Layout
Edit the Certificate Layout selected in the settings.
Preview List
A static list of the participants included in the certificate set and some basic values which may affect their eligibility.
Certificates
Generate all certificates in the set in a single PDF file.
Statistics
Statistics can create tables of statistical data either with custom rows/columns or using some of the pre-defined templates.
The list on the left shows all statistics tables in your event file which can be rearranged using drag & drop by clicking the free space to the left of the statistics name.
Statistics can be further sorted into folders, to create a new folder, click the Add Folder icon in the Statistics Header. By clicking the folder header, the folder can be expanded / collapsed, to sort the items within a folder alphabetically, click the icon. Empty folders will be deleted automatically when you reload the window.
Clicking the name of a statistic from the menu opens an overview page for that list.
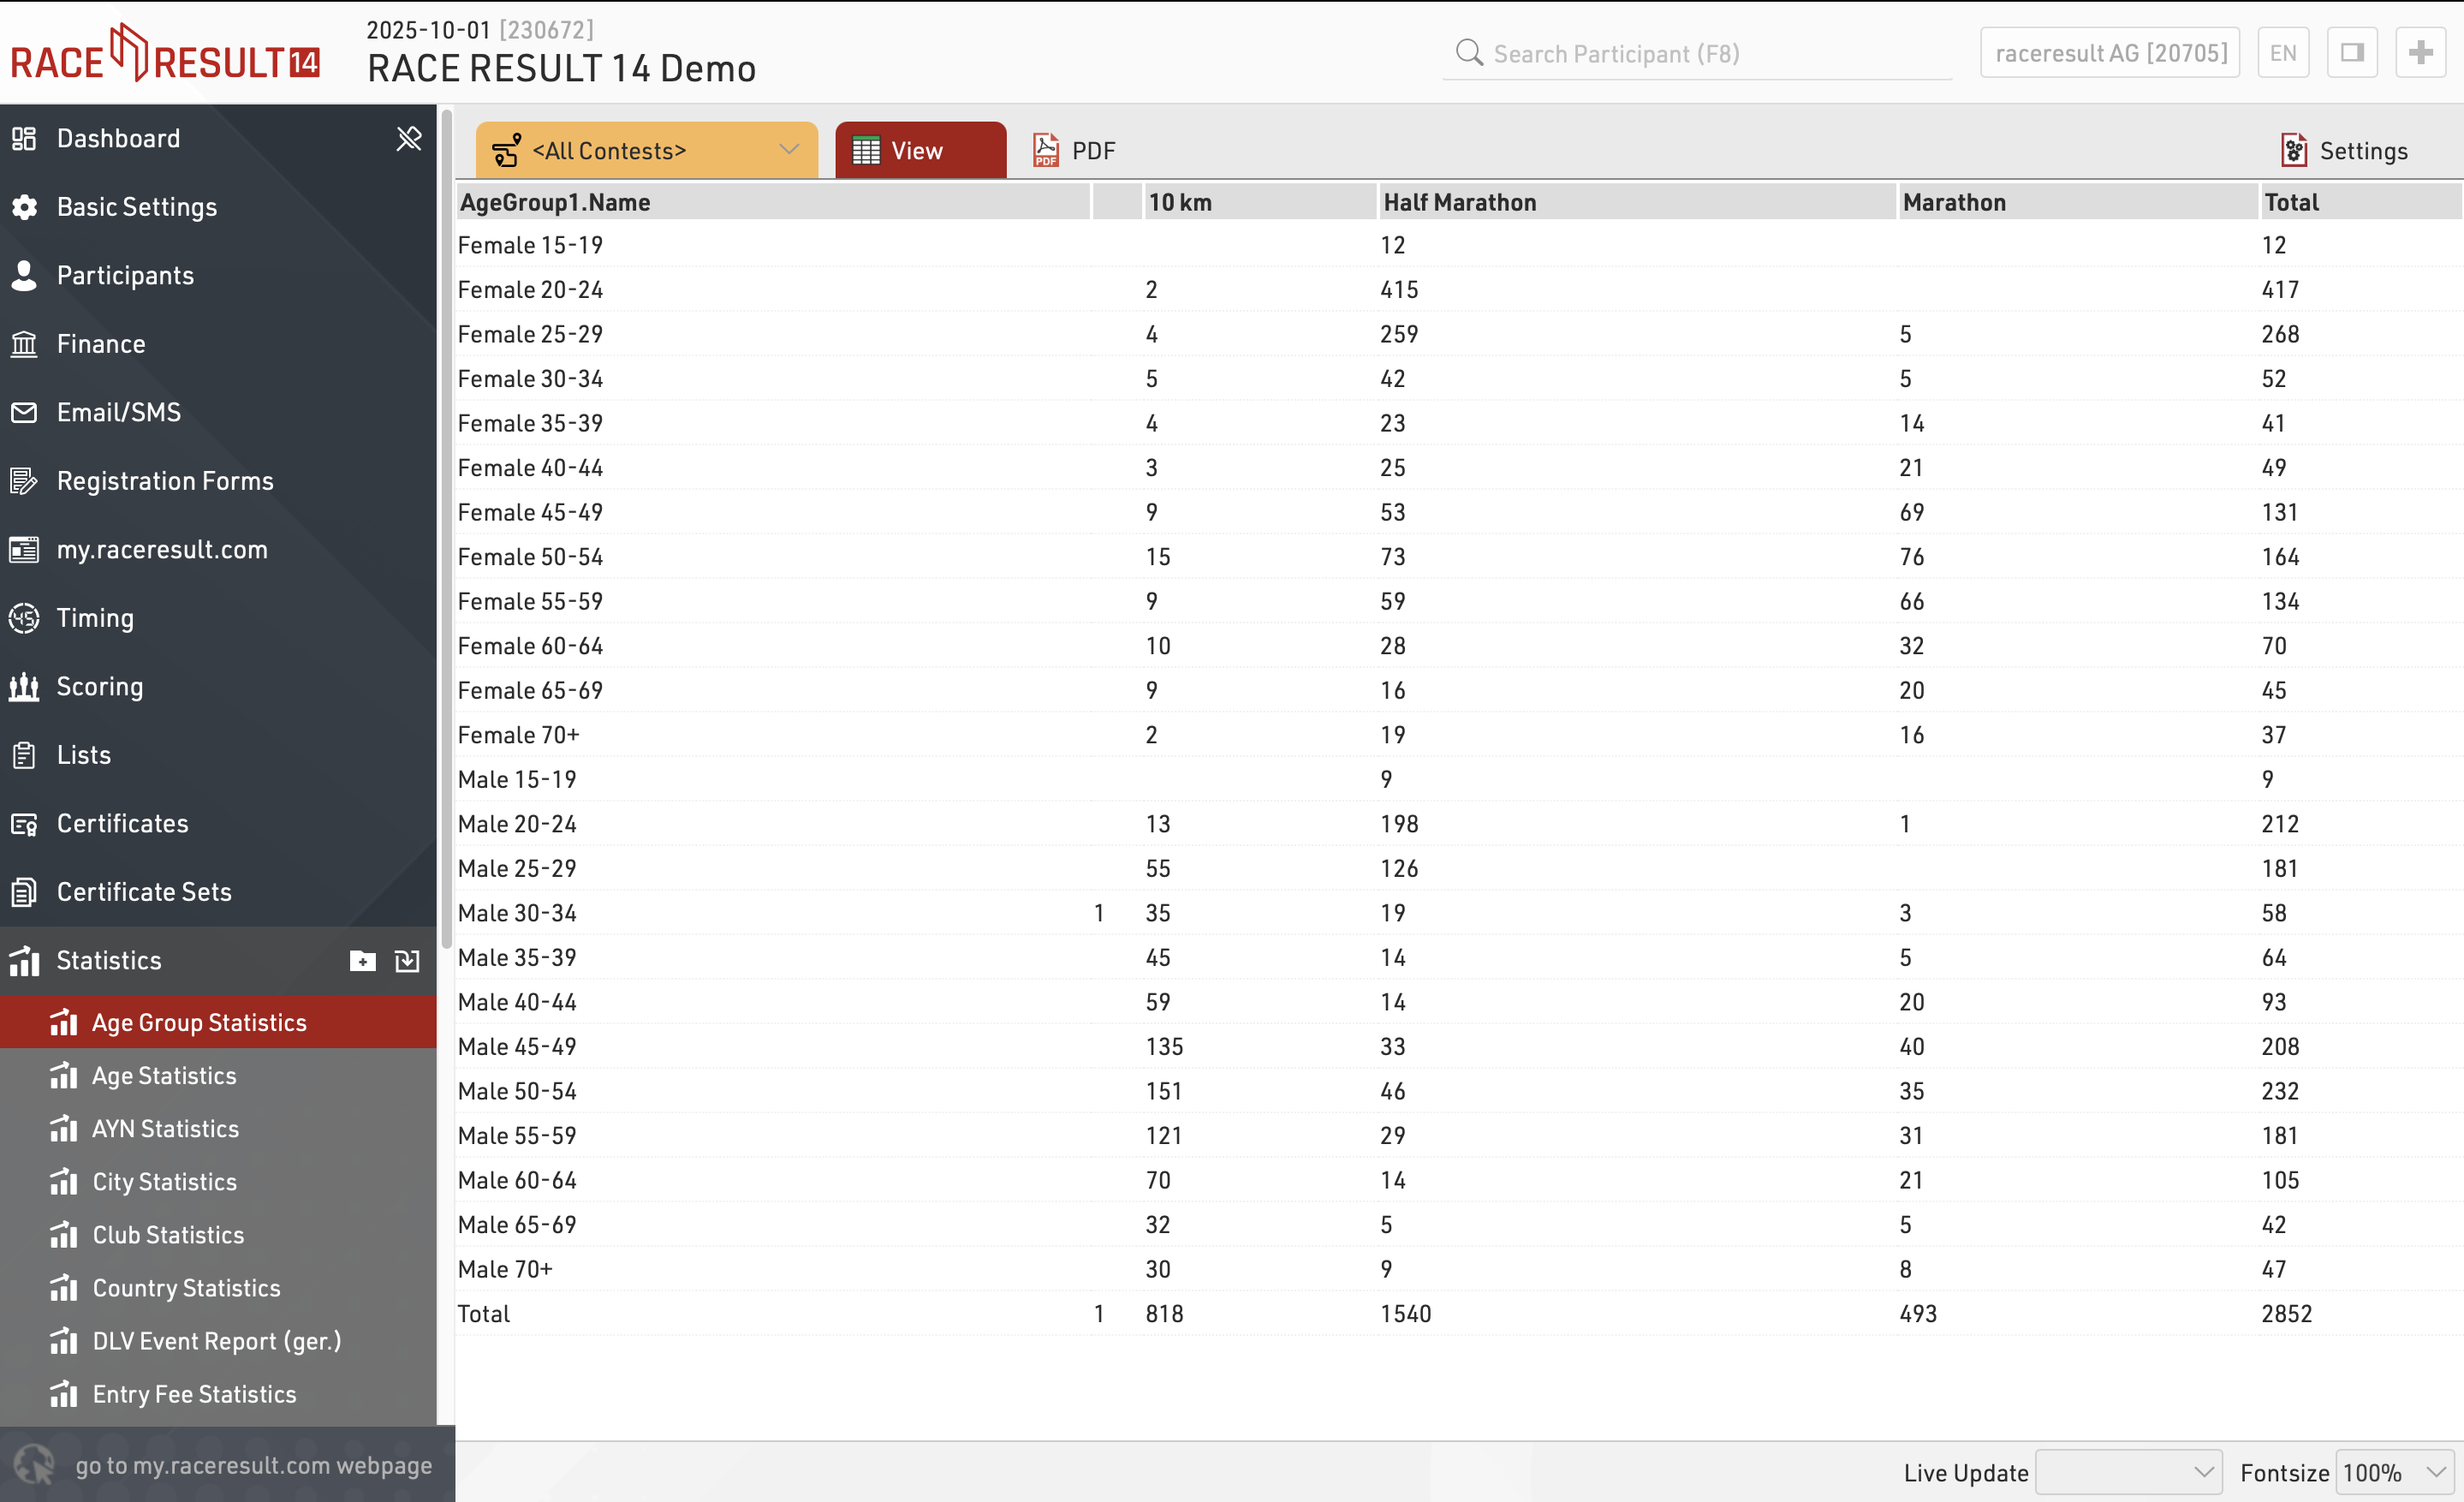
When viewing statistics, clicking on a value in the table will open a popup window with a breakdown of the participants considered in that item, clicking a participant will open that participant's details in the right-side window.
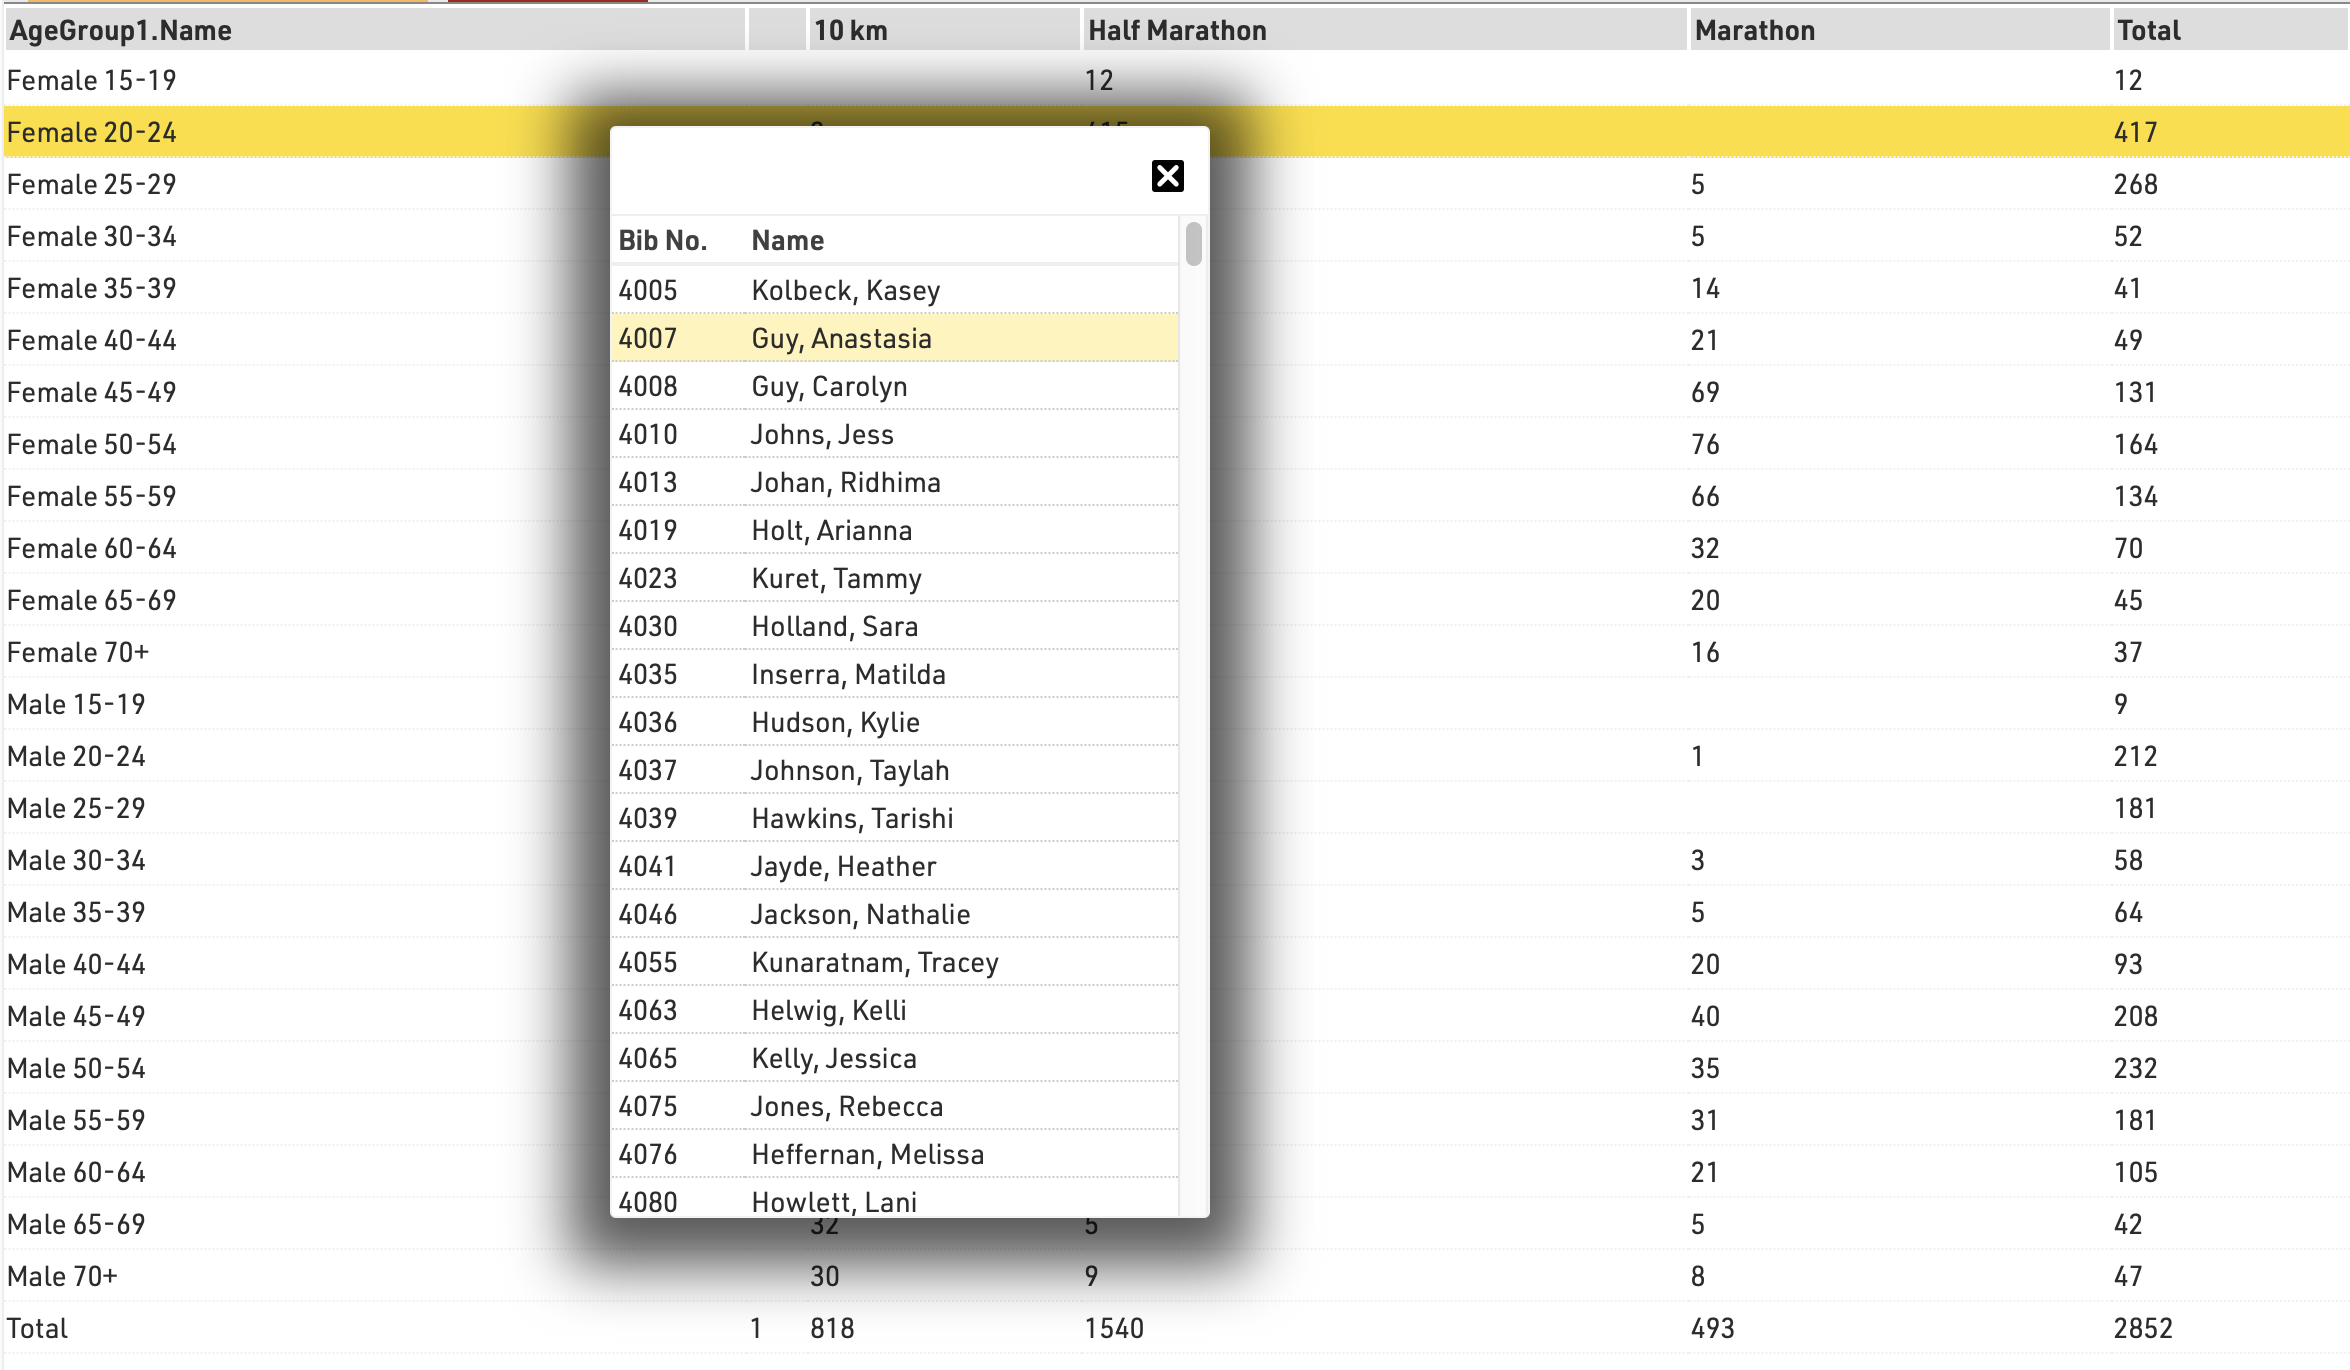
Create new type of statistics
You can easily create a new type of statistics. The most relevant settings are Rows, Columns, Field, and Mode.
In most cases you will use the mode Count: the number of participants matching the row and the column field will be counted.
Alternatively, you can select a field over which the minimum/maximum/average/sum will be calculated.
If you want to restrict the participants considered for the statistics, enable Only Finishers or enter a General Filter.
Special Types of Statistics
Besides these statistics there are some special types of statistics:
- Participants Summary creates a PDF with a general statistics of the event
- DLV is a report for German Athletics Federation
- Results Statistics shows how many participants have a time in each special result
- Entry Fee Statistics lists all entry fees and calculate the sum over all participants for each entry fee
- my.raceresult.com Statistics mirror the my.raceresult.com Statistics
Labels
Labels are normally printed on pre-cut label sheets and allow you to place either text or a certificate design on each label.
The Label Settings determine the basic layout and template for the labels.
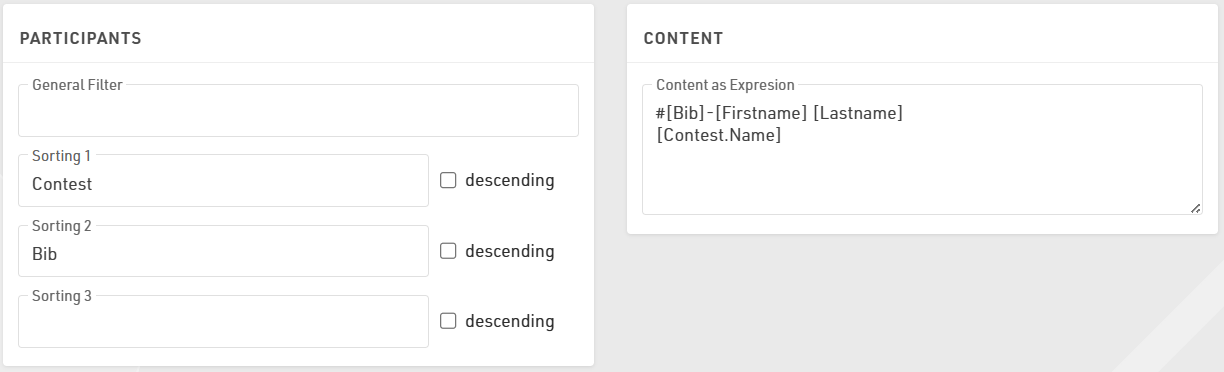
Participants
A Filter that defines for which participants a label will be created.
Sorting Fields that define how the labels will be sorted.
Content
Enter an Expression that defines the content for each label. This is handled as a full-text expression and can support multiple lines.
Other
The Directional layout (row / column direction) of the labels.
Optionally a design to be printed instead of the Expression, see Labels with Design, if a design is selected then it can be edited directly through the Layout tab.
Optionally include an automatically generated Barcode for each label, the barcode will include the bib number. If using a certificate that already has a barcode, leave this blank
Font
Define the font, font size, formatting and alignment for text.
Page
Page settings for each sheet, these are normally provided by the manufacturer of the label sheets.
Label
The individual label sizing / spacing, these are normally provided by the manufacturer of the label sheets.
Once the settings are defined you can preview, download and print the labels through the Labels tab, an example might look like this.
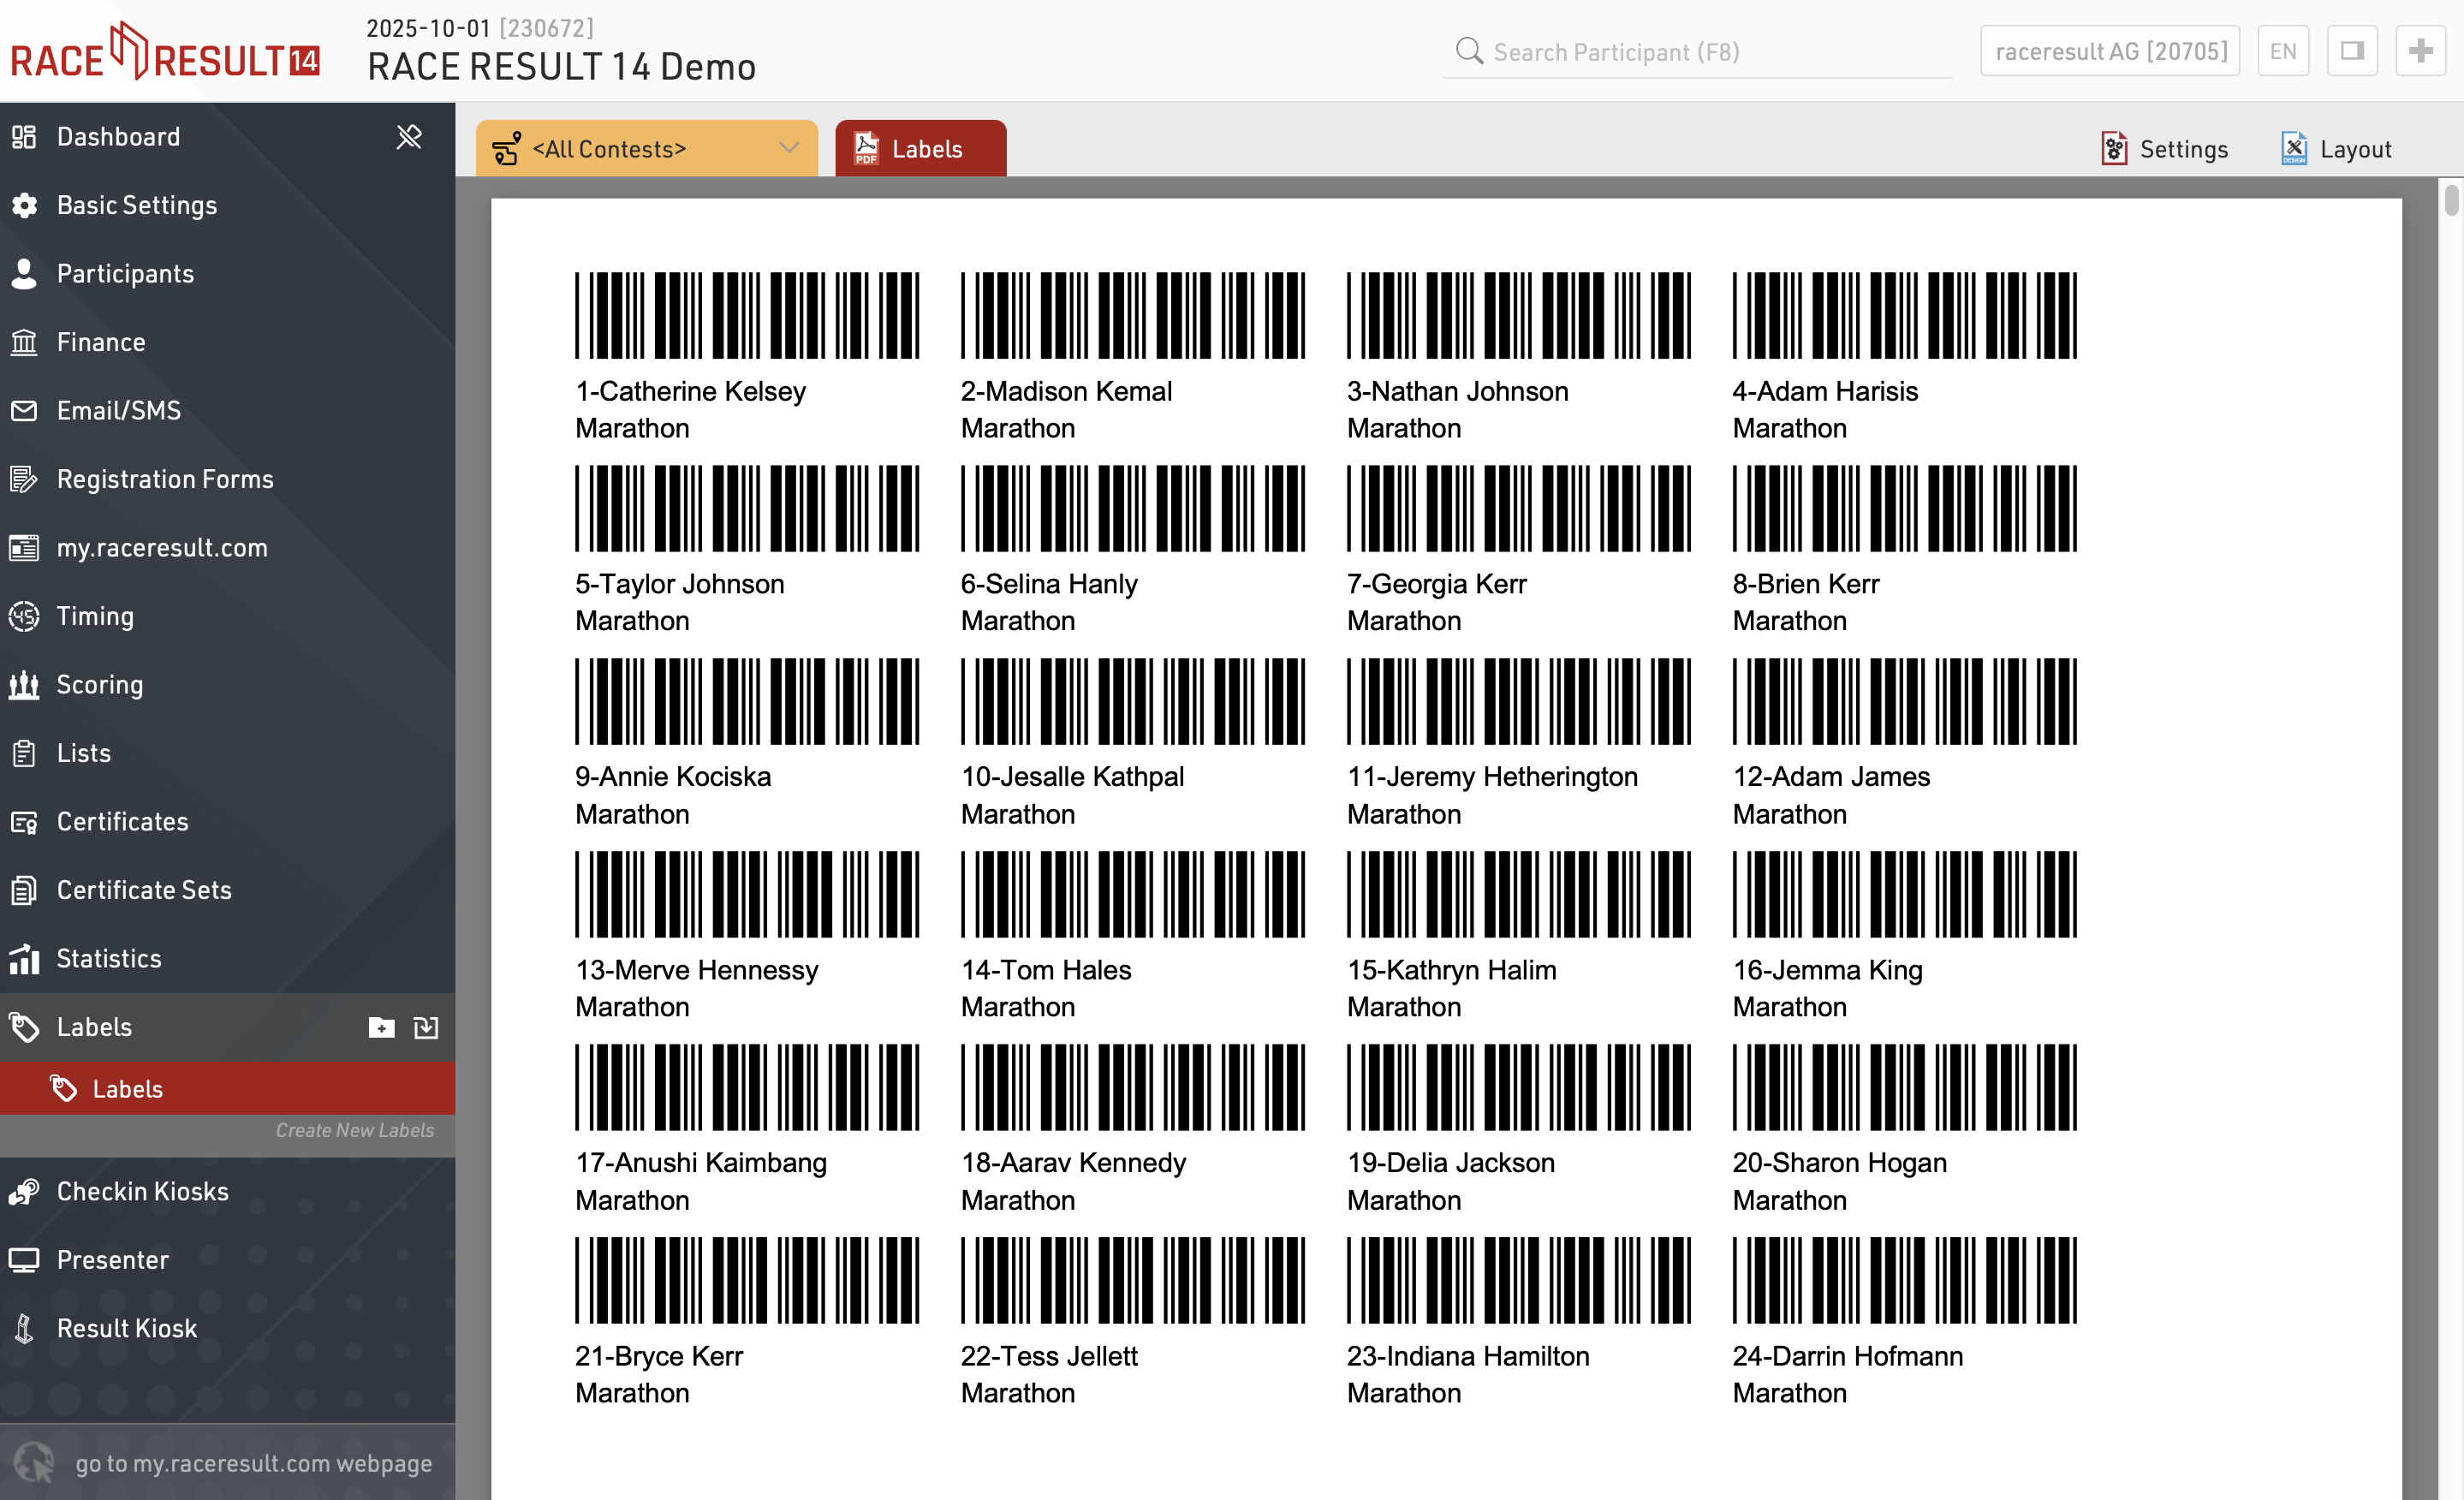
Labels with Design
If you need more flexibility regarding the design of the labels, you can select a certificate that will be printed on each label. For example:

If a certificate is selected, you can click the tab Layout to edit the certificate:

Checkin Kiosks
The Kiosks provide a flexible tool for looking up and editing participant data during an event for example at registration, or giving access to individuals to easily lookup and edit fields without providing full access to RACE RESULT 14.
Within an event file multiple templates for kiosks can be created, each of which can be accessed by a unique URL, this allows different templates to be defined for different purposes.
The given name to each kiosk will be shown in participants' history, when changes are made: in this way, you can always retrieve from which kiosk (and user) a change has been made.
Basic Settings
Kiosks are created from templates which define what is displayed, templates can be imported from other event files or easily copied to create other kiosks. Each should be given a unique name, and each kiosk will then be accessible via a unique URL which contains the kiosk name and a unique key.

Kiosks can be enabled or disabled, and can also be enabled via a time range, the title is the label of the window displayed in the browser.
The option for Transponder Assignment Mode applies to any edit step which is used to assign the Transponder1 or Transponder2 fields, this has 3 options to handle what happens if a transponder is assigned twice within an event.
For advanced customisation it is also possible to apply custom CSS to the display.
Steps
Each kiosk can have multiple steps defined for different purposes which will automatically progress in order. Each step is labelled and the labels for each step are shown in the top navigation bar. With the exception of the search, steps can be rearranged by clicking and dragging, or deleted if not required.

There are 2 types of step, and each step is separated into display fields on the left and action on the right.
After Save Actions
The After Save Actions are saved at the completion of the kiosk after all other fields have been saved. This allows for additional actions to be completed which can store useful information about the participant.
After Save Actions can be filtered to only apply to specific participants.

Save Value
Save Value allows saving of data to an additional field, the value which should be stored should be written as a standard Expression and may use any additional Functions or User-Defined Fields / Functions. This could for example be used to set a checkbox to true or a timestamp to a textfield using the now() function.
Save Certificate
The selected certificate will be generated and stored on the server as a link in the destination field, note that if working offline these will be stored to the local server inside the RACE RESULT installation folder. When choosing a certificate the value defines which template should be created. This may be useful for digital waivers which can be timestamped with the creation time and include the signature captured in an edit step.
Print Certificate
The kiosk can also print a certificate layout after save, this requires the RACE RESULT Web Server to be running on the computer running the kiosk.
When selecting which certificates to print you can choose to either always use the default printer, or you can select which printer to use for each certificate on the first print.

When selecting the printer for a certificate a dialog will be shown on the first print attempt to select a printer for the corresponding certificate. This setting is saved locally in the browser window until the page is re-loaded. Advanced settings allow for turning on autorotate and center settings for better alignment on certain printer setups.
Send E-mail
Send E-mail will trigger the sending of the selected Email/SMS Template which could be used for registration confirmation.
Presenter
Presenter is used to create displays for primarily on-site results presentation, announcers, or for other staff / volunteers to easily access data.
Within an event file, multiple templates for presenter displays can be created, each of which can be accessed by a unique URL. This allows different templates to be defined for different purposes. The URLs can be accessed without logging in to RACE RESULT 14, meaning they can easily be shared without giving full access to the event file. By default, you will find three presenters in your event file: Chip Check, Present Results, and Show Last Chip Reads.
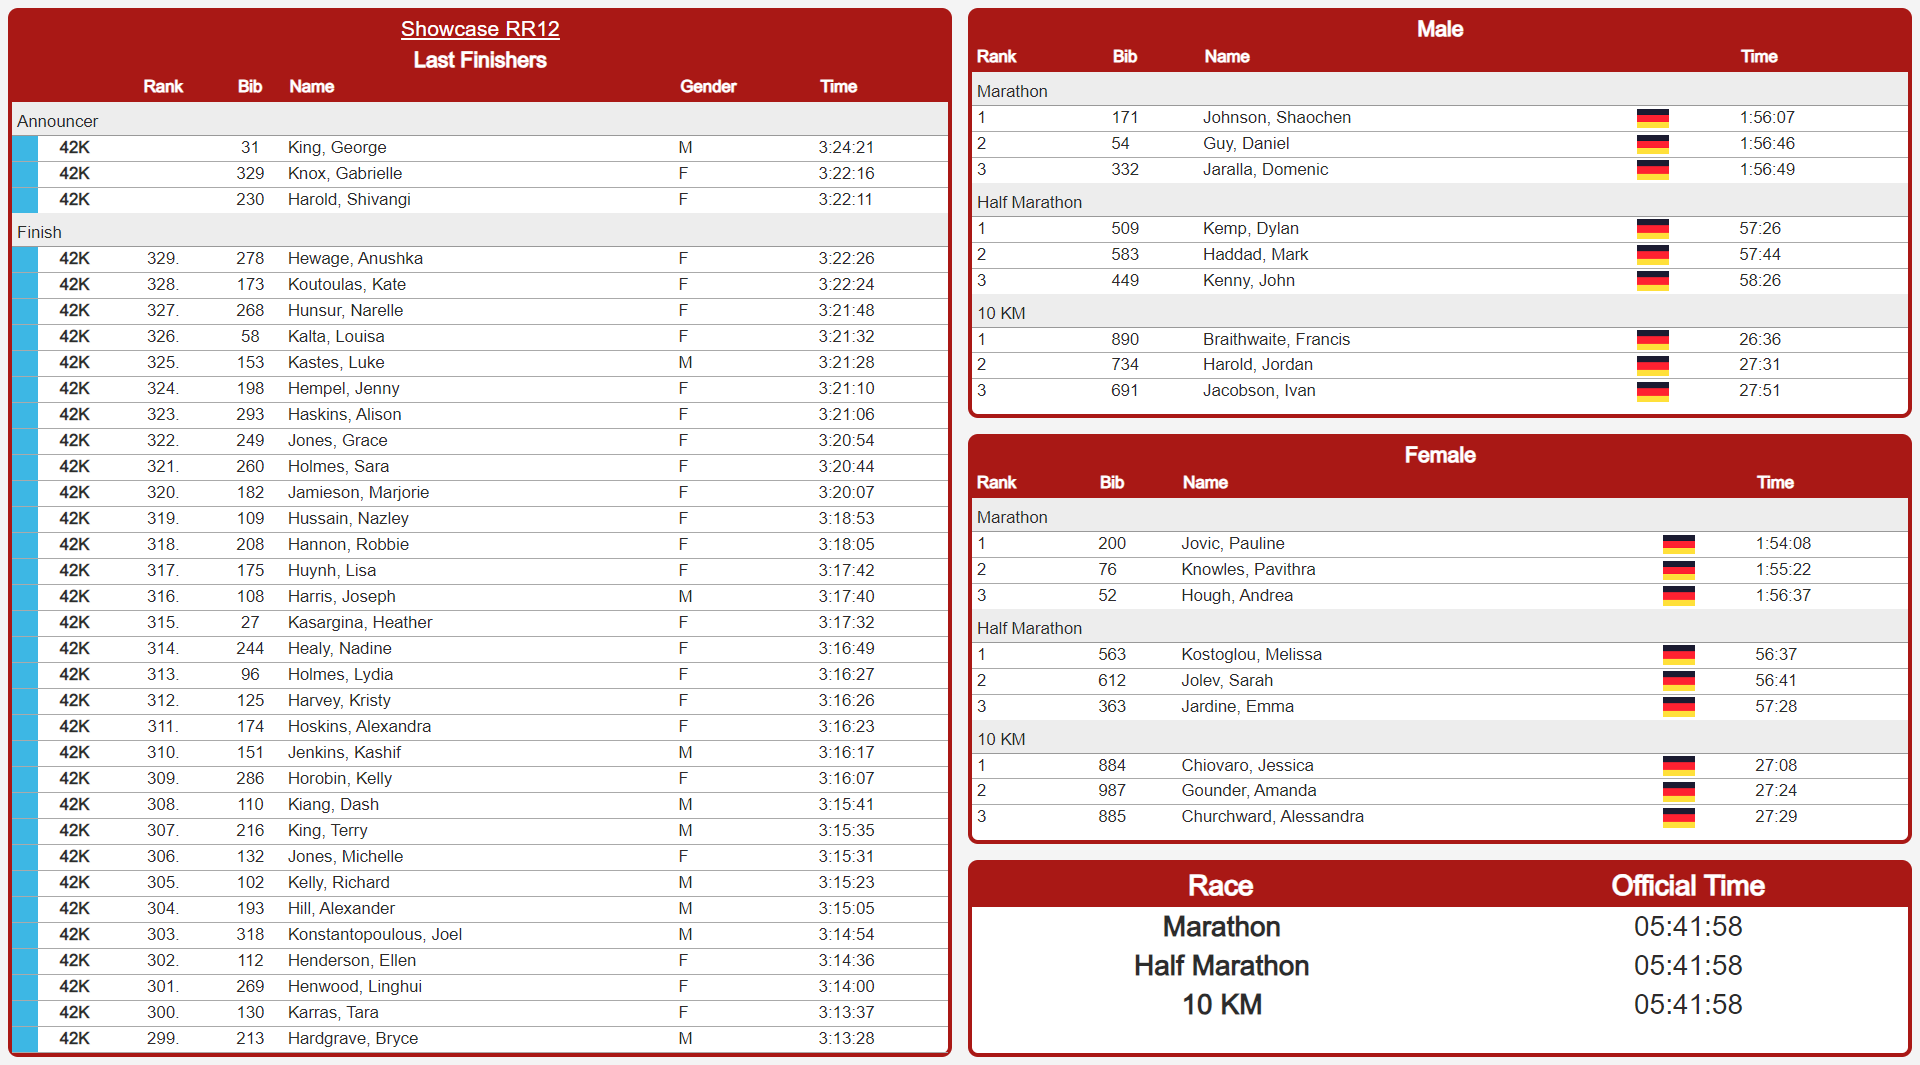
Displays may contain multiple screens which can be switched manually, using a touch screen, or using the FN-Keys 1-4.
Basic Setup
Each display can be enabled for a specific time frame and given a title - which is the title of the browser tab.
New screens are added / deleted individually. When multiple screens are defined, you can also control how the different screens should be switched in the Screen Switch Mode:
- Auto: With Auto Screen Switching, the presenter will switch through all available screens one after the other. A screen will not switch before all windows have reached the end of their data list (with scrolling enabled) and according to the longest Page Time of a window. The tabs of the different screens are hidden, you can navigate to the first four screens with F1-F4 anyway.
- Auto with Tabs: Similar to Auto, except for the navigation bar that shows the different tabs. With a concise screen title the viewer directly knows what that screen is about.
- Manual: In Manual Screen Switching, a screen will be shown until changed manually, either by clicking the respective tab or hitting F1-F4 for the first four screens.
- Always show "Screen": In this mode you can remotely control a screen you don't even have access to. No matter where the presenter is open, all presenters will update their screen automatically. Please note, they will only update when refreshing, it's not an instant push.
When working with multiple tabs it is also possible to force the Presenter to start in a specific tab by appending &tab=X to the URL, where X is the tab number which should be displayed.
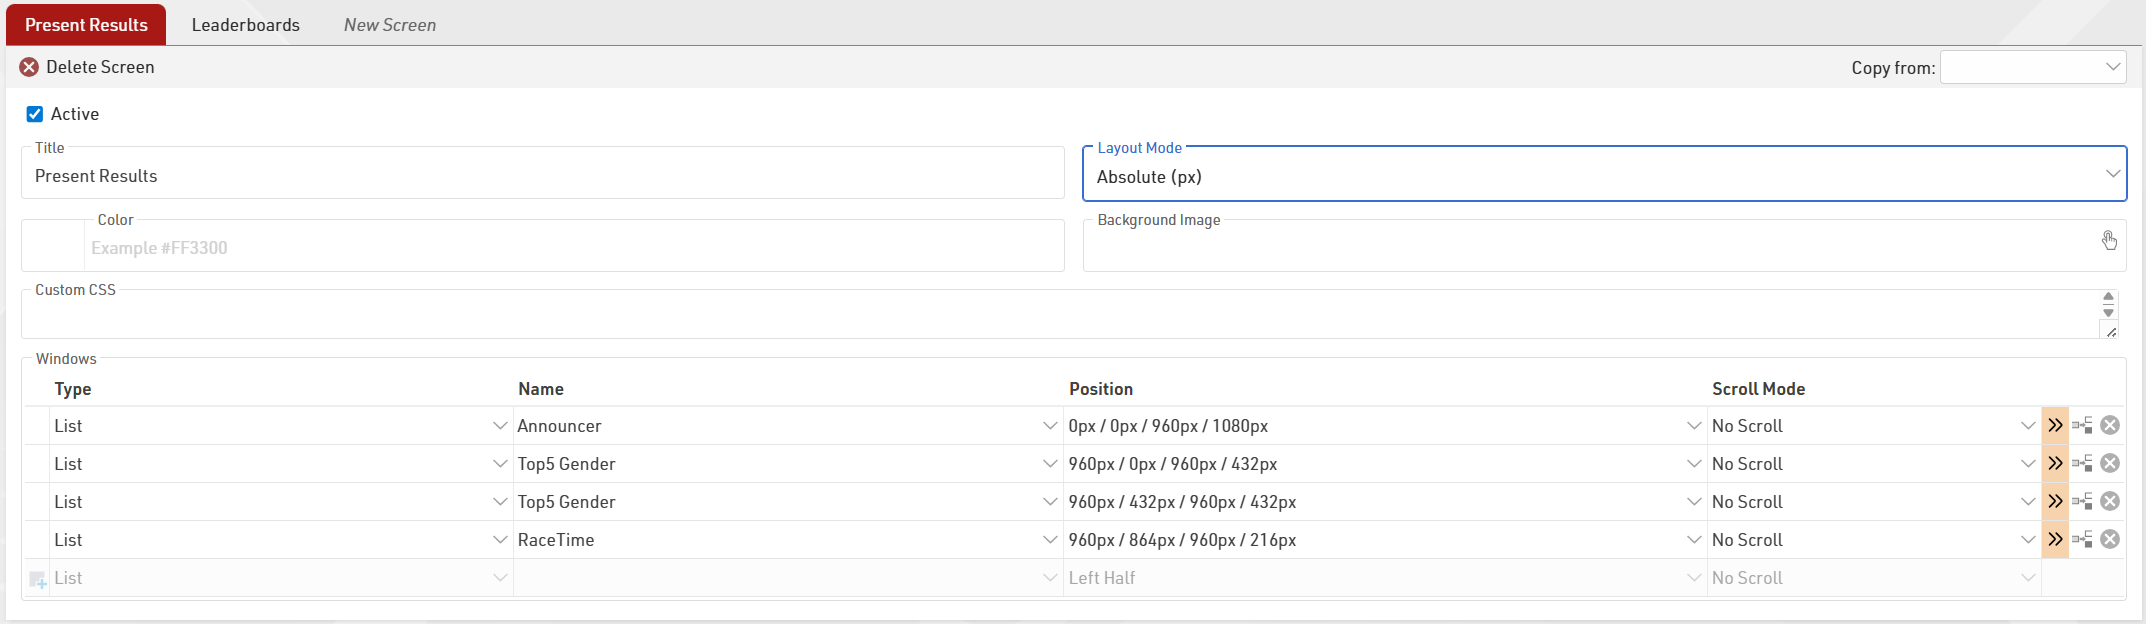
The Screen title is shown in the screen switching tab when more than one screen is set up.
The layout mode defines how positioning will be set. Relative % defines margins (Top/Left) and size (Width/Height) as a percentage of the total display. Absolute (px) defines the same parameters using fixed pixel values. If the global Display Dimensions are changed, the window positions will automatically recalculate to maintain their relative scale.
Each screen may have its own background color or image (from the images inside the event file) which will automatically stretch to fill the entire display. When using background pictures make sure they are adjusted to the target monitor resolution. Custom CSS may be applied to each Screen individually, or globally in advanced settings, for advanced use cases.
Each screen then contains individual windows which control which data is displayed, the position, and scrolling behaviour. Some further details like a filter, font size, or page time/refresh rate can be set in the extended settings.
When adding another screen, you can copy all settings from a different screen within the currently opened Presenter. This will include background color, background image, and the chosen Layout Mode.
Advanced Settings
The Display Dimensions (pixel height and width) and Custom CSS under Advanced Settings will be applied to all screens. If dimensions are set, the area where windows are positioned will be limited to these dimensions, ensuring the layout looks exactly as intended on the target hardware.

Windows
Each screen can contain multiple windows which behave independently of each other.

Type
Each window has a type, different types behave differently and have different options available.
List
List types simply display the selected Output list identically to the Output window, any filter groupings will be handled as Show All.
When using long lists you can optionally set the scroll behaviour to no scroll, automatic smooth scroll, or page-by-page scrolling. With no scroll and page-by-page the advanced settings window page timer controls how frequently the data updates or the page changes.
Contests can be filtered in the advanced settings window so the same Output list could be used to create different windows for specific Contests.
Last Chip Reads
Uses a trigger (Timing Point, Split or Advanced Result) to show a specific participant, the most recently triggered participants will be shown at the top of the list by default.
The columns shown are controlled by the selected Output list.
The advanced settings window allows you to filter to a specific contest and select the trigger source.
Chip Check
In Chip Check you can connect to a locally connected RACE RESULT device (RACE RESULT Web Server needs to be launched locally) to specifically call fields for the participant linked to that particular bib. The list will then define the format of the columns. You can also manually search for a transponder code or bib number. The most recently triggered participants will be shown at the top of the list by default, a repeated check will result in several rows filled with the same participant.
Search List
A search list works like the Chip Check, but the search works only with the fields displayed in the selected output list.
Event Overview
The event overview shows the number of registered, started, and finished participants split into contests and gender.
Details (Certificate)
Especially helpful for a detailed overview for announcers, you can select a certificate to be shown when clicking on a participant in any window with a list. Please note, the format of the certificate may vary from the Designer as, in the Presenter it is rendered as an HTML and positions of fields or logos may change slightly.
Details (List)
Similar to the details list on my.raceresult.com, you can select a list that will only render for the participant you click in any window with a list. This comes in handy when using a record multiplier with an unpredictable number of laps/splits.
HTML
Insert your own HTML content such as text, external media or fully custom elements. HTML content can be entered directly into the Name field. Note that the HTML content cannot reference any field or functions.
Image
Insert images makes it easier to add images to a window without needing to create an entire background image. You can select any of the images which are stored in your event file.
QR Code
Display a QR code without needing to create an entire background image. Define the target address directly in the name of the field.
Clock
Display a clock - either as Time of Day, or based on your start time settings per contest, bib range, or per wave.
Countdown
Display a countdown timer. Configure the settings in the advanced settings. Set the Countdown Duration (required) and an optional Start Time (defaults to 12:00 AM if not set); the timer will display the Countdown Duration until the set start time of day. If Repeat Countdown is active, the Countup field can be set as a buffer between cycles. You can also customize the timer's styling and add a series of beeps to signal the end of a countdown.
Rectangle
Adds a simple geometric shape, useful for framing or sectioning.
Circle
Adds a circular element to the display.
Text
A dedicated window for static text, simpler than using HTML for basic labels.
Position
Position allows multiple windows to easily be displayed on a screen, for example the left side could show a leaderboard where the top right corner shows the latest finishers and the bottom right corner shows certificate details for the announcer.
Default position options provide from 1-4 different positions for windows, or a custom position can be defined.
Custom positions place the window from the top-left corner, defining the margin to be used from top and left. Each window also has a width and height.
Based on the Layout Mode chosen, the custom window positions can be set accordingly:
Relative Mode
All values are defined as a percentage of the total display size. This is ideal if the display will be viewed on various screens with different resolutions. A window with Left 25%, Top 0%, Width: 50%, and Height 100% fills the middle 50% of the display from top to bottom with even margins on the left and right.
Absolute (px) Mode
Uses fixed pixel values for positioning and sizing. It is best used when you are targeting a specific hardware setup, such as a large LED wall or a specific monitor. If no specific display dimensions are set in the presenter's advanced settings, 1920x1080px is used as the default reference. To achieve the same setup as the relative mode on a default display, the window settings would be Left 480px, Top 0px, Width 960px, and Height 1080px.

Additional Settings
In the extended settings you can define a contest filter or any additional filter using an expression. For every window you can define the font size, a page time and the scroll bar behavior. When using "No Scroll" scroll mode, the page time also defines the refresh rate of your list. For lists that do not fit on one page, you can hide the scroll bar or use a thinner scroll bar.
For "Show Last Chip Reads" you find the selection of trigger sources in the additional settings.
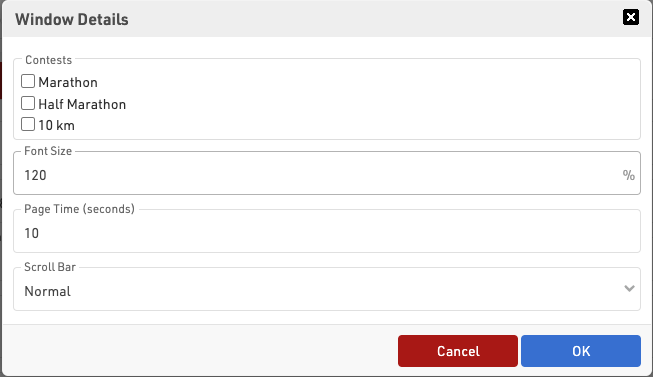
Styling
Basic styling and sizing of the list is possible through both the setup of the output list and window setup.
Formatting applied in the Output List Data/Format will be applied automatically including group headers, except font sizes.
Some additional controls are available from the Output page setup for records, column heads and page headers.
For the different windows within a screen the advanced options offer limited styling options for a color, background-color and padding. Additional advanced styling can be applied using custom CSS.
Result Kiosk
Athletes can use the Result Kiosk tool to check and/or print their result/race certificate on race day, most commonly it is used with a thermal receipt printer so participants can get a quick print out of their Results / Ranks to take home. It can be found in the Tools menu.
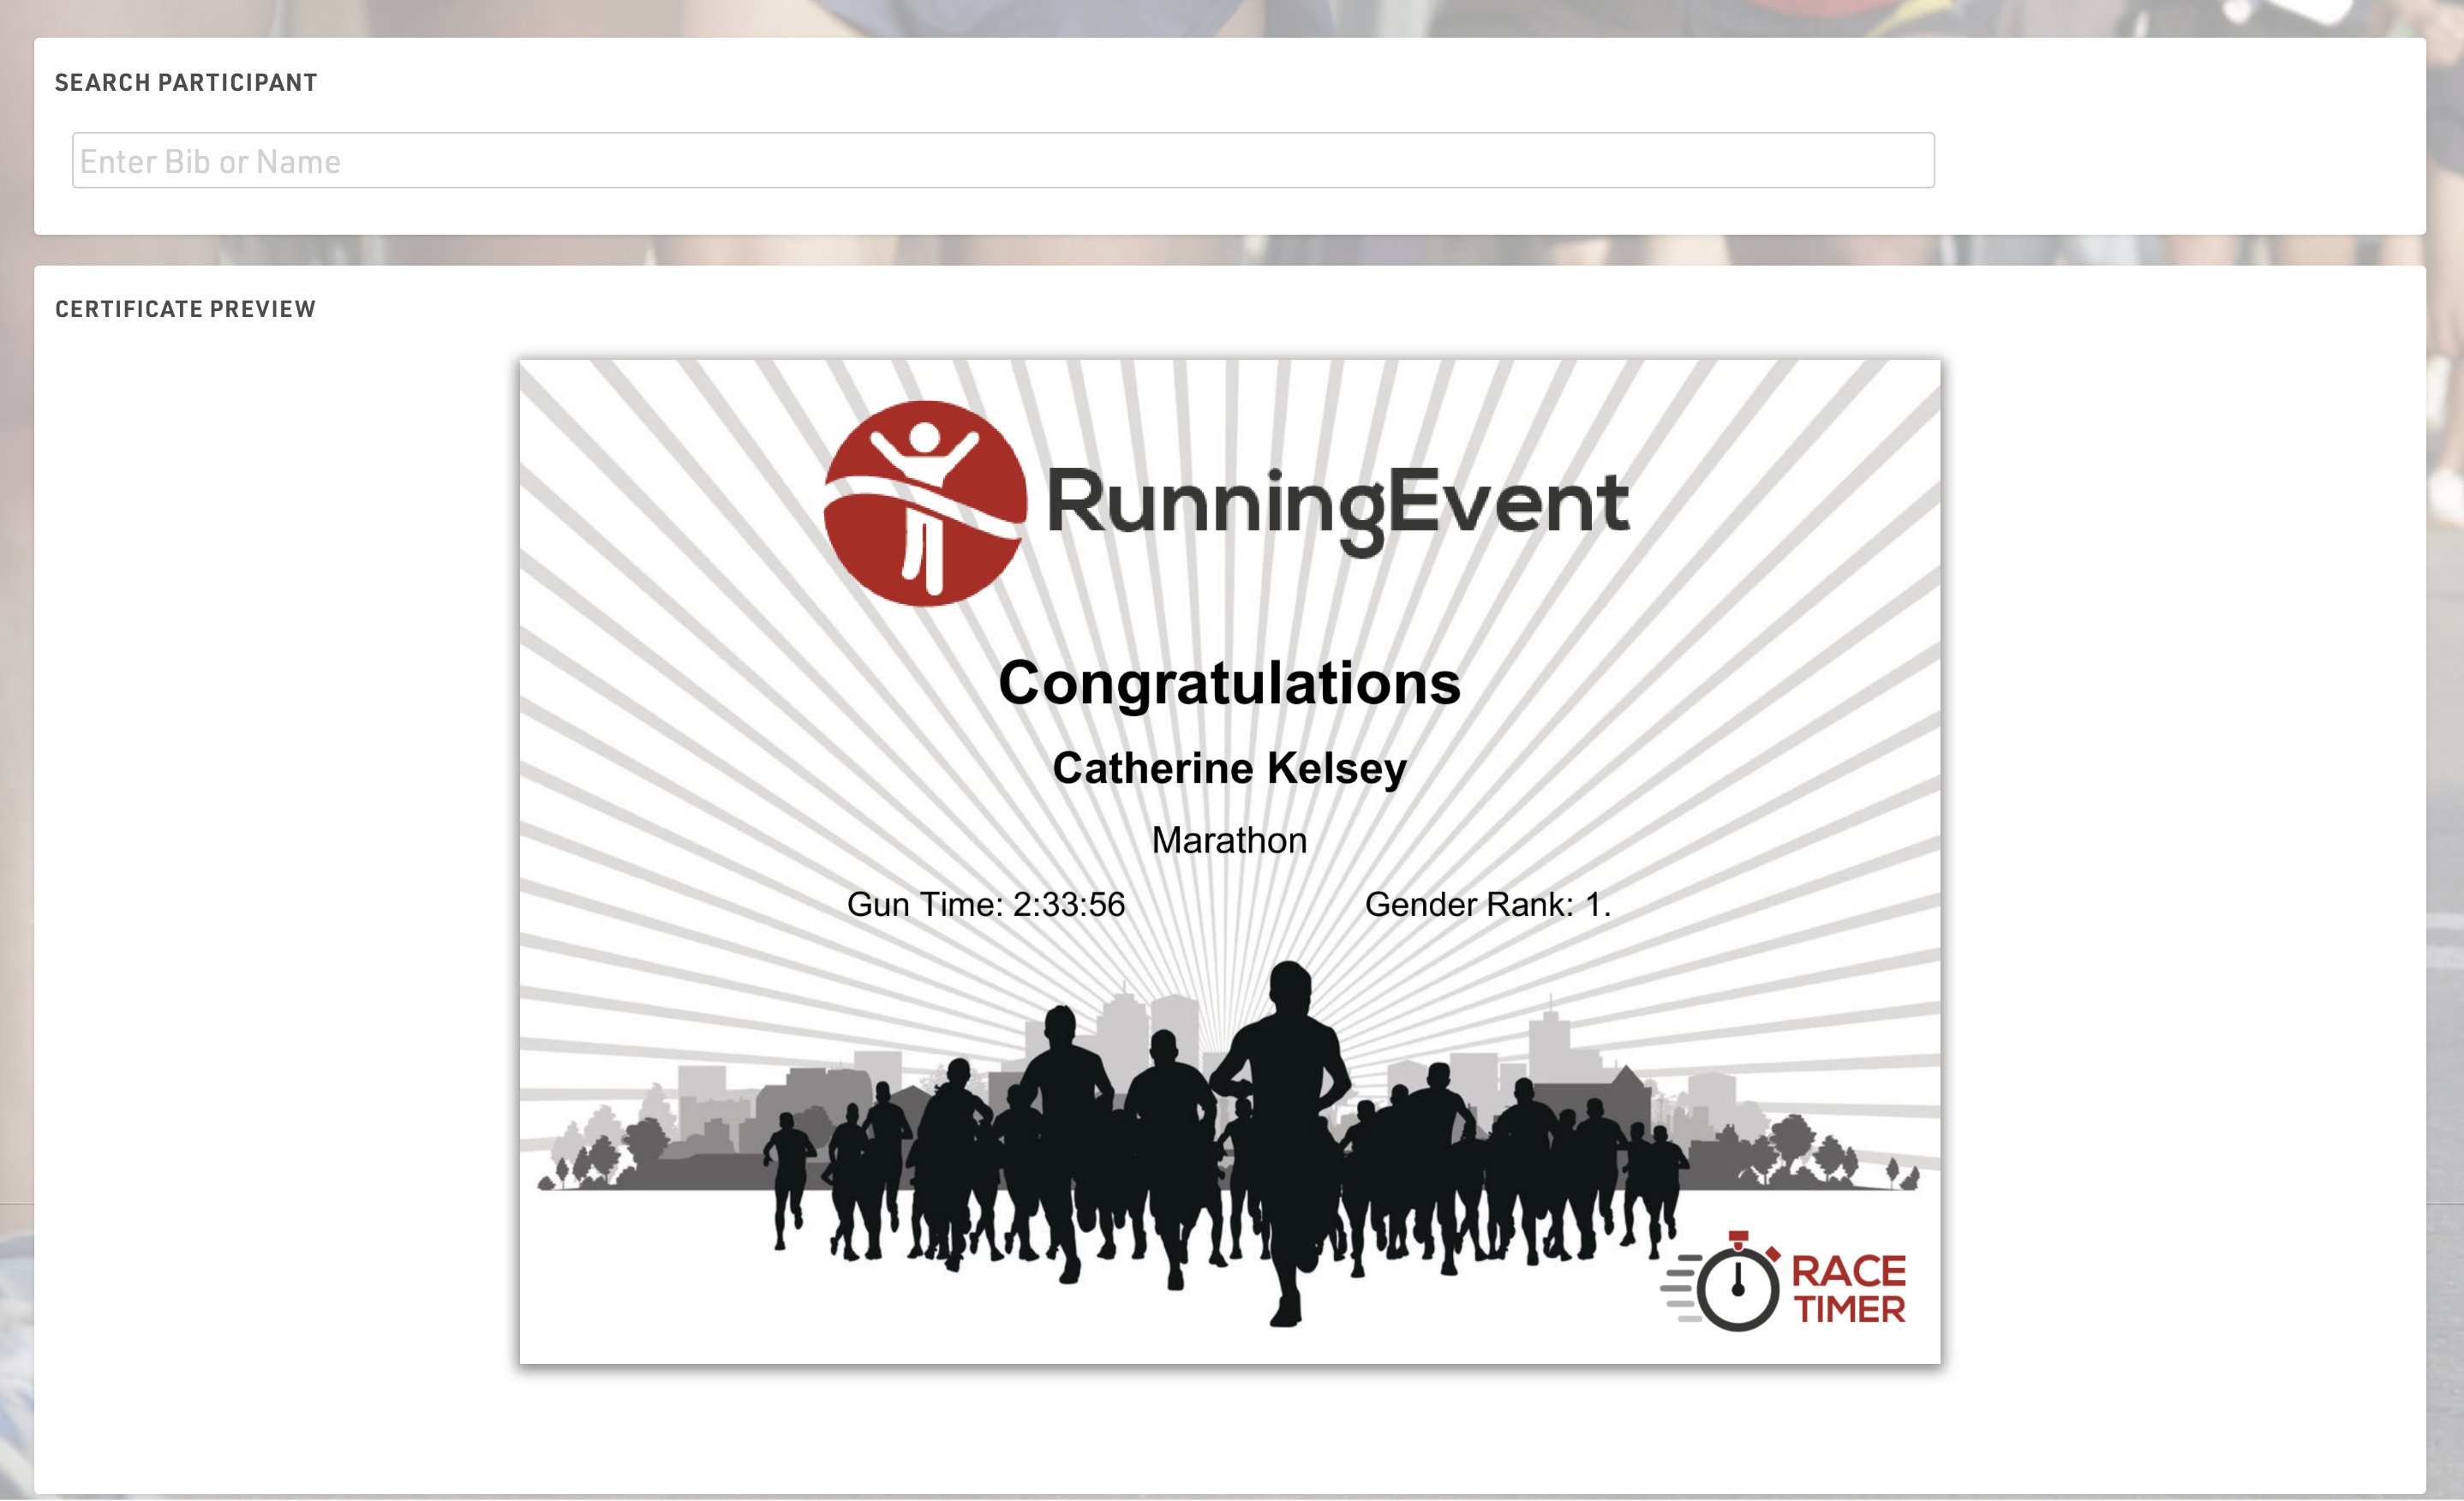
Settings
Make sure to define the following important settings:
- Decide if the user can view and/or print his race certificate. If you would like to support printing, RACE RESULT Web Server needs to be running.
- Select one or more Certificate Sets that can be shown/printed for each contest.
- Optionally, you can add customs texts, automatically set an Additional Field and forbid multiple print outs for the same participant.
Input
The input field can search from either Bib or Name fields or lookup by Transponder Code when using alpha-numeric chip codes (note that standard passive transponders mapped in a chip file cannot be used at this time).
You can use the RACE RESULT Decoder. Tag Reader or USB Timing Box to scan transponders directly into the search bar. To connect to a device click the connection icon in the top right of the search input, this will list available devices below and allow you to connect directly to the device for input of Transponder code. The RACE RESULT Web Server must be running for this.

Tools and Programs
Windows-Based Tools
Note that all of the functionality from the windows-based tools has been replaced by an alternative in the browser, and so there should only be rare cases where these are required.
Most of RACE RESULT 14 is run directly from the browser page, however the standard installation also includes some tools as separate windows-based programs which run independently from the main web server.
Each of these can connect to either a local file, a web server on the local network or the online web server.
To connect to the event file you are working on, open the relevant program, and open the File menu, select either 'Open Event' to open an SES file or Connect to Sports Events Server.
To connect to a web server on the local network enter the IP address of the web server or enter events.raceresult.com to connect to an online file and click connect, you will then need to enter your customer ID and password if connecting to the online server.
The open files in the web server or your available online files will be listed below and can then be opened by the program.