Základné nastavenia definujú základné nastavenia vášho súboru udalostí.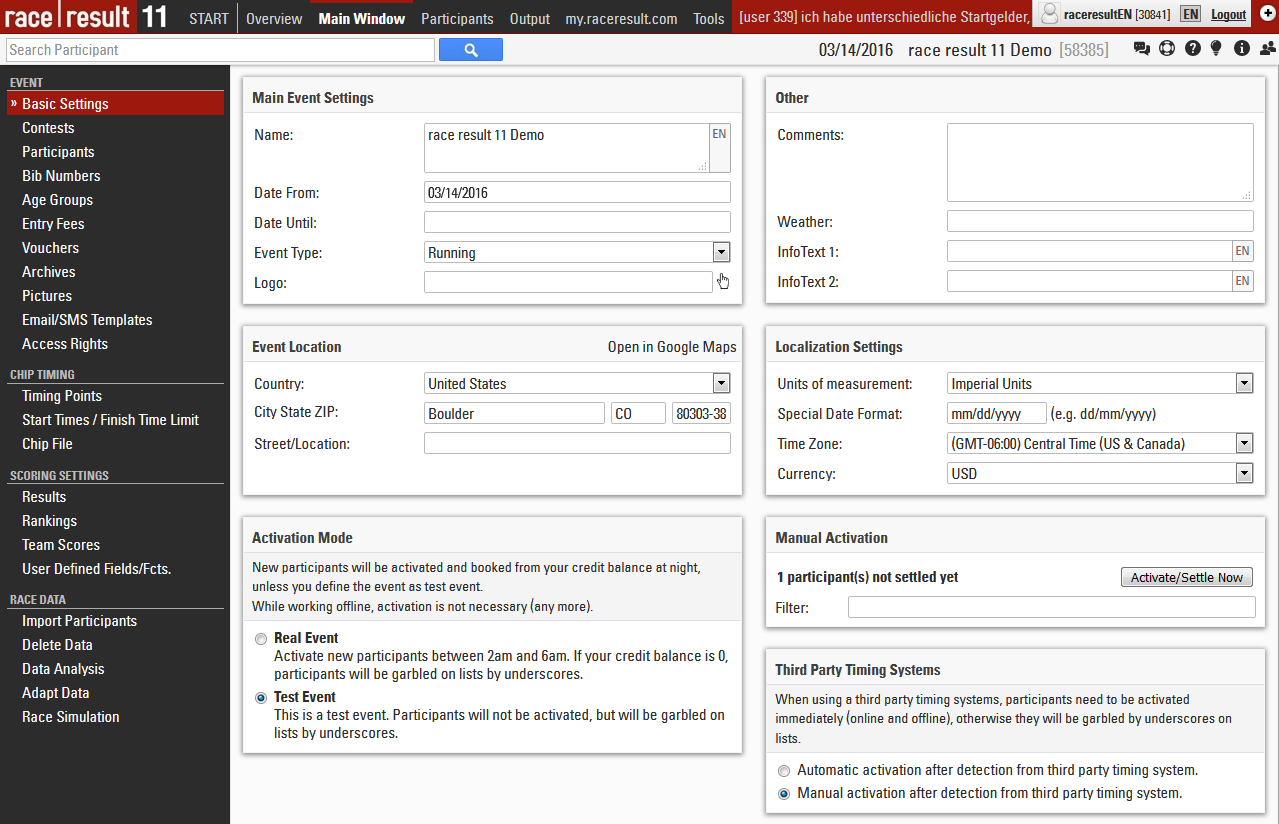
Nastavenia udalosti
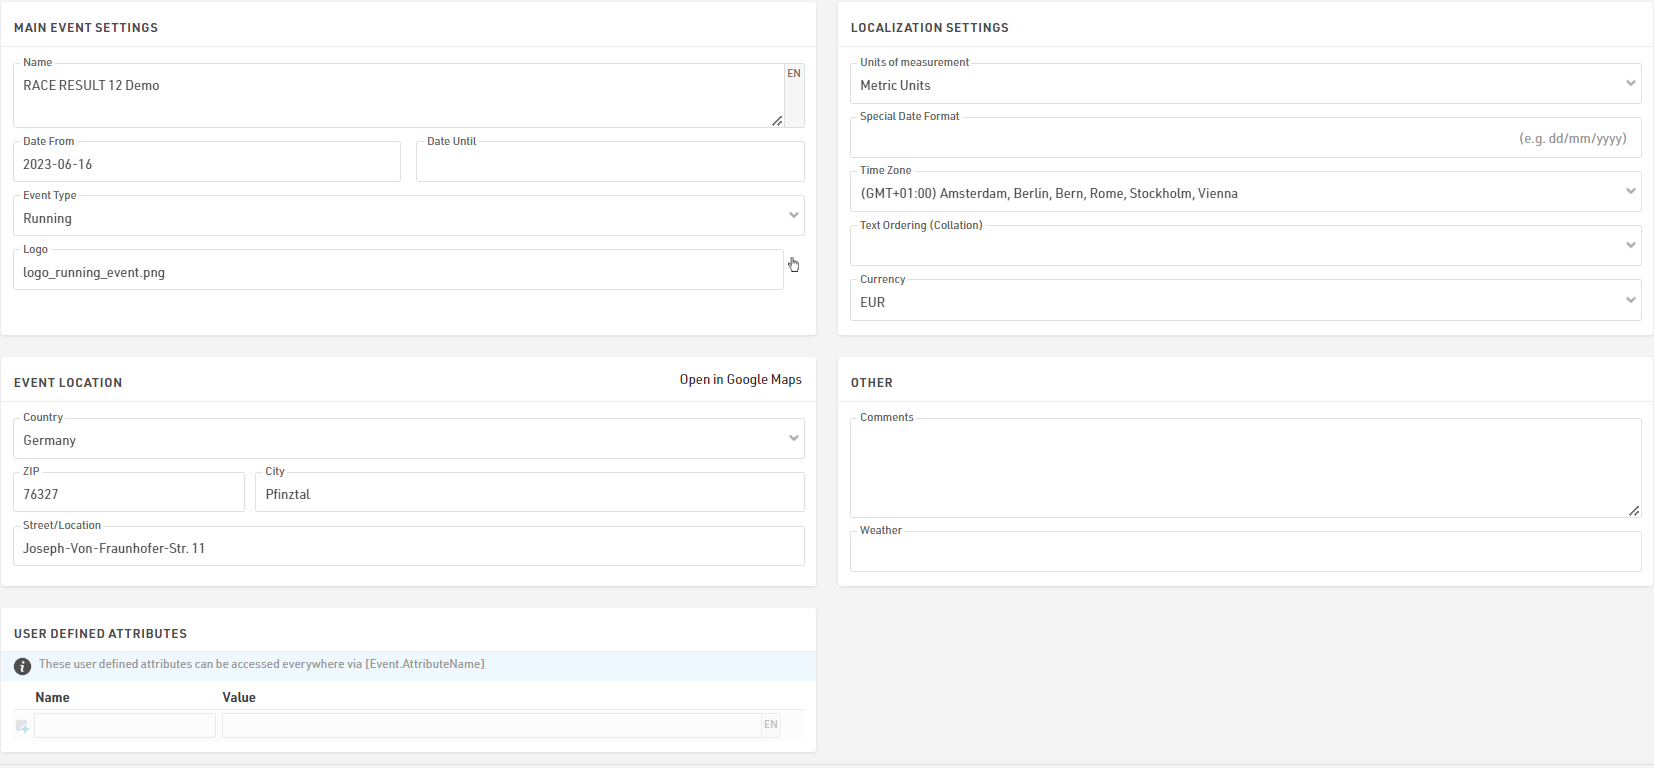
Nastavenia hlavného podujatia
Toto sú najzákladnejšie nastavenia podujatia vrátane názvu a dátumu podujatia, typu a loga, ktoré sa používajú na zobrazenie podujatia na platforme my.raceresult.com.
Nastavenia lokalizácie
Nastavenia lokalizácie sa používajú na nastavenie špecifických hodnôt pre udalosť.
Jednotky merania určujú, či sa majú predvolené hodnoty zobrazovať/vypočítavať v metrických alebo imperiálnych jednotkách. Toto sa používa napríklad pri nastavení Rozdelenia a predvolených funkciách pre rýchlosť a tempo (ktoré vracajú km/h a min/km alebo míle/h a min/míľu).
Špeciálny formát dátumu vám umožňuje zadať a zobraziť dátumy podľa vášho miestneho štandardu alebo požadovaného formátu.
Časové pásmo sa používa na výpočet aktuálneho času udalosti. Používa sa pri nastavovaní dátumu/času, pre ktorý by mali byť k dispozícii prvky online platformy (napríklad registrácia). Používa sa aj na prevod časov UTC z Track Boxov na správny miestny čas.
Zoraďovanie textu (Collation) vám umožňuje definovať spôsob abecedného zoradenia, pretože rôzne jazyky zoradí špeciálne znaky rôznymi spôsobmi.
Mena, ktorá sa má použiť na výpočet vstupných poplatkov a na zachytenie platby prostredníctvom registračného modulu.
Miesto podujatia
Platforma my.raceresult.com používa polohu na pomoc používateľom pri vyhľadávaní podujatí a tiež nastavuje stredový bod máp pre prvky v softvéri.
Iné
Zadajte komentáre alebo informácie o počasí k udalosti, na ktoré sa neskôr odkáže vo výstupných zoznamoch pre hlavičky a päty, aby ste si mohli všimnúť dôležité zmeny udalosti, ktoré sa môžu vyskytnúť.
Používateľom definované atribúty
Atribúty vám umožňujú definovať vlastné polia pre udalosť, ktoré je možné použiť kdekoľvek pomocou [Event.AttributeName].
Súťaže
Súťaže sa používajú na definovanie skupín účastníkov, napríklad v bežeckej disciplíne s maratónom a polmaratónom by každá vzdialenosť bola jedinečnou súťažou. Každý účastník vašej disciplíny by mal byť pridelený do súťaže.
Nastavenie súťaže má niekoľko účinkov:
- Účastníci rôznych súťaží sú zvyčajne hodnotení samostatne (t. j. prvé miesto je pre 5 km a prvé miesto pre 10 km).
- Definujte pre každú súťaž, ako sa časy zaokrúhľujú a formátujú.
- Definujte rôzne vekové skupiny a štartovné pre každú súťaž.
Jednotlivé nastavenia sú vysvetlené nižšie:
Všeobecné
Jednoducho zadajte názov, vzdialenosť/dĺžku a čas začiatku súťaže a priraďte jedinečné číslo (ID).
Účastníci
Definujte, ktorí účastníci sú oprávnení zúčastniť sa súťaže. Toto má nasledujúce dôsledky:
- Neoprávnení účastníci nebudú akceptovaní v online registrácii a registrácii na mieste.
- Po zadaní neoprávneného účastníka v okne účastníkov sa zobrazí varovná správa.
- Analýza údajov zobrazí neoprávnených účastníkov.
Časy
Tieto nastavenia definujú, ako budú časy účastníkov tejto súťaže štandardne zaokrúhlené a formátované. Upozorňujeme, že nastavenia formátu času v časti Všeobecné nastavenia výsledkov budú mať prioritu, ak sú nastavené.
Okrem toho vyberte cieľový výsledok. Cieľový výsledok bude veľmi relevantný pre Hodnotenie, výber cieľového výsledku má dva účinky:
- Polia Čas a DecimalTime odkazujú na formátovaný/desatinný čas v príslušnom výsledku. Napríklad Čas sa môže vzťahovať na pole Čas2 pre účastníkov v jednej súťaži, zatiaľ čo pre účastníkov v inej súťaži sa vzťahuje na pole Čas5.
- Pole Dokončené je pravdivé pre každého účastníka, ak je v príslušnom výsledku dokončenia zadaný čas, a účastník sa v Okne s prehľadom počíta ako dokončený.
Predvolene sa ako filter filter pre hodnotenia používa Finished (Dokončené) a pre triedenie poradia DecimalTime (DecimalnýČas). Inými slovami, Finish Result (Cieľový výsledok) sa používa pre najdôležitejšie skóre. Pri použití Medzičasov môže Finish Result (Cieľový výsledok) automaticky použiť Last Split (Posledný medzičas), ktorý sa použije buď ako Gun Time (Čas streľby), alebo Chip Time (Čip čas) podľa Time Mode (Časový režim) zvoleného v nastavení medzičasov pre danú súťaž.
Podobne si môžete vybrať Start Result (Výsledok začiatku). Ak máte na štarte časovú čiaru, vyberte buď automatické použitie prvého medzičasu, alebo výsledku, ktorý obsahuje čas začiatku. Pole Started (Začaté) bude mať hodnotu true (pravda), ak má účastník čas vo výsledku začiatku, a účastník sa bude v okne Prehľad započítavať ako štartovaný.
Používateľom definované atribúty
Atribúty vám umožňujú definovať vlastné polia pre každú súťaž a zobrazovať rôzne texty pre každú súťaž. Atribúty môžete použiť kdekoľvek pomocou [Contest.AttributeName].
Môžete definovať atribúty s rovnakým názvom pre rôzne súťaže a potom toto pole volať v príslušnom výstupe/certifikáte.
Dráha
Nahrajte súbor GPX s traťou alebo nakreslite trať na mapu kliknutím na tlačidlo Vytvoriť trasu. Trate sa zobrazia na všetkých mapách vo VÝSLEDKOCH PRETEKOV 14, čo je užitočné napríklad na overenie, či sú systémy merania času nastavené na správnom mieste.
Iné
Keď sa detekuje štartovací transpondér, zvyčajne ide o značku z vášho časomeracieho systému, ktorá sa zaznamenáva ako kód transpondéra, napríklad 99999. Čas sa uloží ako Čas štartu (T0).
Nastavte súťaž na neaktívnu, aby sa skryla v okne Prehľad. Túto funkciu použite napríklad, ak sa jedna súťaž neuskutoční tento rok, ale znova na pretekoch budúci rok.
Údaje o účastníkoch
Jedným z najdôležitejších aspektov riadenia podujatia je manipulácia s údajmi o účastníkoch. To zahŕňa celý rad predvolených polí a funkcií, ale umožňuje vám tiež ukladať alebo vypočítavať vlastné polia a funkcie. Pre zjednodušenie pracovného postupu môžete povoliť/zakázať určité predvolené polia a tiež ovládať, ako sa tieto polia správajú pri úpravách prostredníctvom Okna účastníkov.
Predvolené polia
Definujte niektoré všeobecné nastavenia pre spracovanie údajov v okne Účastníci. Aktivujte alebo deaktivujte štandardné polia a definujte, či sú povinné alebo nie. Ak nie sú povinné polia v okne Účastníci vyplnené, zvýraznia sa červeným pruhom a pri pokuse o uloženie sa zobrazí upozornenie. Upozorňujeme, že pre Online registrácia je možné povinné polia definovať samostatne.
Pomoc so vstupom / Nastavenia
Ovládajte, ako sa majú údaje spracovať pri zadávaní/úprave účastníkov priamo v okne Účastníci. Keď je povolená možnosť Zmena vekovej skupiny, vekovú skupinu je možné manuálne zmeniť, čo môže byť užitočné pri práci s prekrývajúcimi sa vekovými skupinami – upozorňujeme však, že toto nastavenie sa prepíše, ak sa vekové skupiny neskôr prepočítajú. Môžete tiež vypnúť funkciu Vek, ak sa nemá používať v celom súbore udalosti.
Štartové čísla
Tieto nastavenia určujú, ako systém spracováva štartovacie čísla.
Prideľovanie štartovacích čísel
Štandardne sa pri zadávaní nového účastníka navrhne najvyššie štartovacie číslo +1. Existujú však ďalšie dve možnosti: Prvé voľné štartovacie číslo navrhne najmenšie nepoužité štartovacie číslo a Žiadny návrh vás núti zadať štartovacie číslo manuálne pred zadaním údajov účastníka do okna Účastníci.
Ak nechcete povoliť určité štartovacie čísla, zadajte ich do vstupného poľa Vylúčiť štartovacie čísla. Potom nebudú navrhnuté.
Rozsahy štartových čísel
Štartovací rozsah priraďuje určitý rozsah štartovacích čísel jednej súťaži súťaži. Po definovaní štartovacích rozsahov existujú dve možnosti:
- Po zadaní štartovacieho čísla pre nový záznam v okne Účastníci sa vyberie súťaž podľa nastavenia štartovacieho rozsahu. Pre túto možnosť vyberte možnosť Použiť štartovacie rozsahy na navrhnutie súťaže.
- Po výbere súťaže pre nového účastníka v okne Účastníci sa účastníkovi priradí štartovacie číslo z štartovacieho rozsahu. Preto vyberte možnosť Použiť štartovacie rozsahy na navrhnutie štartovacieho čísla.
- Štartovacie rozsahy môžete tiež dočasne ignorovať.
Taktiež môžete definovať rôzne časy začiatku pre každý štartovací rozsah.
Vizualizácia štartového čísla
Vizualizácia štartovacích čísel vytvára tabuľku so všetkými štartovacími číslami dostupnými pre každú súťaž podľa nastavených štartovacích rozsahov. Štartovacie čísla môžu byť zobrazené v 3 rôznych farbách.
Biela - Štartovacie číslo je už priradené
Zelená - Štartovacie číslo ešte nie je priradené
Červená - Štartovacie číslo je priradené, ale účastníci súťaže nezodpovedajú nastaveným štartovacím rozsahom
Ďalšie polia
Ak chcete zhromažďovať ďalšie údaje, môžete definovať neobmedzený počet ďalších polí na ukladanie údajov o účastníkoch. Ďalšie polia je možné zoskupiť pomocou vlastných označení skupín, pričom každá skupina sa zobrazí v samostatnom poli na karte účastníci.

Ďalšie polia vyžadujú jedinečný názov poľa a môžu mať aj samostatný štítok, ktorý sa zobrazí v okne účastníkov a registračných formulároch.
Typ poľa
Každé ďalšie pole má typ, ktorý mení vstupné a zobrazovacie charakteristiky poľa alebo spôsob použitia poľa.
| Rozšírené nastavenia | |
| Aktívne | Či je pole aktívne a má sa zobraziť v okne Účastníci. |
| Povinné | Ak by sa pole malo považovať za povinné |
| Predvolená hodnota | Predvolená hodnota v poli pri vytváraní nových účastníkov |
| Zástupný symbol | Zástupný text zobrazený vo vstupe, keď je prázdny |
| Minimálna dĺžka | Minimálna dĺžka hodnoty pre pole |
| Maximálna dĺžka | Maximálna dĺžka hodnoty pre pole |
User-Defined Fields / Functions
Creating your own Fields and Functions allows you to quickly and easily call specific data without creating a long expression each time. User-Defined Fields/Functions are normally used with other data fields or are used to return the same for every participant.
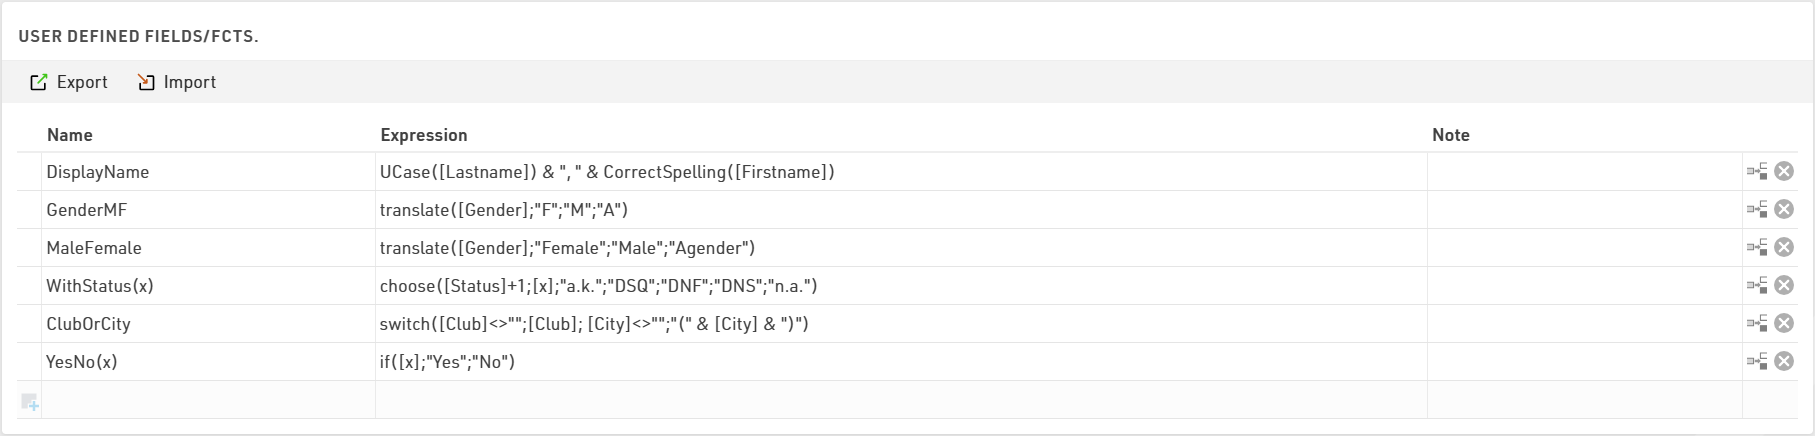
Some default User-Defined fields are available when creating a new file, such as MaleFemale which converts Gender to the full gender label. These default fields can be updated as you prefer.
When creating User-Defined fields the Expression must be formatted as a RACE RESULT 14 Expression.
When writing functions which should take additional parameters then the field name should use brackets around a semi-colon separeted list of identifiers (e.g. Function(x;y) creates a function with 2 parameters x and y).
Parameters can be accessed inside the function by wrapping them in square brackets (e.g. [x] and [y]).
e.g. YesNo(x) - if([x];"Yes";"No") is normally used with Check Box values to return "Yes" or "No" in an Output List if the value of [x] is 1 or 0.
It can also be useful to write a note for each function to describe it's purpose or how it should be used.
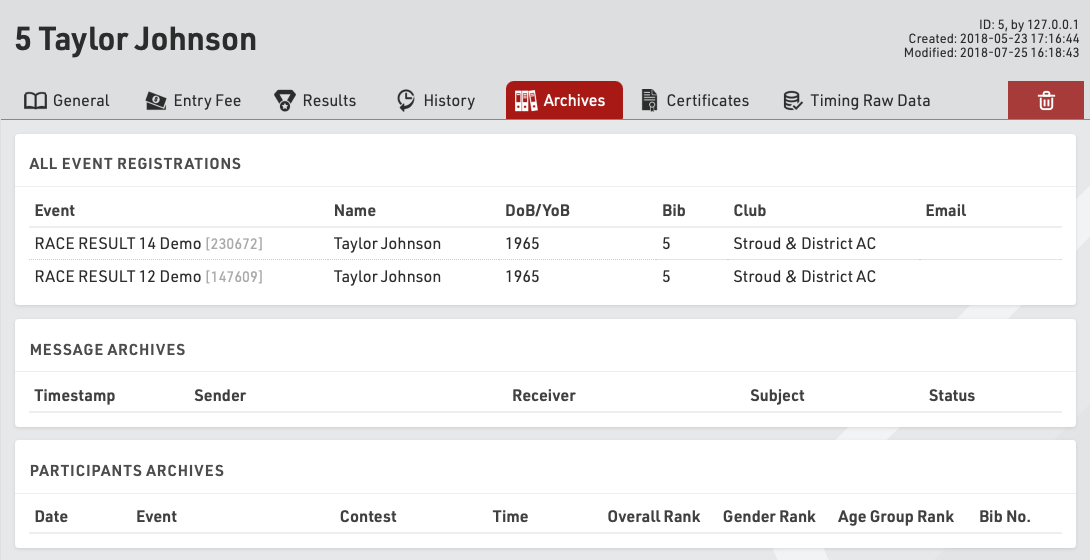
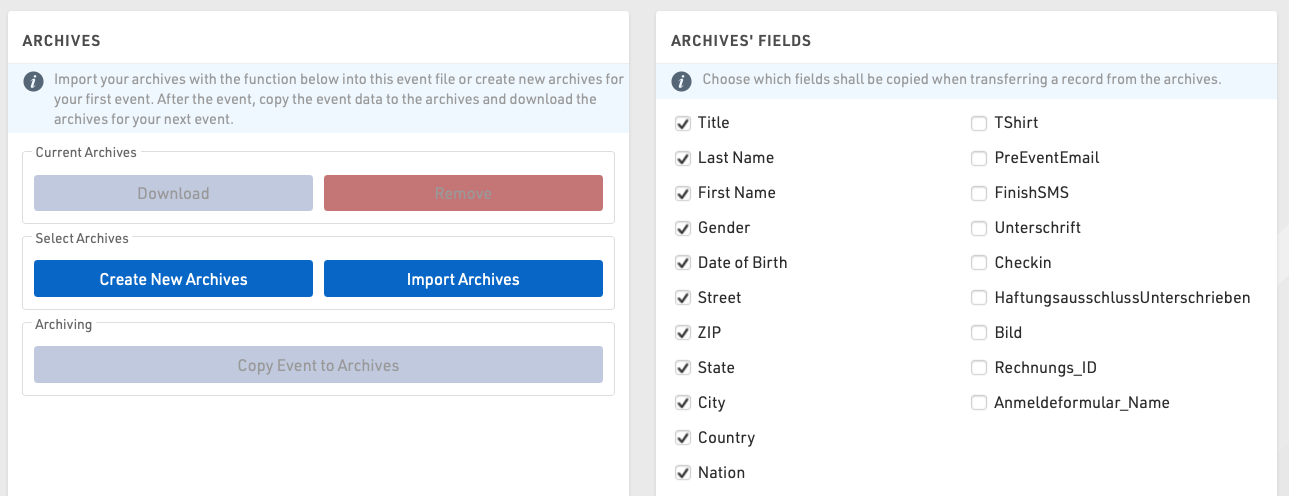
Archives
Using Archives, you can access data from previous events in the Participants Window:
- When manually entering a new participant, the records from the Archives will be suggested, so that you can import the record including attributes from the Archives.
- Results from previous events will be available in the Archives tab.
Procedure for Using Archives
After the event, go to the Archives settings. When using the archives function for the first time, create a new archives file and then write the data into it (button Copy Event to Archives).
For next year's event you can create a copy of the event file which then still includes the archives file.
If you already have an event file for the upcoming event, you can proceed as follows:
- Open last year's event and create a new archives file in the Main Window. Copy the event data to the new archives file and then download it to your local PC.
- Open next year's event and import the archives file from your local PC. If there already is an archives file in the new event, it needs to be deleted first.
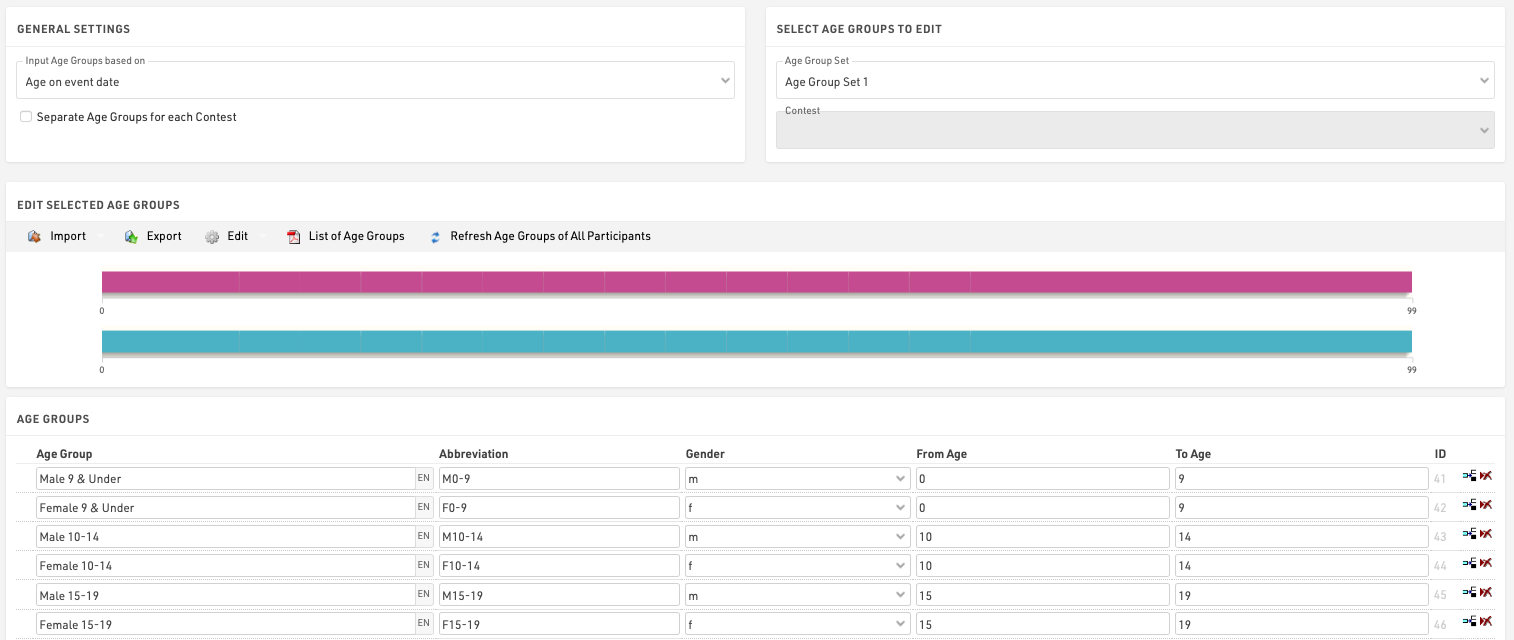
Age Groups
An Age Group (short AG) is a group of athletes with roughly the same age. Usually, events have an age group score where the athletes of each group will be ranked independently from the athletes of other groups. Age Group definitions often vary according to the type of sport and also your local governing body regulations.
When creating a new Event File, default age groups will be set up automatically which can be changed freely according to your needs.
General/ Import of Age Groups
Via the Import button you have the opportunity, to import age groups from different sources. For example you can load standard age groups or import age groups from a file which you created via Export.
Should you have made a copy of the previous year's event file, you can adjust the age groups with the functions Edit->Years +1 and Years -1.
If you need different age groups for different contests, activate the option Separate Age Groups for Each Contest under General Settings. Either enter different age groups for each contest or import them with the function Import->From Contest from another contest and then make necessary changes.
Second/Third Age Group Set
Maybe it is necessary to set up two or three different age group sets so that each participant is assigned two or three age groups. The second age group can be used for an additional score like a team score where for example the age groups M40, M45 and M50 are combined in the age group Masters.
Input Age Groups Based On
You will need to define on which criteria you will enter and with which age groups are set, this will usually depend on the type of event you are timing. Under Input Age Groups Based On you can select:
Date of birth - Age groups are set by a defined date range rather than age ranges.
Age on event date - Participants' age on the day of the event set in the event Basic Settings.
Age on 12/31 (Previous Year) - Age on 31st December of the previous year.
Age on 12/31 (current year) - Age on 31st December of the current year.
Age on arbitrary date - Age on a specific date, to be defined below.
Updating Age Groups
In the Participants Window, the age group will be assigned automatically, based on gender and date of birth. However, you can manually change the age group if needed. That is why age groups will not be updated automatically, when changing the age group settings.
To update the assigned age groups after changing the age group settings, click on Refresh Age Groups of All Participants.
Useful Hints
Accessing Age Groups
On lists and certificates you can access the name of the age group selected for the participants via the fields [AgeGroup.Name] / [AgeGroup1.Name] (and [AgeGroup2.Name], [AgeGroup3.Name]).
Sorting of Age Groups
Often the age groups are to be handed out in a certain order, for example because an age group is first in the award ceremony. Therefore you can change the order of the age groups by moving the arrow icon on the left to the desired position. The order of the age groups influences the fields [AgeGroup1.OrderPos] ([AgeGroup2.OrderPos], [AgeGroup3.OrderPos]) which create ascending numbers according to the entry order in the age group settings. These fields can be used for sorting on lists. The default list Result List AG also uses this procedure.
Age Group Abbreviation
Aside from the name for the age group you can also enter an abbreviation. If not much space is left on a list, you can access it via the field [AgeGroup.NameShort] / [AgeGroup1.NameShort] ([AgeGroup2.NameShort], [AgeGroup3.NameShort]).
Age Group ID
Each age group has a unique ID which does not change if the name of the age group is changed. It can be accessed via the field [AgeGroup.ID] / [AgeGroup1.ID] ([AgeGroup2.ID], [AgeGroup3.ID]).
The age group ID is well suited for the grouping at the calculation of rankings as age groups are distinguished even if they have the same name. If you set up two groups named Kids (for boys and girl separately) and group the ranking by AgeGroup.Name, boys and girls would be ranked together. However, if you use AgeGroup / AgeGroup.ID instead, the two age groups will be ranked separately.
Pictures / Files
Images and other files can be imported in to your event file for use in other parts of the software, most commonly for the my.raceresult.com header.
Files can be imported under Main Window - Pictures / Files

Files which are not stored in any folder will be saved directly to the event file and will be downloaded if the event file is checked out.
Files stored inside the my folder will be available across all event files under your account when working online.
Files stored inside the common folder are stored online and can be accessed by any RACE RESULT user, inside here exists some alternative flags which use the Country / Nation Alpha-2 abbreviation for the file name.
To access files stored inside folders the image name works as a standard file storage system, for example an image named "header.png" stored inside the common folder would use the image name "common\header.png".
See our How To guide on how to use your images and files in different parts of the software.
Access Rights / Simple API
Access Rights
An event file always belongs to a single customer account, and only the account owner can access the access rights settings for security reasons.
Through the access rights you can grant access to another RACE RESULT account either by username or customer ID, you can additionally control the access to certain areas of the software for that specific event.

Simple API
The Simple API serves to make data from your event file accessible through a static link without logging in to your customer account, this may be to publish results on another website.
Settings can be accessed through Main Window->Access Rights/Simple API. Simply select what type of data you would like to make accessible and then select the listname or enter the setting name.
You can choose from different API types:
- List allows you to publish any of the Lists set up in the Output window, in any format (TXT, JSON, JSON ext (including the formatting data of the output), HTML, PDF, XML, XSLX (Excel) or CSV).
- Statistics creates either a PDF or XLS file of any of your Statistics set up in the Output window.
- Settings enables access to event settings of the event file.
- Counter outputs a count of all participants in the event, or in a given contest.
- Custom allows you to do very specific things which would be impossible to fully document here.
- Racemap access is designed to transmit the participants data of your event file to Racemap, for use in their tracking visualisation interface. This setting is explained in more details below.
The icon in the column Link then leads to the static link.
When calling APIs you should consider that they will be cached for between 10-30 seconds, therefore calling them more often may not result in data updating correctly.
The Simple API applies rate limiting of 1 call per second per each unique API URL from each unique address. If your client script is calling an API more than once per second then it will receive a 406 error code. If you require more frequent calls please contact support.
Webhooks
RACE RESULT 14 can send webhooks upon certain triggers, these are predominantly used to ensure the syncronisation of data between 2 separate data stores, for example if you are using your own registration platform and want to ensure participant data is updated if it is changed in the Event File.

Webhooks are configured under Main Window - Access Rights / Simple API.
Each webhook needs to define the trigger, the desination URL, and for certain triggers a filter and fields can be defined.
When setup and activated the webhooks will automatically be sent according to the triggers defined, there is no time limit to how long webhooks will be activated for.
All webhooks are sent as a POST request with data in the POST body as JSON, by default the body will always contain Event ID, Webhook ID, Timestamp, additional values depend on the trigger being used.
A call is considered successfully sent if a response code <500 is received, even if the status code is an error code it is still conidered received by the destination. If a call is unsuccessful then the server will attempt to resend it with an increased delay between or until the Server queue limit is reached at which point the message will be dropped.
Webhooks are sent by the SES which is running the event file, if you are timing offline, even with online forwarding enabled, the webhooks will only be sent by your local SES.
Triggers
New Participant
A call will be sent when a new participant is added, this can be either through import participants, online registration, on-site registration or directly through the participants window.
A filter can be applied to only send the webhook if a certain filter is true, for example if a participant has selected a specific option during registration.
The post body can also include any fields which are defined as a list of semi-colon separated values.
Participant Update
Similar to the new participant trigger the participant update will send whenever the data fields of a participant record are changed, this will not be triggered by changes to Splits, Results calculations or User-Defined Fields.
A filter can also be applied to participant updates and the post body can be configured to include fields as well.
New Raw Data
The new raw data trigger will be sent whenever a new raw data record is added, the record is linked to a participant record so you can optionally define a filter and fields to be included in the POST body.
When using the New Raw Data it is recommended to link the filter to a specific result or the Finish result, for example - only send the webhook if the participant is Finished. Any calculations which depend on the raw data record will be completed first so it will send even if that time is used for the specific result you are looking at.
Settings Changed
This applies to any event file settings which are changed, this includes for example all Event, Chip Timing and Scoring settings under the Main Window, updates to Output Lists, my.rr settings and more.
Since the settings apply to the Event file and not a participant record it cannot be filtered or include additional fields. The Post body will include the ModJobID in the Values field to allow you to track the changes.
The ModJob ID is an integer which represents the last calculation cycle run by the SES. Whenever something is changed in an event file a unique job is run which calculates what should be updated in the database. This ID will increase for every change no matter how big or small.
All Changes
All changes means any change to the event file.
Since the all changes applies to the Event file and not a participant record it cannot be filtered or include additional fields. The Post body will include the ModJobID in the Values field to allow you to track the changes.