La página de eventos de my.raceresult.com ha sido rediseñada, pasando de un conjunto fijo de subpáginas a un sistema más flexible basado en pestañas. Las pestañas pueden configurarse con diferentes nombres, tipos y tiempos de publicación, lo que te permite controlar mejor el diseño de la página del evento en my.raceresult.com.
Los archivos de eventos existentes se convierten automáticamente a esta nueva estructura. Los eventos nuevos se crearán con un conjunto estándar de pestañas predeterminadas, que incluyen Información, Inscripción, Participantes, En Vivo, Resultados, Reseñas y Contacto. Cada una de estas pestañas ahora puede moverse, renombrarse o programarse de forma independiente.

Configuración de Título / URL
Este apartado define cómo aparece la pestaña en el menú de navegación, qué plantilla se utiliza y cuál será la dirección web.
URL Preset (Preajuste de URL):
Selecciona una plantilla y ruta estándar. Esto configura automáticamente el comportamiento de la pestaña.
Título:
Si deseas un nombre personalizado en el menú (por ejemplo, “Mirá tus tiempos” en lugar de “Resultados”), ingrésalo aquí.
Es posible agregar traducciones seleccionando los idiomas deseados y escribiendo el texto correspondiente.
Si se deja vacío, se utilizará el nombre del URL Preset.
URL personalizada:
Cuando se utiliza un preset de tipo Custom URL, aquí podés definir la dirección web personalizada.
Configuracion: General:
Estos controles gestionan el estado y la visibilidad de cada página.
El botón Publicar (Publish) habilita la URL pública de la pestaña.
La opción Visibilidad en el menú (Menu Visibility) determina cómo los usuarios acceden a la pestaña:
- Nunca (Never): siempre oculta en el menú; solo es accesible mediante enlace directo o incrustación.
- Cuando esté activa (When Active): visible únicamente durante las fechas definidas en Página activa desde / hasta (Page Active From / To).
- Siempre (Always): siempre visible; aparece atenuada (en gris) fuera del rango de fechas Página activa desde / hasta.
Utiliza los campos Página activa desde / hasta para automatizar el acceso a la pestaña según un calendario; por ejemplo, desactivar Inscripción y activar Resultados en Vivo al inicio del evento.
Añadir una nueva pestaña
Al agregar una nueva pestaña, primero debes seleccionar el tipo de contenido que tendrá.
La plantilla de la nueva pestaña dependerá de esa selección:
- Texto: utilizará la plantilla de Info.
- Contenido externo: incrustará contenido o video proveniente de fuentes externas.
Importación/Exportación
Cualquier pestaña, excepto Contact, puede exportarse e importarse a través de la interfaz de usuario (UI). Esto permite reutilizar la configuración de una pestaña en otra pestaña o evento sin necesidad de editar directamente el archivo JSON del evento.
Durante la importación, el Nombre (Name) y la URL de la pestaña de destino se mantienen sin cambios y no se sobrescriben, ya que ambos deben seguir siendo únicos. Todos los demás ajustes se reemplazan por la configuración importada.
Una pestaña solo puede importarse en otra pestaña del mismo tipo. Si se intenta importar la configuración en una pestaña de un tipo diferente, se generará un error.
Info / Text
Events on my.raceresult.com can have an "Info" tab that can display text, HTML or embed a website, this is the default landing page for the event if configured.
Inside the Info text it is possible to use a limited set of specific fields for dynamically displaying data, the supported fields are as follows:
- [Event.Name]
- [Event.Location]
- [Event.Zip]
- [Event.State]
- [Event.Street]
- [Event.Date]
- [Event.AttributeName] - The user-defined attributes for the Event.
- [CounterX] - Where X should be replaced by a Contest ID to display the number of participants currently registered for that Contest.
These fields can also be used in the Info text on the Registration page.
Note that some websites may not permit embedding and so will not load, you will need to check the hosting settings for your website in this case.
Registration
Your Registration Forms can be included in the my.raceresult event to accept registrations and payment online.
Basic Settings
The registration page must be activated by checking Activate Online Registration, and a date range can be entered to define when the registration page should be available, according to the time zone set in your event file basic settings. Note that this is separate from the individual Registration Form active date range.
Info Text
The Info Text is displayed at the top of the registration page to provide additional information to participants looking to register, this can be entered as HTML allowing for complete customisation.
Registration Forms
Multiple Registration forms can be added to the registration page, each of which already defines the available dates and contests for the form.
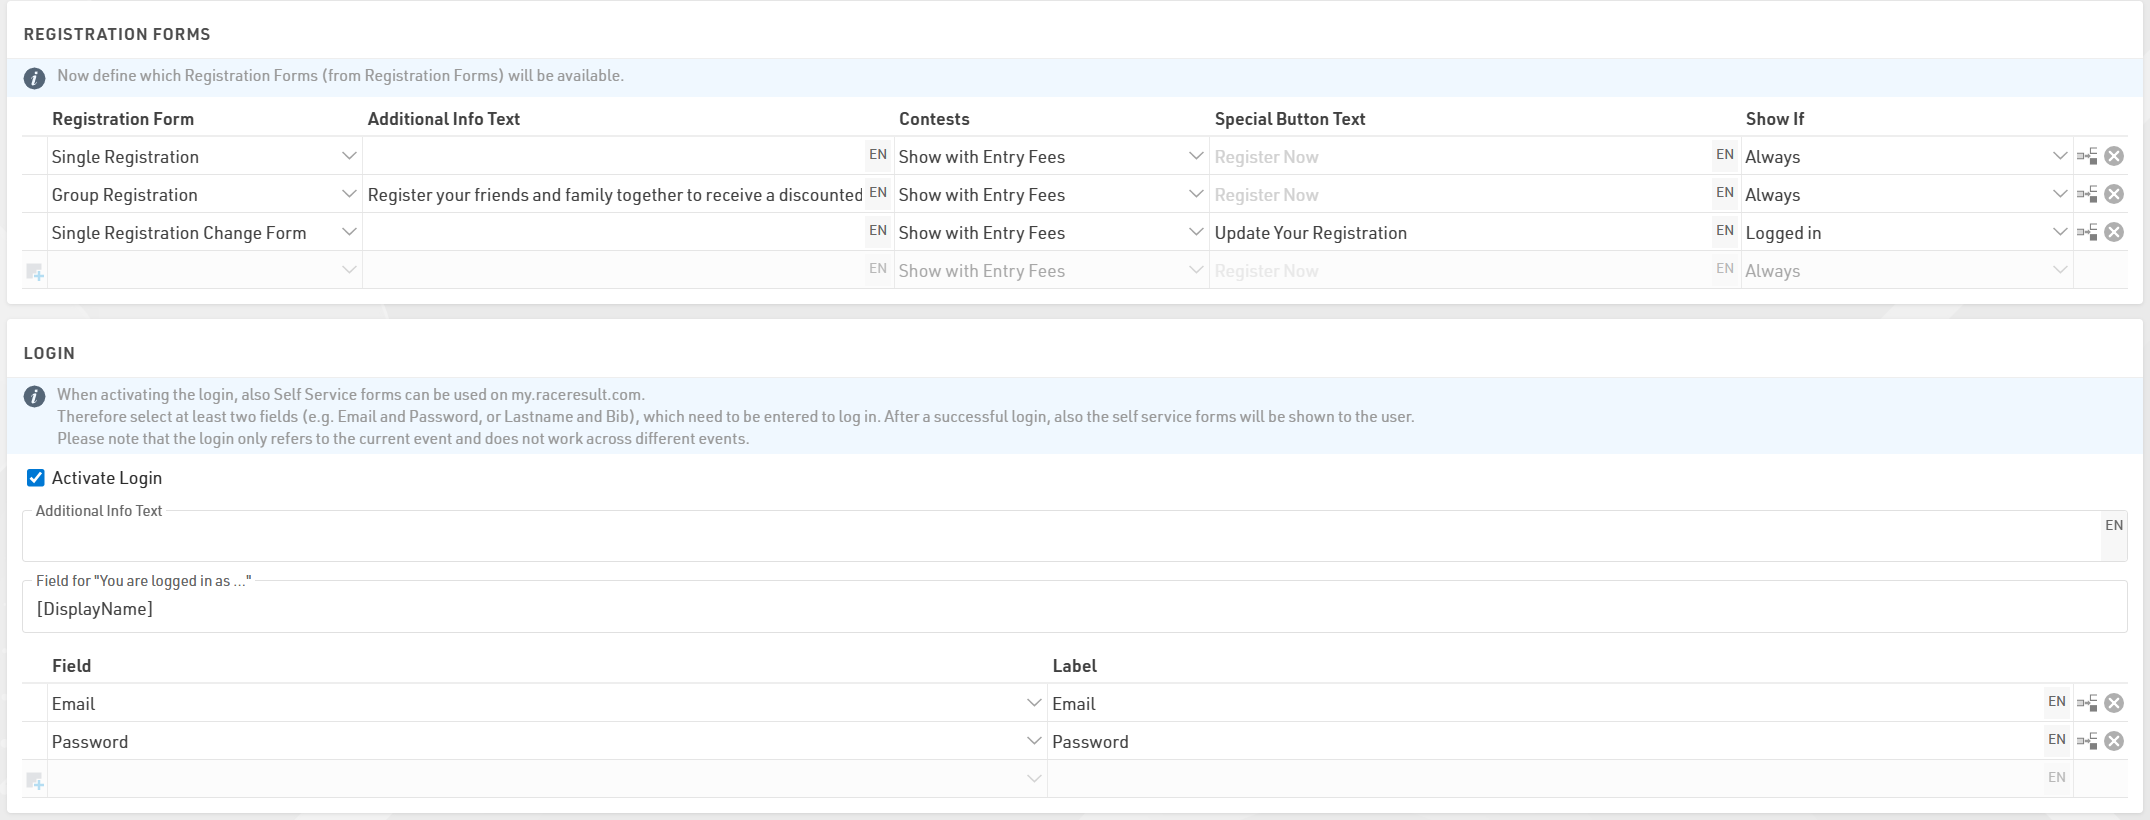
For each form you can define some additional info text to be displayed below the form title.
Selecting Show with Entry Fees will show a summary of the applicable entry fees for each available contest in that form.
You can also optionally relabel the button to start registration for each form.
If Login is activated then an additional dropdown will control which forms should be shown always, only when logged in, or only when not logged in.
Test Mode
Test mode allows you, or a third-party to test a registration form before the registration period, when in test mode the payment will not be captured.
It is advised to enter a date up to which the test mode is active to prevent this link from being used for an actual registration.
A link is available to open the registration page in test mode so this page can be accessed even before it is available according to the date range, note that it still must first be activated .
When in test mode it is possible to simulate specific dates by adding the query parameter &testDate= to the URL, this is useful for validating entry fees or active date ranges for specific fields.
e.g. &testDate=2026-12-25 would simulate registration on 25th December 2026.
Login
Login can be used to allow users to login to access specific registration forms or self service forms: this is commonly used for Company-Races where only one member of a team is in charge of the registration of all members of a team.
Please note the Login is not mandatory for using the Online Self Service. You can set up a self service form and use ChangeLink() to send a Changelink to participants via mail, by integrating the ChangeLink() in the email body.
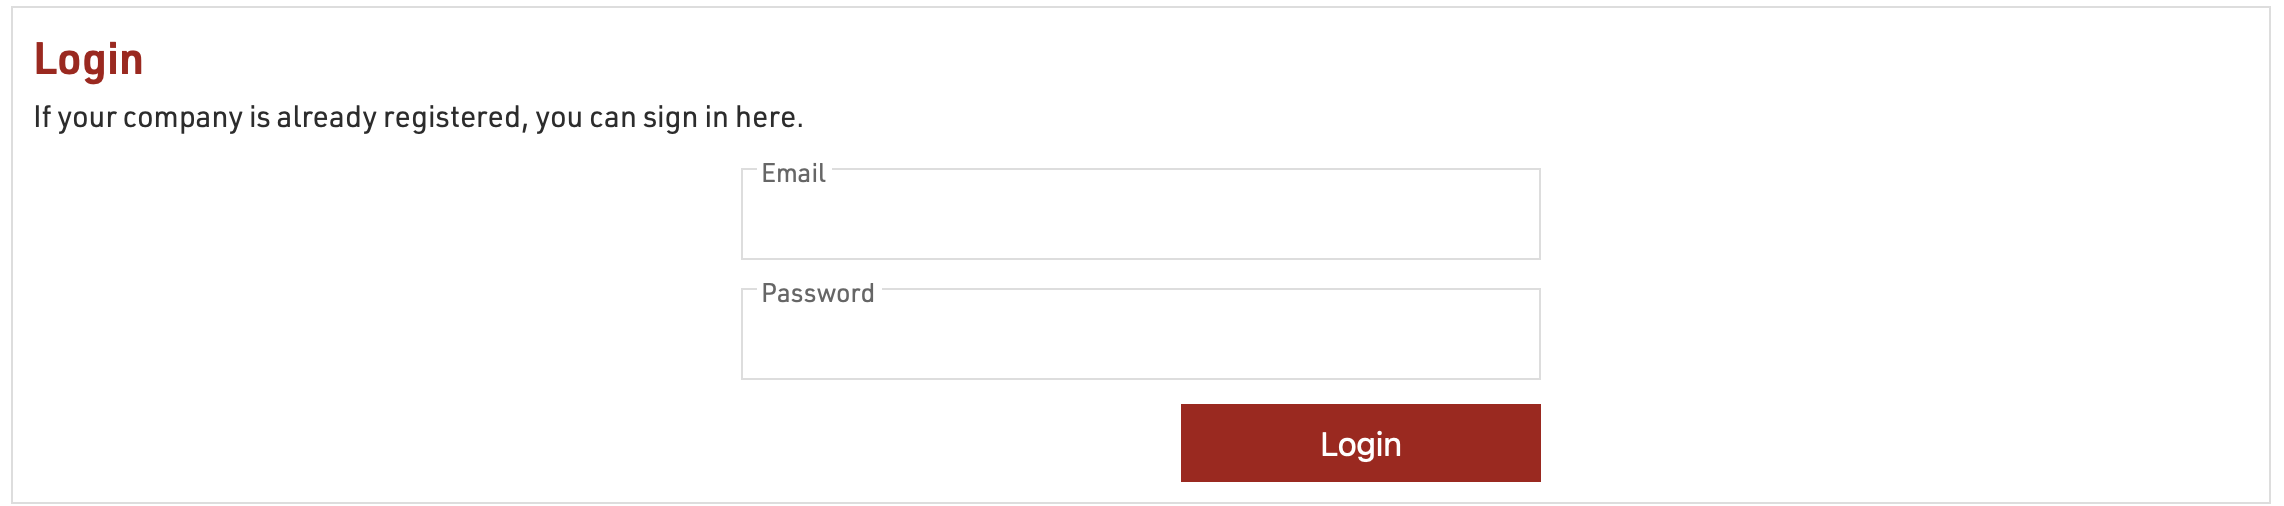
This is primarily used for corporate registrations where a team manager may then register additional team members and ensure they are registered to the correct team / club, or with series registration where members may login to retrieve their details easily.
Note that the login is only accessible within the event it is set up and cannot be used across multiple event files.
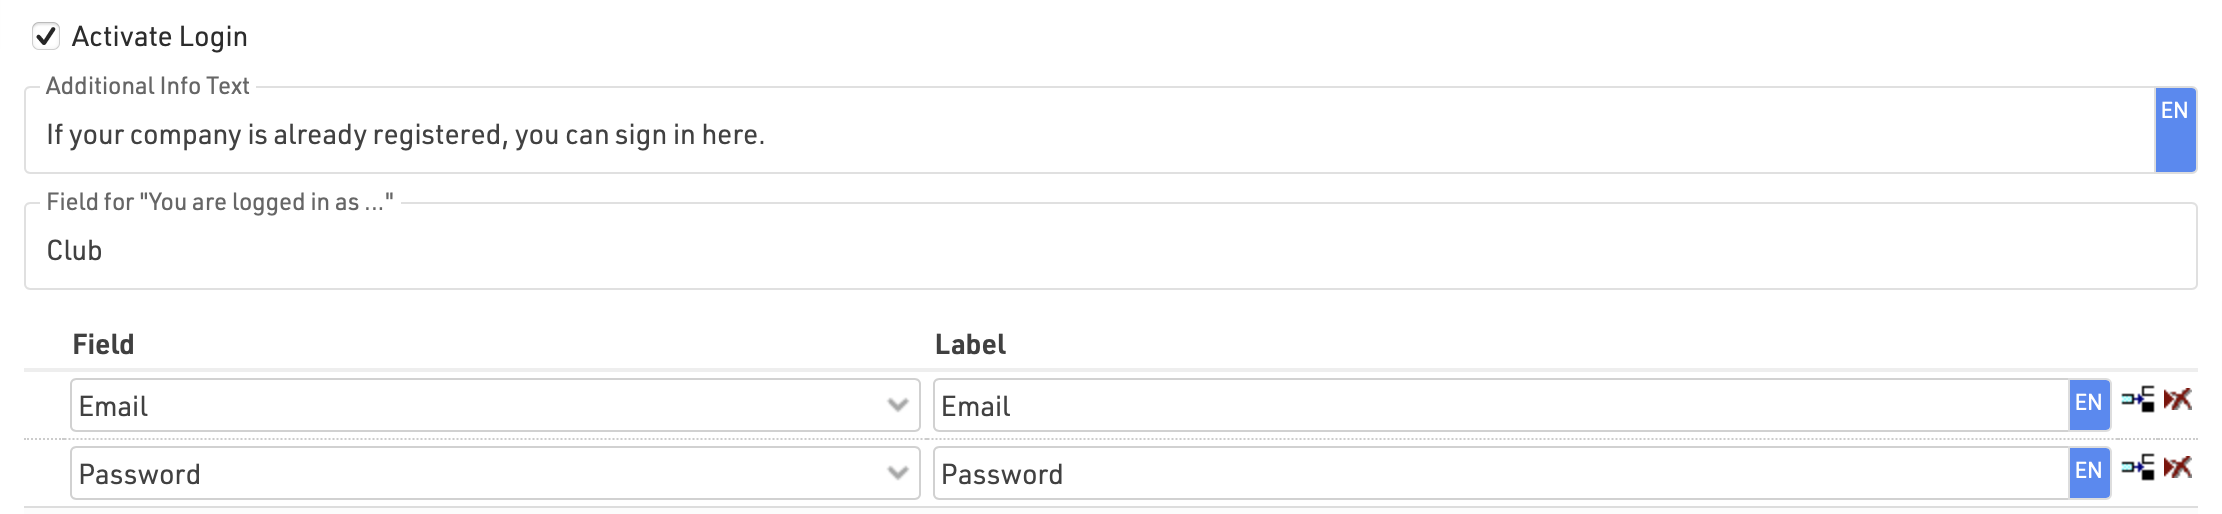
To allow users to login add at least two fields to be used to login, these should be captured in the initial registration and must be unique. Most commonly this would be an e-mail and the password field (which is stored as a hashed value).
When logged in you can show additional specific registration forms or self-service forms for the user to access.
Additionally, fields from the logged in user can be called in Store Additional Values in the advanced settings of registration forms.
Listas
Las plantillas de Listas permiten publicar listados en my.raceresult.com, y cada pestaña está diseñada para facilitar que los usuarios encuentren lo que necesitan.
El caso de uso general para cada plantilla es el siguiente:
- Participantes: Pensado para listas de salida e información antes de la carrera.
- En Vivo: Diseñado para mostrar resultados en vivo DURANTE la carrera, como clasificaciones y avances.
- Resultados: Destinado a publicar las listas completas de resultados después de la carrera.
Configuración:
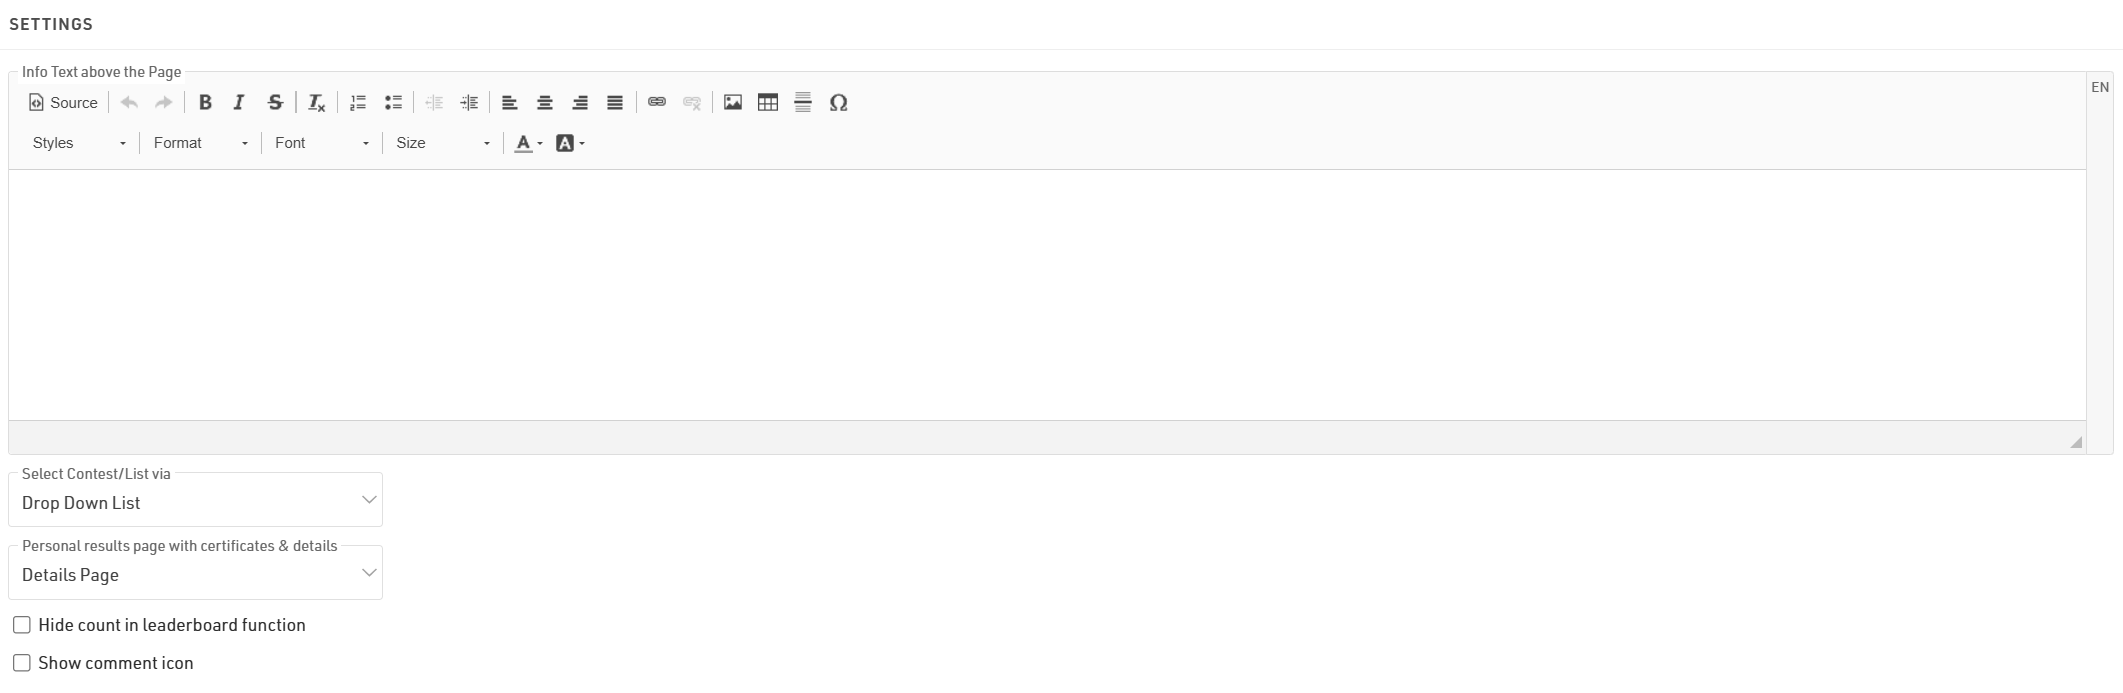
El texto informativo
El texto de información se mostrará encima de tus listas y puede contener contenido HTML adicional.
Si tienes varias listas, pueden mostrarse o seleccionarse mediante un menú desplegable o cuadros de selección. Ambas opciones se explican en el artículo mencionado más abajo.
Si seleccionas una Página de resultados personales con certificados y detalles, se habilitará una ventana emergente al hacer clic en un participante dentro de una lista.
Esta ventana mostrará la lista de detalles y otra información adicional configurada en los ajustes de Certificados / Detalles.
Al usar la función Leaderboard para una lista, aparecerá la opción “Mostrar X participantes”, donde X es la cantidad total de participantes del grupo.
Si ocultas esta opción, X se reemplazará por “todos”.
Seleccionar Mostrar ícono de comentarios mostrará un ícono junto a cada participante de la lista, permitiendo que los usuarios vean y agreguen comentarios sobre participantes específicos.
Publicar Listas
Puedes publicar múltiples listas a través de my.raceresult.com; sin embargo, en la mayoría de los casos se recomienda publicar una sola lista que contenga toda la información necesaria, lo cual simplifica la experiencia para el usuario.
Cuando se publican varias listas en una pestaña, el usuario podrá seleccionarlas usando los menús desplegables o el selector de cajas, según la configuración de Seleccionar Competencia/Lista vía El nombre de la lista puede adaptarse utilizando la etiqueta opcional.

Listas
Las listas pueden activarse o desactivarse individualmente, por lo que pueden mantenerse ocultas hasta que se necesiten.
Al hacer clic en el enlace para abrir una lista, la página se abrirá directamente con esa lista ya seleccionada. Esto seguirá funcionando incluso si la lista o la pestaña no están activas según las fechas de publicación, lo que permite previsualizar una lista antes de publicarla.
Puedes aplicar filtros de Competencia (Contest) a las listas.
Si tienes varias competencias seleccionadas, los filtros o el selector de cajas incluirán primero las opciones de Competencia antes de mostrar la lista.
La función de Leaderboard para las listas reducirá cada grupo dentro de la lista al número correspondiente de registros.
Debajo de cada grupo se mostrarán botones para mostrar más o mostrar todos.
Con la actualización en vivo habilitada, las listas se actualizarán automáticamente en tiempo real, lo cual es muy útil para clasificaciones en vivo (live leaderboards).
Ten en cuenta que esto solo estará activo dentro del rango de fechas del evento, según los Ajustes Básicos.
Cada lista puede tener configuraciones avanzadas:
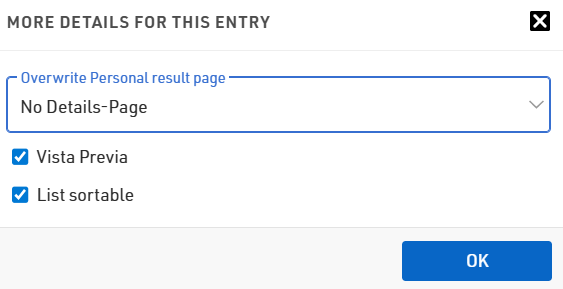
Funciones avanzadas de las listas
Si deseas mostrar la Página de Detalles solo en listas específicas, puedes usar la opción Sobrescribir página de resultados personales, que permite habilitar o deshabilitar las páginas de resultados personales para esa lista en particular.
Si la Vista previa de una lista está deshabilitada, entonces al seleccionar esa lista se abrirá automáticamente un PDF con la información.
Del mismo modo, si la opción PDF está habilitada, se mostrará un enlace arriba que permitirá a los usuarios abrir la lista en formato PDF.
Cuando Lista ordenable está activado, los usuarios pueden ordenar cada columna en orden ascendente o descendente haciendo clic en los encabezados de las columnas.
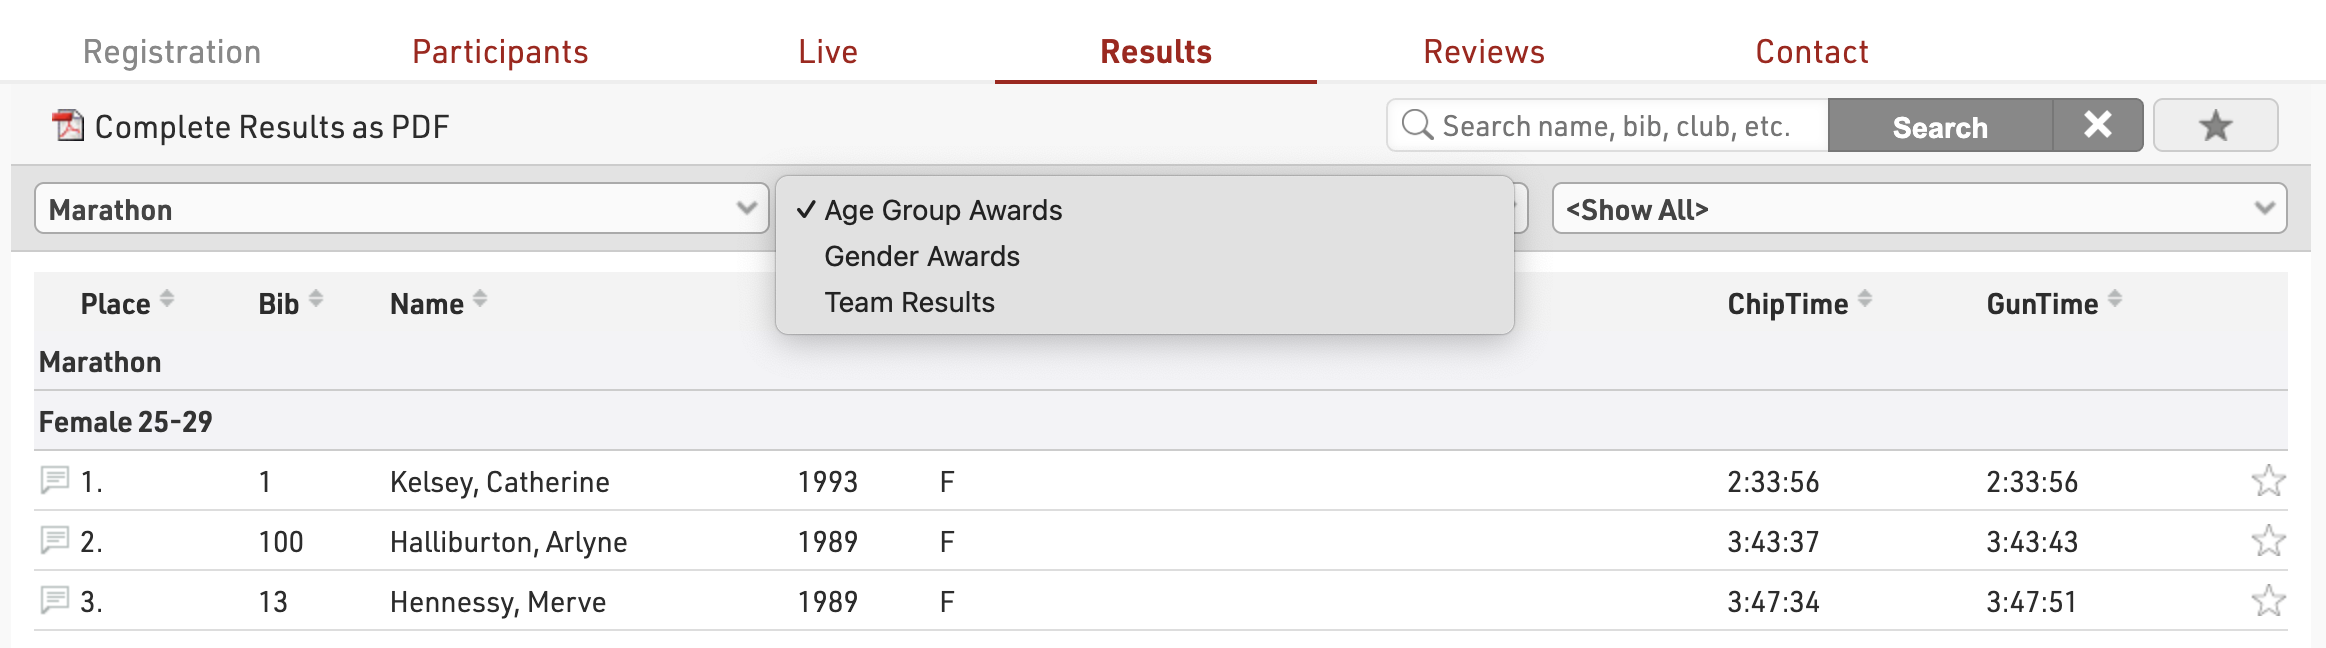
Drop-Down / Box Selector
When publishing multiple lists then these can be selected via either a drop-down menu or box selector.
Drop Down
A dropdown is added above the lists, before any other drop-down filters within the list, to choose which list should be opened. If also filtering by Contest in the publish list settings then a dropdown for the Contests will be shown first.
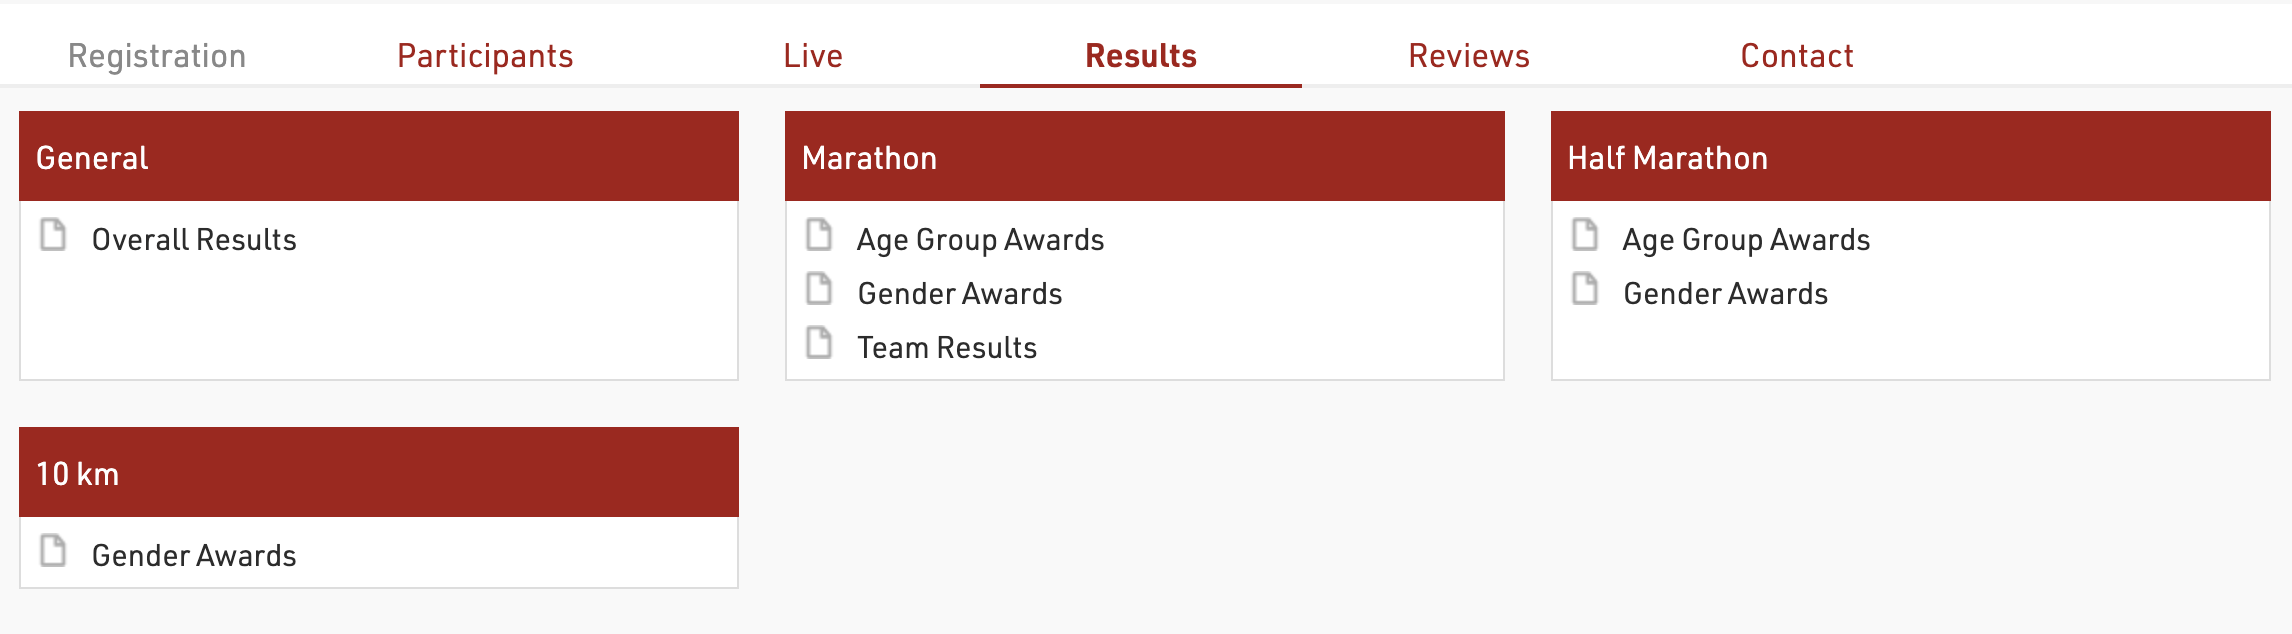
Box Selector
When opening the page a series of Boxes is shown for each Contest (if filtering by Contest) and a box for All Contests, with the available lists shown below, clicking a list will open the corresponding list.
Visualización en dispositivos móviles
La mayoría de los usuarios ahora consultan las páginas de resultados desde dispositivos móviles. Por eso es importante comprender la lógica de visualización de my.raceresult.com en dispositivos móviles, para configurar tus resultados de manera óptima.
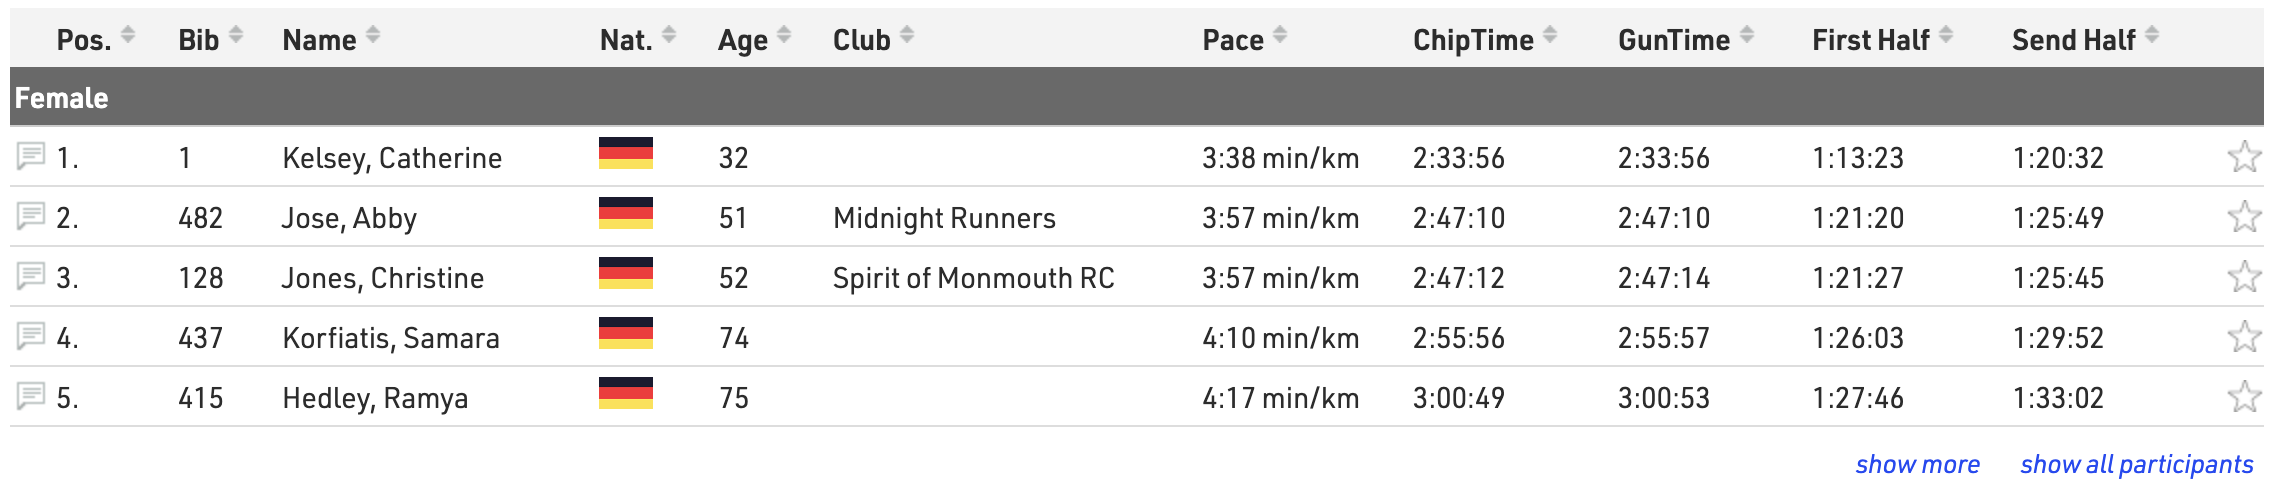
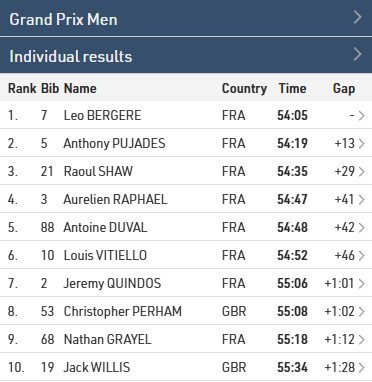
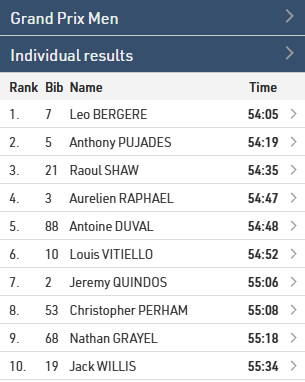
Cuando la pantalla se vuelve demasiado pequeña para mostrar todos los datos, los campos desaparecen uno por uno. A continuación, se muestra un ejemplo de cómo evoluciona la visualización de los resultados a medida que la pantalla se hace más estrecha.
Cuando la pantalla es lo suficientemente ancha, se muestran todos los campos:
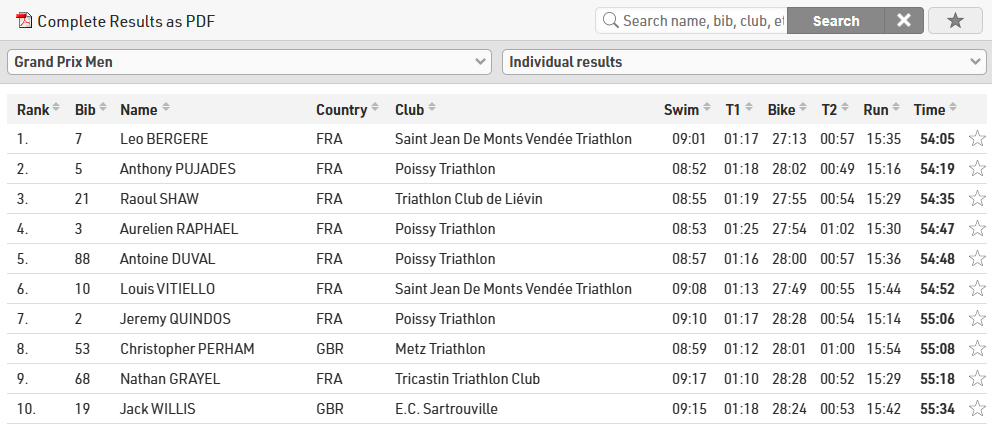
A medida que la pantalla se hace más estrecha, los campos desaparecen uno por uno. Los menús desplegables también cambian a un diseño más adaptado para dispositivos móviles.
Los campos ocultos pueden consultarse haciendo clic en un participante. Al volver a hacer clic en el participante, el usuario accede a la vista detallada del participante.
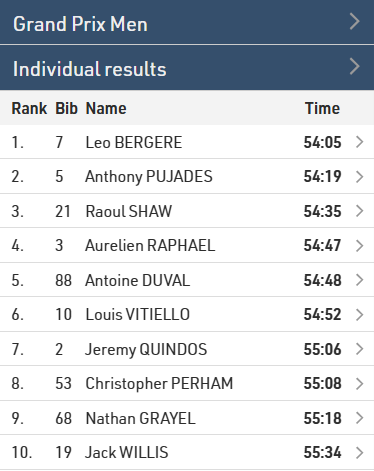
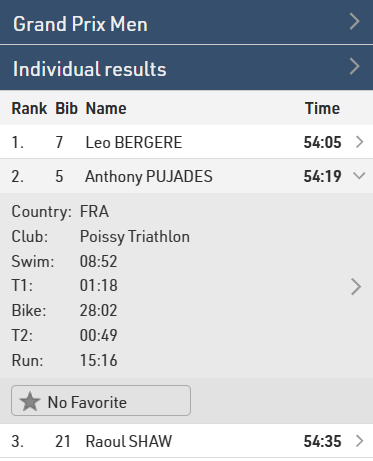
A veces puede que desees tener un mayor control sobre el orden en que se ocultan los campos. En las opciones avanzadas de cada campo dentro de la salida, puedes elegir entre cuatro configuraciones:
- Automático (Automatic): el sistema decide cuándo ocultar la columna según el espacio disponible.
- Ocultar columna primero (Hide column first): esta columna será de las primeras en ocultarse cuando la pantalla se reduzca.
- Ocultar columna al final (Hide column last): esta columna se mantendrá visible el mayor tiempo posible y se ocultará entre las últimas.
- Nunca ocultar columna (Never hide column): esta columna permanecerá siempre visible, independientemente del tamaño de la pantalla.

De forma predeterminada, todos los campos están configurados como Automático. Si seleccionas una configuración diferente para distintos campos, se seguirá aplicando la misma lógica de orden, pero dentro de grupos:
- A medida que la pantalla se hace más estrecha, los campos configurados como Ocultar columna primero comenzarán a desaparecer de derecha a izquierda. Dentro de este grupo, la columna situada más a la derecha será la última en ocultarse.
- Después, desaparecerán los campos configurados como Automático, siguiendo la misma lógica.
- Finalmente, se ocultarán los campos configurados como Ocultar columna al final.
Ten en cuenta que todos los campos configurados como Nunca ocultar columna deben compartir el espacio disponible en las pantallas más estrechas junto con el resto de los campos. Por ello, esta opción debe utilizarse únicamente para aquellos campos que realmente sean imprescindibles para el usuario.
A continuación se muestra la misma lista del ejemplo anterior, esta vez con una diferencia de tiempo (gap time) para ilustrar cómo funcionan estas configuraciones:
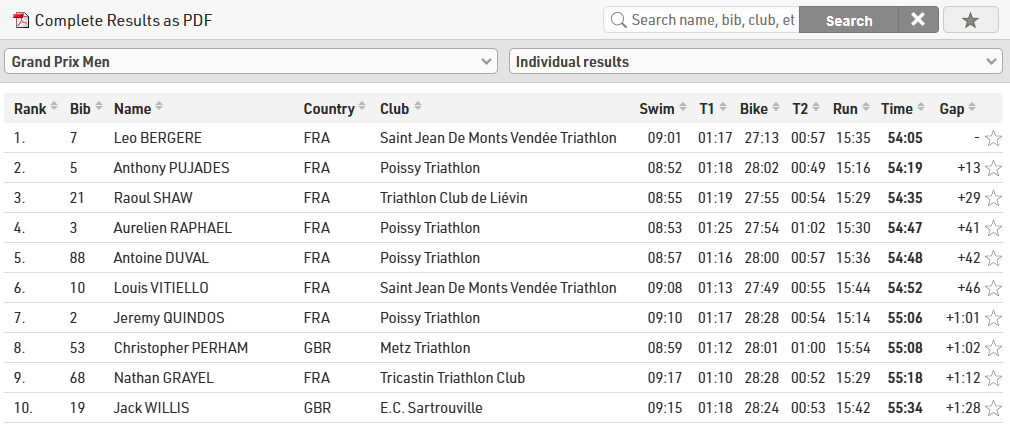
Los tiempos parciales (splits), el club y el país están configurados como Ocultar columna primero (Hide column first), el tiempo de diferencia (gap) como Automático (Automatic), y la posición, el dorsal, el nombre y el tiempo final como Ocultar columna al final (Hide column last).
De esta manera, los tiempos parciales, la nacionalidad y la bandera desaparecen primero, mientras que la diferencia de tiempo permanece visible hasta que ya no queda espacio suficiente para mostrarla junto con todos los campos que queremos que se muestren siempre:
Reviews
Visitors can leave comments in two places on my.raceresult.com:
- On the Reviews tab they can leave longer texts and rate the event with a 5-star-system.
- Comments can be left for specific participants in the Participant View. If there are comments for a participant and the comment logo is enabled then the comment icon on the left side of the Output list will be solid.
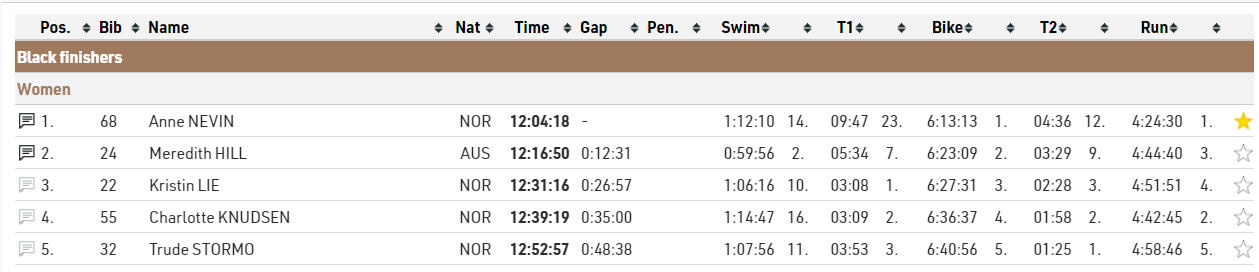

Comments can be set in Particpant Views and the Reviews tab can be disabled if you choose, and you can also moderate comments through the Handle Comments page.

Note that new comments are checked on a daily basis by RACE RESULT and comments deemed inappropriate will be removed.
Contact
Specific Contact Details for the race organizer, timer or payment processor can be listed in the Contact page, it is strongly advised to update these in Activate my.raceresult.com settings to ensure participants know who to contact for any queries - otherwise some may contact RACE RESULT who are unable to answer event specific queries.
The page also shows a Contact form through which participants can submit Inquiries or report missing/incorrect data, this can optionally be disabled if not wanted.
External Content
When adding a new External Content tab it is possible to embed content from a website or YouTube.

iFrame
To load a website directly in a tab, enter an embeddable URL in the iFrame field. Please avoid using standard website homepages or top-level URLs for this purpose, as most sites block this for security reasons, which may cause the tab to appear blank or function incorrectly.
YouTube Video
To display a YouTube video, enter the unique Video ID found at the end of the video's URL. Please note that if a user has not accepted third-party cookies in their browser, the video will not load automatically. Instead, a cover image will be displayed that allows the user to accept YouTube’s terms of use to view the video.
Favorites
The Favorites Tab enables spectators to search for participants and maintain a personalized tracking list. End users can add participants to their favorites directly when viewing lists or via the integrated search.
Search Settings

The favorites search is a global search across the entire event file, so you must define the search parameters to ensure relevant results.
- Search Fields: Add the specific participant fields that the system will query when a user types a search term.
- Filter: Apply a filter expression to restrict the searchable pool, for example, to exclude participants who canceled their registration
Visualisations Configuration
Use the Search Result Visualisation to adjust how users see the results of their search and look for athletes to add to their favorite list.
- Order by Field: Sort the search list in a logical order by adjusting the order by field.
- Elements: Construct the row layout by setting up the elements in the same way as in the Participant View to display relevant data for each participant

The Favorite List Visualisation configures the actual saved favorites list. Here you define how the list looks once a spectator has chosen their favorites and what happens when they click on a participant.
- Order by Field: Set the sorting logic for the active favorites list.
- Linked Participant View: Specify which detailed Participant View layout opens when a user clicks on a participant in the list.
- Elements: Build the list display layout, for example show latest split data so that spectators have relevant data for all favorites without having to click into indivual participant views.

Note: Favorites are stored locally in the user's browser cache. They do not sync across different devices or browsers (e.g., from a phone to a computer).