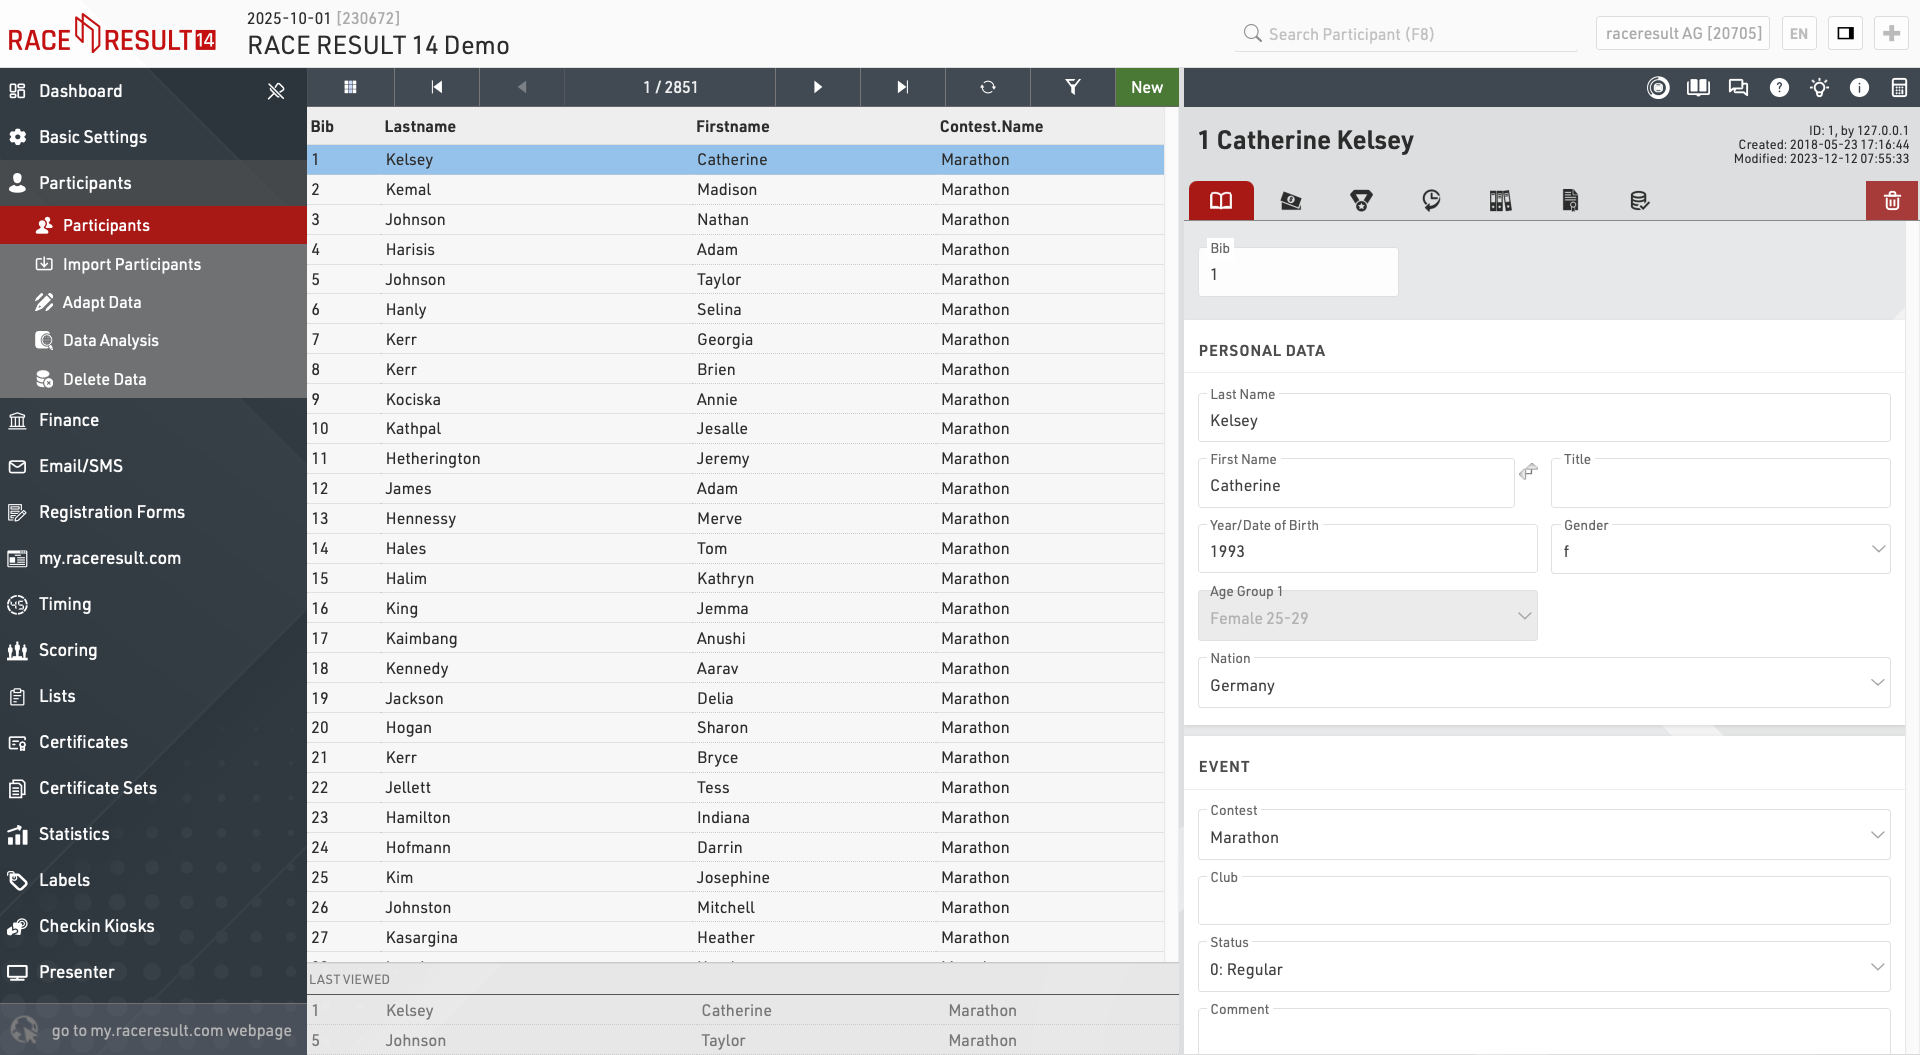
La ventana de Participantes se utiliza para gestionar todos los datos de los participantes dentro del archivo del evento.
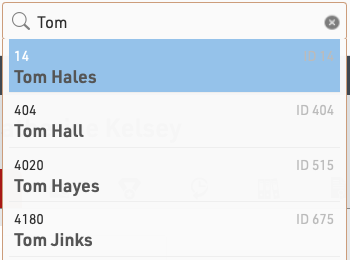
También puedes acceder a la ventana de participantes utilizando la barra de búsqueda en la barra de navegación principal. Al seleccionar un nombre desde la búsqueda, se abrirá automáticamente ese participante en la vista principal.
Vista de Participantes
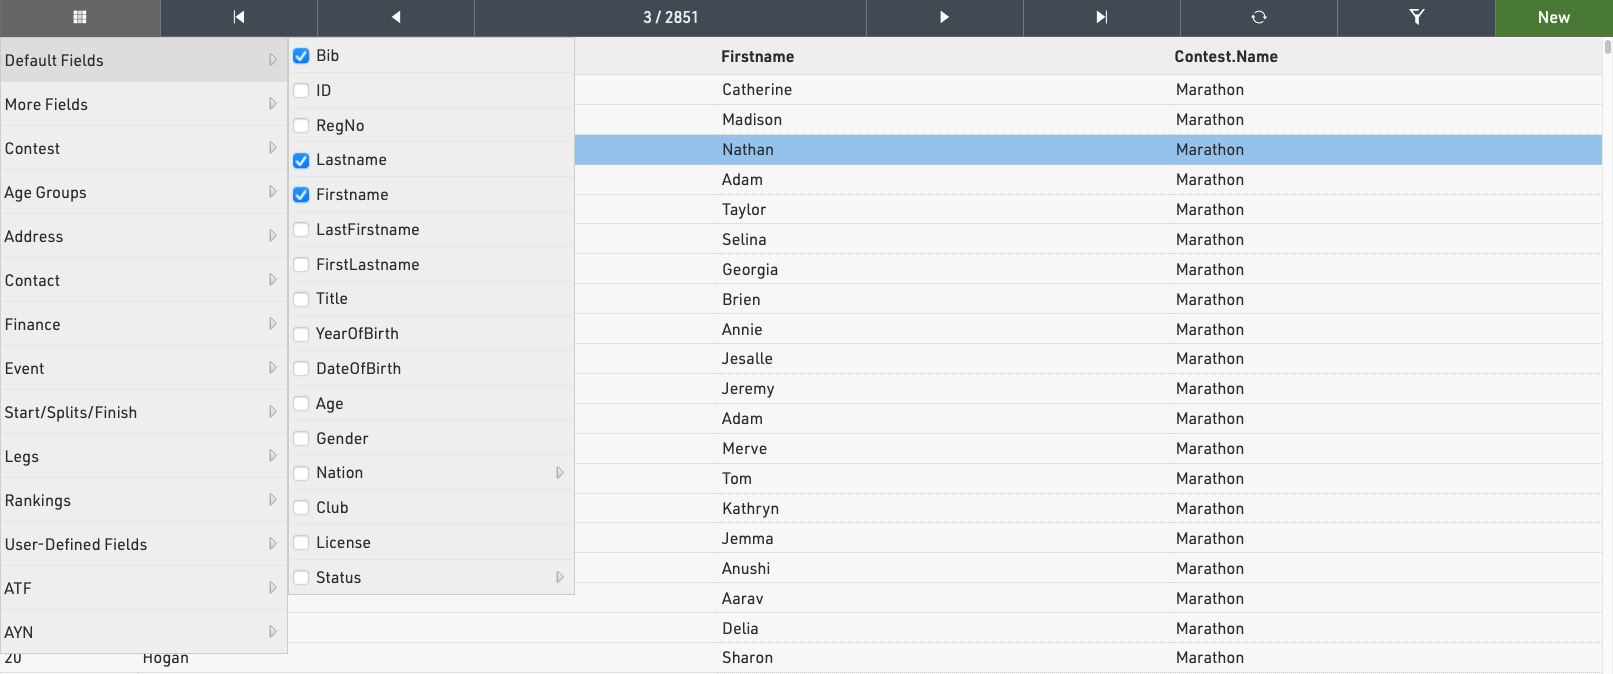
Al abrir la vista de participantes, se mostrará una tabla con todos los participantes. Si anteriormente abriste la vista de un participante individual, entonces los últimos participantes visualizados se mostrarán debajo para un acceso rápido.
Al hacer clic en un registro de participante desde esta tabla, se abrirá la Vista de Participante para ese participante en el lado derecho de la tabla.
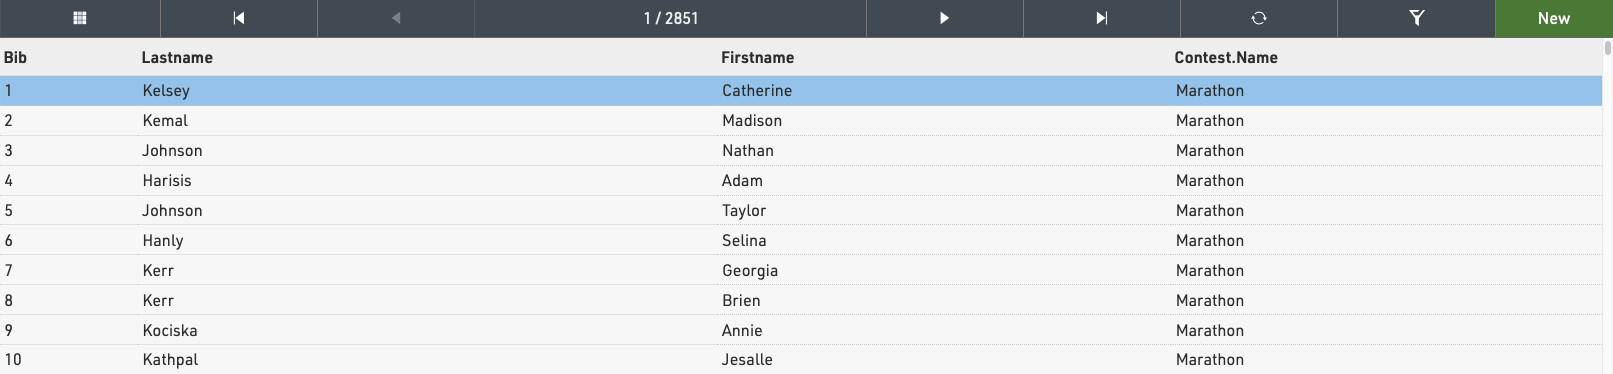
Las flechas en la barra superior pueden usarse para desplazarse por los participantes uno por uno, según el orden actual de la vista principal de la tabla.
Al hacer clic en Nuevo, se creará inmediatamente un nuevo registro de participante en blanco, que se abrirá en la vista de participante.
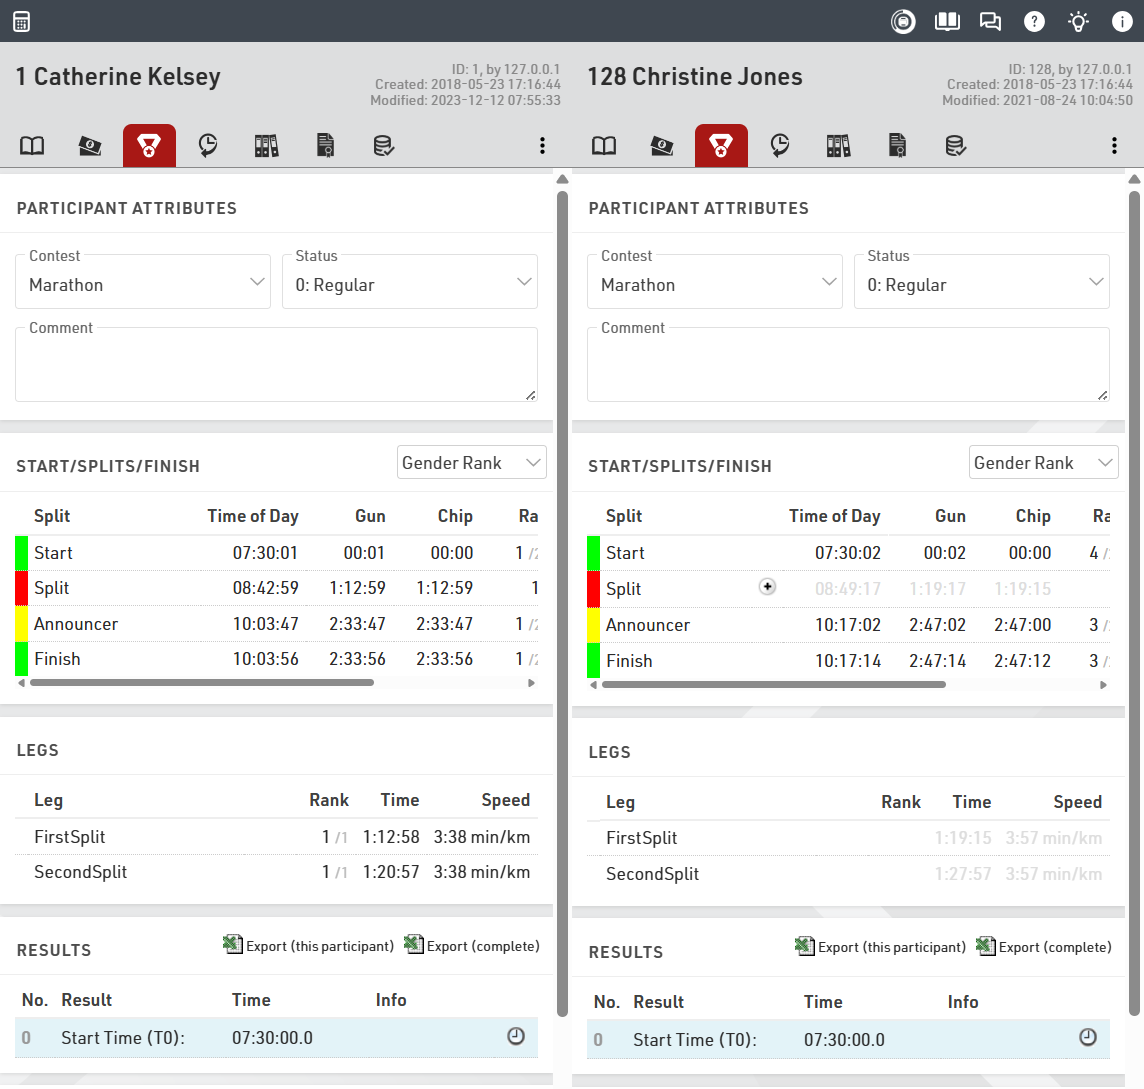
Para ver dos participantes uno al lado del otro, haz clic en el primer participante que deseas mostrar y luego haz clic en el segundo participante mientras mantienes presionada la tecla CTRL. Puedes navegar por la vista de cada participante de forma individual para comparar datos y tiempos.
Agrega o elimina columnas de la tabla haciendo clic en el ícono de cuadrícula en la barra superior.
Ten en cuenta que la lista de participantes se almacenará en caché por el navegador, por lo que al importar nuevos participantes o editar grandes lotes de datos, puede que necesites recargar la información usando el ícono de recarga en la barra superior.
Agrega o elimina columnas de la tabla haciendo clic en el ícono de cuadrícula en la barra superior.
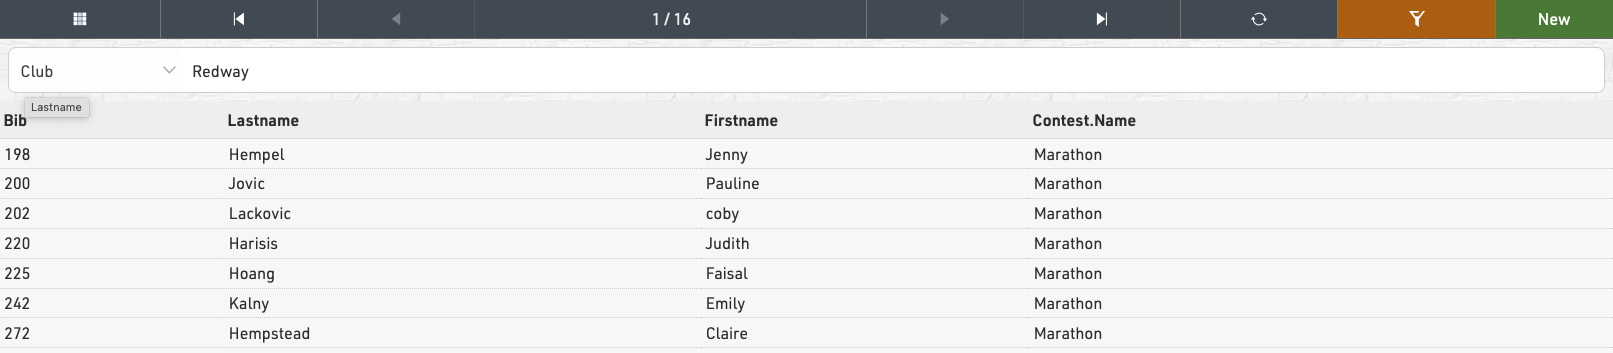
Ordenar / Buscar y Filtrar
Al hacer clic en el encabezado de una columna, puedes ordenar la tabla por esa columna. Presiona el mismo encabezado una segunda vez para ordenar en orden descendente.
Para filtrar la tabla, haz clic en el ícono de filtro en la barra superior y selecciona cómo deseas filtrar a los participantes, ya sea usando uno de los campos estándar o mediante cualquier expresión de filtro. Cuando se aplica un filtro, el botón de filtro se resaltará en color naranja.
Participant View
The participant view will be opened in the right panel when selecting a participant from the main Participants view table or clicking a participant record in a List.
The General tab shows all the participant data fields being used, you can configure the default fields in the participants data settings, all additional fields will be shown within a table for each group.
Additional tabs contain other specific data sets.
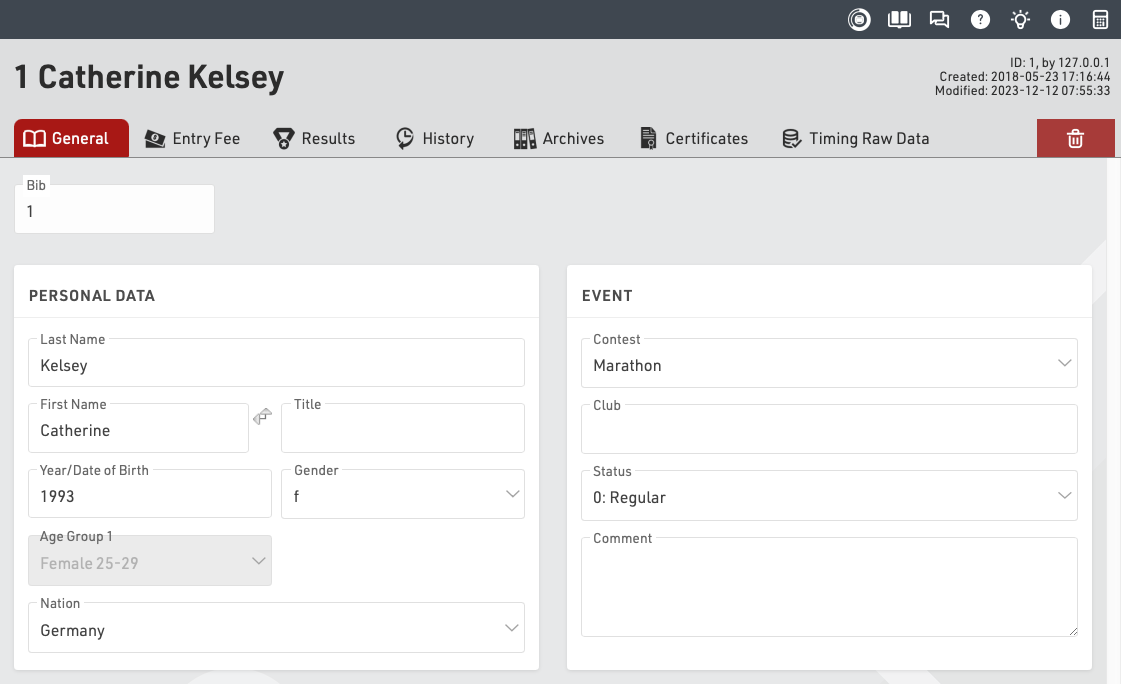
The top right of the participants view shows the unique Participant ID, and information about when the participant was last created and modified and which user or process created the participant.
Clicking the delete icon will permanently delete the participant record - this cannot be undone.
Importar Participantes
Importar Participantes
Para importar participantes desde una fuente externa, puedes cargar un archivo Excel/CSV en Participantes ⇒ Importar Participantes.
Esta herramienta te permite subir archivos Excel o CSV y asignar los datos directamente a los campos de tu evento.
Para iniciar la importación, selecciona un archivo que contenga los datos a importar en la primera hoja del libro.
Después de seleccionar el archivo, podrás previsualizar los datos y asignar (mapear) los campos del archivo a tu base de datos de participantes.
Mejores prácticas
-
Incluye encabezados de columna en la primera fila.
Estos determinan qué campo del archivo del evento llenará cada columna. Puedes ajustar estas asignaciones en la pantalla de previsualización.
Si no hay encabezados, tendrás que mapear cada columna manualmente. -
Se incluye una plantilla de Excel de ejemplo con los campos predeterminados directamente en la pantalla de importación.
Puedes usarla como punto de partida para cargas simples. -
Importante: Solo importa Age (Edad) o DateOfBirth (Fecha de nacimiento) o YearOfBirth (Año de nacimiento).
Si importas más de uno, estos campos entrarán en conflicto y los datos serán incorrectos.
Más información sobre estos campos está disponible en el artículo YearOfBirth and DateOfBirth.
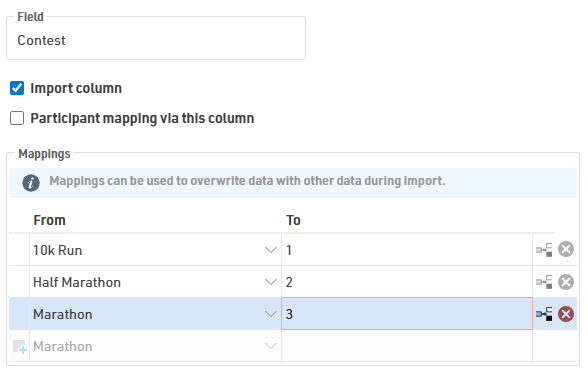
Asignación de Campos (Mapping Fields)

Asignación de campos durante la importación
La primera fila del archivo de importación, que contiene los encabezados de columna, aparecerá en la parte superior de la vista previa de importación.
Los campos que no estén asignados a un campo existente en la base de datos se mostrarán con un indicador de campo no mapeado.
Para estos campos sin asignar, hay 3 opciones:
1. Importar como un campo nuevo
Deja el mapeo en blanco para crear un nuevo campo adicional, que luego aparecerá en los datos del participante.
2. No importar la columna
Desmarca la casilla Importar columna para ignorar esos datos y evitar que se importen.
3. Mapear a un campo existente
Edita el cuadro de Field (Campo) y selecciona el campo correspondiente en la base de datos al que quieres vincular esa columna.
Un tooltip (mensaje emergente) mostrará una lista de los campos actualmente disponibles.
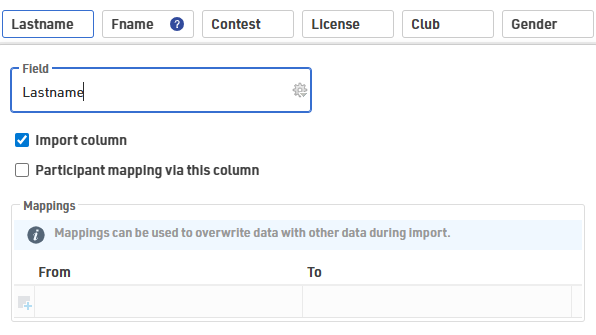
Uso del cuadro de Mapeos (Mappings)
Además, el cuadro Mappings permite realizar manipulaciones de datos antes de importar la información al archivo de la carrera.
Esto es especialmente útil si el formato de exportación de tu sistema de inscripción no coincide perfectamente con la estructura del archivo de tu evento.
Modos de Importación
Existen tres modos de importación, y el modo predeterminado es Solo agregar nuevos participantes (Only add new participants).
Puedes cambiar el modo en la esquina inferior izquierda de la vista previa de importación.
Asignación de Participantes (Participants Mapping)
El ajuste Participants Mapping – Via this column define qué registro del archivo del evento corresponde a qué registro del archivo de importación.
Normalmente, los registros se asignan mediante el número de Bib, pero también puedes usar otras columnas, como:
- un ID de participante/registro,
- o una combinación de Nombre y Apellido.
Las columnas utilizadas para el mapeo se indican con un ícono especial en la vista previa de importación.
| Modo | Descripcion | Mapping |
| solo agregar nuevos |
Solo crea nuevos registrosCrea únicamente registros nuevos. |
Opcional |
| actualizar existentes |
Actualiza todos los registrosActualiza todos los registros en el archivo del evento basándose en la clave de mapeo seleccionada. |
Requerido |
| Agregar y actualizar |
Actualiza y crea registros según correspondaActualiza a los participantes existentes que coinciden con la clave de mapeo seleccionada, |
Requerido |
Asignación de números de dorsal (Bib) al agregar nuevos participantes
Cuando se agregan nuevos participantes, si el archivo de importación no contiene un número de dorsal (Bib), se asignará automáticamente un nuevo número de acuerdo con la configuración definida en Bib Number Settings.
Sin embargo, si el archivo de importación sí contiene la columna Bib y se ha ingresado un número, ese número de bib será utilizado.
Esto implica que el registro no se importará si ese número de bib ya existe en el archivo del evento.
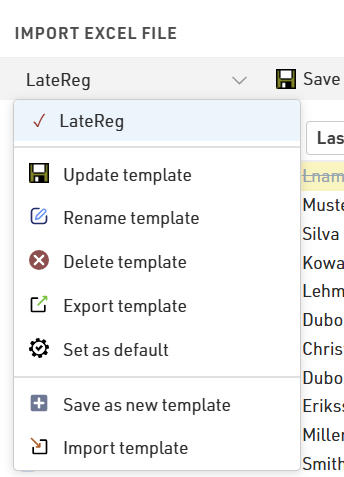
Consideraciones adicionales
Si importas datos frecuentemente con el mismo formato, puedes guardar tus asignaciones de campos y configuraciones de importación como una plantilla de importación para acelerar futuros procesos.
- Las plantillas pueden exportarse para utilizarlas en otros eventos.
- También puedes establecer una plantilla como predeterminada, de modo que se cargue automáticamente cada vez que abras la vista previa de importación.
Importar Participantes desde un Archivo de evento
Se utiliza para importar participantes y tiempos desde otro archivo de evento. De esta manera puede importar registros tardíos desde otra computadora o fusionar varios archivos de eventos para una evaluación de serie.
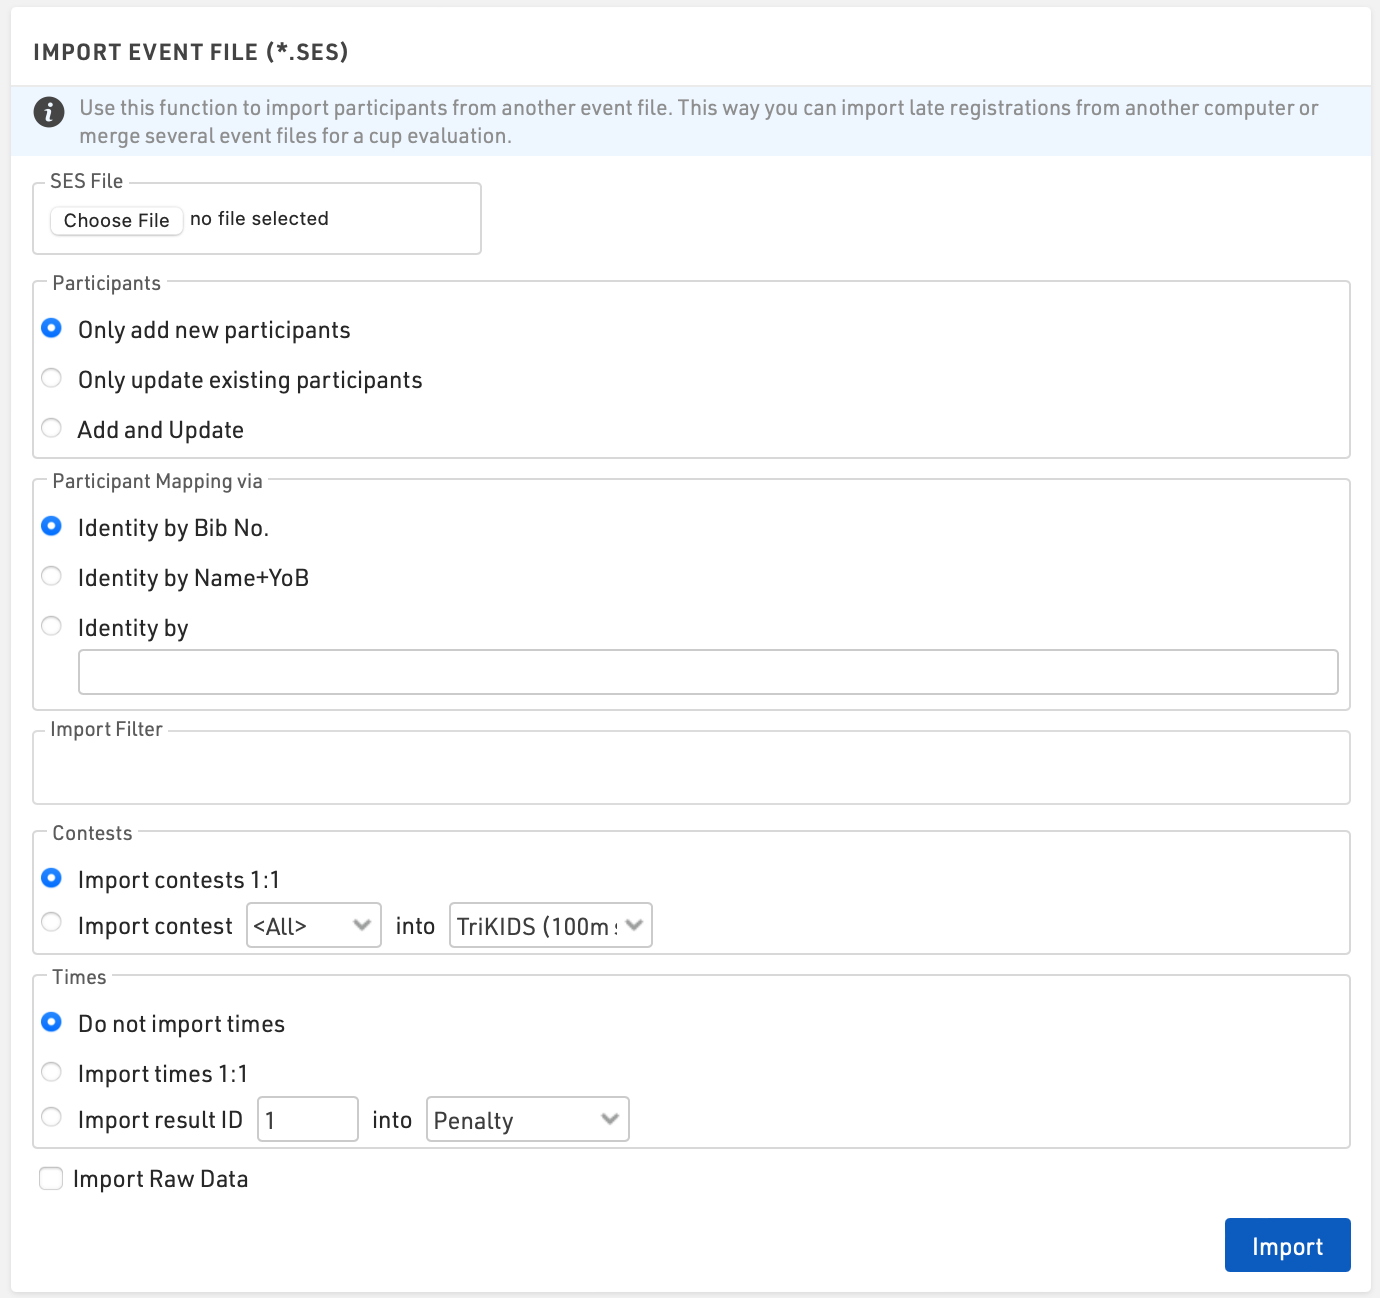
Consejo: Al importar e identificar participantes, se recomienda que primero haga una copia de seguridad local del archivo del evento.
Participantes
Elija cómo manejar los datos que está importando
- Solo agrega nuevos participantes
- Actualizar solo los participantes existentes
- Agregar y actualizar
Mapeo de participantesLo más habitual es que los participantes sean identificados por su dorsal. Si los participantes no utilizan el mismo número de dorsal, se pueden utilizar opciones de identidad alternativas, como Nombre+YOB, o un identificador único, como Número de registro.
Filtro
Se puede aplicar un filtro a la importación; por ejemplo, es posible que solo quieras importar registros para dorsales entre 1 y 500 o para un Concurso específico.
CompetenciasLos participantes serán asignados a un Concurso de acuerdo con la configuración de coincidencia del concurso.
El concurso 1:1 requiere que el número de identificación del concurso de ambos archivos de eventos coincida exactamente. Esta opción se utiliza comúnmente cuando se utiliza una copia de los mismos archivos de eventos, como cuando se realizan inscripciones tardías.
Los concursos que no tengan ID coincidentes se pueden importar seleccionando el número del concurso y el nombre del concurso correspondiente.
Consejo: si un participante ingresa a un evento de la serie y cambia de concurso a mitad de camino, debe identificar a los participantes mediante su identificador y concurso preferidos, p. [Dorsal] y [Competancia].
TiemposLos tiempos en Resultados especiales se pueden importar de la misma manera. Los tiempos con ID de resultados coincidentes se pueden importar con Times 1:1. Si el archivo importado se utiliza para una evaluación de serie, puede asignar el ID del resultado a otro campo de resultado.
Datos en Bruto
Cuando se selecciona la opción Importar datos sin procesar, se importarán todos los registros de datos sin procesar. Es importante que el nombre de los puntos de cronometraje coincida en ambos archivos.
Posibles mensajes de error de importación de Excel
Al importar participantes, es posible recibir un mensaje de error si algo en su archivo de importación es incorrecto. A continuación se muestra una lista de posibles mensajes de error con explicaciones y posibles soluciones.
Dorsal no único, Dorsal XX
- Esto indica que tiene más de uno del mismo número de dorsal en la columna Dorsal. El ejemplo anterior muestra un duplicado del dorsal 100.
- En su archivo de Excel, verifique la columna Bib para ver si hay duplicados. Es útil ordenar su archivo por el valor Bib.
Error: Dorsal Existente:
- Este error ocurre cuando estás intentando importar una lista de participantes y estás mapeando usando un valor distinto al “Bib”.
- El error indica que uno de los participantes que se está importando tiene un número de Bib que ya existe en el archivo del evento, y el valor de mapeo no coincide.
- Ejemplo: El Bib 100 ya existe en el archivo del evento con un valor de mapeo 1. Intentas importar el Bib 100 con un valor de mapeo 2 → se generará un error de “Bib existente”.
Bib no debe ser negativo
- La columna Bib no puede contener números negativos.
- La columna Bib debe ser un número entero (no valores decimales).
-
No se seleccionaron columnas para el mapeo de participantes
Cuando se usa el modo de importación “solo actualizar participantes existentes”, debes definir al menos un campo de mapeo.
[n] fila(s) con campos de mapeo de participante vacíos
Cuando se usa el modo “solo actualizar participantes existentes”, todos los participantes importados deben tener un valor en la columna usada para el mapeo.
- [n] representa el número de filas afectadas.
- Las filas afectadas aparecerán resaltadas en rojo.
-
Los campos de mapeo de participantes no son únicos en el archivo de importación: John, Doe
Esto significa que dos filas en el archivo de importación tienen los mismos valores en los campos de mapeo.
Ejemplo:
“John, Doe” aparece dos veces en el archivo de importación.
Los campos de mapeo de participantes no son únicos en el evento existente: John, Doe
Esto significa que hay valores duplicados en los campos de mapeo dentro del archivo del evento.
Ejemplo:
“John, Doe” existe dos veces como participante en el archivo del evento.
Adapt Data
Participants ⇒ Adapt Data offers numerous functions to change data of several participants at the same time.
Swap / Copy
To use the Swap or Copy functions, simply enter the two bib numbers and click the button according to what you need to achieve, the options and use cases are explained below.
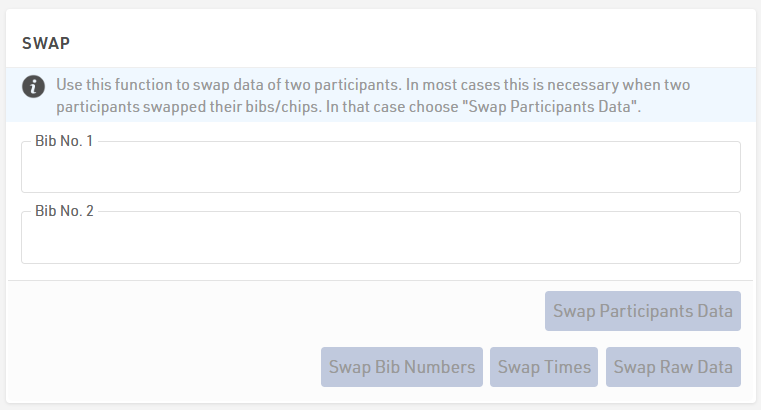
The Swap functions allow you to:
- Swap Bib Numbers of two participants if they interchanged the bib after packet pickup. In this case, the transponder was not interchanged, so times/results were correctly assigned to each bib.
- Swap Times of two participants if they interchanged the transponder but not the bib or data was incorrectly stored. Bibs and participant data are correct but times saved directly in Special Results need to be swapped.
- Swap Raw Data of two participants if they interchanged the transponder (but not the bib). Bibs and participant data match in this case, but the raw timing data needs to be swapped.
- Swap Participant data of two participants if they interchanged the bib and the transponder. In this case, both Bib and Raw Data were not correctly assigned to the right participant.
In some cases it may be necessary to perform more than one swap, for example if bib and transponder have been swapped.
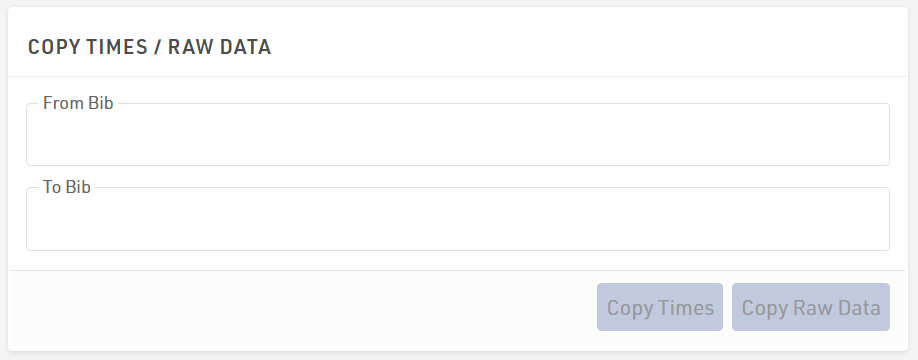
- Copy Times from one participant to another, this copies times saved directly into Special Results.
- Copy Raw Data from one participant to another, this copies all raw timing data.
Redistribute Bib Numbers
With this function you can allocate new bib numbers for some or all participants at the same time. If the current bib numbers are only preliminary, you can use this function to assign the final bib number, for example in alphabetical order.
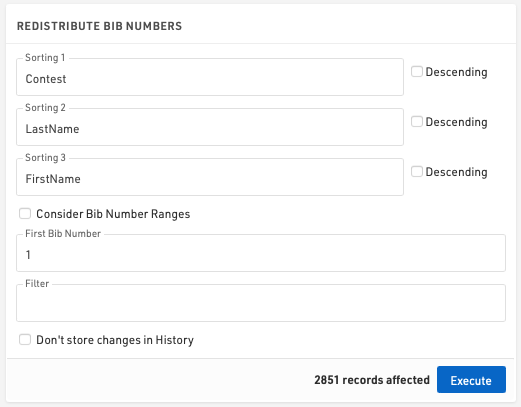
For this purpose you can select up to three fields which define in which order the new bib numbers will be assigned. If you activate Consider Bib Number Ranges, only numbers from the bib ranges of the chosen contest will be assigned.
Via First Bib Number you can define the smallest bib number to be assigned. If you leave the field blank, the first number will be 1.
When using a filter only certain participants will be assigned a new bib number.
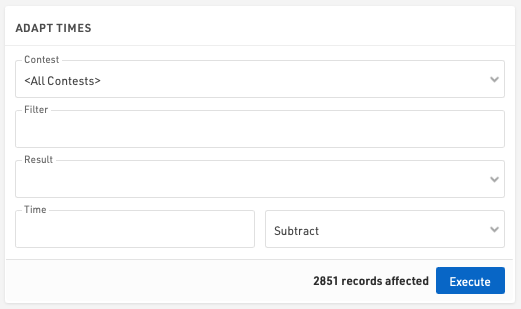
Adapt Times
With this function you can adjust the times (in static Special Results) of all participants of a contest by adding or subtracting a certain time value. This has no impact on raw timing data.
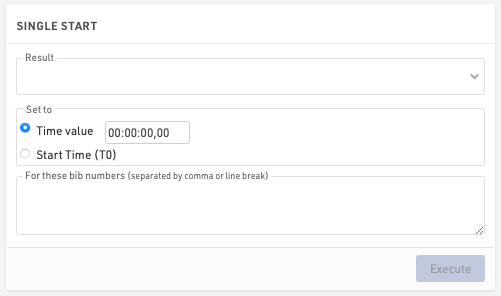
Single Start
Con esta función estableces resultados especiales a intervalos fijos para los participantes de una determinada competición, por ejemplo para una salida escalonada de contrarreloj. Seleccione los Resultados en los que se guardarán las horas de inicio y defina la hora de inicio para el primer participante y los intervalos para las siguientes horas de inicio. El campo Clasificación define en qué orden los participantes recibirán las horas de inicio.
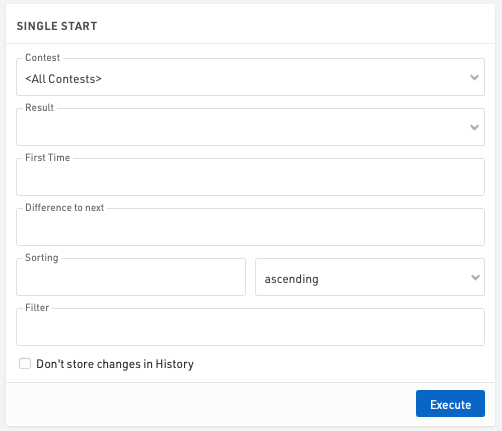
Cuando se utiliza un filtro, solo aquellos participantes que coincidan con el filtro recibirán una hora de inicio.
La segunda función le permite establecer un resultado en un tiempo fijo para un conjunto de participantes. Seleccione el resultado que guardará el tiempo, defina el tiempo e ingrese los números de dorsal que recibirán el tiempo de inicio.
Generate Random Times
You can generate random times in Special Results for example for testing purposes. Simply select the result which shall save the random times and specify the minimum and maximum time.
The setting Add this time to random time is helpful if you want to make sure that the random time is greater than another time.
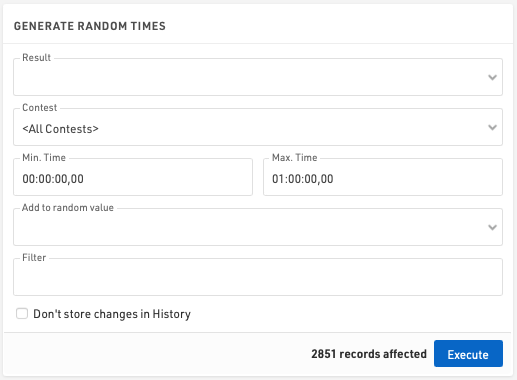
Using a filter, only those participants matching the filter will receive a random time.
For more advanced testing of your race, you can use the Race Simulation tool.
Interpolate Times
If you missed many reads, for example if your system was setup incorrectly, you can use this function to interpolate missing times.
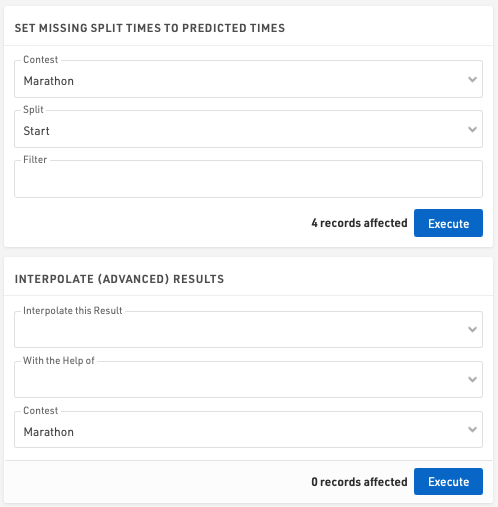
When using Splits then the Predicted Times for Splits are used, in this way a manual raw data record is created at the predicted time.
When using Results, you need to select the result you would like to interpolate and a "helper" result. If for example you interpolate the start with the help of finish, the following will happen:
For each participant missing the start time, the system looks for the 5 participants that finished right before him/her and the 5 participants that finished right after him/her. The system then calculates the average start time of these 10 participants and uses this average as an interpolated value.
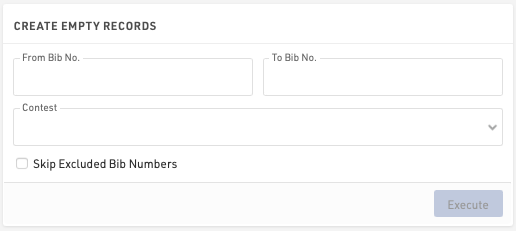
Create Empty Records
Sometimes it is useful to add empty records to your event file. This function helps you to do this easily.
Create Increasing Number
This function can be used to create an increasing number which will then be saved in an Additional Field.
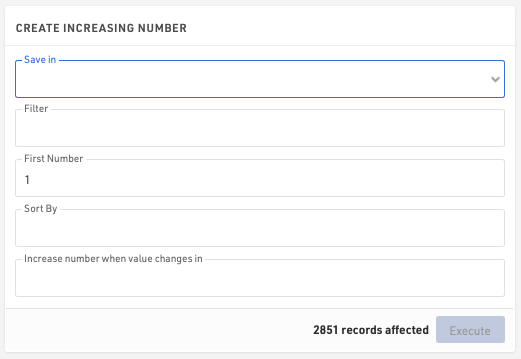
Save in: Select the field in which the number will be saved.
Filter: enter a filter if only a specific group of participants should be used.
First Number: define the starting number of the sequence.
Sort By: select a field by which the records will be sorted. In other words, in which order the increasing number will be assigned.
Increase number when value changes in: select a field which defines when the number will be increased by 1. If for example everyone in the same club shall have the same number, select Club. If however every participant shall receive a different number, select Bib.
Click Execute to create and save the number sequence.
Raw Data Invalidation
When using Raw Data Mode, sometimes it is useful to ignore groups of detections without deleting all the data.
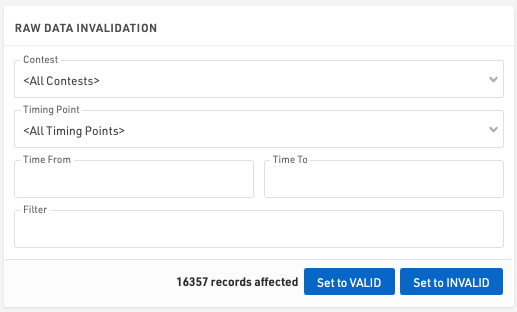
Using the Raw Data invalidation you can quickly select Raw Data for certain contests, timing points, time ranges and apply any filter. This will set all the Raw Data which fits the criteria to invalid and so will not be used in Results calculations.
You can also re-validate data here if necessary.
Move Raw Data
Use the Move Raw Data function to shift data from one timing point to another. This is typically used to correct setup errors or participant flow issues.
To begin, select your source Timing Point and Target Timing Point. You can limit the scope of the move by filtering for specific contests, applying a custom expression. For more granular control, select Show Raw Data Filters to filter by specific devices, setups, tags, timeframes, or files.

Data Manipulation
Data Manipulation is a frequently used function to modify several participants at the same time.
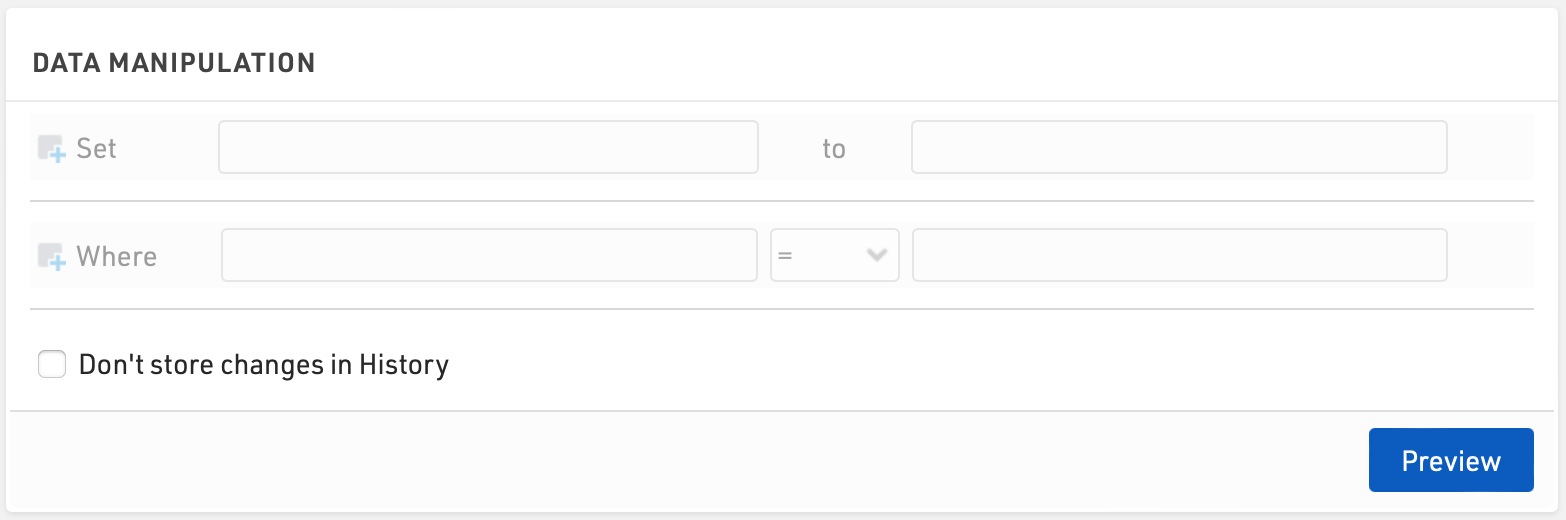
Enter the Data Fields you wish to update, under Set, and the value to which they should be assigned. The value can be entered as an expression using fields / functions, or if no match is found, will be considered as a text / numerical value.
Additionally enter a filter, Where, to determine which participants should be updated.
Once set, click Preview to show a list of the affected participants and the fields which will be updated. To confirm the changes click the Execute button.
Via Save/load templates you can also store the settings and retrieve them later easily.
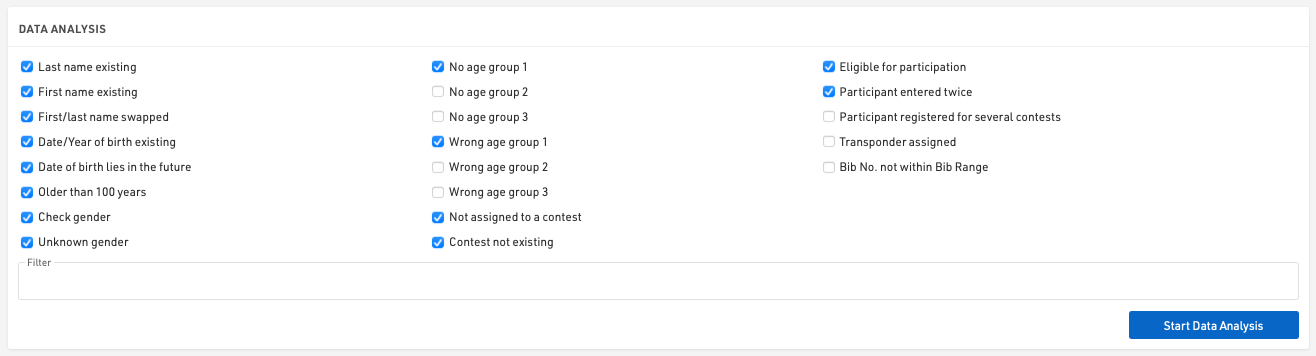
Data Analysis
Participants ⇒ Data Analysis offers three functions:
Data Analysis
This tools can test the participants' data for numerous errors. Simply select the types of errors you would like to check for, an optional filter on participants can be applied, and click Start Data Analysis to see the results.
Club Name Compare
This function finds participants with similar club names. These may be actually the same club with different spelling. If a Team Score uses the club field to join participants together, they need to be spelled in the exact same way.
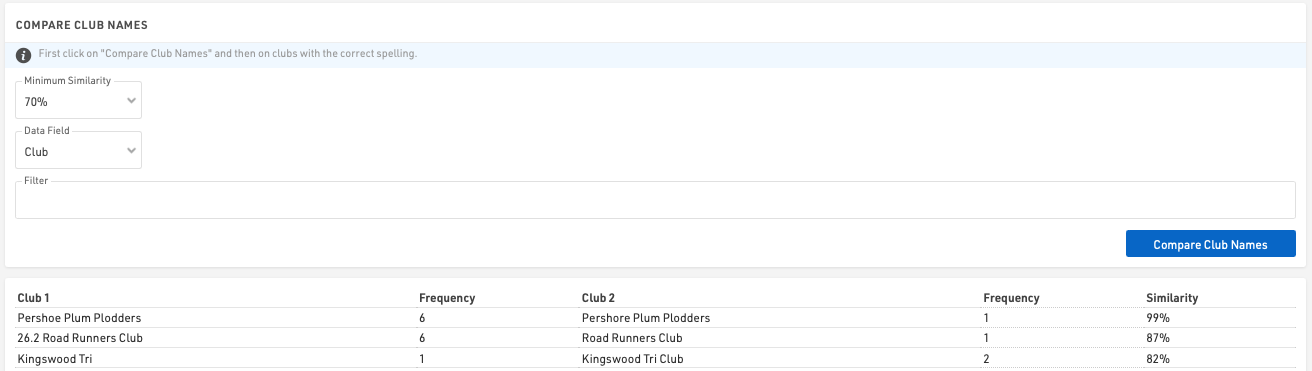
Click the button Compare Club Names to start the comparison and see the results. Then unify the spelling by clicking on the correct version in the list of results.
You can also define a minimum similarity two clubs need to have to show in the results and you can also run the comparison based on an Additional Field instead of the club field.
Name Compare
Name Compare finds participants with similar names. If you use RACE RESULT 14 for a series scoring, you may import participants from different sources (the different races). You may have different participants with different spelling who are actually the same person. This function can find these issues and join the participants together.
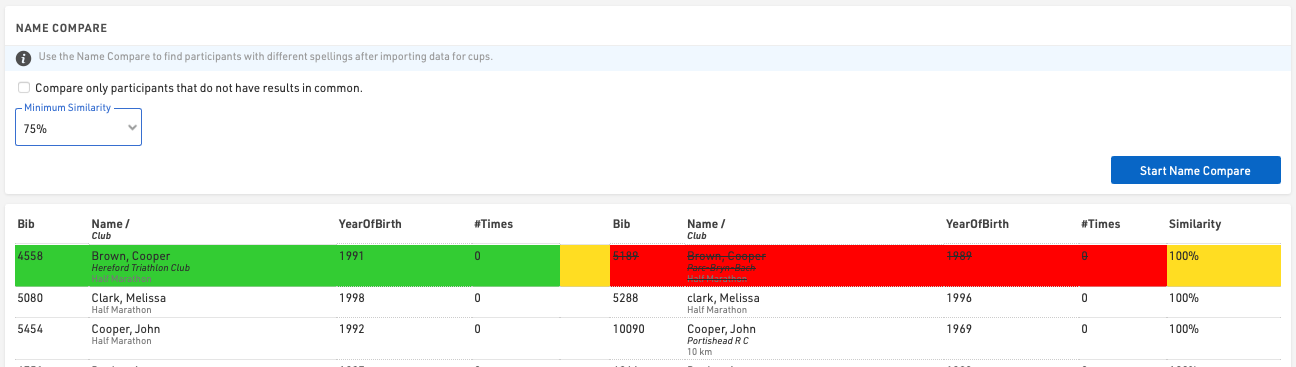
You can also define a minimum similiary two participant names need to have to show in the results. If you activate Compare only participants that do not have results in common two participants will only be compared if they do not have times in the same result. Imagine you have result 1,2,3, and 4. If one participant has times in result 1 and 4, and the other in 2 and 3, they may be the same person in a series scoring. If, however, they both have a time in result 2, they cannot be the same person in a series scoring.
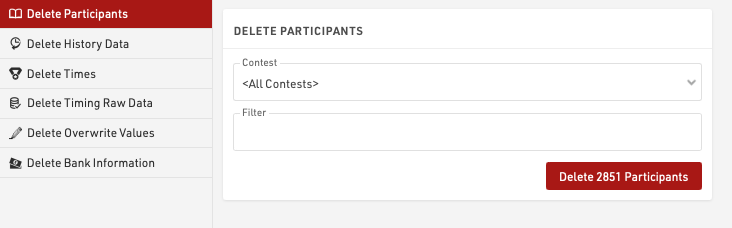
Borrar Datos
Eliminar datos proporciona métodos para eliminar grandes lotes de datos, los participantes individuales o los tiempos se pueden eliminar en la Participants Window.
Primero, seleccione qué datos desea eliminar:
- Participantes
- History Tiempos (Resultados Especiales)
- Datos en tiempo en Bruto
- Valores Sobreescritos (Resultados Especiales)
- Información Bancaria
Luego seleccione los detalles (como competencia), ingrese un filtersi es necesario y seleccione el botón Eliminar.
Se mostrará el número de registros que se verán afectados por la acción de eliminación. Cuando se trabaja con conjuntos de datos grandes, se recomienda crear un backup primero.
History
The Participant History log allows you to track, filter, and manage all modifications made to participant data. From this view, you can audit specific changes, export data for reporting, or roll back unauthorized edits.
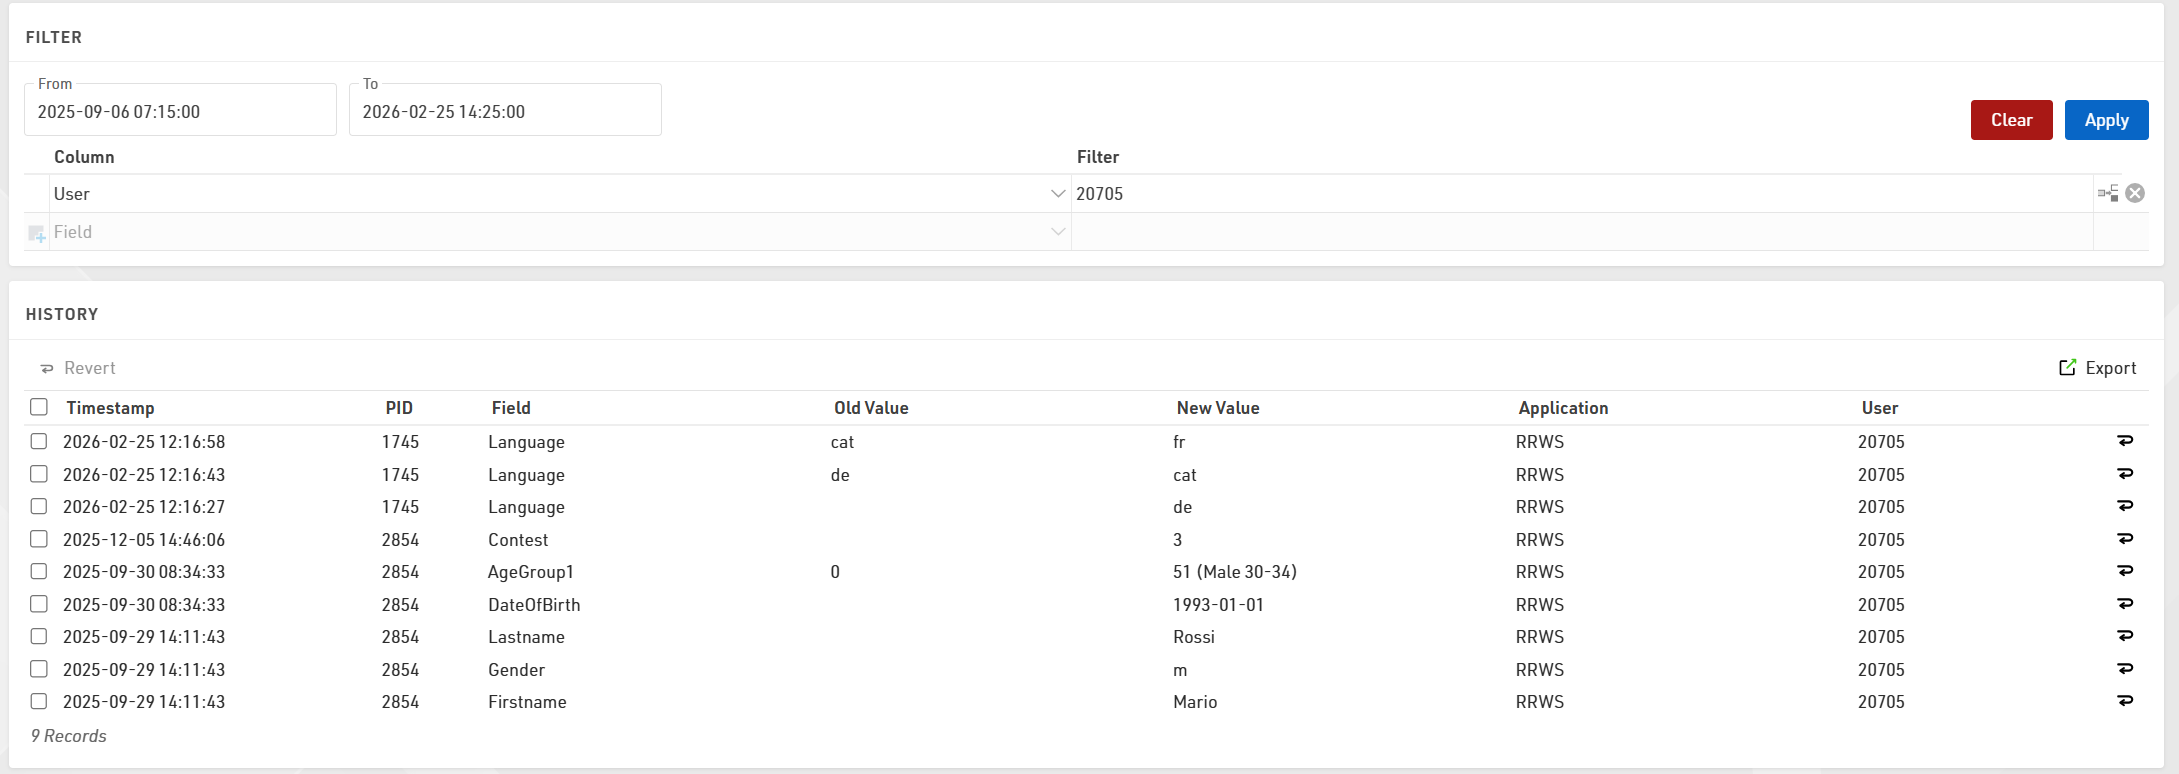
Filtering and Sorting
To locate specific records, you can sort the list by any column or apply filters using the following criteria:
- Date Range: Set From and To dates down to the minute to view changes within a specific timeframe.
- Target Data: Filter by specific Bib (PID), Field, or the exact text of the Old Value or New Value.
- Application: Filter by how the data was modified (e.g., Online, Import, or Change Form).
- User: Filter by the specific User-id that performed the update.
- Expressions: Use custom expressions for advanced data filtering.
Reverting Changes
If data was entered incorrectly, you can restore previous values directly from the history log. To undo a single change, click the Revert symbol  at the end of the specific row. To make a bulk edit, select the checkboxes for multiple rows and click the Revert button located at the top of the list.
Exporting Data
To save a copy of the history for external use, click the Export button to generate a CSV file of the currently filtered or selected view.