Lists are the most important method for getting data out or RACE RESULT 14, and are used for a variety of applications - printed results, publishing online results, presenter screens, creating custom statistics lists, checklists for verifying results or any custom report you need.
The list on the left shows all lists in your event file which can be rearranged using drag & drop by clicking the free space to the left of the list name; list names highlighted in blue are published online through my.raceresult.com.
Lists can be further sorted into folders, to create a new folder, click the Add Folder icon in the Lists Header. By clicking the folder header, the folder can be expanded / collapsed, to sort the items within a folder alphabetically, click the  icon. Empty folders will be deleted automatically when you reload the window.
Clicking the name of a list from the menu opens an overview page for that list.
Lists show a defined set of fields for a specific set of records. The settings of a list determine:
- which participants are shown
- which data fields (columns) are shown
- how the records are sorted
- how the records are formatted
- how the page is formatted (page format, margin etc)
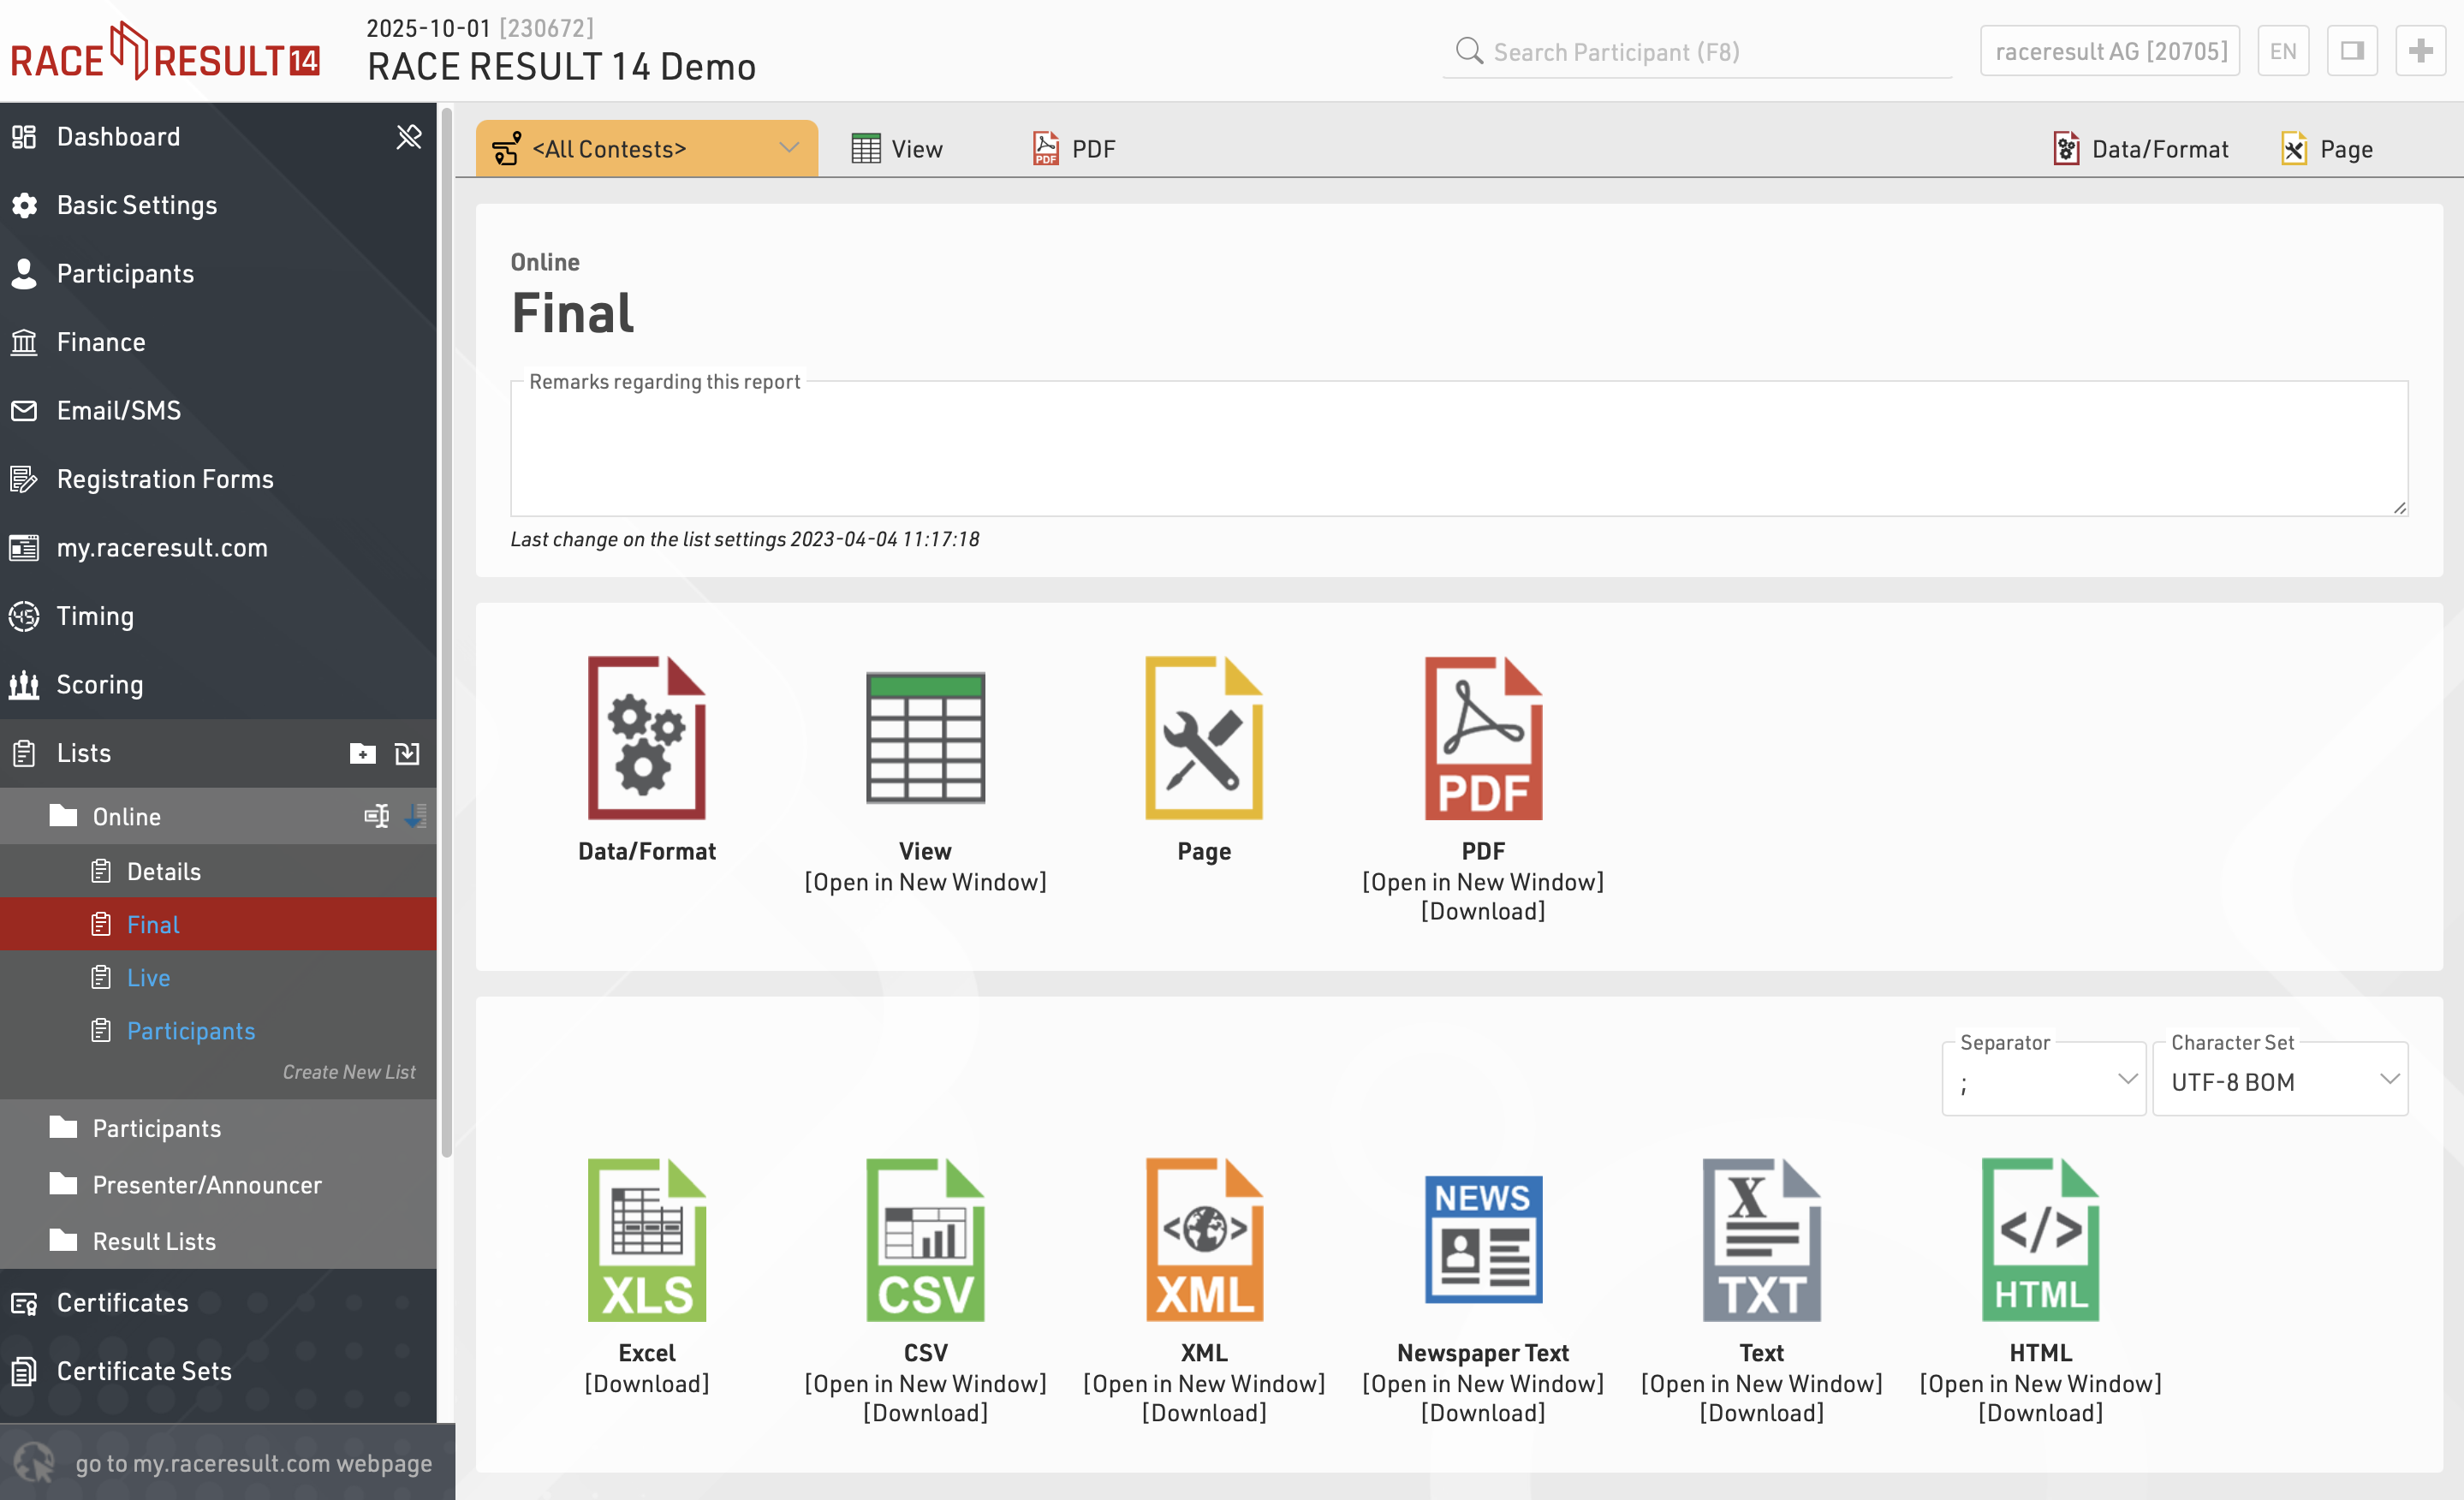
The settings of a list are split into the tabs Data/Format and Page. Data/Format contains all settings regarding the data shown on the list and how it is formatted, whereas the Page settings concern the general page layout and are only relevant for the PDF and HTML output form.
To view a list click the View button or tab, this can also be opened in a new window, lists can also be opened directly to the View tab by double clicking the list name from the menu. A PDF view of the list can also be previewed or downloaded.
Lists can also be exported in different formats as EXCEL, CSV, XML, TXT and HTML.
Data/Format Settings
The Data/Format Settings tab is divided into three sections: Grouping/Sorting, Fields/Columns and Filter. Each of those sections will be explained in the following. According to the settings and selections made in those sections, the participant data will be displayed in the list.
Grouping/Sorting
This section defines how the records on the list will be sorted.
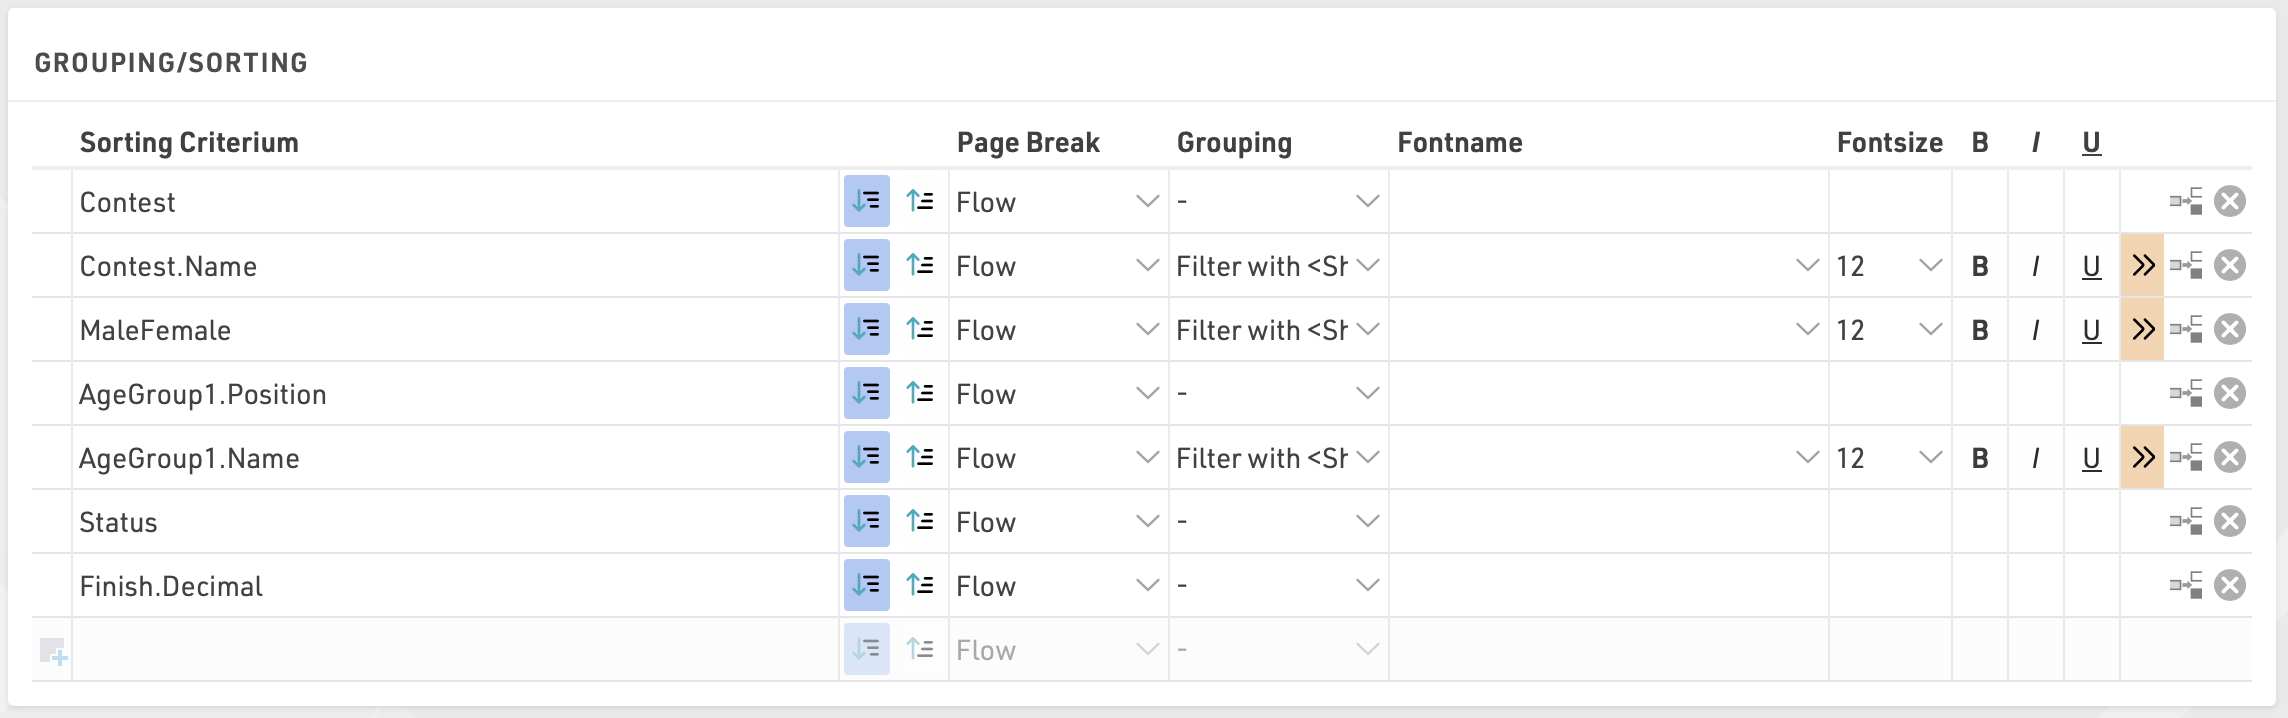
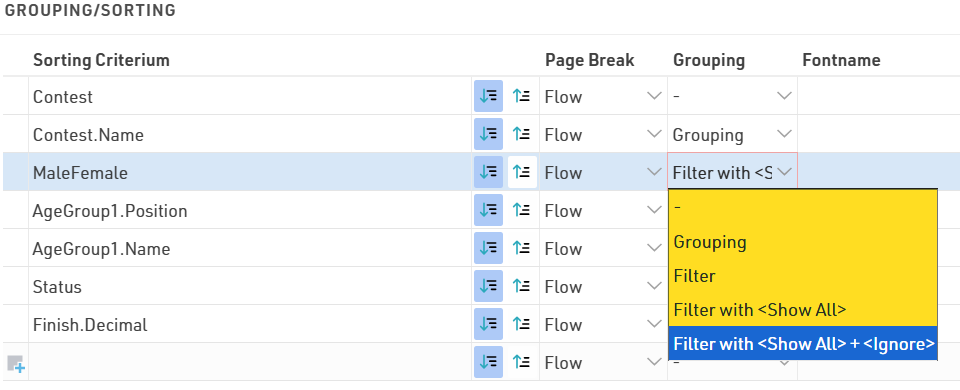
Simply select one or more fields from the Field Wizard which pops up below the input box. The list will be sorted by the first field and, if this field is not decisive, by the second, and so on. Additionally, for each field, choose if the records shall be sorted in ascending or descending order.
Fields can also be used as a Grouping or Filter, when used as a Grouping then a group header line will be inserted for each group value on all output types. Alternatively a list can be filtered by a group, with this setup an additional dropdown will appear in the preview and also on my.raceresult.com for each filter which can then show all groups, filter to a specific group, or ignore this level of grouping all together (if filter with ignore is selected). Filter is particularly useful for online results to make these easier to navigate / filter to the data somebody actually wants to view.
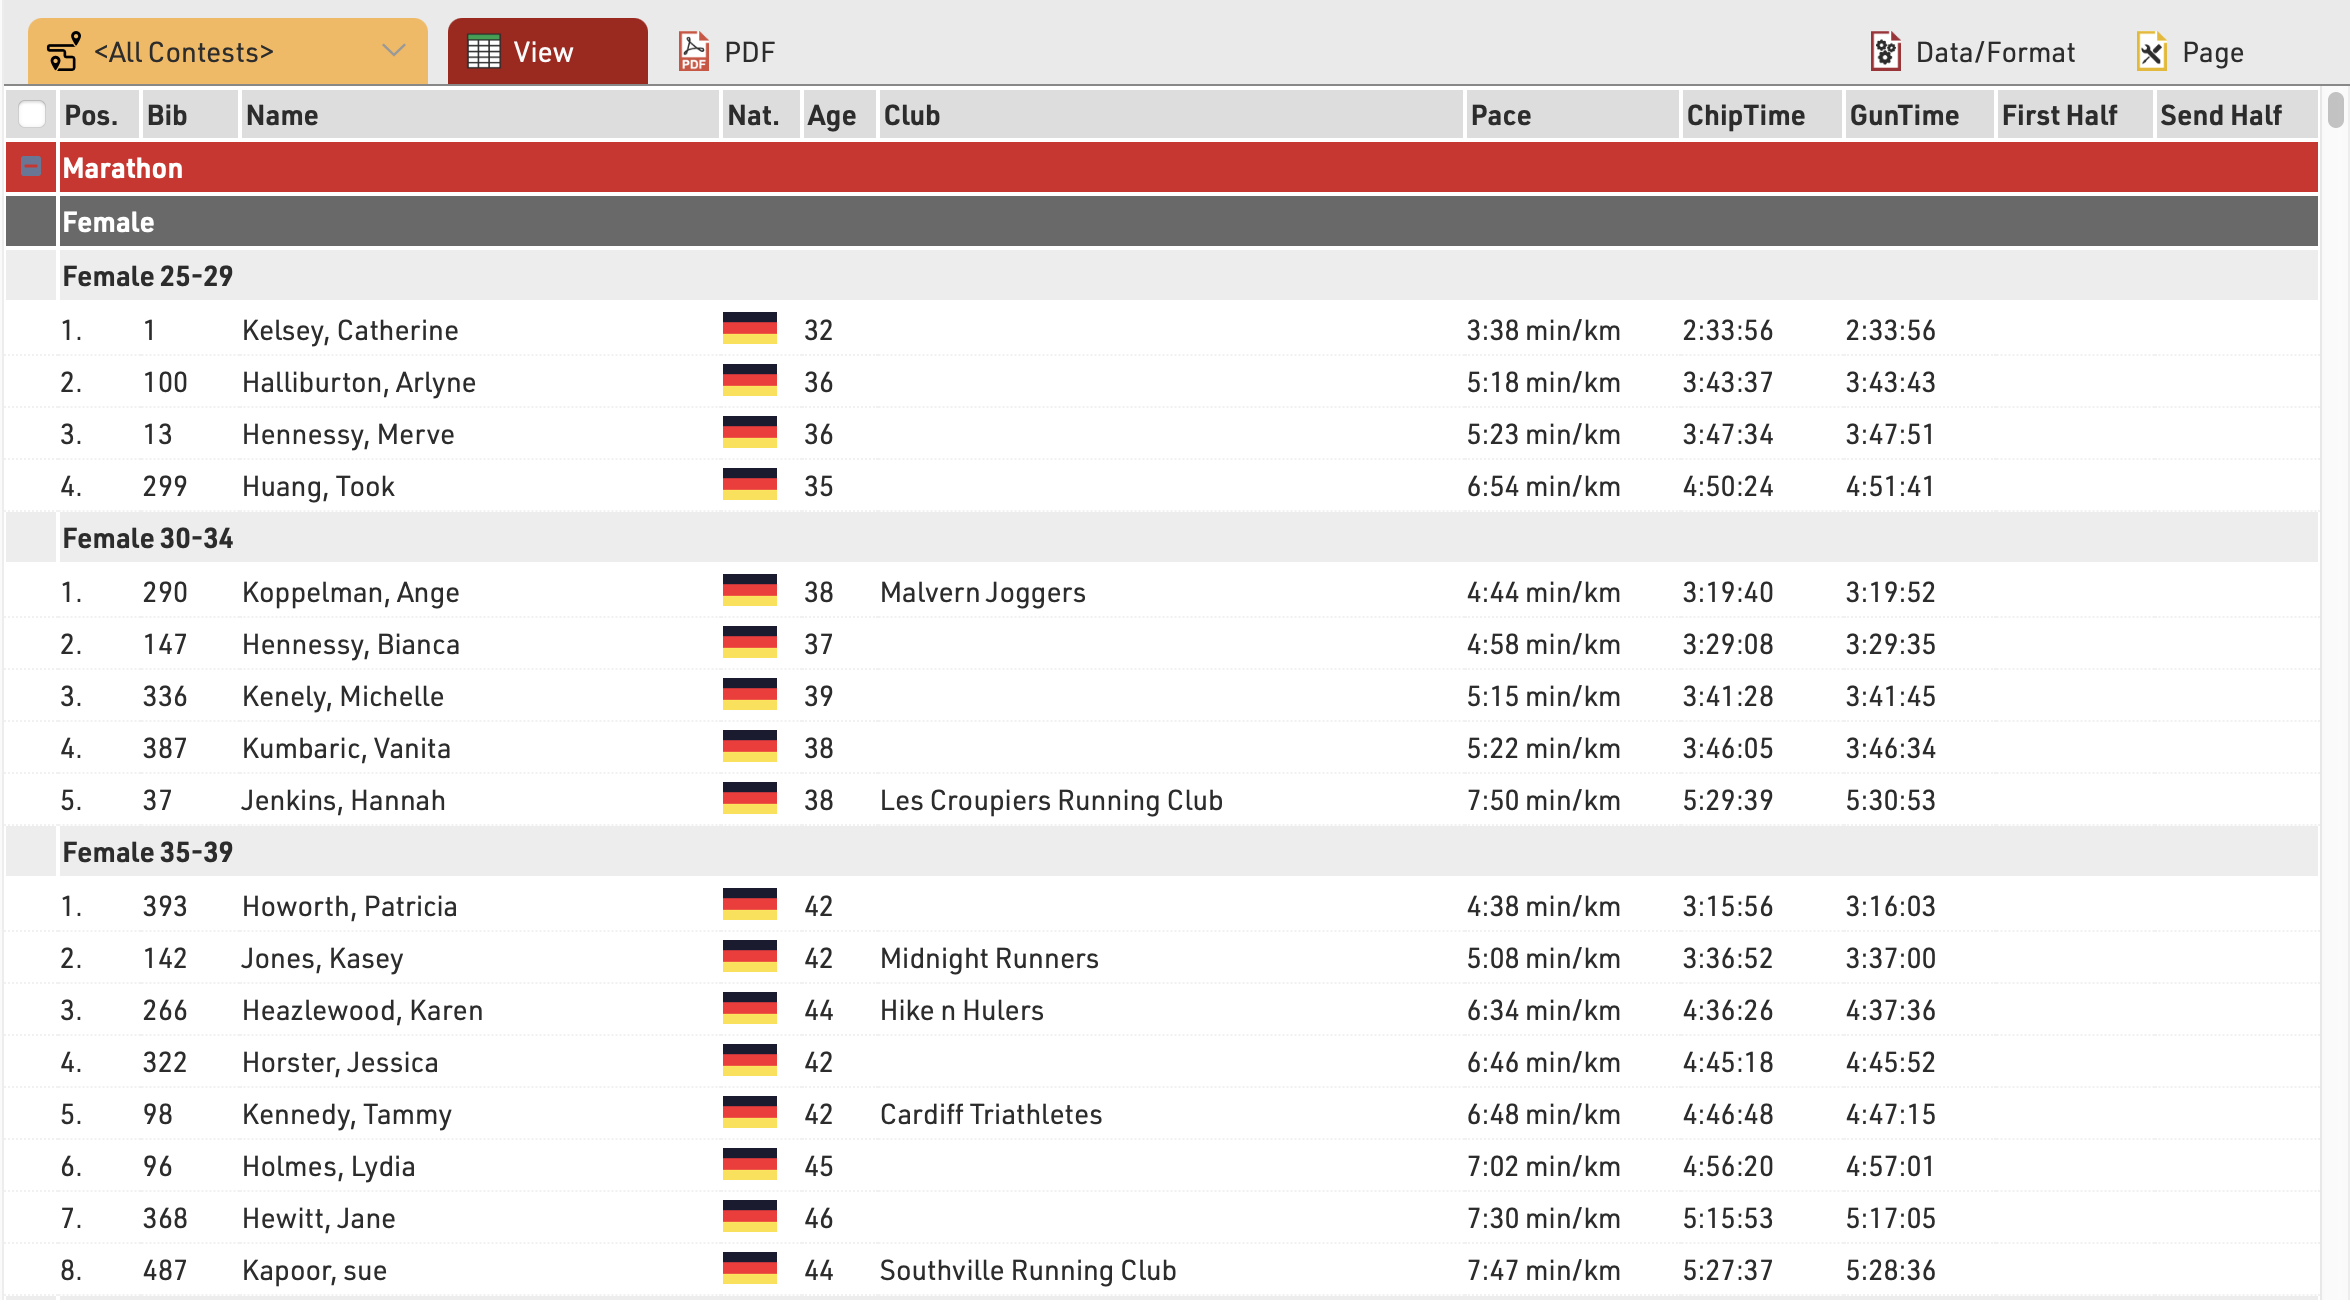
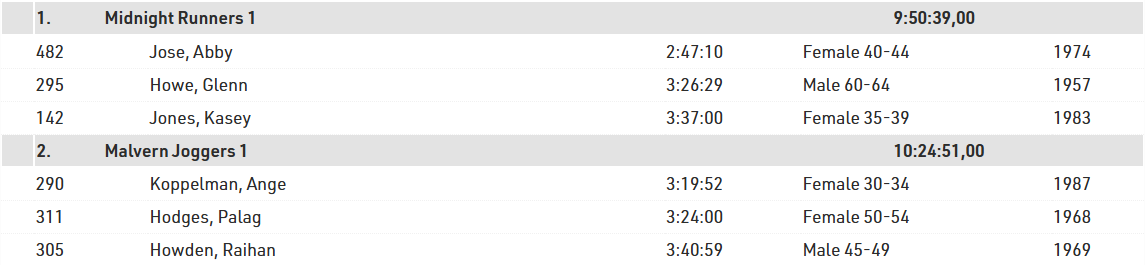
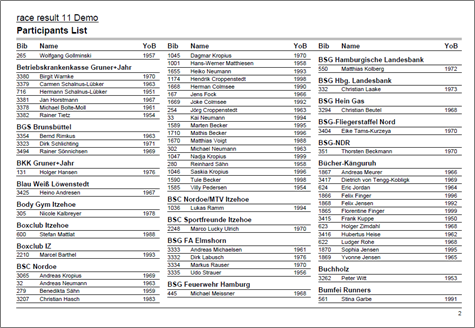
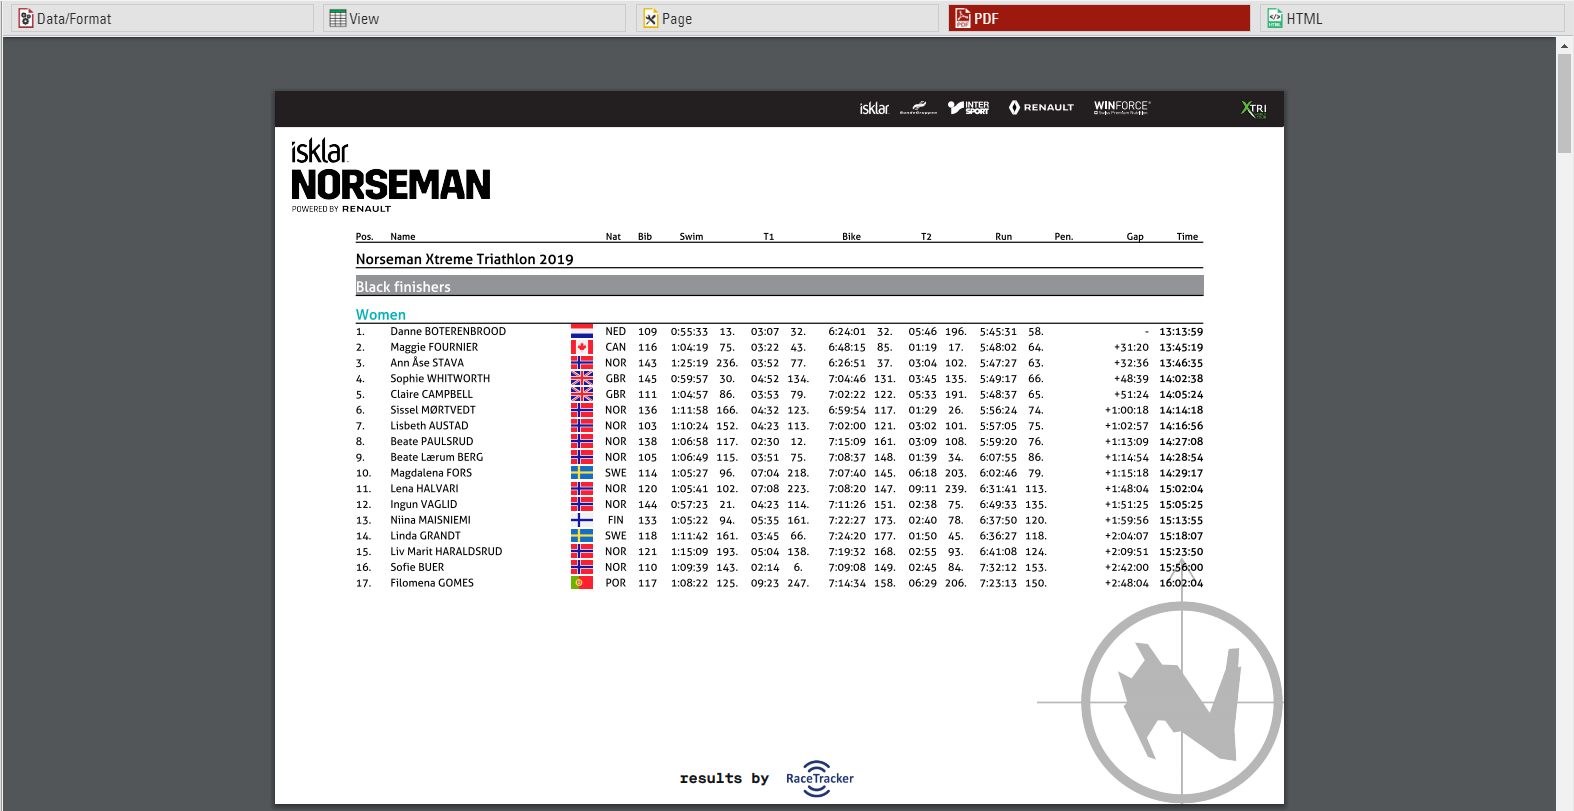
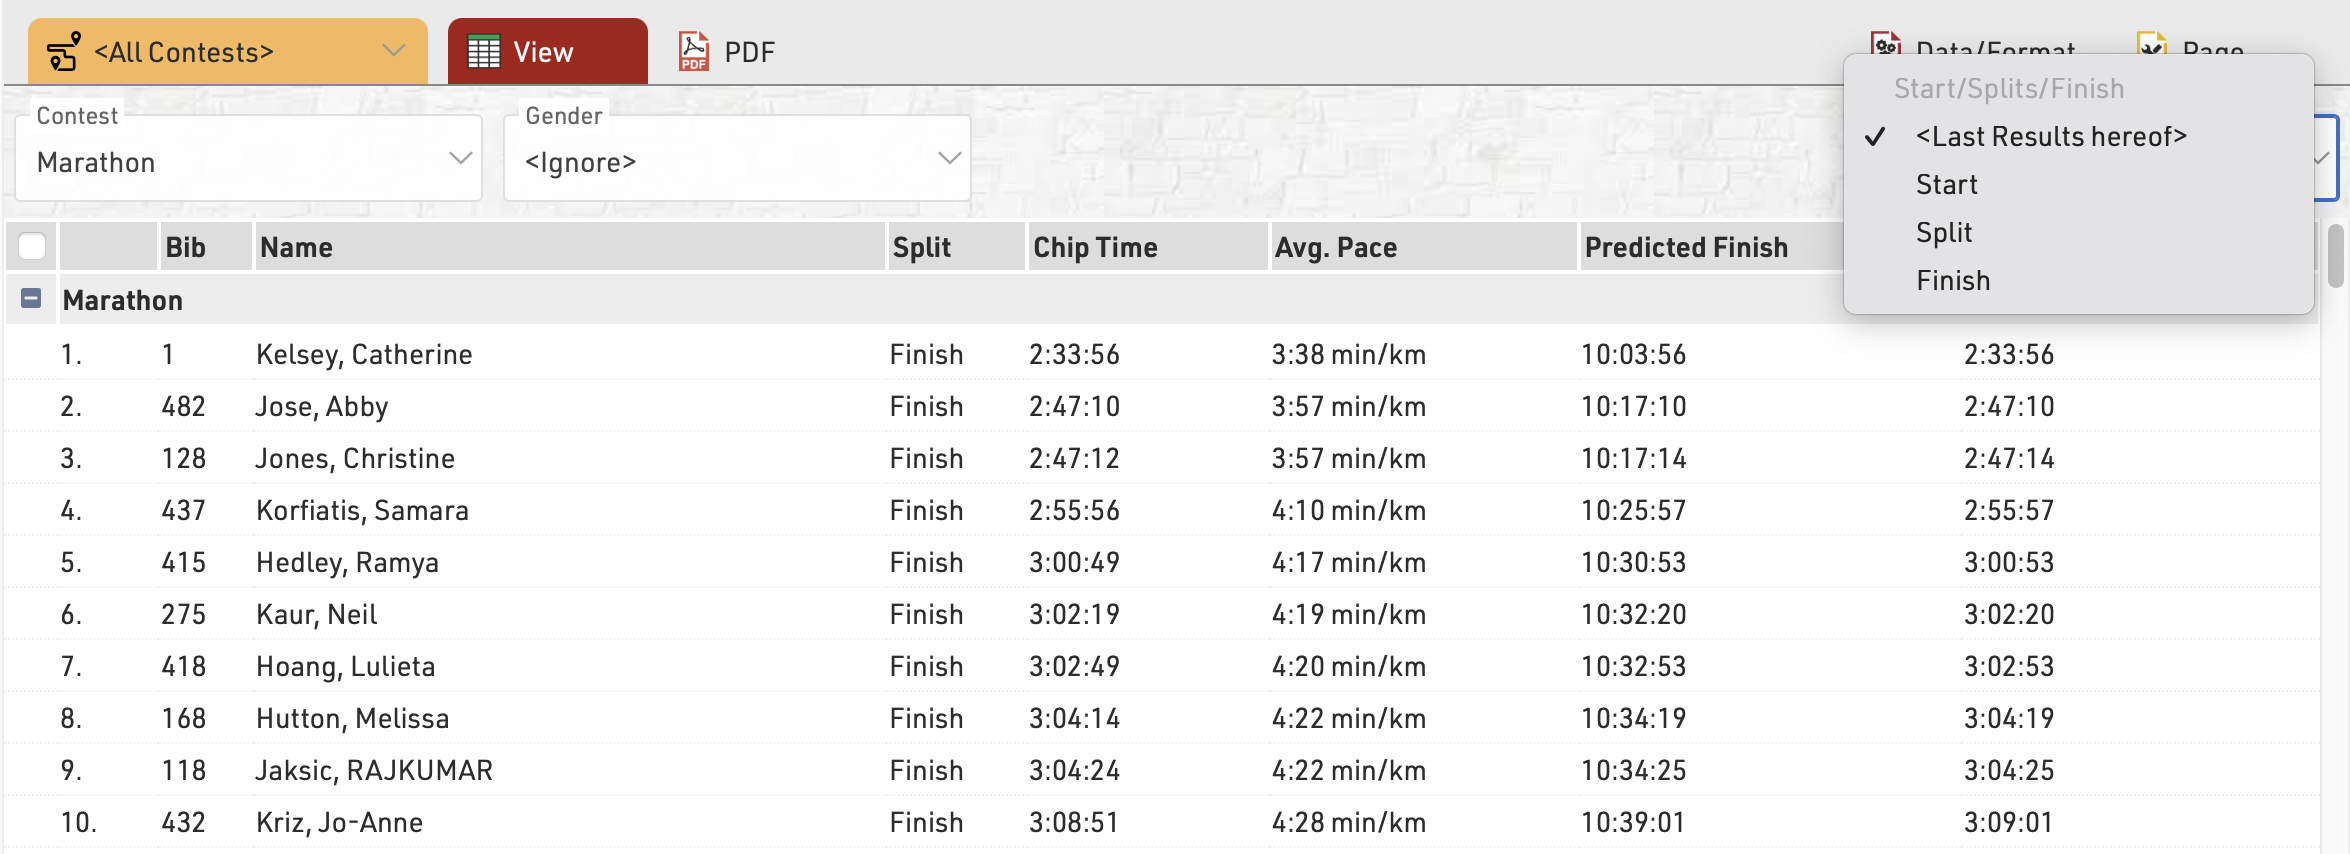
This list is grouped by contest, gender and age group:
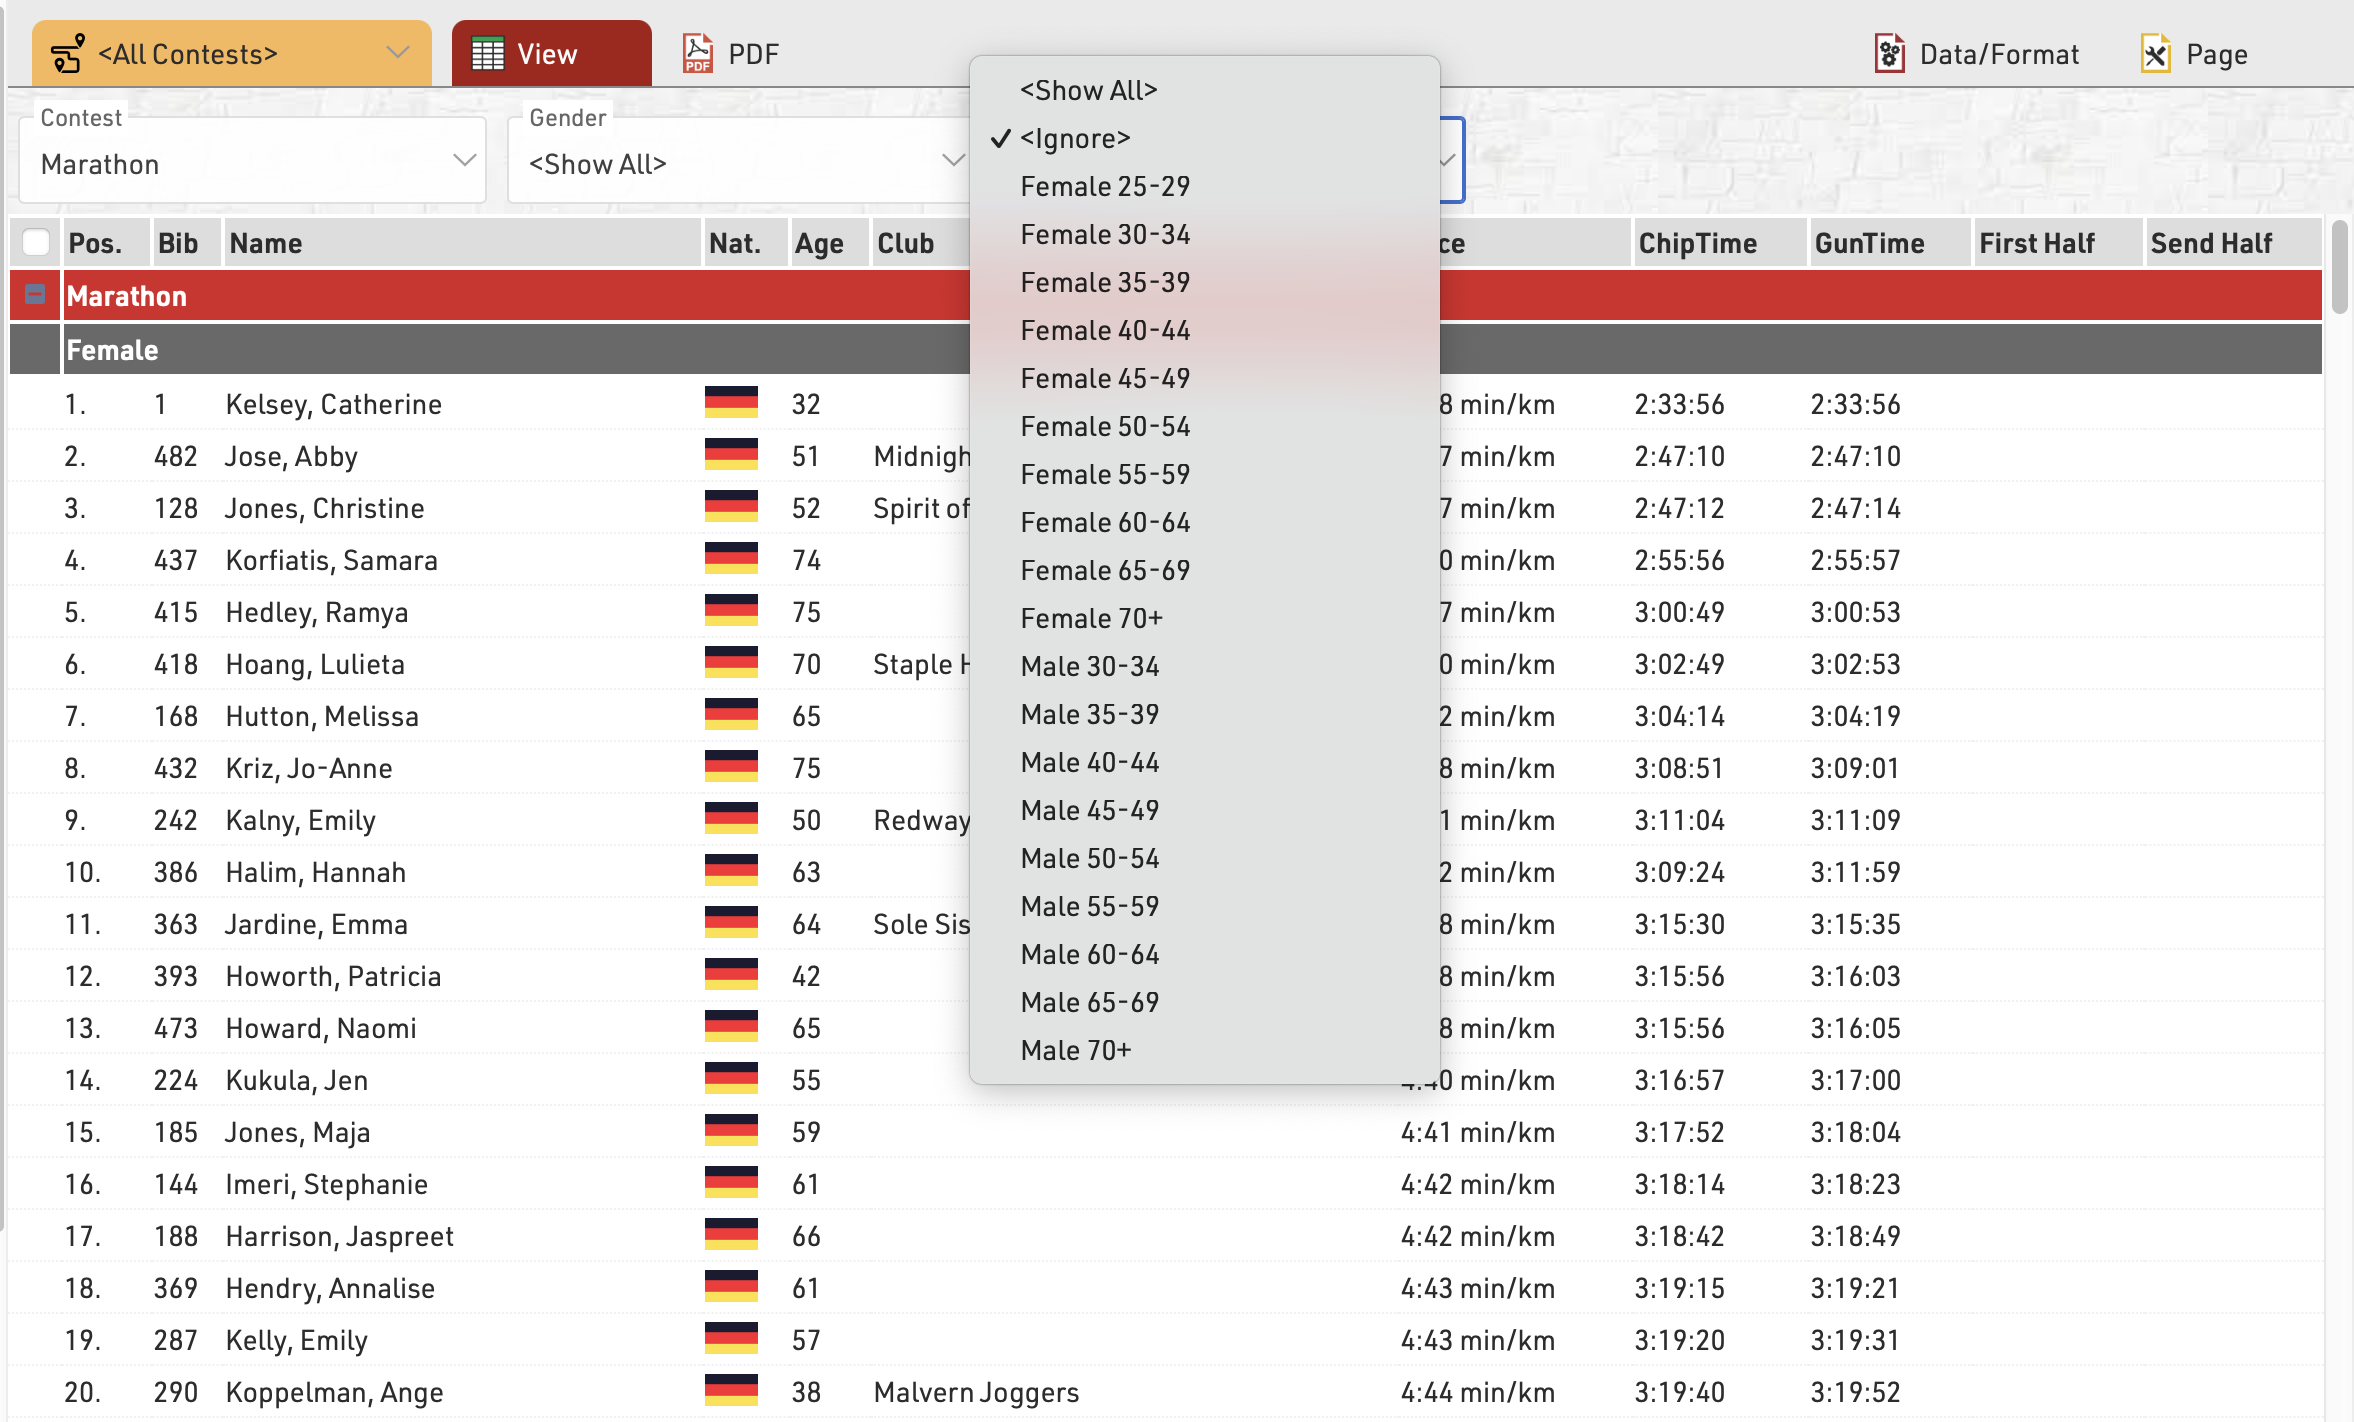
and below the same list using a filter instead of simple grouping, where each level can be filtered using the dropdown menus.
See Grouping/Sorting Details for more details and option
Fields/Columns
In the section Fields/Columns select the fields which shall form the columns of your list.
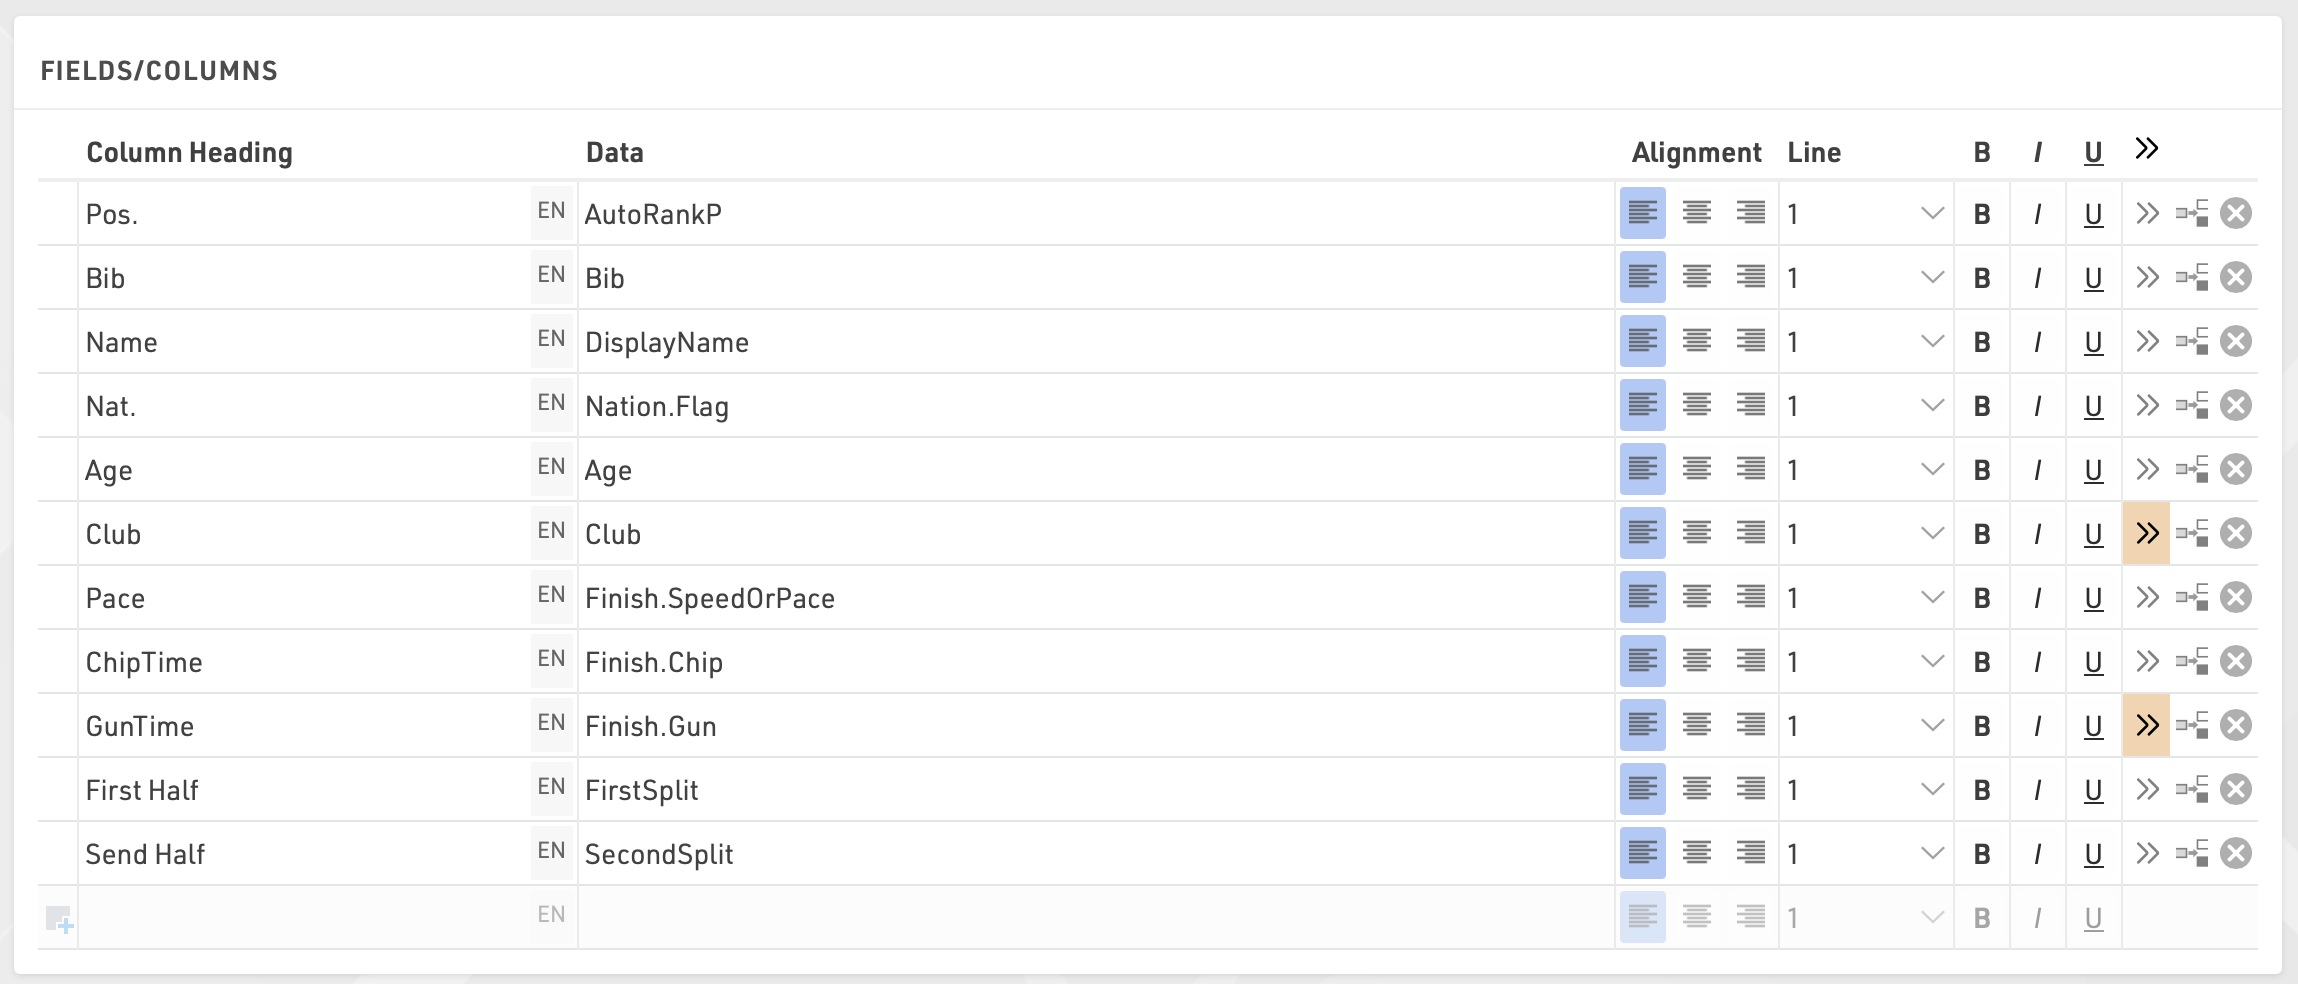
In Column Heading enter a description of the field and in Data select a field from the Field Wizard or enter an expression. For example, using an expression you can combine the fields Lastname, Firstname and YearOfBirth to: "Doe, John (70)"
The corresponding expression would be:
[DisplayName] & "(" & [YearOfBirth] & ")"
Select a line number greater than 1 to create Multi-Line Lists.
Additional formatting is available through the Extended List Column Settings.
Filter
By setting a Filter you can exclude certain records from the report. If you do not define a filter all records will be shown on the report.
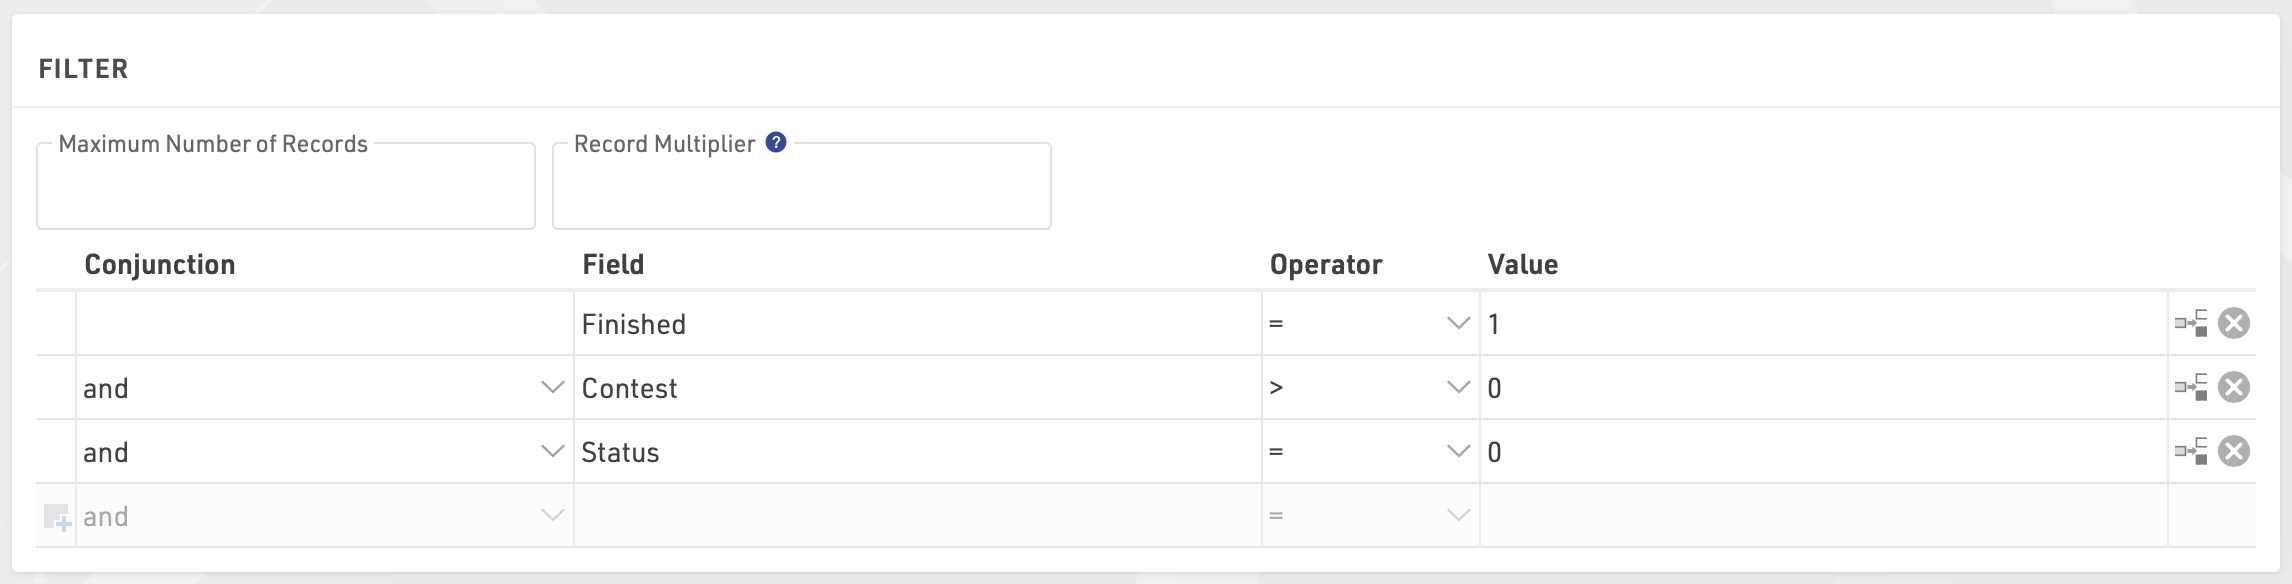
In particular, filters are important for result lists: you would like to show only those participants that have already finished. Usually, the filter will be that the rank must be greater than 0.
Instead of setting a filter, you can also limit the number of records shown on the list by setting a maximum number of records.
Besides, the Record Multiplier allows to show records more than once with different information (e.g. lap times) on a list.
Detalles de Agrupar/Ordenar
Detalles de Agrupación/Orden
Salto de Página
Usando la configuración de Salto de Página, puedes insertar saltos de página en el formato de salida PDF cuando cambia el valor del campo de orden. Las siguientes opciones están disponibles:
- Flujo: Valor predeterminado. Se inicia una nueva página si los registros adicionales no caben en la anterior.
- Nueva Página: Si el valor de orden/agrupación cambia, comienza una nueva página. Por ejemplo, una lista podría tener una página nueva para cada concurso.
- Nueva Columna: Igual que Nueva Página, pero en el caso de listas con varias columnas, comienza una nueva columna, no necesariamente una nueva página.
- Mantener Juntos: Se intenta mostrar todos los registros de un grupo en la misma página. Si no caben todos los registros en una sola página, se inicia una nueva. Por ejemplo, en el caso de resultados por equipo, se puede comenzar una nueva página si el equipo completo no cabe en la página.
- Repetir: Igual que Flujo, pero el encabezado de agrupación se repite en la nueva página.
Colores
Haz clic en el botón (Más detalles para esta entrada) para definir la fuente y el fondo colores:

Campos Diferentes para Orden y Agrupación
Con frecuencia, la lista debe agruparse por un campo, pero no ordenarse por ese mismo campo. Por ejemplo, ordenar por el ID del concurso pero mostrar el nombre del concurso.
En ese caso, simplemente ingresa el campo de ordenación antes del campo de agrupación.
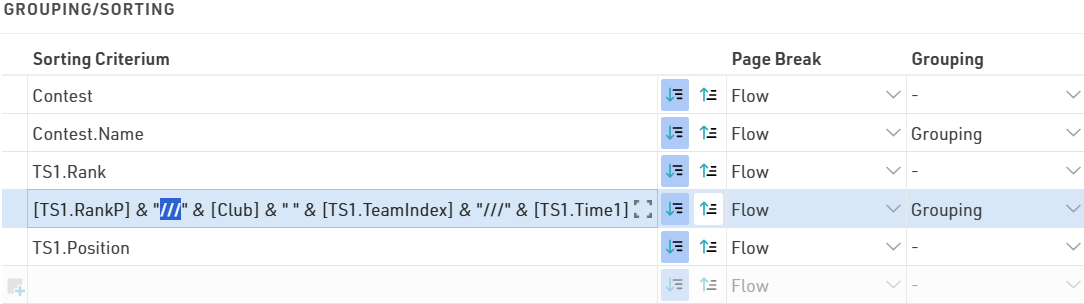
En el ejemplo siguiente, la lista se ordena por el ID del concurso, pero el encabezado del grupo mostrará el nombre del concurso. De manera similar, dentro de los concursos, la lista se ordena por la posición del grupo de edad, pero el encabezado del grupo muestra el nombre del grupo de edad:
Filtros
También se pueden aplicar filtros, los cuales permiten filtrar las listas manualmente utilizando selectores desplegables adicionales según los valores disponibles. Estos filtros también se mostrarán en my.raceresult.com cuando se utilicen listas en línea.
Filtro con ignorar permite además ignorar cualquier agrupación; por ejemplo, si se filtra por Género, puede ser útil ignorar esto y mostrar todo junto. Ten en cuenta que cuando se aplica un ignorar, entonces cualquier filtro o agrupación que esté debajo de este también será ignorado.
Columnas en el Encabezado de Grupo
En algunos casos, es útil crear columnas dentro del encabezado del grupo, por ejemplo, en resultados por equipo.
En este caso, queremos mostrar un encabezado de grupo para cada equipo que incluya su posición del equipo, nombre del equipo y tiempo del equipo, cada uno en columnas separadas. Luego, debajo, mostraremos a cada miembro del equipo con sus detalles individuales.
Columns will be created when the value of the grouping field contains three slashes (///). In other words, the three slashes are the column seperator:
Extended List Column Settings
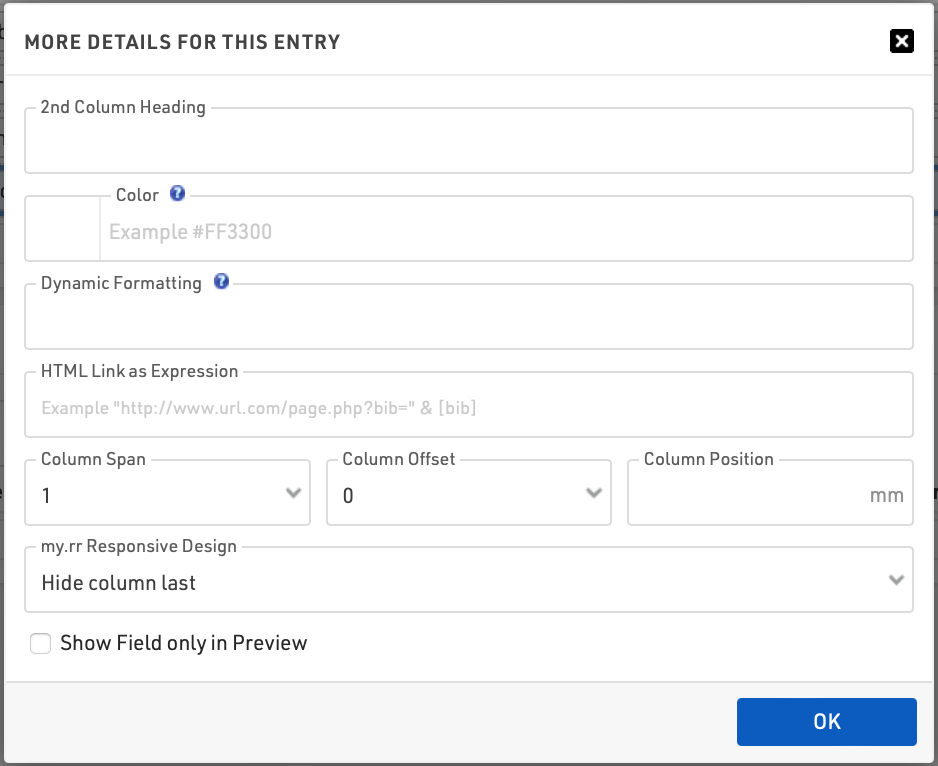
2nd Column Heading
The column header can have two lines. The second line will show if any field has an entry for this setting. This function is sometimes used for printed results that shall have column headings in two languages.
Color
Select a color for this column.
Dynamic Formatting
Different records can be formatted differently, see Dynamic Formatting.
HTML Link as Expression
When clicking a line in that column, the link will be followed. This is mostly used for results published on my.raceresult.com, for example, to create an individual link to a website with photos.
Column Span
If a field should span more than one column then define the column span accordingly, for example in multi-line lists where fields on different rows may have different lengths and so don't align in a single column.
Column Offset
The Column Offset setting serves for multi-line lists, see next section.
Column Position
Normally, RACE RESULT 14 automatically calculates the width of the columns depending on the content. In some rare cases, you may want to set the column position manually (only applies to PDF). Therefore enter the position in millimeters from the left.
my.rr Responsive Design
Use this setting to determine in which order fields should be hidden when being viewed on mobile, or narrower screens, through my.raceresult.com or your own custom embed. This helps optimize the spectator/participant experience since most results views are on mobile devices and you want to ensure that the most important fields are viewed easily. Read more about the Display Logic on Mobile Devices to understand how the settings work.
Show Field only in Preview
The field will only be shown in the preview, but not on the PDF. This may be used for the photo links as described above.
Listas Multi-Línea
Las Listas Multi-Línea son una manera fácil de poner más información en una lista, más comúnmente usadas para listas detalladas de resultados en línea o para mostrar resultados con múltiples splits. Cada registro de participante puede tener hasta 50 líneas en la lista, para crear filas adicionales simplemente seleccione un número de línea mayor que 1.
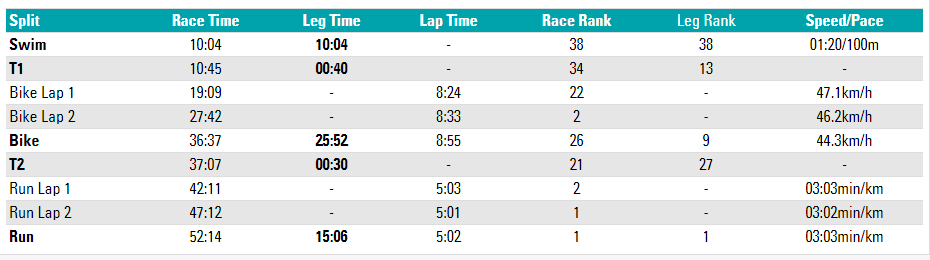
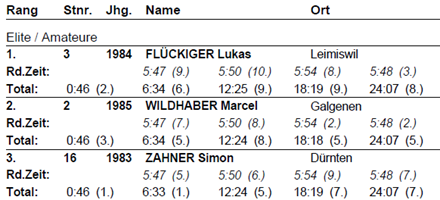
En este ejemplo cada split de la carrera se muestra en una nueva línea, para cada línea los campos de datos se muestran en el orden indicado. Los Encabezados de Fila son de 1 línea, usando texto simple con formato personalizado. Puede ser necesario añadir campos en blanco usando "" si necesita columnas para alinear correctamente.
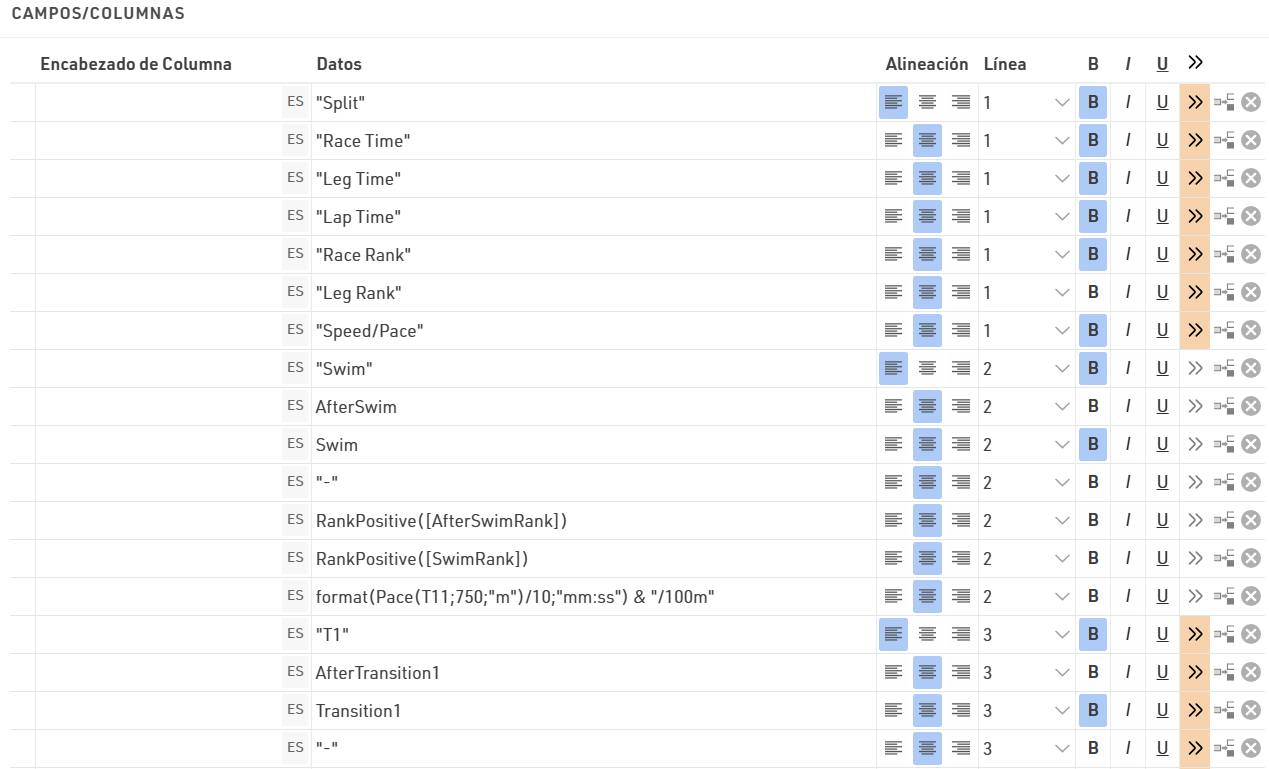
Quizás desea tener diferentes anchos de columna para las diferentes líneas como en la captura de pantalla de abajo: los tiempos de vuelta en la segunda y tercera línea tienen diferentes posiciones de columna que la información básica de arriba. Esto sólo es posible en listas PDF.
Para ello, tiene dos opciones:
- Ingrese la posición exacta de la columna en las opciones extendidas del campo. Esto hará caso omiso de los anchos de columna de otras filas.
- Fijar un desplazamiento de columna. Todas las líneas tendrán las mismas columnas, pero por ejemplo en la segunda línea el campo se moverá una o varias columnas a la derecha, es decir, la columna anterior tiene una mayor extensión.
Multiplicador de Registros
Utilizando el Multiplicador de Registros, los registros se pueden mostrar varias veces en una lista, opcionalmente con diferentes datos, por ejemplo, los tiempos de vuelta.
La opción Multiplicador de Registros en los ajustes de Datos/Formatos puede contener un valor fijo (por ejemplo, 3) o uno variable (por ejemplo, DecimalTime6). Si el resultado] 6 guarda el número de vueltas, la lista mostrará una línea por cada tiempo de vuelta.
Para mostrar los tiempos de vuelta en las líneas, se puede utilizar el parámetro {n}, que será iterado de 1 a n (=valor del multiplicador de registros). Si, por ejemplo, los tiempos de vuelta se guardan en los resultados con los nombres "Lap1", "Lap2", etc., se puede utilizar este campo:
[Lap{n}]
Ingresar Filtros Complejos
Las opciones de Filtrar para una lista ofrecen una definición fácil, por ejemplo:
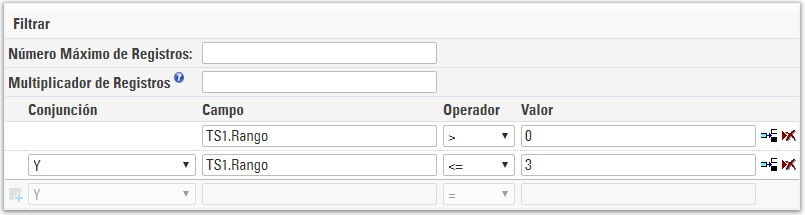
Si necesita ingresar un filtro jerarquizado complejo, la interfaz gráfica de usuario puede ser tediosa. En ese caso, simplemente introduzca su filtro en la primera línea de la siguiente manera:
iif(([Contest]=2 AND T2>5) OR ([Contest]=3 AND T2=5); 1; 0) = 1
View
When viewing lists there are some additional functions and shortcuts to make working with the list and participant data easier.
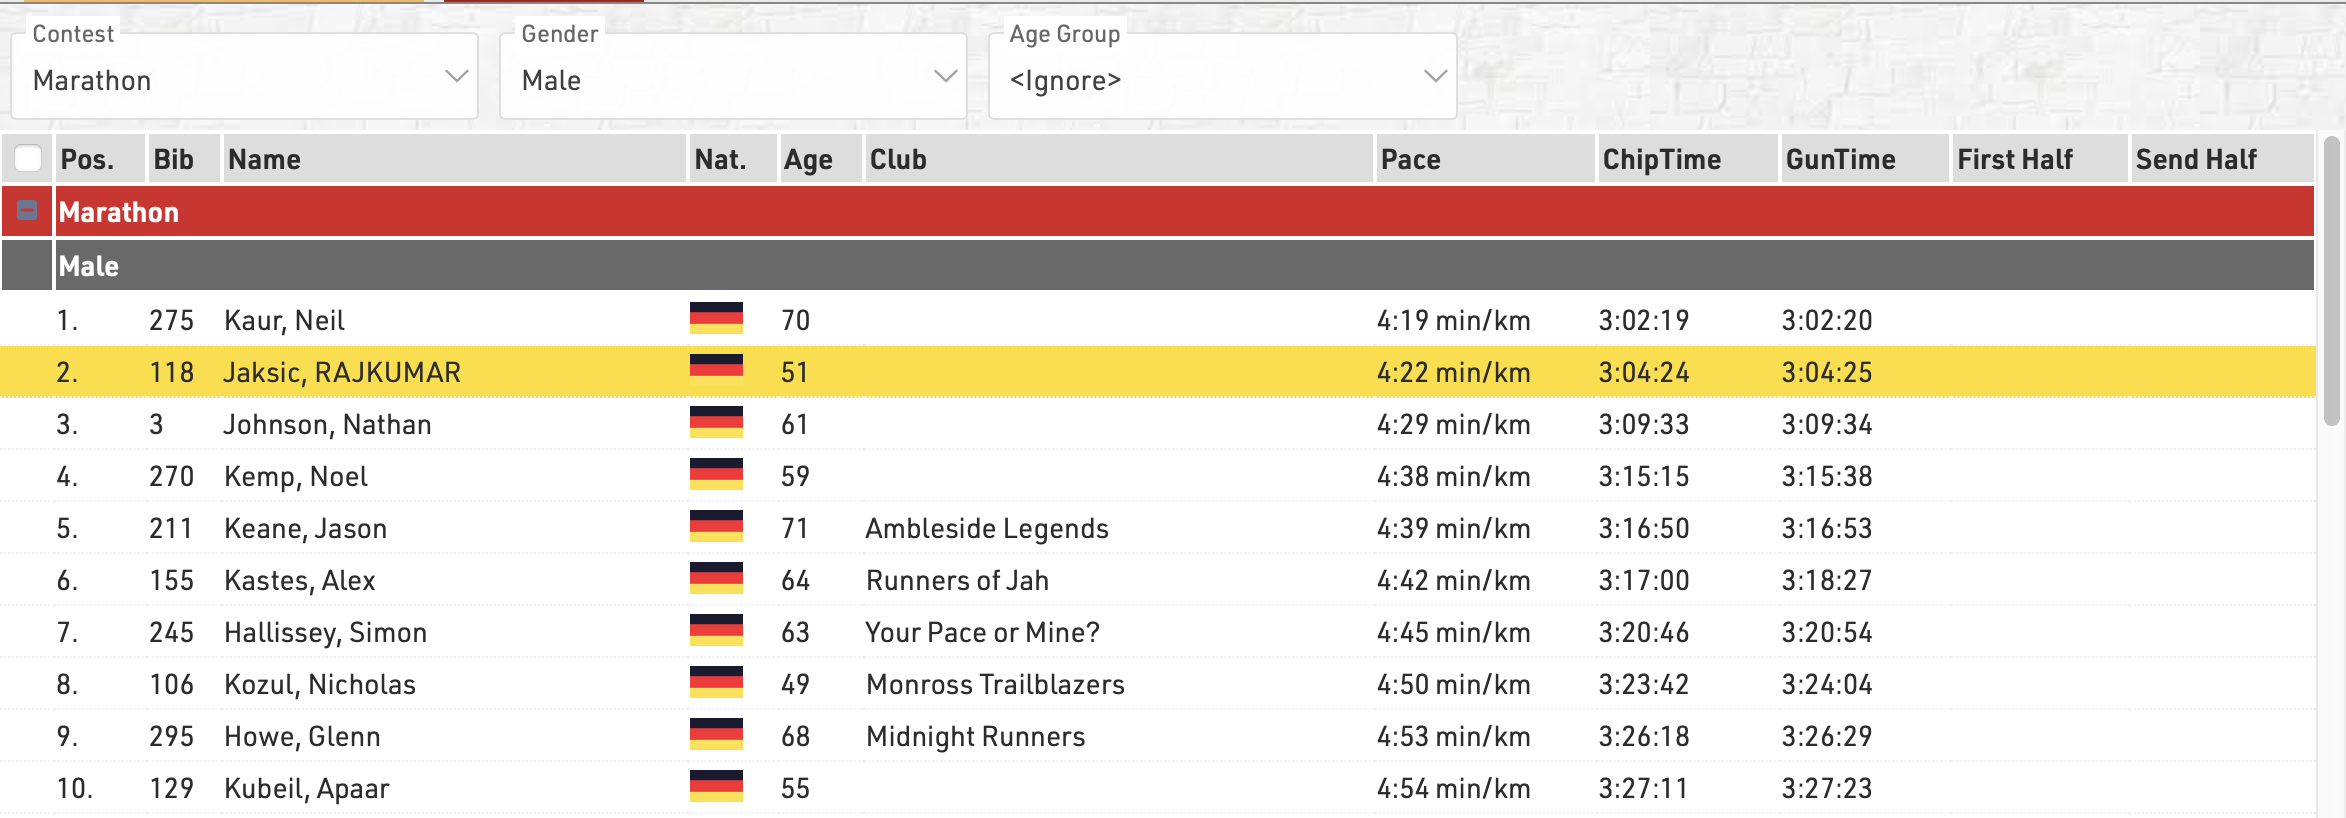
Any Filters you have applied to the list will be shown at the top of the list, allowing you to quickly filter to specific data sets. If using Groupings then the groups can be expanded or collapsed using the +/- icon at the start of the row.
Hovering over a row will highlight that entire row yellow.
Clicking on a row will open the Participants Tab directly to that participant record, if the right-side dock is open to the Participants Tab then it instead the participant record will be opened here.
Live Update allows you to set the list to automatically refresh at a pre-defined interval (from 1s to 60s), useful for monitoring specific lists during a race in an additional window.
Font size can also be adapted between 40% and 200%.
Page Settings
The settings in the Page tab are mostly relevant for the PDF output format as well as partially for the Presenter (marked with a *) and define how the records will be formatted and which additional information will be shown in the page header and footer.
Page Settings
Select here the page format, choose between portrait and landscape orientation and define the page margin in millimeters.
Multi Column
In some cases it can be helpful to split the page into several columns:
Simply define the number of columns and the column spacing in the Page settings of your list.
Background
The settings under Page Header allow you to put a picture in the top right corner of the report. However, if you require more flexibility regarding the design of the list, you can select a certificate at Design that will be shown in the background. This option gives you unlimited flexibility in designing your reports.
Cover sheet
Similar to the background, you can insert a certificate as an additional Cover Sheet at the beginning of your report and an additional Back Sheet at the end of the report.
Page Header
Via these settings you can add and format the following elements of the page header: two header text lines*, the column headers*, a picture (which will be shown in the top right corner) and a gray line below the two header lines.
Records *
Define here the font type and size of the data records. Additionally, define if there shall be a thin line between the records and if every other line shall have a gray background. Via the Line Spacing setting you can define the height of the records.
Hint: Probably you would like to have the same font type throughout the entire report. Therefore, simply select the font type here and leave all other font type boxes empty. The font type for the records will then also be used for the header and footer texts.
Page Footer
You can add several texts and an image to the page footer. For example enter [Page] to show the page number in the footer of your report.
List Header and Footer
Enter an additional text that will be shown at the beginning/at the end of the list.
Output Selector
The output selector is designed to allow for easier creation of results lists which may otherwise require multiple output lists and ranks to be setup. It also includes an option to always show the last result which makes live results lists even easier to setup.
When the output selector is enabled an additional filter is shown which allows the user to select which result they want to look at, there are then a few different fields which can be used to show information according to which result is selected.
Selector de Splits
Para habilitar el selector desplegable para Splits hay 3 opciones para los nombres de campo, de los cuales uno debe llamarse en el Output.
- {Selector} - Mostrará todos los Splits y Etapas en el desplegable
- {Selector.Splits} - Mostrará todos los Splits solo en el desplegable
- {Selector.Etapas} - Mostrará todas las Etapas solo en el desplegable
Con estos prefijos, los nombres de campo de Split/Etapa estándar se pueden anexar de la misma manera en la que se reemplazaría el nombre de Split o Etapa seleccionado.
Por ejemplo {Selector.Etapas}. La distancia devolvería la distancia de la pierna seleccionada en el desplegable.
Los Splits que se establecen en Solo Interno no se mostrarán en el Selector ni se llamarán en la opción <Últimos Resultados de este>.
Selector de resultados
Para habilitar el selector de resultados debe incluir SelectorTiempoDecimal o SelectorTiempo en los campos de datos de la lista de salida, sus funciones se explican a continuación. Cuando se incluye una nueva tabla aparecerá debajo del filtro de resultados del selector, aquí puede seleccionar qué resultados se pueden seleccionar mediante el menú desplegable,si está configurando una lista de resultados en vivo, puede incluir <Últimos Resultados de este> que cuando se seleccione tomará el último resultado de los seleccionados a continuación la cual tiene una hora y los ordenará desde el último resultado hasta el primero.
Para cada resultado seleccionado puede elegir mostrar hasta 2 resultados separados, esto podría ser, por ejemplo, un tiempo de pistola y tiempo neto

Selectores Campos
Con el selector activado ahora hay algunos campos adicionales que se pueden llamar el cual son relevantes para el resultado seleccionado.
SelectorTiempoDecimal / Selector2TiempoDecimal - Esto devolverá el tiempo decimal en los resultados 1 y 2 para el participante de acuerdo con el resultado seleccionado.
SelectorTiempo / Selector2Tiempo - Esto devolverá el tiempo formateado en los resultados del selector 1 y 2 para el participante de acuerdo con el resultado seleccionado.
SelectorTiempoPositivo / Selector2TiempoPositivo - Devolverá un 1 si hay un tiempo en los resultados del selector 1 y 2 para el participante de acuerdo con el resultado seleccionado de lo contratrio devuelve 0. similar a TiempoPositivo.
SelectorNombre - Devuelve el nombre del resultado seleccionado actualmente (útil cuando se usan los últimos resultados de este documento cuando los participantes pueden mostrar resultados diferentes.
SelectorID - Devuelve el identificador del resultado seleccionado actualmente si hay un tiempo en ese resultado.
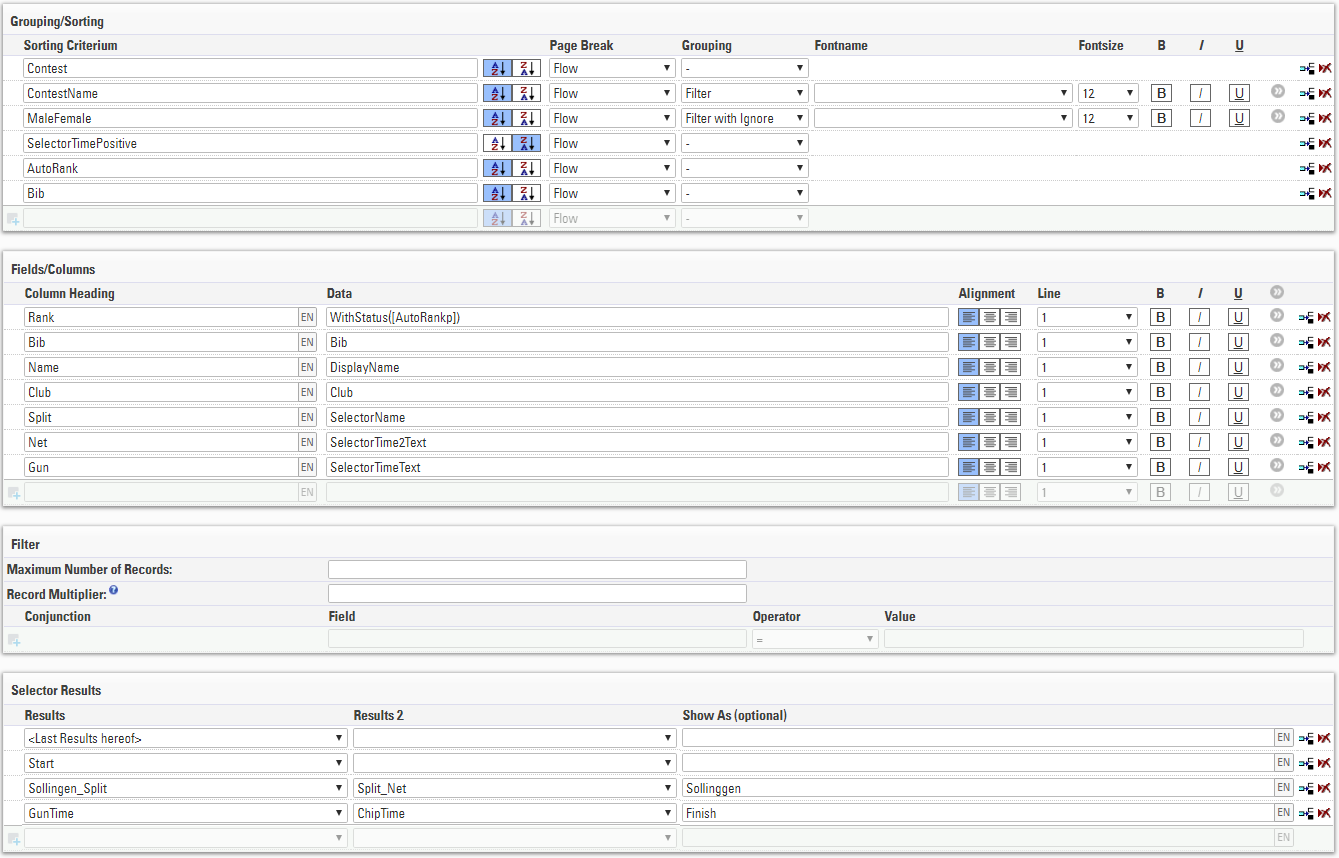
Al utilizar el selector de resultados, puede habilitar la clasificación automática de los participantes mediante el uso de AutoRango para mostrar a aquellos que no tienen un tiempo en la parte inferior de la lista, primero puede ordenar por SelectorTiempoPositivo de mayor a menor para que los que los que tiene una hora se muestren primero.
A continuación se muestra una configuración típica que se puede utilizar para una lista de resultados en vivo mediante el Selector de Resultados.
Insertar Imágenes
Se pueden insertar imágenes en las listas, éstas pueden ser útiles para funciones tales como enlazar las fotos o videos de los participantes, o logotipos de los equipos.
Se pueden insertar imágenes mediante las imágenes guardadas en el archivo del evento, mediante una función definida por el usuario o desde un enlace URL externo.
Para insertar una imagen, use el código:
"[img:ImageName.png|height:30px]"
Asegúrese que "ImageName.png" tiene el nombre correcto y la terminación de archivo correcta de su imagen.
"ImageName.png" puede ser reemplazado por la función definida por el usuario o por la URL de la imagen.
Si no se defina una altura, entonces la imagen se mostrará en tamaño completo.