So you're looking to time your first event? Or maybe you already have some experience with timing but you're new to working with RACE RESULT?
The following guide is designed to cover the fundamentals of race timing with RACE RESULT, we recommend reading the entire guide as early as possible before your event to prepare yourself for what's going to be required and even have a practice beforehand.
The guide is broken down into three main sections you will need to be familiar with:
RACE RESULT 14 Setup - You should start on the software setup as soon as possible, the earlier you have this ready the better - especially if you plan to offer Online Registration through RACE RESULT 14.
Hardware Setup - Understand how to correctly setup your RACE RESULT timing hardware to ensure reliable recording of times during the event.
Timing an Event - What you will need to do during the event to start timing, monitor the race, and publish your results.
RACE RESULT 14 Setup
RACE RESULT 14 is designed to be incredibly flexible to cover any type of event, it is unlikely you will ever need to use every single setting or feature within the software.
Here we cover the basic setup which should be considered for any event, including how to create and setup your event, how the timing will be handled, and how to then publish your results.
It is expected that you have already read the RACE RESULT 14 Introduction and you are familiar with how to access and navigate RACE RESULT 14.
Create an Event
Within RACE RESULT 14 each event is handled as an individual file, note that one event may still contain multiple Contests which may be different distances or even different disciplines all in one file.
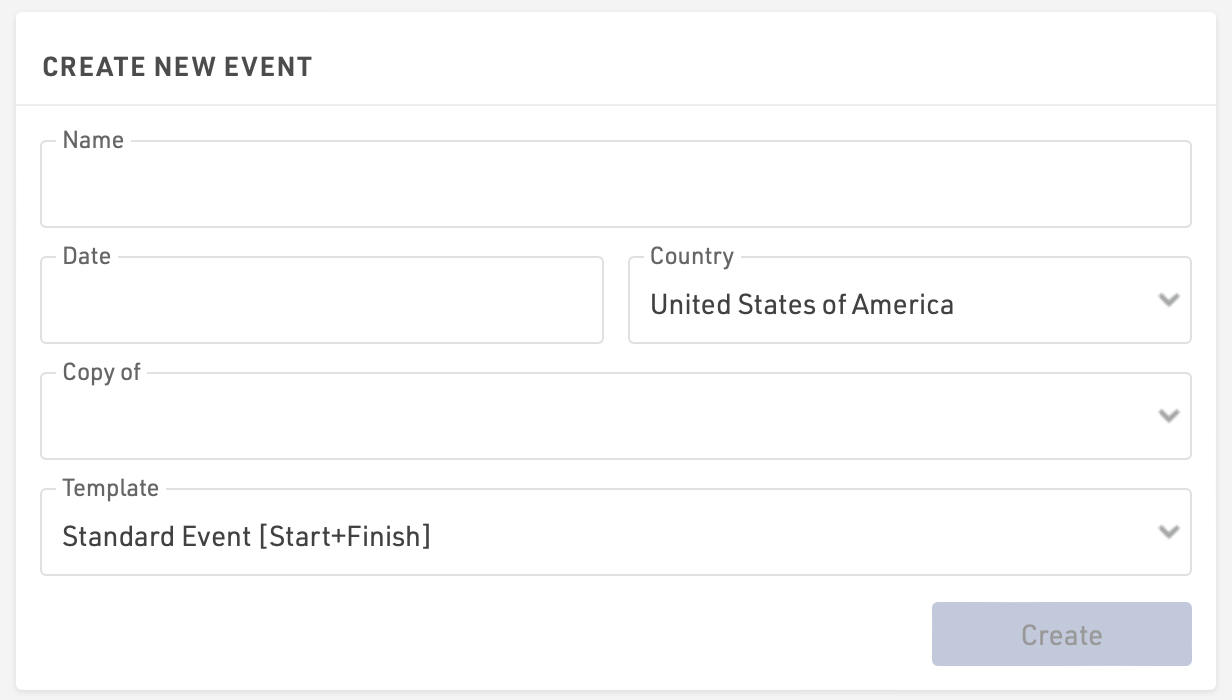
Click Create New Event from the RACE RESULT 14 Start Menu to create your event, you will need to enter some basic details including the event name, date (formatted as yyyy-mm-dd) and country.
You can choose to copy a previous event file, for example if you are running the same event again in a following year, or choose from one of the available templates. Note that when copying an event then the data will all be copied into the new file including participant data, you should check any fixed dates such as Contest Eligibility, Age Groups, my.raceresult.com publishing dates.
Event Settings
Participant Data
Data management is a critical part of RACE RESULT 14 and ensuring a logical data structure is an important step when managing your event.
RACE RESULT 14 already contains some basic default fields for storing participant data, if you wish to store additional participant data fields then you may need to create some additional fields for this.
Timing Basics
There are 2 parts to calculating times and subsequently results within RACE RESULT 14, firstly the collection of raw timing data - which is then assigned to a Timing Point, and secondly the calculations which define how this raw data is used either through Splits or Special Results.
Even if you only have a single timing point for the finish, you will still need at least one Split or Special Result setup in order to calculate the actual race times.
Whether you use Splits or Special Results depends on the type of event you are timing and the complexity of any additional requirements you may have for scoring. In some cases, such as the Biathlon template, you may even combine Splits and Results.
Both Splits and Special Results reference to T0, this is the official start time which will be used for calculations, this will be covered more when looking at Timing an Event.
When timing there are two possible methods to score participants, which you use may depend on the type of event you are timing or how the start is handled. It is still possible to display both Gun Time and Chip Time in your results, but the rankings will be based on one of the two options.
Gun Time - Times are calculated from the official start (T0) to when participants cross the finish line for all participants.
Chip Time - Times for each participant are calculated from when they cross the start line, their individual chip start, to when they cross the finish line.
Splits and Special Results are always calculated dynamically, so it is even possible to make changes during the event. When doing so everything will be automatically recalculated for all participants.
Output Lists
Output lists serve to produce lists of data such as start lists or results lists, but can be used for any purpose you might need. Output lists can be printed, published online through my.raceresult.com as part of your Online Publishing, or used with other tools within RACE RESULT 14 such as Presenter for results displays.
Each of the event templates include some default templates for typical results lists that may be required, some of these are specific to the template but the same principles apply to all outputs.

To view or edit an Output List click the name of the list from the left hand menu, the data of the output can be modified in the Data/Format tab.
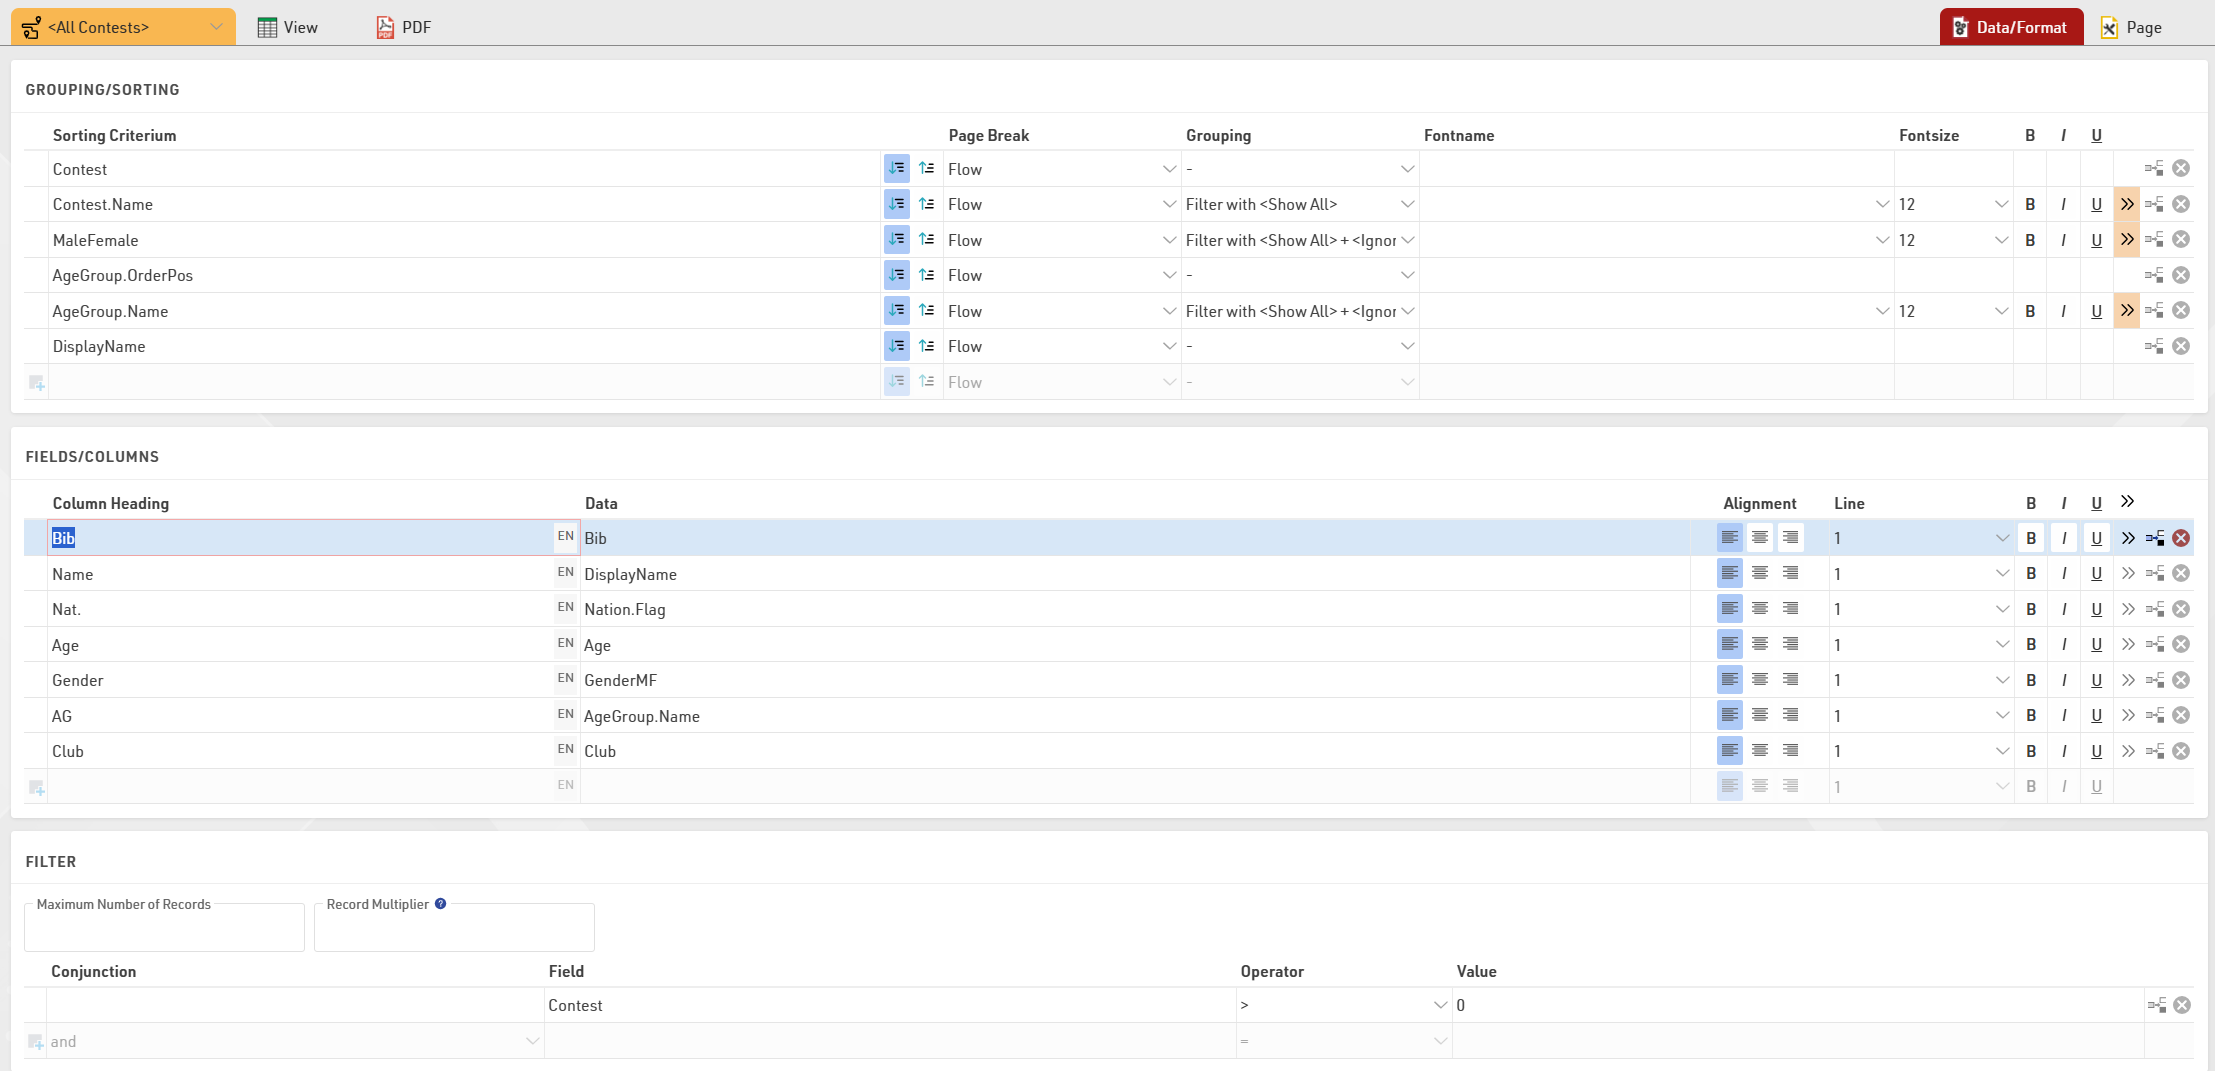
You can edit which fields are displayed in the Fields/Columns section, each column has a heading and the data value which is the field or function you wish to show.
The Grouping/Sorting defines how participants are sorted within a list, and the Filter defines which participants should be shown in the list. Additional formatting options are available to further customize lists, for a more detailed description see the main Output List guide.
Online Publishing
Working with RACE RESULT 14 online allows you to also publish your event through the my.raceresult.com platform at no additional charge.
With this you can list your event in the calendar for participants to find, create a landing page to provide additional event information, publish online registration, publish a startlist and results lists or even receive reviews and inquiries from your participants.
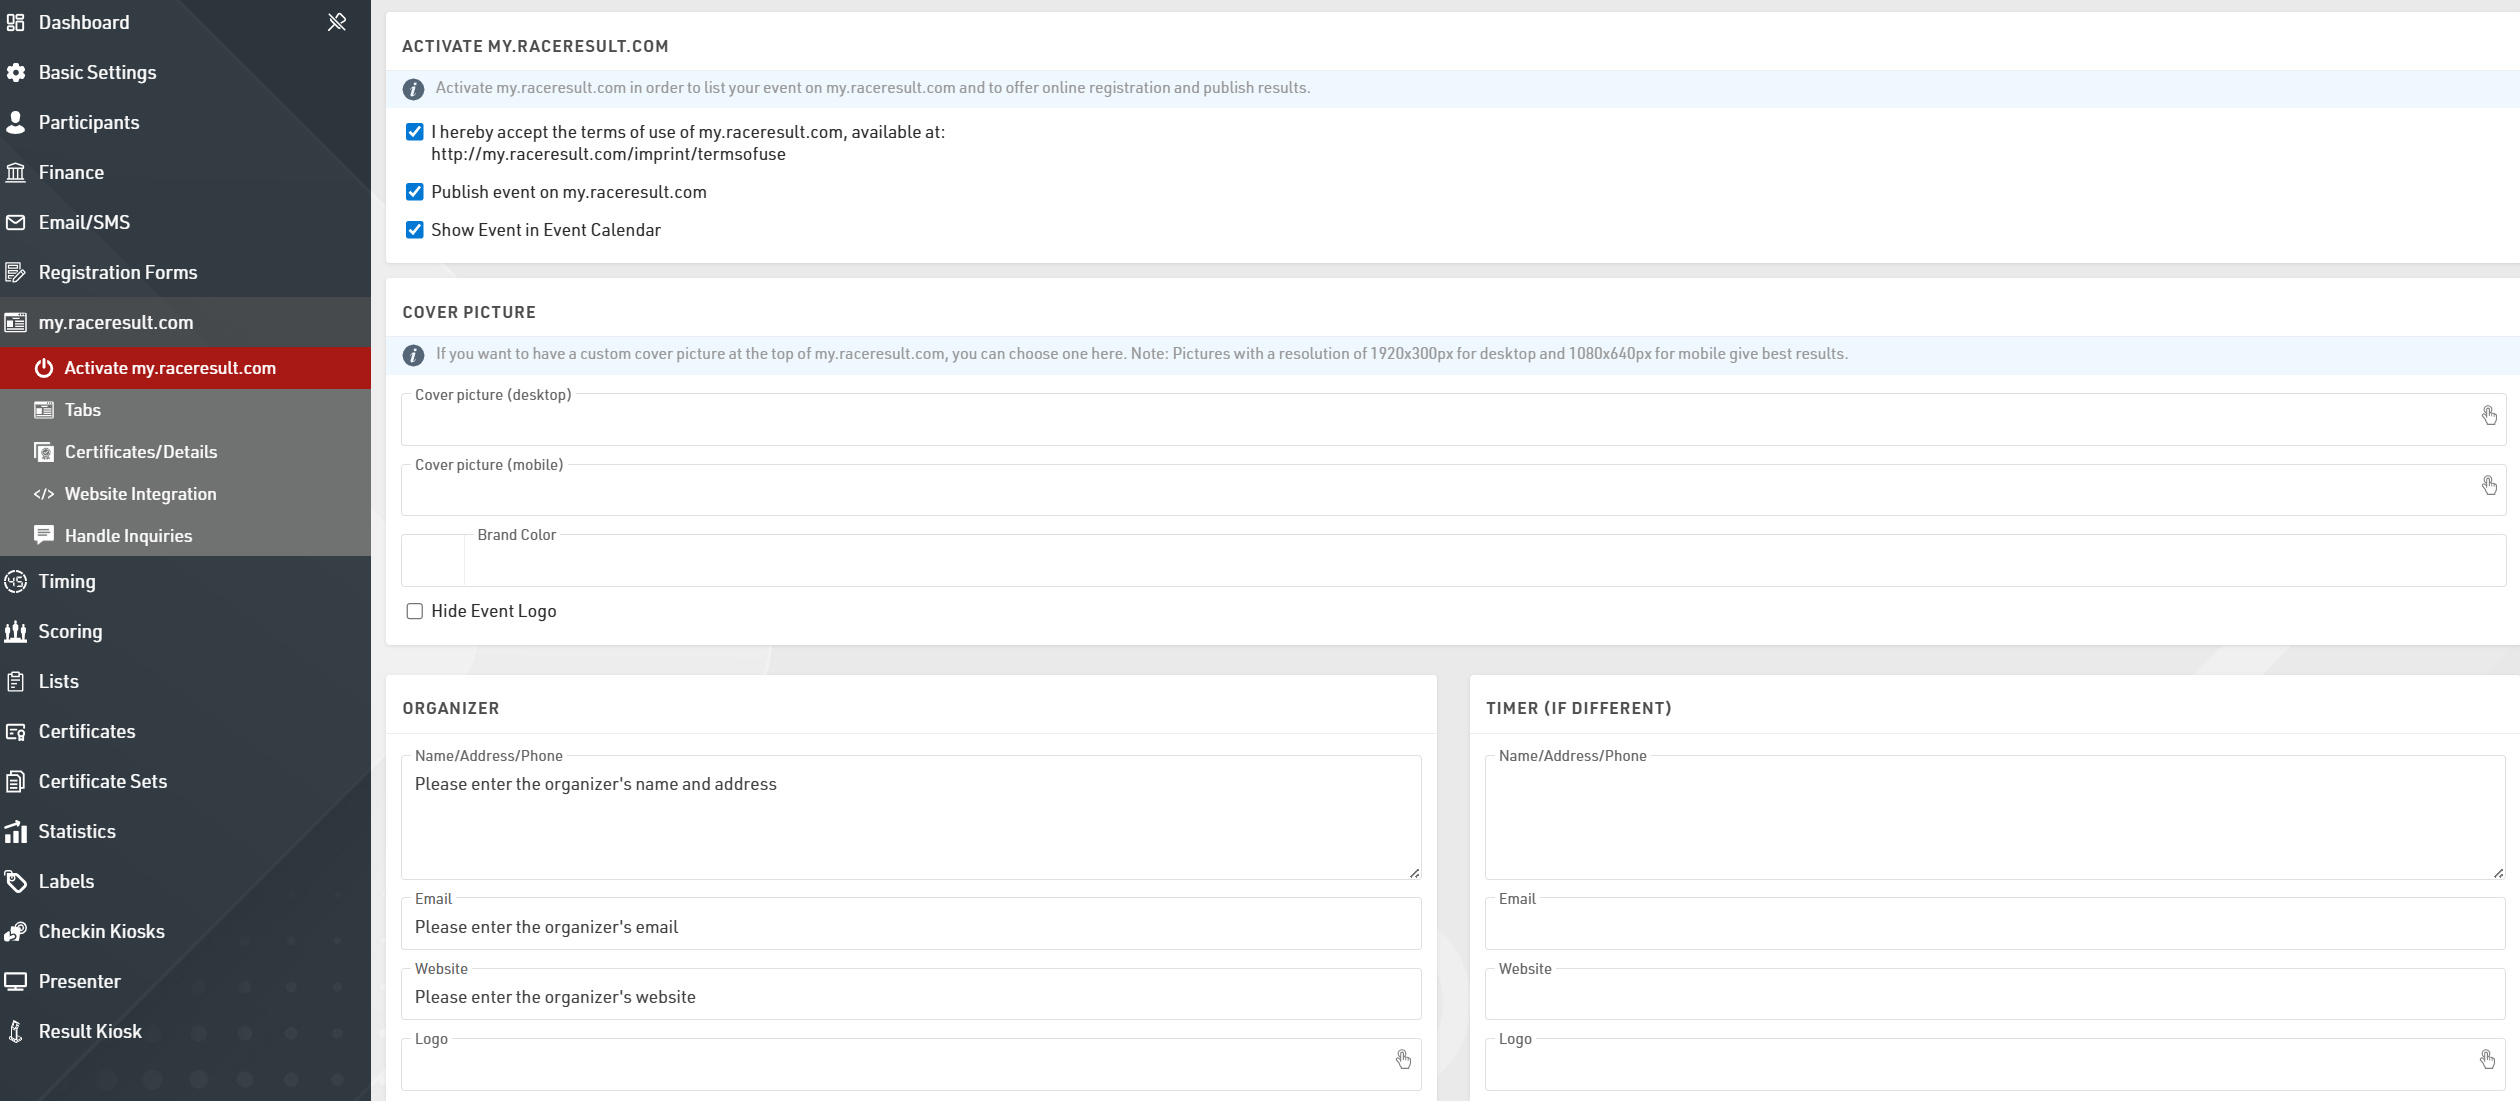
In order to publish your event online you first need to agree to the terms of use which are linked through the Activate my.raceresult.com page, you can then choose to publish the event and whether the event should be listed in the event calendar.
The cover picture is displayed at the top of the event page and can be customized with your own image, the event logo (as defined in the Basic Settings) is also displayed by default. If you want to change the menu text to match the event's color scheme, you can also define that as the Brand Color.
The my.raceresult.com page for your event has a number of different sub pages which can be used and edited according to your requirements.
Below is a summary of some of the key points for publishing an event, for more advanced customisation please refer to the main my.raceresult.com guide.
Info
The info page acts as a landing page for the event, you can choose to embed a web page via a URL or create your own content using the text editor. The editor also allows for HTML content to be inserted so you can customize this further.
If embedding a web page you will need to ensure that the target site allows cross-site scripting, otherwise it will not be loaded.
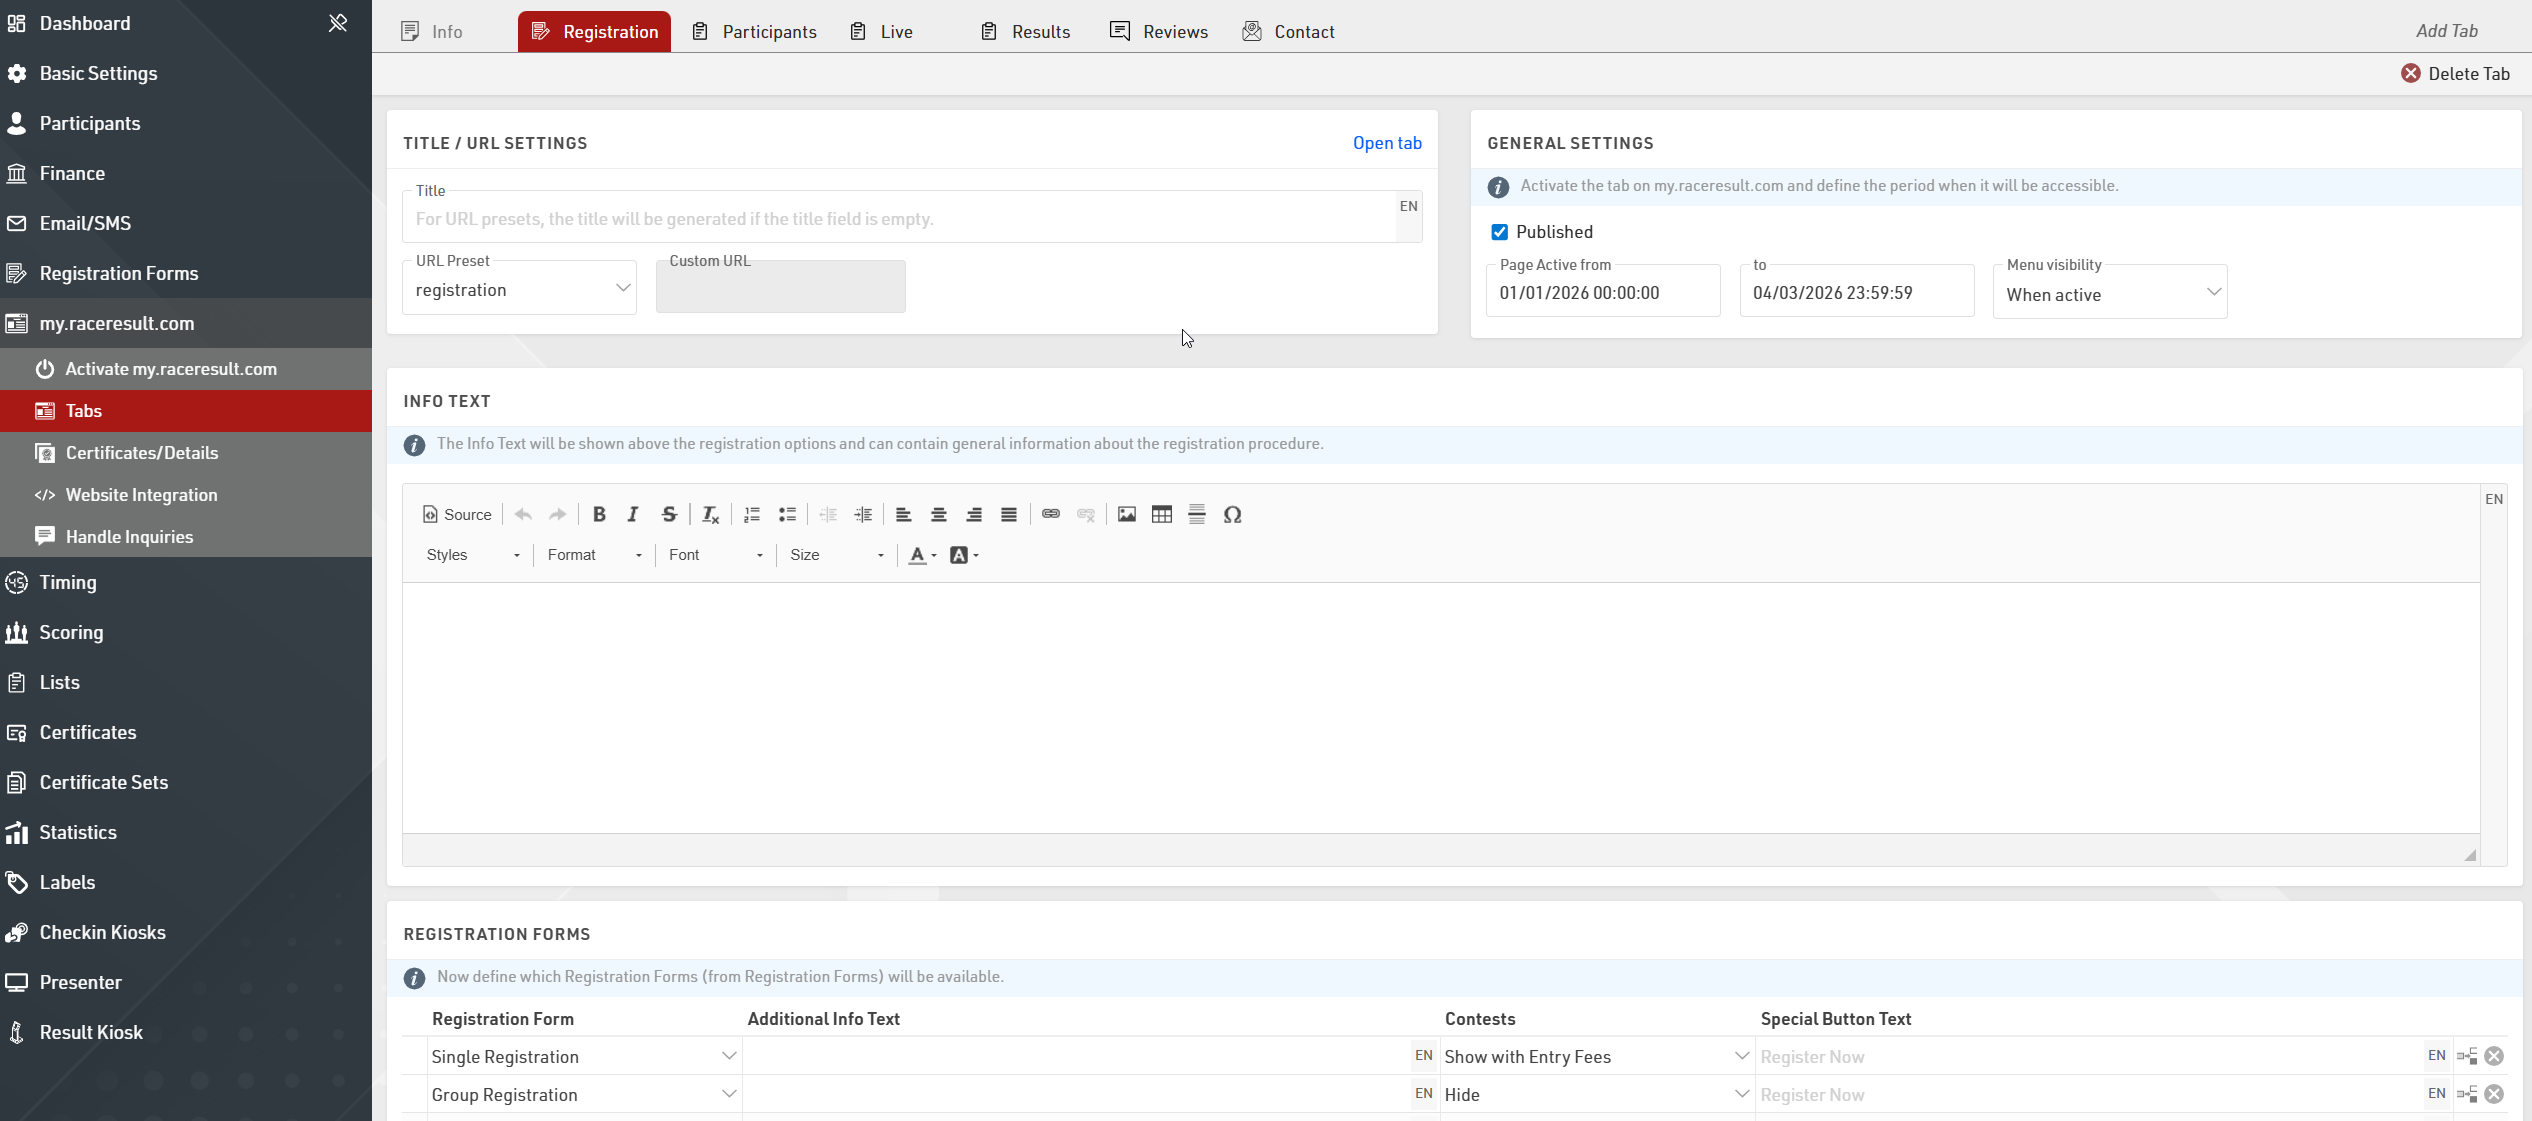
Registration
You can use the my.raceresult.com platform to offer online registration to your participants.
You will need to first setup the Registration Forms you wish to publish online, then you can activate a Registration tab and select the date range for which the Registration tab should be available.
An additional info text can be defined for the Registration page, and you can also customize the options for each registration form.
Lists
There are three pages which are default tabs used for publishing Output Lists online for your event. It is possible to configure these and additional list tabs to fit your requirements
Generally the Participants page is used to publish a start list before the event, Live is used for a live leaderboard during the event and Results is used for official results during and after the event. Each page has a setting of how it shows up in the menu and a date range which defines when the page is available online, the default settings for each page are based on these general guidelines using the Event Date when the file is created.
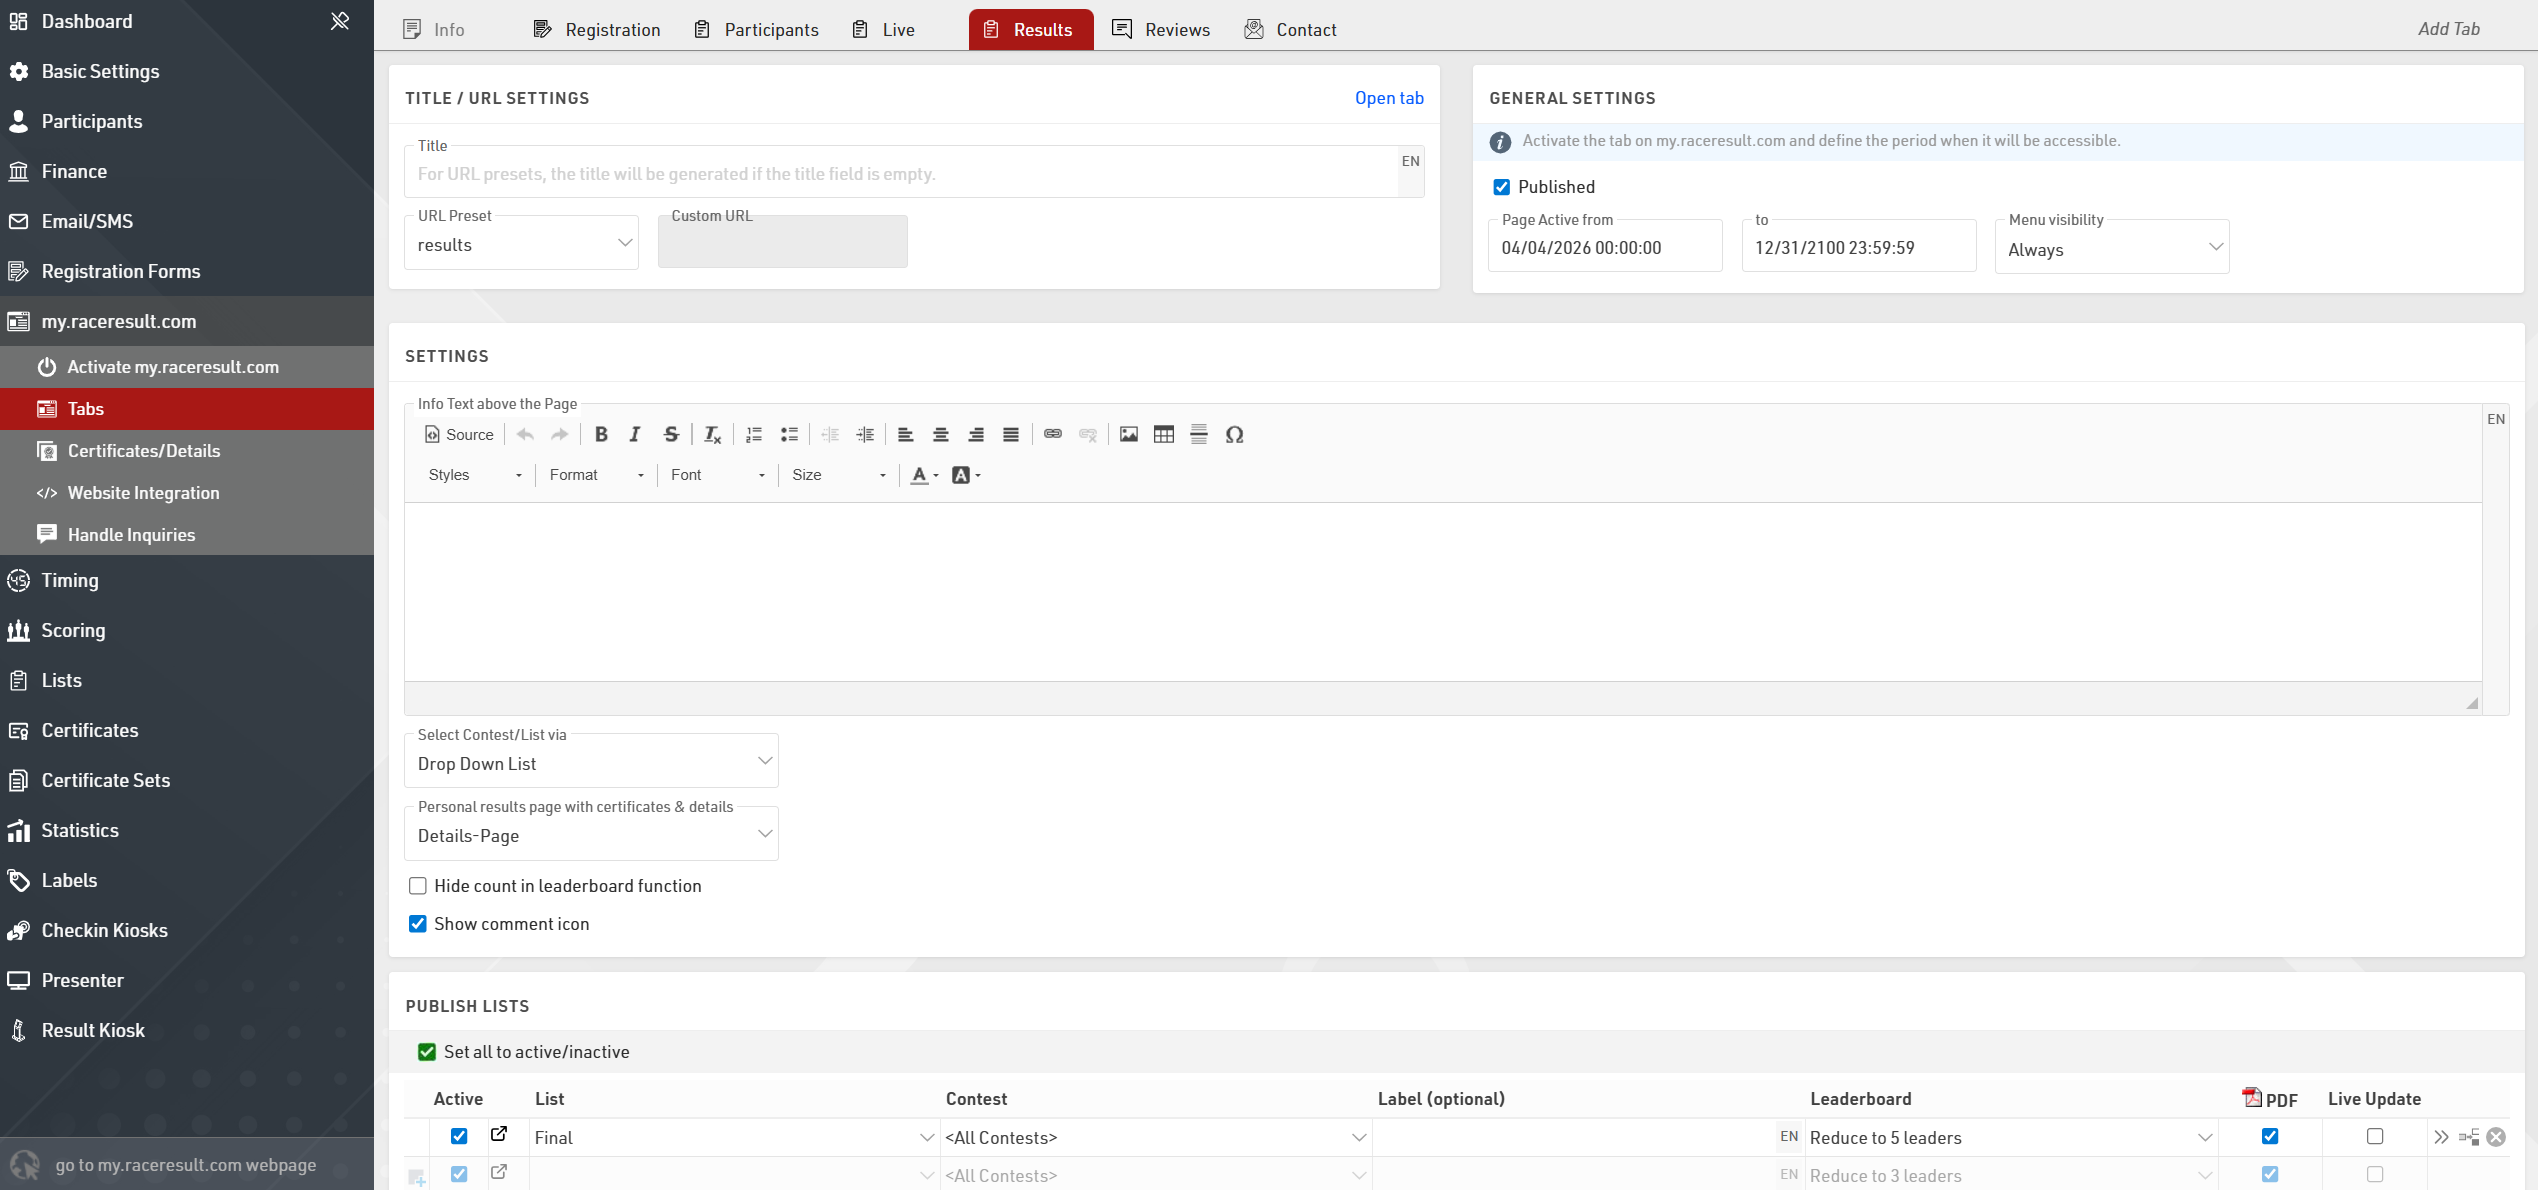
For each page you can choose which Output Lists should be published, if more than one list is published then a dropdown will allow the user to change between the different lists.
Hardware Setup
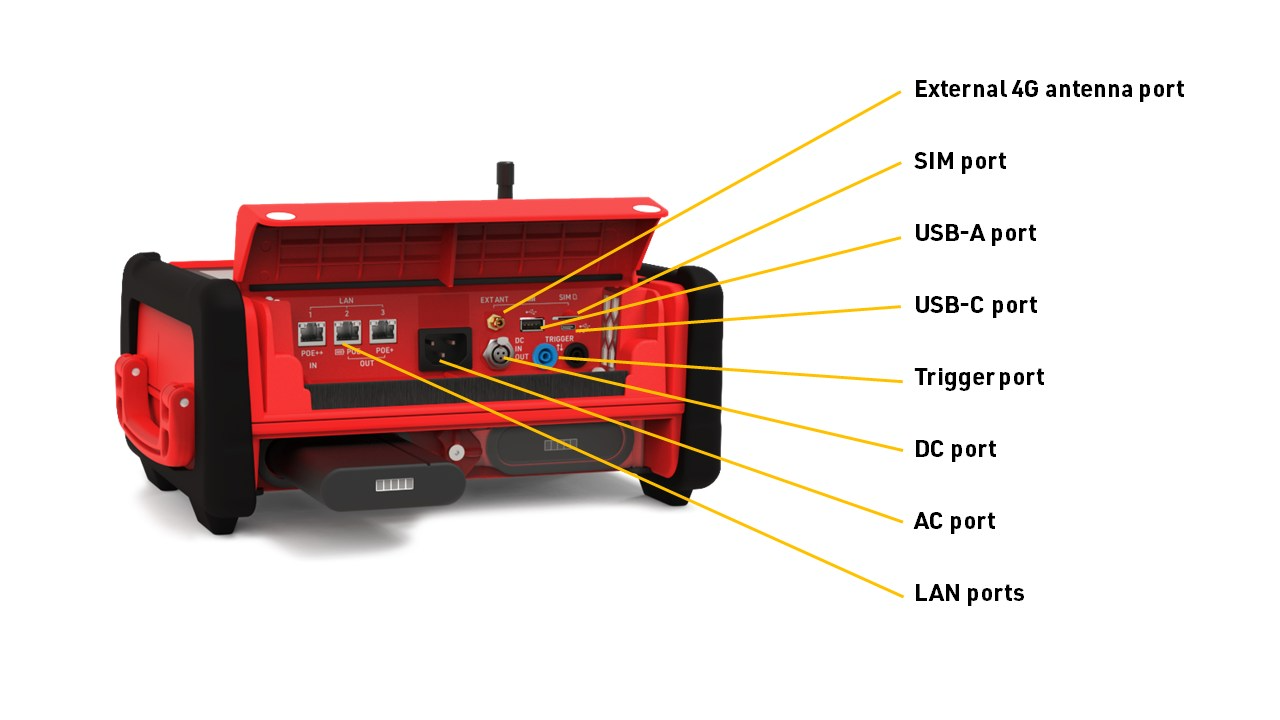
Ubidium
Ubidium is the most advanced timing system available with support for both Active and Passive timing with unbeatable battery life and connectivity. Below is an overview of the elements of Ubidium, some of these will be referenced later in the guide.
System Overview


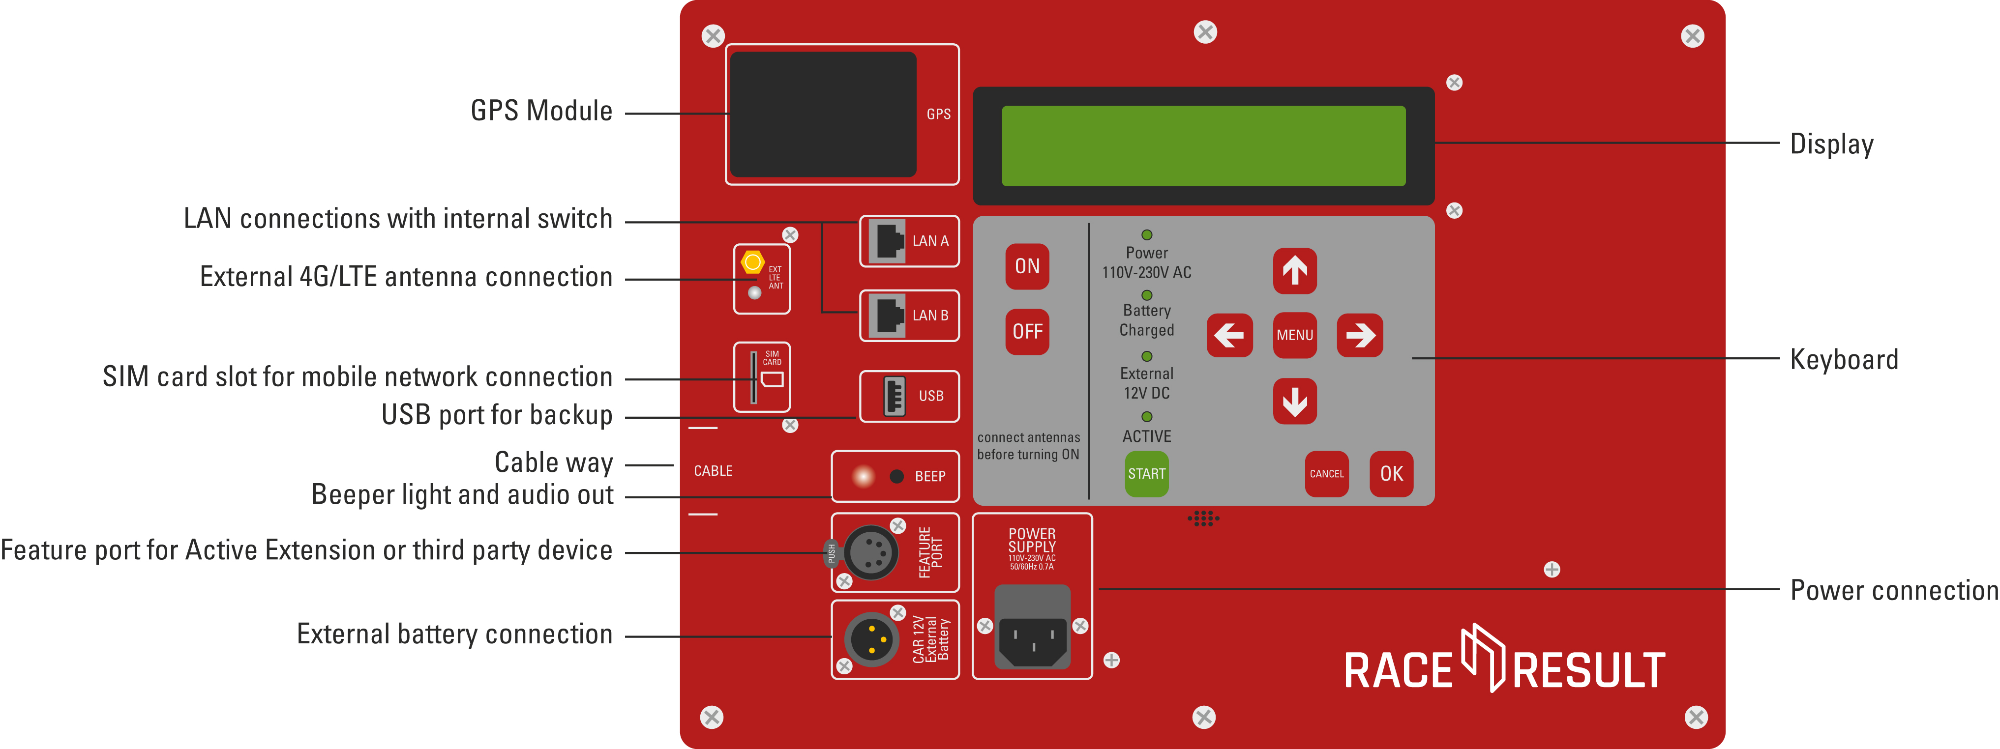
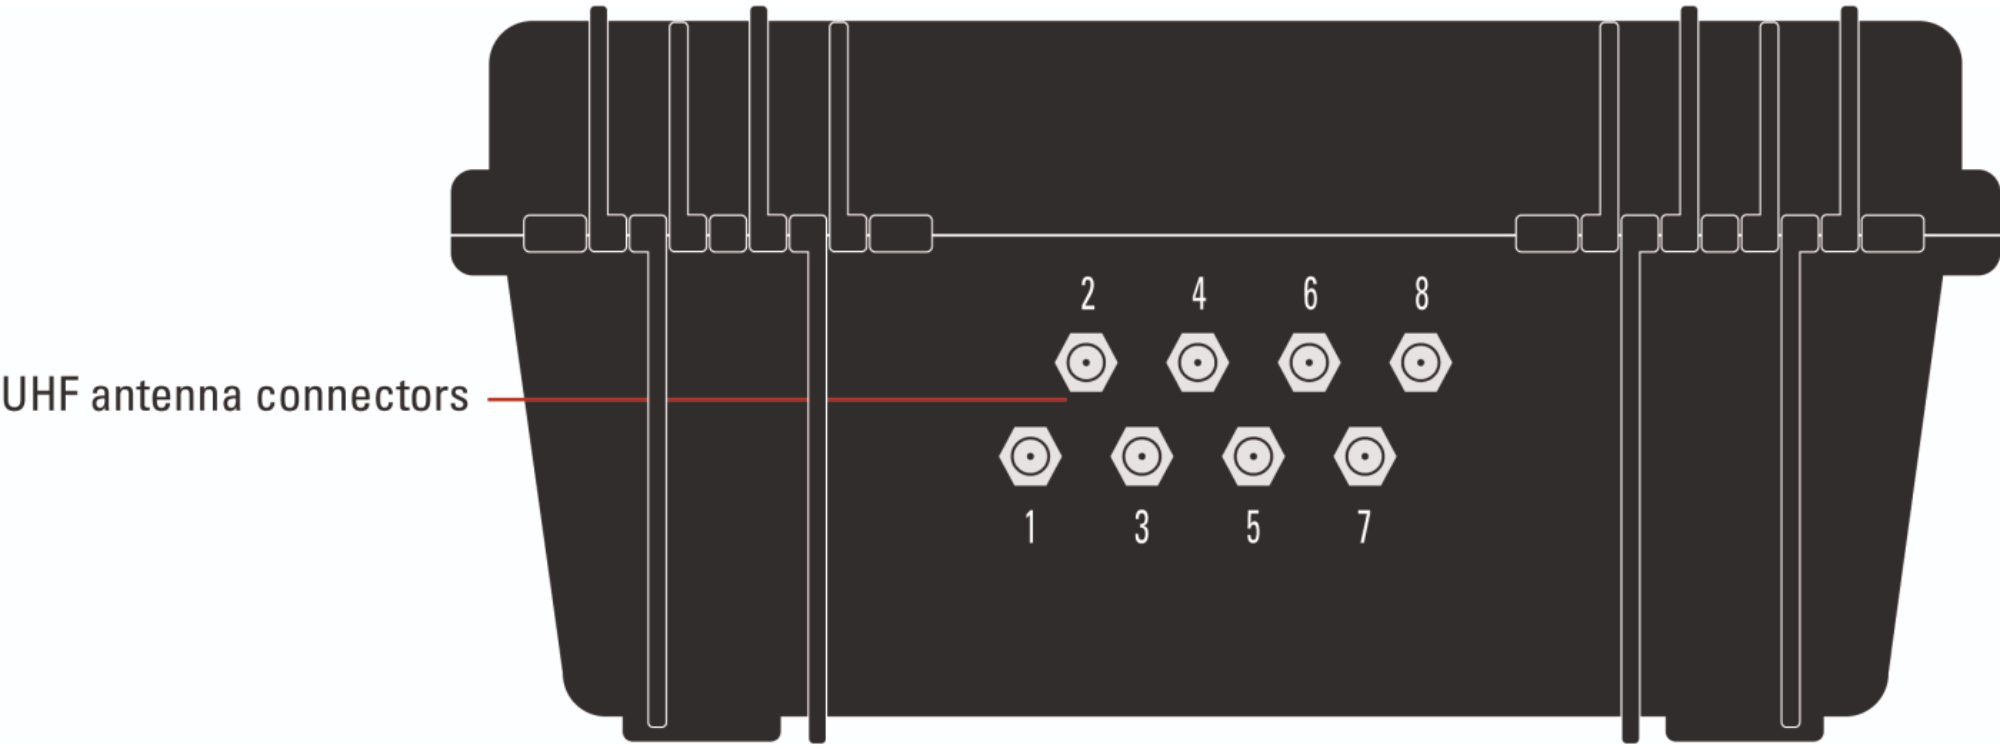
RACE RESULT Decoder
System Overview

Timing an Event
During your event, you will primarily be working in the Timing tab. This contains the tools required to connect to your timing hardware to collect the times in the software, set the start time and monitor the event as it is ongoing.
Timing System Connection
For most events you will work with the Chip Timing page during the event, here you will need to connect to your timing system(s) in order to record the times in the software. This will additionally be used to later set the Start Times.
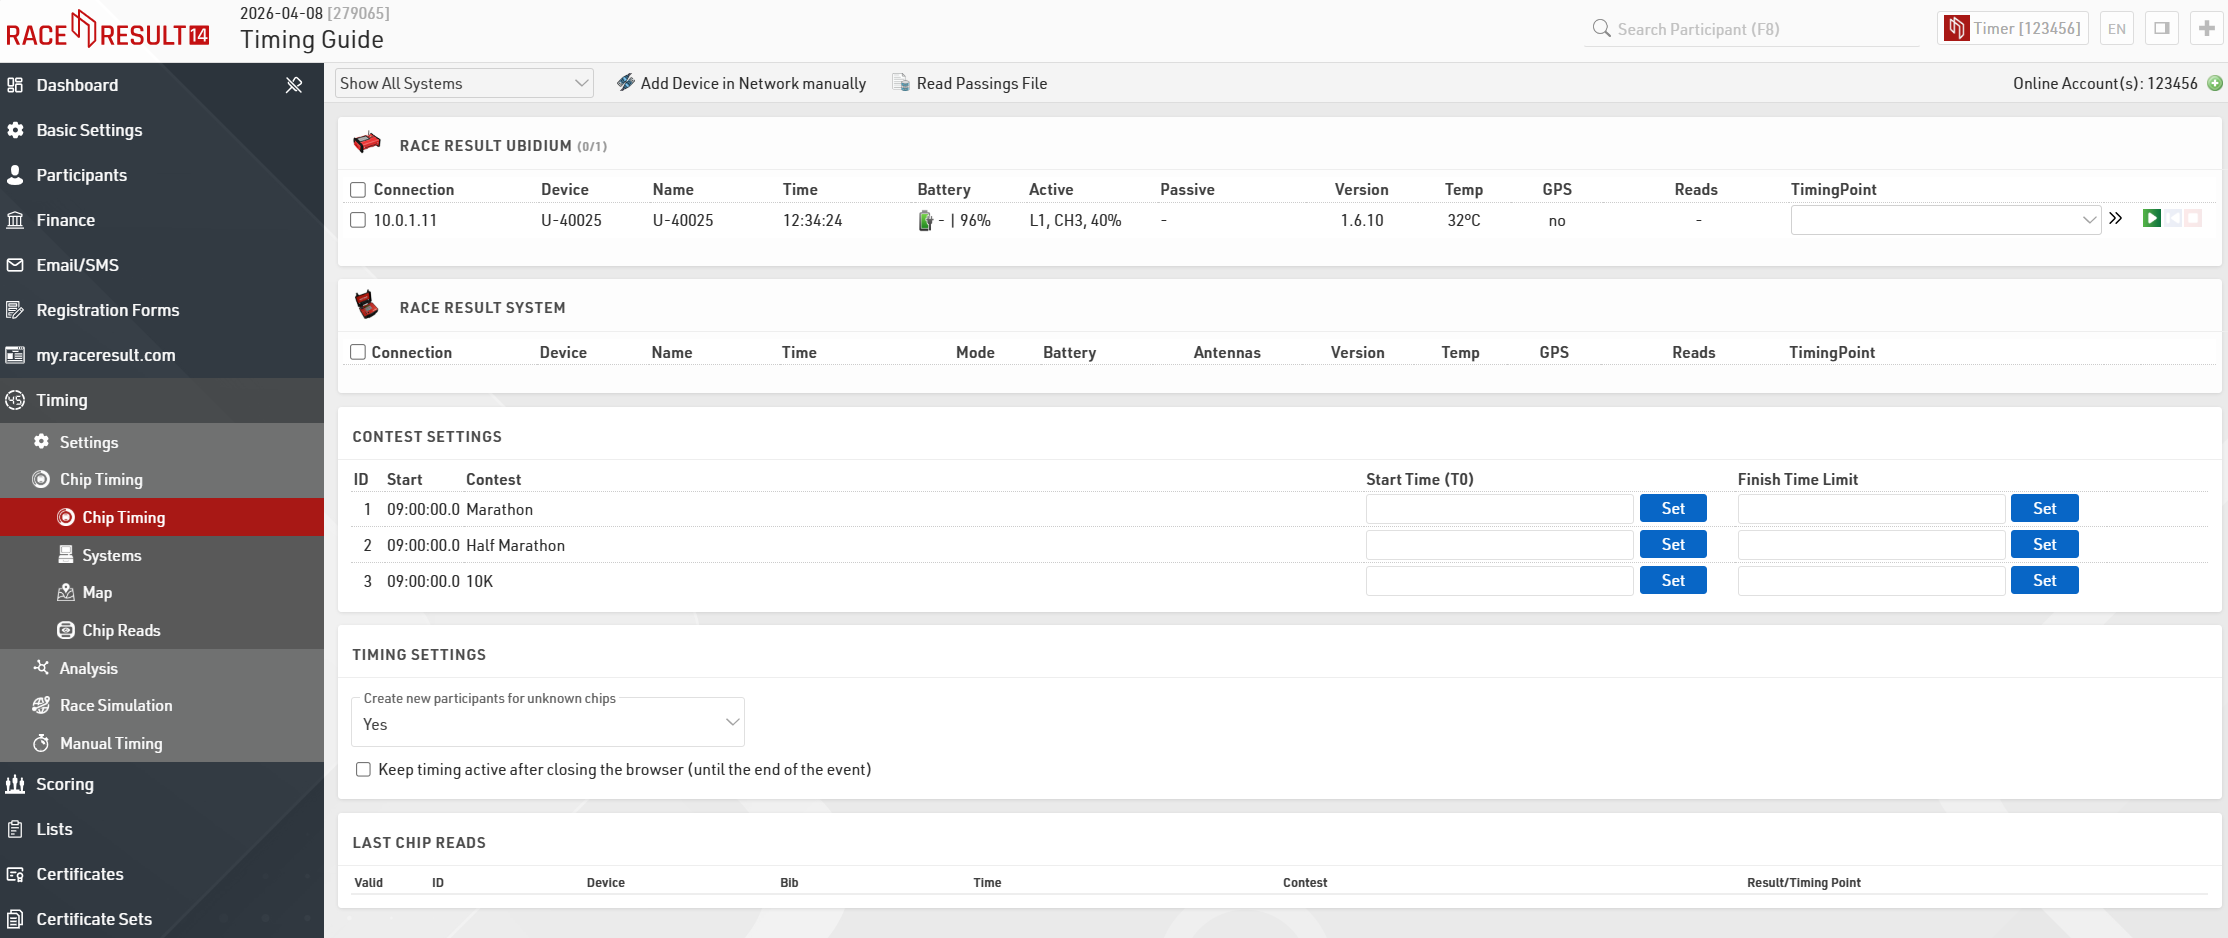
Systems that are connected online to your customer account will be listed automatically ready to connect.
If you are connecting to a system via a local connection, either LAN or Wi-Fi, then you will need to ensure that you have the RACE RESULT Web Server running on your computer and that your IP configuration is correct on both your timing system and computer.

Once you identify your system correctly you will need to assign the correct Timing Point to each system, this will assign all raw data received from that system to the corresponding Timing Point.
To now start receiving times from the system click the green play button, this opens a connection to the system and you are ready to start the race.
If you are only able to connect to the system after it has already recorded some times, or if for some reason the connection was broken, you can click the blue button to replay the current file from the system.
At the end of the event, you should click the red stop button to close the connection to the system.
Start Times
RACE RESULT 14 refers to the Start Time as T0, and this value is then used by all your Splits or Special Results settings to calculate the times.

By default in all templates, the Start Times are set individually by each Contest, however, this value can be set according to any wave definition required. If you require a more advanced wave setup then see the guide on Multiple Wave Starts, if using this then you will need to navigate to the Start Times / Finish Time Limit page within the Timing Tab to set the Start Times.

Set the Start Time for each Contest by clicking the Set button, this will use the time from your timing system to get the most accurate possible Start Time.
Alternatively, you can also manually type the time in the input box, this may be necessary if you have multiple Contests starting simultaneously and you need to ensure they all have the same Start Time. Start times should always be entered as a time of day, the times will be saved automatically when exiting the text box.
Once the Start Time has been set then a timer will be displayed on the right-hand side showing the current race time.
You do not need to take any additional steps to stop the race unless you have a time limit after which no more times should be counted. In this case, you can set the Finish Time Limit in the same way as the Start Time, this should also be entered as a time of day.
Monitoring
During the event, you should continue to monitor the timing system and your results to ensure everything is being recorded and calculated as you expect.
Timing System
It is always advisable to monitor the timing system during the event, the Chip Timing screen gives you a good overview of your system at all times.
You should ensure that the system remains connected and that times are still being sent to the software, and monitor the battery life of your system - especially during long events. Additionally, ensure that the system is not reporting any errors - for example, if a loop cable has been pulled out or a passive antenna disconnected.
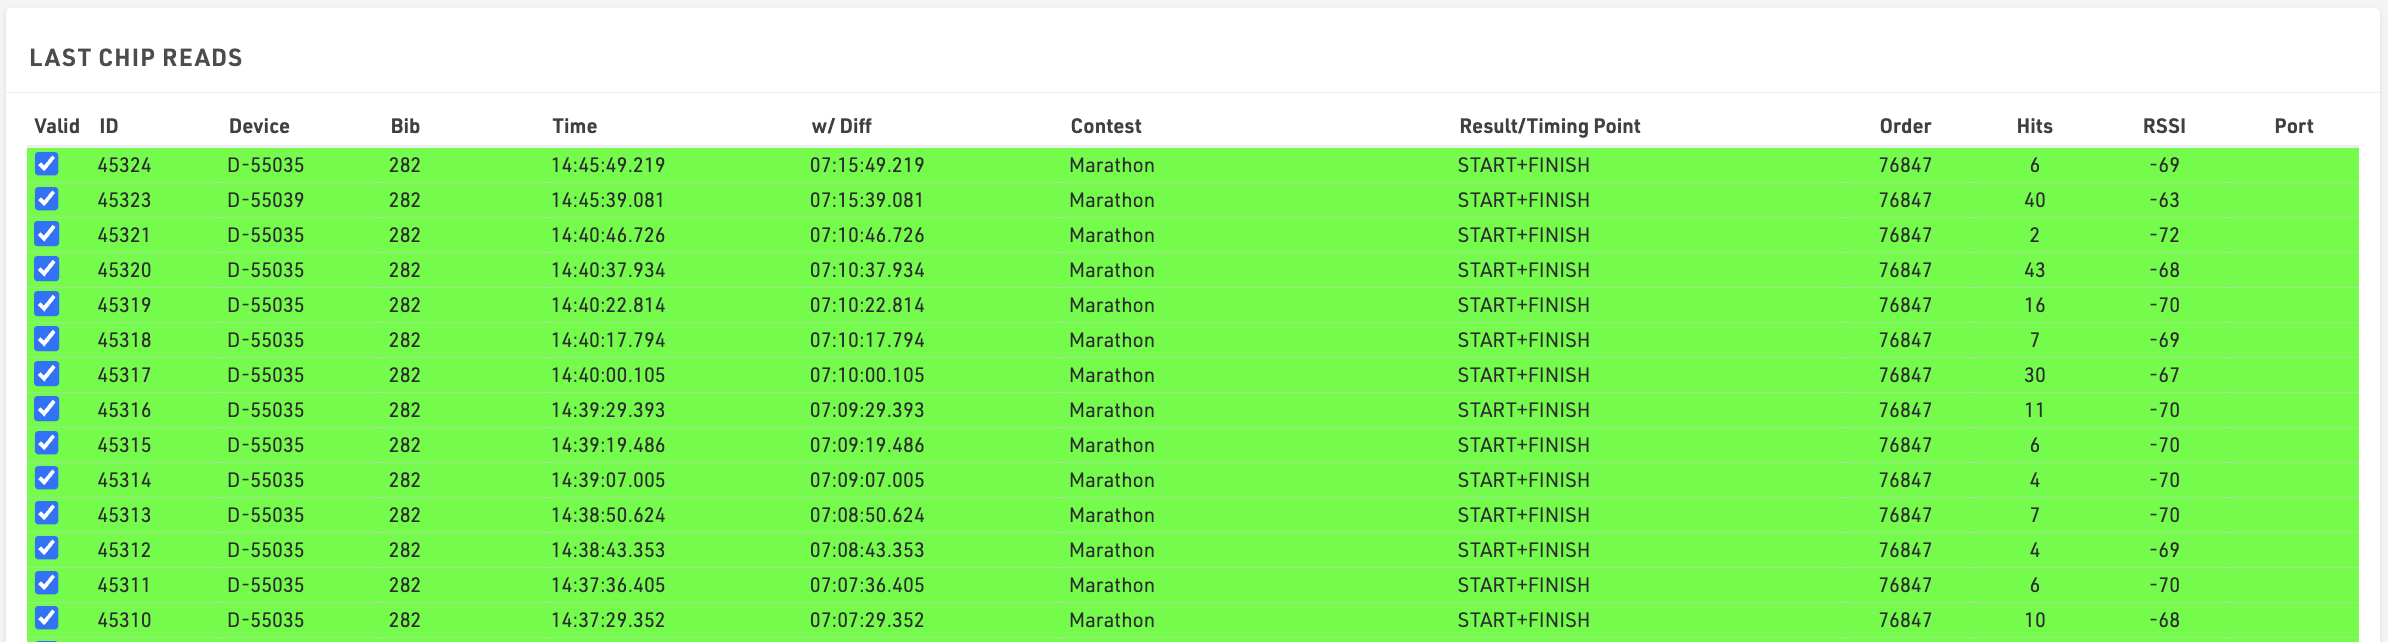
At the bottom of the Chip Timing screen, you can also see an overview of the Last Chip Reads, here you can see the latest data that has been received from your timing system.
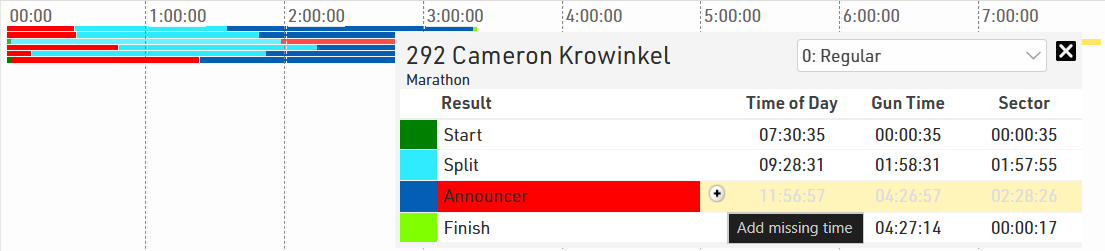
Time Visualisation
Time Visualisation is a useful tool for quickly checking that your times are all handled correctly and identifying any missing passings.
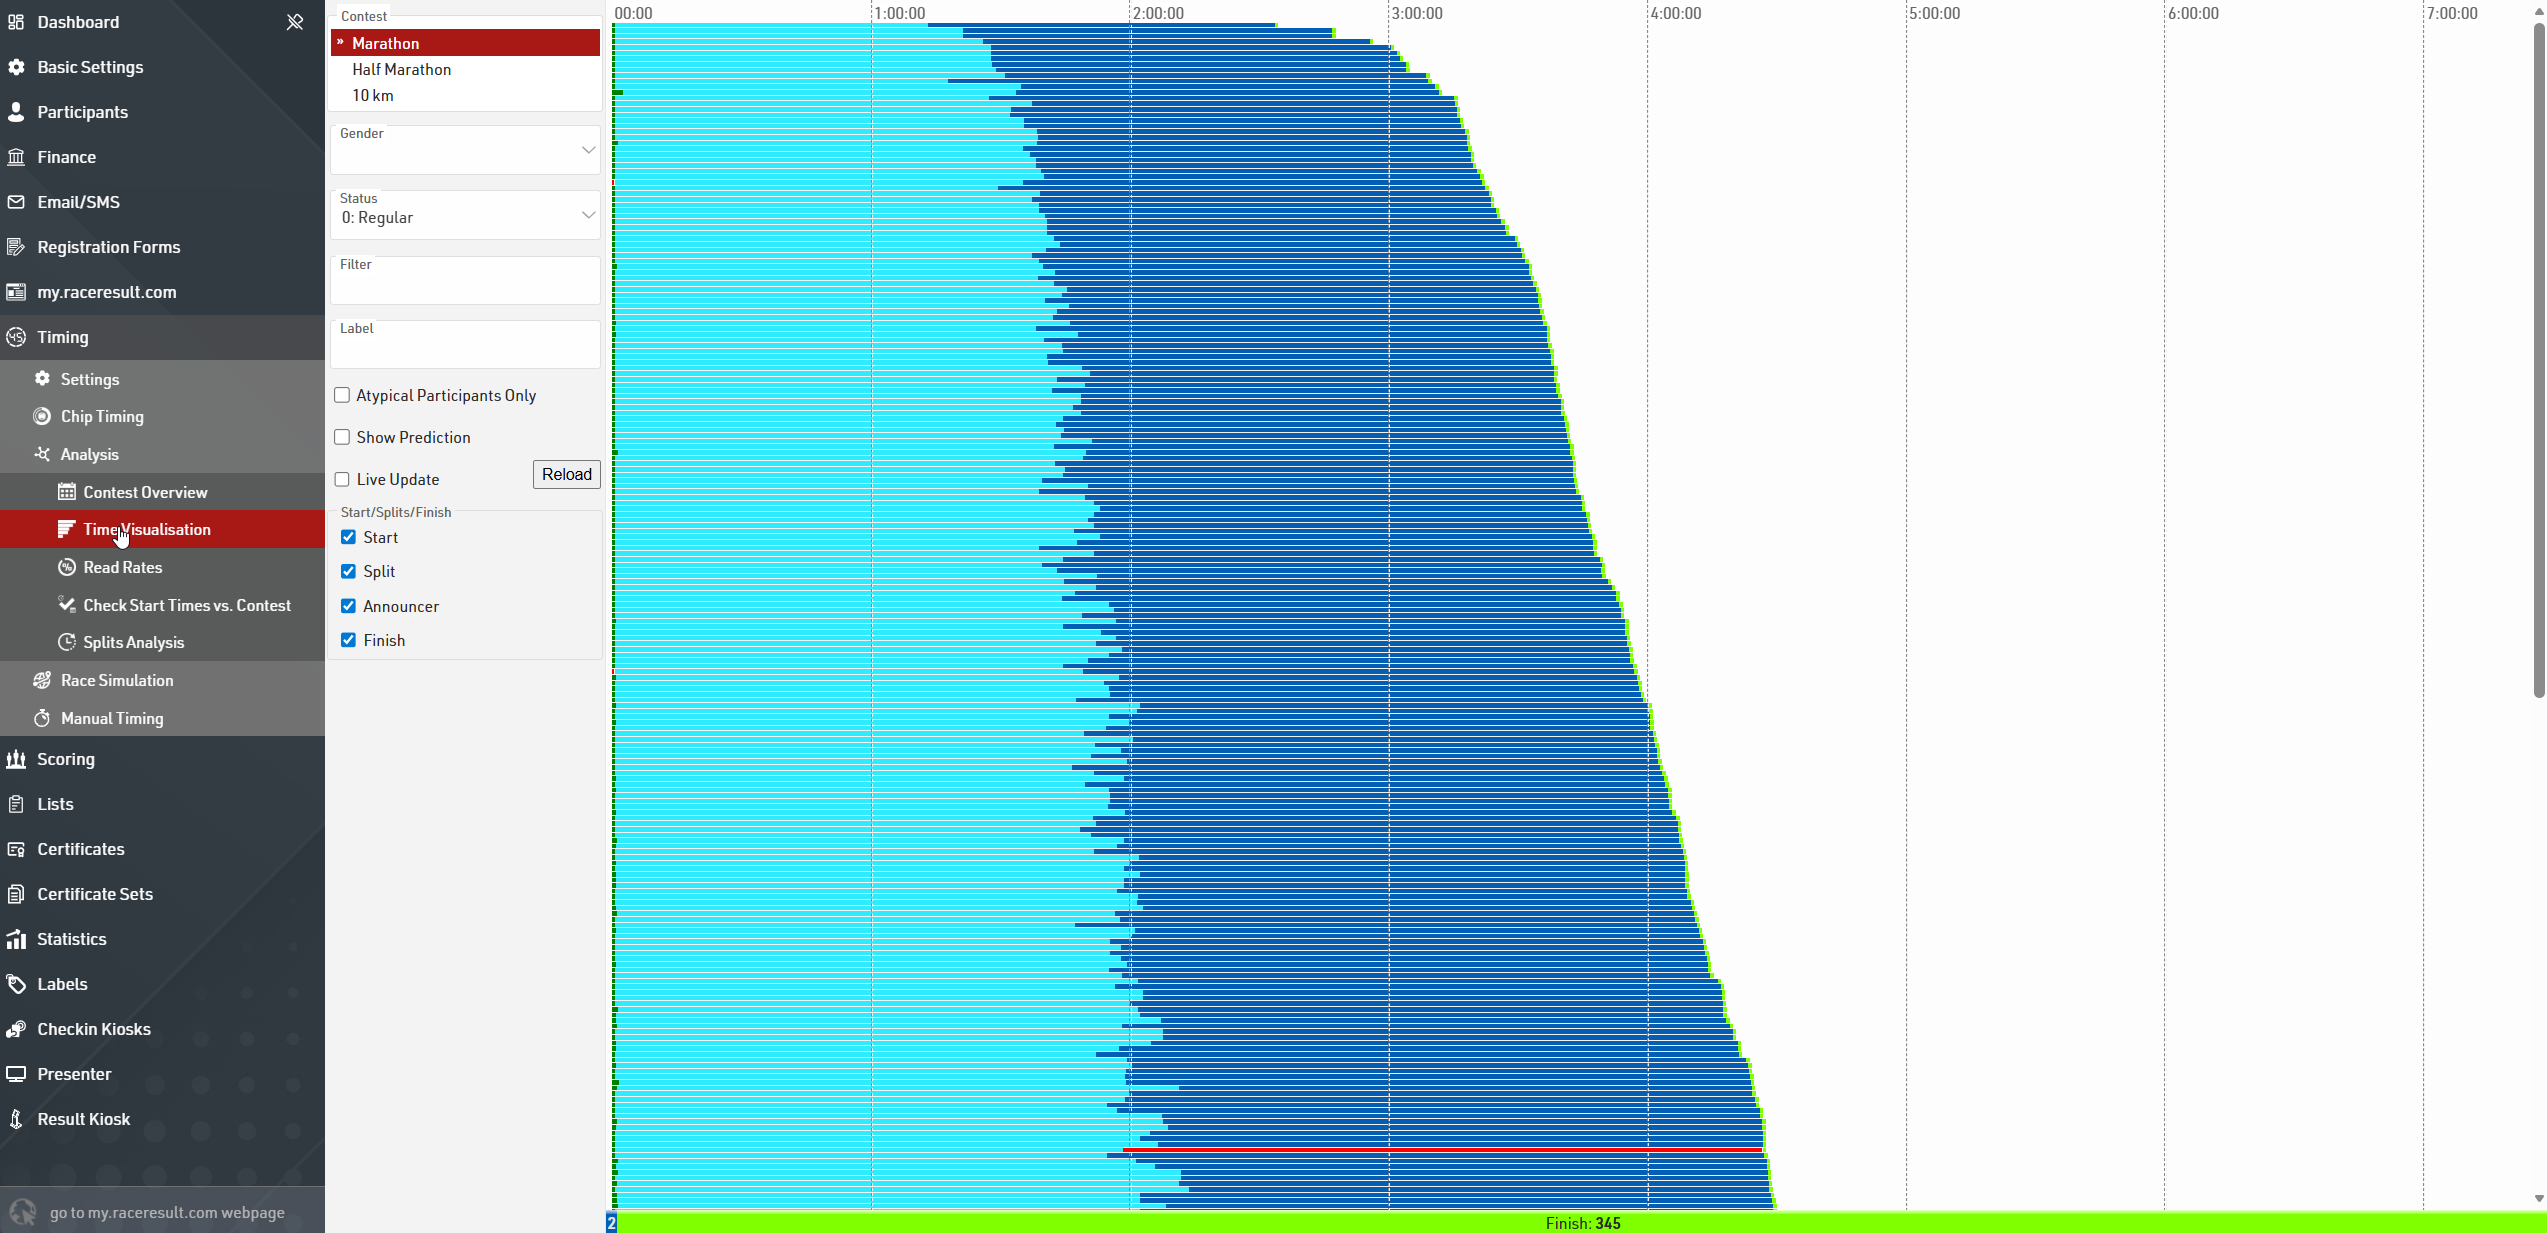
The graph shows a bar for each participant with at least one time in the selected Splits or Special Results. A red bar indicates that a time is missing and should be checked.

Clicking the bar will open a popup with the information for that participant including their times at each of the Splits or Results and the possibility to change their Status.
You can quickly view all participants with missing times by ticking the box for Atypical Participants Only.
Results
The simplest way to additionally check everything is correct is to check your results Output Lists. The best time to do this is immediately after the first participant has finished.
If they do not have a finish time then you may need to check why!
- Do they have a time recorded at the finish? Check the Timing Raw Data tab in the participant record.
- Does their time fit the minimum and maximum rules for your finish Split?
- Is the Start Time set correctly?
- Is their Status equal to 0 (Regular)?
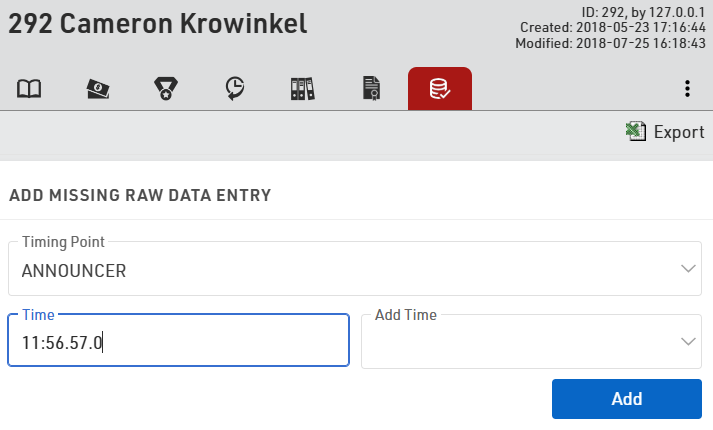
Adding Missing Times
When viewing a participant with a missing time on the Time Visualisation, the missing time will be highlighted in red. You can quickly add predicted times by clicking the plus button and hitting enter after confirming the missing time.
Additionally, times can be added manually in the Timing Raw Data tab of the Participant view. To do this, select the correct timing point and then enter the correct time to add to the participants raw data with "(Manual)" listed as the device.