Event: This is a fictional Sprint Triathlon which will be run as a virtual race. A full set of participants are already registered in the event file in a single contest for testing.
Task: Since this event has been changed at the last minute to a virtual race you will need to setup everything needed to enter participant's times and score them accordingly. Times should be captured through the my.raceresult.com online self service, you will need to setup the necessary form fields for the online self-service.
You should capture individual swim, bike and run times with minimum times of 9 minutes, 25 minutes and 15 minutes respectively.
You will also need to calculate the total time and produce Ranks for Overall, Gender and Age Group, further ranks should also be setup for each leg by Gender.
Notes: It will be easier to complete this challenge with the file online to test the changelink. To do so you should check in the file through the RACE RESULT web server, all participants have been activated in this file so you will not be charged any credits for uploading this to your account.
Think about the presentation of the online self service, there are some icons included in the event file which you may use.
This task is not asking you to create the e-mail to send out the changelink.
Our Solution
This solution is an expanded version of the How to time a virtual race guide which covers the basic requirements for enabling this.
Recording / Calculating Times
Each leg time will be stored in an ATF field, thus we need three ATF fields here which we named VirtualSwim, VIrtualBike and VirtualRun.

We then created 4 results; one for each leg (SwimTime, BikeTime and RunTime) which converted the corresponding ATF to a time, for this we use the function TimeFromString(), and an additional result (TotalTime) to sum these times together for which we used a simple TSum().

For our later ranks and output we wanted to use the standard Finish Result to determine who had actually finished, since the TSum in our TotalTime always returns a result even if it is 0, this still triggered participants as finished. We therefore needed a way to determine who actually had a time.
To do this we created an additional result using an if() statment using the expression below.
If(T1>0;1)
This looks at whether the time in Result 1 (TotalTime) is greater than 0, if it is then returns a 1 but does not use any "else" paramter, thus if T1 is equal to 0 then it returns nothing. We then set this result as our Contest Finish Result.

Ranking Setup
The setup for ranks is fairly simple, since we already set the Finish Result we can use the default Overall, Gender and AgeGroup ranks.

For our leg ranks we used the Result Dot Logic fields for both the filter and sorting of each, grouping uses the standard Contest and then Gender grouping to ensure that only those of the same Contest and Gender are ranked against each other.
For example our SwimRank is filtered by SwimTime.Positive and then sorted by SwimTime.Decimal
Online Self-Service
This solution focuses on how to make your online self-service stand out a little more than a standard registration form, the same techniques can be applied to the standard online registration too. You can preview our Online Self Service form by clicking here.
To take this further you could use some HTML lines and custom CSS to style the form in an unlimited number of ways.
Once the online-self service was enabled we first changed the Rules of Participation, since this is a virtual event we asked participants to confirm that the times recorded were accurate so as not to misrepresent themselves in results.
The form fields setup is comprised of 2 main sections, the first provides an overview of the participant's details (Name, Gender & Year Of Birth), the second creates an entry field for each time we need to record.

For each set of data we were capturing or displaying we enclosed the fields in the PICBOX (PICBOXSTART and PICBOXEND), this creates a box around the data which makes the form flow better, each PICBOX is preceded by a Separator/Text Wide to ensure they're nicely spaced.

We created 4 boxes, one for the participant's details, and one for each leg time we were capturing. Each PICBOX then used Separator/Text Wide to create a header for the box. To make these box headers stand out, we set the background color and font color and bold font using the more details for this field.

Since we did not allow participants to change data at this time, the participant details fields were set to Non-Editable in the mandtory setting, so they are displayed but cannot be edited.
Within each Leg PICBOX we used the icons which were saved in the file using the <Picture> field, entering the image name then loads the corresponding image. Pictures entered in this way always align to the left, and fields entered are then aligned to the right of this until the end of the PICBOX.

When capturing each ATF we wanted to ensure 2 things, the data was entered in the correct uniform format and that times were at least somewhat realistic, to achieve this we applied additional settings for each field.
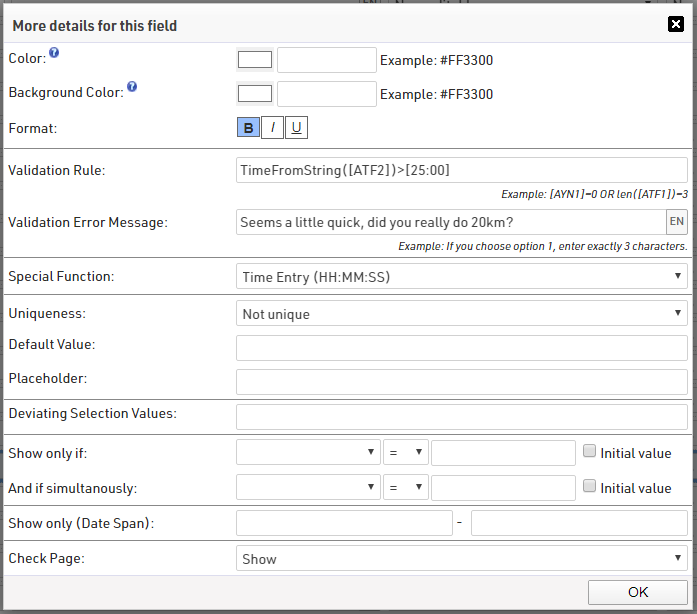
Firstly we used the Special Function - Time Entry (HH:MM:SS), this converts the entry box to a series of 3 drop downs for hh:mm:ss and the times are recorded in that format.
Secondly we applied a validation rule to each, this validation rule again used the TimeFromString() function to compare the ATF to a time value. To make the time value easy to read and enter we enclosed the time in square brackets which then uses the colon to convert the time correctly. For example the minimum bike time was stated at 25 minutes using the below expression.
TimeFromString([VirtualBike])>[25:00]
Once set we can apply our own custom validation error messages.