Start
Evénements
Le menu Evénements de RACE RESULT 14 est principalement utilisé pour créer de nouveaux fichiers d'événements et pour ouvrir ou effacer des fichiers existants, lorsque vous travaillez hors ligne, toutes les options du menu ne seront pas accessibles.
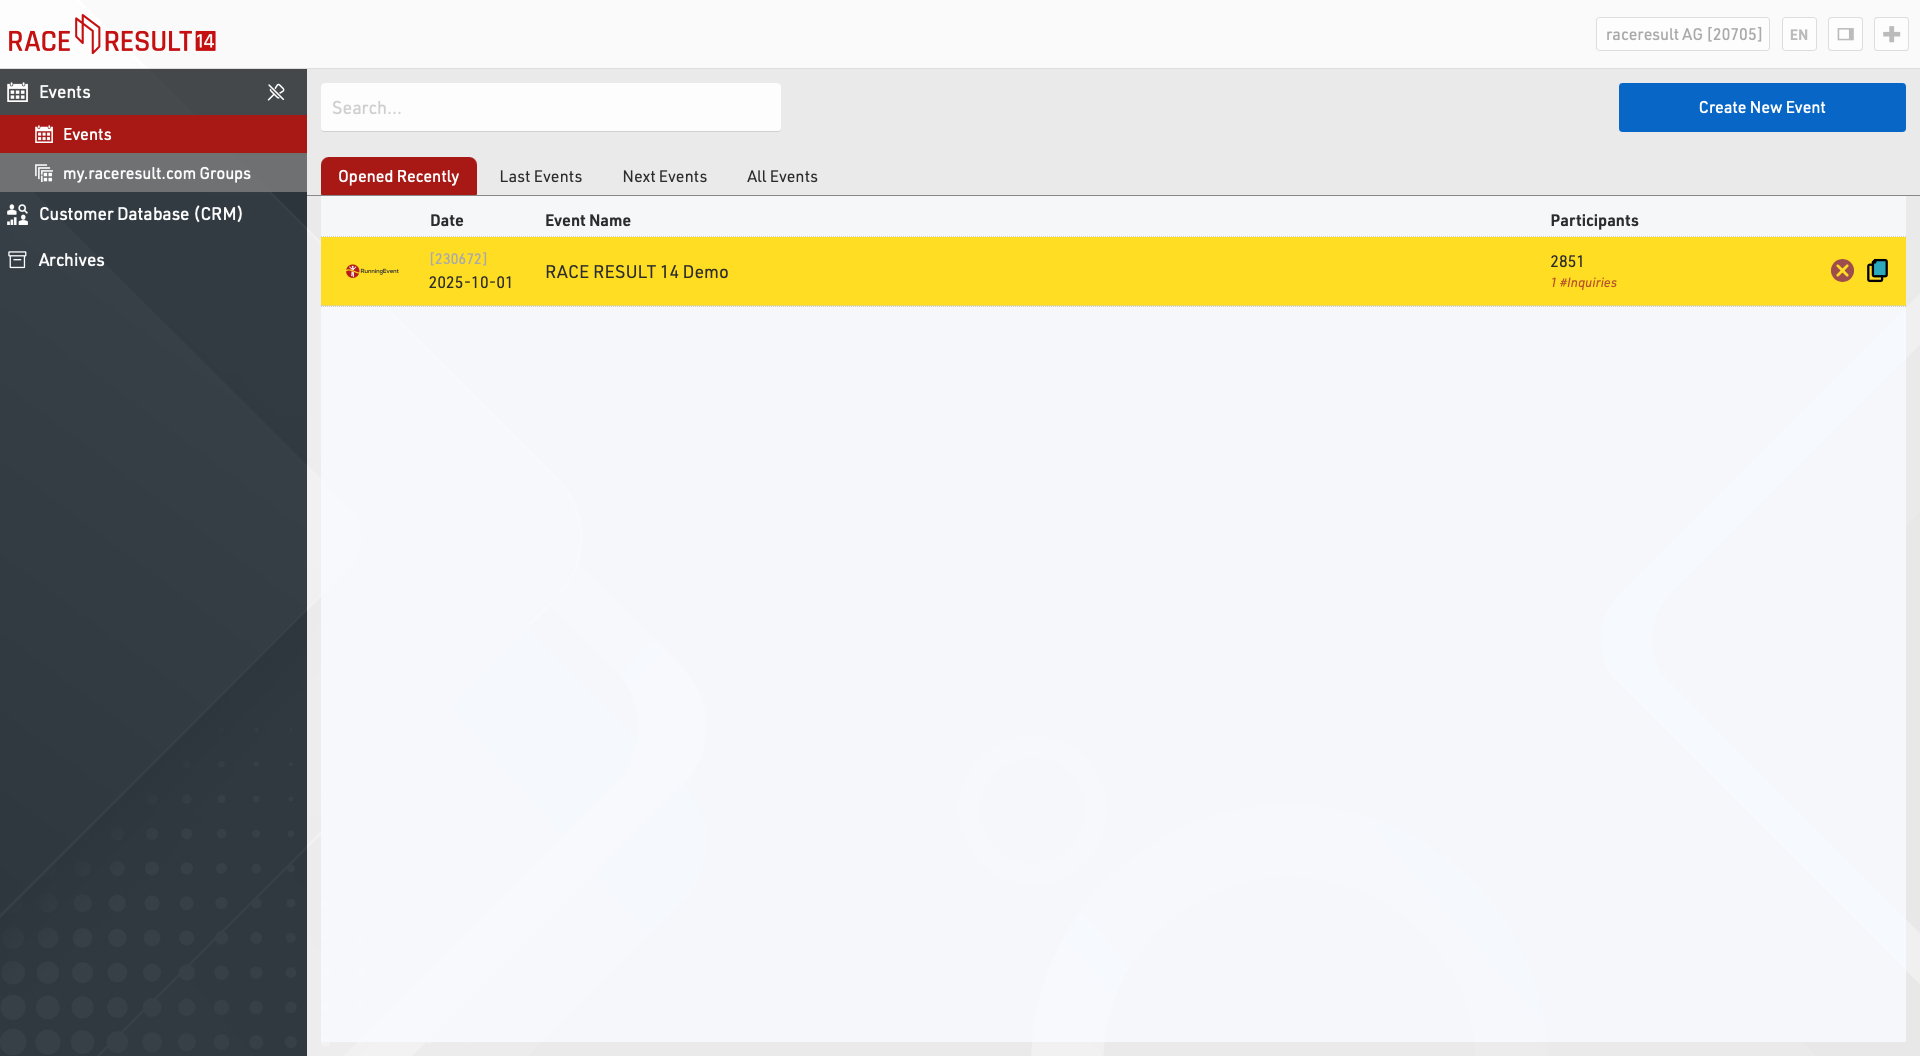
Pour créer un nouvel événement, il suffit de cliquer sur le bouton Créer un nouvel événement, de saisir le nom et la date de l'événement, de sélectionner un modèle et de cliquer sur Créer (Cette fonction n'est disponible que lorsque vous travaillez en ligne. Hors ligne, de nouveaux fichiers d'événements peuvent être créés dans le serveur web RACE RESULT).
Cliquez sur un événement existant pour l'ouvrir ou entrez le nom de l'événement dans la boîte de recherche en haut de l'écran et appuyez sur Entrée.
Pour supprimer un événement, cliquez sur l'icône de suppression à droite (disponible uniquement lorsque vous travaillez en ligne). Lors de la suppression d'un événement, il vous sera demandé votre mot de passe de connexion (qui appartient à votre numéro de client).
Recherche de participants
La fonction de recherche de participants vous permet de rechercher des participants dans tous vos fichiers d'événements.
Groupes d'événements
Les groupes d'événements sont utilisés pour trier vos événements sur my.raceresult.com dans les différentes catégories affichées. Vous pouvez trouver plus d'informations dans l'article Groupes.
Analyse des clients
La base de données clients (CRM) vous donne des informations précieuses sur l'identité de vos participants (clients), sur le lieu et la fréquence de leurs courses et sur leur provenance.
Groupes
La section Groupes d'événements est située sur la page principale de RACE RESULT 14 online où vous pouvez créer de nouveaux groupes et gérer vos groupes existants.
Ces groupes sont utilisés pour trier vos événements sur my.raceresult.com dans les différentes catégories affichées.
Organisateurs de courses - Clubs - Séries - Chronométreurs - Sujets
Veuillez noter qu'un événement peut être ajouté à plusieurs groupes et que vous pouvez également créer des groupes internes qui ne sont pas visibles sur my.raceresult.com.
Création de nouveaux groupes
Si vous créez un nouveau groupe, donnez-lui un nom significatif et facile à comprendre.
Groupes publics
Vous pouvez ajouter vos événements à des groupes publics et rendre votre groupe accessible aux autres utilisateurs de RR14. Veuillez utiliser cette fonction de manière responsable. Plus les événements sont bien classés, plus il est facile pour les utilisateurs de trouver vos événements sur la plateforme :
- N'ajoutez des événements à un groupe que si cela permet d'améliorer l'expérience de l'utilisateur final (participant / spectateur).
- Avant de créer un groupe public, vérifiez si un tel groupe existe déjà.
- Si vous pensez avoir besoin d'accéder à un groupe existant (club, série d'événements, thème), essayez de contacter le responsable de ce groupe.
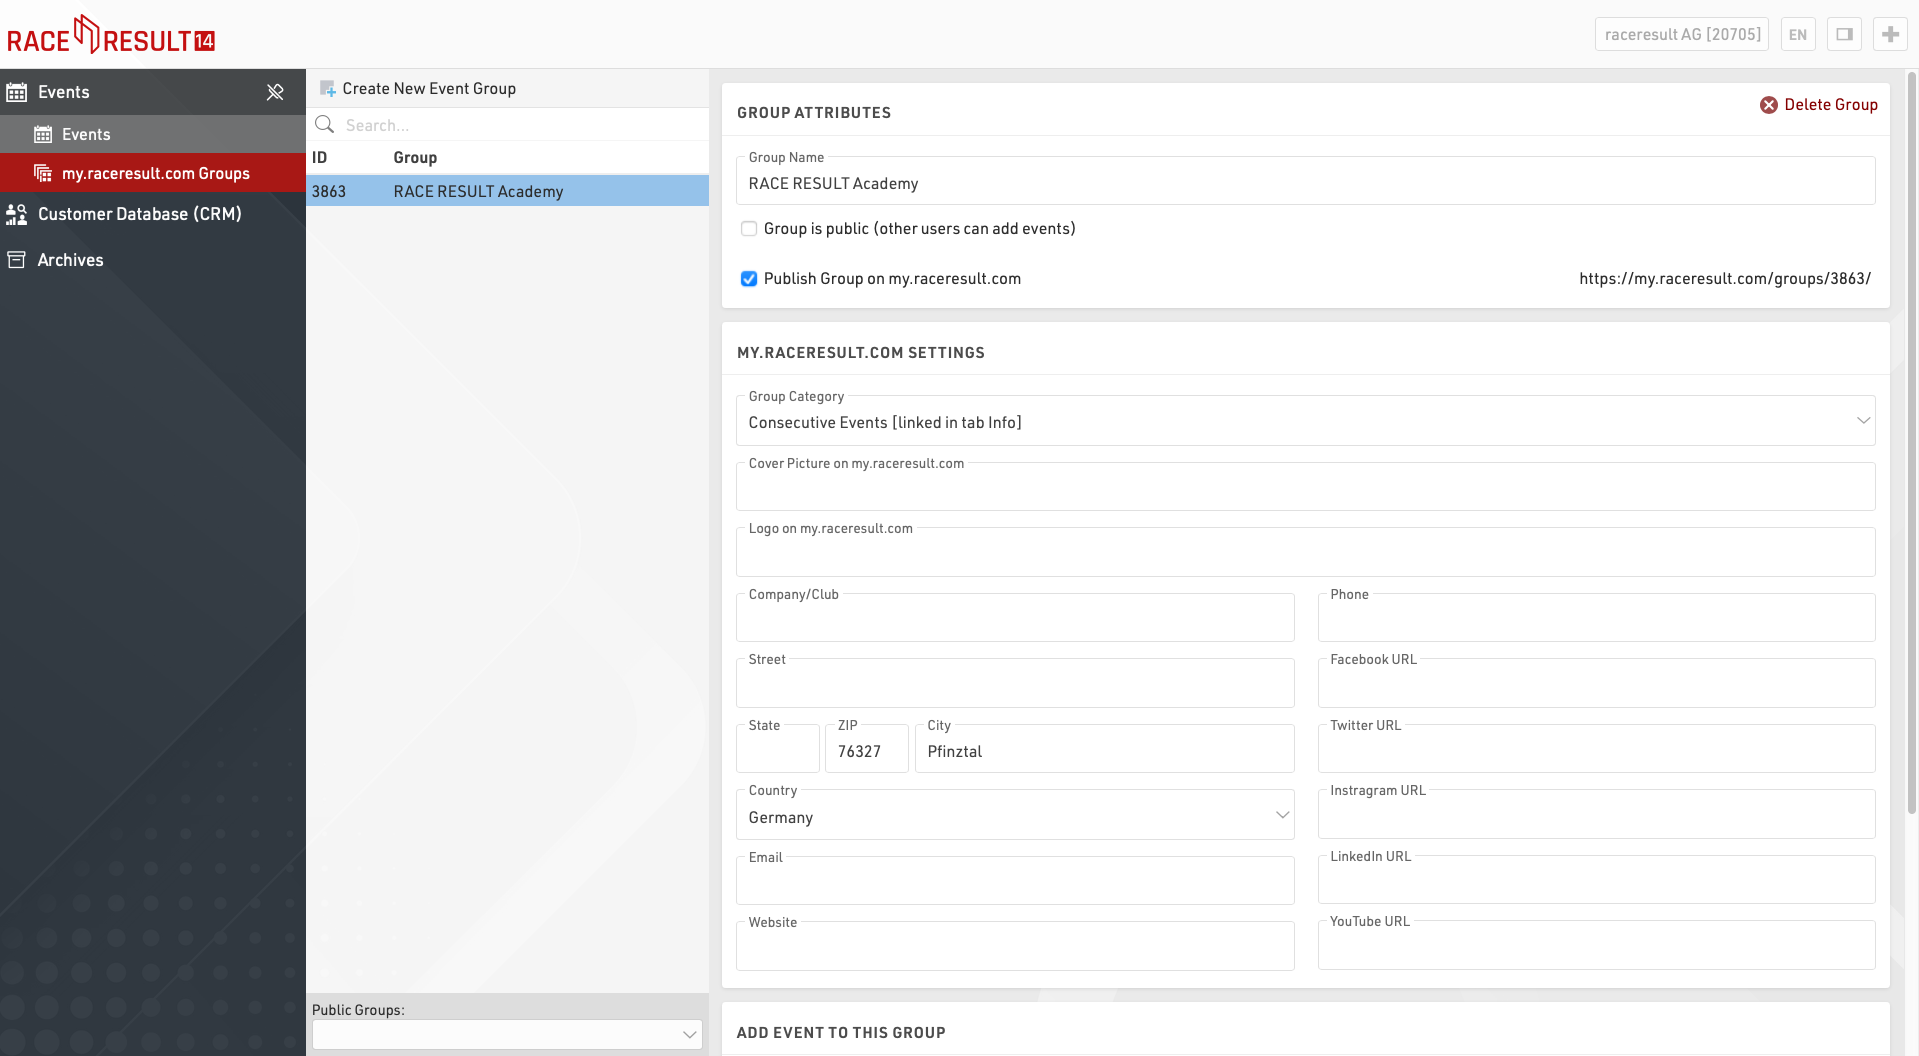
Publier le groupe sur my.raceresult.com
Si vous souhaitez que le groupe soit listé publiquement, cochez la case publier sur my.raceresult.com et assurez-vous de l'assigner à la catégorie appropriée. De cette façon, le groupe est affiché dans l'onglet approprié sur my.raceresult.com et peut être facilement trouvé par les utilisateurs.
Catégorie de groupe
Pour la catégorie de groupe, vous avez les options suivantes :
- Série d'événements : Si vous avez plusieurs événements qui, par exemple, ont un score global, font partie d'une ligue, d'une coupe, etc.
- Clubs : Ajoutez tous les événements organisés par le même club. Un tel groupe peut être facilement intégré au site web d'un club.
- Autres sujets : Il s'agit d'une catégorie qui pourrait être utile à d'autres chronométreurs/organisateurs qui ne correspondent à aucune des autres catégories, comme les événements d'une région spécifique.
- Chronométreur : Cette catégorie vous permet, en tant que chronométreur, de lister tous vos événements publiés en une seule fois, afin de montrer à vos clients potentiels l'étendue de vos événements.
- Organisateur de course : Répertoriez tous les événements organisés par le même organisateur afin de promouvoir d'autres événements connexes.
N'oubliez pas que tous les événements publiés sont répertoriés sous "Tous les événements" sur my.raceresult.com, où les participants peuvent filtrer par sport, date, pays, etc. L'inscription d'un événement dans l'une des catégories ci-dessus est une fonction supplémentaire facultative.
En particulier pour les groupes de chronométreurs, il peut être utile de cocher la case pour inclure tous vos fichiers d'événements dans ce groupe, chaque fois que vous créez un nouvel événement, il sera ajouté automatiquement.
Photo de couverture
Le téléchargement d'une image d'en-tête rendra la page du groupe beaucoup plus attrayante. La taille optimale de ces images est de 1150 x 212 px. Les autres formats seront automatiquement redimensionnés. Si vous ne téléchargez pas d'image, un modèle par défaut sera utilisé.
Logo
Téléchargez un logo pour augmenter votre valeur de reconnaissance ! Nous suggérons de télécharger un fichier d'une résolution de 300 x 300 px. Les autres formats seront automatiquement redimensionnés.
Informations de contact
Fournissez des informations de contact pertinentes pour le groupe. Ces champs sont facultatifs mais utiles à remplir. En particulier, l'indication d'une adresse électronique permet aux participants et aux prospects d'être facilement contactés.
Algorithme de tri
En arrière-plan, my.raceresult classe tous les événements en fonction de l'activité récente des utilisateurs (nombre de clics, d'inscriptions, de consultations de listes, etc.) Plus un événement est populaire, plus il sera affiché en haut de la liste des événements récents et à venir.
Pour les groupes, l'algorithme additionne tous les scores des événements au sein de chaque groupe. Plus l'activité des utilisateurs au sein d'un groupe est importante, plus le groupe sera mis en évidence. Cela signifie également que le classement peut être mis à jour tout au long de la journée si plusieurs événements populaires sont organisés.
Pour affiner encore l'expérience des participants, le système vérifie également les paramètres locaux du navigateur et affiche d'abord les résultats provenant de ce pays. Le champ de recherche détecte les lieux connus et trie les résultats en fonction de la géolocalisation de l'adresse de l'événement/du chronométreur. Si vous tapez Berlin, les résultats de la recherche seront triés en fonction de leur distance par rapport à Berlin.
Modifier/masquer des informations sur my.raceresult.com
Les groupes peuvent être facilement édités / mis à jour, et il est conseillé de garder les bannières et les logos à jour si ceux-ci changent au fil du temps. Un groupe peut être caché de my.raceresult.com à tout moment en désactivant l'option de publication de l'événement.
Pour le lancement de la plateforme, nous avons pris la liberté de télécharger quelques logos de chronométreurs et de trier tous les groupes existants dans les nouvelles catégories. Si vous pensez qu'il y a des problèmes plus importants, veuillez contacter support@raceresult.com.
Archives
Les archives sont liées à votre compte client RACE RESULT et donnent accès à des informations historiques. Certaines de ces informations sont également disponibles directement auprès de RACE RESULT 14.
Systèmes de chronométrage
Les archives des systèmes de chronométrage répertorient tous les systèmes qui ont été connectés aux serveurs de RACE RESULT en utilisant votre numéro de client. Quelques informations de base sur le système sont également affichées.
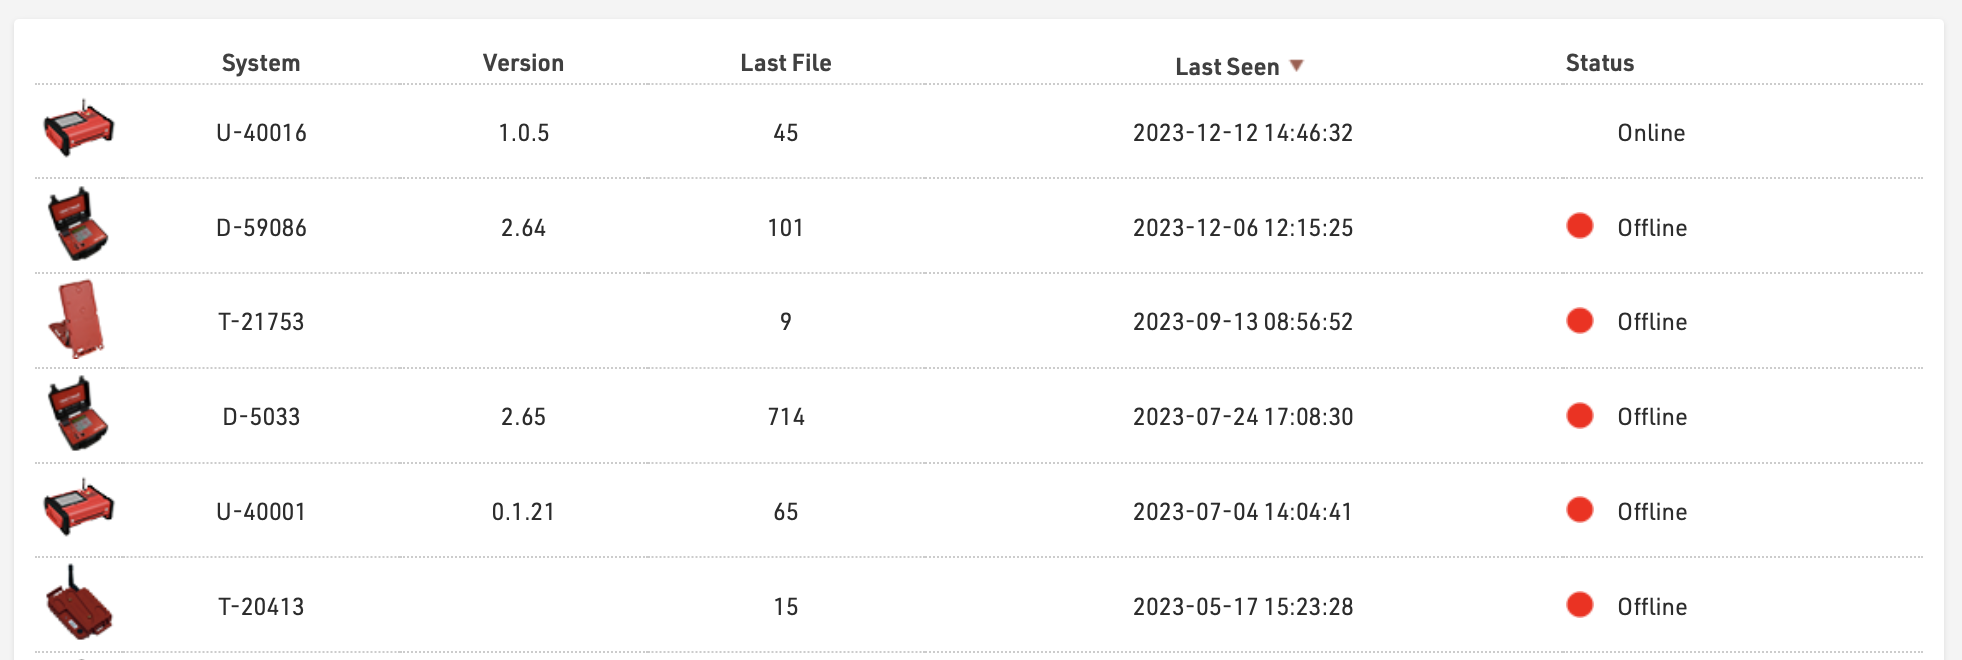
En cliquant sur un système, une fenêtre s'ouvre et répertorie tous les fichiers de passage qui ont été téléchargés pour ce système. La carte sur le côté gauche montre la position GPS du système au moment où le fichier a été créé.

En cliquant sur un fichier, vous téléchargez un fichier txt de ce fichier de passages qui peut ensuite être importé manuellement via l'onglet Chronométrage de RACE RESULT 14, si nécessaire. Cliquer sur Dernière position permet de zoomer sur la dernière position connue de l'appareil (selon les appels d'état de l'appareil).
Archives des courriels
Lors de l'envoi d'emails par le biais de RACE RESULT 14 en ligne, que ce soit par le module Email / SMS, les formulaires d'inscription ou les exportateurs de données brutes, une copie de base de l'email sera conservée dans les archives, ainsi que le statut de l'email s'il a été renvoyé par le serveur de messagerie. En cliquant sur un élément, un aperçu du contenu complet de l'e-mail s'ouvrira.

Archives des SMS
Lors de l'envoi de SMS par le biais de RACE RESULT 14 en ligne, que ce soit par le biais du module Email / SMS, des formulaires d'inscription ou des exportateurs de données brutes, une copie de base du SMS sera conservée dans les archives, avec le statut du SMS.

Vue d'ensemble
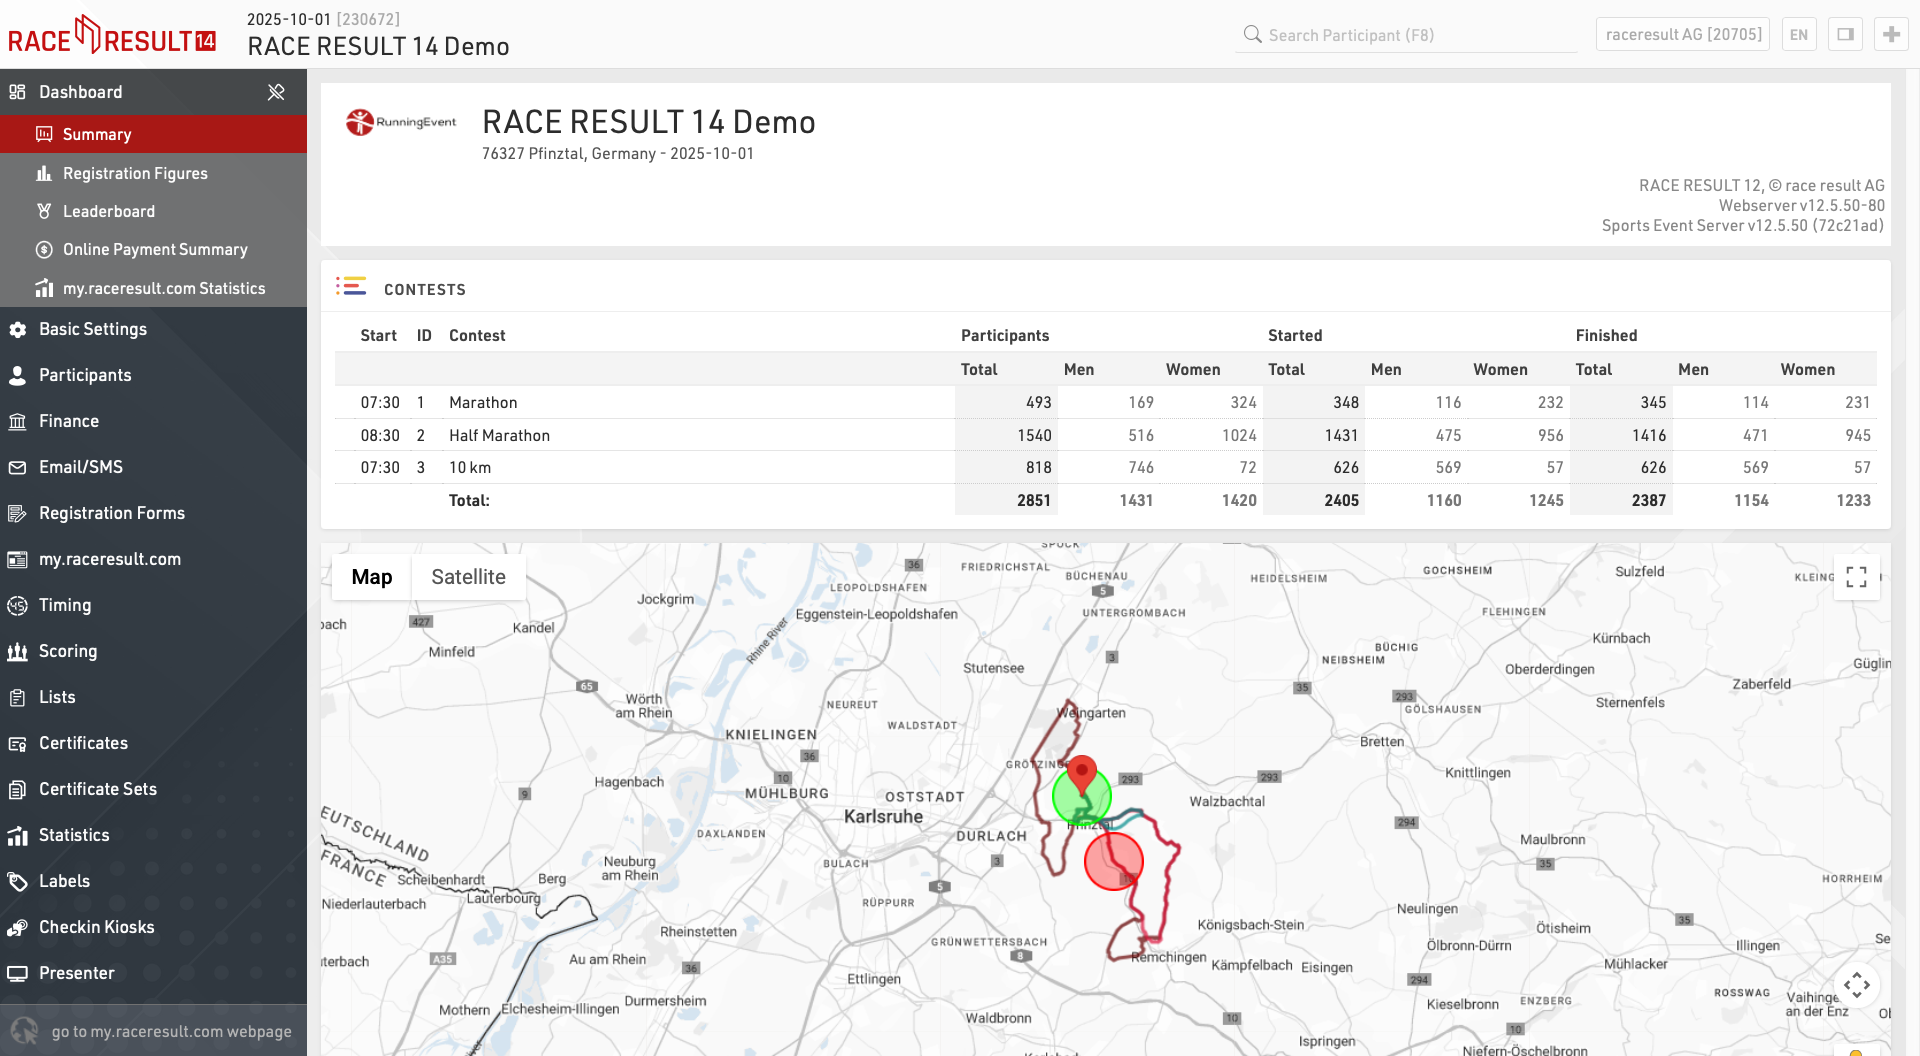
La fenêtre d'aperçu fournit une vue d'ensemble rapide de votre événement, en particulier des informations sur les chiffres d'inscription et les paiements.
Résumé
Concours
Résumé rapide du nombre total de participants à chaque concours et du nombre de participants ayant commencé/terminé. 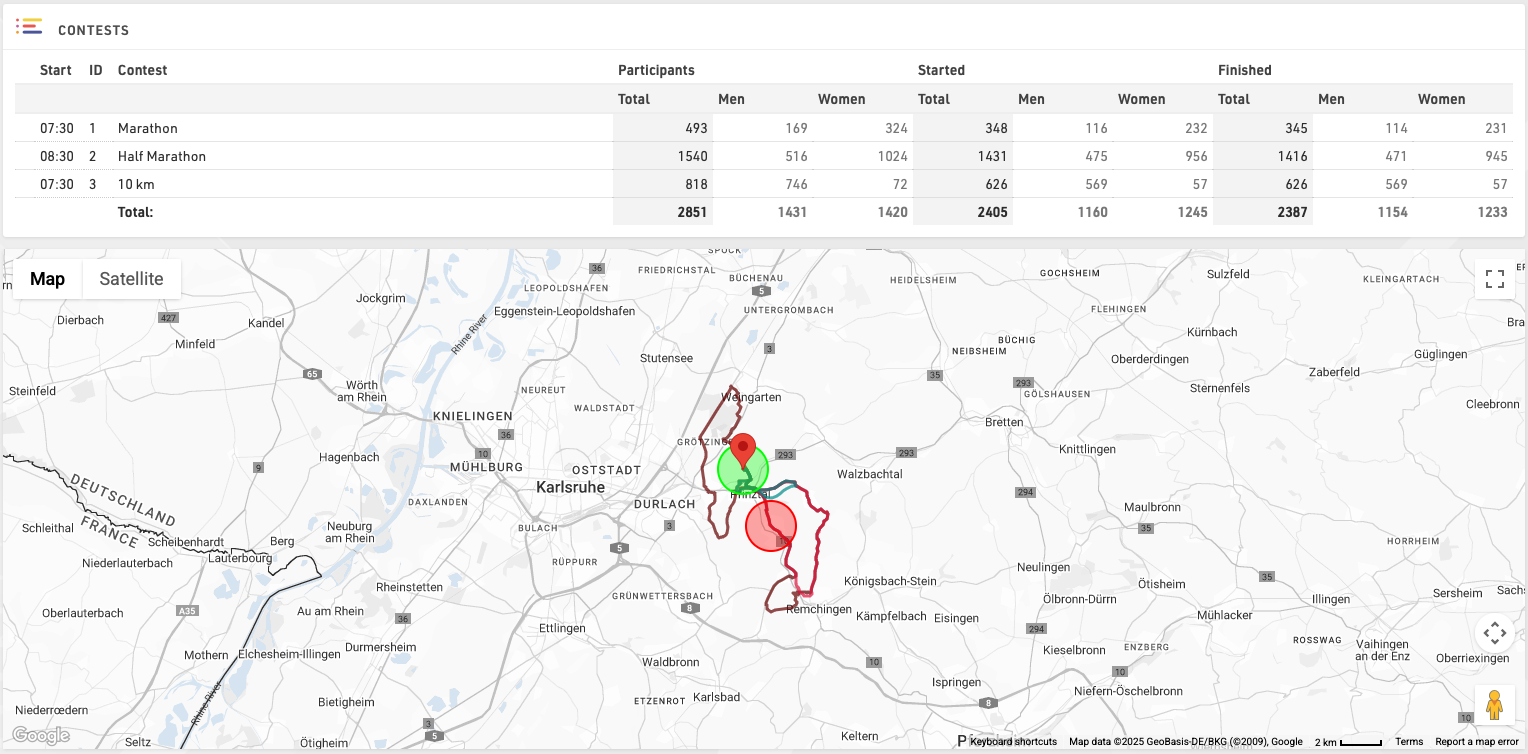
Cliquez sur « Afficher la carte » pour voir également les itinéraires GPX de chaque concours sur une carte.
Aperçu
Aperçu technique de l'événement, qui vous avertira notamment de toute référence circulaire dans votre fichier susceptible de causer des erreurs de calcul.

Vous pouvez également télécharger une copie de votre fichier événementiel.
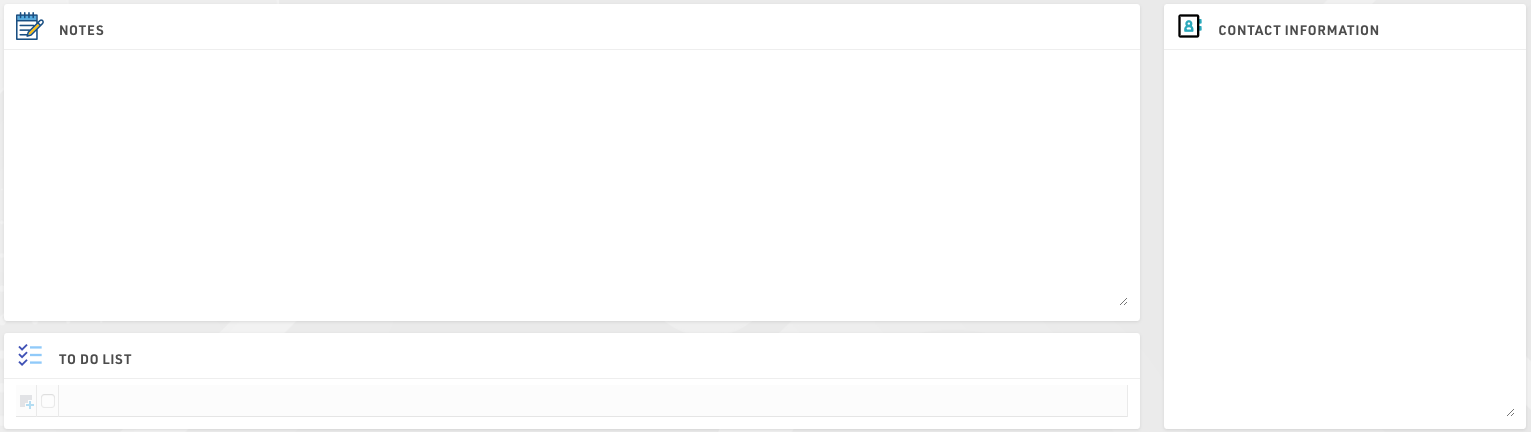
Notes / Liste des tâches / Coordonnées
Conservez toutes les informations utiles relatives à l'événement ou créez une liste des tâches à accomplir.
Registration Figures
The Registration Figures show information regarding the distribution of participants' registration before the Event Date.

The window consist of 2 sections: the Registration Chart, showing a graph with Cumulative, Day, Week and Month views, and the Registration Figures showing how many participants registered for each contest on which day, expressed as D-X where D is the event date and x is the number of days before this date.
It is also possible to Compare the registration figures with another event which is owned by the same account, useful to compare year-on-year registrations for the same event for example.
tableau des leaders
Le classement affiche les gagnants ou les leaders actuels de l'événement. Grâce aux paramètres situés en bas de l'écran, vous pouvez sélectionner un classement et un nombre x afin que les x premiers participants de chaque groupe du classement soient affichés.
Si vous souhaitez afficher différentes colonnes (ou utiliser un format différent), vous pouvez également sélectionner une liste à partir de laquelle les paramètres des colonnes seront repris.
Cochez la case Mise à jour automatique pour actualiser automatiquement la page toutes les 30 secondes.
section Paiement en ligne
Le récapitulatif affiche toutes les transactions reçues via le paiement en ligne et un récapitulatif des paiements mensuels.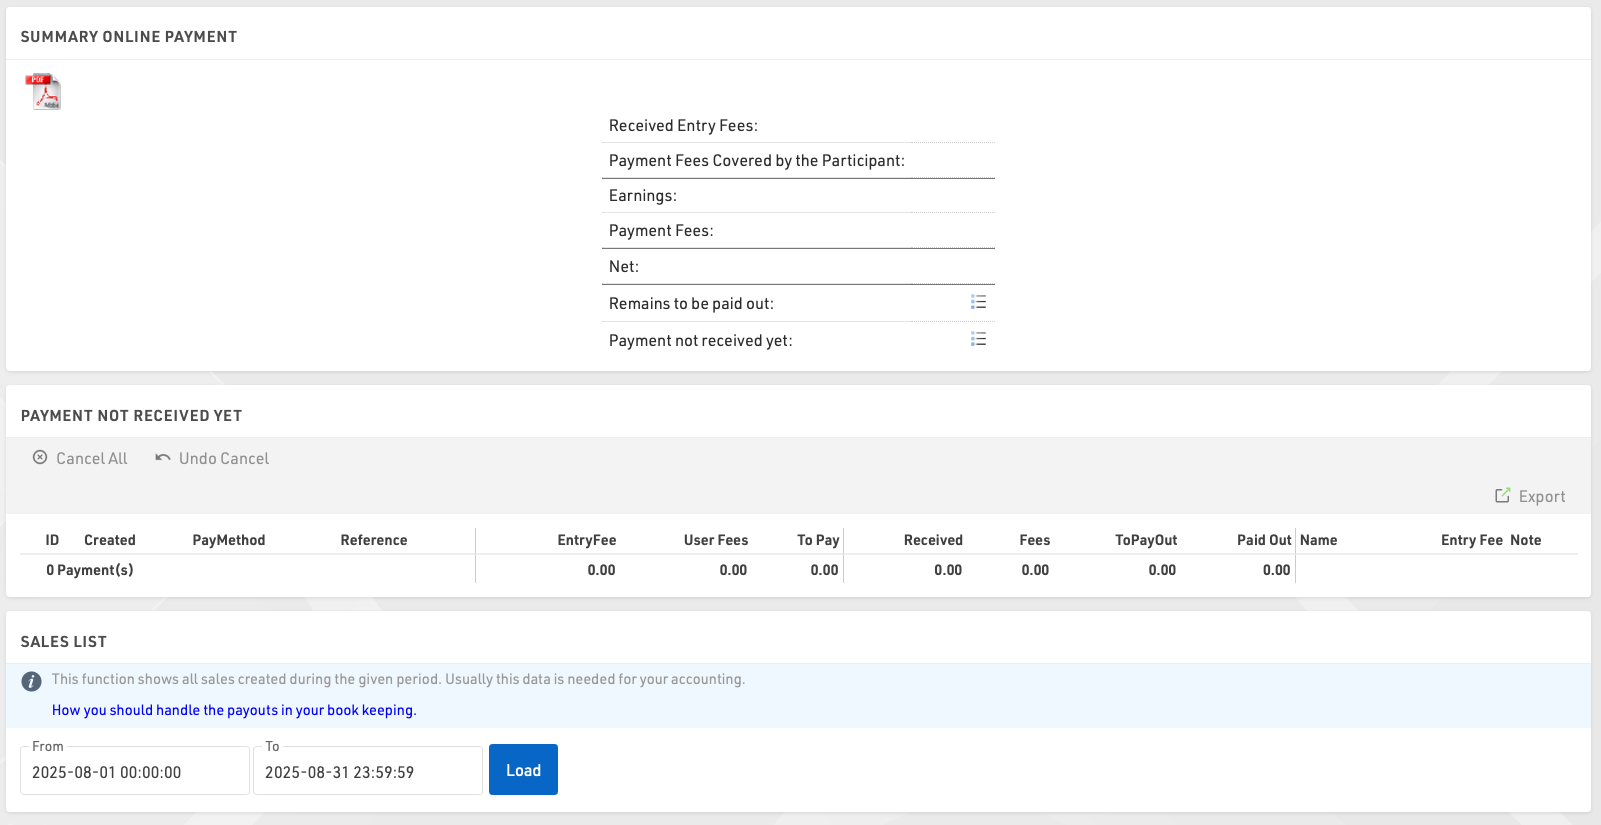
Dans l'aperçu des paiements en ligne, vous pouvez également annuler des paiements différés si nécessaire.
La liste des ventes vous permet de générer une liste des paiements reçus au cours d'une période donnée, généralement requise à des fins comptables.
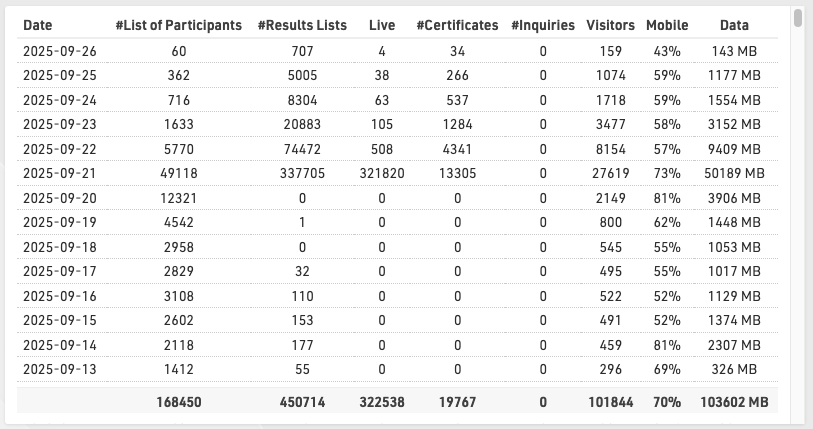
my.raceresult.com Statistiques
Les statistiques de my.raceresult.com indiquent chaque jour le nombre de listes et de certificats de course qui ont été chargés. Après la date de l'événement, les statistiques peuvent être regroupées par mois lorsque les chiffres sont moins pertinents.
fenêtre principale
La fenêtre principale sert principalement à définir les paramètres de votre fichier d'événement, ainsi qu'à importer, vérifier, modifier et supprimer les données des participants.
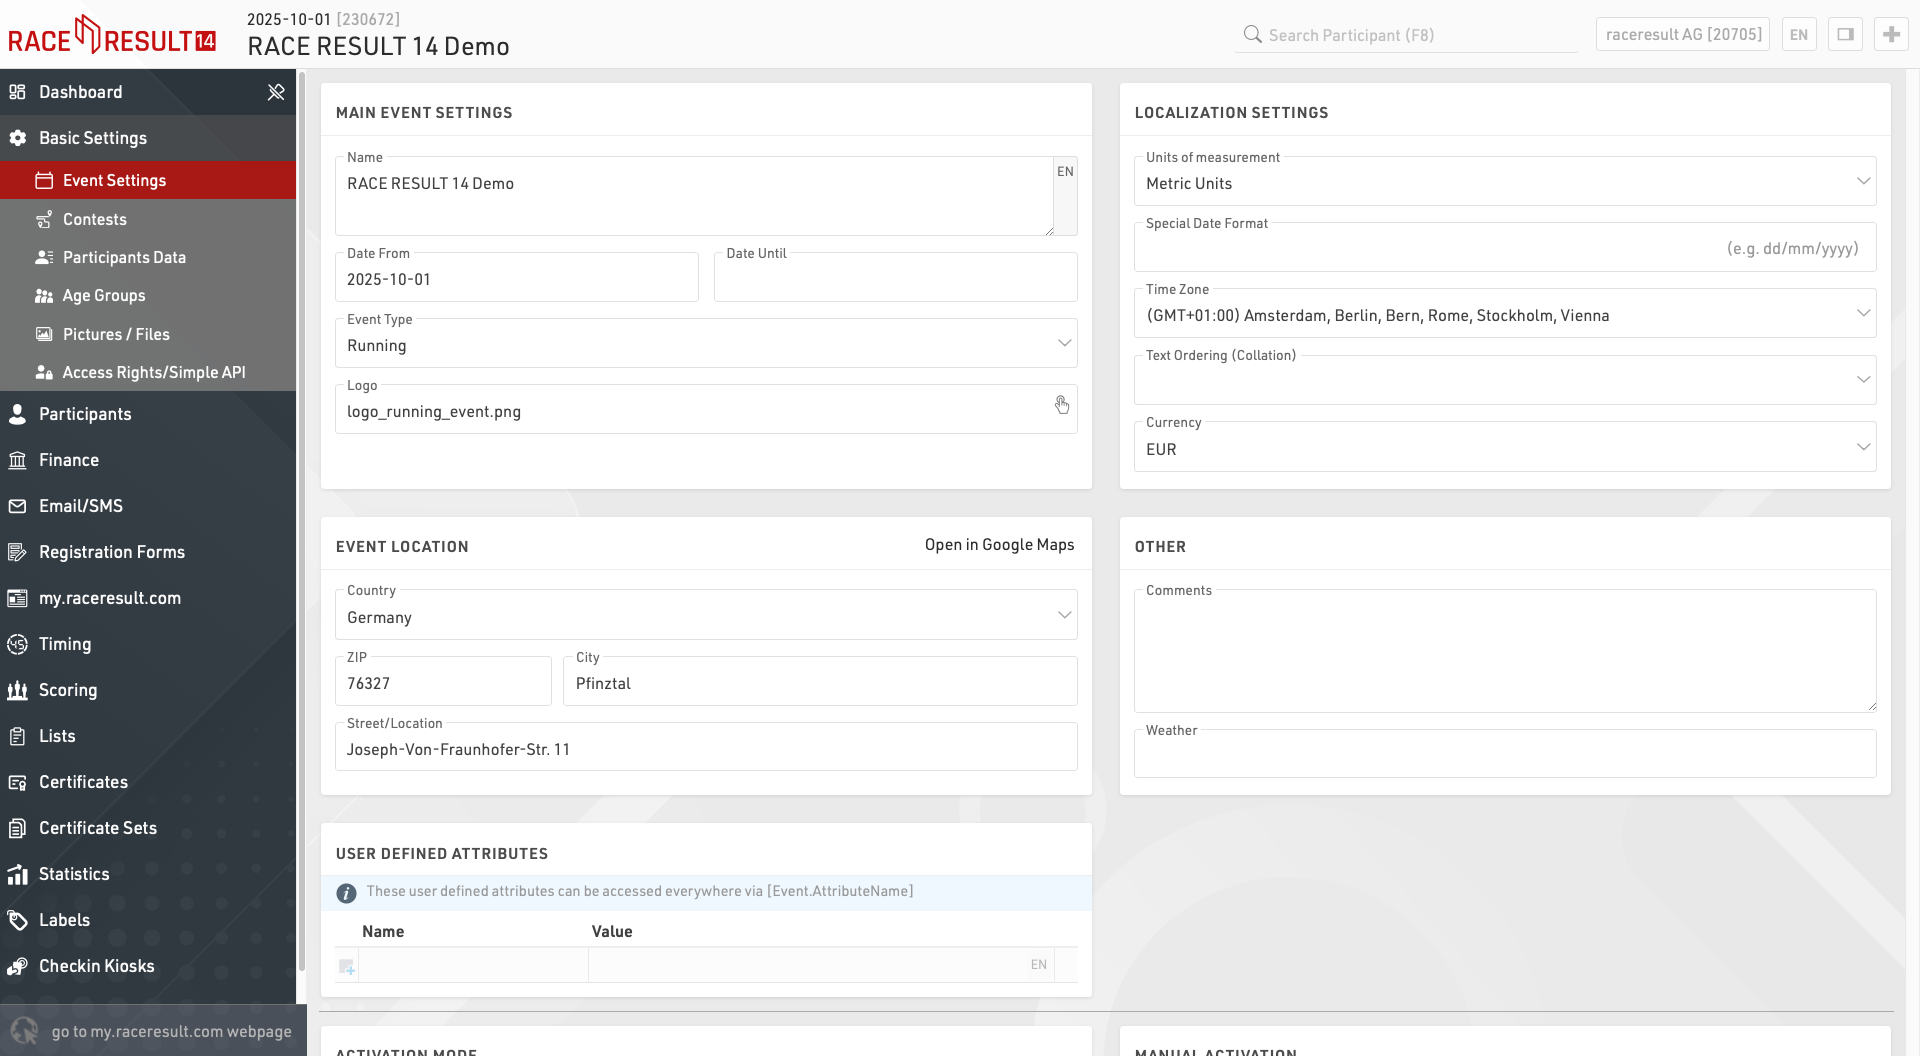
Paramètres de l'événement
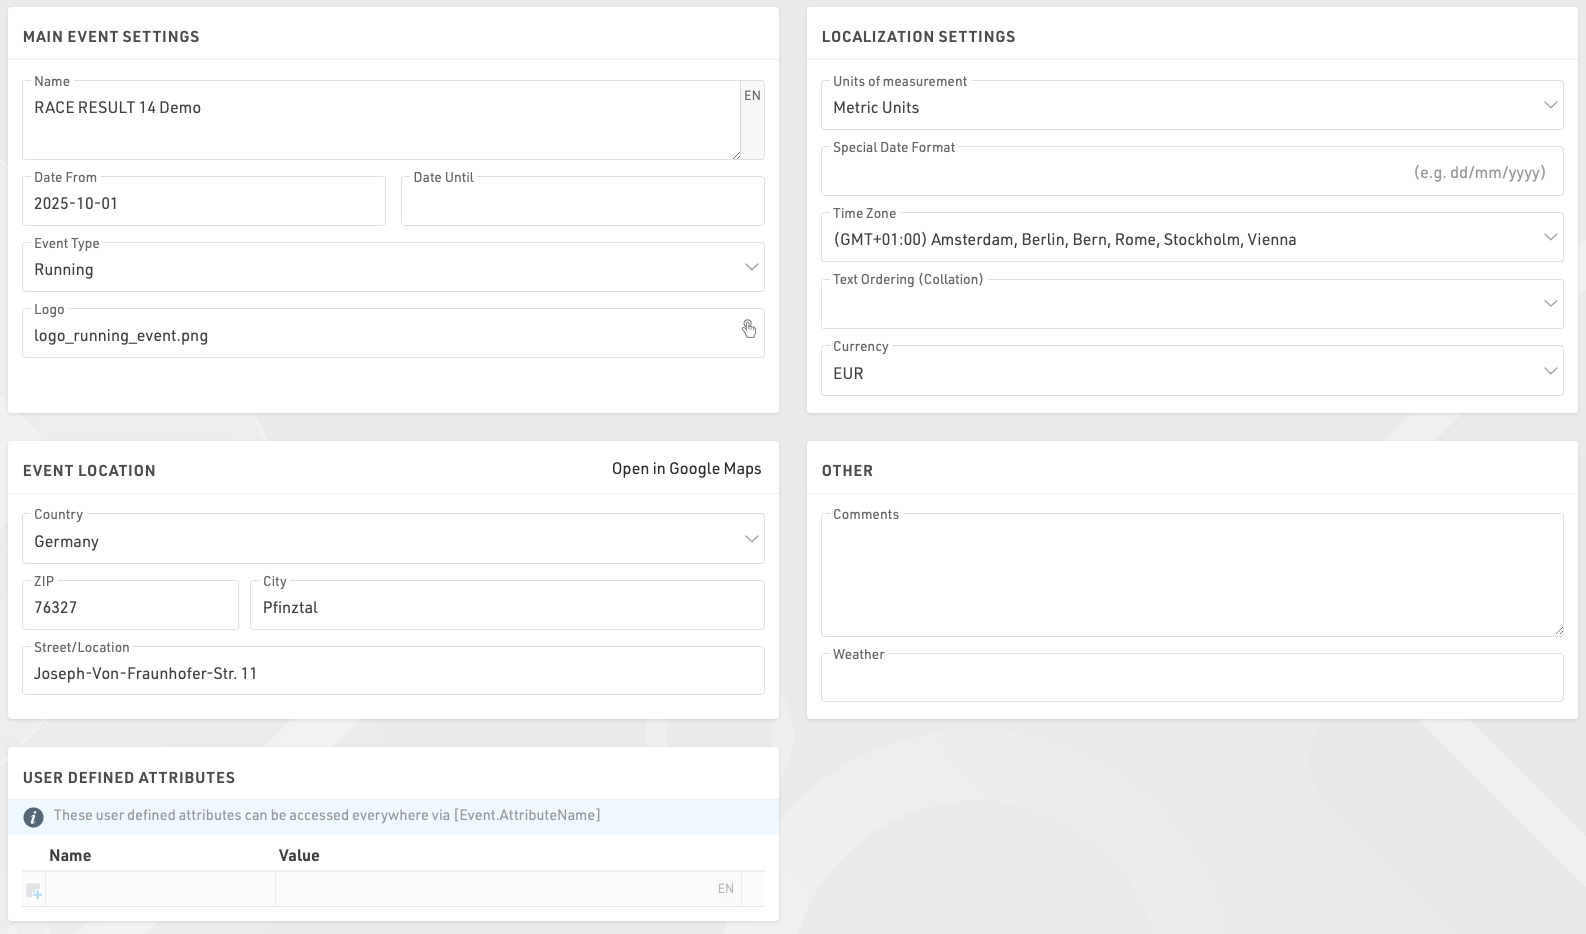
Paramètres principaux de l'événement
Il s'agit des paramètres de base d'un événement, notamment le nom et la date de l'événement, le type et le logo utilisés pour l'inscription de l'événement sur la plateforme my.raceresult.com.
Paramètres de localisation
Les paramètres de localisation permettent de définir des valeurs spécifiques pour l'événement.
Les unités de mesure déterminent si les valeurs par défaut doivent être affichées / calculées en unités métriques ou impériales, ce qui est utilisé par exemple pour la configuration des divisions et les fonctions par défaut pour la vitesse et l'allure (qui renvoient Km/h et Min/Km ou Mph et Min/Mile en conséquence).
Le format spécial de la date vous permet de saisir et d'afficher les dates conformément à votre norme locale ou à un format requis.
Le fuseau horaire est utilisé pour calculer l'heure actuelle de l'événement, ce qui permet de fixer la date et l'heure auxquelles les éléments de la plateforme en ligne (tels que l'inscription) doivent être disponibles. Il est également utilisé pour convertir les heures UTC des boîtes à outils en heures locales correctes.
L'option Text Ordering (Collation) permet de définir le mode de classement alphabétique, car les langues trient les caractères spéciaux de différentes manières.
La devise à utiliser pour calculer les droits d'inscription et pour enregistrer les paiements dans le module d'inscription.
Lieu de l'événement
L'emplacement est utilisé par la plateforme my.raceresult.com pour aider les utilisateurs à trouver des événements. Il définit également le point central des cartes pour les éléments du logiciel.
Autre
Entrez des commentaires ou des informations météorologiques sur l'événement. Ces informations peuvent être référencées ultérieurement dans les listes de sortie pour les en-têtes et les pieds de page, par exemple pour noter les changements importants susceptibles d'intervenir dans l'événement.
Attributs définis par l'utilisateur
Les attributs vous permettent de définir des champs personnalisés pour l'événement qui peuvent être utilisés n'importe où en utilisant [Event.AttributeName].
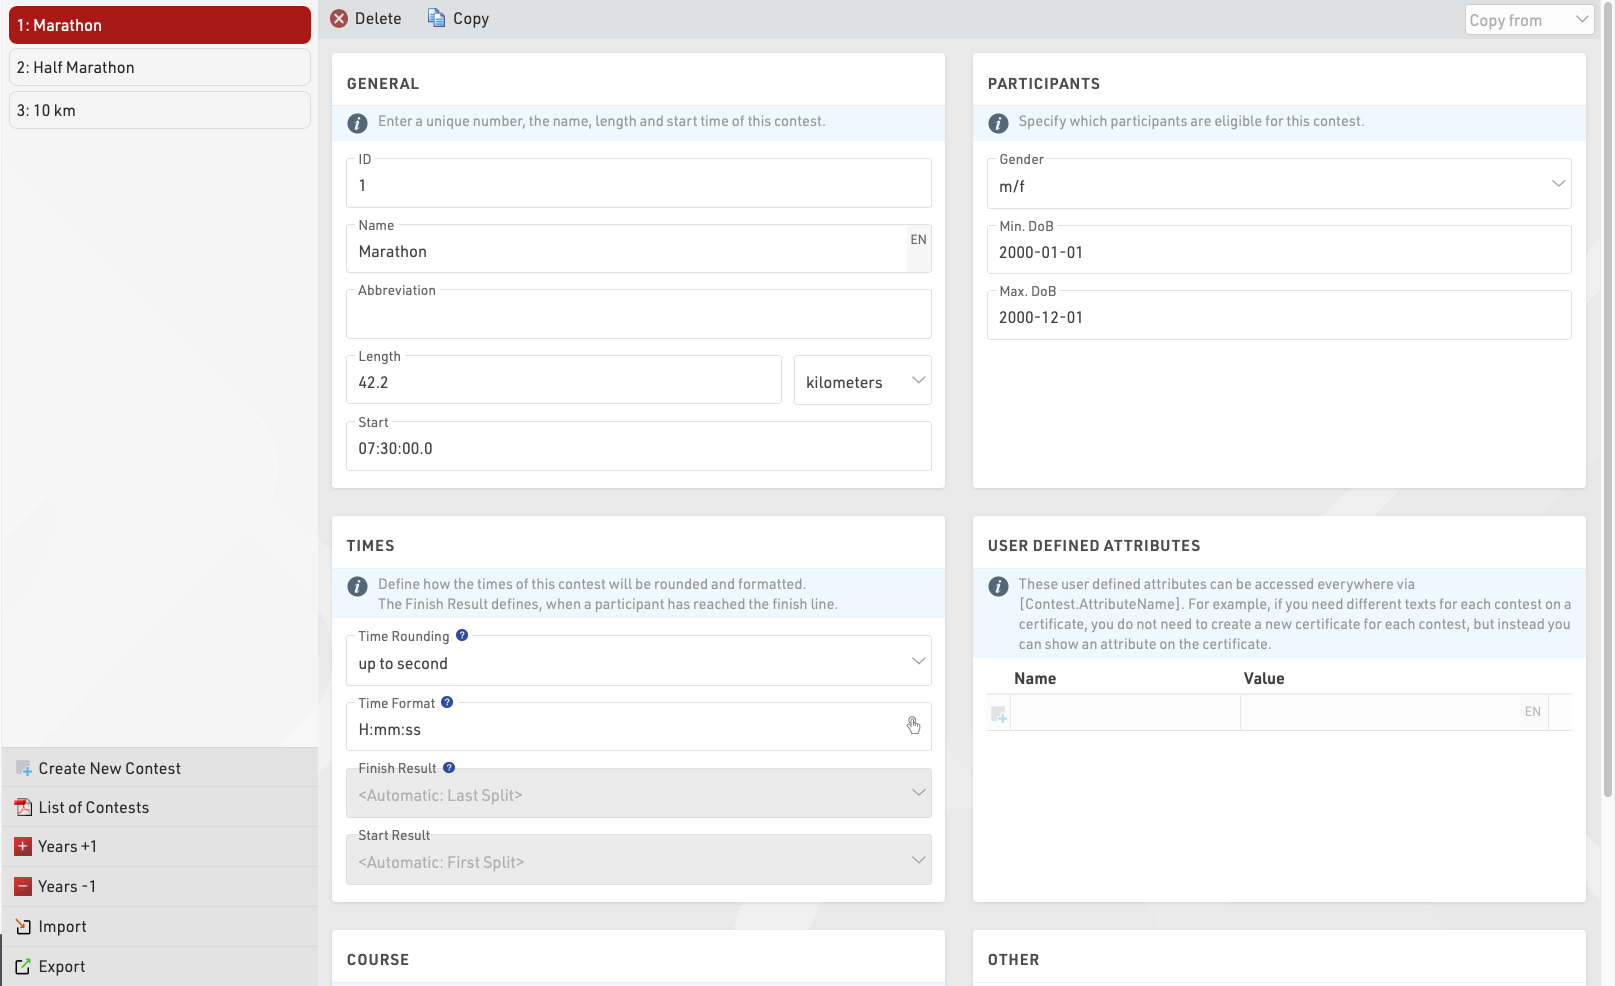
Concours
Les concours sont utilisés pour définir des groupes de participants. Par exemple, dans le cadre d'un événement de course à pied comprenant un marathon et un semi-marathon, chaque distance fera l'objet d'un concours unique. Chaque participant à votre événement doit être affecté à un concours.
La mise en place d'un concours a plusieurs effets :
- Les participants à différents concours sont généralement classés séparément (par exemple, il y a une première place pour le 5 km et une première place pour le 10 km).
- Définir pour chaque concours comment les temps sont arrondis et formatés.
- Définir les différentes catégories d'âge et les droits d'inscription pour chaque épreuve.
Les différents paramètres sont expliqués ci-dessous :
Général
Saisissez simplement le nom, la distance/longueur et l'heure de début du concours et attribuez un numéro unique (ID).
Participants
Définissez les participants éligibles pour le concours. Cela a les effets suivants :
- Les participants non éligibles ne seront pas acceptés lors de l'inscription en ligne et de l'inscription sur place.
- Lors de la saisie d'un participant non éligible dans la fenêtre Participants, un message d'avertissement s'affiche.
- L'analyse des données affichera les participants non éligibles.
Temps
Ces paramètres définissent comment les heures des participants à ce concours seront arrondies et formatées par défaut. Notez que les paramètres de format de l'heure dans les Paramètres généraux des résultats seront prioritaires s'ils sont définis.
En outre, sélectionnez le résultat final. Le résultat de l'arrivée sera très important pour la notation, la sélection du résultat de l'arrivée a deux effets :
- Les champs Heure et Heure décimale font référence à l'heure formatée/décimale dans le résultat respectif. Par exemple, Time peut se référer au champ Time2 pour les participants à un concours alors qu'il se réfère à Time5 pour les participants à un autre concours.
- Le champ Fini est vrai pour chaque participant si un temps a été saisi dans le résultat d'arrivée correspondantet, et le participant est compté comme ayant terminé dans la fenêtre de vue d'ensemble.
Par défaut, Finished est utilisé comme filtre pour les classements et DecimalTime pour le tri des classements. En d'autres termes, le résultat à l'arrivée est utilisé pour les scores les plus importants.
Lors de l'utilisation de fractionnements, le résultat à l'arrivée peut automatiquement utiliser le dernier fractionnement, qui sera utilisé comme temps de pistolet ou temps de puce selon le mode de temps sélectionné dans la configuration des fractionnements pour ce concours.
De même, vous pouvez sélectionner le résultat du départ, si vous avez une ligne de chronométrage au départ, choisissez d'utiliser automatiquement le premier fractionnement ou le résultat qui contient l'heure de départ. Le champ Commencé sera vrai si le participant a un temps dans le résultat de départ et le participant sera compté comme ayant commencé dans la fenêtre de vue d'ensemble.
Attributs définis par l'utilisateur
Les attributs vous permettent de définir des champs personnalisés pour chaque concours et d'afficher des textes différents pour chaque concours. Vous pouvez utiliser les attributs n'importe où en utilisant [Contest.AttributeName].
Vous pouvez définir des attributs portant le même nom pour différents concours, puis appeler ce champ dans le résultat ou le certificat correspondant.
Parcours
Téléchargez un fichier GPX avec le parcours ou dessinez le parcours sur la carte en cliquant sur le bouton Créer un itinéraire. Les parcours seront affichés sur toutes les cartes dans RACE RESULT 14, ce qui est utile, par exemple, pour vérifier que les systèmes de chronométrage sont installés au bon endroit.
Autre
Lorsque le transpondeur de départ est détecté, il s'agit généralement d'un marqueur de votre système de chronométrage qui est enregistré sous la forme d'un code de transpondeur tel que 99999, le temps sera sauvegardé en tant qu'heure de départ (T0).
Réglez le concours sur inactif pour le cacher dans la fenêtre de vue d'ensemble. Utilisez cette fonction par exemple si un concours n'a pas lieu cette année, mais qu'il aura lieu l'année suivante.
Données des participants
L'un des aspects les plus importants de RACE RESULT 12 est la gestion des données des participants, qui comprend une série de champs et de fonctions par défaut, mais qui vous permet également de stocker ou de calculer vos propres champs et fonctions personnalisés. Pour simplifier le flux de travail, vous pouvez activer / désactiver certains champs par défaut et également contrôler le comportement de ces champs lors de l'édition dans la fenêtre des participants.
Champs par défaut
Définir certains paramètres généraux pour le traitement des données dans la fenêtre des participants. Activez ou désactivez les champs standard et définissez s'ils sont obligatoires ou non. Si les champs obligatoires ne sont pas remplis dans la fenêtre des participants, ils sont mis en évidence par une barre rouge et un avertissement s'affiche lors de la tentative d'enregistrement. Notez que pour l'inscription en ligne, les champs obligatoires peuvent être définis séparément.
Aide à la saisie
Contrôlez la manière dont les données doivent être traitées lorsque vous saisissez/modifiez des participants directement dans la fenêtre Participants. Lorsque l'option Groupe d'âge modifiable est activée, le groupe d'âge peut être modifié manuellement, ce qui peut être utile si vous travaillez avec des groupes d'âge qui se chevauchent - mais notez que cela sera annulé si les groupes d'âge sont recalculés ultérieurement. Vous pouvez également désactiver Agender s'il ne doit pas être utilisé dans le fichier d'événements.
Boîtes définies par l'utilisateur dans l'onglet Résultats
Il est possible de configurer une liste de résultats à afficher en haut d'une fenêtre de participant. Cela peut être utile pour les événements comportant un grand nombre de résultats difficiles à faire défiler ou pour afficher des données supplémentaires qui ne figurent pas dans la fenêtre principale du participant.

Groupe d'âge
Un groupe d'âge est un groupe d'athlètes ayant à peu près le même âge. En général, les épreuves ont un score par groupe d'âge où les athlètes de chaque groupe sont classés indépendamment des athlètes des autres groupes. Les définitions des groupes d'âge varient souvent en fonction du type de sport et des règlements de l'organisme de tutelle local.
Lors de la création d'un nouveau fichier d'événement, des groupes d'âge par défaut seront définis automatiquement et pourront être modifiés librement en fonction de vos besoins.
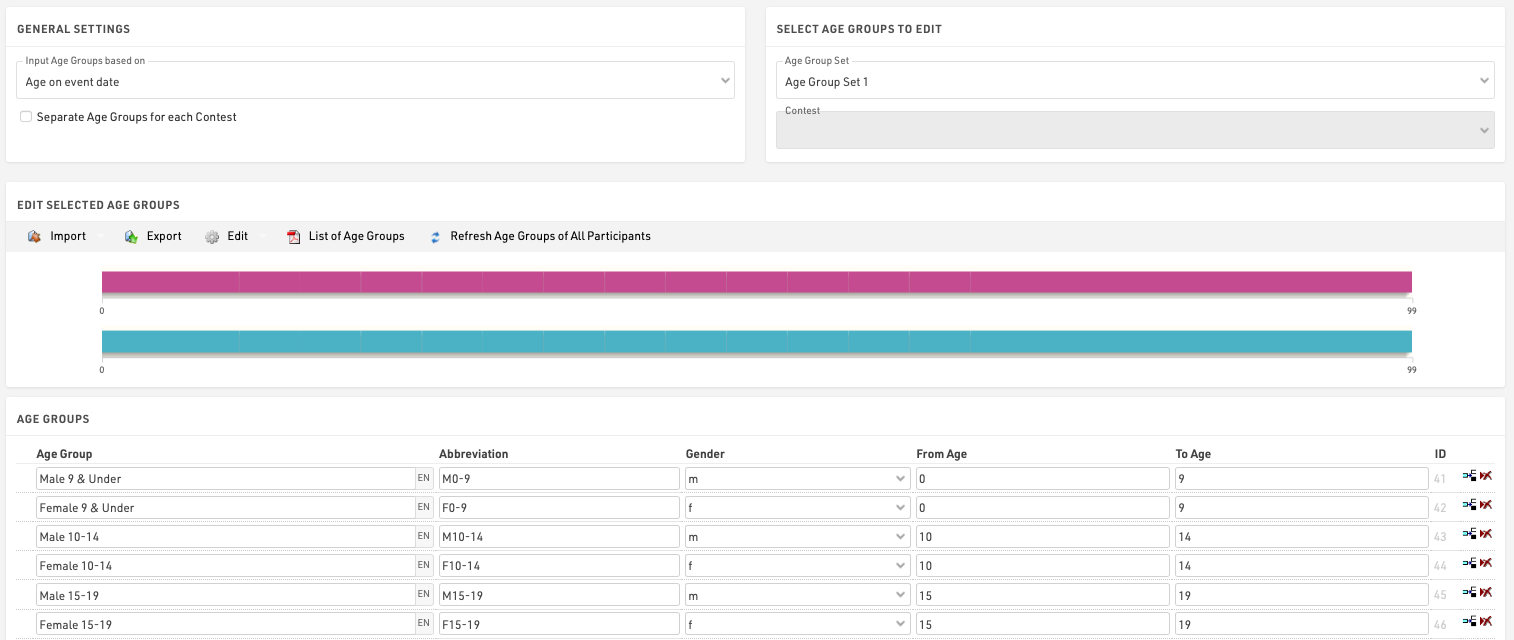
Général/ Importation de groupes d'âge
Le bouton Importer vous permet d'importer des groupes d'âge à partir de différentes sources. Par exemple, vous pouvez charger des groupes d'âge standard ou importer des groupes d'âge à partir d'un fichier que vous avez créé via Export.
Si vous avez fait une copie du fichier des événements de l'année précédente, vous pouvez ajuster les groupes d'âge avec les fonctions Editer->Années +1 et Années -1.
Si vous avez besoin de groupes d'âge différents pour des concours différents, activez l'option Séparer les groupes d'âge pour chaque concours dans les Paramètres généraux. Saisissez des groupes d'âge différents pour chaque concours ou importez-les d'un autre concours à l'aide de la fonction Importer->Du concours, puis effectuez les modifications nécessaires.
Deuxième/troisième groupe d'âge
Il peut être nécessaire de définir deux ou trois groupes d'âge différents afin que chaque participant se voie attribuer deux ou trois groupes d'âge. Le deuxième groupe d'âge peut être utilisé pour un score supplémentaire, comme un score d'équipe où, par exemple, les groupes d'âge M40, M45 et M50 sont combinés dans le groupe d'âge Masters.
Saisir les groupes d'âge en fonction de
Vous devrez définir sur quels critères vous allez entrer et avec quels groupes d'âge, cela dépendra généralement du type d'événement que vous chronométrez. Sous Entrée des groupes d'âge basés sur, vous pouvez sélectionner:
Date de naissance - Les groupes d'âge sont définis en fonction d'une fourchette de dates plutôt que de fourchettes d'âge.
Âge à la date de l'événement - Âge des participants le jour de l'événement défini dans les paramètres de base de l'événement.
Âge au 31/12 (année précédente) - Âge au 31 décembre de l'année précédente.
Âge au 31/12 (année en cours) - Âge au 31 décembre de l'année en cours.
Âge à une date arbitraire - Âge à une date spécifique, à définir ci-dessous.
Mise à jour des groupes d'âge
Dans la fenêtre Participants, le groupe d'âge est attribué automatiquement en fonction du sexe et de la date de naissance. Toutefois, vous pouvez modifier manuellement le groupe d'âge si nécessaire. C'est pourquoi les groupes d'âge ne seront pas mis à jour automatiquement lorsque vous modifiez les paramètres des groupes d'âge.
Pour mettre à jour les groupes d'âge attribués après avoir modifié les paramètres des groupes d'âge, cliquez sur Actualiser les groupes d'âge de tous les participants.
Conseils utiles
Accès aux groupes d'âge
Dans les listes et les certificats, vous pouvez accéder au nom du groupe d'âge sélectionné pour les participants via les champs [AgeGroup.Name] / [AgeGroup1.Name] (et [AgeGroup2.Name], [AgeGroup3.Name]).
Tri des groupes d'âge
Il arrive souvent que les groupes d'âge soient distribués dans un certain ordre, par exemple parce qu'un groupe d'âge est le premier à être récompensé lors de la cérémonie de remise des prix. Vous pouvez donc modifier l'ordre des groupes d'âge en déplaçant l'icône de la flèche sur la gauche jusqu'à la position souhaitée. L'ordre des groupes d'âge influence les champs [AgeGroup1.OrderPos] ([AgeGroup2.OrderPos], [AgeGroup3.OrderPos]) qui créent des nombres croissants en fonction de l'ordre d'entrée dans les paramètres des groupes d'âge. Ces champs peuvent être utilisés pour trier les listes. La liste par défaut Result List AG utilise également cette procédure.
Abréviation de la classe d'âge
Outre le nom de la classe d'âge, vous pouvez également saisir une abréviation. S'il reste peu de place dans une liste, vous pouvez y accéder via le champ [AgeGroup.NameShort] / [AgeGroup1.NameShort] ([AgeGroup2.NameShort], [AgeGroup3.NameShort]).
ID de la classe d'âge
Chaque groupe d'âge a un identifiant unique qui ne change pas si le nom du groupe d'âge est modifié. Il est accessible via le champ [AgeGroup.ID] / [AgeGroup1.ID] ([AgeGroup2.ID], [AgeGroup3.ID]).
L'identifiant du groupe d'âge est bien adapté au regroupement lors du calcul des classements, car les groupes d'âge sont distingués même s'ils portent le même nom. Si vous créez deux groupes nommés Kids (pour les garçons et les filles séparément) et que vous regroupez le classement par AgeGroup.Name, les garçons et les filles seront classés ensemble. Cependant, si vous utilisez AgeGroup / AgeGroup.ID à la place, les deux groupes d'âge seront classés séparément.
Images et d'autres fichiers
Des images et d'autres fichiers peuvent être importés dans votre fichier d'événement RACE RESULT 12 pour être utilisés dans d'autres parties du logiciel, le plus souvent pour l'en-tête my.raceresult.com.
Les fichiers peuvent être importés sous Paramétres généraux ⇒ Images / Fischiers.

Les fichiers qui ne sont pas stockés dans un dossier seront enregistrés directement dans le fichier de l'événement et seront téléchargés si le fichier de l'événement est extrait.
Les fichiers stockés dans le dossier "my" seront disponibles dans tous les fichiers d'événement de votre compte lorsque vous travaillez en ligne.
Les fichiers stockés dans le dossier commun sont stockés en ligne et peuvent être accédés par n'importe quel utilisateur de RACE RESULT, à l'intérieur duquel il existe des drapeaux alternatifs qui utilisent l'abréviation alpha-2 Pays/Nation pour le fichier. Alpha-2 pour le nom du fichier.
Pour accéder aux fichiers stockés dans les dossiers, le nom de l'image fonctionne comme un système de stockage de fichiers standard, par exemple une image nommée "header.png" stockée dans le dossier commun utiliserait le nom d'image "common\header.png".
Consultez notre guide How To pour savoir comment utiliser vos images et vos fichiers dans les différentes parties du logiciel.
Droits d'accès / Simple API
Participants
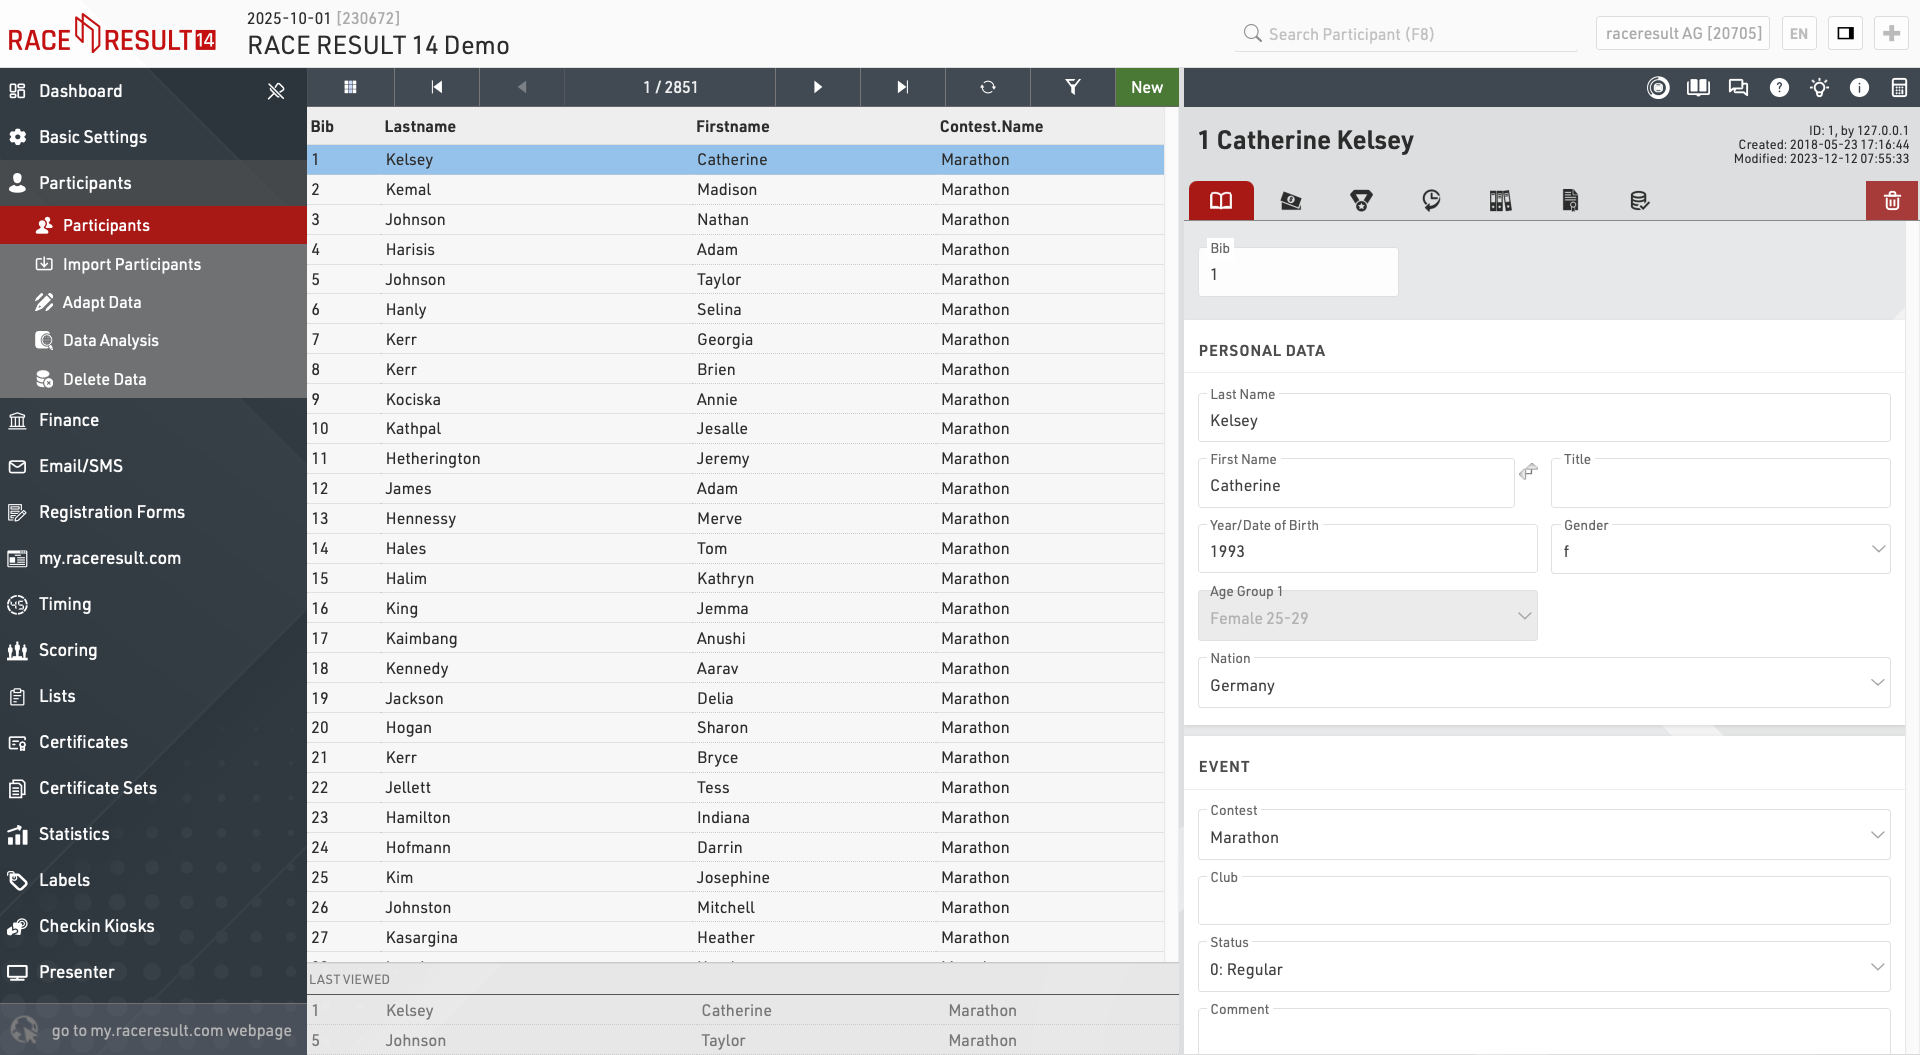
The Participants Window is used to manage all participant data within the event file.
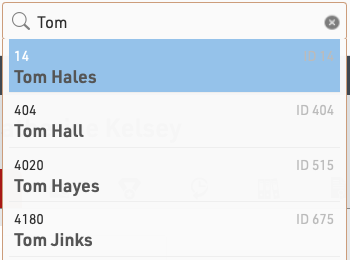
The participants window can also be accessed by using the search bar in the main navigation bar, selecting a name from the search will automatically open that participant in the main view.
View Participants
When opening the participants view a table of all participants will be shown, if you have previously opened the participant view for an individual participant then your last viewed participants will be shown below for quick access.
Clicking on a participant record from this table will open the Participant View for that participant to the right side of the table. The arrows in the top bar can be used to scroll through the participants one by one according to the current sorting of the main table view. Clicking New will immediately create a new blank participant record which will be opened in the participant view.
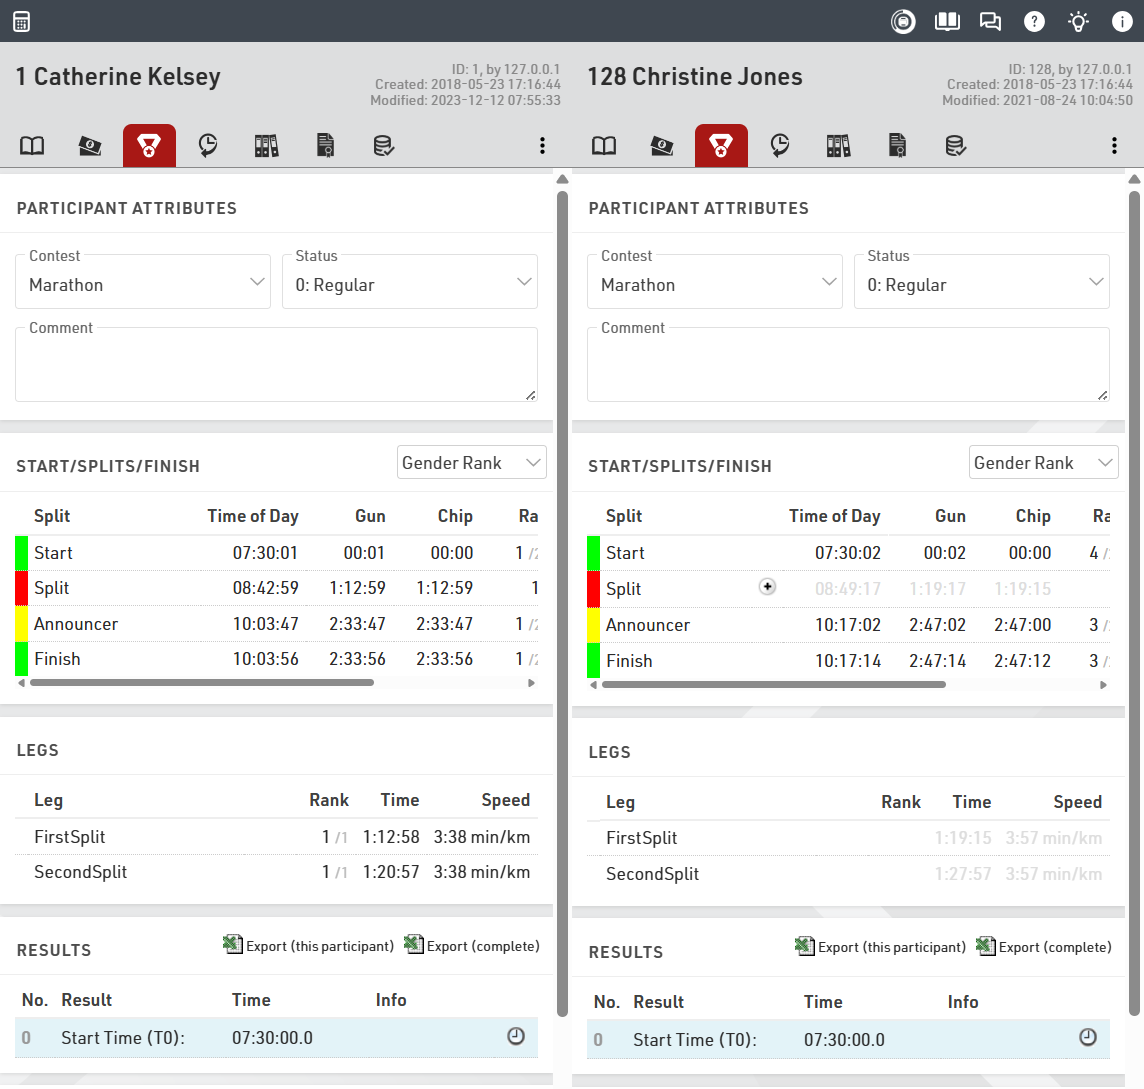
To view two participants side by side click on the first participant you want to display, and then click on the second participant while holding CTRL. You can navigate each participant view individually to compare data and times.
Note that the list of participants will be cached by the browser so when importing new participants or editing large batches of data you may need to reload the data using the reload icon in the top bar.
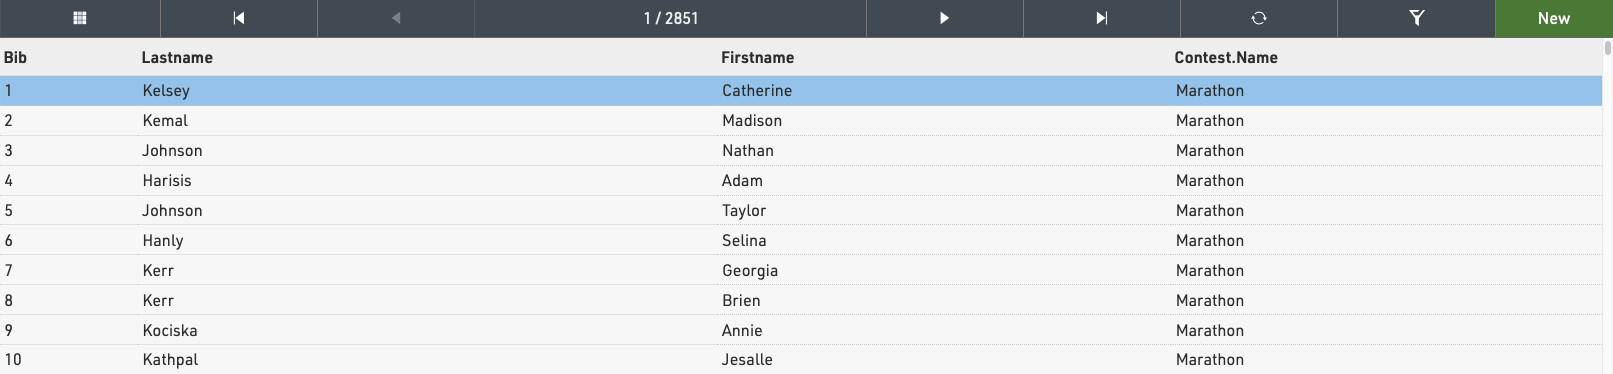
Add or remove columns to the table by clicking the grid icon in the top bar.
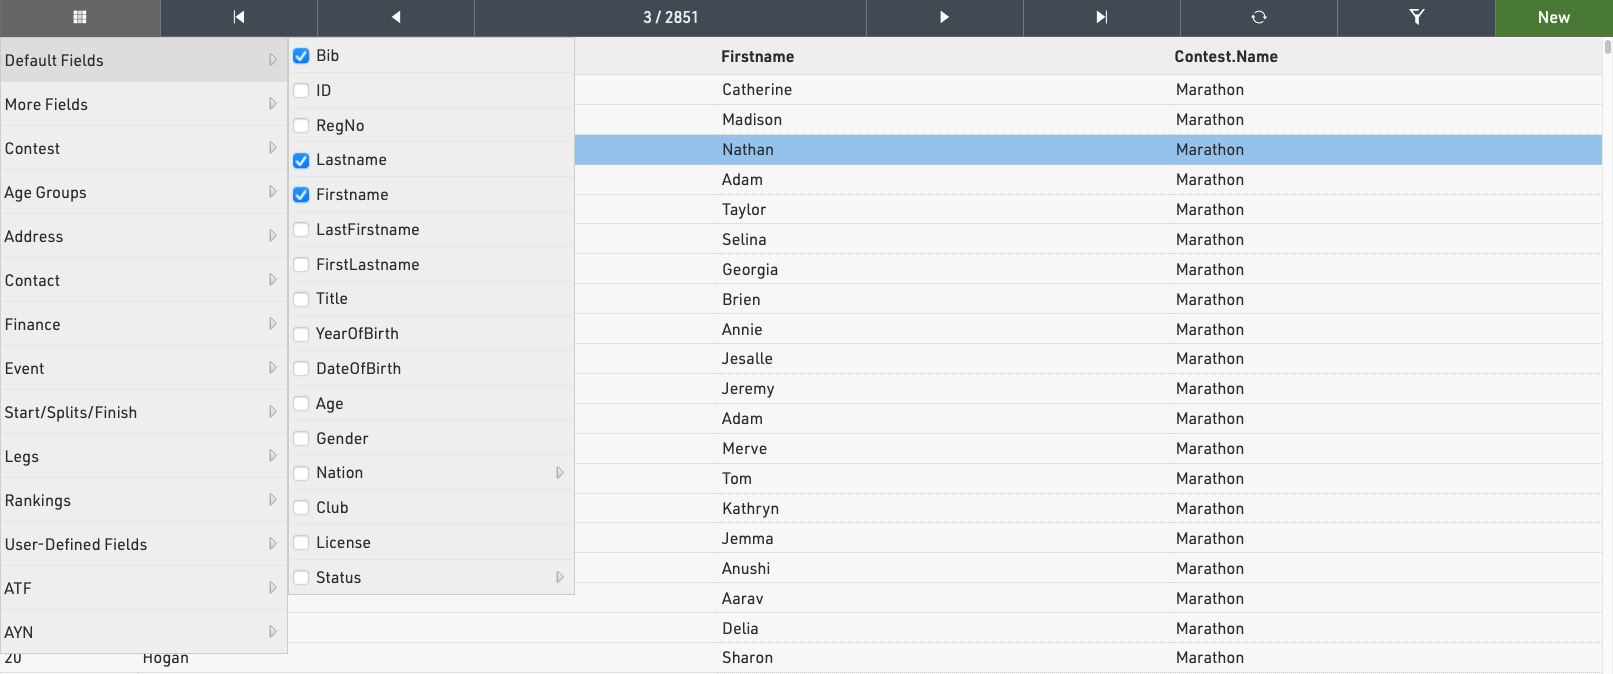
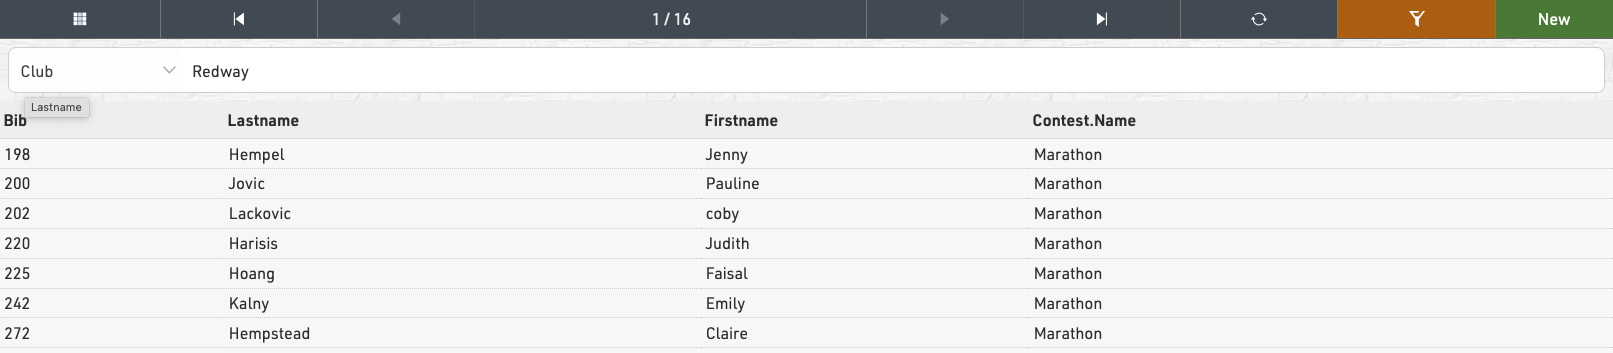
Sorting / Searching & Filtering
By clicking on the head of a column you can sort the table by this column. Press the same column head a second time to sort in descending order.
To filter the table click the filter icon in the top bar and select how you wish to filter participants, either using one of the standard fields or using any filter expression. When a filter is applied the filter button will be highlighted orange.
Import Participants
To import participants from an external source, you can import an Excel/CSV file in Participants⇒Import Participants. This tool allows you to upload Excel or CSV files and map the data directly to your event fields. To start the import select a file with the data to import on the first worksheet of the workbook. After selecting the file to import, you’ll be able to preview the data and map fields from the file to your participant database.
Best Practices:
- Include column headers in the first row. These determine which Field in the event file each column will populate. You can adjust these mappings in the preview screen. If column headers are not in the upload data, then each column will have to be mapped individually.
- An example Excel template with default fields is linked directly in the import screen. You can use this as a starting point for simple uploads.
- It is important to only import Age or DateOfBirth or YearOfBirth. If you import more than one of these fields they will conflict with each other and your data will be incorrect. More information on these fields can be found in our article YearOfBirth and DateOfBirth.
Mapping Fields

The first row from the import file with the column headers will appear at the top of the import preview. Fields that are not mapped to a current database field will display  . There are 3 options for handling these fields:
- Import as a new field: Leave the mapping blank to create a new additional field that will appear in the participant data.
- Do not import column: Uncheck the Import Column checkbox to ignore this data
- Map to an existing field: Edit the Field box and select the database field you want to match. A tooltip is available with a list of current fields.
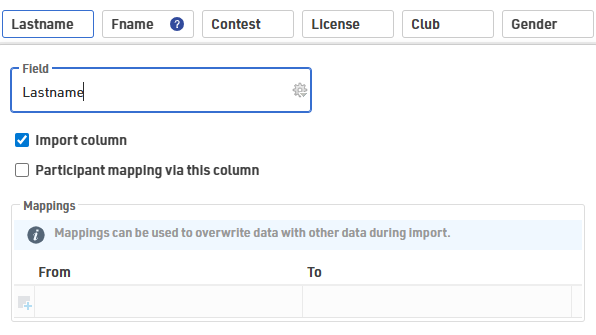
Additionally, the Mappings box allows for data manipulation prior to importing the data into the race file. This is particularly useful if your registration system’s export format doesn't perfectly match your event file's structure.
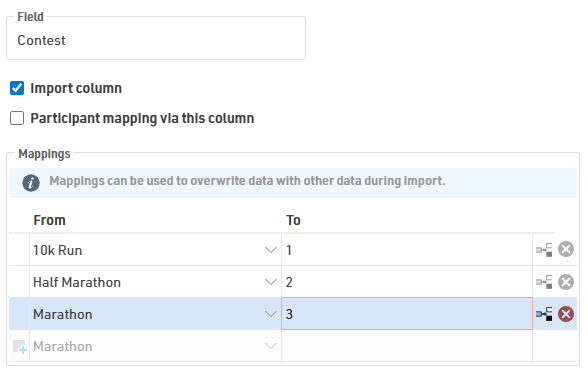
Import Modes
There are three import modes, the default mode is Only add new participants. You can change the mode in the lower-left corner of the import preview.
The setting Participants Mapping Via this column defines which record in the event file and which record in the import file correspond to each other. Usually, records are mapped by Bib, but you can also use other columns such as a participant/registration ID or First Name and Last Name combination. Mapping columns are indicated by  in the import preview.
| Mode | Description | Mapping |
| Only add new | Creates new records only. If a bib number in the file matches one already in the event, that row is skipped. | Optional |
| Update existing | Updates all records in the event file based on the selected mapping key. | Required |
| Add and update | Updates existing participants that match the selected mapping key and creates new records for all other rows in the import file. | Required |
When adding new participants, if the import file does not contain a bib number, a new bib number according to the Bib Number Settings will be assigned.However, if the import file contains the column Bib and a number is entered, this bib will be used. This means that the record will not be imported if the bib number already exists in the event file.
Additional considerations
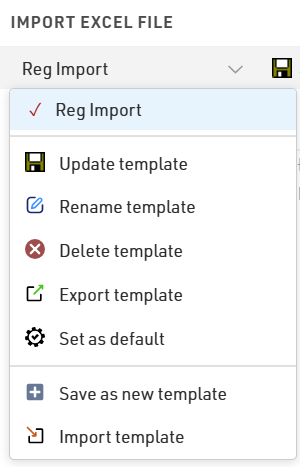
If you frequently import data in the same format, you can save your field mappings and import settings as an import template for faster future imports. Templates can be exported for use in other events or set as the default template so it will load automatically every time you preview an import.
Adapt Data
Participants ⇒ Adapt Data offers numerous functions to change data of several participants at the same time.
Data Analysis
Participants ⇒ Data Analysis offers three functions:
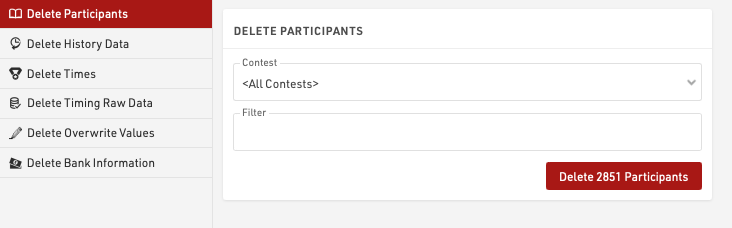
Delete Data
Delete data provides methods to delete large batches of data, individual participants or times can be deleted in the Participants Window.
First, select what data you would like to delete:
- Participants
- History Data
- Times (Special Results)
- Raw Timing Data
- Overwrite Values (Special Results)
- Bank Information
Then select the details (like contest), enter a filter if needed and select the Delete button.
The number of records that will be affected by the delete action will be shown. When dealing with large datasets it is recommended to create a backup first.
History
The Participant History log allows you to track, filter, and manage all modifications made to participant data. From this view, you can audit specific changes, export data for reporting, or roll back unauthorized edits.
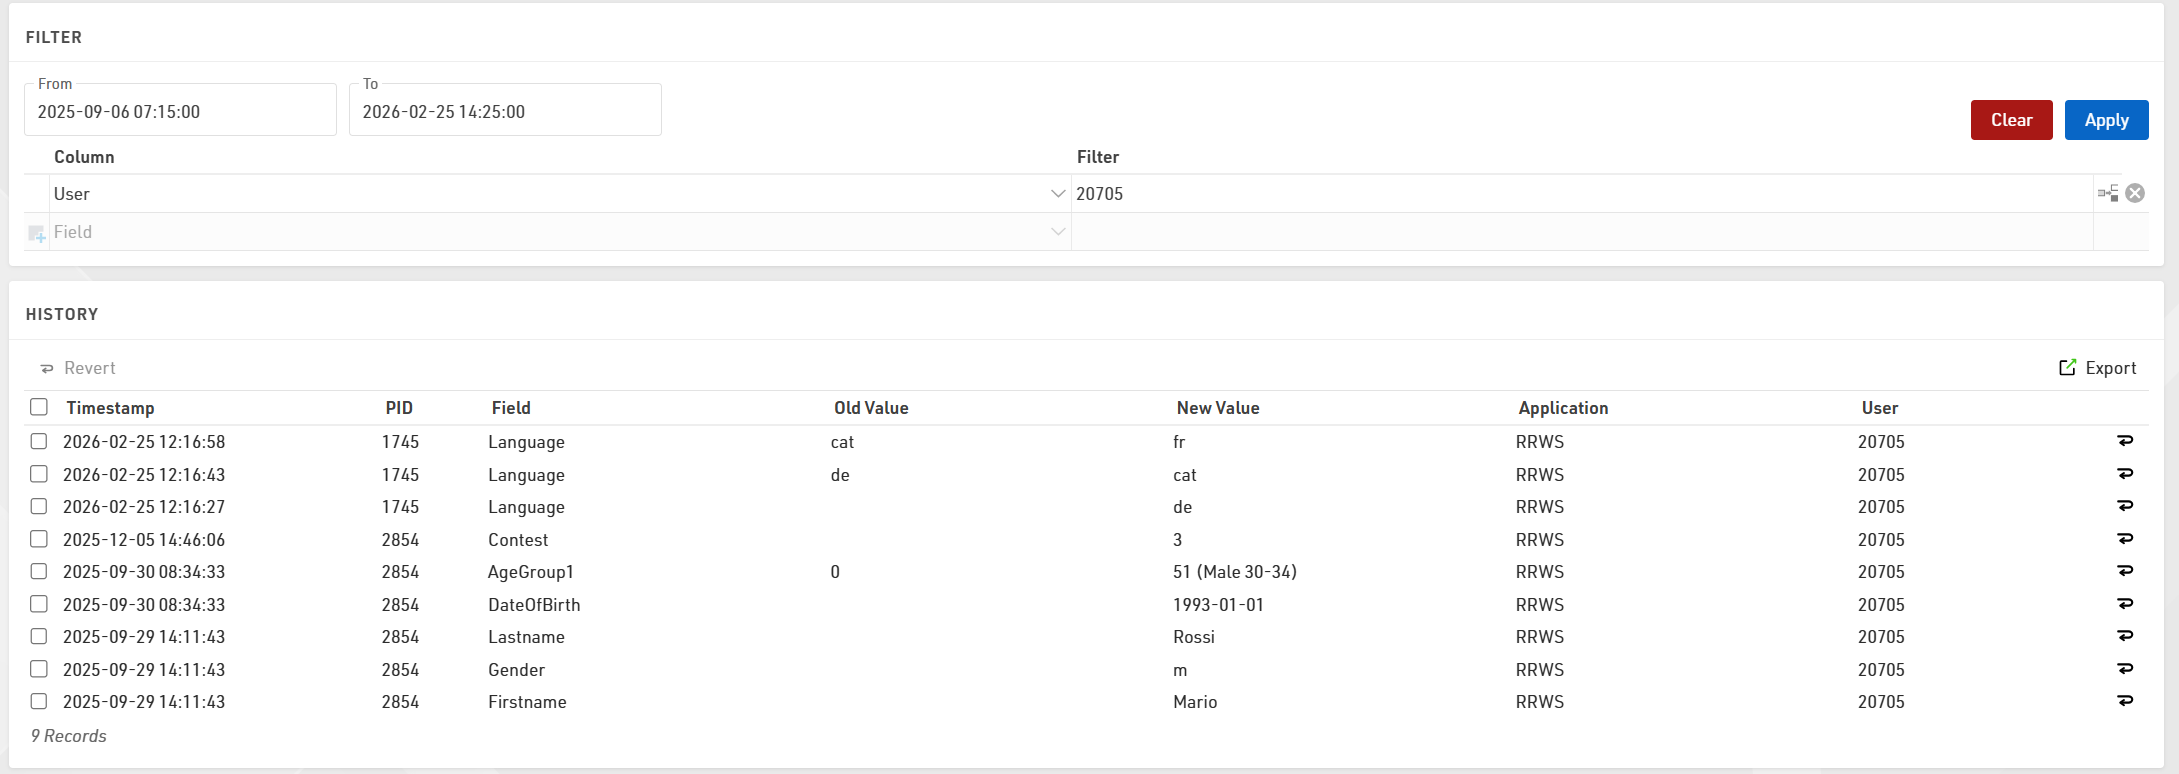
Filtering and Sorting
To locate specific records, you can sort the list by any column or apply filters using the following criteria:
- Date Range: Set From and To dates down to the minute to view changes within a specific timeframe.
- Target Data: Filter by specific Bib (PID), Field, or the exact text of the Old Value or New Value.
- Application: Filter by how the data was modified (e.g., Online, Import, or Change Form).
- User: Filter by the specific User-id that performed the update.
- Expressions: Use custom expressions for advanced data filtering.
Reverting Changes
If data was entered incorrectly, you can restore previous values directly from the history log. To undo a single change, click the Revert symbol  at the end of the specific row. To make a bulk edit, select the checkboxes for multiple rows and click the Revert button located at the top of the list.
Exporting Data
To save a copy of the history for external use, click the Export button to generate a CSV file of the currently filtered or selected view.
Finance
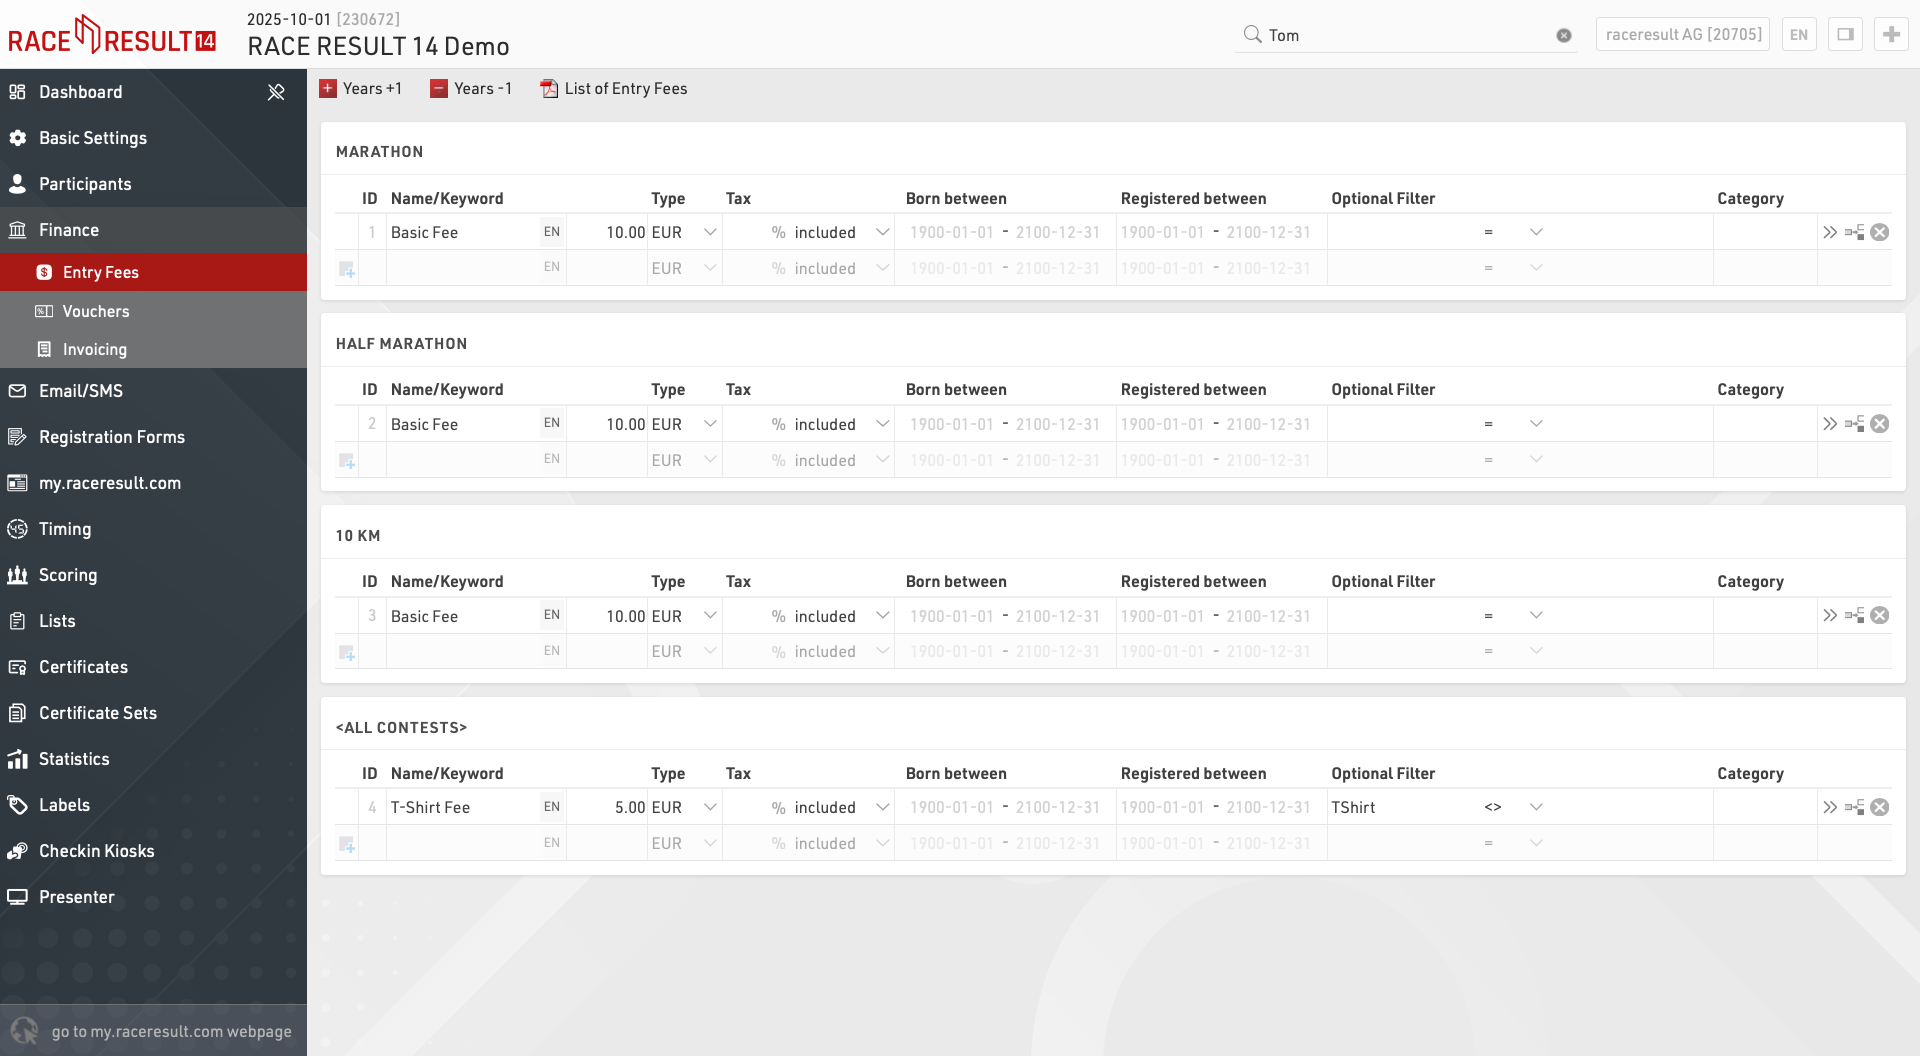
Droits d'entrée
Il est possible de définir ici un nombre quelconque de droits d'entrée, qu'il s'agisse de droits de base ou de droits optionnels. Le droit d'entrée final d'un participant sera calculé en additionnant tous les droits d'entrée applicables.

Saisissez un nom ou un mot-clé décrivant le droit d'entrée. Ce nom apparaîtra également dans l'inscription en ligne si ce droit est appliqué. Saisissez ensuite le montant ou sélectionnez % comme type et saisissez un pourcentage. Tous les droits d'entrée applicables dans la liste ci-dessus seront additionnés puis multipliés par le pourcentage.
Le champ Taxe vous permet de définir comment la taxe doit être traitée pour un droit d'entrée spécifique. Vous pouvez saisir n'importe quelle valeur décimale et choisir si le montant inclut la taxe ou si celle-ci doit être ajoutée à la valeur lors de la validation de la commande.
Si les droits d'inscription sont séparés par âge, définissez les valeurs de Born Between en conséquence ; si les droits d'inscription s'appliquent à tous les participants, ces valeurs peuvent être laissées en blanc.
De même, il est possible de définir une fourchette de dates pour les droits d'entrée, ce qui permet d'établir des prix échelonnés sur différentes fourchettes de dates.
Si seuls certains participants doivent payer ce droit d'entrée, par exemple ceux qui ont commandé un t-shirt, saisissez un filtre qui appelle le champ supplémentaire TShirt <> (vide).
L'attribution d'un nom de catégorie pour les droits d'entrée peut être importante pour les chèques.
Le bouton  Plus de détails vous permet d'accéder à des paramètres supplémentaires :
- Lorsqu'un champ est spécifié dans Multiplier par, les frais d'inscription seront multipliés par la valeur de ce champ ou de cette expression. Si un champ supplémentaire enregistre le nombre de t-shirts commandés, le prix du t-shirt peut être multiplié par ce nombre.
- Si vous cochez la case Afficher comme frais de base, les frais d'inscription optionnels (c'est-à-dire avec un filtre) seront affichés sur la page d'accueil de l'inscription en ligne.
Vouchers
Les bons sont souvent utilisés pour réduire les frais d'inscription. Si un code de bon est saisi dans le champ de données Voucher, le système recherchera le montant de ce bon dans le tableau des bons et réduira les frais d'inscription en conséquenc

Lors de la création de bons, vous pouvez définir les paramètres suivants :
- Code : code du bon, par exemple RACE2021
- Type : le montant du bon peut être un montant fixe ou un pourcentage (du droit d'inscription). En outre, le bon peut ramener le prix au prix de la première ou de la précédente période d'inscription.
- Montant : saisissez le montant ou la valeur en pourcentage
- Catégorie concernée : si vous avez défini des catégories pour vos droits d'inscription, vous pouvez faire en sorte que ce bon ne s'applique qu'à une catégorie. Par exemple, le bon d'achat peut réduire le prix des frais de base, mais pas le prix des extras comme un t-shirt.
- Nombre d'utilisations : si vous sélectionnez un nombre ici, le bon ne pourra être utilisé qu'un certain nombre de fois lors de l'inscription en ligne.
- Remarque : notez, par exemple, qui a reçu ce code de bon.
Dans la plupart des cas, vous pouvez soit créer des codes de bons comme RACE2021 qui peuvent être utilisés de manière illimitée, soit créer plusieurs codes de bons individuels comme K4A7B5DJ qui ne peuvent être utilisés qu'une seule fois. La fonction Autogénérer peut vous aider à générer de nombreux codes de bons individuels.
Invoicing
When using online registration you may need to produce invoices for participants with their payment information for accounting purposes. An invoice is a unique and singular document containing a fixed set of data which should not change.
Invoices are not be linked to just a single participant record, they may group multiple participants together under a single invoice. Each invoice contains the data as to which specific entry fees have been linked to that invoice, this allows multiple invoices to be generated for participants for later payments or refunds if required. Invoices have their own set of fields to be used which relate to the invoice settings.
Invoices can also be generated as e-invoices in the ZUGFeRD format. It is important to note that an invoice does not necessarily have to be linked to a payment process and can therefore also be created and sent independently of online payment. One invoice could also contain several payments of different participants.
Creating and sending invoices can optionally be combined with the email confirmation, but is generally independent of the registration process. Application examples for creating and sending invoices can be found in our How To.
Email / SMS
The Email / SMS Module allows for bulk sending of Emails or SMS to participants.
You can create an arbitrary number of templates for different purposes which can be sent through the E-mail / SMS window or may be triggered through an Exporters.
The list on the left shows all templates in your event file which can be rearranged using drag&drop by clicking the free space to the left of the template name.
Templates can be further sorted into folders, to create a new folder, click the Add Folder icon in the Email/SMS Header. By clicking the folder header, the folder can be expanded / collapsed, to sort the items within a folder alphabetically, click the  icon. Empty folders will be deleted automatically when you reload the window.
Clicking the name of a template from the menu opens the settings for that template where the template can then additionally be sent from.
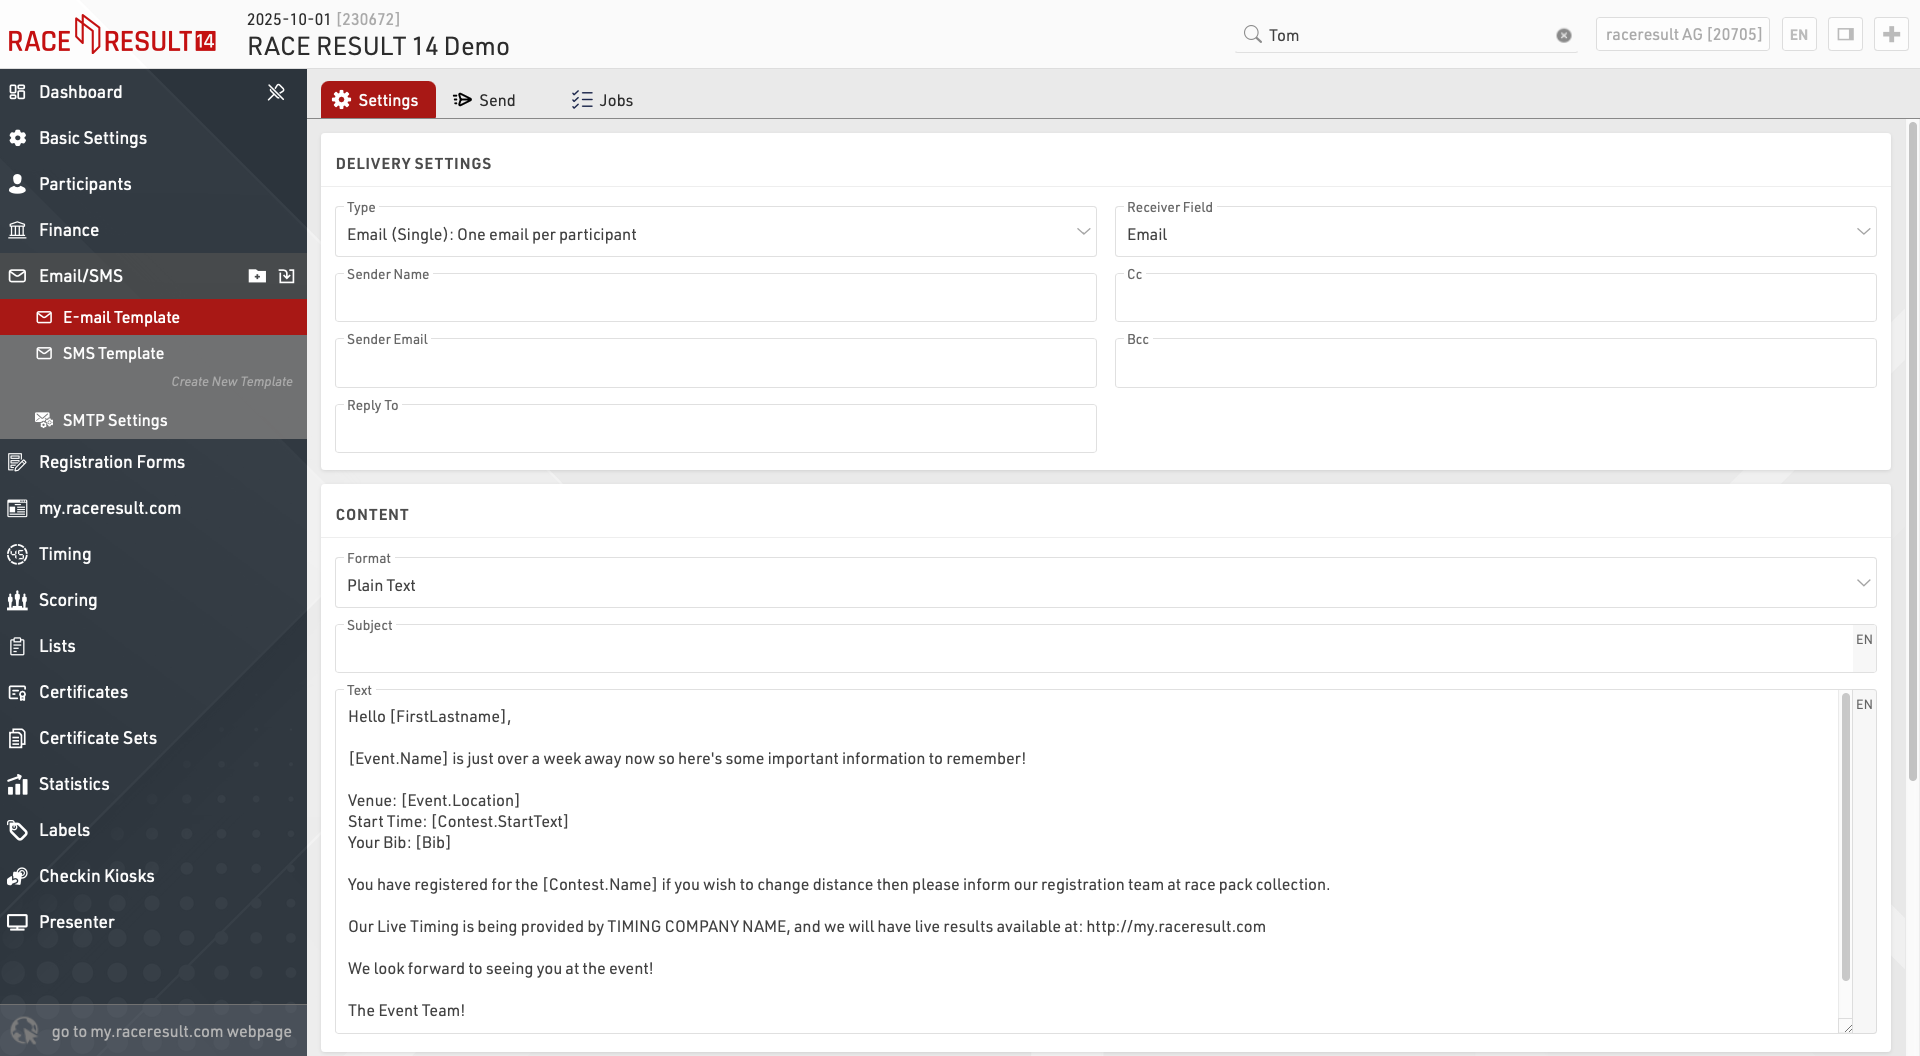
Modèles d'e-mails/SMS
Lorsque vous créez un nouveau modèle, choisissez d'abord le type :
- Email (Single) : enverra des emails individuels aux participants.
- Email (Groupe) Un email par adresse email : enverra un email par adresse email unique dans chaque enregistrement de groupe (défini par le GroupID). Si plusieurs participants au sein du groupe sont enregistrés avec la même adresse électronique, le contenu du texte sera répété pour chaque participant.
- Email (Group) One email per group registration : un seul email sera envoyé à chaque enregistrement de groupe (défini par le GroupID). Si plusieurs adresses électroniques sont présentes dans le groupe, chacune d'entre elles sera incluse dans l'e-mail To. Le contenu du texte sera répété pour tous les participants du groupe.
- SMS : pour envoyer des messages texte
- Appel de service web : sert à déclencher une requête HTTP GET vers un serveur tiers.
Les paramètres disponibles dépendront du type de modèle.
Plus d'options
Vous pouvez parfois souhaiter définir d'autres adresses de destinataires pour les e-mails/SMS. Par défaut, le champ Destinataire sera défini sur les champs standard E-mail ou Téléphone portable, mais vous pouvez choisir n'importe lequel de vos champs supplémentaires de type Champ de texte. Si vous souhaitez envoyer le même modèle d'e-mail ou de SMS à plusieurs destinataires, vous pouvez créer une liste de valeurs séparées par des points-virgules dans le champ qui sera utilisé comme champ Destinataire pour le modèle concerné.
Un filtre par défaut est utile si vous souhaitez vous assurer que le modèle ne sera envoyé qu'à certains participants. Plus tard, lors de l'envoi des messages, vous pourrez toujours modifier le filtre, mais vous ne devez pas oublier de le saisir. Ainsi, par exemple, pour vous assurer que le modèle ne sera envoyé qu'aux participants du concours 2, saisissez le filtre filter :
[Contest]=2
Cocher une case supplémentaire permet de savoir à quels participants un modèle a déjà été envoyé.
Vous pouvez combiner cette fonction avec le filtre par défaut : cochez la case lorsque le message a été envoyé et utilisez ce filtre par défaut pour les futurs envois :
[Contest]=2 AND [CheckBoxName]=0
Sending Templates
Clicking the Send tab within a template will display the list of participants who will receive the e-mail according to the filter, the right side will also show a preview of the e-mail for each participant.
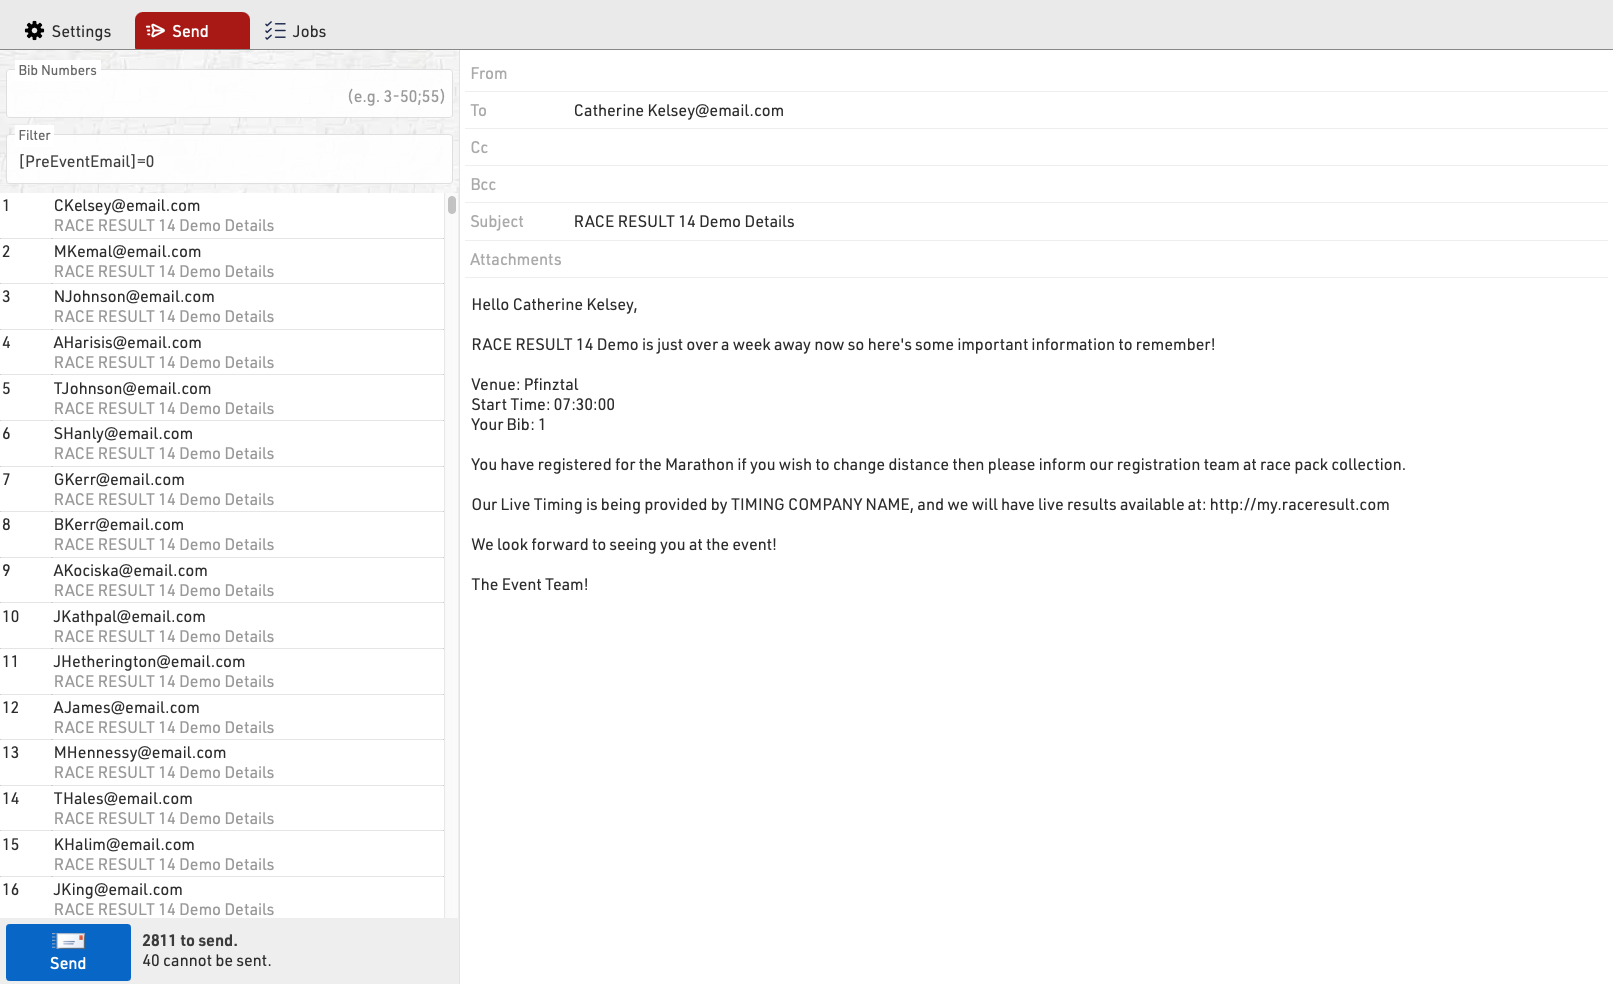
You can choose to send to specific bibs or adapt the filter before sending.
Clicking Send will create a Job which will begin sending all the e-mails, the job will show details for each e-mail. If the job receives an unknown error from the SMTP server it will stop.
Configuration de l'e-mail SMTP
Lorsque vous envoyez des courriels à partir de RACE RESULT 14, vous pouvez utiliser nos serveurs pour envoyer un maximum de 10 courriels (à l'exclusion des courriels de confirmation automatique de l'inscription), ou vous pouvez connecter votre propre serveur SMTP pour envoyer un nombre beaucoup plus important de courriels.
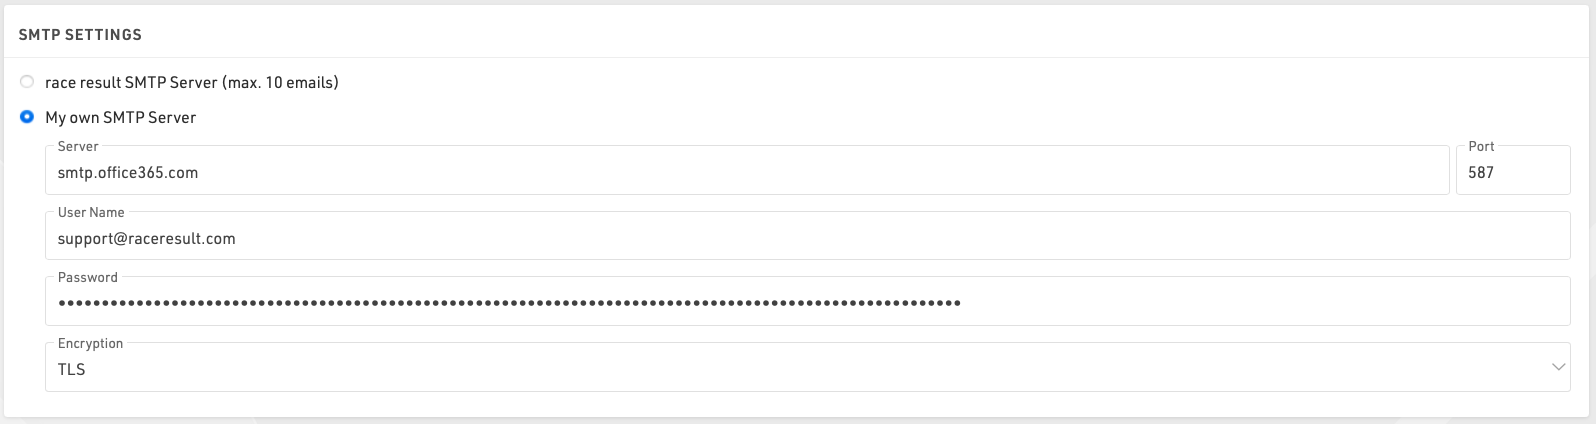
Vous devrez trouver les paramètres de votre serveur de messagerie SMTP, qui sont normalement disponibles auprès de votre fournisseur d'hébergement, le nom d'utilisateur étant normalement votre adresse électronique et le mot de passe correspondant.
Lorsque vous configurez votre serveur SMTP pour la première fois, il est conseillé de le tester en vous envoyant un courrier électronique, ce qui peut être fait dans le cadre d'un événement test en vous ajoutant en tant que participant.
Voici quelques paramètres courants du serveur SMTP. Veuillez noter que ces paramètres changent et qu'ils peuvent n'être exacts que jusqu'à la date de rédaction de ce document, le 17 mars 2020.
Paramètres SMTP d'Office 365
- Adresse du serveur : smtp.office365.com
- Port : 587
- Cryptage : TLS
Paramètres SMTP Outlook
- Adresse du serveur : smtp-mail.outlook.com
- Port : 587
- Cryptage : TLS
Paramètres SMTP de GoDaddy en Amérique
- Adresse du serveur : smtpout.secureserver.net
- Port : 465 ou 587
- Encryption : SSL
Paramètres SMTP de Gmail
- Adresse du serveur : smtp.gmail.com
- Port: 587
- Encryption: TLS
Gmail requiert un niveau de sécurité supplémentaire. Vous devrez générer un mot de passe supplémentaire sur votre compte Gmail afin d'utiliser Gmail avec RR12. Ce mot de passe généré sera utilisé à la place du mot de passe normal de votre compte Google.
Formulaires d'inscription
L'inscription peut être gérée dans RACE RESULT 14 soit en ligne (lors de l'enregistrement de l'événement), soit localement en tant qu'inscription sur place. Cette fonction peut également être étendue à un libre-service permettant aux participants de mettre à jour leurs données (uniquement disponible en ligne).
Plusieurs formulaires d'inscription peuvent être configurés dans la fenêtre principale, où chaque formulaire est l'un des quatre types suivants :
- Inscription unique
- Inscription de groupe (saisie simultanée de plusieurs inscriptions)
- Libre-service individuel
- Libre-service de groupe
Pour accéder au libre-service, une URL unique est générée pour chaque participant, qui contient une clé unique pour la sécurité. L'URL peut être récupérée à l'aide de la fonction Changelink.
Chaque formulaire d'inscription génère une URL unique qui peut être ouverte directement, ou le formulaire peut être inclus dans la page d'inscription my.raceresult.
Paramètres généraux
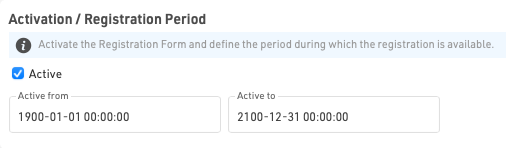
Période d'activation / d'enregistrement
Définissez la plage de dates pendant laquelle un formulaire d'inscription doit être disponible, ou activez/désactivez manuellement un formulaire dans son intégralité.
Notez que la date et l'heure dépendent du fuseau horaire de votre fichier d'événement.
Type d'enregistrement
Définir le titre et le type de formulaire pour le formulaire d'inscription.

Si vous utilisez un enregistrement de groupe, vous devez également définir les valeurs min, max, par défaut et d'incrémentation.

L'incrément est le nombre de nouvelles entrées ajoutées lorsque l'utilisateur clique sur "ajouter une inscription" dans le formulaire.
Lors de la création d'un formulaire en libre-service (individuel ou collectif), vous pouvez appliquer un filtre pour définir les participants pour lesquels le formulaire doit être disponible, ou les participants qui doivent être inclus dans le groupe.
En outre, pour les formulaires en libre-service de groupe, vous pouvez définir le champ d'identité - il s'agit du champ sur lequel les participants doivent être appariés afin de faire partie du même groupe, par exemple le club si vous gérez l'inscription d'un club ou d'une équipe. Par défaut, ce champ utilise le GroupID.

Concours / Limite d'inscription
Si le formulaire d'inscription ne doit être disponible que pour un concours spécifique, sélectionnez ici le concours et définissez éventuellement une limite d'inscription.
Si vous sélectionnez Tous les concours, la limite d'inscription s'applique au nombre total de participants. Notez que des limites individuelles peuvent être appliquées au formulaire d'inscription.

Si vous souhaitez exclure certains concours d'un formulaire, vous pouvez le faire en utilisant les paramètres étendus des champs de saisie.
Intégration au site web
Les formulaires d'inscription individuels peuvent être intégrés directement à votre propre site web à l'aide du code d'intégration de chaque formulaire.
Pour plus d'informations sur l'intégration des formulaires d'inscription dans votre propre site web, voir Intégration au site web.
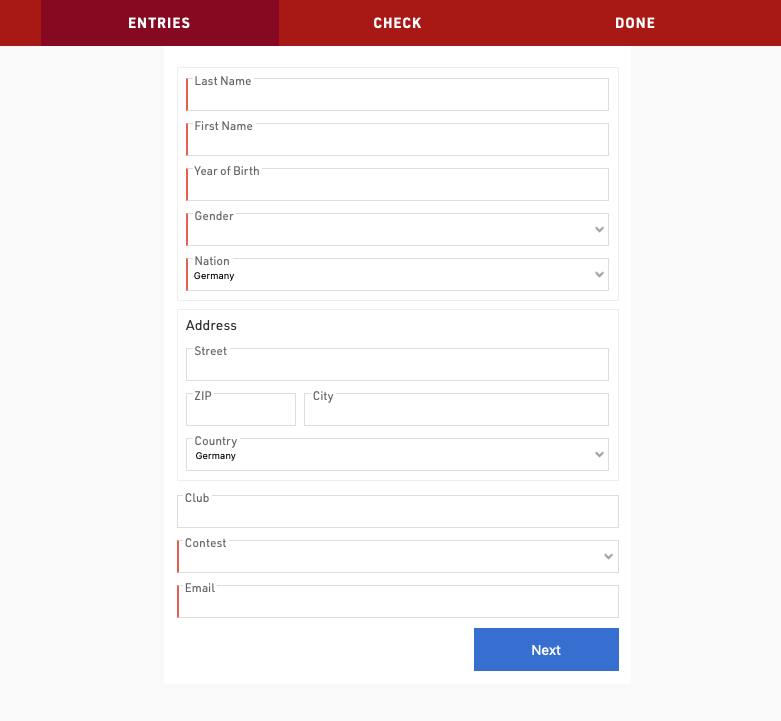
Formulaire d'inscription
Chaque formulaire d'inscription peut contenir un nombre arbitraire d'étapes, chaque étape pouvant saisir/afficher des données différentes.
Un formulaire d'inscription classique comporte au moins deux étapes, la première pour saisir les données du participant et la seconde comme page de contrôle pour confirmer que les détails sont corrects et accepter les conditions générales applicables.

L'étape doit avoir un titre, qui s'affiche dans la barre de navigation supérieure pendant la procédure d'enregistrement. Les étapes individuelles peuvent également avoir des dates actives de début et de fin si certaines options ne sont valables que pour une période spécifique. En option, le texte du bouton "Suivant" peut être personnalisé.
Lors de la navigation avant/arrière entre les étapes, le contenu à afficher est calculé par le serveur, ce qui permet aux formulaires de calculer les données de manière dynamique. Il est également possible de forcer une étape à rafraîchir les données affichées à l'aide de l'option Paramètres étendus.
Paiement en ligne
Le paiement en ligne vous permet de saisir le paiement directement dans le cadre de l'enregistrement. Lorsque cette option est activée, les étapes supplémentaires pour sélectionner et effectuer le paiement sont automatiquement générées lorsque le formulaire d'enregistrement est chargé.
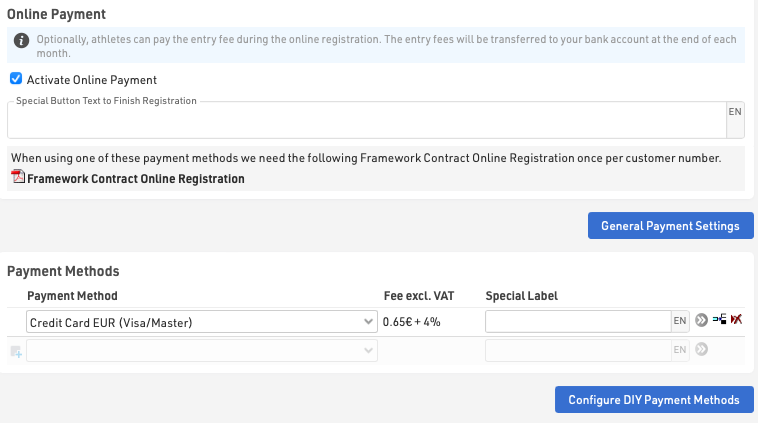
Méthodes de paiement
RACE RESULT offre une gamme d'options de méthodes de paiement par le biais de l'inscription en ligne, notez que toutes les méthodes de paiement ne sont pas disponibles dans tous les pays.
Pour les paiements où des frais sont perçus par RACE RESULT, le contrat d'inscription en ligne est requis, un lien vers celui-ci sera affiché lorsqu'un mode de paiement le nécessitant est sélectionné. Ces méthodes de paiement sont soumises à des frais et à des paiements conformément au contrat, les frais pour chaque méthode sont indiqués dans les paramètres.
Le texte du bouton spécial pour terminer l'enregistrement est affiché pour les méthodes où l'utilisateur n'est pas redirigé vers une autre page de paiement (par exemple, SEPA, virement bancaire ou paiements en espèces).
Méthodes de paiement instantané
Le participant effectue un paiement direct en ligne, normalement à l'aide d'une carte de crédit ou de débit, disponible pour les transactions en EUR, CHF, GBP, USD avec l'Europe uniquement.
Méthodes de paiement différé
Le participant peut effectuer un transfert à une date ultérieure sur les comptes de RACE RESULT en Allemagne ou en Suisse. Ces transferts ne seront marqués comme payés qu'une fois les fonds reçus.
Traitement des paiements par soi-même
Si vous disposez d'un compte auprès d'une plateforme de paiement reconnue, les participants effectueront un paiement direct via cette plateforme, qui sera ensuite versé directement sur votre compte, à vos risques et périls. Veuillez noter que le paiement par carte de crédit est généralement la seule méthode de paiement prise en charge par ces passerelles de paiement, même si elles proposent un certain nombre de méthodes de paiement différentes.
Vous devrez entrer les détails de votre compte en fonction de la méthode choisie.
Les méthodes de paiement disponibles et leurs frais sont décrits dans l'article ci-dessous.
Confirmation Page
The confirmation page is automatically added as a step to the end of the registration after either the last step defined in the form or the online payment if enabled.
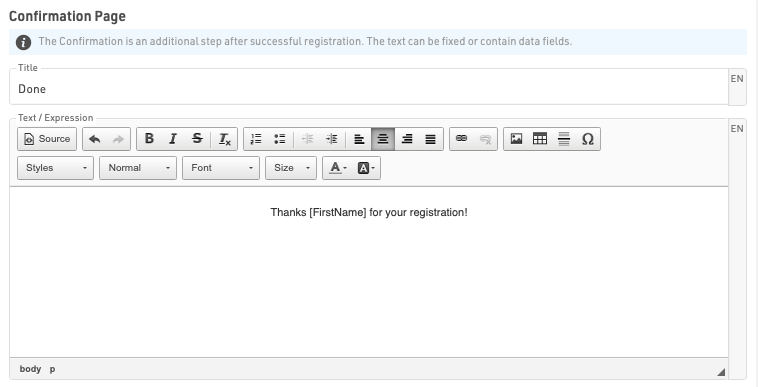
The Confirmation Page can be given a label and then allows for fully customised HTML text to be entered.
Additionally it is possible to use any fields or functions in the confirmation to display participant or event data, note that for Group Registrations, data is only shown for the first participant of the group.
A button to enter a new registration is always displayed below the confirmation by default.
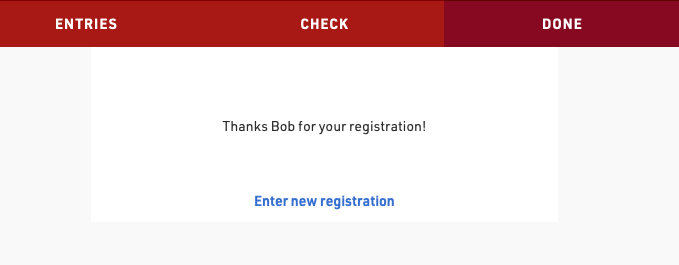
If an error occurs during the registration then this will additionally be displayed to the participant in the confirmation page.
Après les actions de sauvegarde
Les actions d'enregistrement sont déclenchées lorsqu'une inscription est terminée, après la dernière étape du formulaire d'inscription ou le paiement en ligne, si celui-ci est activé.
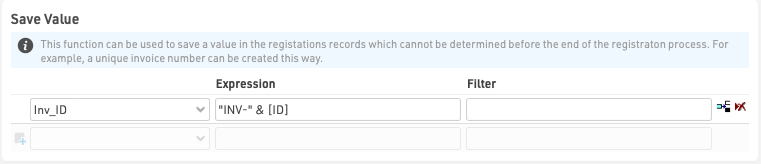
Enregistrer la valeur
Cette fonction peut être utilisée pour enregistrer une valeur dans les dossiers d'inscription qui ne peut être déterminée avant la fin du processus d'inscription, par exemple un numéro de facture unique ou un identifiant d'inscription.
La valeur peut être enregistrée dans n'importe quel champ par défaut ou champ supplémentaire et doit être saisie sous la forme d'une expression Expression normale pouvant utiliser n'importe quel autre champ ou fonction. En option, un filtre peut être appliqué pour n'enregistrer cette valeur que pour des participants spécifiques.
Envoyer un e-mail
La fonction « Envoyer un e-mail » permet d'envoyer tout modèle d'e-mail/SMS préconfiguré, souvent utilisé comme confirmation d'inscription. Différents modèles peuvent être filtrés pour différents participants si nécessaire. Par exemple, un e-mail d'inscription de groupe peut être configuré différemment d'un e-mail d'inscription individuelle.

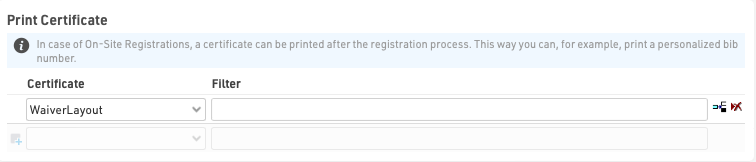
Imprimer le certificat
Cette option est utilisée lorsque le formulaire d'inscription est utilisé pour l'inscription sur place, par exemple pour imprimer un numéro de dossard directement après l'inscription.
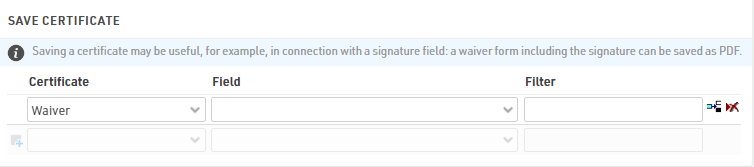
Enregistrer le certificat
L'enregistrement d'un certificat peut être utile en relation avec un champ de signature, où la signature sur un formulaire de décharge est enregistrée au format PDF.
Paramètres avancés
Les paramètres avancés s'appliquent à toutes les inscriptions effectuées via le formulaire d'inscription afin de personnaliser le comportement ou le style.
Paramètres
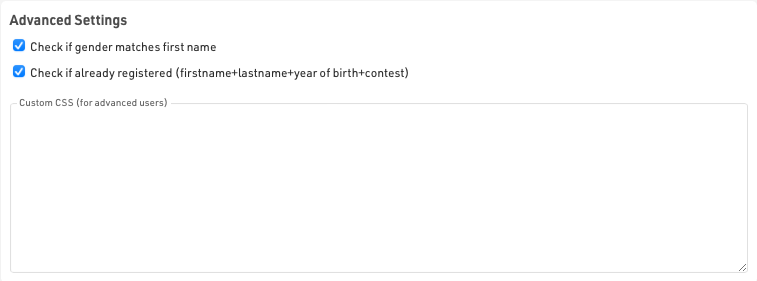
Vérifier si le sexe correspond au prénom : cela avertira l'utilisateur s'il a potentiellement saisi un sexe incorrect en fonction du prénom. Les données utilisées ici sont basées sur les tendances de tous les événements stockés sur les serveurs RACE RESULT et ne sont en aucun cas fixes.
Vérifier si l'utilisateur est déjà inscrit : n'accepter une inscription que s'il n'existe pas déjà une inscription avec le même prénom, le même nom, la même année de naissance et dans le même concours afin d'éviter les inscriptions/paiements en double.
CSS : CSS personnalisé qui s'applique à l'ensemble de la page dans laquelle le formulaire d'inscription est chargé.
Enregistrer des valeurs supplémentaires
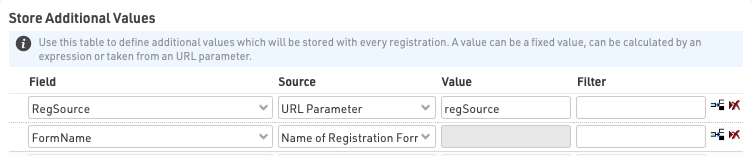
Cela permet de saisir des données supplémentaires spécifiques à enregistrer avec chaque inscription. La valeur peut être enregistrée dans n'importe quel champ par défaut ou supplémentaire. En option, un filtre peut être appliqué pour n'enregistrer ces données que pour certains participants. Elles sont enregistrées lors de la saisie de l'inscription, donc avant que toute action postérieure à l'enregistrement ne soit déclenchée.
Les valeurs supplémentaires ne seront enregistrées que si le champ ne fait pas partie des champs habituels du formulaire d'inscription. Si le champ est inclus, cette valeur sera toujours prioritaire. Les champs supplémentaires peuvent également être utilisés pour les filtres « afficher si ».
Notez qu'à l'exception de l'expression source, les valeurs doivent être saisies sous forme de texte brut et non sous forme d'expression RACE RESULT, ce qui signifie qu'il ne doit pas y avoir de guillemets autour de la valeur pour le texte brut.
Il existe plusieurs sources différentes à partir desquelles les données peuvent être extraites.
| Valeur fixe | Une valeur textuelle fixe à stocker dans un champ. |
| Expression | Calcule une valeur à partir d'une expression à enregistrer. |
| Valeur maximale + 1 | Prend la valeur maximale actuelle pour le champ spécifié pour tous les participants inscrits, plus un. |
| Valeur maximale + 1 (concours) | Prend la valeur maximale actuelle pour le champ spécifié pour les participants inscrits au même concours, plus un. |
| Paramètre URL | Enregistre la valeur du paramètre de requête URL spécifié. |
| URL | Enregistre l'URL complète à partir de laquelle le formulaire d'inscription a été chargé. |
| Nom du formulaire d'inscription | Enregistre le nom du formulaire d'inscription. |
| Langue | Stocke la langue utilisée pendant le processus d'inscription. Il s'agit de la langue de my.raceresult.com lorsque vous utilisez l'inscription en ligne standard. Notez que cela n'est requis que pour les applications spéciales, car le champ Langue par défaut sera toujours stocké lors de l'enregistrement des données d'inscription. |
| Nombre d'inscriptions de groupe | Le nombre de participants inscrits dans l'inscription de groupe. |
| Valeur provenant de l'enregistrement de connexion | Récupère la valeur du champ spécifié pour l'enregistrement du participant actuellement connecté, lors de l'utilisation de la fonction de connexion my.rr. |
Paramètres généraux de paiement
Les paramètres généraux de paiement se rapportent au paiement des frais par RACE RESULT conformément au contrat d'inscription en ligne.
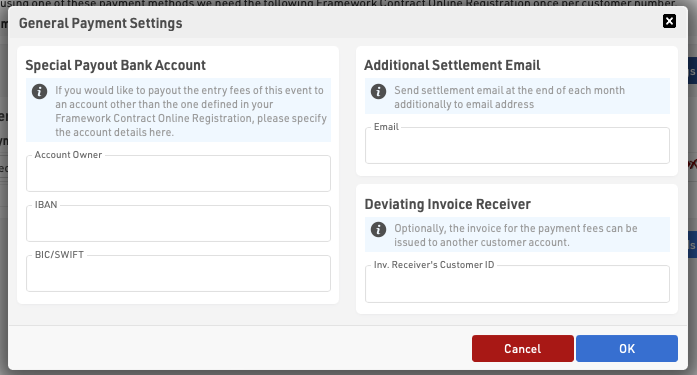
Compte bancaire spécial de paiement
Si vous souhaitez que les frais soient payés directement sur un compte différent de celui indiqué dans votre contrat, par exemple celui de l'organisateur pour lequel vous agissez en son nom, vous pouvez fournir les détails du compte ici.
Courriel de règlement supplémentaire
Le récapitulatif des détails du règlement peut être envoyé à une adresse électronique supplémentaire spécifiée ici.
Destinataire de la facture différent
Si le paiement doit être versé à un autre titulaire de compte RACE RESULT, vous pouvez indiquer son numéro de compte ici.
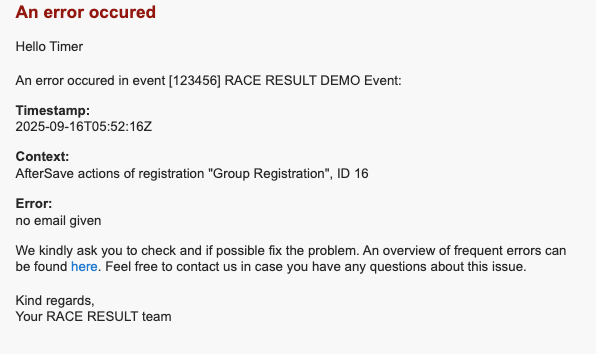
Messages d'erreur
Si une erreur survient lors de l'enregistrement d'une inscription, un e-mail vous sera automatiquement envoyé avec la description de l'erreur.
Les causes possibles des erreurs sont les suivantes :
Erreurs d'envoi d'e-mails
- Aucun modèle d'e-mail sélectionné
- Configuration SMTP non valide
- Adresse e-mail du destinataire manquante ou non valide
- Configuration du modèle non valide
- Erreurs du serveur de messagerie
Actions après enregistrement
- Tentative d'utiliser une action d'impression sans imprimante connectée
Erreurs de paiement en ligne
- Identifiants de passerelle de paiement DIY invalides ou manquants
Le contenu de l'e-mail doit indiquer la cause de l'erreur. Si vous ne comprenez pas ce qui cause l'erreur, vous pouvez contacter support@raceresult.com
Certaines erreurs SMTP courantes sont expliquées ici.
Remarque :
L'ID indiqué dans le contexte est l'ID du participant dont l'inscription a déclenché l'erreur. Identifiez rapidement le participant en question à l'aide du filtre d'affichage des participants, par exemple avec l'expression [ID]=123.
my.raceresult.com
La page my.raceresult.com est utilisée pour configurer les pages de résultats et plateforme d'inscription en ligne ainsi que pour gérer les réclamations sur my.raceresult.com.
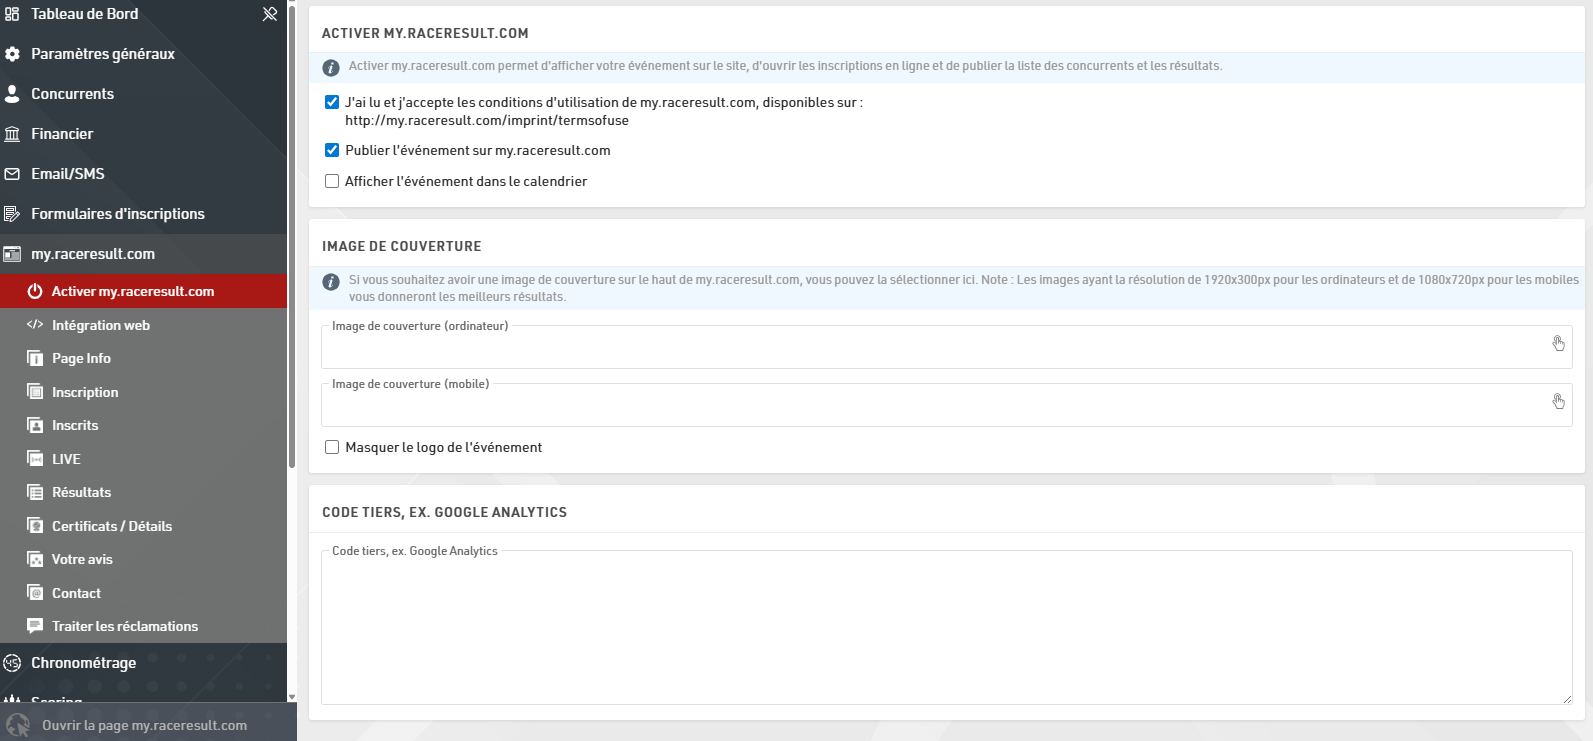
Activate my.raceresult.com
Afin d'afficher votre épreuve dans le calendrier de my.raceresult.com, de publier les résultats en ligne, d'utiliser la plateforme des inscriptions en ligne, vous devez commencer par accepter les conditions d'utilisation, puis publier l'événement en utilisant les cases à cocher.

Par défaut, l'événement sera puiblié dans le calendrier principal de my.raceresult.com, si vous ne souhaitez l'afficher, vous pouvez décocher la case "Afficher l'événement dans le calendrier".
Lors de la visualisation de l'événement, une banière est affichée en haut de page, une image de couverture standard est affichée par défaut, en fonction de la discipline sélectionnée dans les Paramètres Généraux > Paramètres de l'événement.
Vous pouvez choisir de télécharger vos propres images de bannière à utiliser ici à la place. La taille de la bannière pour les ordinateurs de bureau est de 1920x300px et celle pour les appareils mobiles est de 1080x720px. Les images qui ne respectent pas ces dimensions seront comprimées ou étirées.
La couleur des éléments du menu peut être définie à l'aide de la fonction ''Couleur de marque''. Il est recommandé d'utiliser des couleurs plus foncées pour la "Couleur de marque" afin qu'elle ressorte bien sur un fond plus clair. Toute modification CSS personnalisée effectuée dans la section "Code supplémentaire", par exemple pour Google Analytics, ne s'appliquera qu'à la zone située sous le menu.
Si vous chargez un logo de l'événement, il sera affiché. Comme le logo chevauchera la banière, vous pouvez le masquer en cochant la case "Masquer le logo de l'événement".
Notez que cette image de couverture est stockée en cache dans votre navigateur. Si l'image ne change pas après mise à jour, vous devriez probablement effacer les données de navigation, ou essayer d'ouvrir la page depuis un autre navigateur ou en navigation privée.
Les coordonnées du directeur de course, du chronométreur et du prestataire de services de paiement tiers peuvent être saisies sur cette page. Ces informations s'afficheront dans l'onglet contact, qui est le seul onglet ne pouvant pas être supprimé si la publication est activée.
Onglets
La page événement de my.raceresult.com a été repensée : le système de sous-pages fixes laisse place à un système d'onglets beaucoup plus flexible. Les onglets peuvent désormais être configurés avec différents noms, types et paramétrages temporels, vous offrant ainsi un meilleur contrôle sur le design de votre page événement sur my.raceresult.com. Les fichiers d'événements existants sont automatiquement convertis vers cette nouvelle structure. Les nouveaux événements seront créés avec un ensemble d'onglets par défaut, comprenant : Info, Inscription, Participants, Live, Résultats, Avis et Contact. Chacun de ces onglets peut désormais être déplacé, renommé ou programmé indépendamment.

Paramètres du Titre / de l'URL
Cette section définit l'apparence de l'onglet dans le menu de navigation, le modèle utilisé ainsi que son adresse Web.
Préréglage d'URL (URL Preset) : Sélectionnez un modèle standard et un chemin d'accès. Cela définit automatiquement le comportement de l'onglet.
Titre : Si vous souhaitez un nom personnalisé dans le menu (par exemple « Voir vos temps » au lieu de « Résultats »), saisissez-le ici. La traduction est possible en sélectionnant les langues choisies et en ajoutant le texte. Si ce champ est laissé vide, le nom du préréglage d'URL sera utilisé par défaut.
URL personnalisée : Lorsque vous utilisez un préréglage d'URL personnalisée, vous pouvez définir une URL spécifique ici.
Paramètres Généraux
Ces commandes gèrent le statut et la visibilité de la page. Le bouton Publier active l'URL publique de l'onglet. La Visibilité du menu détermine comment les utilisateurs accèdent à l'onglet :
- Jamais : Toujours masqué du menu ; accessible via un lien direct ou une intégration (embed).
- Si actif : Visible uniquement pendant les dates définies dans "Page active du / au".
- Toujours : Toujours visible ; apparaît grisé en dehors des dates de validité de la page.
Utilisez les champs Page active du / au pour automatiser l'accès à l'onglet selon un calendrier précis, par exemple pour désactiver les inscriptions et activer les résultats en direct (Live) dès le début de l'événement.
Ajouter un nouvel onglet
Lors de l'ajout d'un nouvel onglet, vous sélectionnez d'abord le type de contenu de l'onglet. Le modèle du nouvel onglet dépendra de votre sélection. Le type Texte utilisera le modèle d'information et le contenu externe permettra d'intégrer du contenu ou des vidéos provenant de sources externes.
Certificates / Details
As part of the personal results page under Participants / Live / Results tabs you can additionally show a customised header for each participant and publish certificate sets.
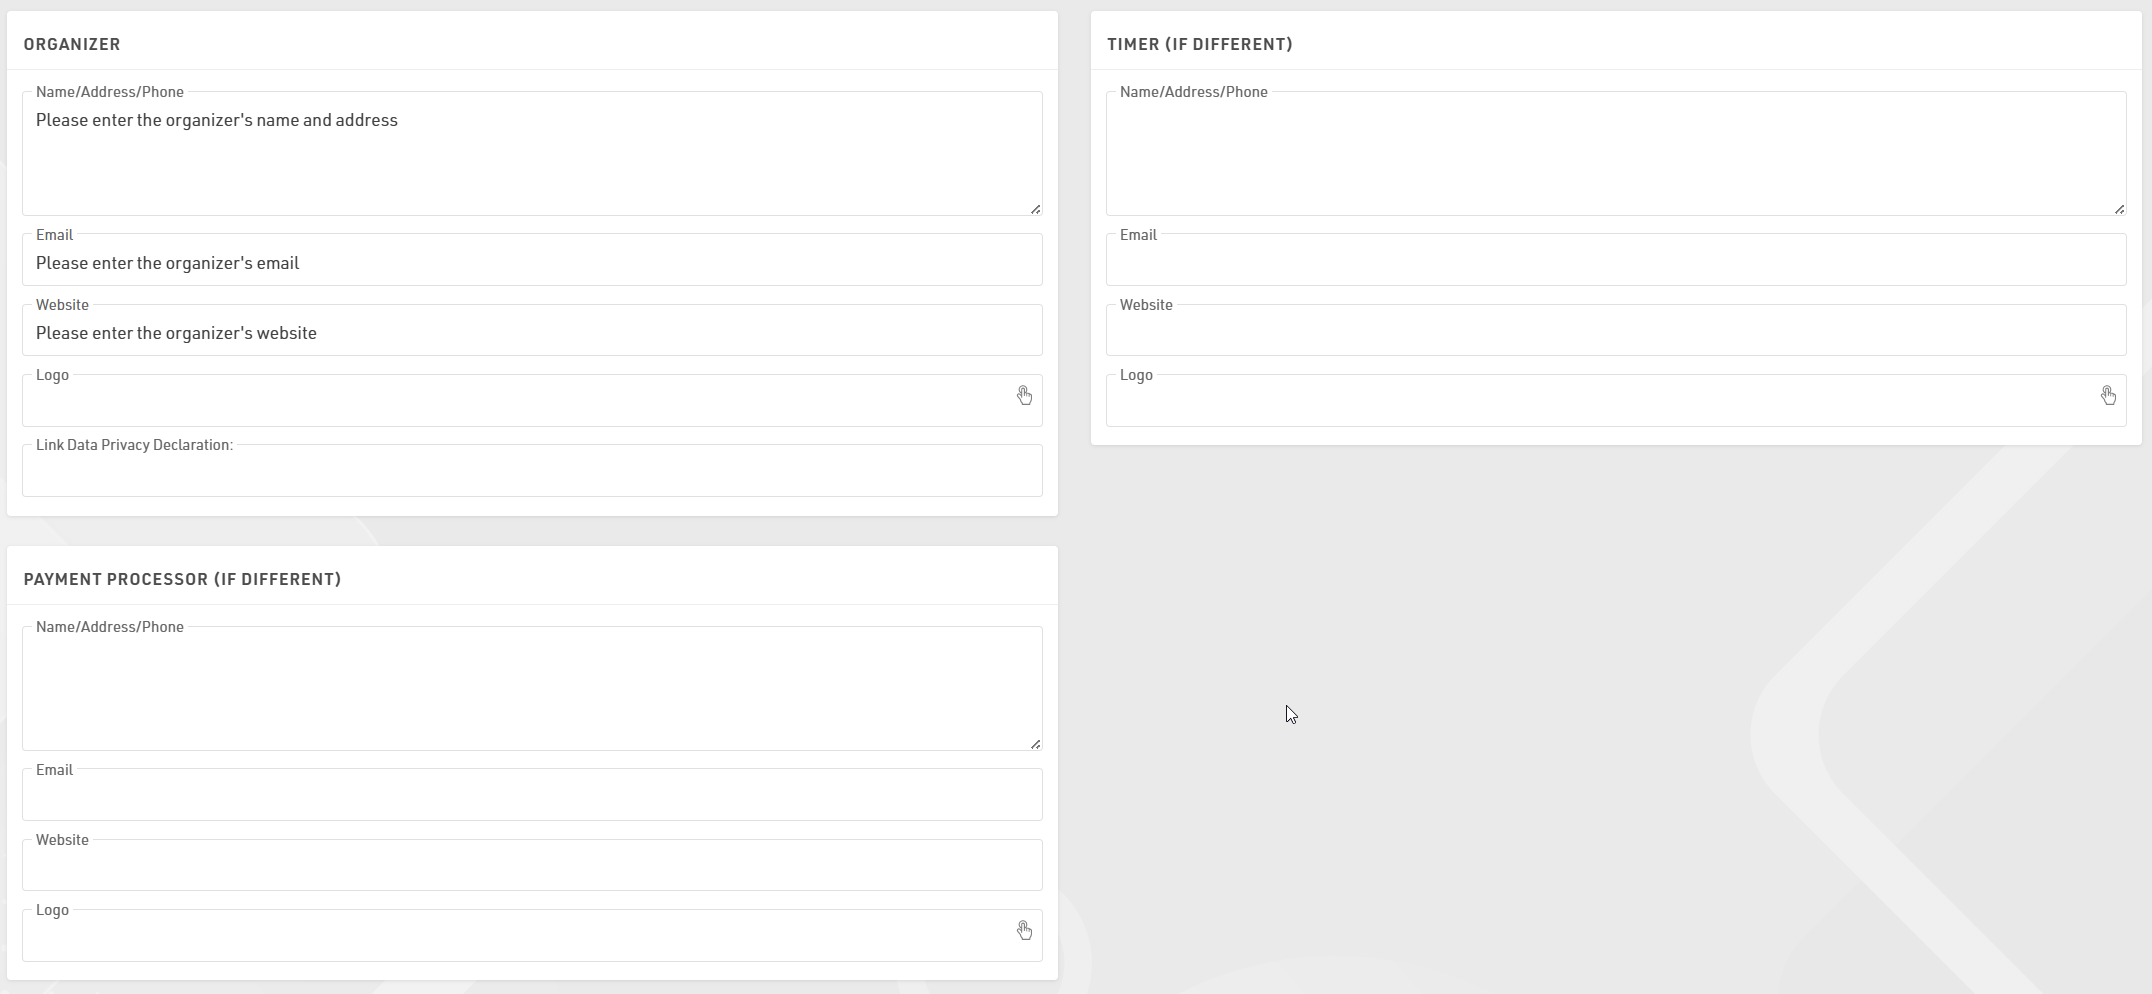
Header Area
The Header Line should be written as an Expression and can contain text and fields. This is displayed at the top of the popup window and is always shown even when scrolling.
Header Text allows you to enter custom text or HTML to be displayed as a header, this is displayed above the Splits details or any published details list.

Start/Splits/Finish
The Splits settings are consistent across all published lists when enabled, see Detailed Results.
Publish Certificates

Select which certificate sets should be published and for which contests, individual sets can be enabled or disabled as required, or a general active date range can also be defined.
By default a preview of the certificate is shown as visible in the designer, you can alternatively upload a custom image preview to be shown instead. Similarly the name of the certificate set will be shown or a custom label can be defined.
Links

In the popup window, you can also publish personal links to other websites which you can define here. Customize the URL by using an expression to forward participants to a custom landing page, such as their personal race photos or videos.
Photos
You can link directly to an individual participant's event photos with one of the below-listed integrations. Select the platform to link to, enter the platform's Event ID, and it will show samples of the first 5 photos for that participant which also link to a unique gallery for that participant. If matching is done on an alpha-numeric bib number you can match this using the optional field.
Available Photo Integrations
Website Integration
RACE RESULT vous permet d'intégrer facilement dans le site de l'événement ces pages de Résultats, LIVE, Inscrits et Inscription en ligne.
Cela se fait grâce à de petits extraits de code JavaScript qui chargent les résultats directement sur votre site web (sans iframe). Tous les styles CSS de votre site seront appliqués à l'inscription en ligne et aux résultats. Au besoin, vous pouvez ajouter du CSS pour personnaliser l'apparence.
Le code JavaScript à copier-coller sur votre site web se trouve dans le menu my.raceresult.com > Intégration web.
Les articles ci-dessous expliquent plus en détail les différents types de code d'intégration.
Voici un exemple pour les Résultats :
<div id="divRRPublish" class="RRPublish"></div>
<script type="text/javascript" src="//my.raceresult.com/RRPublish/load.js.php?lang=en"></script>
<script type="text/javascript">
<!--
   var rrp=new RRPublish(document.getElementById("divRRPublish"), 58385, "results");
-->
</script>
<style>
   /* Add custom CSS here or elsewhere to change the design */
</style>
Dans la capture d'écran ci-dessus, certaines couleurs du cadre des résultats ont été modifiées ; ceci est réalisé à l'aide de CSS personnalisé dans les balises de style.
Handle Inquiries
Athletes can file inquiries by filling out the inquiry form on the Contact page of an event on my.raceresult.com. It serves to standardize communication between participant and race director/timer.
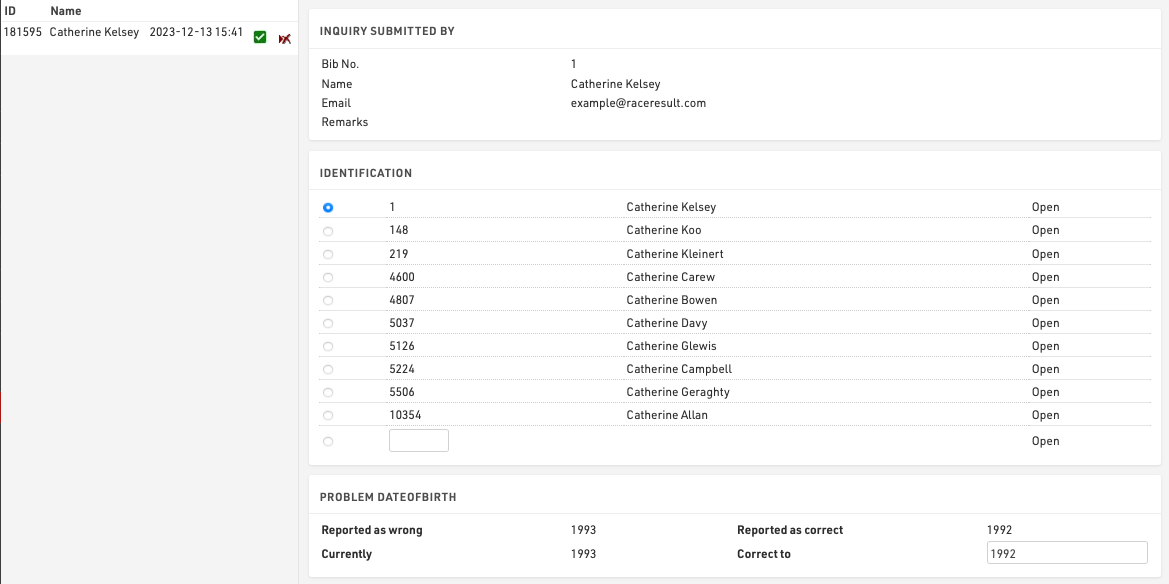
On the left side you can see all the inquiries which were submitted for this event. By clicking on an entry in the list the inquiry is shown on the right side. By clicking on the delete-icon in the list you can remove the inquiry completely or mark it as 'done' (in case you have already responded to it by email or phone).
There are five steps to handle an inquiry.
- Determine which participant sent the inquiry. Under Identification you can find some suggestions.
- The reported problems are displayed. Determine how to correct these.
- Optionally choose to send a response email and fill up the text.
- Optionally enter some notes (for internal reference)
- Click on Correct to finish editing, correct the problem and send the response email.
Timing
The Timing window contains important timing settings and the main interface for connecting to timing systems during the event.
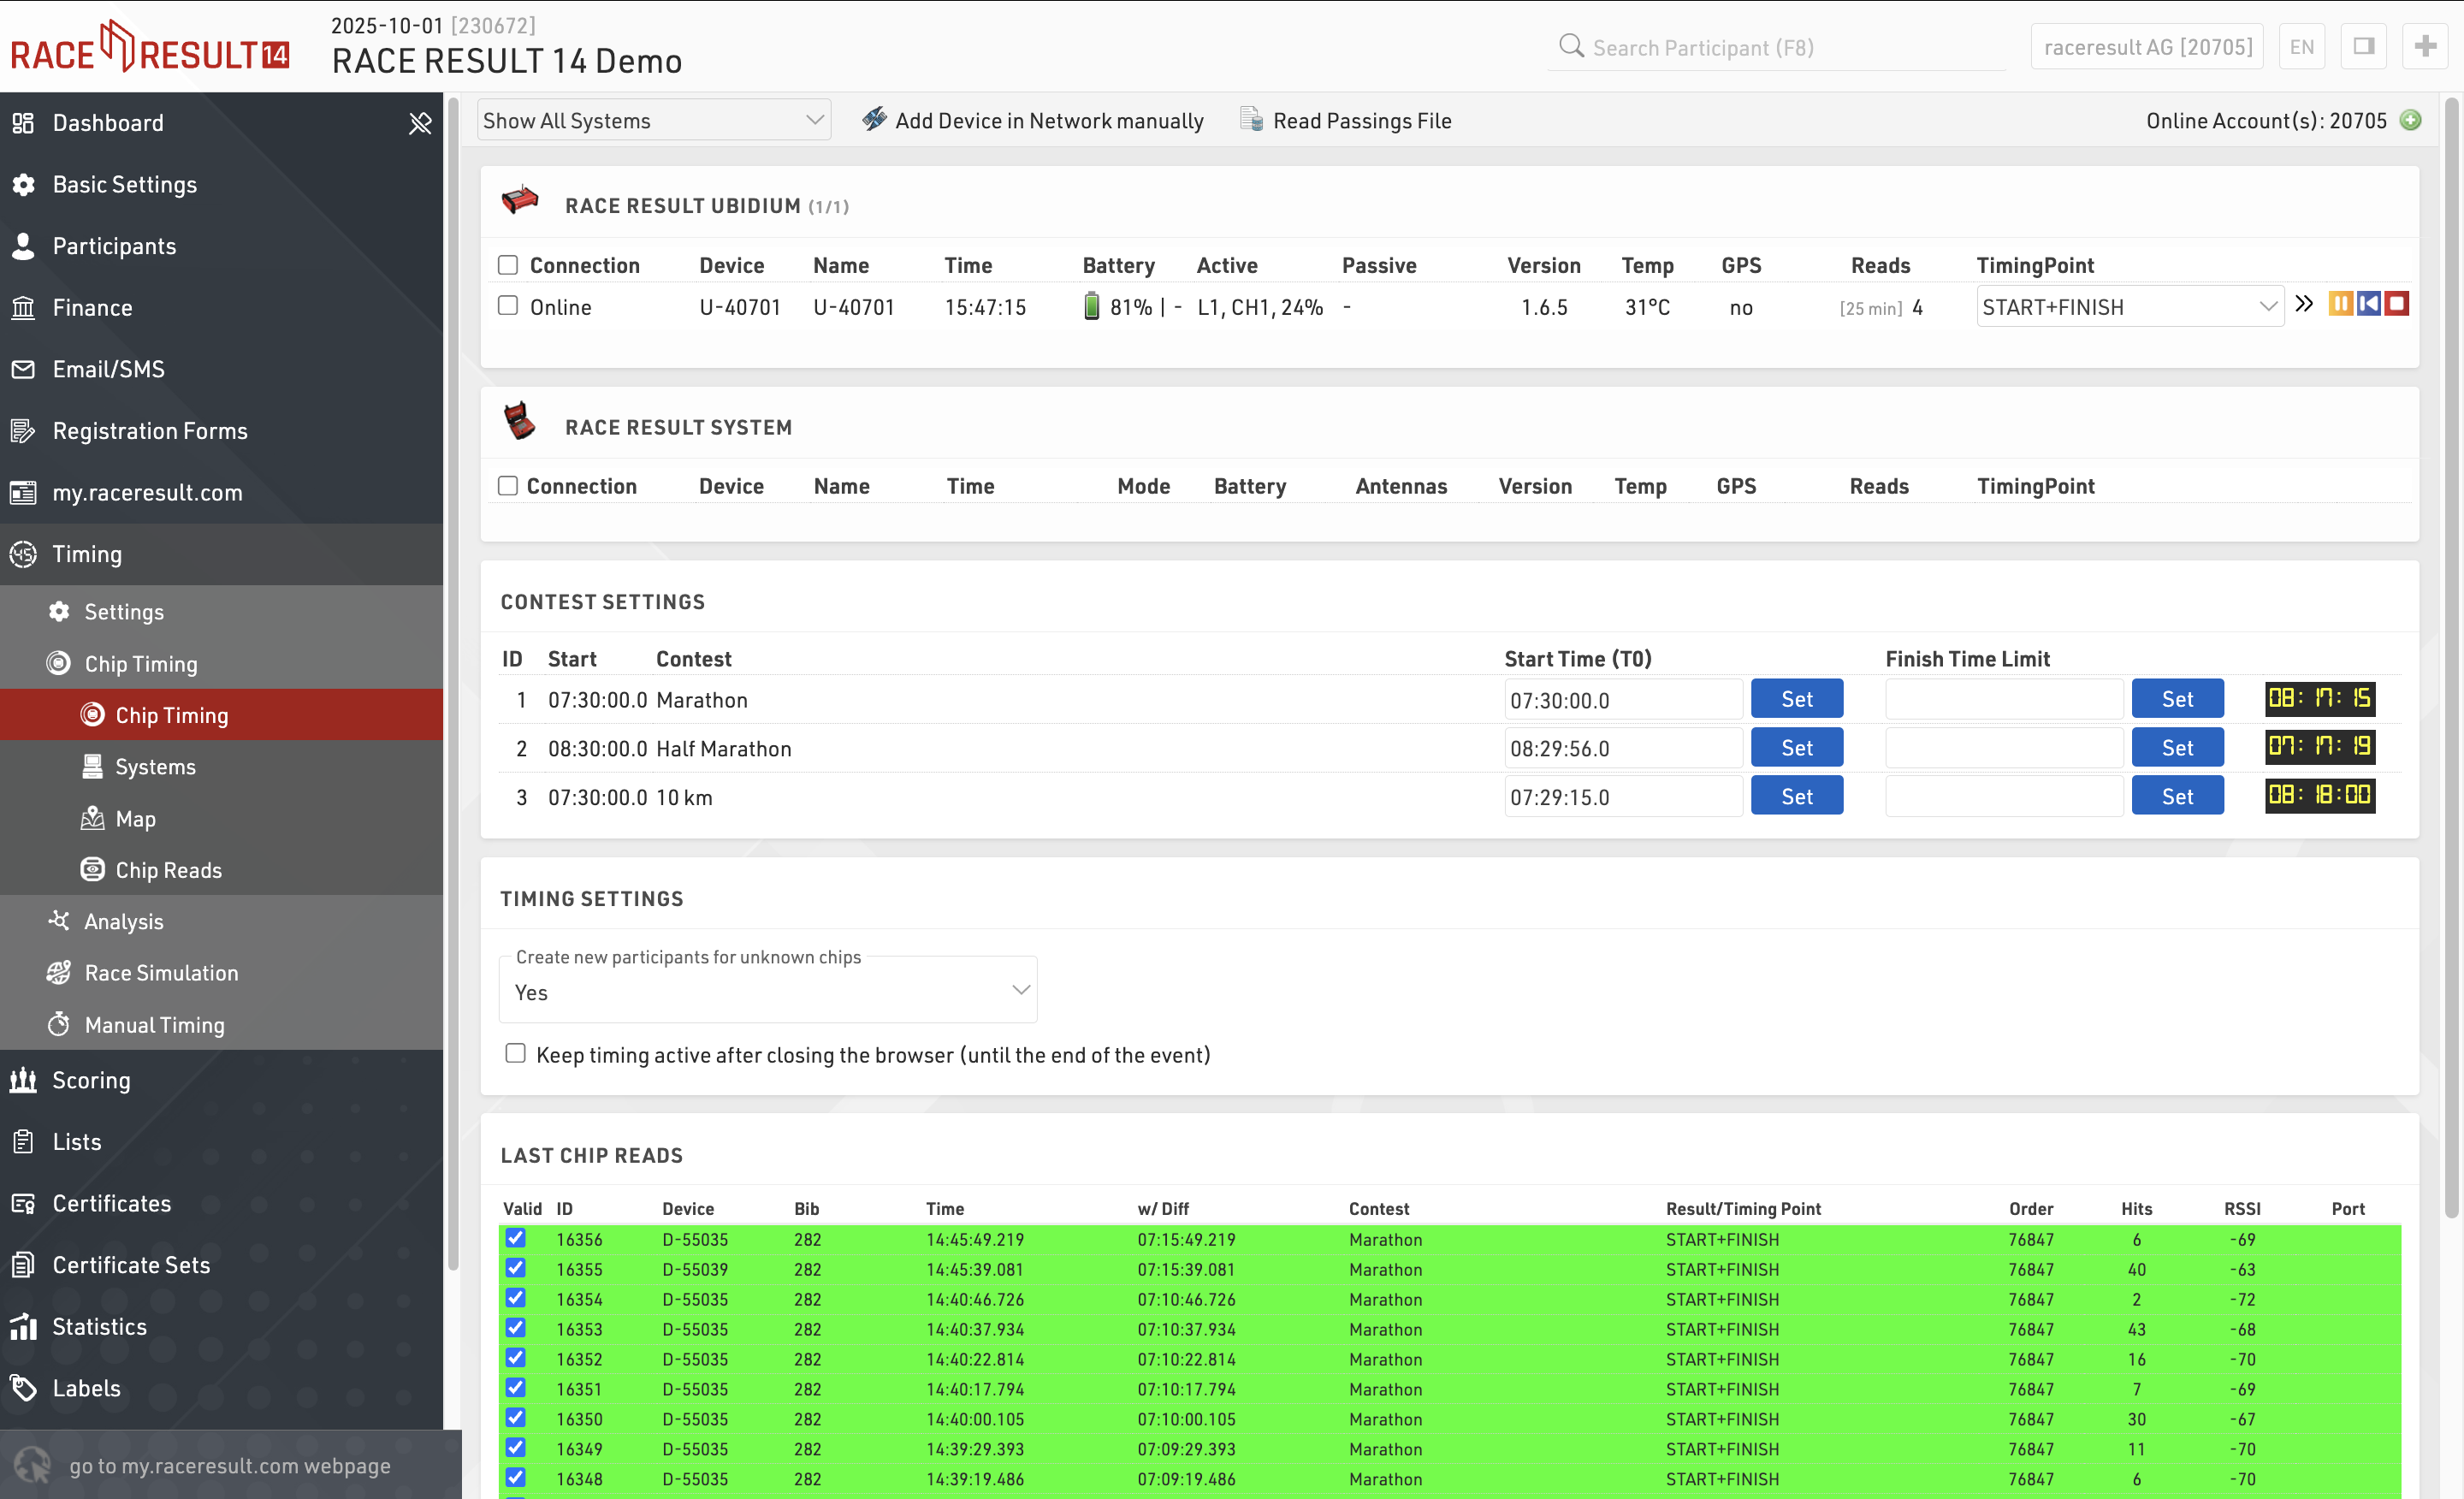
By default the Settings page will be opened if the current date is before the start of the event, after which the Chip Timing page will be opened automatically.
Settings
The settings primarily control how raw timing data should be handled by RACE RESULT 14.
Timing Points - Each raw data record should be assigned to a timing point which identifies where it was recorded, for example the START, FINISH or your Split Timing Points on course.
Chip File - A chip file helps to identify to which participant a raw data record should be assigned.
Start Times / Finish Time Limits - The official start time (T0) to be used for timing the race, this is used by your Splits or Special Results setup to calculate race times. Optionally, a maximum time can be set.
Exporters / Forwarding - Trigger the sending of e-mails / SMS or to export/forward data to third party platforms if required.
Chip Timing
Chip Timing is used to handle the connections to your timing systems and the flow of raw timing data.
Analysis
Under Analysis you will find some tools which are useful for analysing your event whilst it is ongoing, these are designed to aid you with Timing the event by identifying any erroneous data, most often caused by participant error.
Race Simulation
This tool serves to simulate the race before race day to make sure all your settings are correct. You can either generate all times all at once (so you basically get the final results after race day) or you can simulate the times live. The latter is helpful to test functions like announcer screens or result screens.
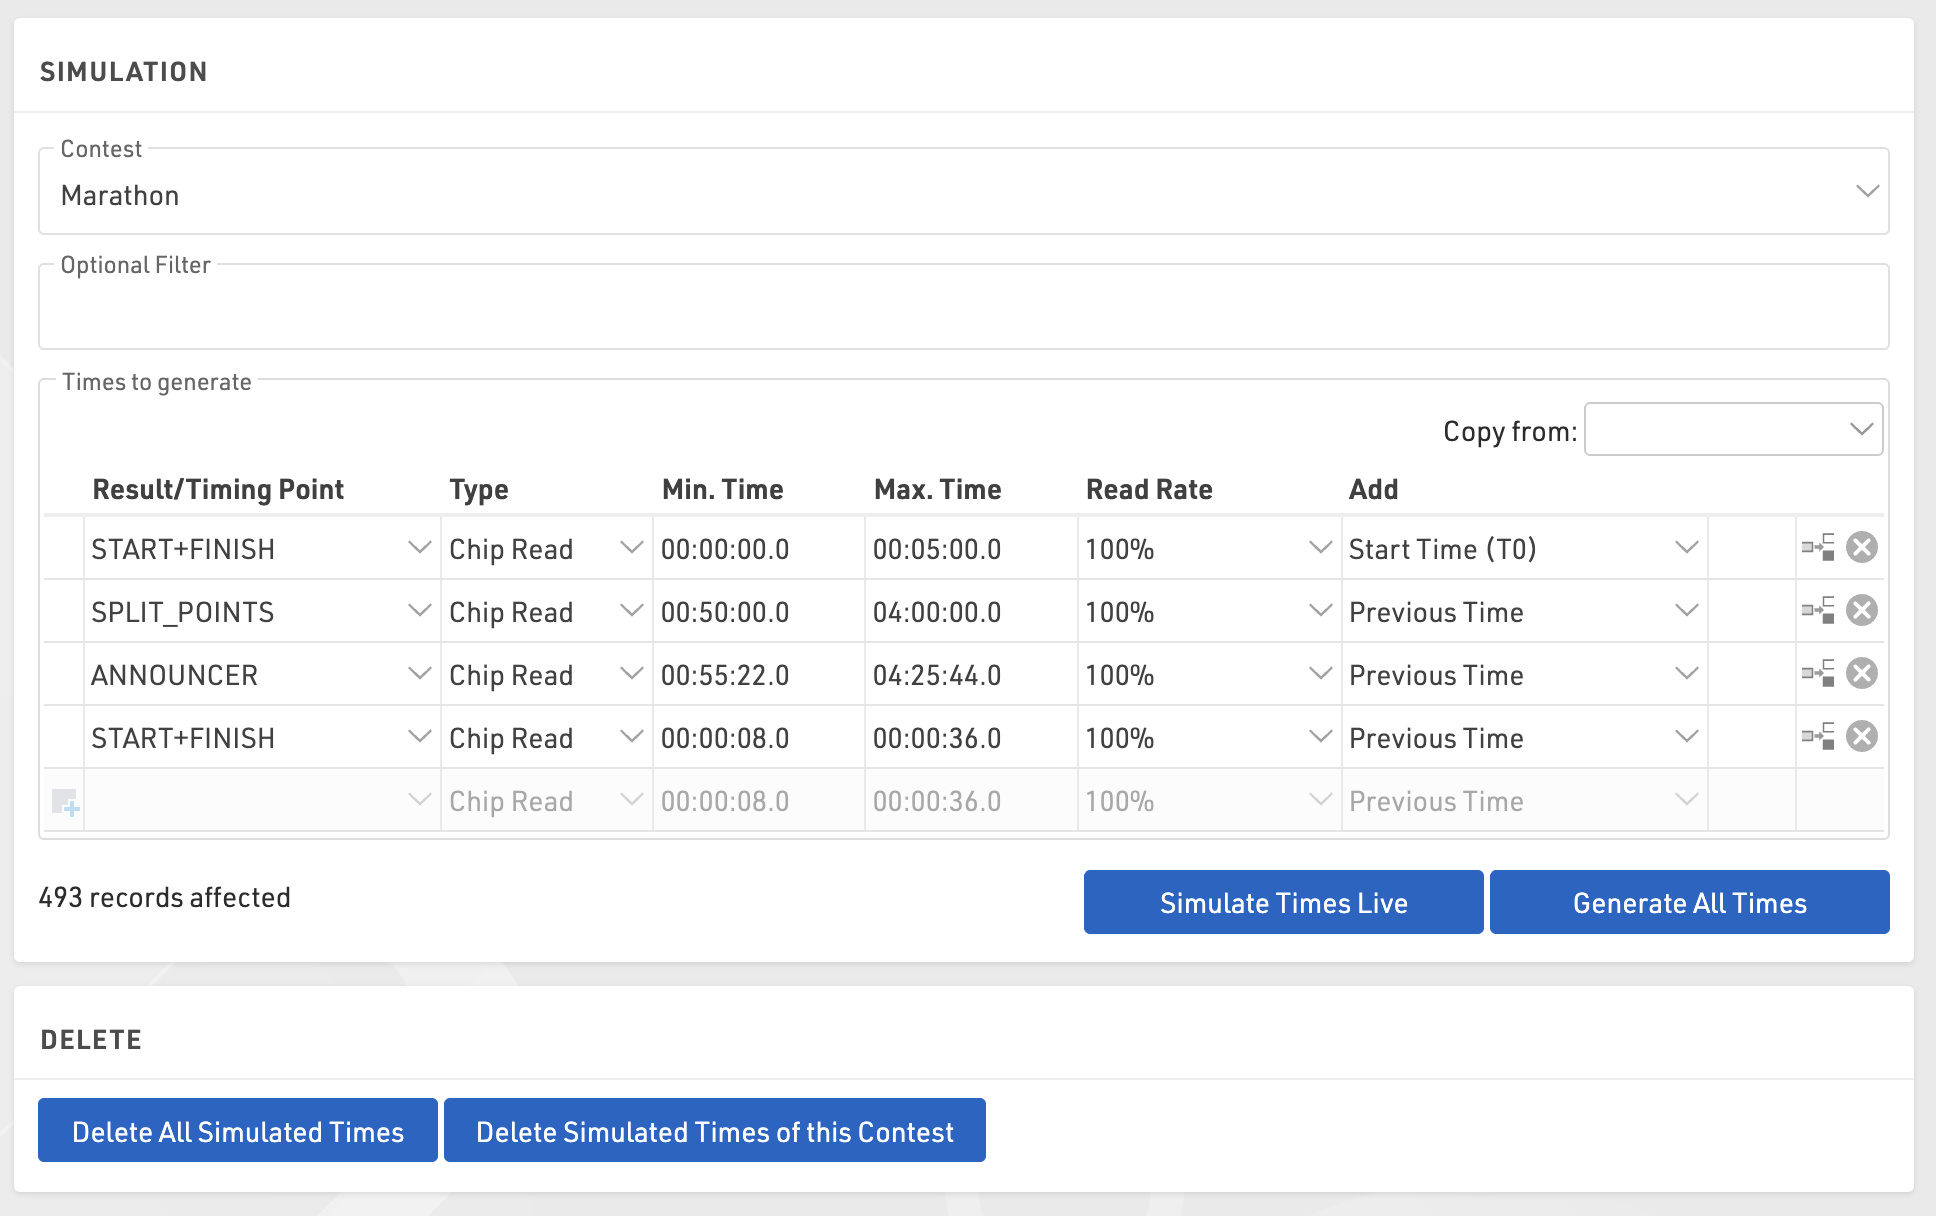
To use the function first select a contest for which times shall be generated and optionally enter a filter if not all participants shall be part of the simulation.
Manual configuration
Select which timing points should be used and enter a minimum and maximum time for each passing you want to simulate. In most cases, you will use the Add function to add the previous time in order to make sure that the time is greater than the previous time. Add T0 to your start detection. For realistic timestamps, set T0 to a realistic time as well. Your minimum/maximum time will then be the sector times. Example:
- Start: min 0:00, max 5:00, Add T0
- 10K: min 30:00, max 60:00, Add Previous Time
- 20K: min 30:00, max 60:00, Add Previous Time
- 30K: min 30:00, max 60:00, Add Previous Time
- 40K: min 30:00, max 60:00, Add Previous Time
- Finish: min 5:00, max 10:00, Add Previous Time
Copy from Splits
If you are using splits you can generate your race simulation based on the splits you configured under Scoring > Splits. To copy your split setup use the Copy from dropdown menu. Under the section labeled Splits select the contest you want to copy settings from.
Generate Times
Then click Generate All Times to generate all times all at once or Simulate Times Live to simulate the times live. In the latter case, you can see the clock running next to the button and you can also increase the speed of the clock. In most cases, you will open another browser tab or window to check the results of the live simulation while the Race Simulation tool remains open and running.
You can also select a Read Rate less than 100% if you want to simulate some missed reads at the start or if some timing points will not be passed by everyone (for example an optional timing line to donate a certain amount).
Manual Timing
The Manual Timing tool can be used to record times manually for each participant, whether as a primary split or finish time or as a manual backup. It can also be used to connect to serial devices which transmit data.
Scoring
The scoring settings define how RACE RESULT 14 uses your raw data to calculate times for each participant.
The most simple option is to use Splits which provide the quickest setup for races which follow a standard pattern, with a defined start and finish such as a point to point or a fixed number of laps. Splits will also automatically generate many of the times and ranks required for lists as well as additional / legs which may span a range of splits. Splits also generate a wide range of fields for each Split, including different time formats, ranks and pace.
For more complex races or for custom scoring methods you may need to define more advanced settings.
Special Results - Results are fields associated with a time, which can be pulled/calculated from Raw Data or calculated from Splits / other data. Results may be required for certain event types such as variable lap races.
Rankings - Checking the configuration of specific rankings, for example overall/gender/age group rank.
Team Scores - A team score will, for example, sum up the times of best three athletes of each club and create a ranking over the team time.
Note: By default, an event file already has overall/gender/age group rankings. You need to work on the rankings only if you want them to be calculated in a different way or if you want to calculate additional rankings.
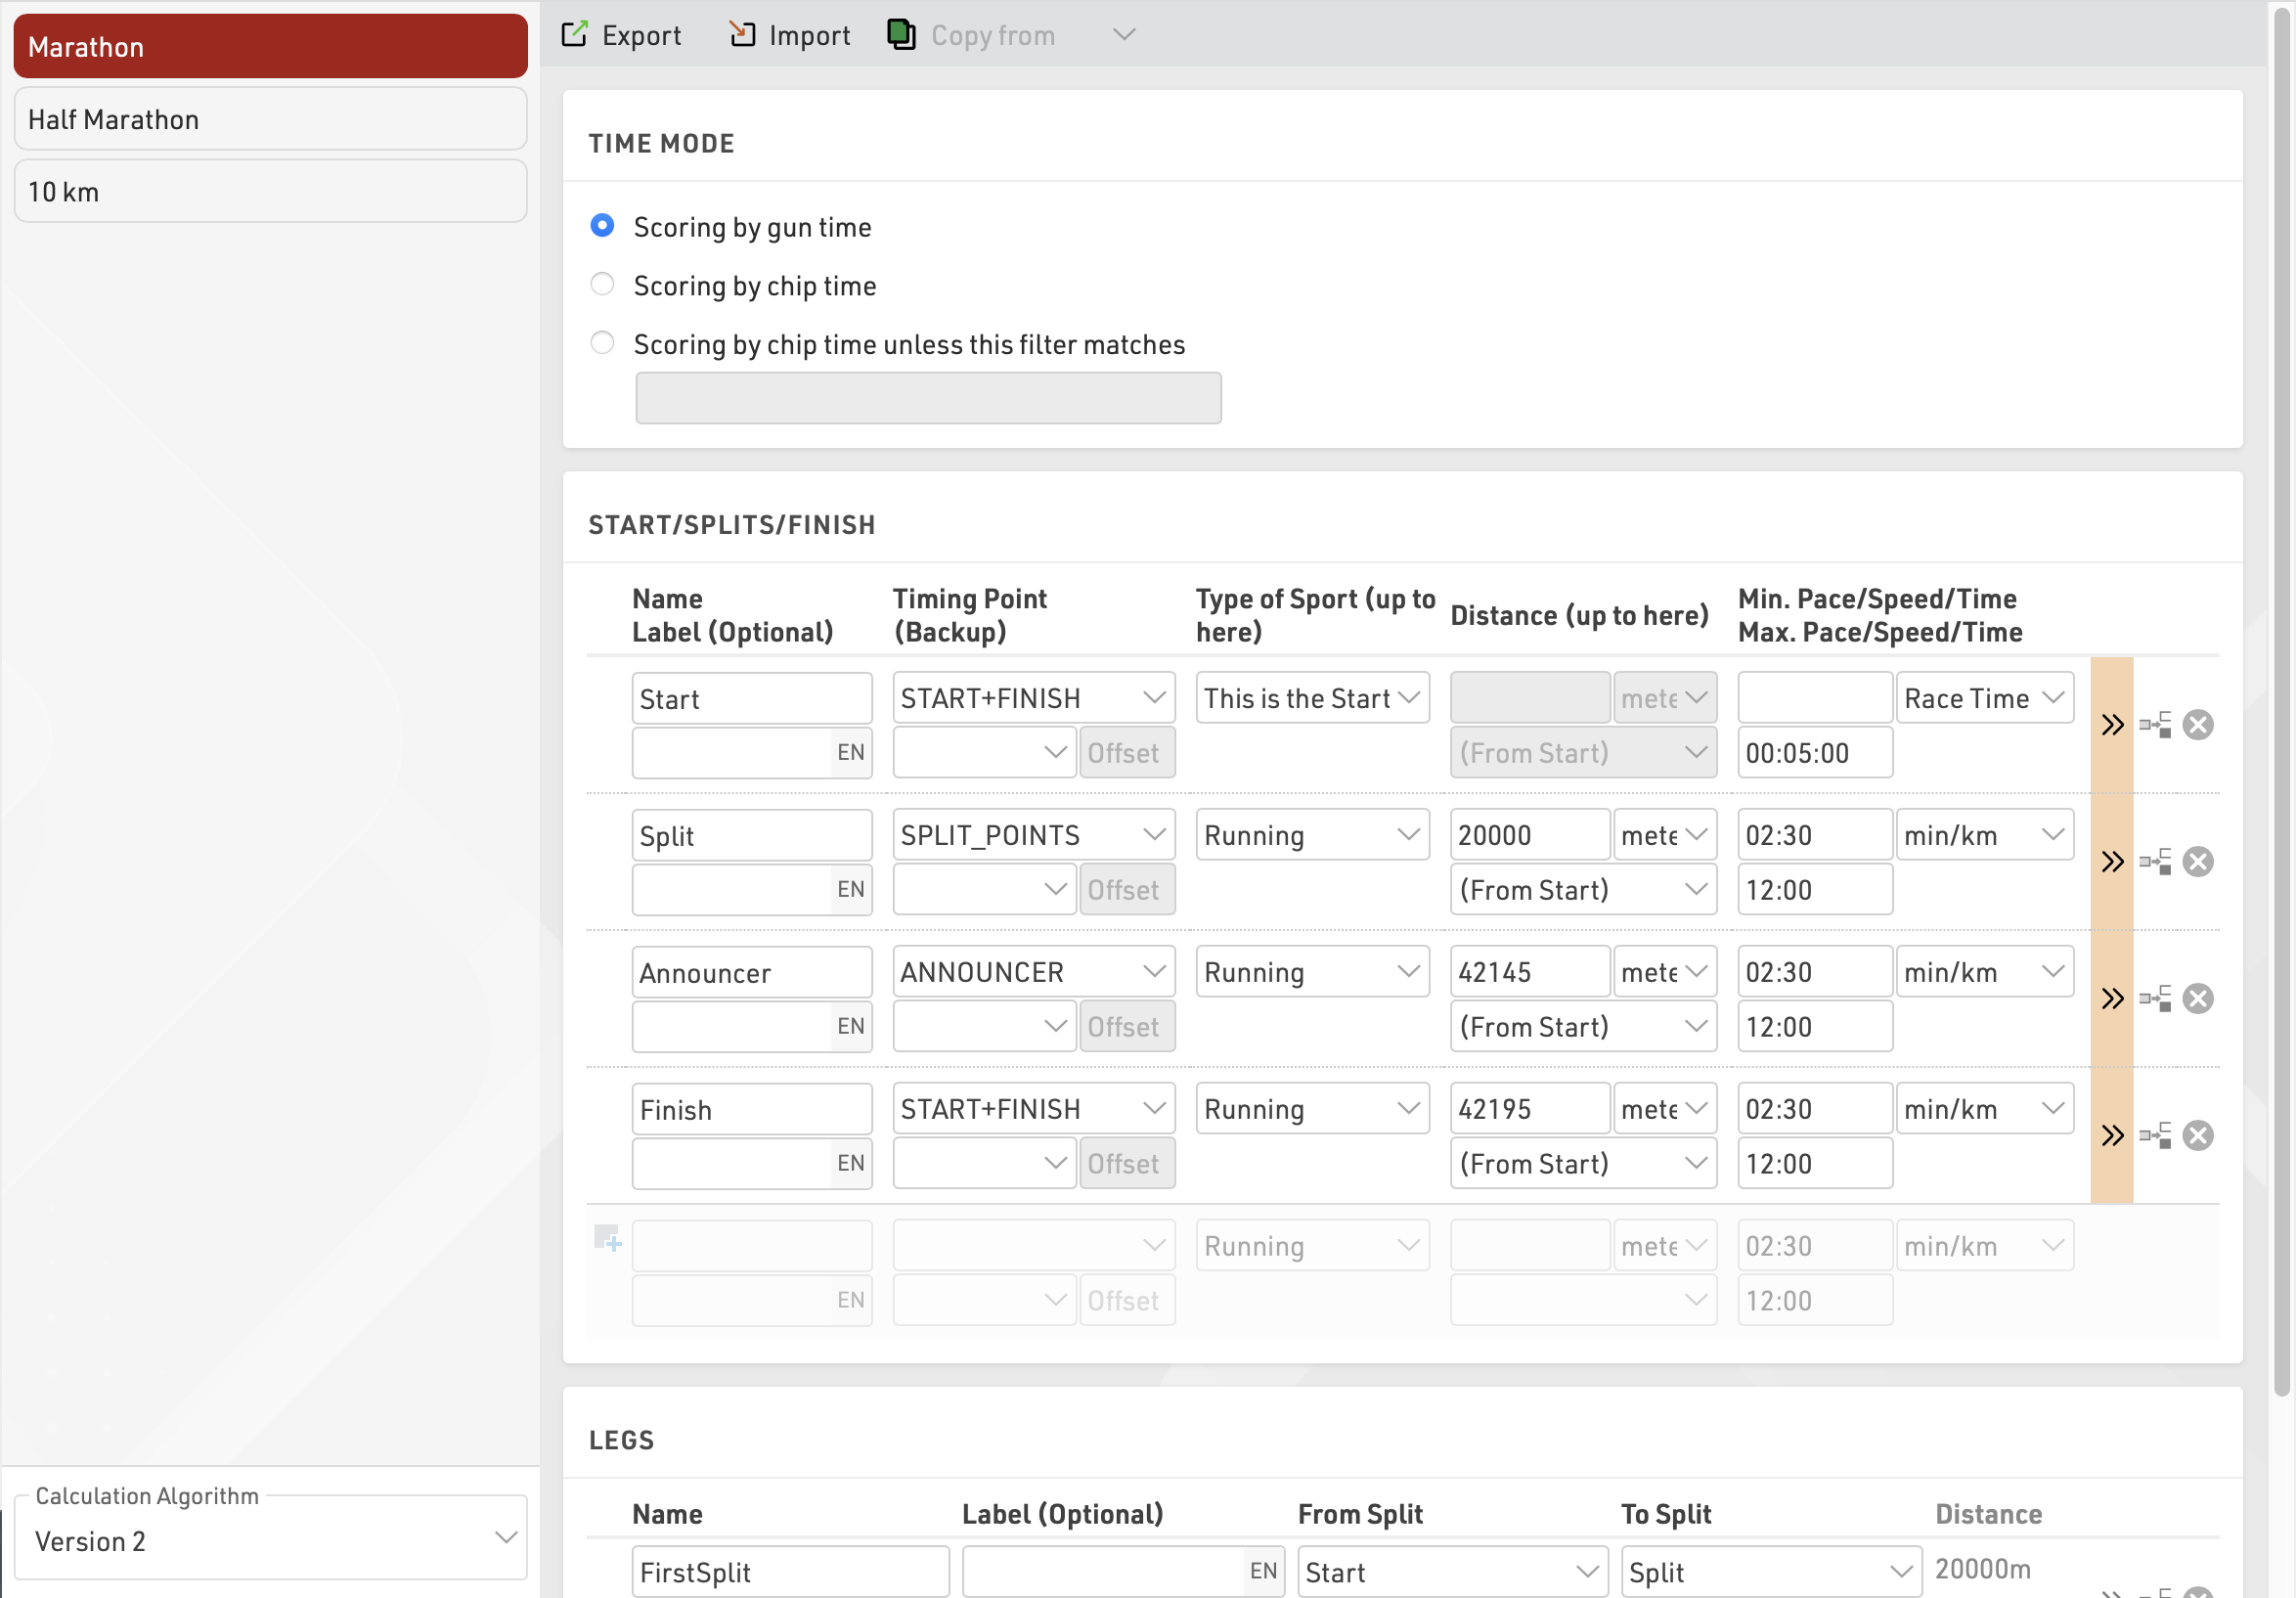
Splits
Splits are defined for each Contest individually, allowing for an easy way of adding additional timing points to a particular contest and also defining contest specific rules where appropriate. Split setup can be copied from another Contest.
Special Results
Special Results are defined with the following settings.
First, choose an ID and a name for the result. The times of the results can be accessed by either the ID or the name of the result, see Time Fields.
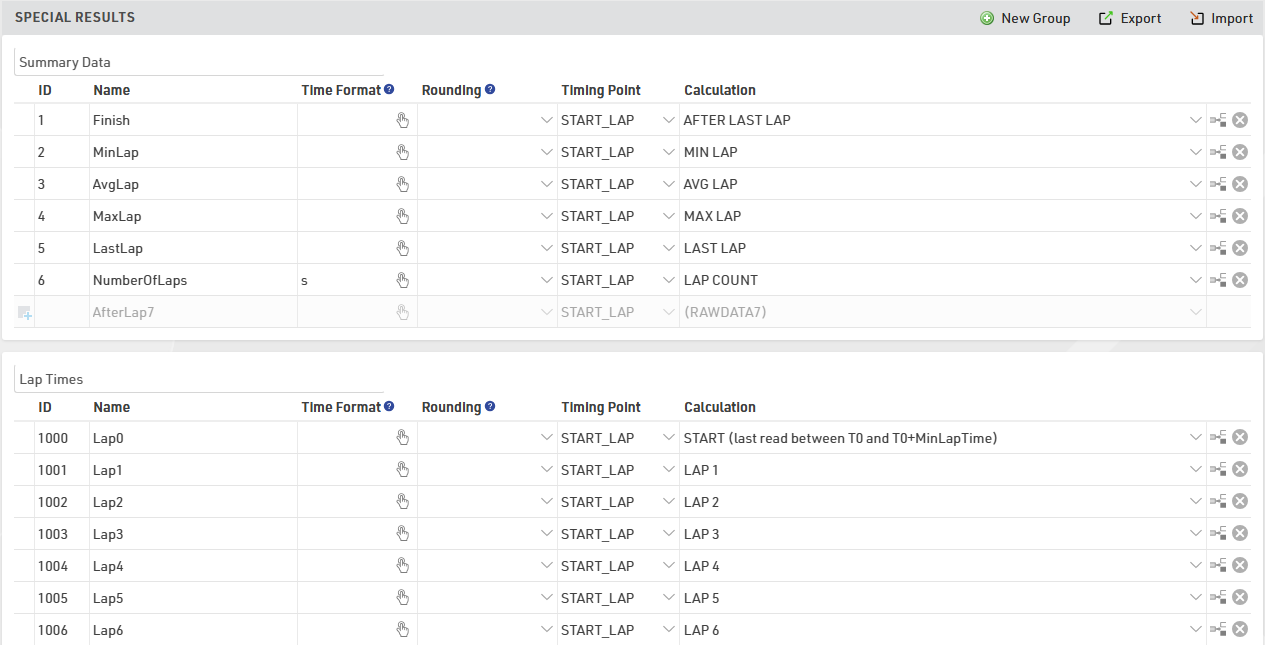
Make sure to choose your IDs wisely so that they are intuitive:
- For example save lap 1 in result 21, lap 2 in result 22, lap 3 in result 23, and so on – instead of lap 1 in result 27.
- Make sure to leave gaps in your IDs, maybe you would like to add something in between later.
- Use the low ID numbers for important results - these will be more visible in the Participants Window.
- Convention is that the result with ID 1 is the most important result, usually a Finish Time.
Next, you can optionally select a Time Format that defines how the times will be displayed, for example h:mm:ss. This time rounding will take priority over the Contest Settings, if you do not define a time format, the format from the Contest Settings will be used. Usually you would define the time format per contest and enter a time format for a result only if that result needs different formatting.
If you have results like number of laps or points, which are a numerical value instead of a time, you can use the time format: s
The same applies to the Time Rounding. If the result shall be rounded other than defined in the contest setting, select a rounding option.
It's possible for an event to have hundreds of special results. Grouping results can help organize the data for easier viewing and handling in the Participants Results Tab and Side-Bar Overview.
Rankings
Using a Ranking, ranks for all or some participants according to any kind of metrics can be calculated. These ranks can then be used in lists, certificates or in any other part of the software.
Our event templates have the three most common rankings already set up by default: an overall ranking, a gender ranking and an age group ranking. You can edit these or set up additional rankings to calculate for example a city championship. Read the sub-article below to find out how to set up your own rankings.
For each ranking these rank fields will be calculated.
Team Scores
A Team Score groups several participants (e.g. from one club) to a team and calculates values such as the sum or the average of their times, and ranks the team compared to other teams. These values can then be shown on lists, certificates or in any other part of the software.
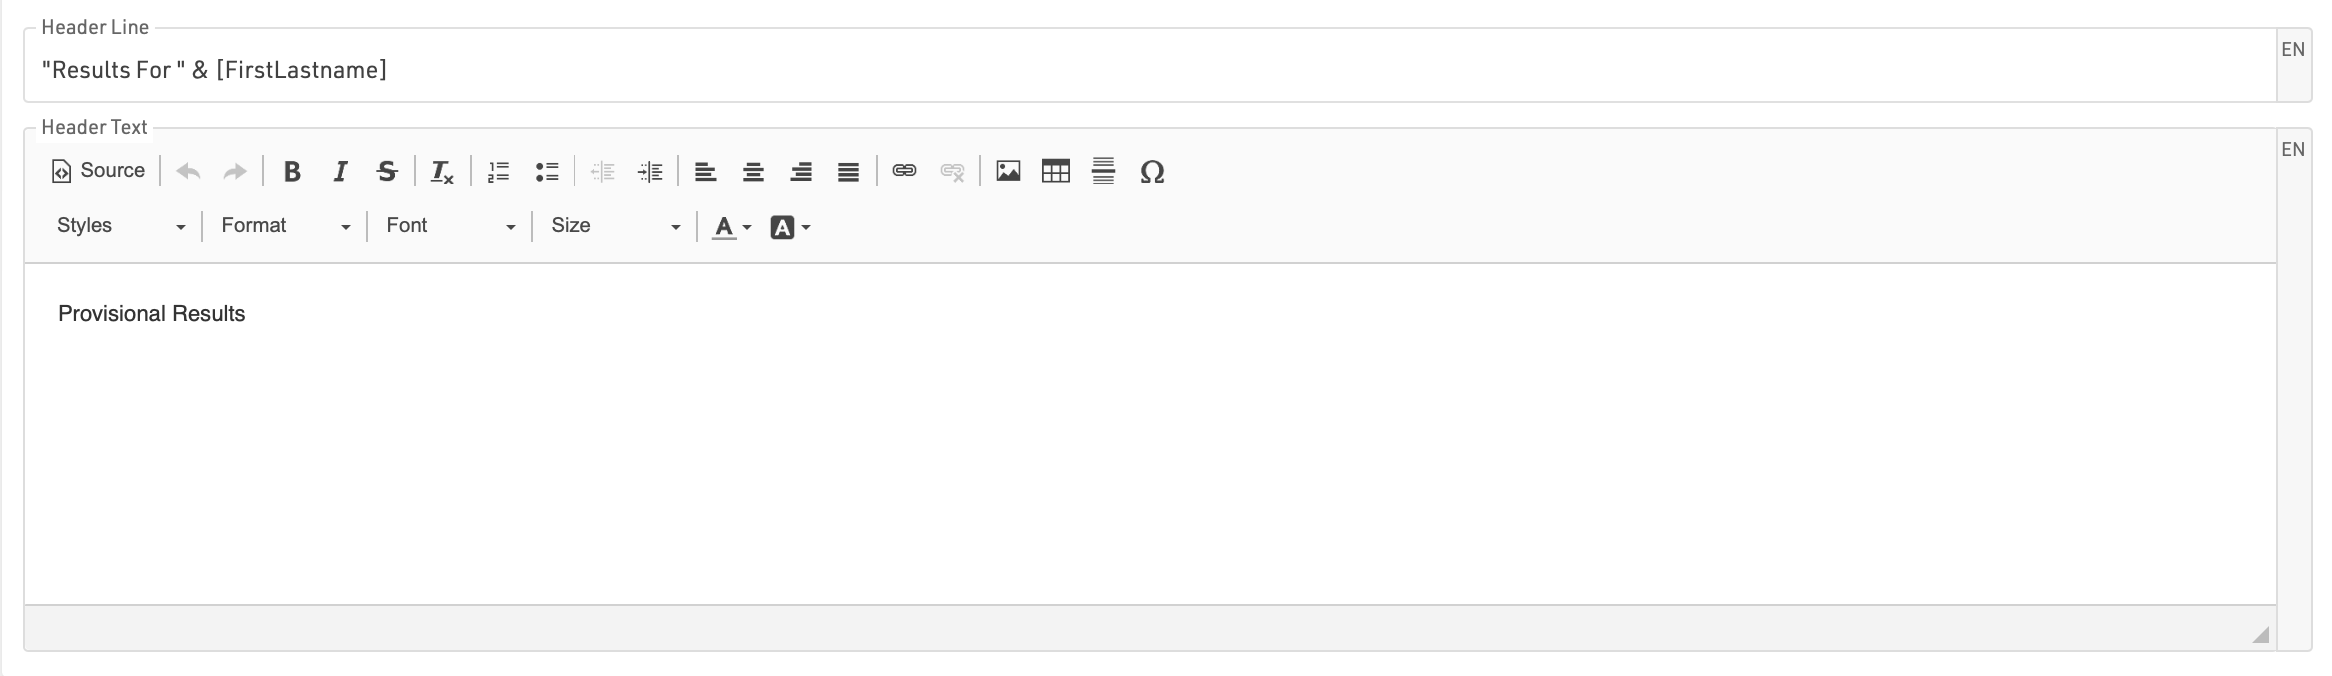
The final result of a team score may look like this result list:
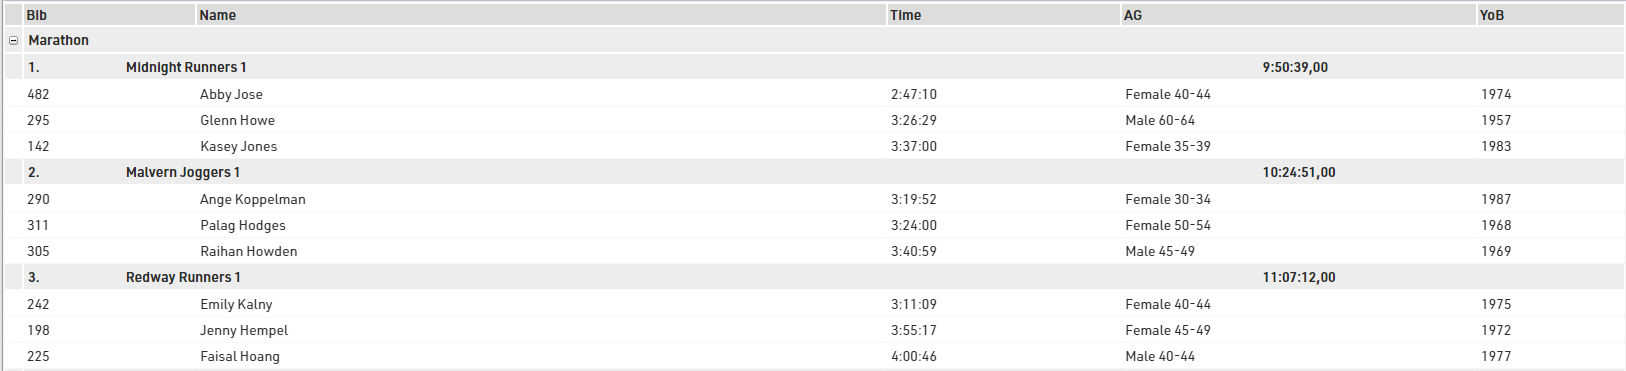
By default, a new event file has two pre-configured team scores (see Scoring ⇒Team Scores):
- Team score 1 (named "Team Score") builds teams of three per club and sums up their finish times.
- Team score 2 (named "Team Results m/f") builds teams of three men or three women per club, sums up their finish times and scores male and female teams separately.
In the window, you will find two lists ("Team Results", "Team Results m/f") which show the results of the two team scores.
In most cases either of these team scores can be used with no or minor modifications. For example, you may want to change the number of participants per team from 3 to 5.
However, if you plan on creating special team scores, you will need to dive deeper into the settings. These are described in the sub-sections.
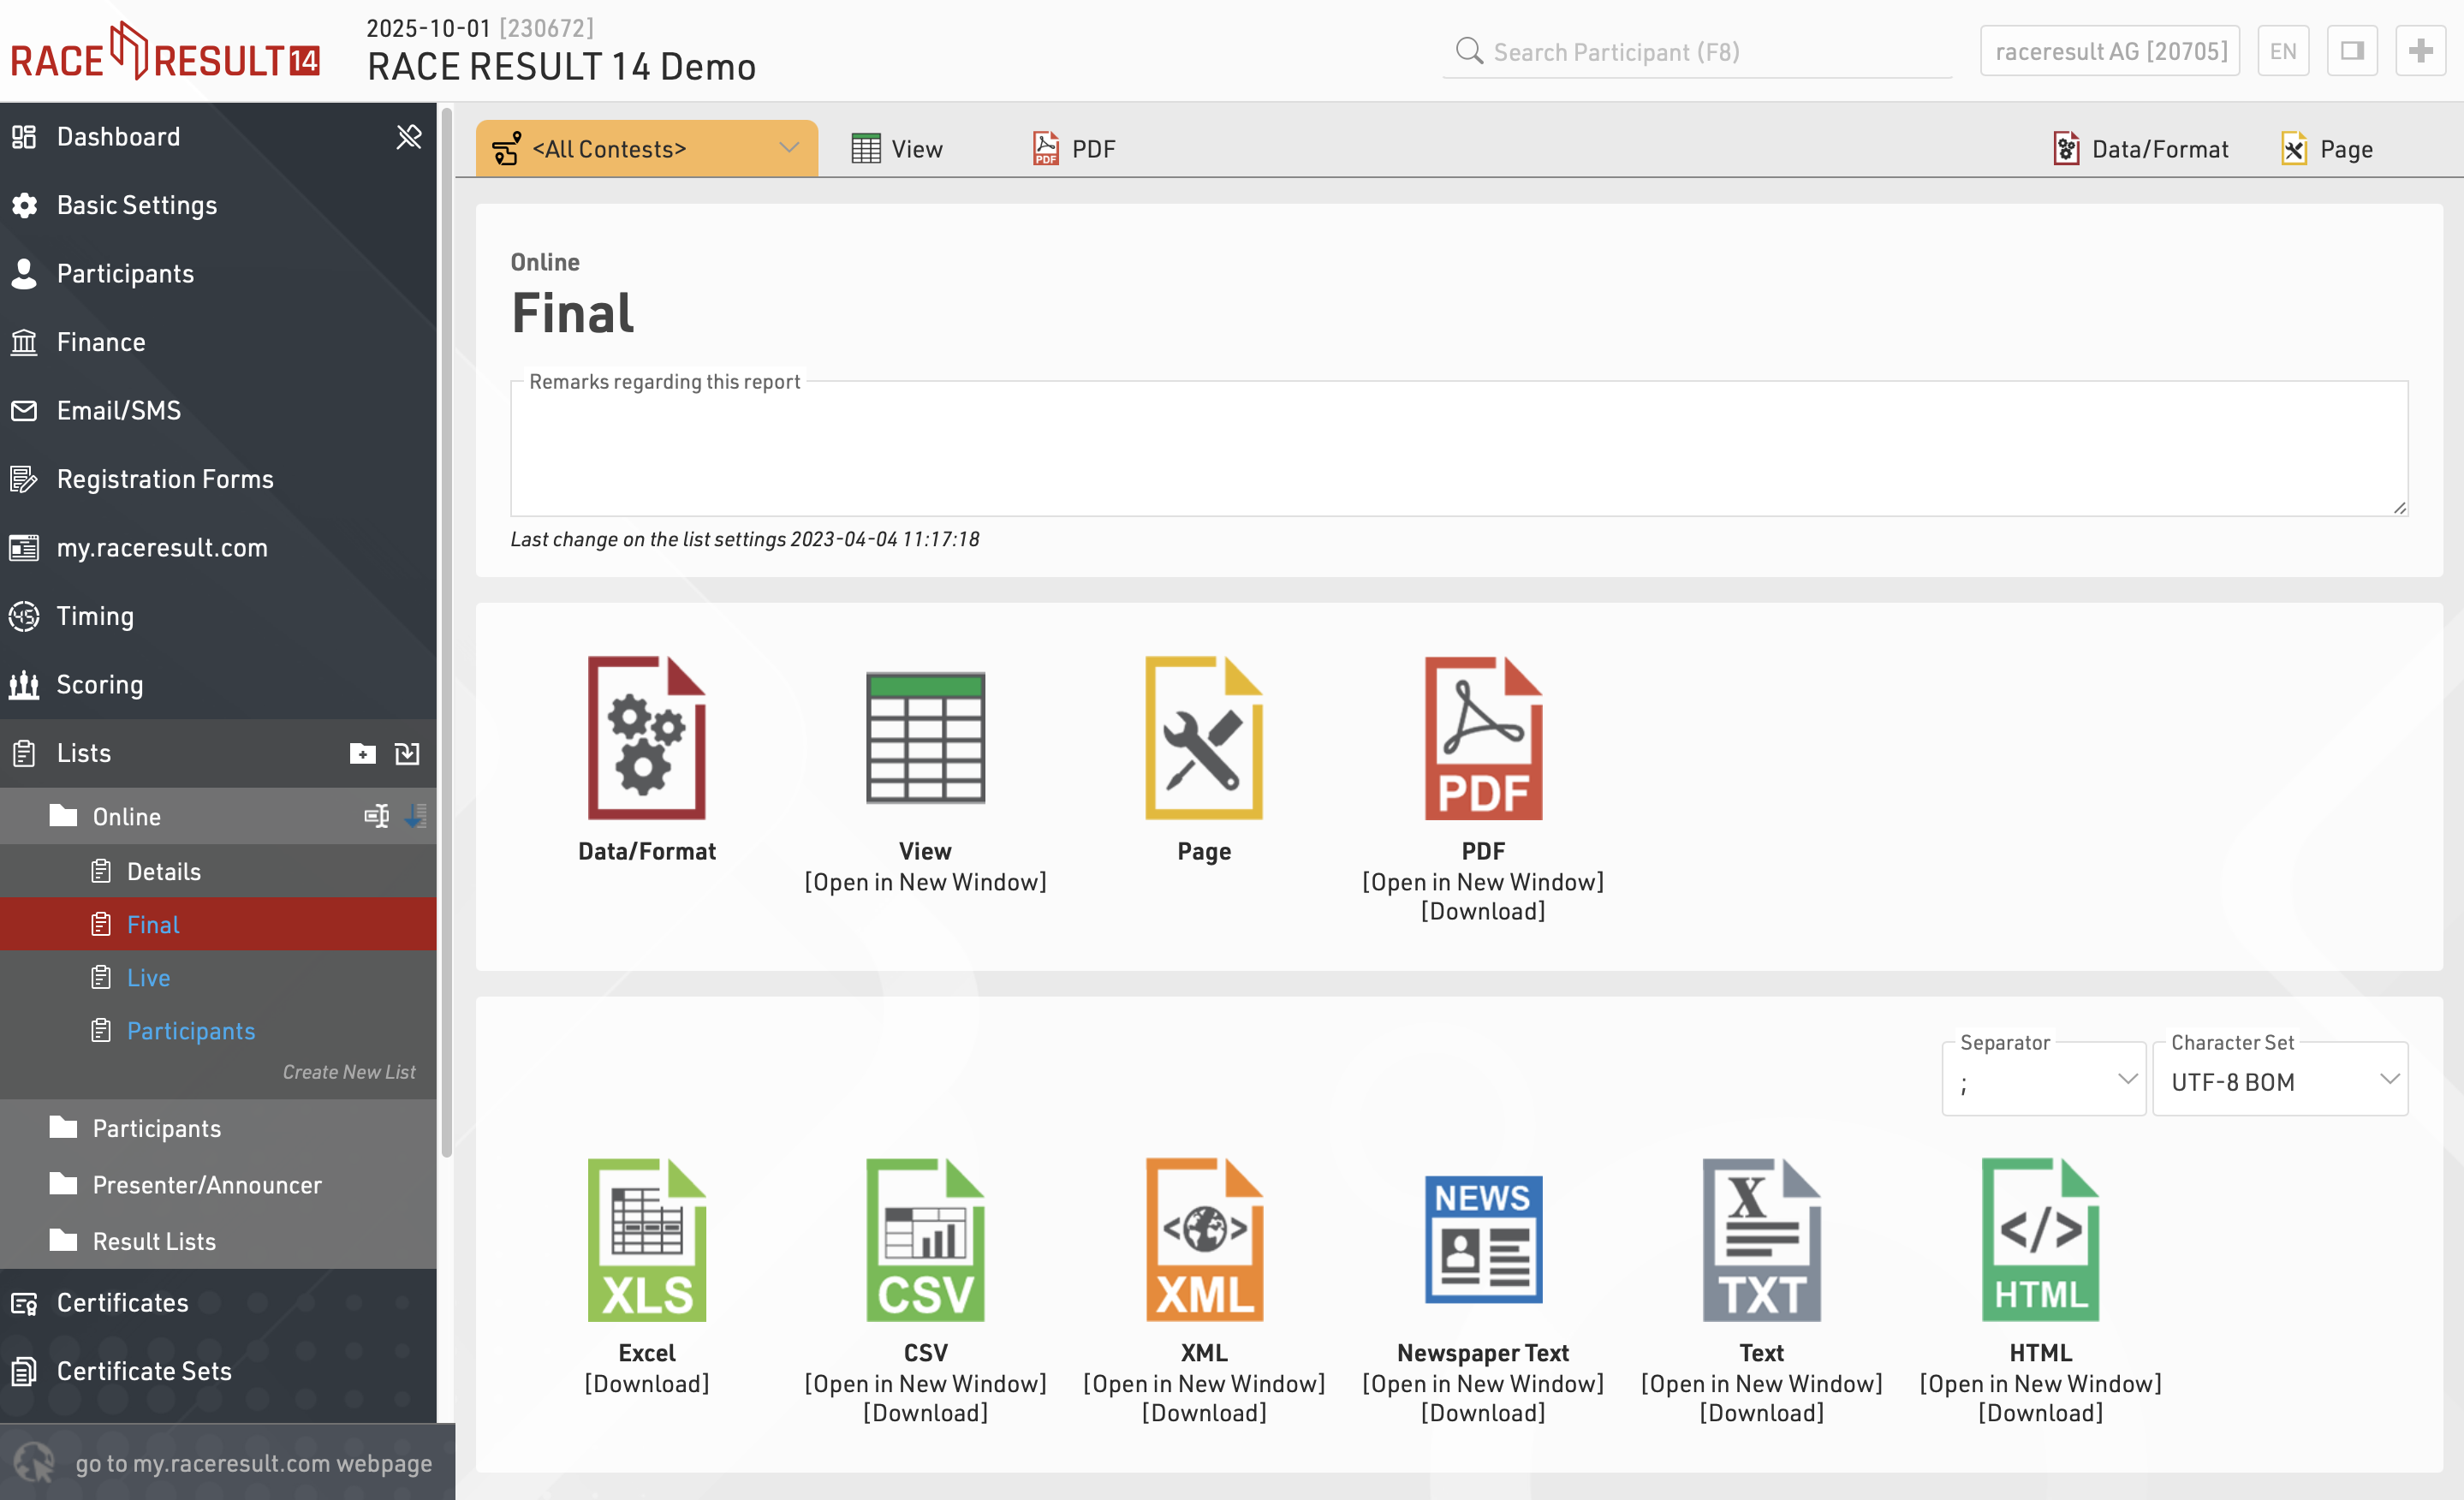
Lists
Lists are the most important method for getting data out or RACE RESULT 14, and are used for a variety of applications - printed results, publishing online results, presenter screens, creating custom statistics lists, checklists for verifying results or any custom report you need.
The list on the left shows all lists in your event file which can be rearranged using drag & drop by clicking the free space to the left of the list name; list names highlighted in blue are published online through my.raceresult.com.
Lists can be further sorted into folders, to create a new folder, click the Add Folder icon in the Lists Header. By clicking the folder header, the folder can be expanded / collapsed, to sort the items within a folder alphabetically, click the icon. Empty folders will be deleted automatically when you reload the window.
Clicking the name of a list from the menu opens an overview page for that list.
Lists show a defined set of fields for a specific set of records. The settings of a list determine:
- which participants are shown
- which data fields (columns) are shown
- how the records are sorted
- how the records are formatted
- how the page is formatted (page format, margin etc)
The settings of a list are split into the tabs Data/Format and Page. Data/Format contains all settings regarding the data shown on the list and how it is formatted, whereas the Page settings concern the general page layout and are only relevant for the PDF and HTML output form.
To view a list click the View button or tab, this can also be opened in a new window, lists can also be opened directly to the View tab by double clicking the list name from the menu. A PDF view of the list can also be previewed or downloaded.
Lists can also be exported in different formats as EXCEL, CSV, XML, TXT and HTML.
Data/Format Settings
The Data/Format Settings tab is divided into three sections: Grouping/Sorting, Fields/Columns and Filter. Each of those sections will be explained in the following. According to the settings and selections made in those sections, the participant data will be displayed in the list.
Grouping/Sorting
This section defines how the records on the list will be sorted.
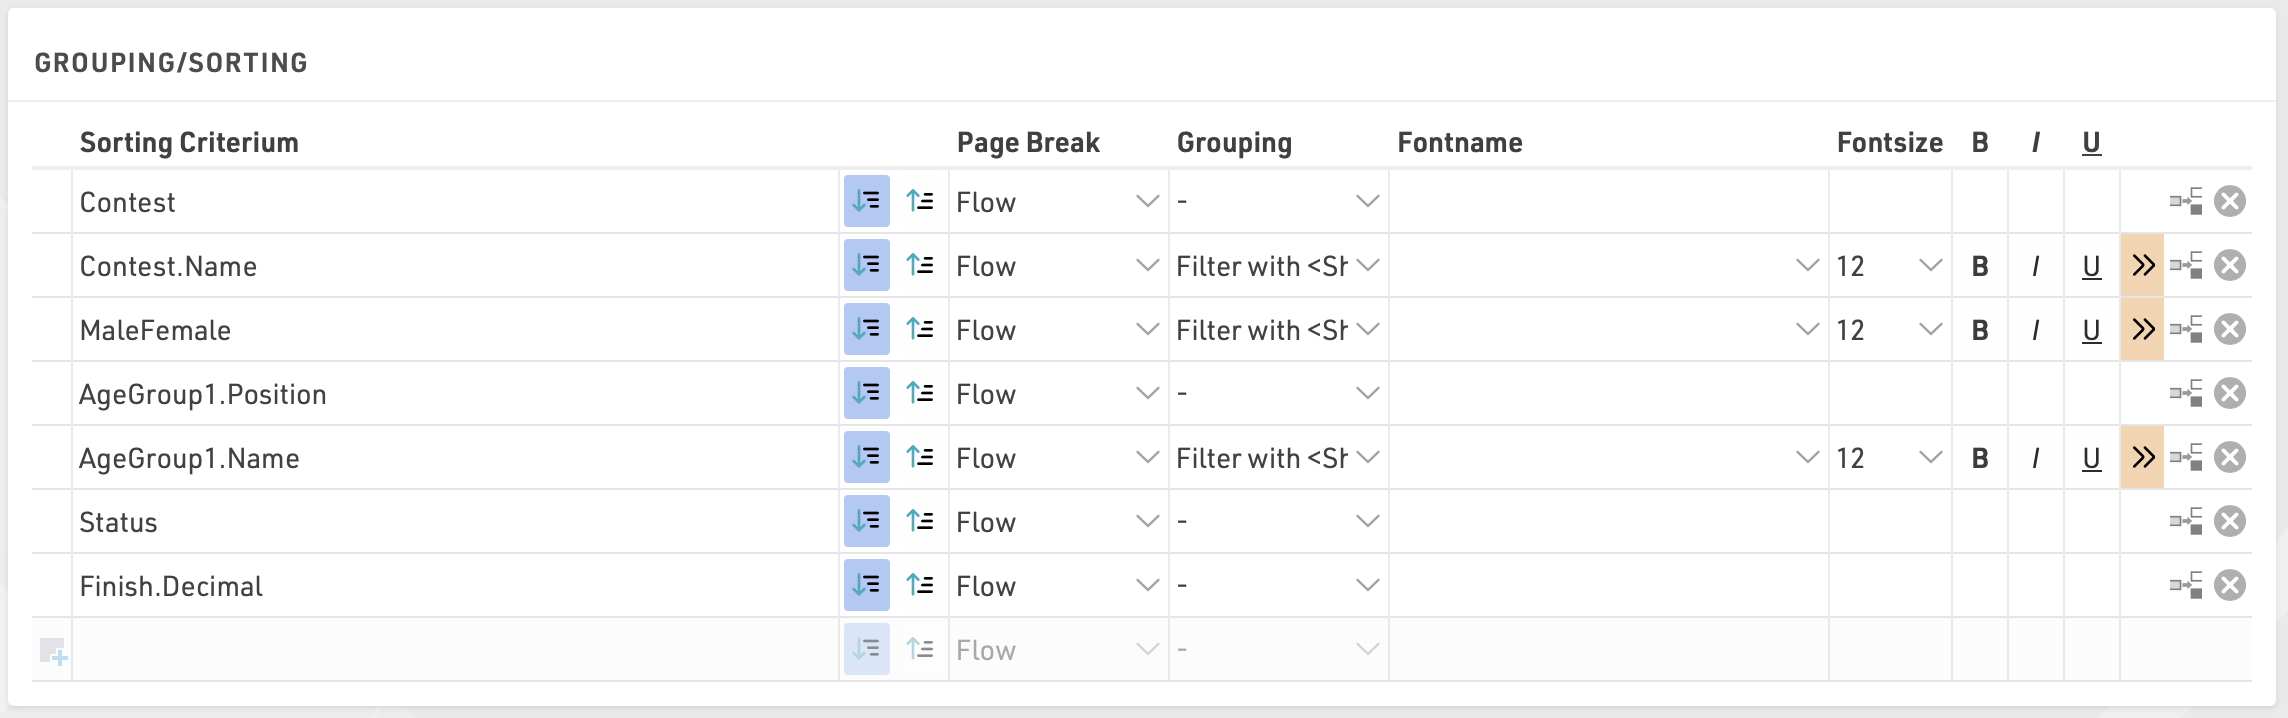
Simply select one or more fields from the Field Wizard which pops up below the input box. The list will be sorted by the first field and, if this field is not decisive, by the second, and so on. Additionally, for each field, choose if the records shall be sorted in ascending or descending order.
Fields can also be used as a Grouping or Filter, when used as a Grouping then a group header line will be inserted for each group value on all output types. Alternatively a list can be filtered by a group, with this setup an additional dropdown will appear in the preview and also on my.raceresult.com for each filter which can then show all groups, filter to a specific group, or ignore this level of grouping all together (if filter with ignore is selected). Filter is particularly useful for online results to make these easier to navigate / filter to the data somebody actually wants to view.
This list is grouped by contest, gender and age group:
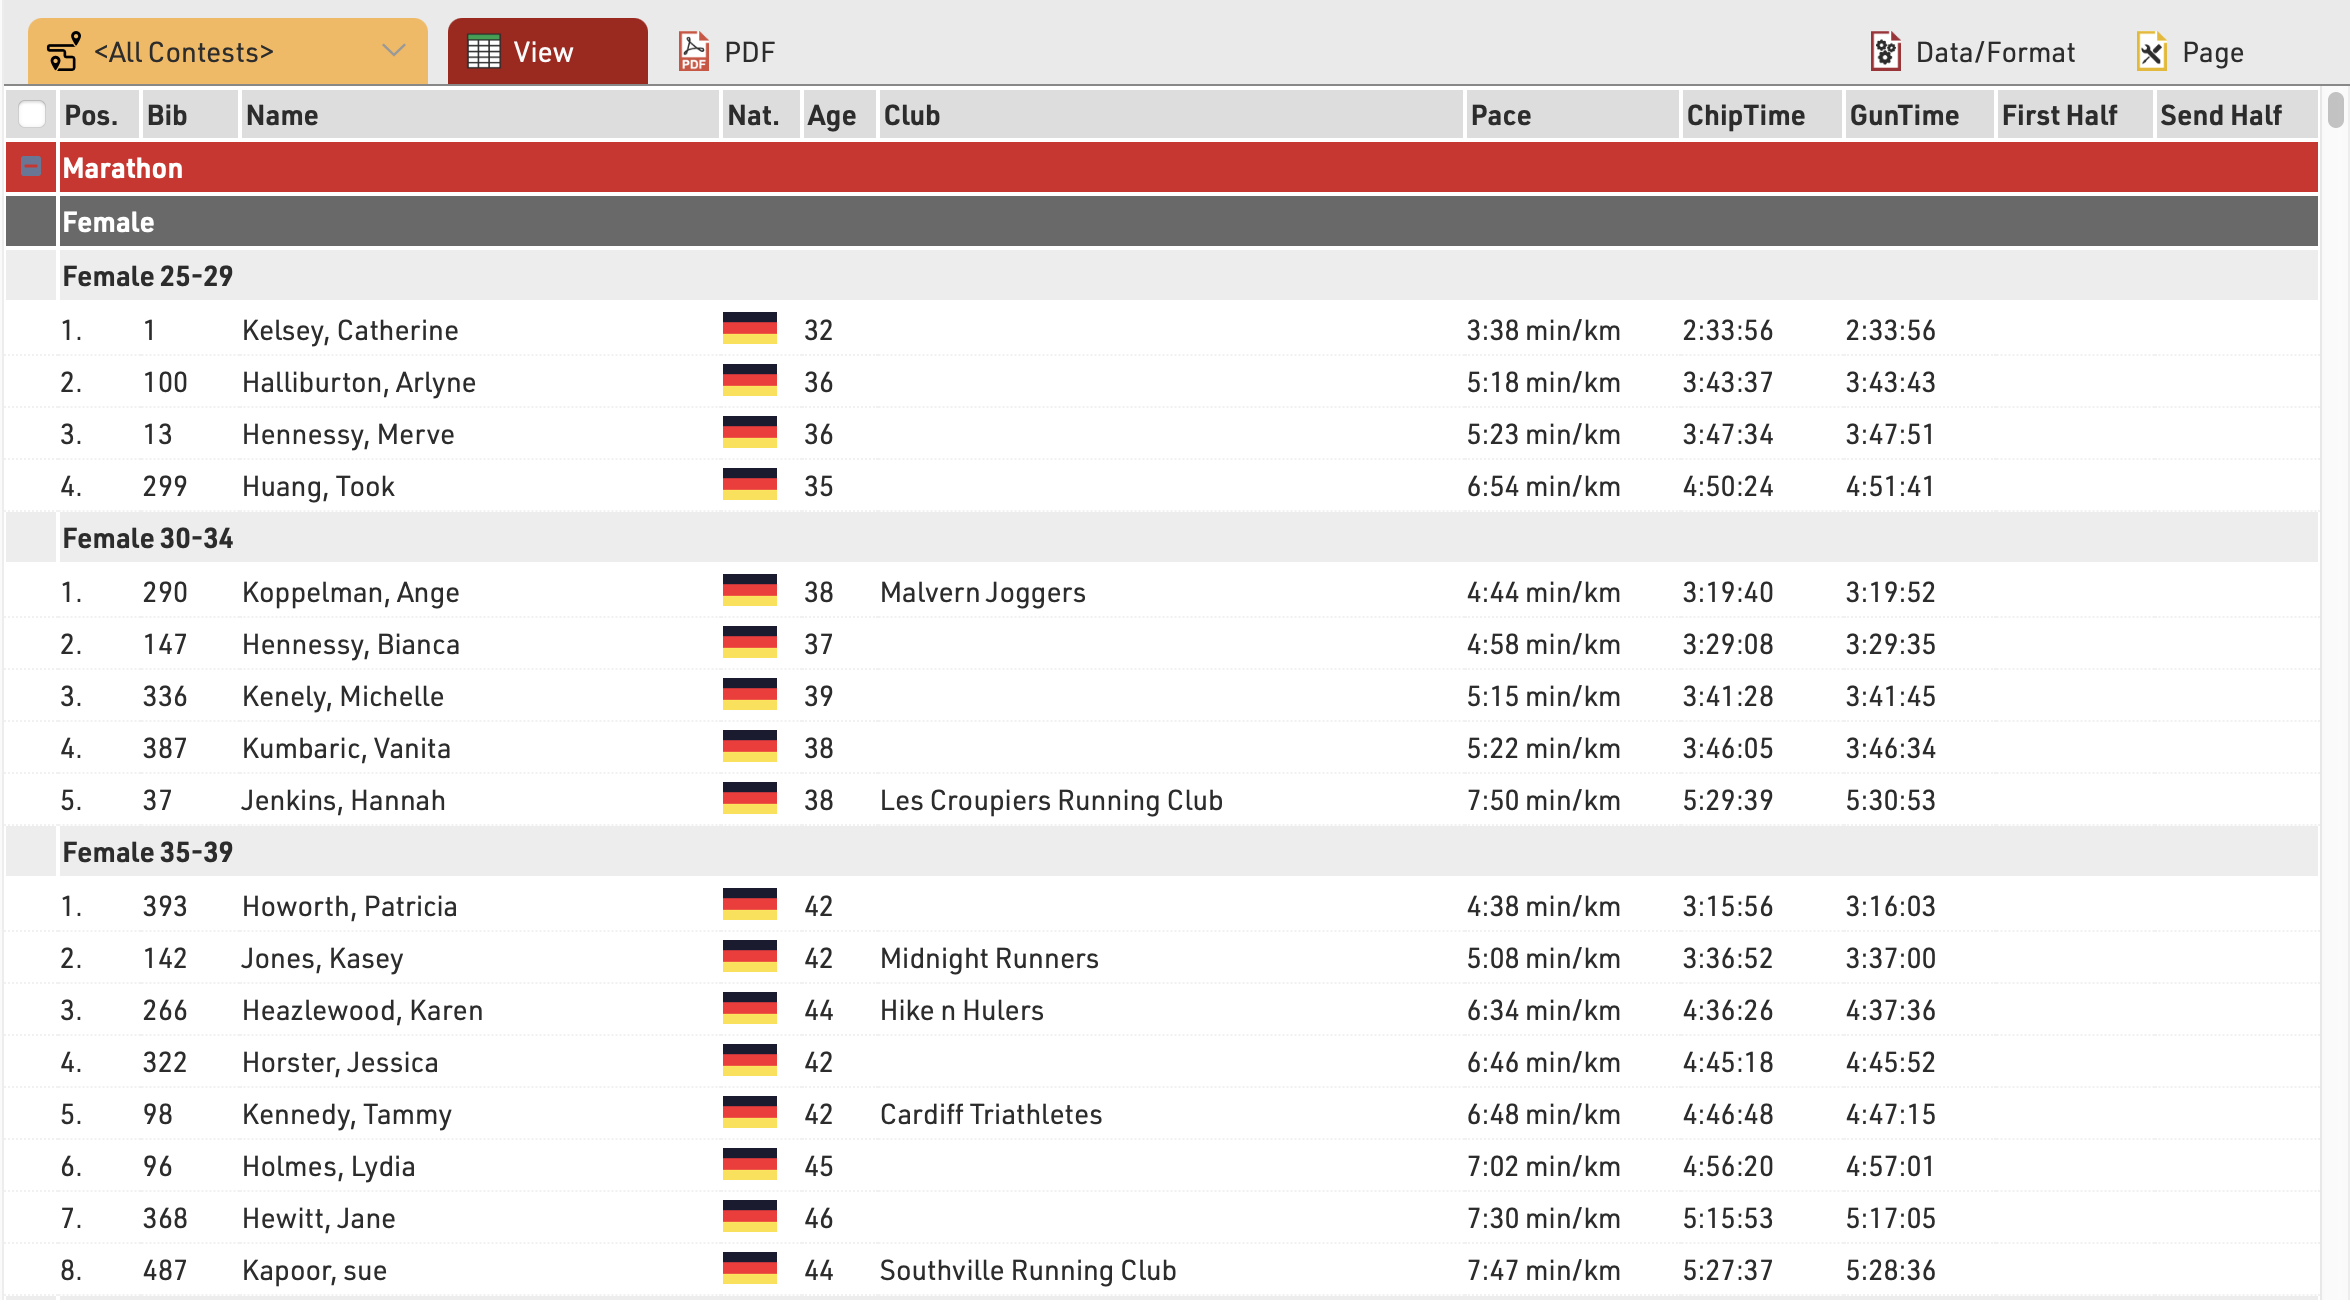
and below the same list using a filter instead of simple grouping, where each level can be filtered using the dropdown menus.
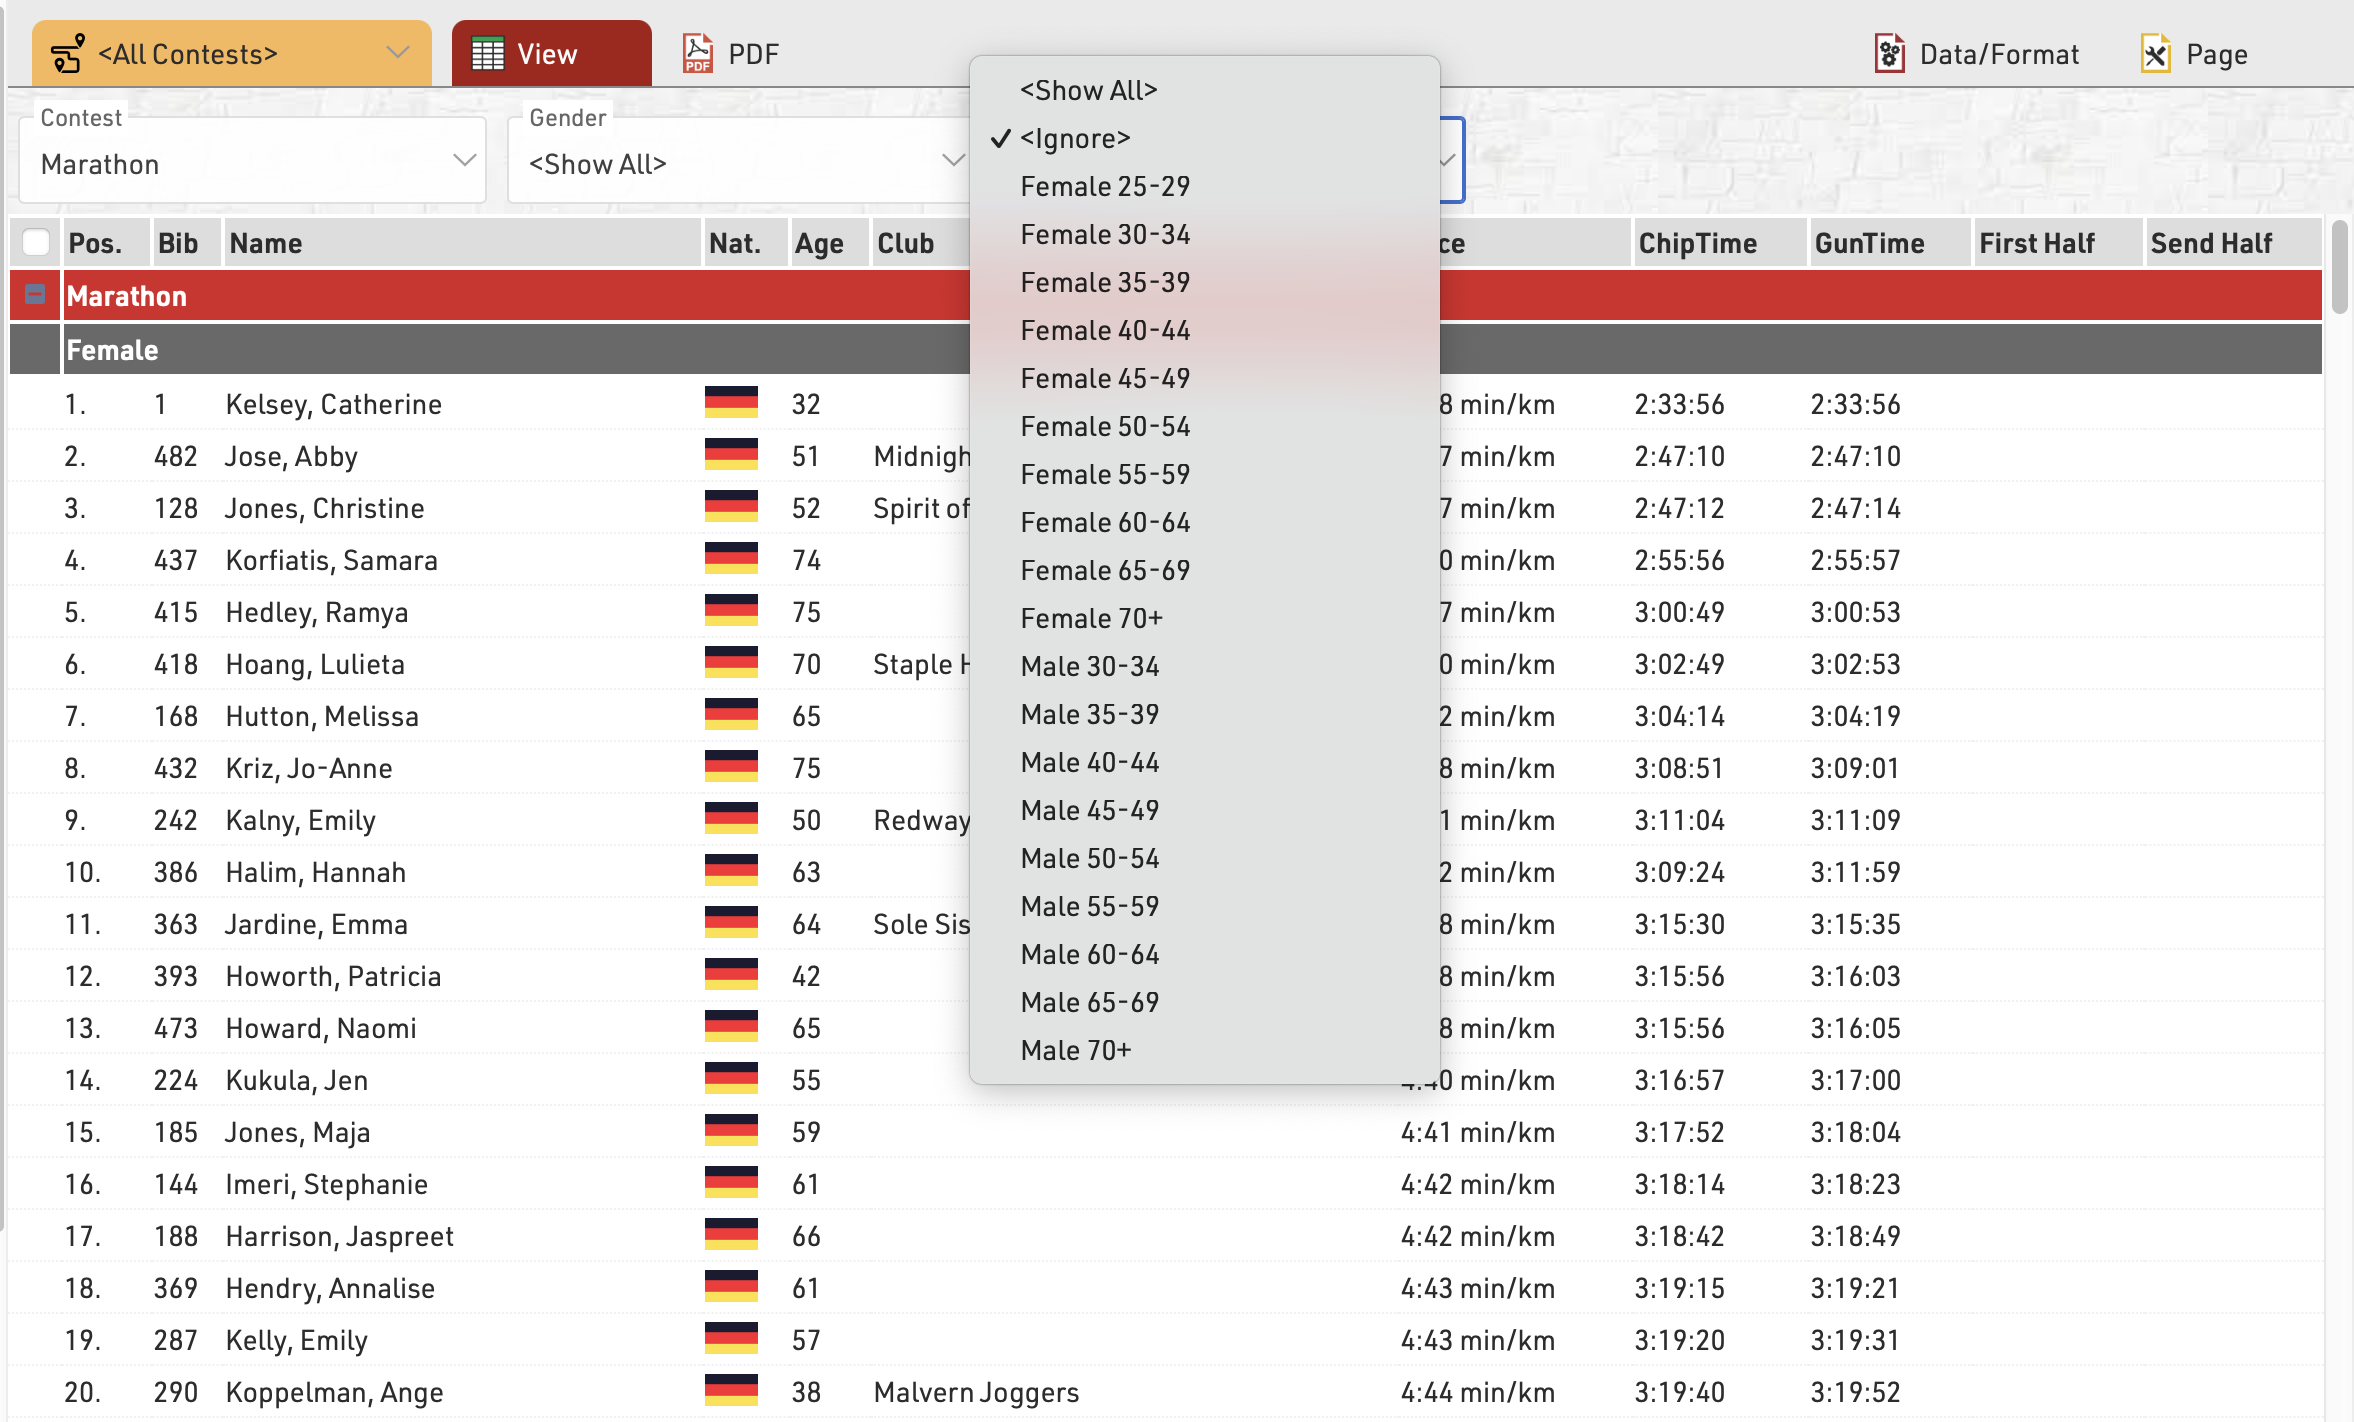
See Grouping/Sorting Details for more details and option
Fields/Columns
In the section Fields/Columns select the fields which shall form the columns of your list.
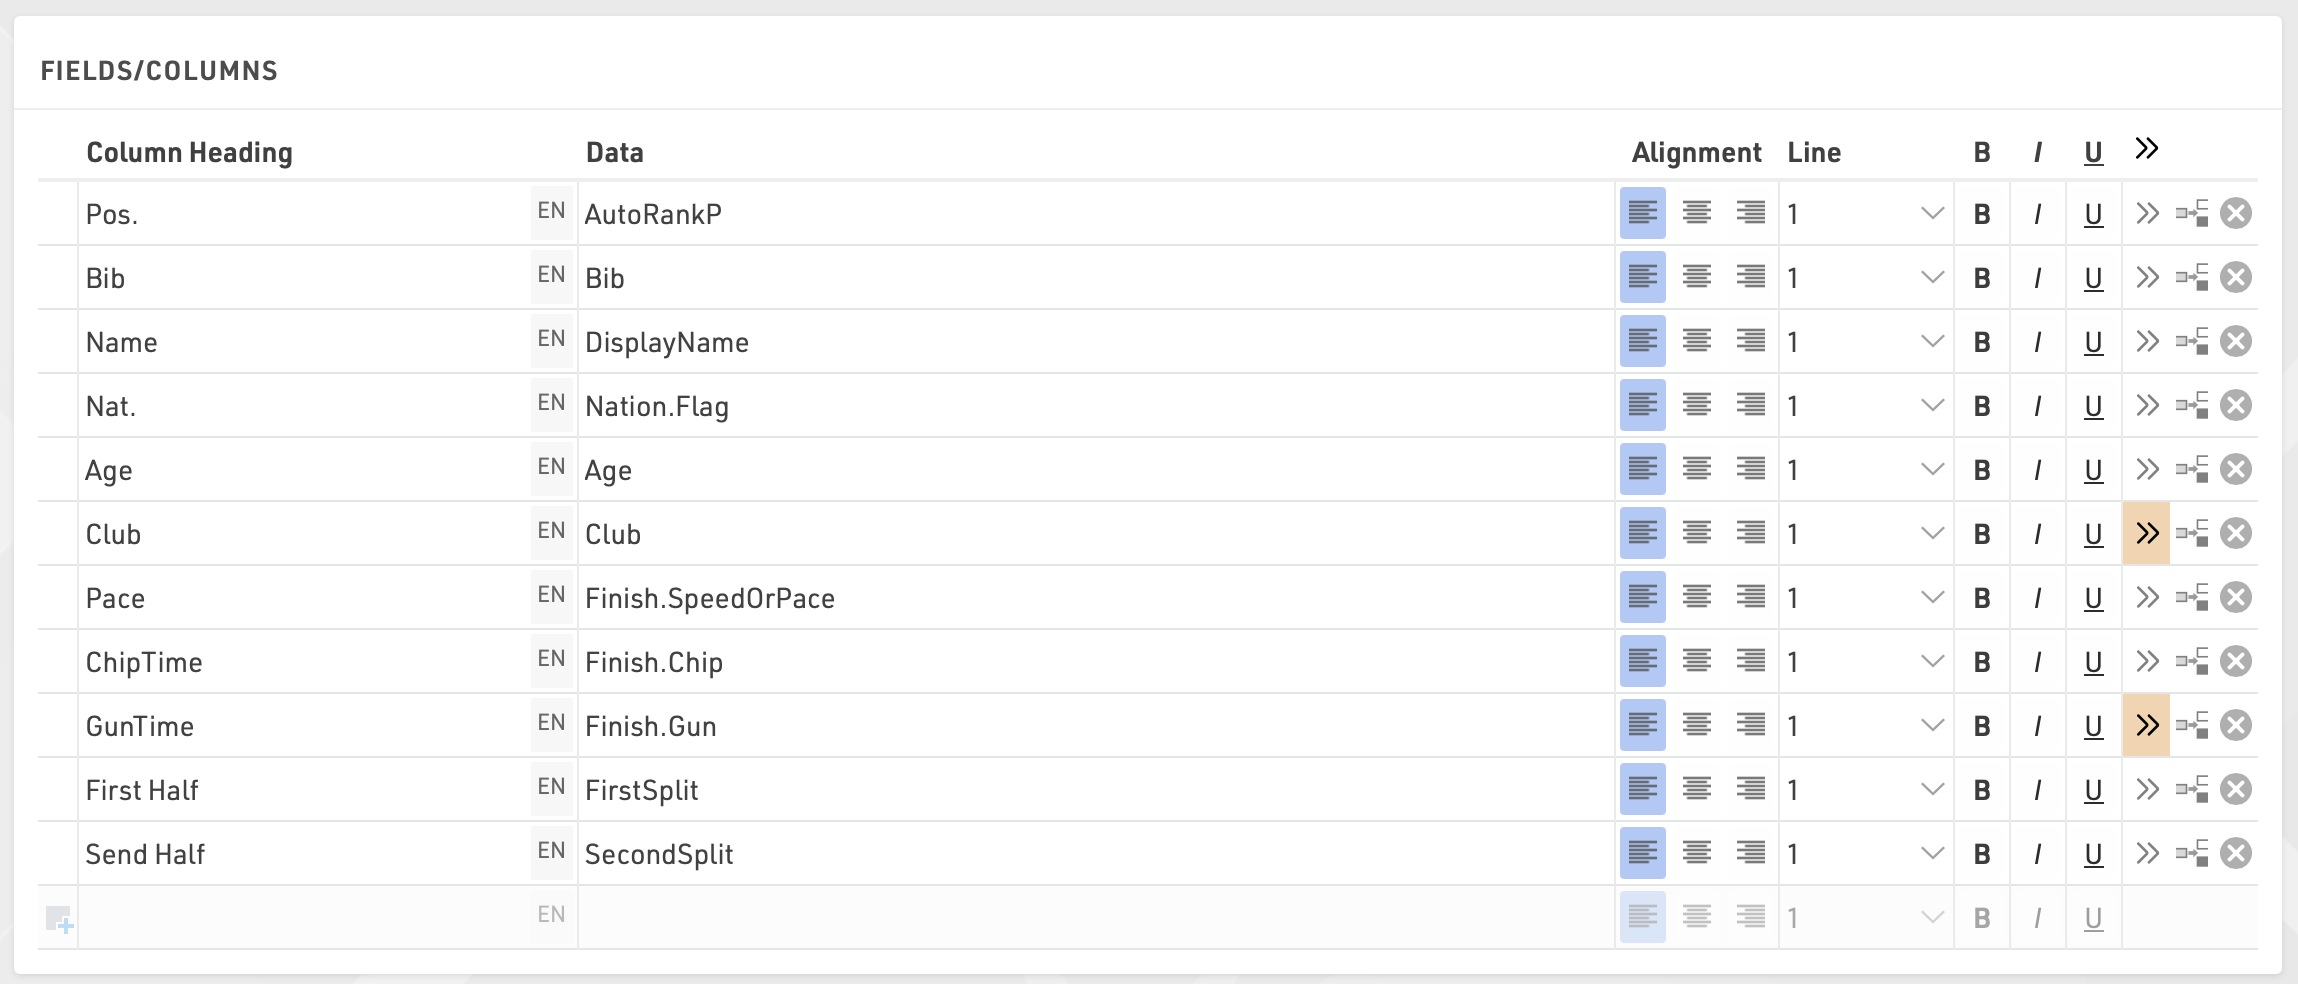
In Column Heading enter a description of the field and in Data select a field from the Field Wizard or enter an expression. For example, using an expression you can combine the fields Lastname, Firstname and YearOfBirth to: "Doe, John (70)"
The corresponding expression would be:
[DisplayName] & "(" & [YearOfBirth] & ")"
Select a line number greater than 1 to create Multi-Line Lists.
Additional formatting is available through the Extended List Column Settings.
Filter
By setting a Filter you can exclude certain records from the report. If you do not define a filter all records will be shown on the report.
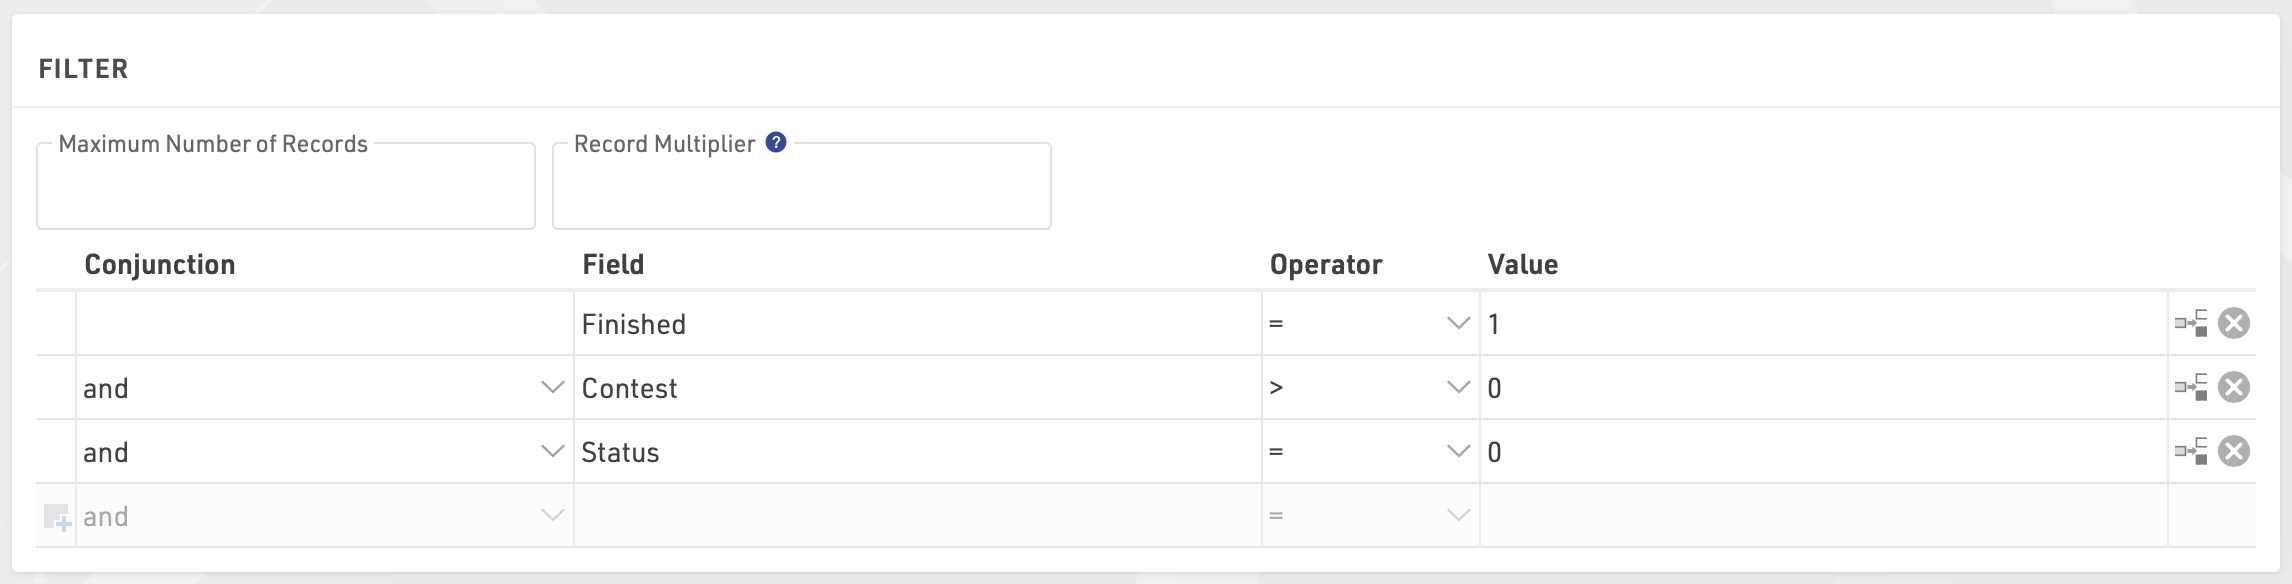
In particular, filters are important for result lists: you would like to show only those participants that have already finished. Usually, the filter will be that the rank must be greater than 0.
Instead of setting a filter, you can also limit the number of records shown on the list by setting a maximum number of records.
Besides, the Record Multiplier allows to show records more than once with different information (e.g. lap times) on a list.
View
When viewing lists there are some additional functions and shortcuts to make working with the list and participant data easier.
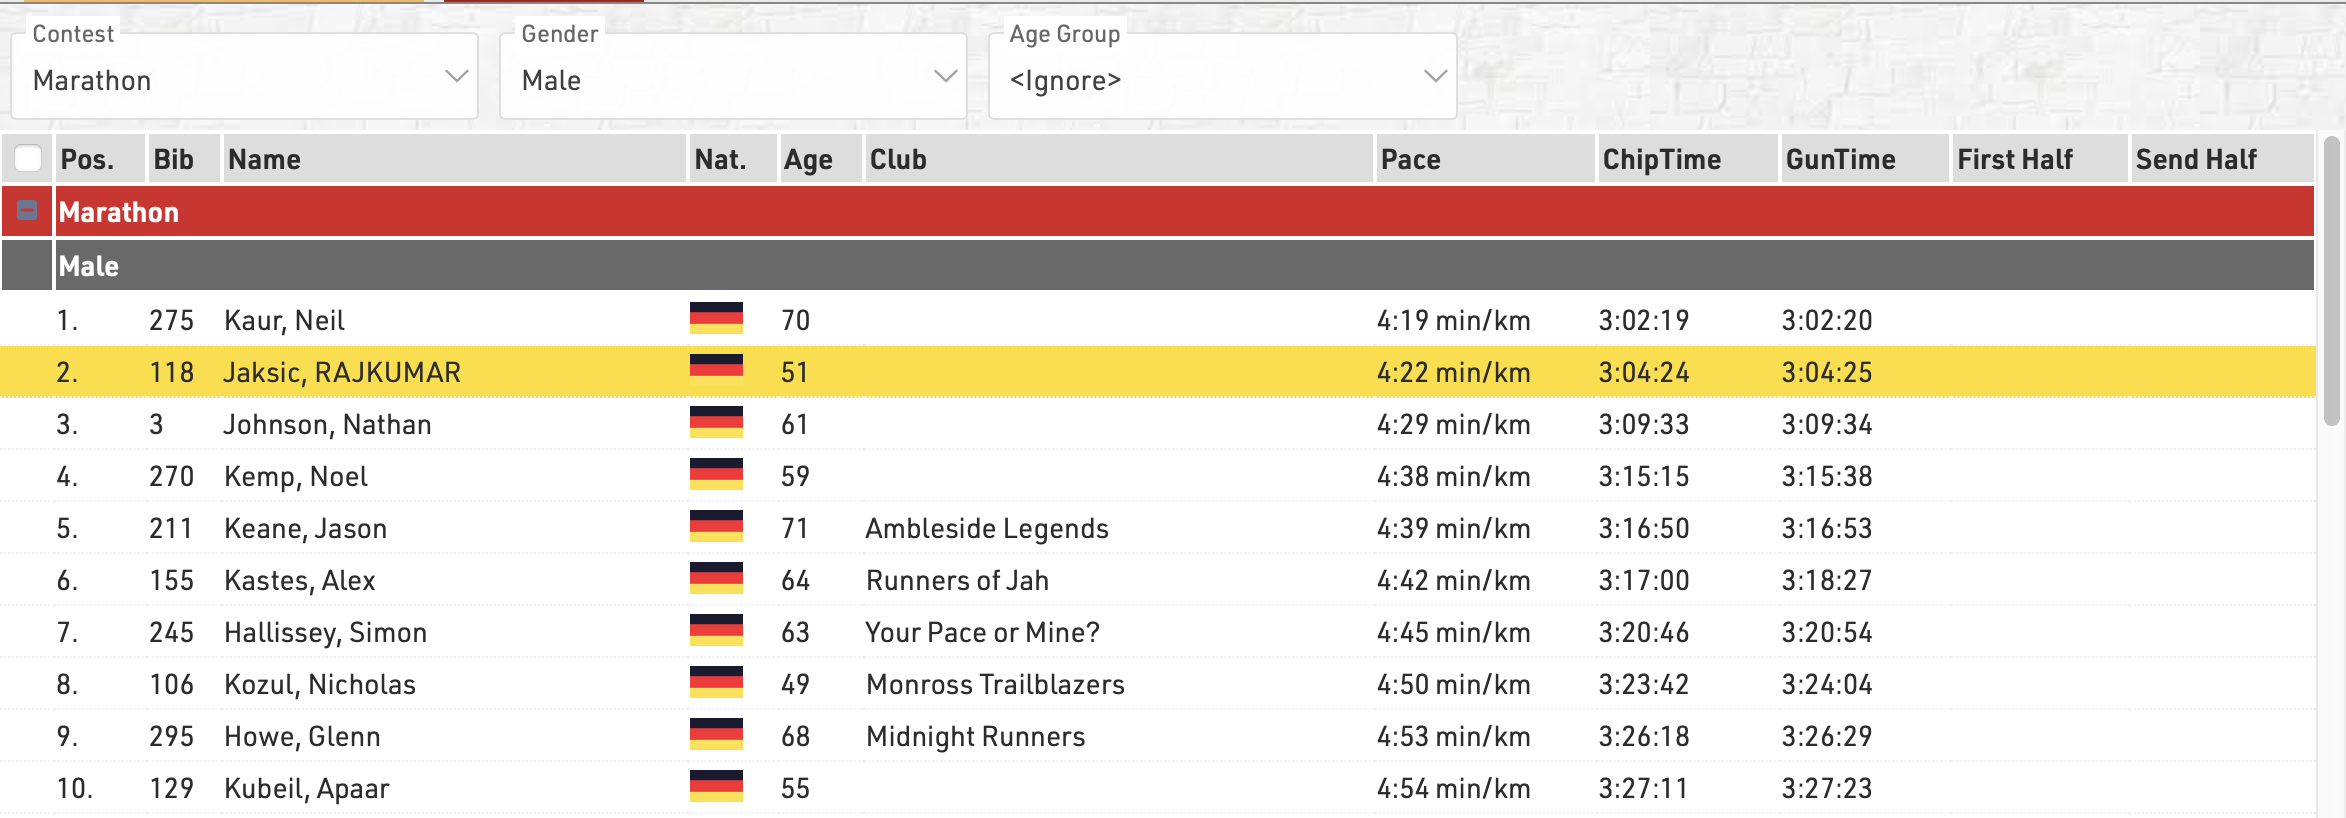
Any Filters you have applied to the list will be shown at the top of the list, allowing you to quickly filter to specific data sets. If using Groupings then the groups can be expanded or collapsed using the +/- icon at the start of the row.
Hovering over a row will highlight that entire row yellow.
Clicking on a row will open the Participants Tab directly to that participant record, if the right-side dock is open to the Participants Tab then it instead the participant record will be opened here.
Live Update allows you to set the list to automatically refresh at a pre-defined interval (from 1s to 60s), useful for monitoring specific lists during a race in an additional window.
Font size can also be adapted between 40% and 200%.
Page Settings
The settings in the Page tab are mostly relevant for the PDF output format as well as partially for the Presenter (marked with a *) and define how the records will be formatted and which additional information will be shown in the page header and footer.
Page Settings
Select here the page format, choose between portrait and landscape orientation and define the page margin in millimeters.
Multi Column
In some cases it can be helpful to split the page into several columns:
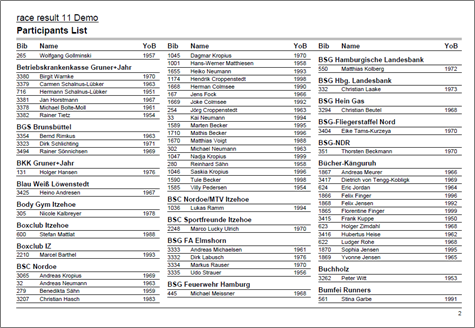
Simply define the number of columns and the column spacing in the Page settings of your list.
Background
The settings under Page Header allow you to put a picture in the top right corner of the report. However, if you require more flexibility regarding the design of the list, you can select a certificate at Design that will be shown in the background. This option gives you unlimited flexibility in designing your reports.
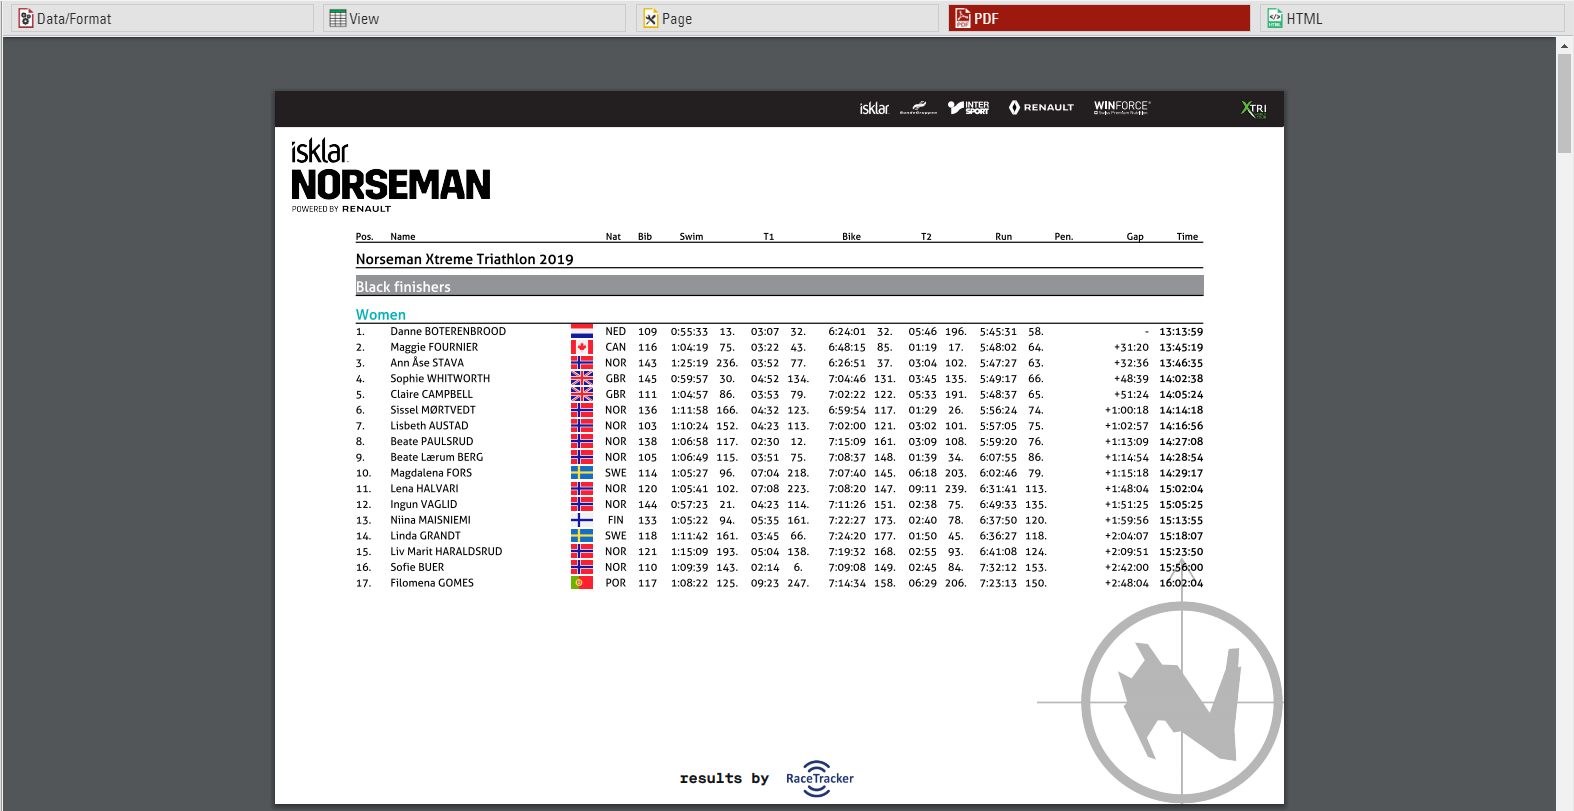
Cover sheet
Similar to the background, you can insert a certificate as an additional Cover Sheet at the beginning of your report and an additional Back Sheet at the end of the report.
Page Header
Via these settings you can add and format the following elements of the page header: two header text lines*, the column headers*, a picture (which will be shown in the top right corner) and a gray line below the two header lines.
Records *
Define here the font type and size of the data records. Additionally, define if there shall be a thin line between the records and if every other line shall have a gray background. Via the Line Spacing setting you can define the height of the records.
Hint: Probably you would like to have the same font type throughout the entire report. Therefore, simply select the font type here and leave all other font type boxes empty. The font type for the records will then also be used for the header and footer texts.
Page Footer
You can add several texts and an image to the page footer. For example enter [Page] to show the page number in the footer of your report.
List Header and Footer
Enter an additional text that will be shown at the beginning/at the end of the list.
Output Selector
The output selector is designed to allow for easier creation of results lists which may otherwise require multiple output lists and ranks to be setup. It also includes an option to always show the last result which makes live results lists even easier to setup.
When the output selector is enabled an additional filter is shown which allows the user to select which result they want to look at, there are then a few different fields which can be used to show information according to which result is selected.
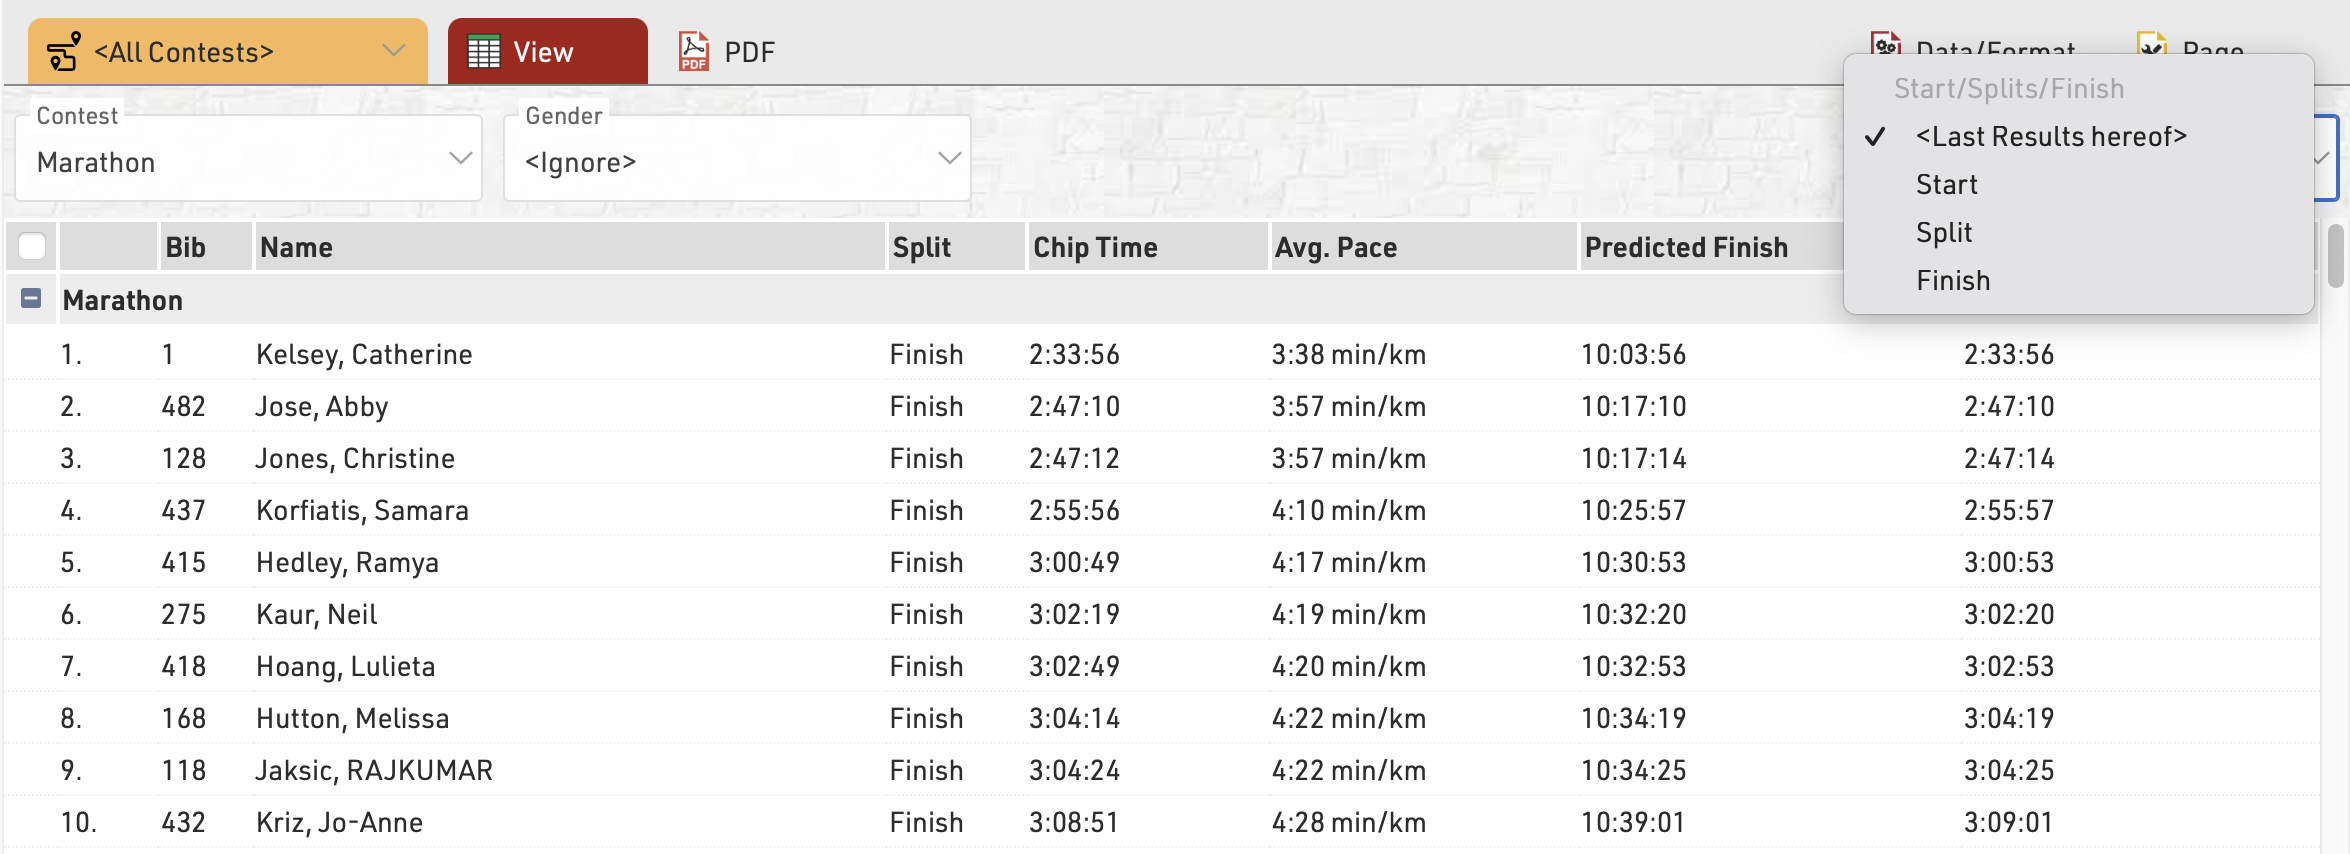
Inserting Images
Images can be inserted into Output lists, these can be useful for functions such as linking to participant photos, videos or team logos.
Images can be inserted either from the event file pictures, a user-defined function or from an external URL link.
To insert an image use the code:
"[img:ImageName.png|height:30px]"
Ensuring that "ImageName.png" is the correct name and file ending of your image.
"ImageName.png" can be replaced with either your user-defined function or the URL of the image. When replacing the image name with a UDF or other data field you need to concatenate the data field name with the rest of the string.
"[img:"&[ImageUDF]&"|height:30px]"
If no height is defined then the image will be shown in full size.
Certificate
The Certificate creates a graphical layout which can contain images, text and even data fields.
Certificates may be used for
- Layouts of Certificate Sets to generate individual participant certificates
- Background image for a List
- Cover sheet and closing page for a List
- Content of Labels
Certificates can be designed in any size format allowing them to be designed for different printer types, additionally - certificates may contain multiple pages.
The list on the left shows all certificates in your event file which can be rearranged using drag&drop by clicking the free space to the left of the list name. Certificates can be further sorted into folders, to create a new folder, click the Add Folder icon in the Certificates Header. By clicking the folder header, the folder can be expanded / collapsed, to sort the items within a folder alphabetically, click the icon. Empty folders will be deleted automatically when you reload the window.
Clicking the name of a certificate from the menu opens the layout editor for that certificate.
Page Settings
First, define the page size and choose between landscape and portrait orientation:
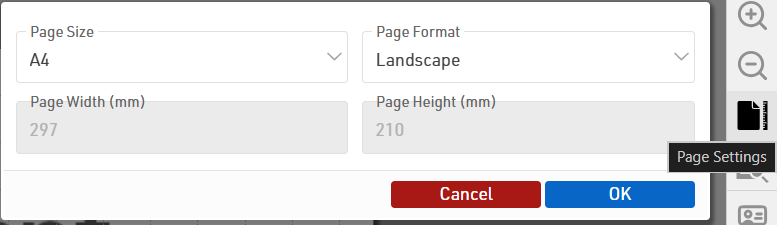
Preview
At any time you can render a real preview of the certificate for any bib number using this button:
Adding Elements
The menu on the right offers different types of elements that can be placed on the certificate:
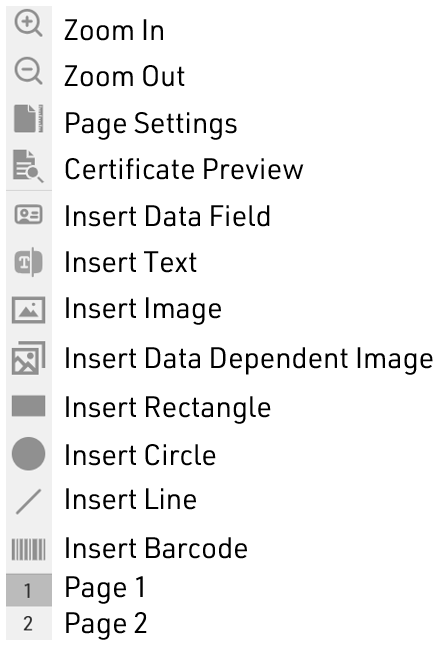
Data Field
You can enter a Field or an Expression in a Data Filed to display specific participant data. The example below displays the participant's first name.
Firstname
Using an expression you could display static text with dynamic text.
"Gender Rank: "&[GenderRank]
Text
The Text element can be used to display static text. Note, that you can not set Dynamic Formatting for text elements. Only Data Field elements can have Dynamic Formatting.
Image
The Image element can be used to display static images. When selecting this element, you will be given the option to select an image from the list of available images in your event file or from the available folders.
Data Dependent Image
The Data Dependent Image element can be used to display dynamic images using an Expression. The Expression should evaluate the name of the image, including the image extension (eg. .jpg).
For example, you can use the field Nation.Alpha2 in an expression to evaluate the name of each image file. The below would be evaluated to "flag_DE.jpg" assuming the participant was from Germany.
"flag_" & [Nation.Alpha2] & ".jpg"
Another example would be if you wanted to use a Control Function like an if() statement to determine what image to display. Here is one example
if([GenderRank] IN "1-3";"Winner.jpg";"Blank.jpg")
Shapes (Rectangle, Circle, and Line)
You can use the Rectangle, Circle, or Line options to display colored shapes. Using Dynamic Formatting, the colors can change dynamically for each participant.
Barcode/QR Code
You can encode any Field or Expression in one of the below format options.
- Barcode 39
- EAN 13
- Barcode 128
- QR Code
Element Setting Bar
Each element listed above has various settings. Not all available settings work for all elements. These settings are located at the top of the certificate window.
Top Row

The left text box is where you enter a field or expression for a given element. This is used for Data Field, Text, Image, and Data Dependent Image elements.
The two center drop-down lists pertain to team scores. This is discussed in more detail further down in this article.
The right text box labeled DF stands for Dynamic Formatting. Dynamic formatting can be used to change the formatting of an element dynamically. For example, you could change the text color depending on the participant's finishing place.
if([GenderRank] IN "1-3";"C(#ffdb4d)";"C(#000000)")
Bottom Row

The bottom row of options has standard text formatting options like bold, italics, and unlined text. There are also options for text alignment within a text box, layering options, color, text outline, and element transparency.
Aligning Elements
After adding an element to the certificate you can position and scale it on the certificate with the mouse. Alternatively, you can use the cursor keys (see keyboard codes in the bottom left corner) or use the entry fields at the bottom of the screen to position and scale the element.
Select several elements at the same time by clicking and holding your mouse button and dragging the selection rectangle over the elements.
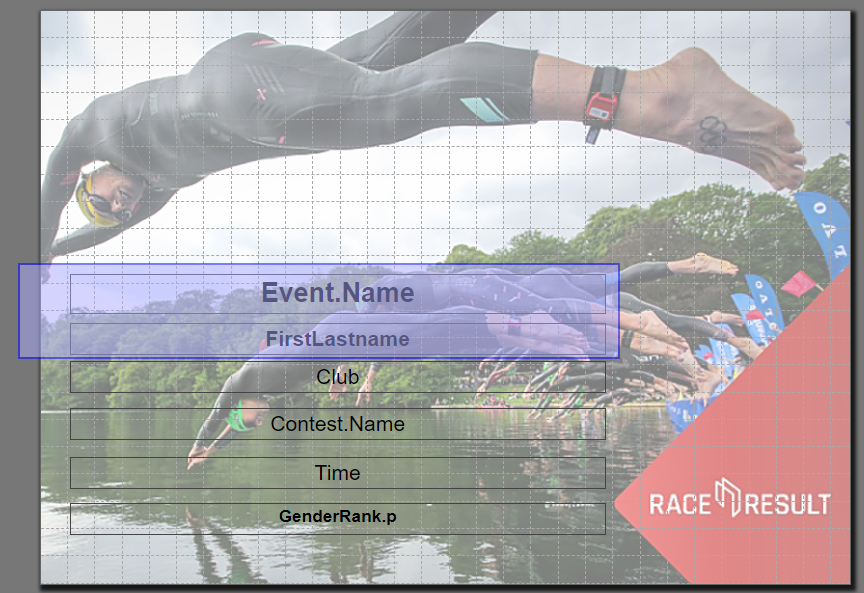
Alternatively, you can hold the Ctrl key on the keyboard and click one element after the other.
Then, these functions appear in the top left corner to align the elements:
Pages
Optionally, a certificate can include more than one page. Simply click on "2" in the toolbar on the right to access page 2. Once you have placed an element there, you can add a page 3 and so on.
Team Certificates
Certificates for teams work exactly the same as a normal certificate. Instead of the individual rank and time, you would show the team’s rank and time. If you would like to also show information on the other team members, you can simply enter the field/expression in the top left corner and then select the team score and the participant.

For example, to show the last name of the second participant of the team (according to team score 1), the system will use the field TS1.P2.Lastname. In the preview, you can see that selecting a team score/participant only helps you to set up your certificate, but internally the field name will be used.
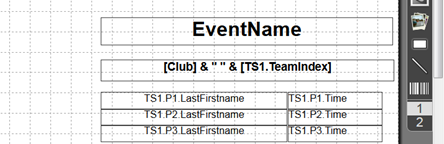
Certificate Set
Certificate Sets are used for the publishing and printing of certificates to determine for which participants a specific certificate should be generated, the complete set of certificates can be generated as a single PDF file if required.
Certificate sets make it possible to produce different certificates for different contests or subsets of participants - such as awards winners.
The list on the left shows all certificate sets in your event file which can be rearranged using drag&drop by clicking the free space to the left of the list name; certificate sets highlighted in blue are published online through my.raceresult.com.
Certificate sets can be further sorted into folders, to create a new folder, click the Add Folder icon in the Certificate Sets Header. By clicking the folder header, the folder can be expanded / collapsed, to sort the items within a folder alphabetically, click the icon. Empty folders will be deleted automatically when you reload the window.
Clicking the name of a certificate set from the menu opens an overview page for that list.
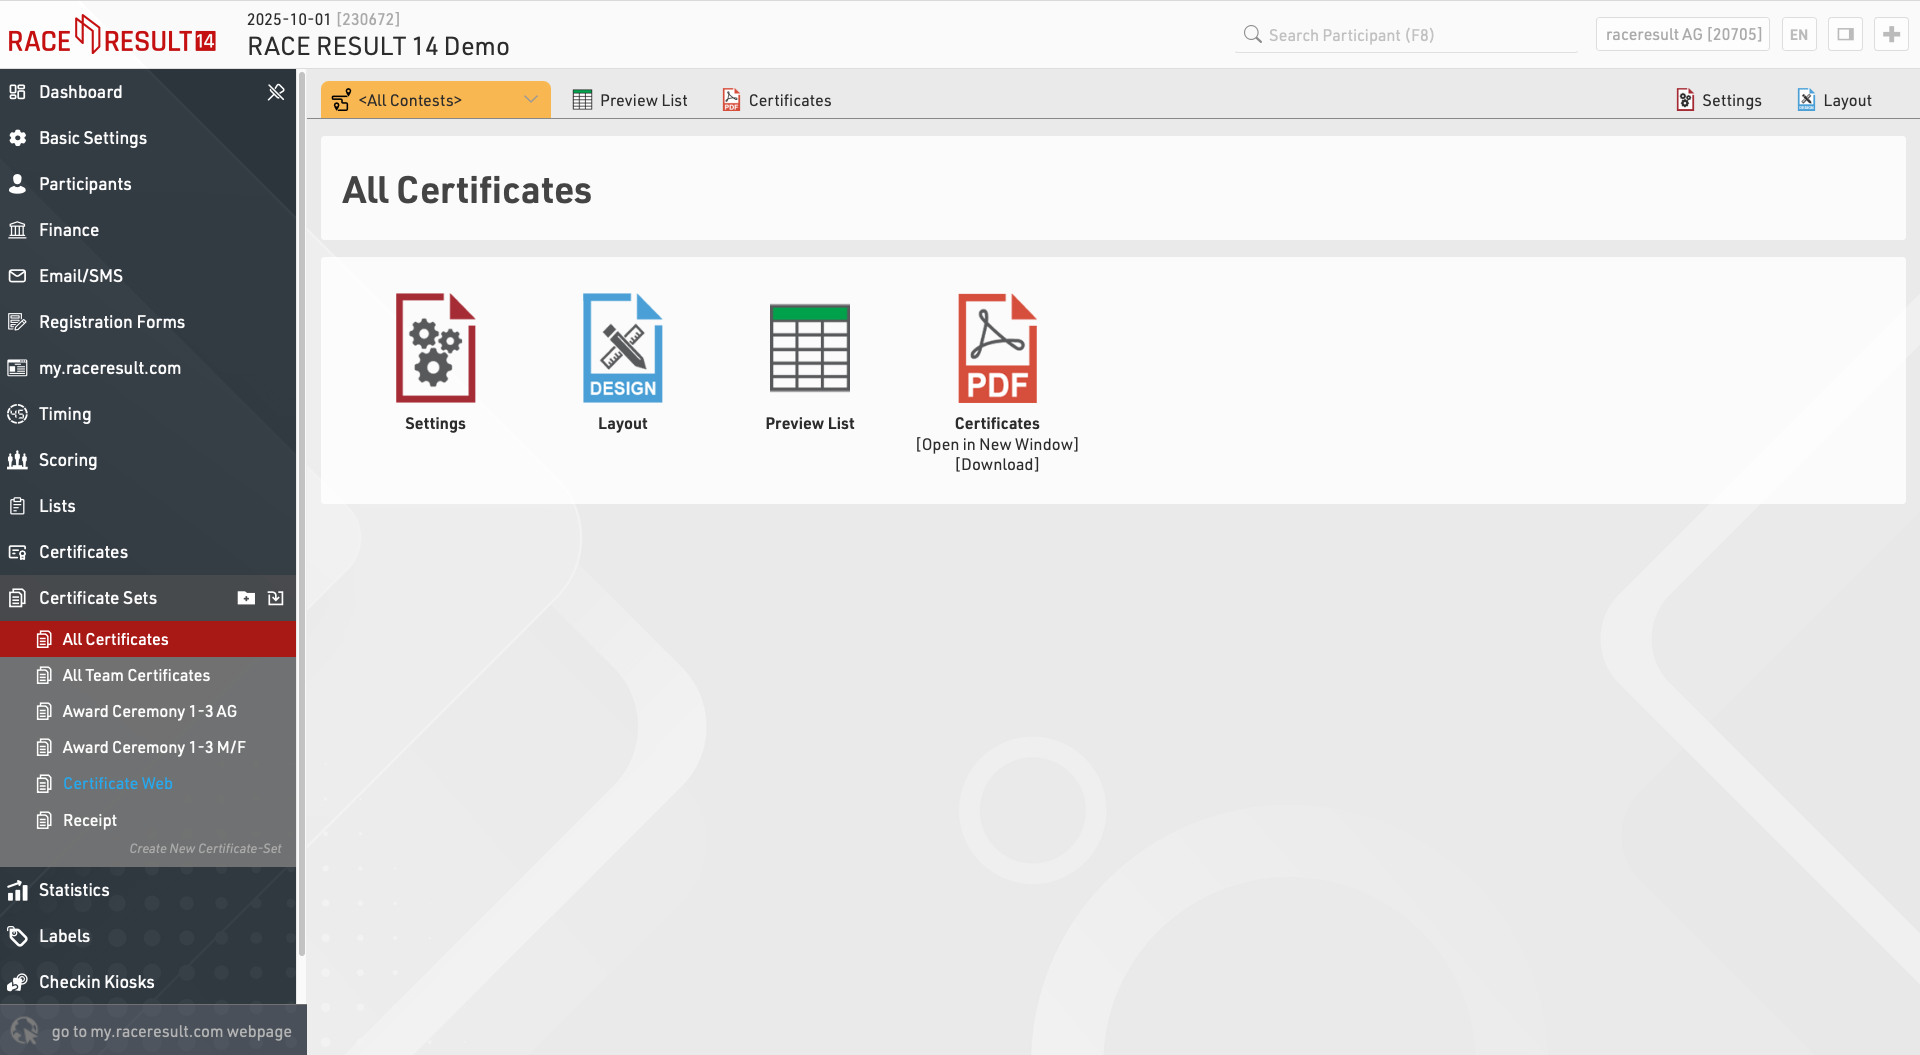
Settings
Certificate Layout
First, select the Certificate layout which should be used.
Then choose if you would like to create individual or team certificates. If you choose Team Certificate (1 per Participant), certificates will be created only for members of a team. If you select Team Certificate (1 per Team) a certificate will be printed only for the first member of each team.
For which Participant do you want to create certificates?
You can further limit for whom certificates will be printed. Oftentimes certificate sets are filtered by a rank, for example if you want to print certificates for only the best three. You can also enter a general filter.
Order of the Certificates
Determine in what order the certificates will be created.
Layout
Edit the Certificate Layout selected in the settings.
Preview List
A static list of the participants included in the certificate set and some basic values which may affect their eligibility.
Certificates
Generate all certificates in the set in a single PDF file.
Statistics
Statistics can create tables of statistical data either with custom rows/columns or using some of the pre-defined templates.
The list on the left shows all statistics tables in your event file which can be rearranged using drag&drop by clicking the free space to the left of the statistics name.
Statistics can be further sorted into folders, to create a new folder, click the Add Folder icon in the Statistics Header. By clicking the folder header, the folder can be expanded / collapsed, to sort the items within a folder alphabetically, click the icon. Empty folders will be deleted automatically when you reload the window.
Clicking the name of a statistic from the menu opens an overview page for that list.
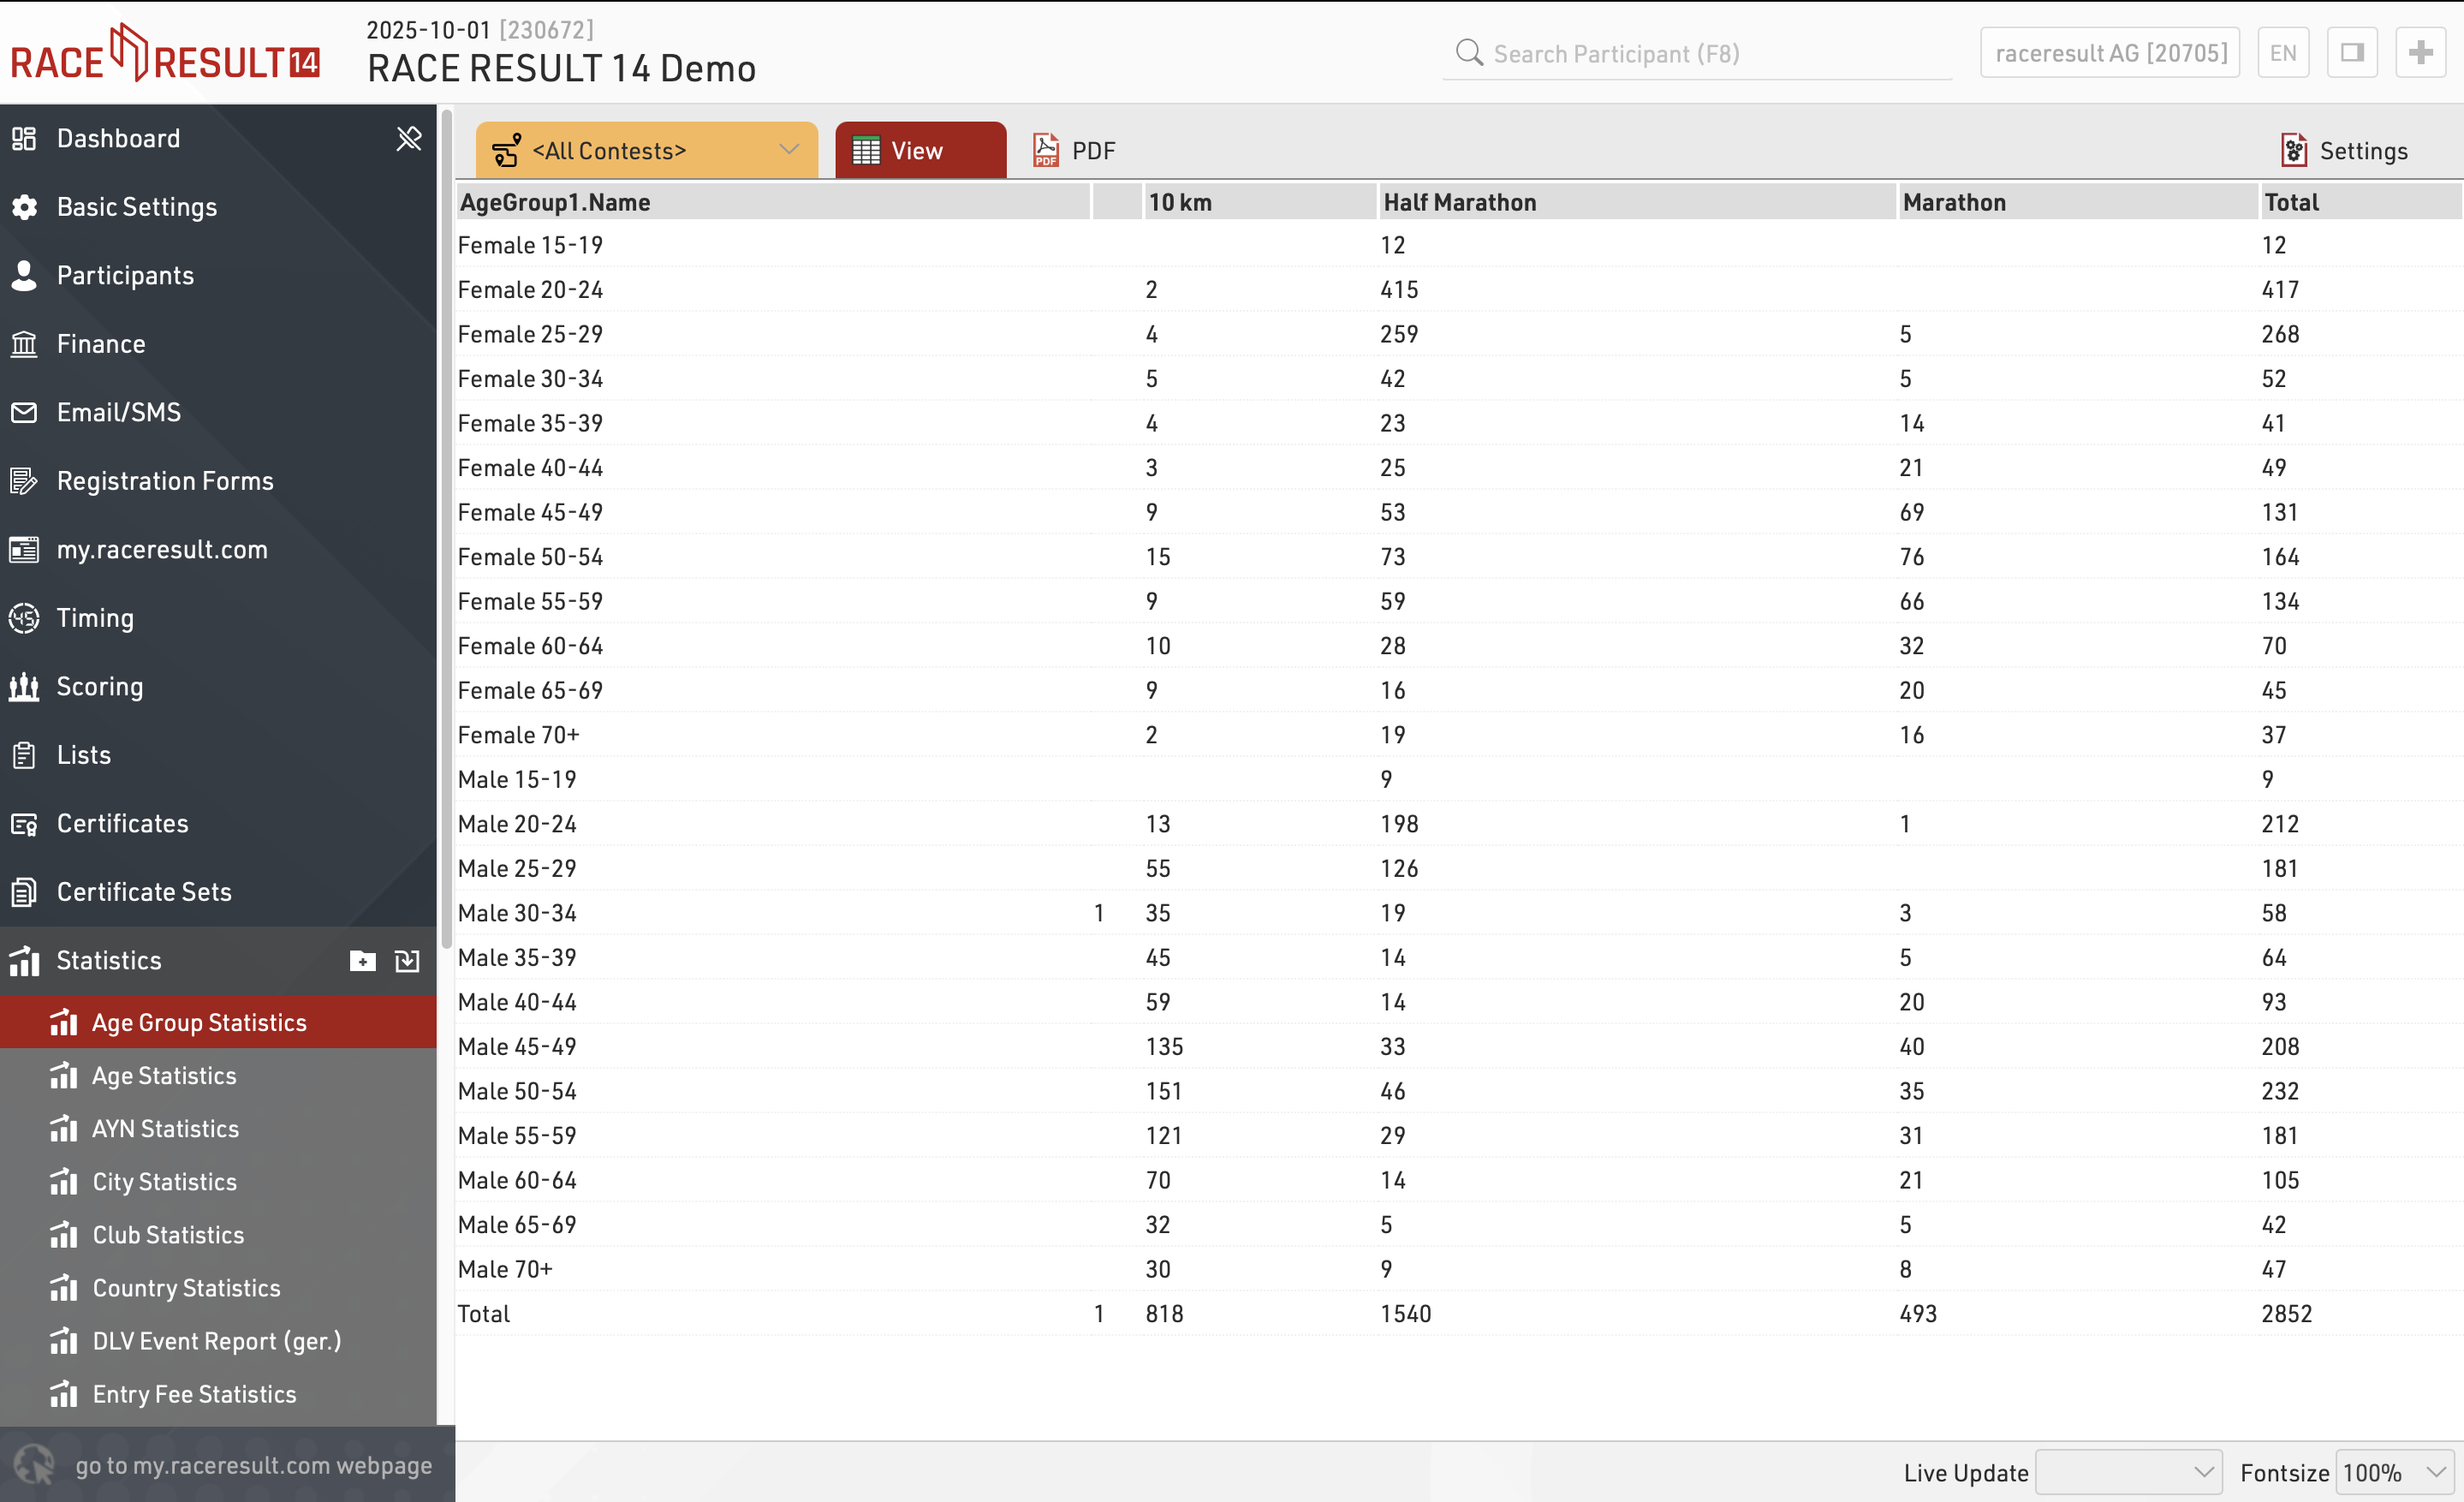
When viewing statistics, clicking on a value in the table will open a popup window with a breakdown of the participants considered in that item, clicking a participant will open that participant's details in the right-side window.
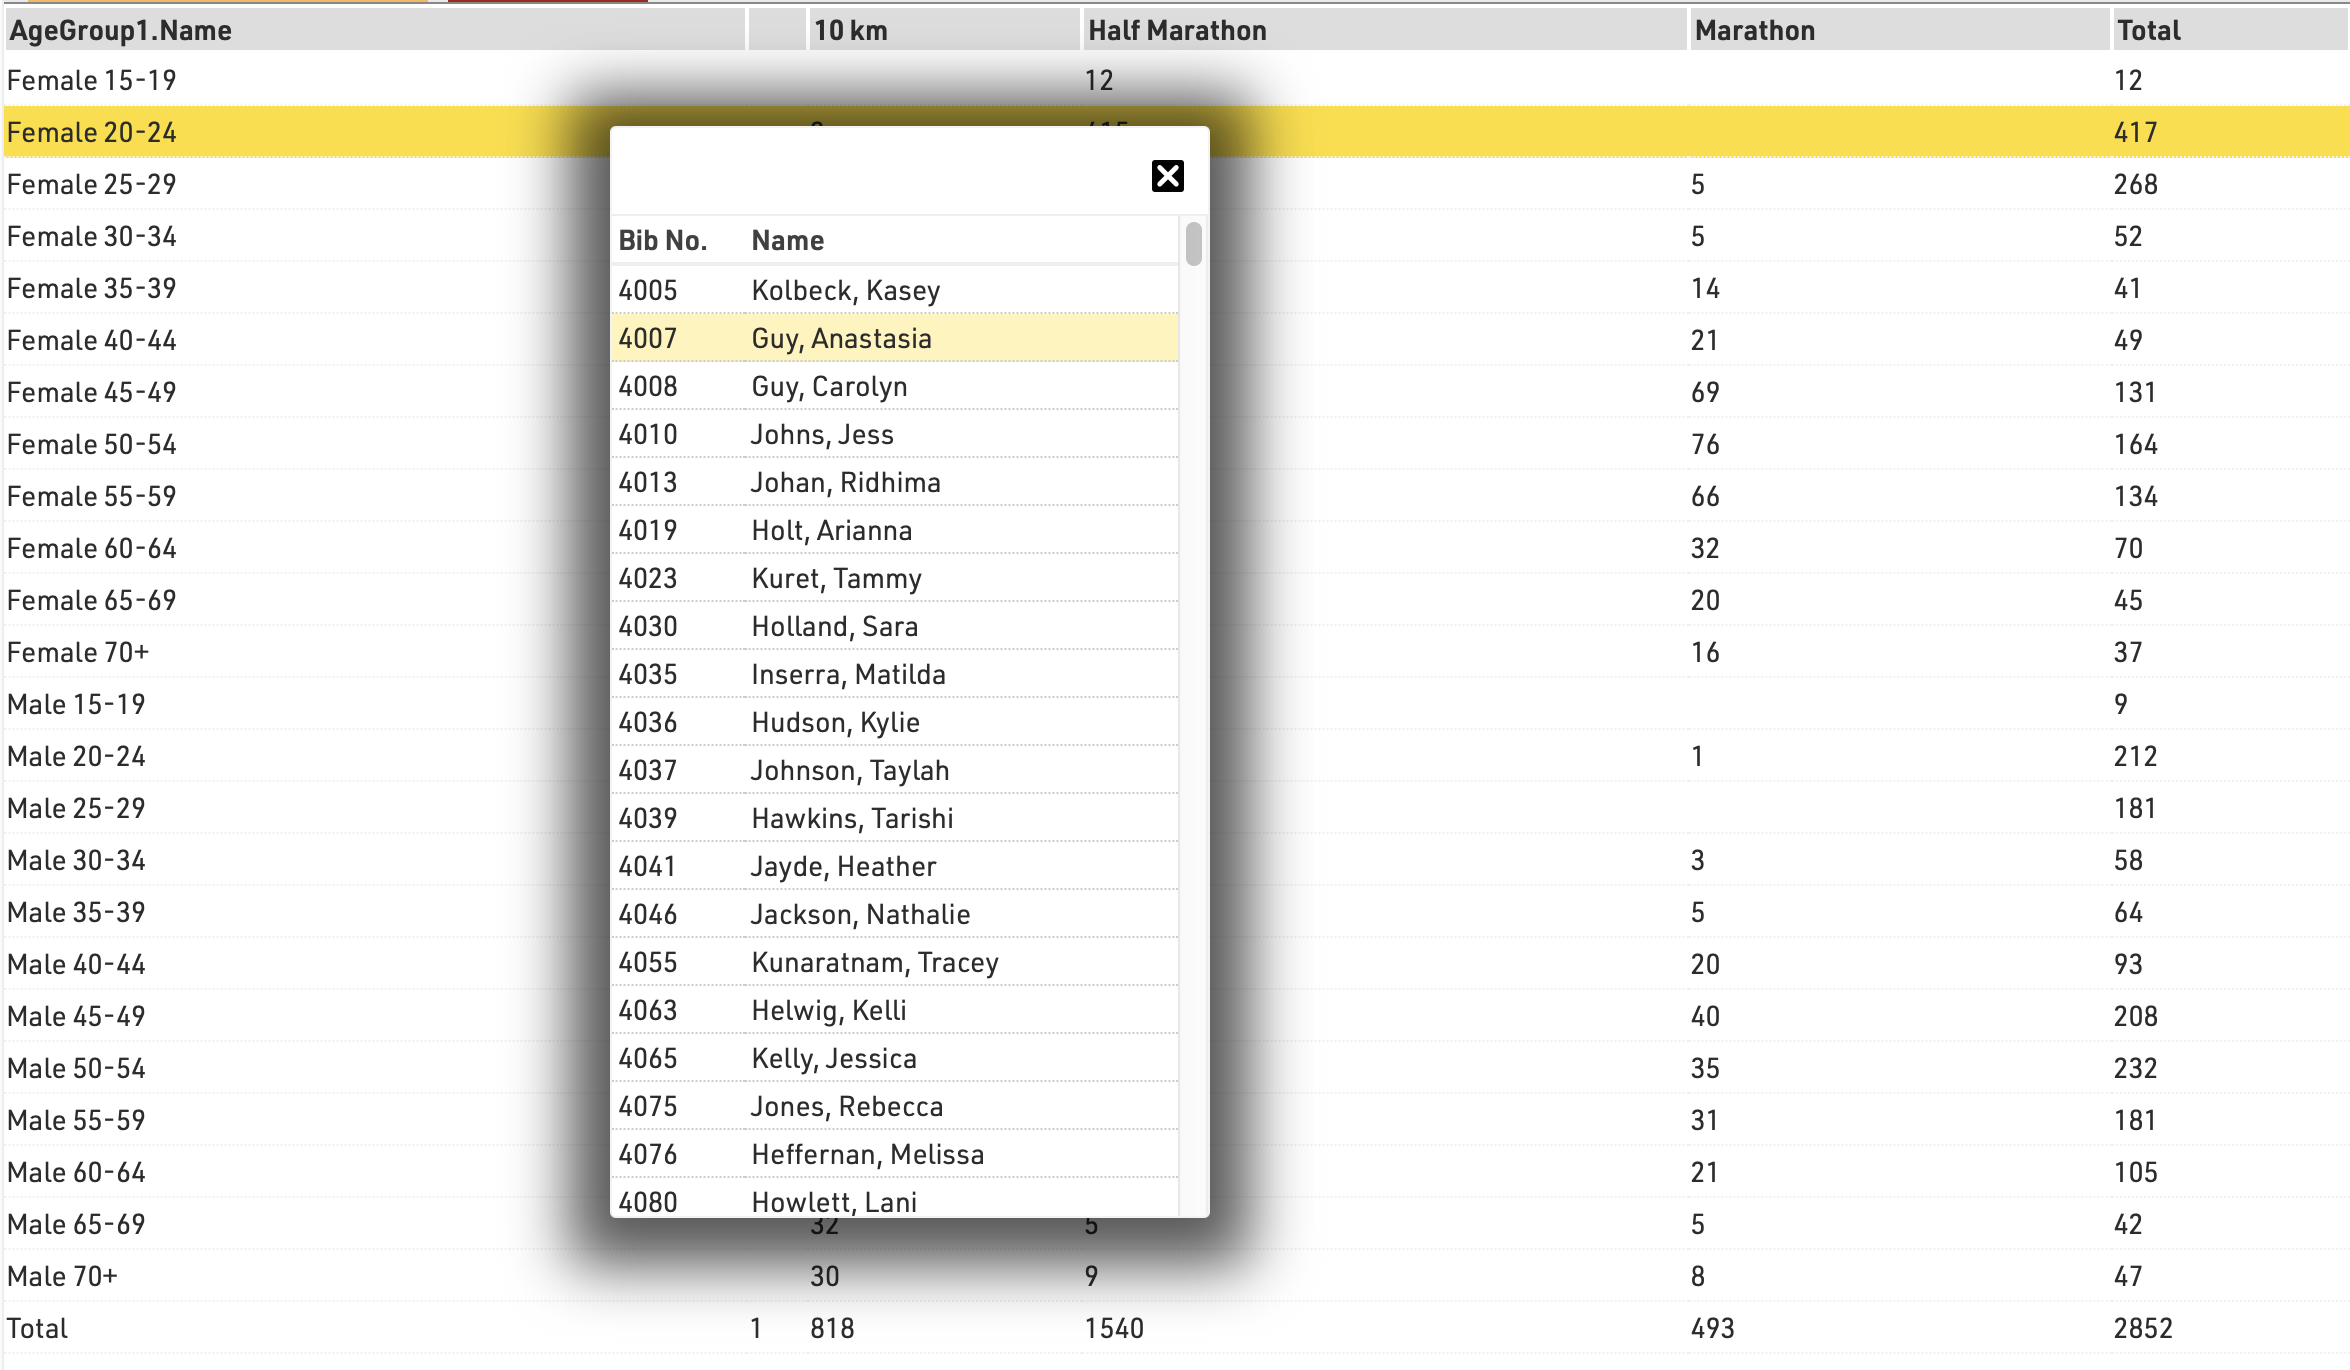
Create new type of statistics
You can easily create a new type of statistics. The most relevant settings are Rows, Columns, Field, and Mode.
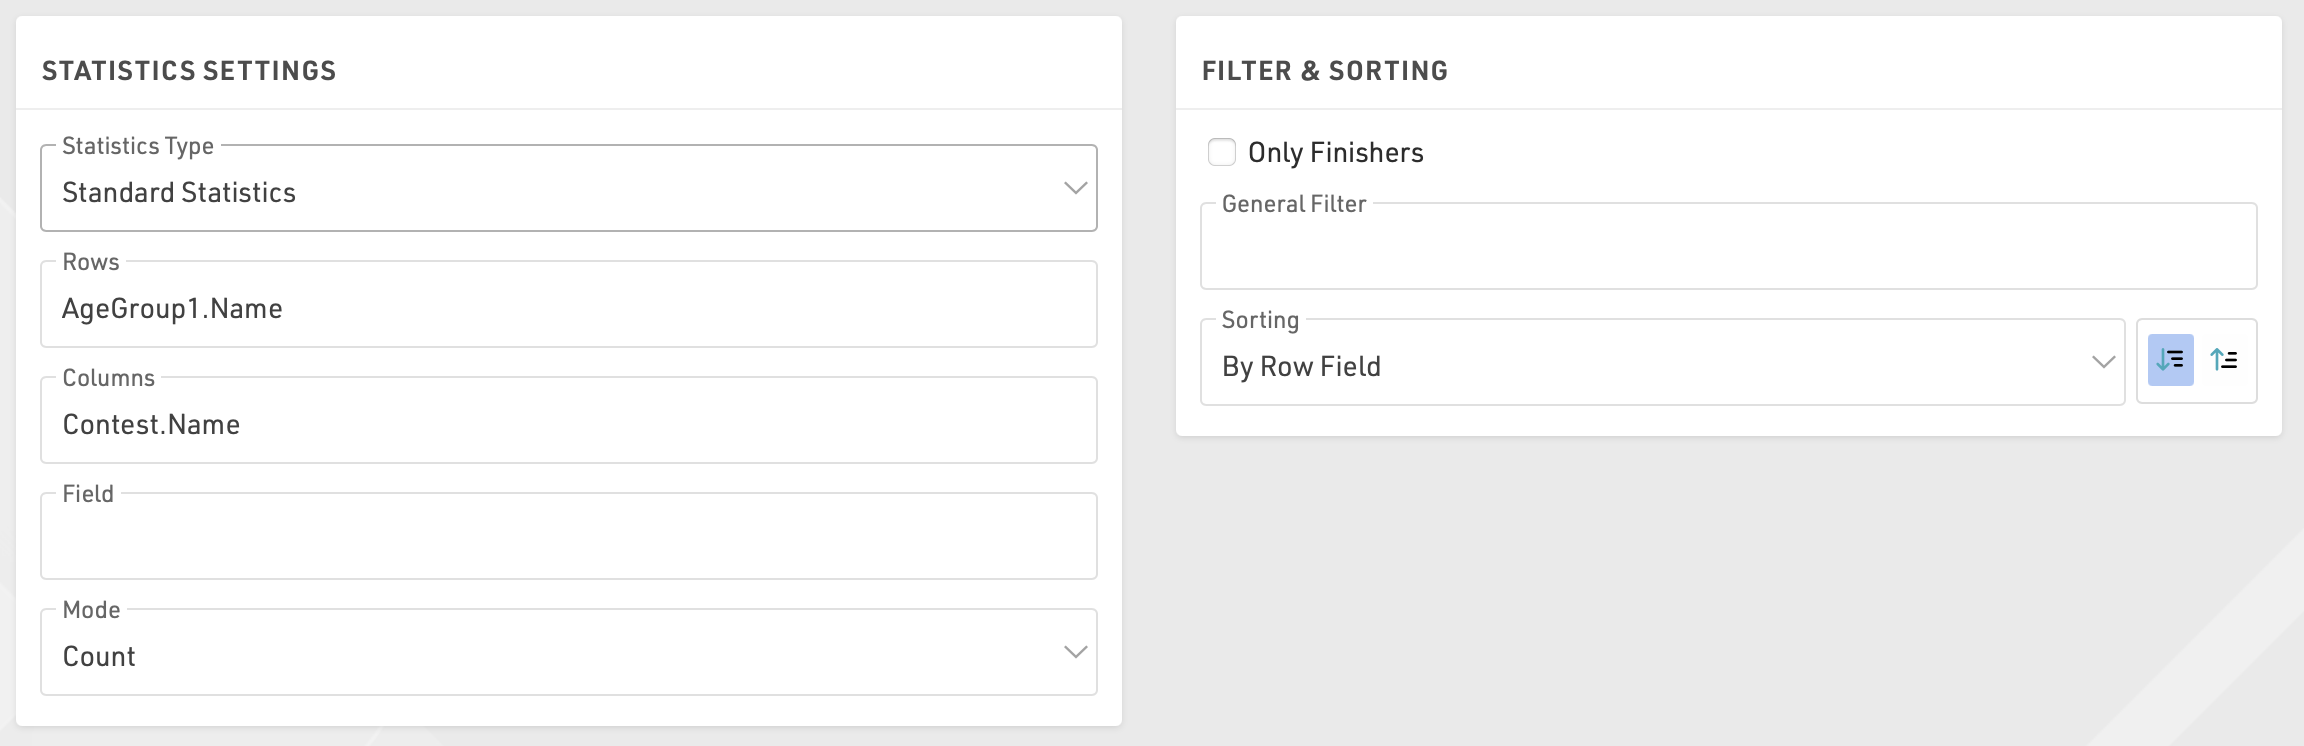
In most cases you will use the mode Count: the number of participants matching the row and the column field will be counted.
Alternatively, you can select a field over which the minimum/maximum/average/sum will be calculated.
If you want to restrict the participants considered for the statistics, enable Only Finishers or enter a General Filter.
Special Types of Statistics
Besides these statistics there are some special types of statistics:
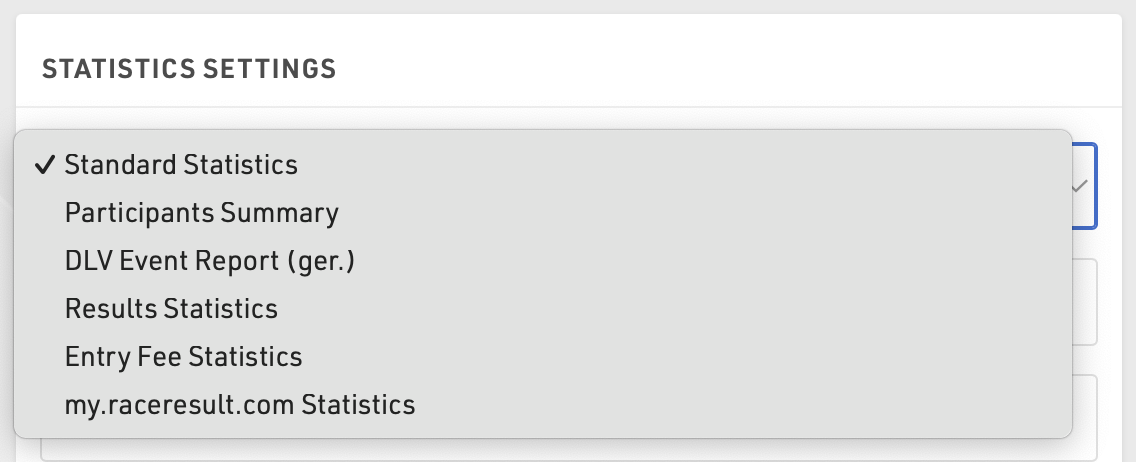
- Participants Summary creates a PDF with a general statistics of the event
- DLV is a report for German Athletics Federation
- Results Statistics shows how many participants have a time in each special result
- Entry Fee Statistics lists all entry fees and calculate the sum over all participants for each entry fee
- my.raceresult.com Statistics mirror the my.raceresult.com Statistics
Labels
Labels are normally printed on pre-cut label sheets and allow you to place either text or a certificate design on each label.
The Label Settings determine the basic layout and template for the labels.
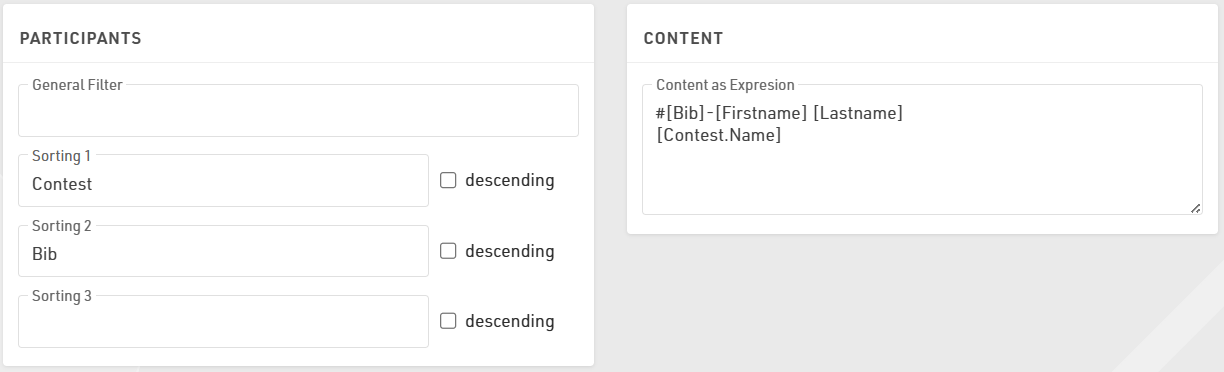
Participants
A Filter that defines for which participants a label will be created.
Sorting Fields that define how the labels will be sorted.
Content
Enter an Expression that defines the content for each label. This is handled as a full-text expression and can support multiple lines.
Other
The Directional layout (row / column direction) of the labels.
Optionally a design to be printed instead of the Expression, see Labels with Design, if a design is selected then it can be edited directly through the Layout tab.
Optionally include an automatically generated Barcode for each label, the barcode will include the bib number. If using a certificate that already has a barcode, leave this blank
Font
Define the font, font size, formatting and alignment for text.
Page
Page settings for each sheet, these are normally provided by the manufacturer of the label sheets.
Label
The individual label sizing / spacing, these are normally provided by the manufacturer of the label sheets.
Once the settings are defined you can preview, download and print the labels through the Labels tab, an example might look like this.
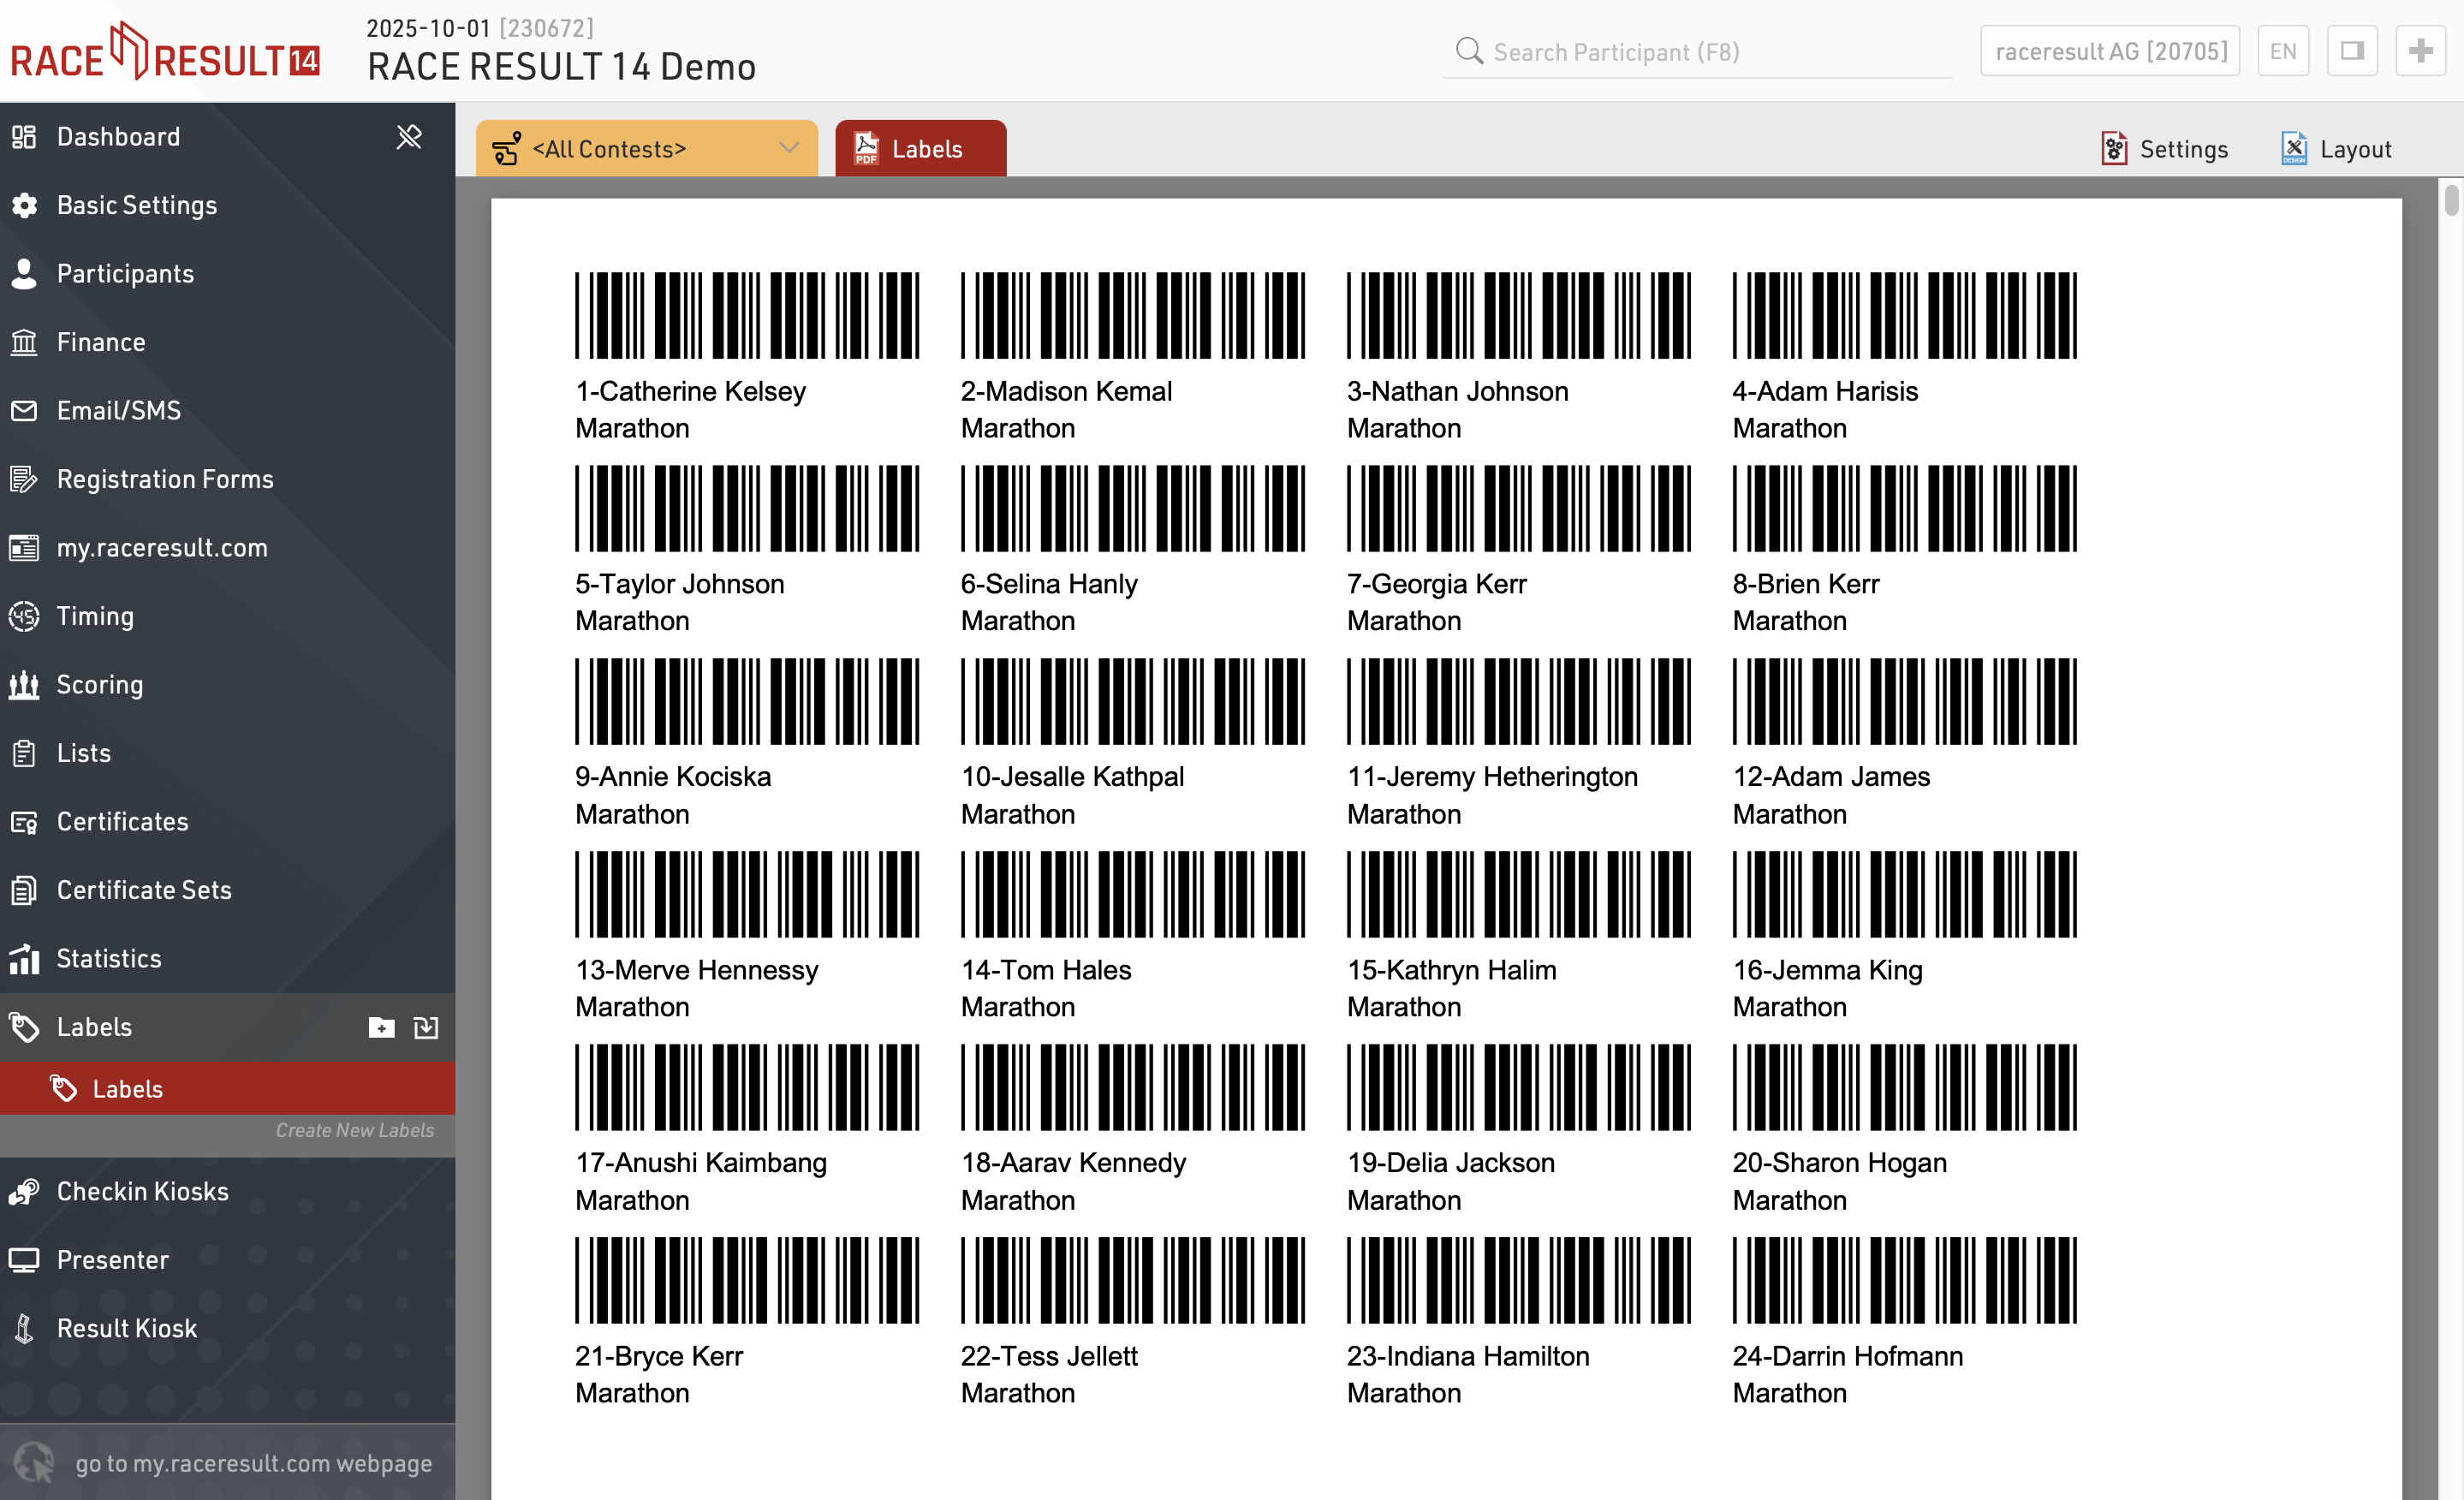
Labels with Design
If you need more flexibility regarding the design of the labels, you can select a certificate that will be printed on each label. For example:

If a certificate is selected, you can click the tab Layout to edit the certificate:

Checkin Kiosks
The Kiosks provide a flexible tool for looking up and editing participant data during an event for example at registration, or giving access to individuals to easily lookup and edit fields without providing full access to RACE RESULT 14.
Within an event file multiple templates for kiosks can be created, each of which can be accessed by a unique URL, this allows different templates to be defined for different purposes.
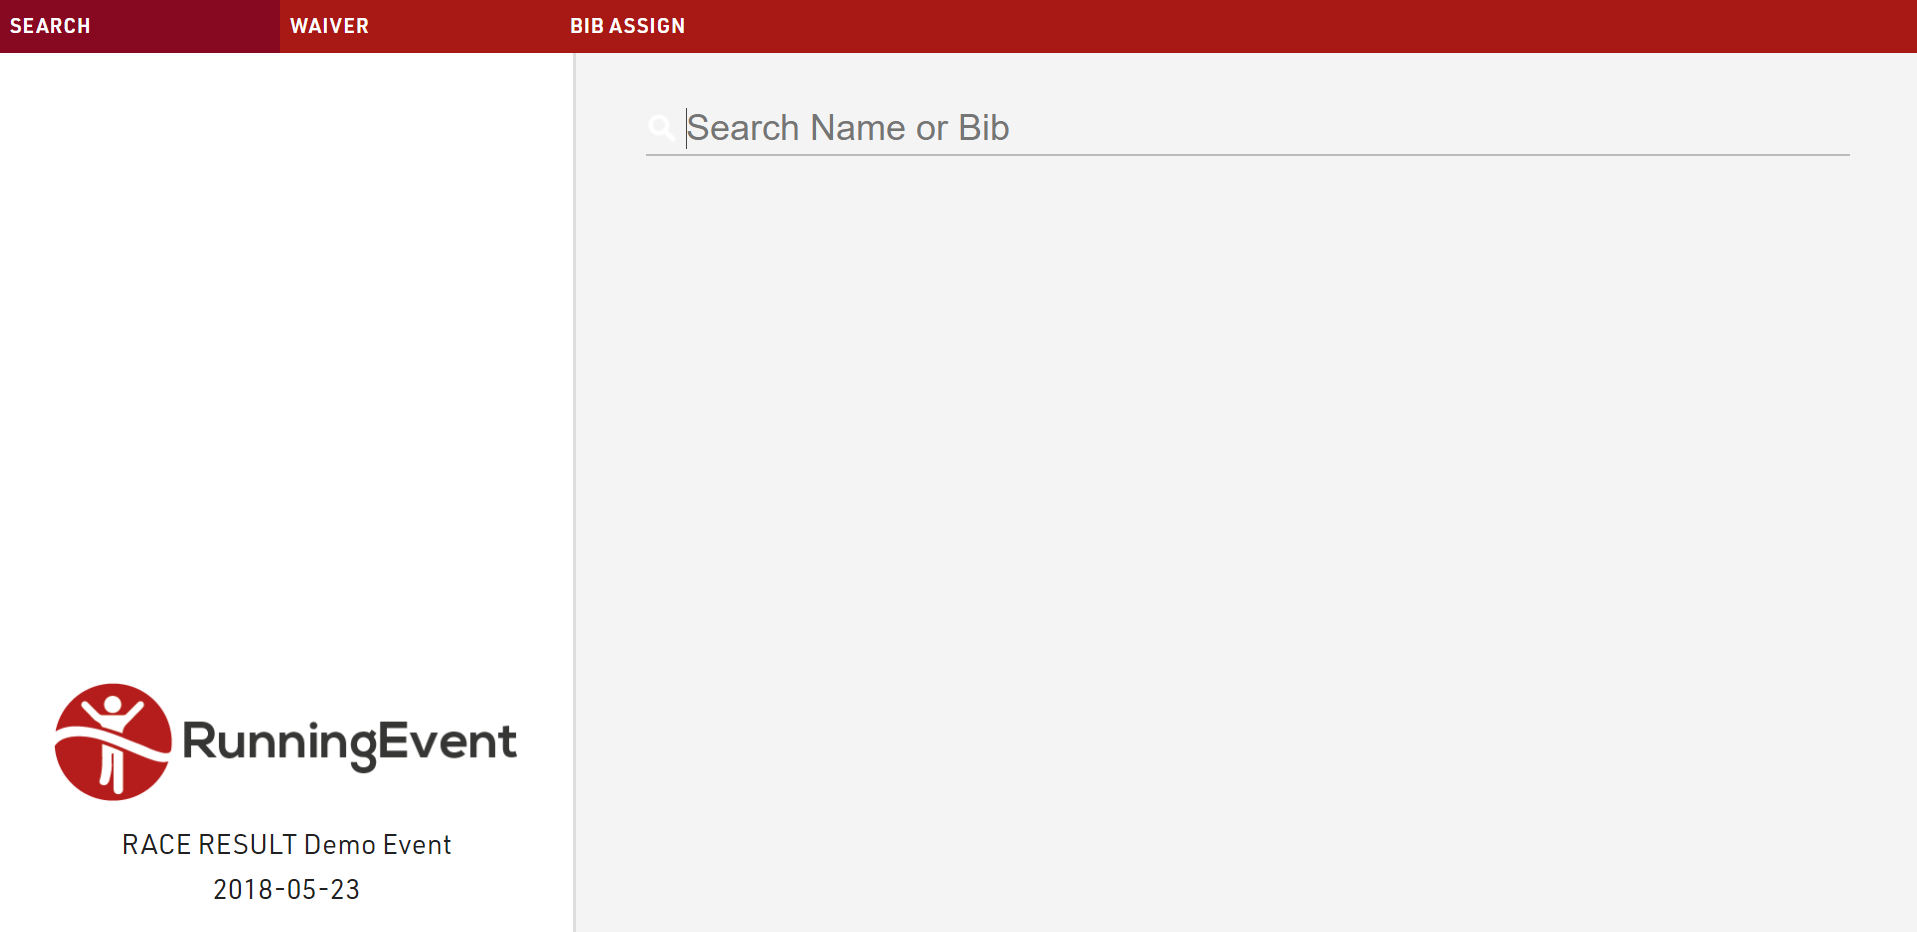
The given name to each kiosk will be shown in participants' history, when changes are made: in this way, you can always retrieve from which kiosk (and user) a change has been made.
Basic Settings
Kiosks are created from templates which define what is displayed, templates can be imported from other event files or easily copied to create other kiosks. Each should be given a unique name, and each kiosk will then be accessible via a unique URL which contains the kiosk name and a unique key.

Kiosks can be enabled or disabled, and can also be enabled via a time range, the title is the label of the window displayed in the browser.
The option for Transponder Assignment Mode applies to any edit step which is used to assign the Transponder1 or Transponder2 fields, this has 3 options to handle what happens if a transponder is assigned twice within an event.
For advanced customisation it is also possible to apply custom CSS to the display.
Steps
Each kiosk can have multiple steps defined for different purposes which will automatically progress in order. Each step is labelled and the labels for each step are shown in the top navigation bar. With the exception of the search, steps can be rearranged by clicking and dragging, or deleted if not required.

There are 2 types of step, and each step is separated into display fields on the left and action on the right.
After Save Actions
The After Save Actions are saved at the completion of the kiosk after all other fields have been saved. This allows for additional actions to be completed which can store useful information about the participant.
After Save Actions can be filtered to only apply to specific participants.

Save Value
Save Value allows saving of data to an additional field, the value which should be stored should be written as a standard Expression and may use any additional Functions or User-Defined Fields / Functions. This could for example be used to set a checkbox to true or a timestamp to a textfield using the now() function.
Save Certificate
The selected certificate will be generated and stored on the server as a link in the destination field, note that if working offline these will be stored to the local server inside the RACE RESULT installation folder. When choosing a certificate the value defines which template should be created. This may be useful for digital waivers which can be timestamped with the creation time and include the signature captured in an edit step.
Print Certificate
The kiosk can also print a certificate layout after save, this requires the RACE RESULT Web Server to be running on the computer running the kiosk.
When selecting which certificates to print you can choose to either always use the default printer, or you can select which printer to use for each certificate on the first print.

When selecting the printer for a certificate a dialog will be shown on the first print attempt to select a printer for the corresponding certificate. This setting is saved locally in the browser window until the page is re-loaded. Advanced settings allow for turning on autorotate and center settings for better alignment on certain printer setups.
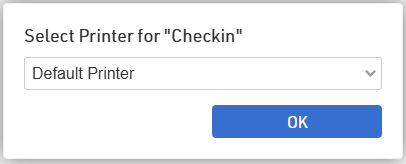
Send E-mail
Send E-mail will trigger the sending of the selected Email/SMS Template which could be used for registration confirmation.
Presenter
Presenter is used to create displays for primarily on-site results presentation, announcers, or for other staff / volunteers to easily access data.
Within an event file, multiple templates for presenter displays can be created, each of which can be accessed by a unique URL. This allows different templates to be defined for different purposes. The URLs can be accessed without logging in to RACE RESULT 14, meaning they can easily be shared without giving full access to the event file. By default, you will find three presenters in your event file: Chip Check, Present Results, and Show Last Chip Reads.
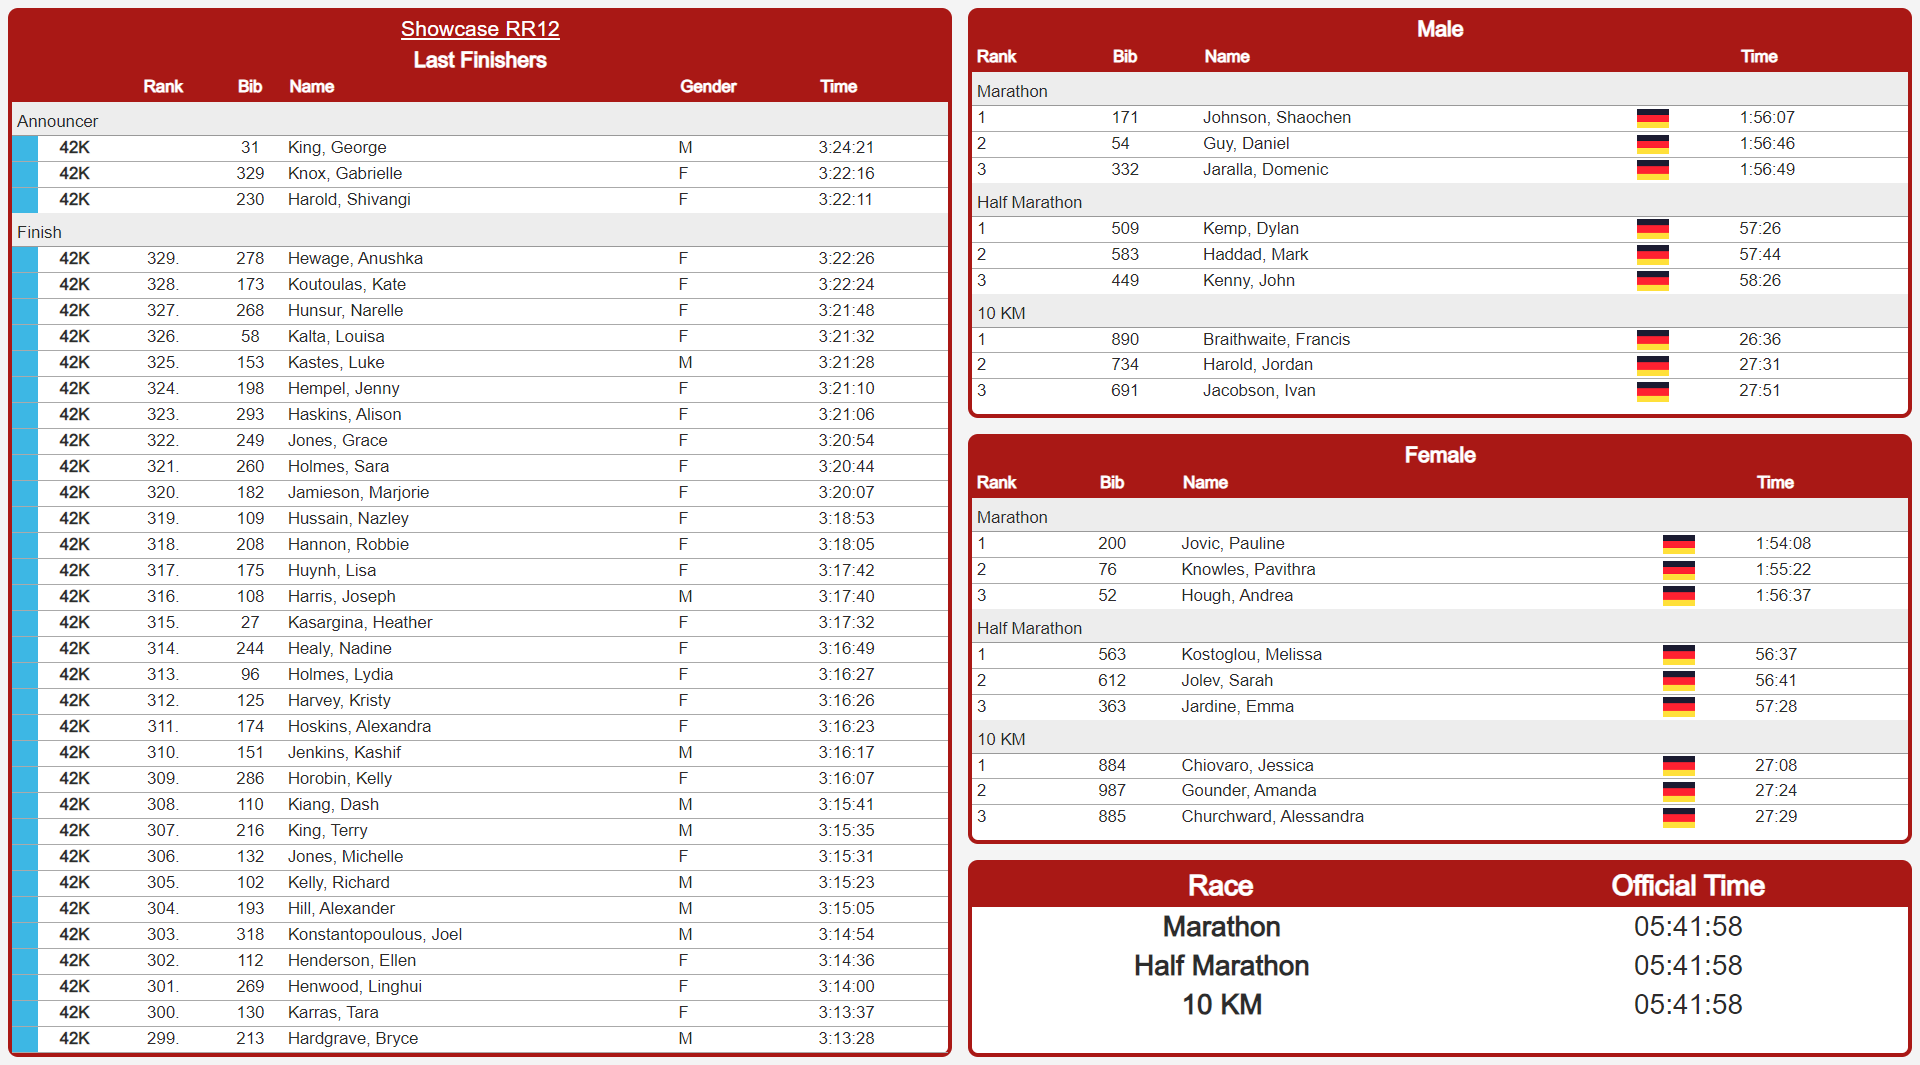
Displays may contain multiple screens which can be switched manually, using a touch screen, or using the FN-Keys 1-4.
Basic Setup
Each display can be enabled for a specific time frame and given a title - which is the title of the browser tab.
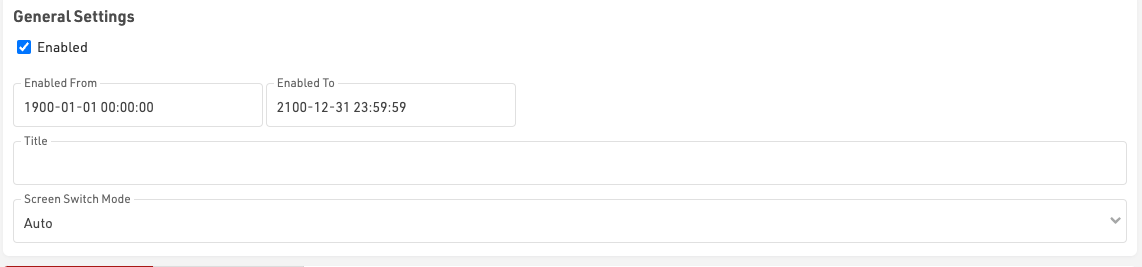
New screens are added / deleted individually. When multiple screens are defined, you can also control how the different screens should be switched in the Screen Switch Mode:
- Auto: With Auto Screen Switching, the presenter will switch through all available screens one after the other. A screen will not switch before all windows have reached the end of their data list (with scrolling enabled) and according to the longest Page Time of a window. The tabs of the different screens are hidden, you can navigate to the first four screens with F1-F4 anyway.
- Auto with Tabs: Similar to Auto, except for the navigation bar that shows the different tabs. With a concise screen title the viewer directly knows what that screen is about.
- Manual: In Manual Screen Switching, a screen will be shown until changed manually, either by clicking the respective tab or hitting F1-F4 for the first four screens.
- Always show "Screen": In this mode you can remotely control a screen you don't even have access to. No matter where the presenter is open, all presenters will update their screen automatically. Please note, they will only update when refreshing, it's not an instant push.
When working with multiple tabs it is also possible to force the Presenter to start in a specific tab by appending &tab=X to the URL, where X is the tab number which should be displayed.
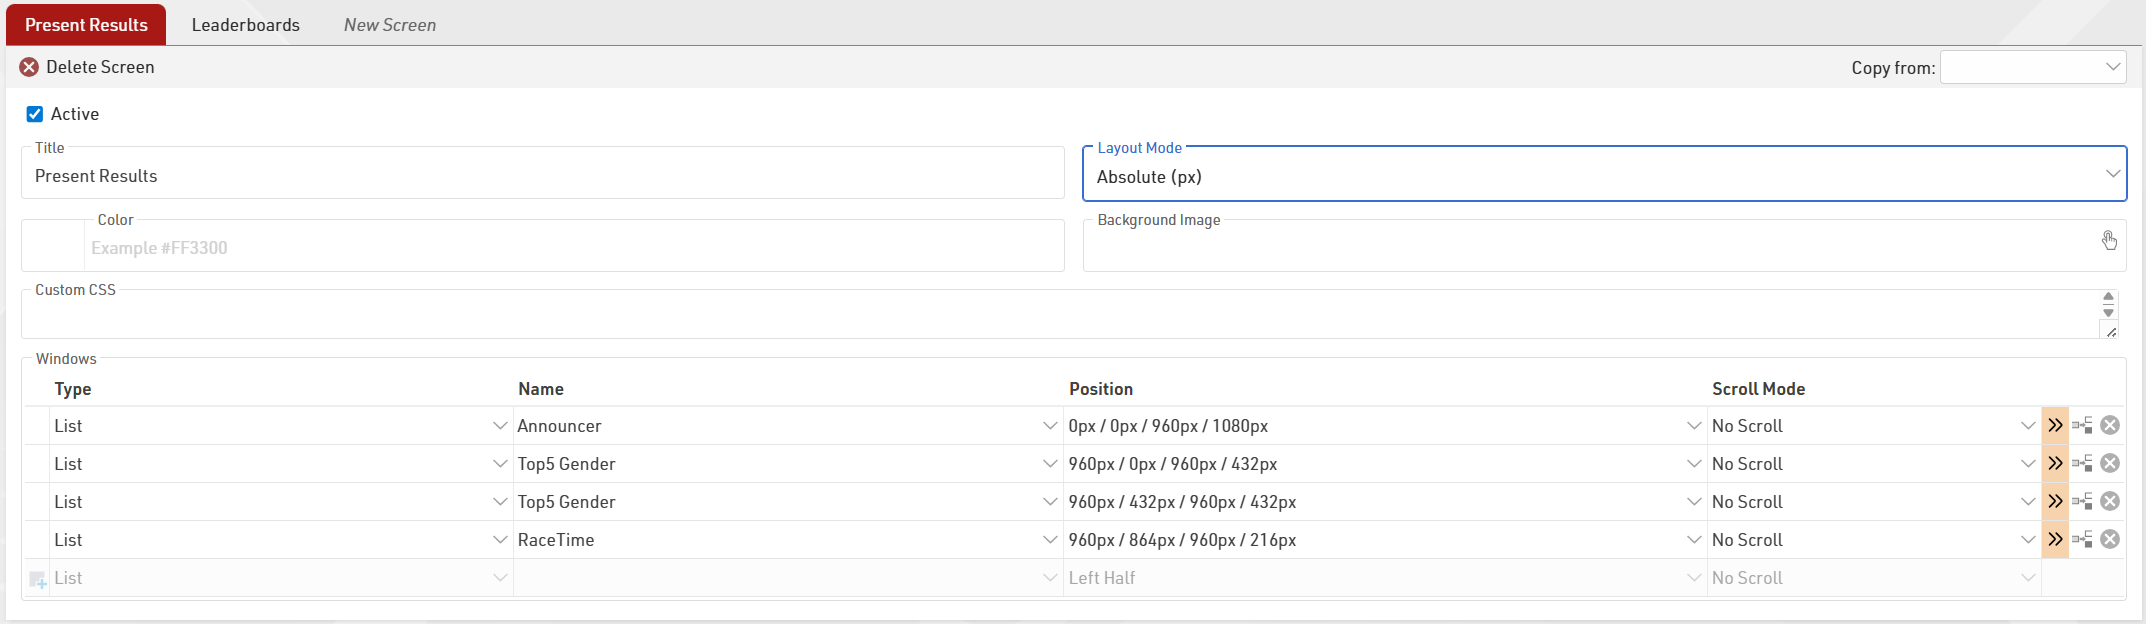
The Screen title is shown in the screen switching tab when more than one screen is set up.
The layout mode defines how positioning will be set. Relative % defines margins (Top/Left) and size (Width/Height) as a percentage of the total display. Absolute (px) defines the same parameters using fixed pixel values. If the global Display Dimensions are changed, the window positions will automatically recalculate to maintain their relative scale.
Each screen may have its own background color or image (from the images inside the event file) which will automatically stretch to fill the entire display. When using background pictures make sure they are adjusted to the target monitor resolution. Custom CSS may be applied to each Screen individually, or globally in advanced settings, for advanced use cases.
Each screen then contains individual windows which control which data is displayed, the position, and scrolling behaviour. Some further details like a filter, font size, or page time/refresh rate can be set in the extended settings.
When adding another screen, you can copy all settings from a different screen within the currently opened Presenter. This will include background color, background image, and the chosen Layout Mode.
Advanced Settings
The Display Dimensions (pixel height and width) and Custom CSS under Advanced Settings will be applied to all screens. If dimensions are set, the area where windows are positioned will be limited to these dimensions, ensuring the layout looks exactly as intended on the target hardware.

Windows
Each screen can contain multiple windows which behave independently of each other.

Type
Each window has a type, different types behave differently and have different options available.
List
List types simply display the selected Output list identically to the Output window, any filter groupings will be handled as Show All.
When using long lists you can optionally set the scroll behaviour to no scroll, automatic smooth scroll, or page-by-page scrolling. With no scroll and page-by-page the advanced settings window page timer controls how frequently the data updates or the page changes.
Contests can be filtered in the advanced settings window so the same Output list could be used to create different windows for specific Contests.
Last Chip Reads
Uses a trigger (Timing Point, Split or Advanced Result) to show a specific participant, the most recently triggered participants will be shown at the top of the list by default.
The columns shown are controlled by the selected Output list.
The advanced settings window allows you to filter to a specific contest and select the trigger source.
Chip Check
In Chip Check you can connect to a locally connected RACE RESULT device (RACE RESULT Web Server needs to be launched locally) to specifically call fields for the participant linked to that particular bib. The list will then define the format of the columns. You can also manually search for a transponder code or bib number. The most recently triggered participants will be shown at the top of the list by default, a repeated check will result in several rows filled with the same participant.
Search List
A search list works like the Chip Check, but the search works only with the fields displayed in the selected output list.
Event Overview
The event overview shows the number of registered, started, and finished participants split into contests and gender.
Details (Certificate)
Especially helpful for a detailed overview for announcers, you can select a certificate to be shown when clicking on a participant in any window with a list. Please note, the format of the certificate may vary from the Designer as, in the Presenter it is rendered as an HTML and positions of fields or logos may change slightly.
Details (List)
Similar to the details list on my.raceresult.com, you can select a list that will only render for the participant you click in any window with a list. This comes in handy when using a record multiplier with an unpredictable number of laps/splits.
HTML
Insert your own HTML content such as text, external media or fully custom elements. HTML content can be entered directly into the Name field. Note that the HTML content cannot reference any field or functions.
Image
Insert images makes it easier to add images to a window without needing to create an entire background image. You can select any of the images which are stored in your event file.
QR Code
Display a QR code without needing to create an entire background image. Define the target address directly in the name of the field.
Clock
Display a clock - either as Time of Day, or based on your start time settings per contest, bib range, or per wave.
Countdown
Display a countdown timer. Configure the settings in the advanced settings. Set the Countdown Duration (required) and an optional Start Time (defaults to 12:00 AM if not set); the timer will display the Countdown Duration until the set start time of day. If Repeat Countdown is active, the Countup field can be set as a buffer between cycles. You can also customize the timer's styling and add a series of beeps to signal the end of a countdown.
Rectangle
Adds a simple geometric shape, useful for framing or sectioning.
Circle
Adds a circular element to the display.
Text
A dedicated window for static text, simpler than using HTML for basic labels.
Position
Position allows multiple windows to easily be displayed on a screen, for example the left side could show a leaderboard where the top right corner shows the latest finishers and the bottom right corner shows certificate details for the announcer.
Default position options provide from 1-4 different positions for windows, or a custom position can be defined.
Custom positions place the window from the top-left corner, defining the margin to be used from top and left. Each window also has a width and height.
Based on the Layout Mode chosen, the custom window positions can be set accordingly:
Relative Mode
All values are defined as a percentage of the total display size. This is ideal if the display will be viewed on various screens with different resolutions. A window with Left 25%, Top 0%, Width: 50%, and Height 100% fills the middle 50% of the display from top to bottom with even margins on the left and right.
Absolute (px) Mode
Uses fixed pixel values for positioning and sizing. It is best used when you are targeting a specific hardware setup, such as a large LED wall or a specific monitor. If no specific display dimensions are set in the presenter's advanced settings, 1920x1080px is used as the default reference. To achieve the same setup as the relative mode on a default display, the window settings would be Left 480px, Top 0px, Width 960px, and Height 1080px.

Additional Settings
In the extended settings you can define a contest filter or any additional filter using an expression. For every window you can define the font size, a page time and the scroll bar behavior. When using "No Scroll" scroll mode, the page time also defines the refresh rate of your list. For lists that do not fit on one page, you can hide the scroll bar or use a thinner scroll bar.
For "Show Last Chip Reads" you find the selection of trigger sources in the additional settings.
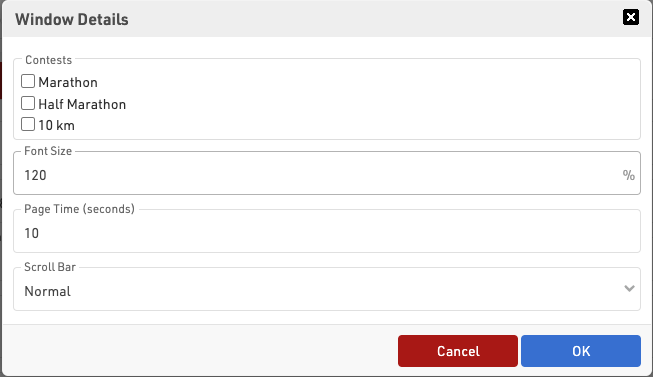
Styling
Basic styling and sizing of the list is possible through both the setup of the output list and window setup.
Formatting applied in the Output List Data/Format will be applied automatically including group headers, except font sizes.
Some additional controls are available from the Output page setup for records, column heads and page headers.
For the different windows within a screen the advanced options offer limited styling options for a color, background-color and padding. Additional advanced styling can be applied using custom CSS.
Result Kiosk
Athletes can use the Result Kiosk tool to check and/or print their result/race certificate on race day, most commonly it is used with a thermal receipt printer so participants can get a quick print out of their Results / Ranks to take home. It can be found in the Tools menu.
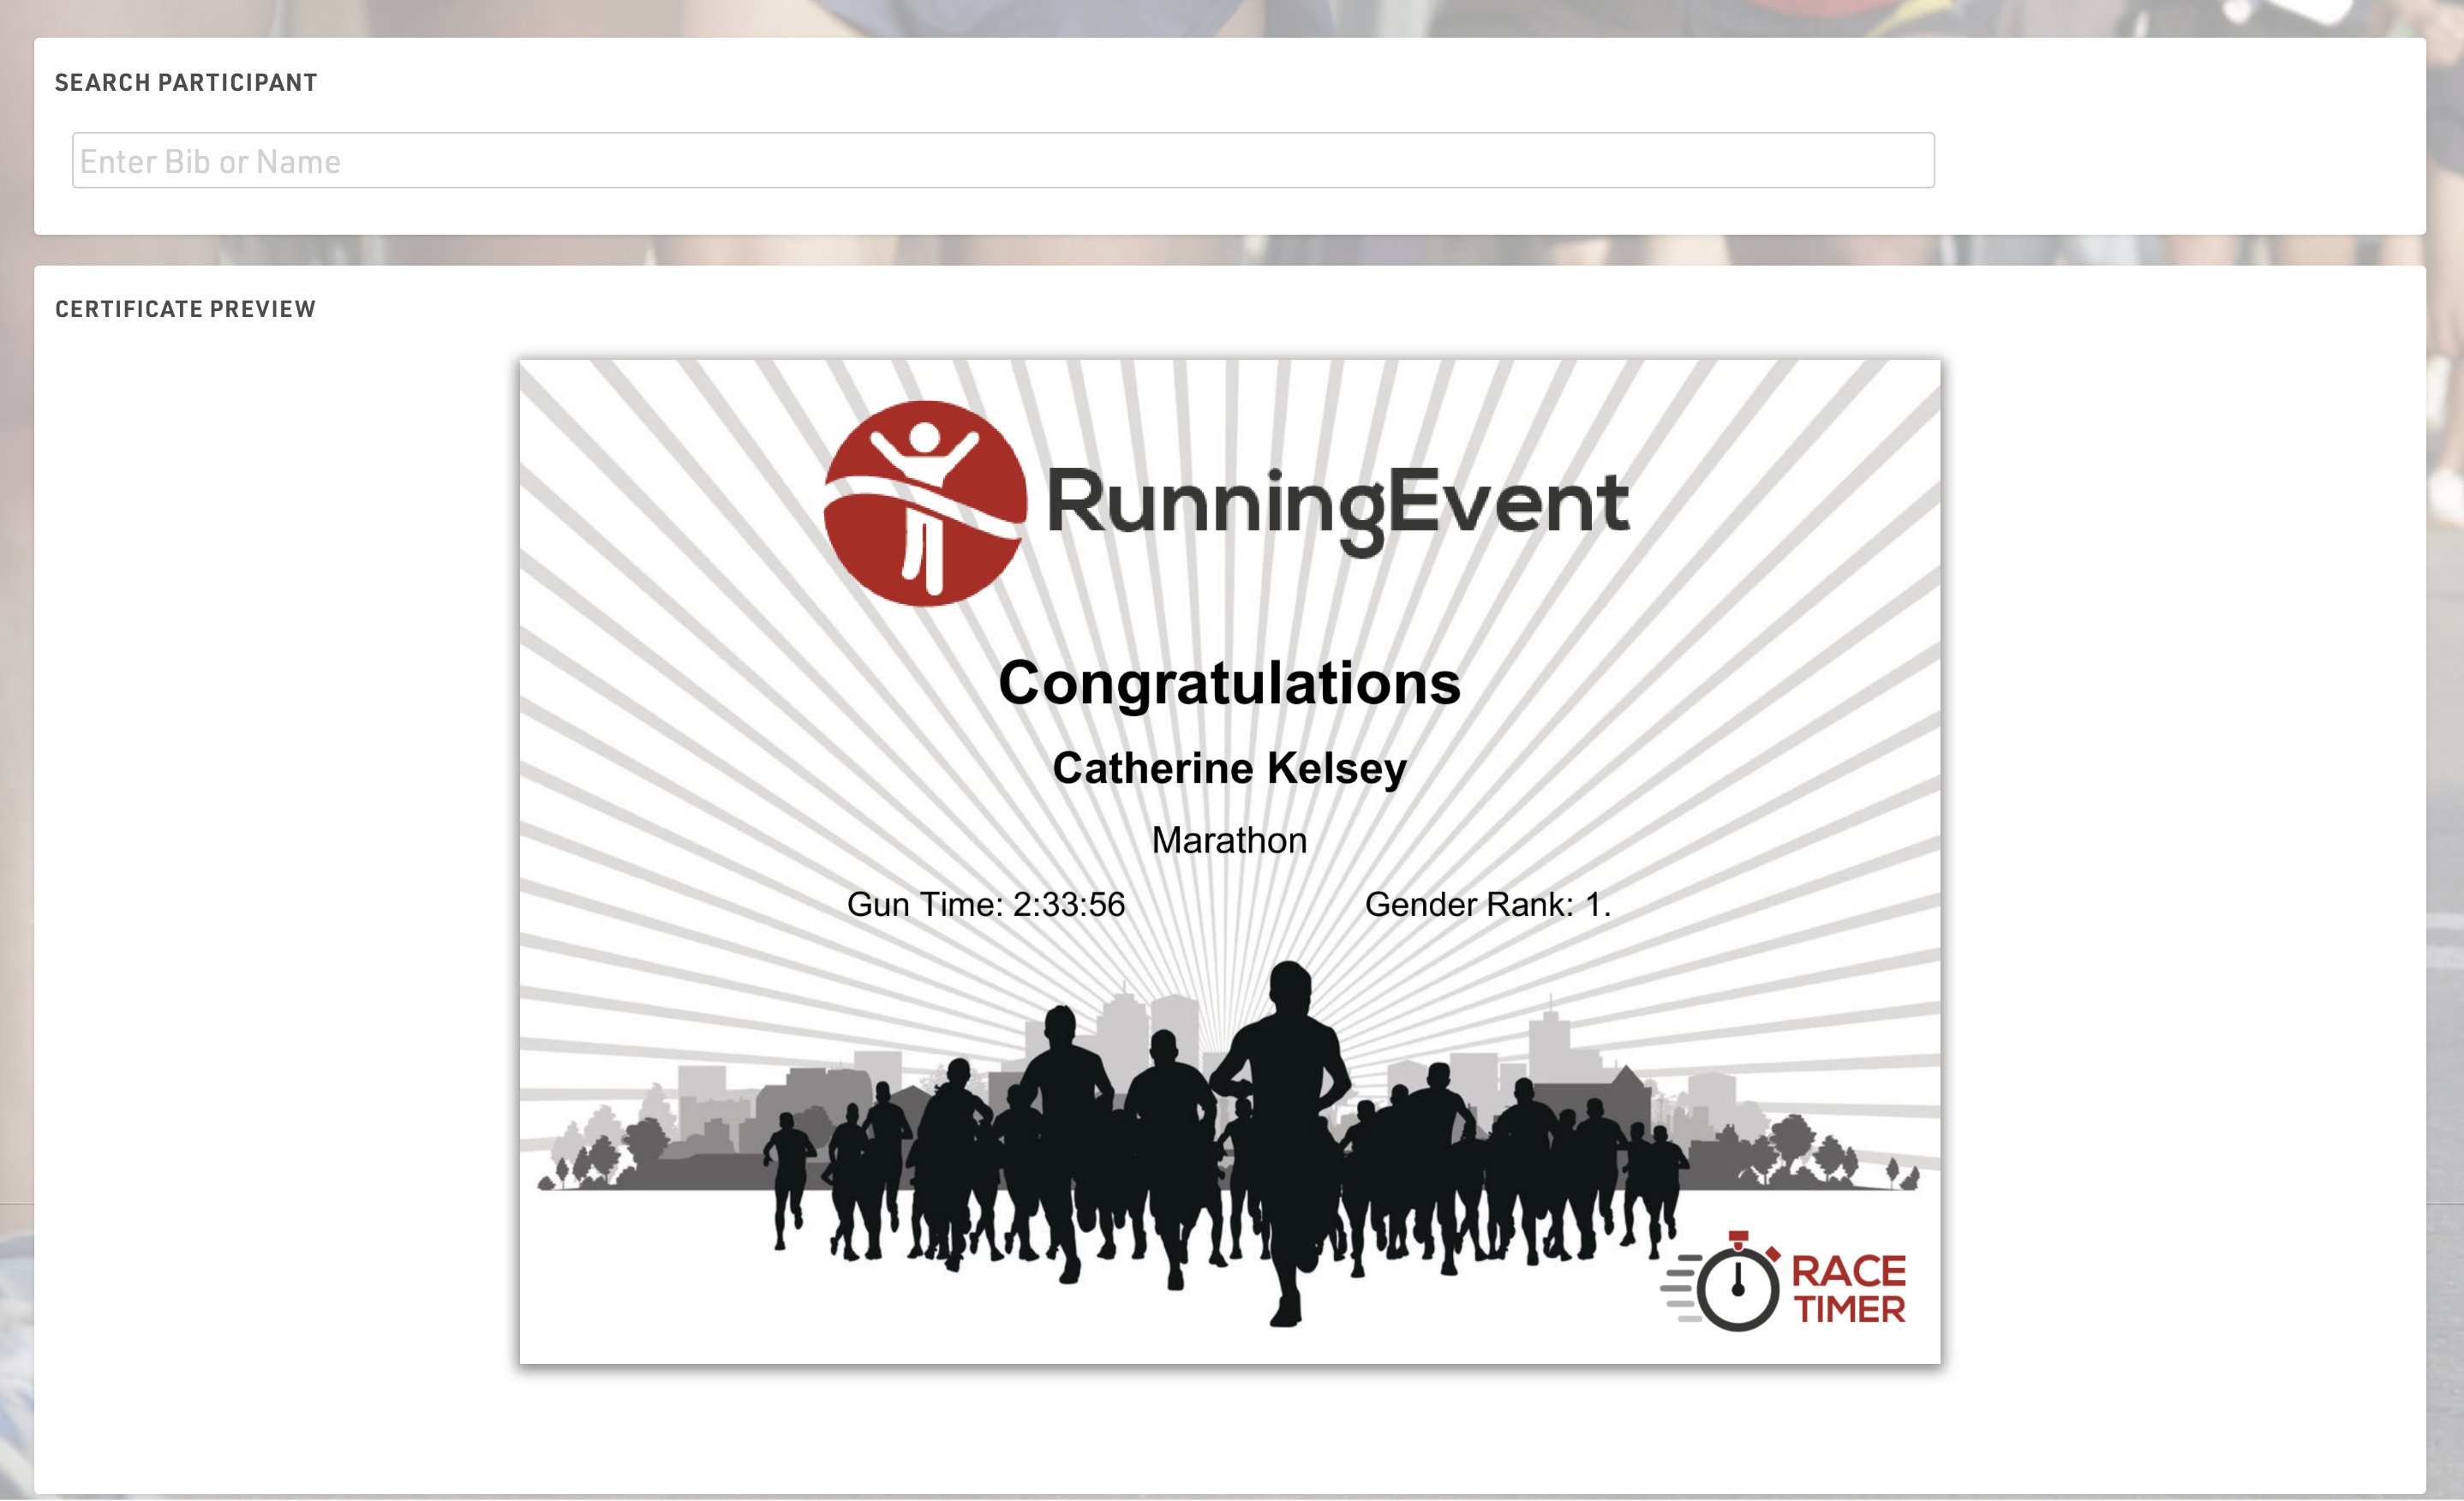
Settings
Make sure to define the following important settings:
- Decide if the user can view and/or print his race certificate. If you would like to support printing, RACE RESULT Web Server needs to be running.
- Select one or more Certificate Sets that can be shown/printed for each contest.
- Optionally, you can add customs texts, automatically set an Additional Field and forbid multiple print outs for the same participant.
Input
The input field can search from either Bib or Name fields or lookup by Transponder Code when using alpha-numeric chip codes (note that standard passive transponders mapped in a chip file cannot be used at this time).
You can use the RACE RESULT Decoder. Tag Reader or USB Timing Box to scan transponders directly into the search bar. To connect to a device click the connection icon in the top right of the search input, this will list available devices below and allow you to connect directly to the device for input of Transponder code. The RACE RESULT Web Server must be running for this.

Tools and Programs
Windows-Based Tools
Note that all of the functionality from the windows-based tools has been replaced by an alternative in the browser, and so there should only be rare cases where these are required.
Most of RACE RESULT 14 is run directly from the browser page, however the standard installation also includes some tools as separate windows-based programs which run independently from the main web server.
Each of these can connect to either a local file, a web server on the local network or the online web server.
To connect to the event file you are working on, open the relevant program, and open the File menu, select either 'Open Event' to open an SES file or Connect to Sports Events Server.
To connect to a web server on the local network enter the IP address of the web server or enter events.raceresult.com to connect to an online file and click connect, you will then need to enter your customer ID and password if connecting to the online server.
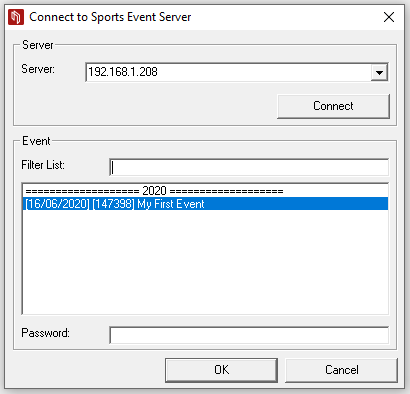
The open files in the web server or your available online files will be listed below and can then be opened by the program.