The Timing window contains important timing settings and the main interface for connecting to timing systems during the event.
By default the Settings page will be opened if the current date is before the start of the event, after which the Chip Timing page will be opened automatically.
Ajustes del Cronometraje
La configuración controla principalmente cómo deben manejarse los datos de cronometraje sin procesar en RACE RESULT 14.
Puntos de cronometraje – Cada registro de datos sin procesar debe asignarse a un punto de cronometraje que identifique dónde fue registrado, por ejemplo, la SALIDA, la LLEGADA o tus puntos intermedios de cronometraje en el recorrido.
Archivo de chips: Un archivo de chips ayuda a identificar a qué participante debe asignarse un registro de datos sin procesar.
Tiempos de salida / Límites de tiempo de llegada – El tiempo oficial de salida (T0) que se utilizará para cronometrar la carrera. Este se usa en la configuración de puntos intermedios o resultados especiales para calcular los tiempos de carrera. Opcionalmente, se puede establecer un tiempo máximo.
Exportadores / Reenvío – Activan el envío de correos electrónicos, SMS o la exportación/reenvío de datos a plataformas de terceros si es necesario.
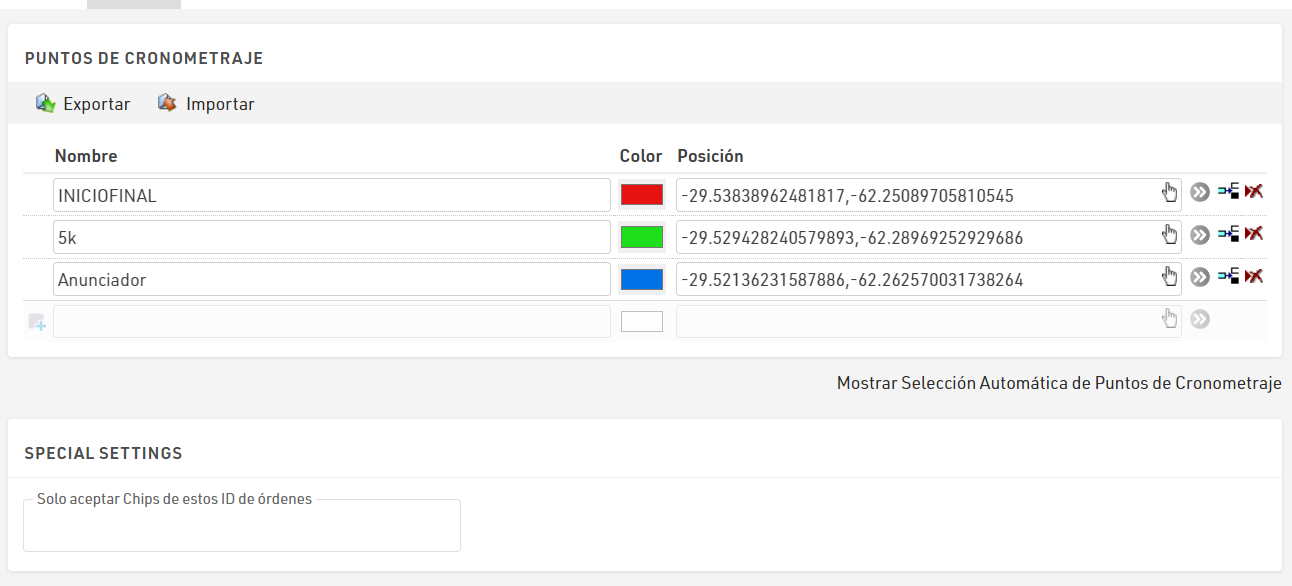
Puntos de Cronometraje
Un Punto de Cronometraje es una ubicación donde se encuentran uno o más sistemas de cronometraje. Si tiene una línea principal y una de respaldo en un punto de cronometraje, generalmente será solo un punto de cronometraje, a menos que desee ejecutar estadísticas sobre el rendimiento de la línea principal y la de respaldo.
Los Puntos de Cronometraje los puede configurar en Ventana Principal -> Puntos de Cronometraje.
Obtenga más información sobre estas configuraciones en las subsecciones.
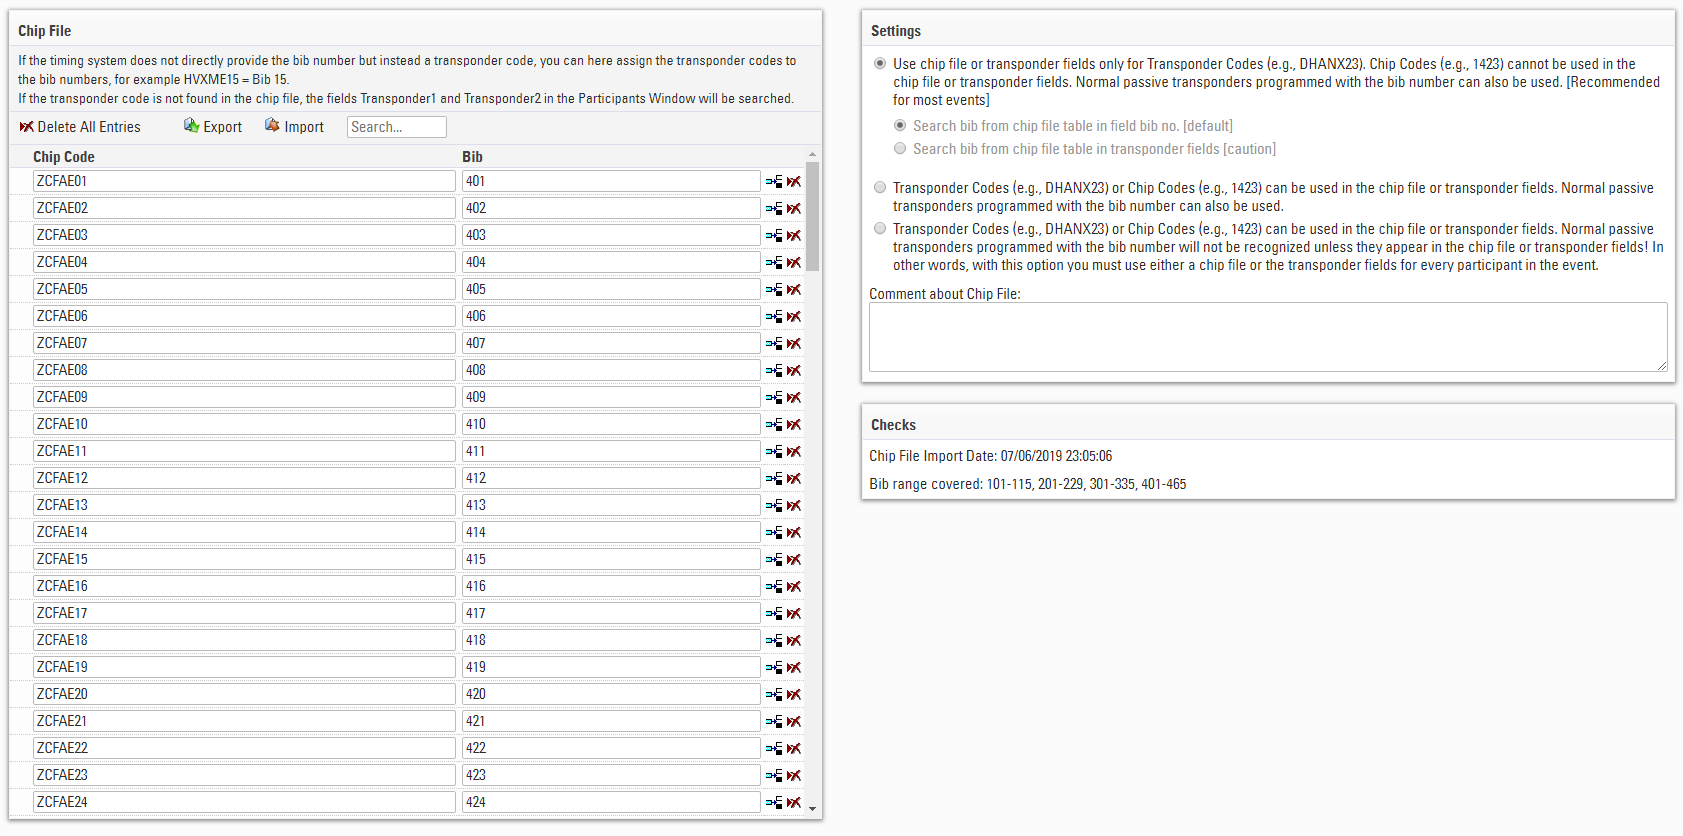
Archivo de Chip
Dependiendo de su configuración y del tipo de transpondedores utilizados, puede ser necesario asignar transpondedores a los participantes para garantizar que los datos de cronometraje se asignen al participante correcto.
Por defecto, al usar Transpondedores Pasivos de RESULTADO DE CARRERA donde el número de dorsal es igual al número de chip, no es necesario usar un archivo de chip ni asignar ningún transpondedor. En la mayoría de los casos, al usar transpondedores pasivos, el número de chip (o código de chip) coincide con el número de dorsal, por lo que los tiempos se asignan automáticamente.
Cuando trabaje con transpondedores reutilizables como el RACE RESULT HuTag o los Active Transponders, o cuando el número de chip NO es igual al número de dorsal, deberá utilizar un archivo de chip o un método alternativo de asignación de transpondedor.
Se puede ingresar o importar un archivo de chip en Conrometraje ⇒ Configuractión ⇒ Archivo de chip. Simplemente ingrese el código del chip y el número de dorsal en la tabla, o importe un archivo Excel, TXT o CSV con los campos correspondientes de código de dorsal y de chip.
También puede buscar el archivo de chip con el Código de Chip o Dorsal para buscar participantes específicos.
Si está utilizando transpondedores pasivos con un archivo de chip y necesita asignar un número diferente de chip y dorsal, debe prestar atención a la Configuración de Archivo de Chip.
También puede crear una asignación de dos pasos para los transpondedores que estén pre-etiquetados pero en los cuales la etiqueta del chip no es necesariamente igual al número de dorsal.
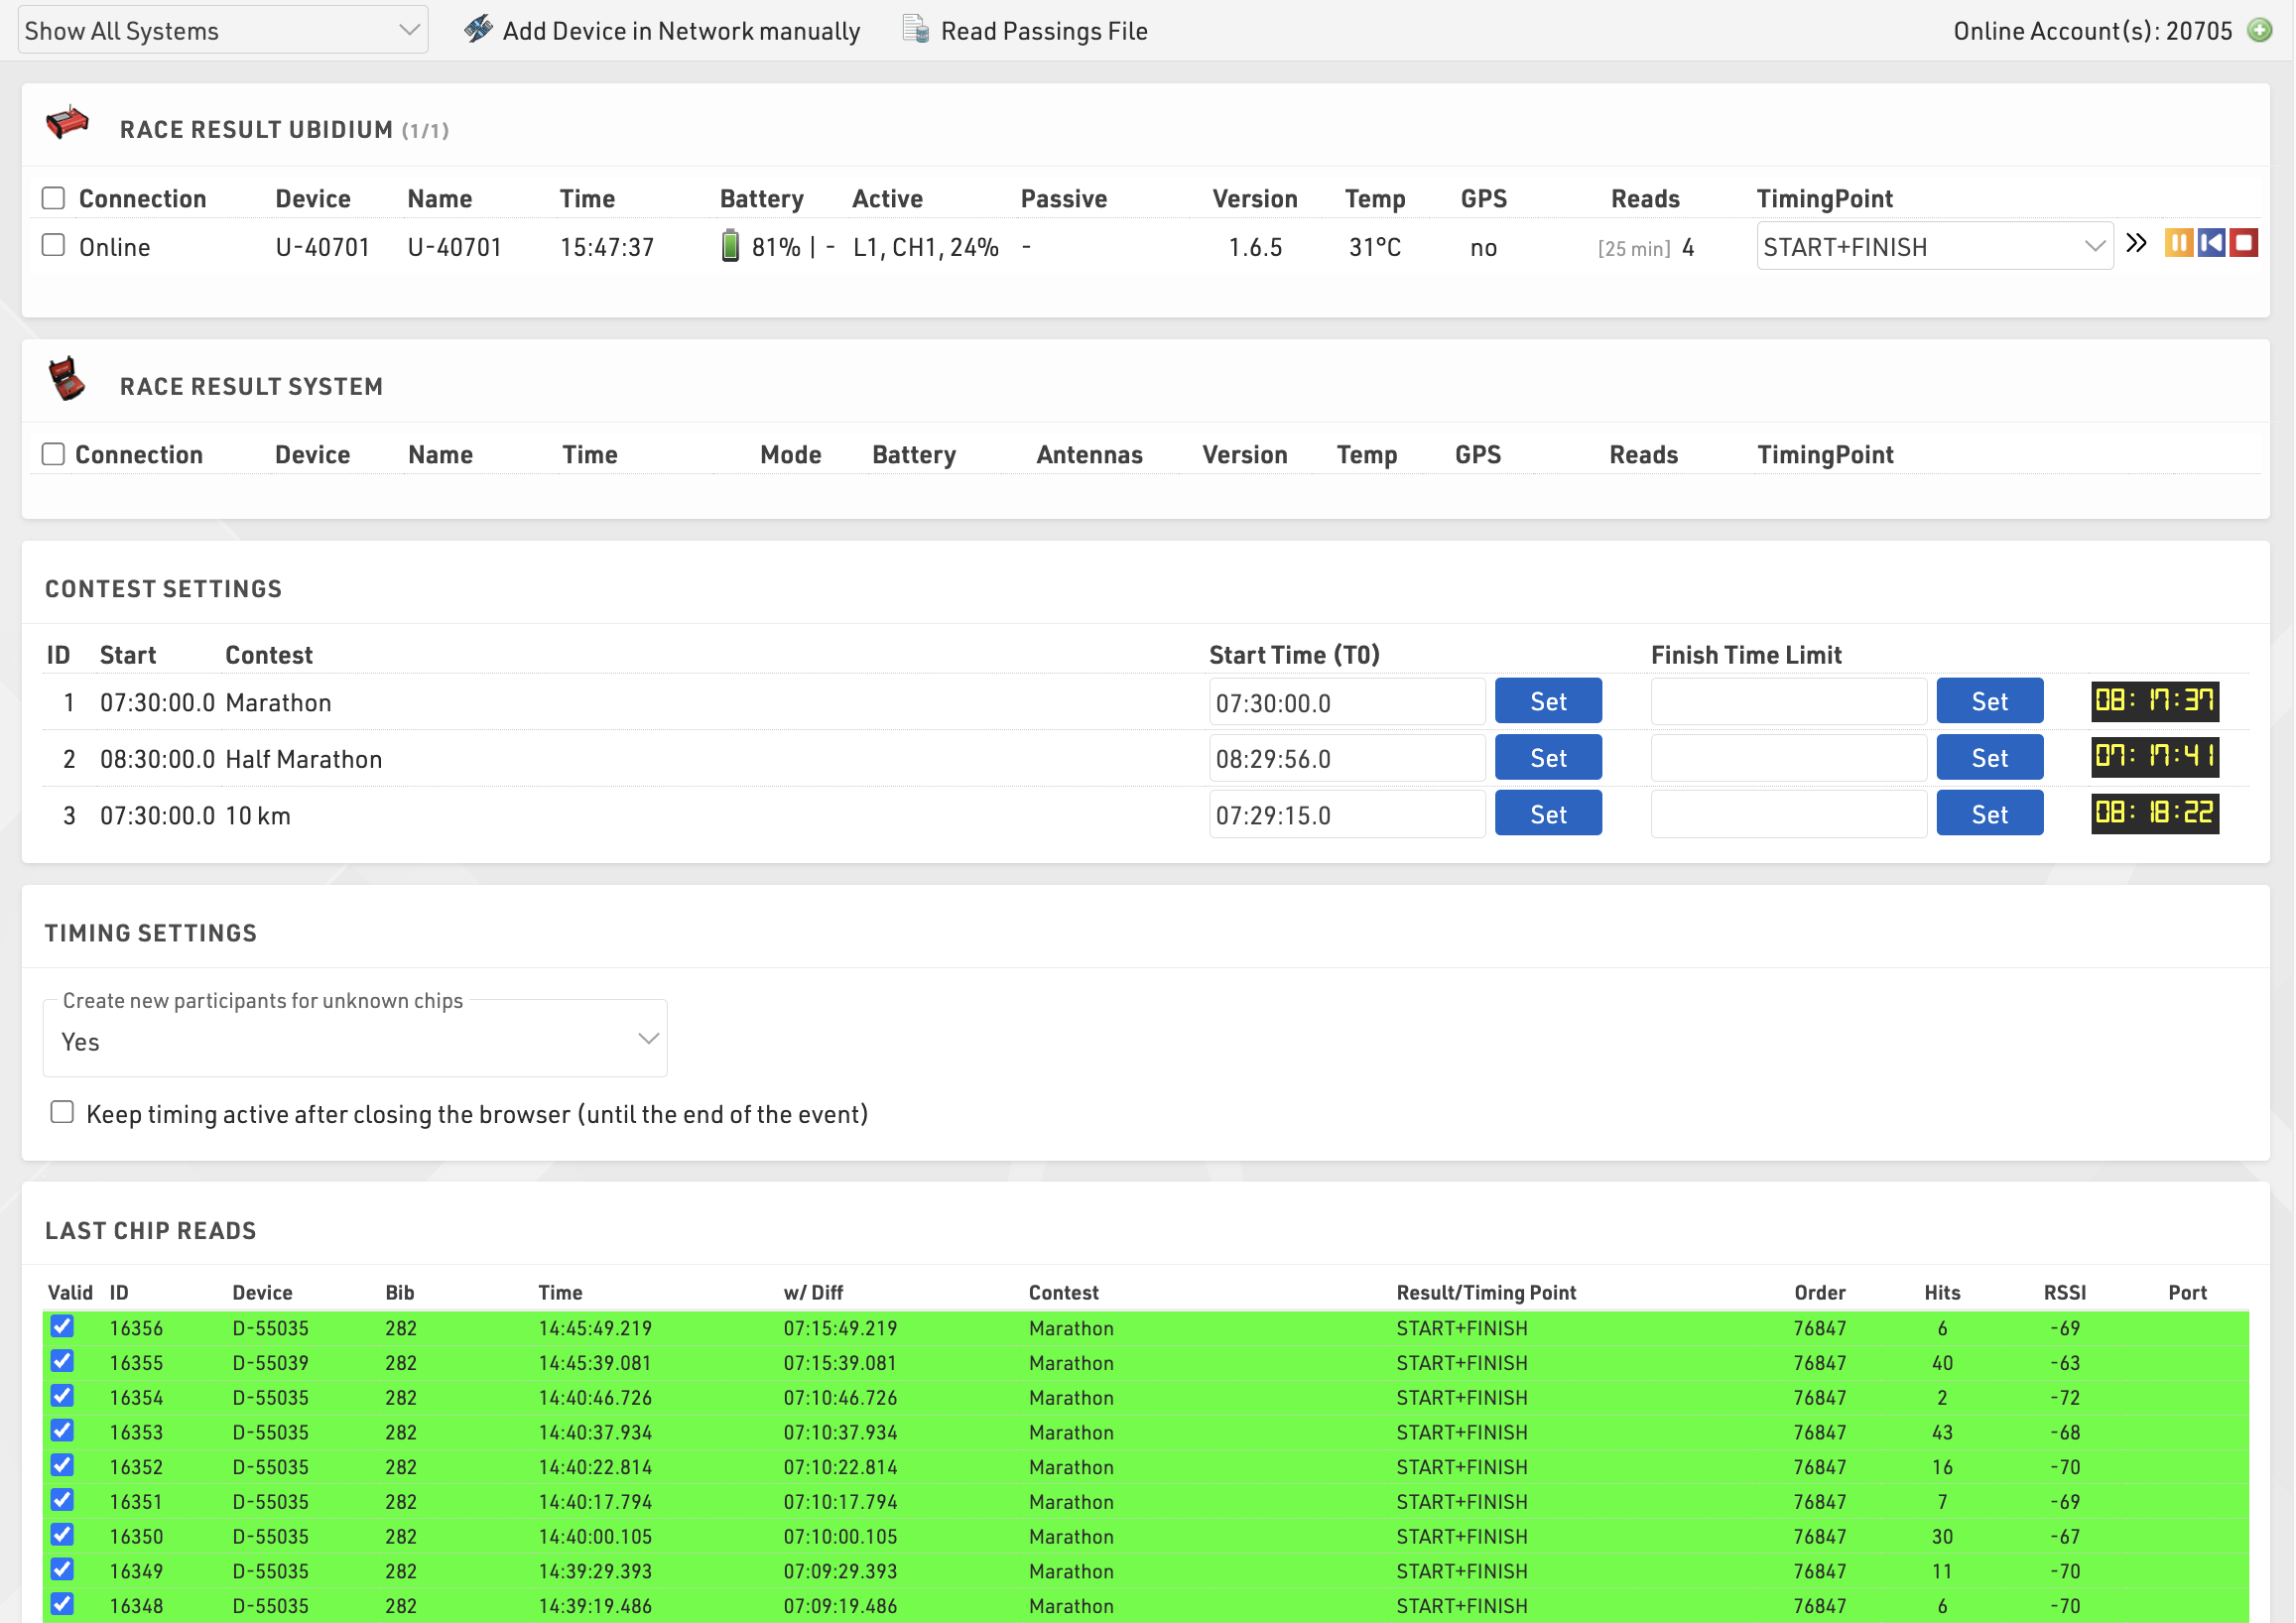
Tiempo de Inicio (T0)/ Tiempos Límite de Finalización
Tiempo de Inicio (T0) es un resultado especial que se calcula automáticamente. Los Tiempos de Inicio se definen en Cronometraje ⇒ Configuración ⇒ Tiempo de Inicio/Tiempo Límite de Finalización ya sea por competencia, por rango de dorsal o basado en cualquier otro campo (Ola de Inicio).
Los Tiempos de Inicio son muy importantes, ya que dependiendo de sus Ajustes de Puntos de Cronometraje, las detecciones antes del inicio se ignorarán y si su sistema de cronometraje trabaja con la hora del día, el tiempo de inicio se le restará a los tiempos de detección para calcular el tiempo de la carrera.
Si un sistema de cronometraje se conecta a su archivo de evento, verá correr el tiempo en la esquina superior derecha. Luego puede hacer click en Fijar Tiempo de Inicio para guardar la hora actual como tiempo de inicio. De otra manera, la esquina superior derecha mostrará No hay ningún tiempo de decodificador y podrá ingresar el tiempo de inicio manualmente.
Si dos o más competencias comienzan al mismo tiempo, puede seleccionarlas usando la casilla al lado izquierdo y después haga click en Fijar Tiempo de Inicio en la parte inferior del cuadro para iniciar todas las competencias seleccionadas al mismo tiempo.
Si no está seguro de que la carrera comience exactamente a la hora programada, establezca un Tiempo de Inicio (T0) después del evento y comience a cronometrar con el botón Fijar Tiempo de Inicio para asegurarse de que se ignorarán las detecciones antes del inicio de la carrera.
Puede suceder que accidentalmente sobrescriba un Tiempo de Inicio. Al hacer click en Mostrar Historia en la esquina superior derecha del cuadro, aún puede encontrar los valores anteriores.
Tiempos Límite de Finalización se pueden definir en Ventana Principal -> Tiempo de Inicio / Tiempo Límite de Finalización. Dependiendo de los ajustes de sus Puntos de Cronometraje, las detecciones después del tiempo límite de finalización se ignorarán.
Si un sistema de cronometraje se conecta a su archivo de evento, verá correr el tiempo en la esquina superior derecha. Luego puede hacer click en Fijar Tiempo de Inicio para guardar la hora actual como tiempo de inicio. De otra manera, la esquina superior derecha mostrará No hay ningún tiempo de decodificador y podrá ingresar el tiempo de inicio manualmente.
Exporters / Forwarding
Exporters can be used to trigger the sending of data to external sources, this can be used to either send E-mail / SMS templates or export timing data to other systems such as third party timing software, tracking partners, LED clocks and more.
Exporters include some built-in functionality for specific partners but it is designed to be fully flexible to support a wide range of uses.
The exporter runs on both online and offline versions of RACE RESULT 14, if you are working online and you are exporting to a local destination (e.g. local network IP address, Serial or File) then ensure to start the RACE RESULT Web Server on your computer.
Chip Timing
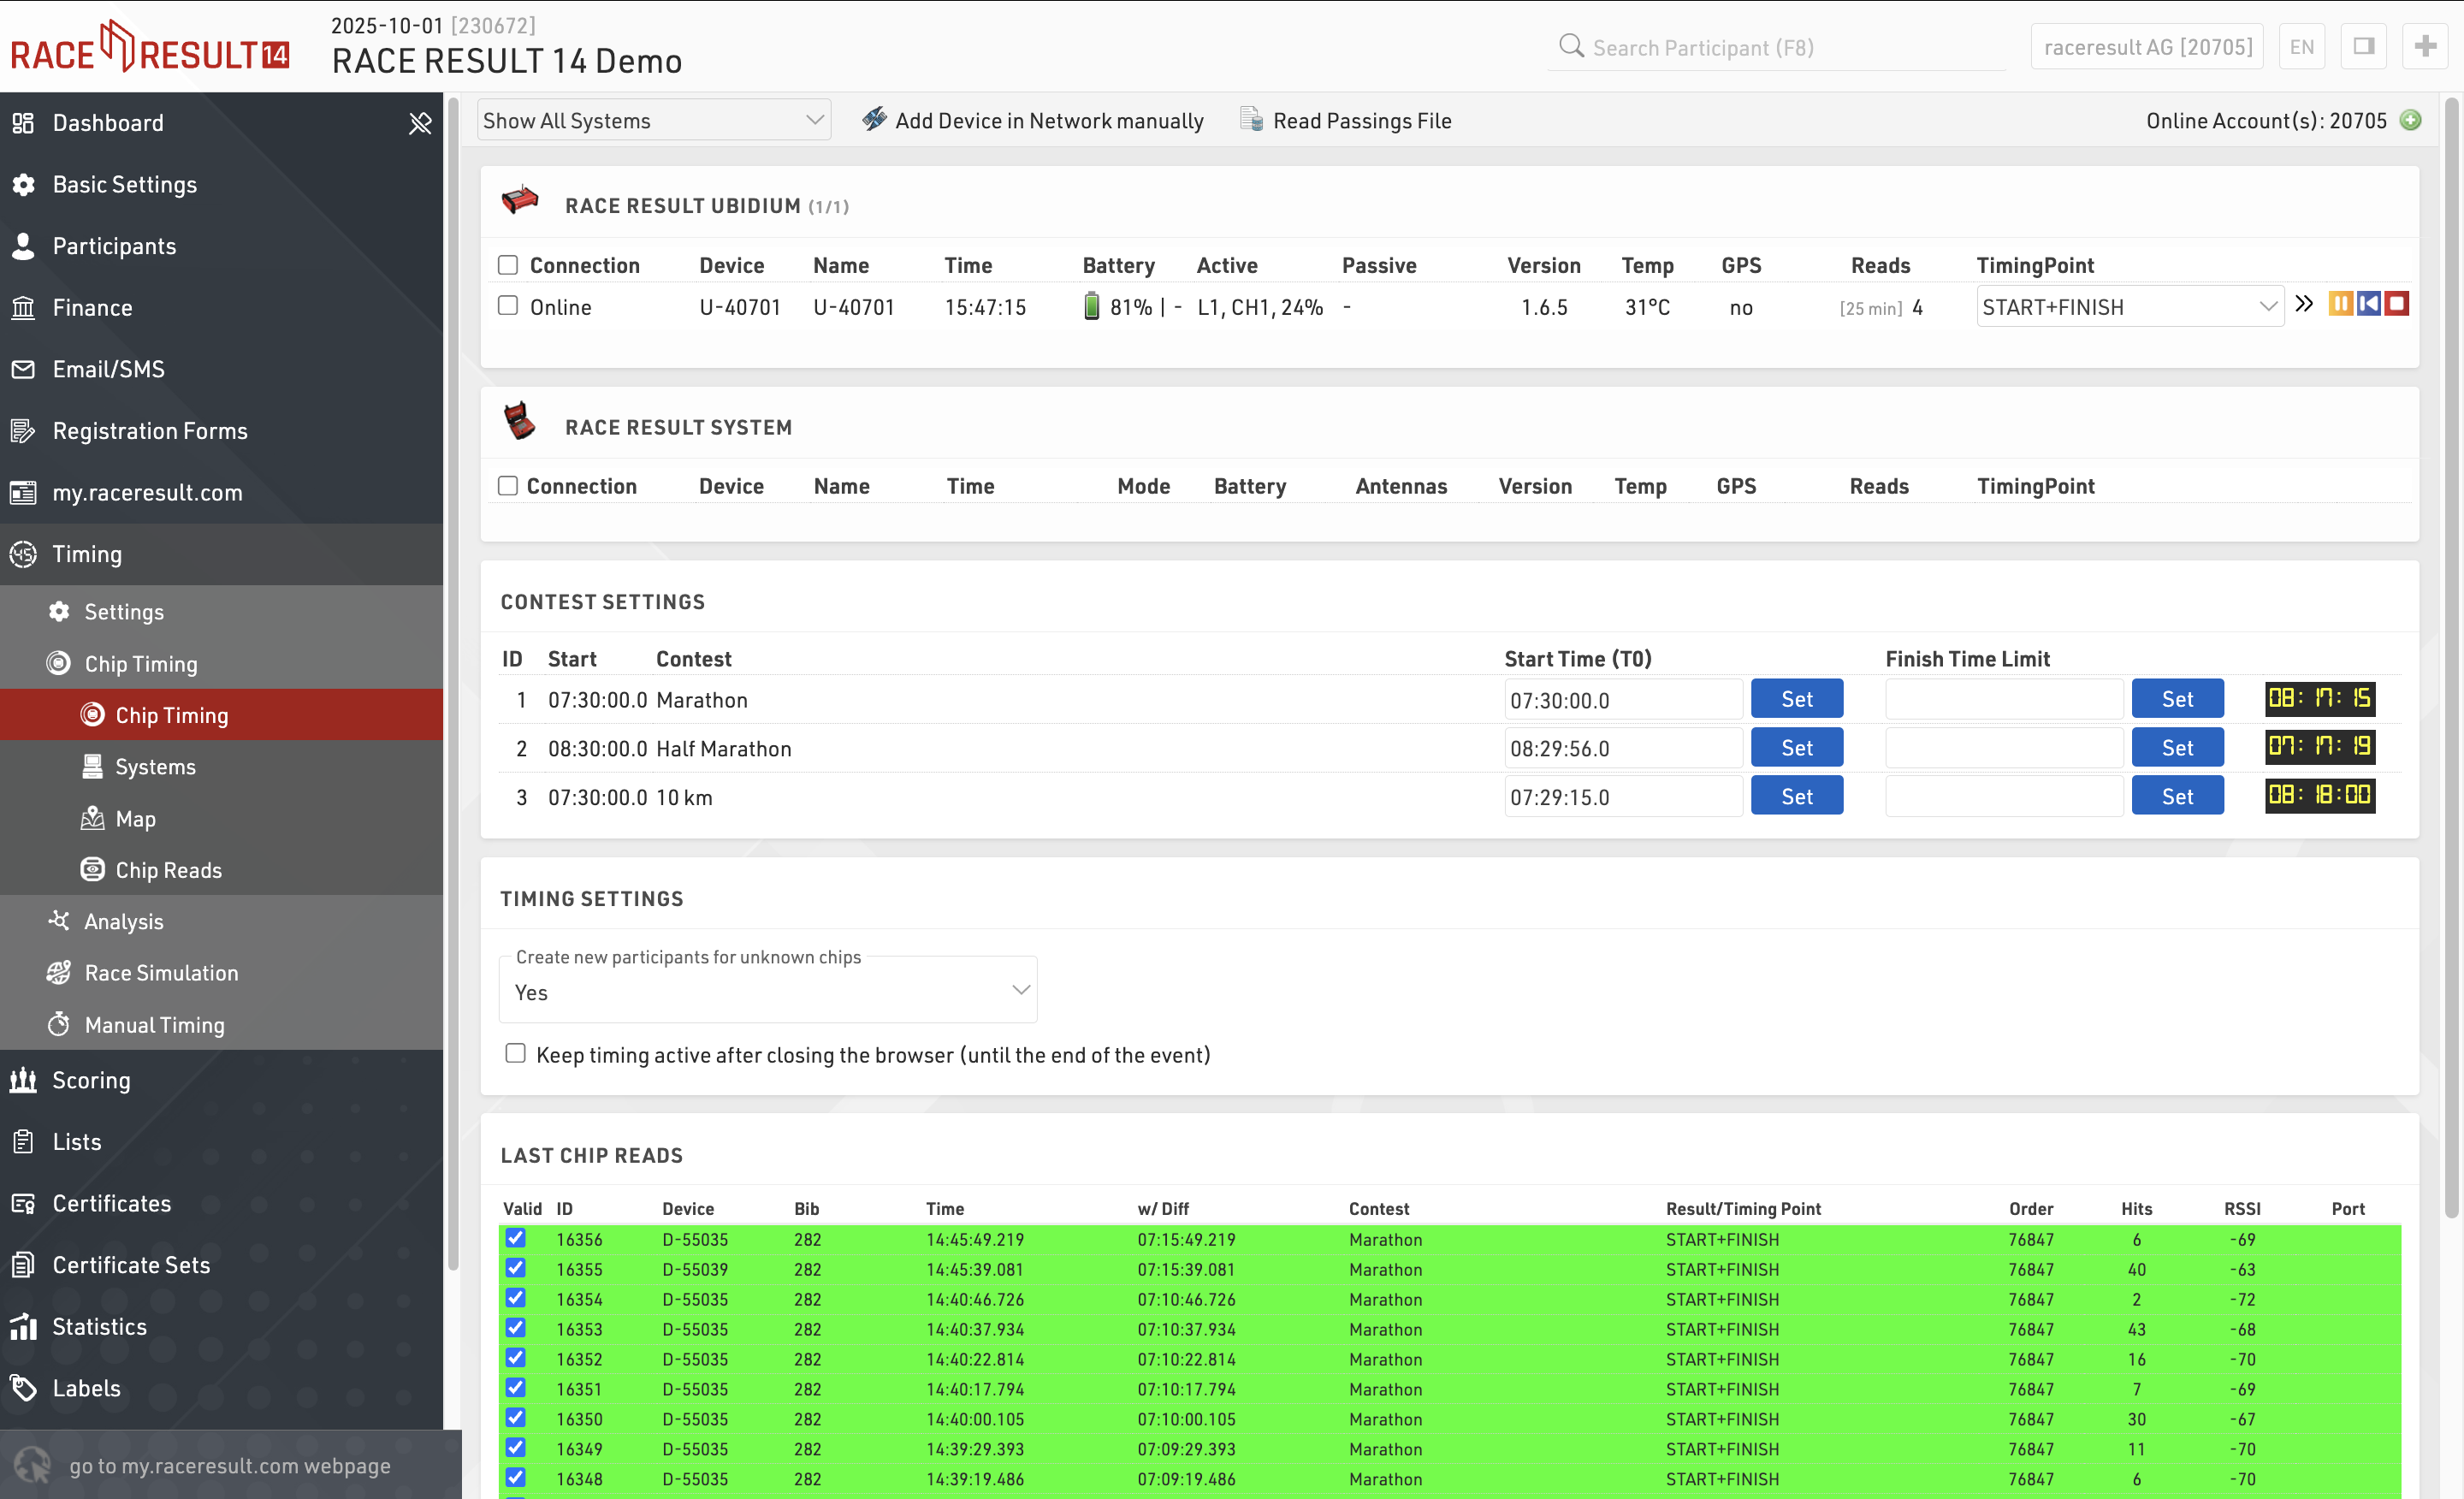
Chip Timing is used to handle the connections to your timing systems and the flow of raw timing data.
Chip Timing
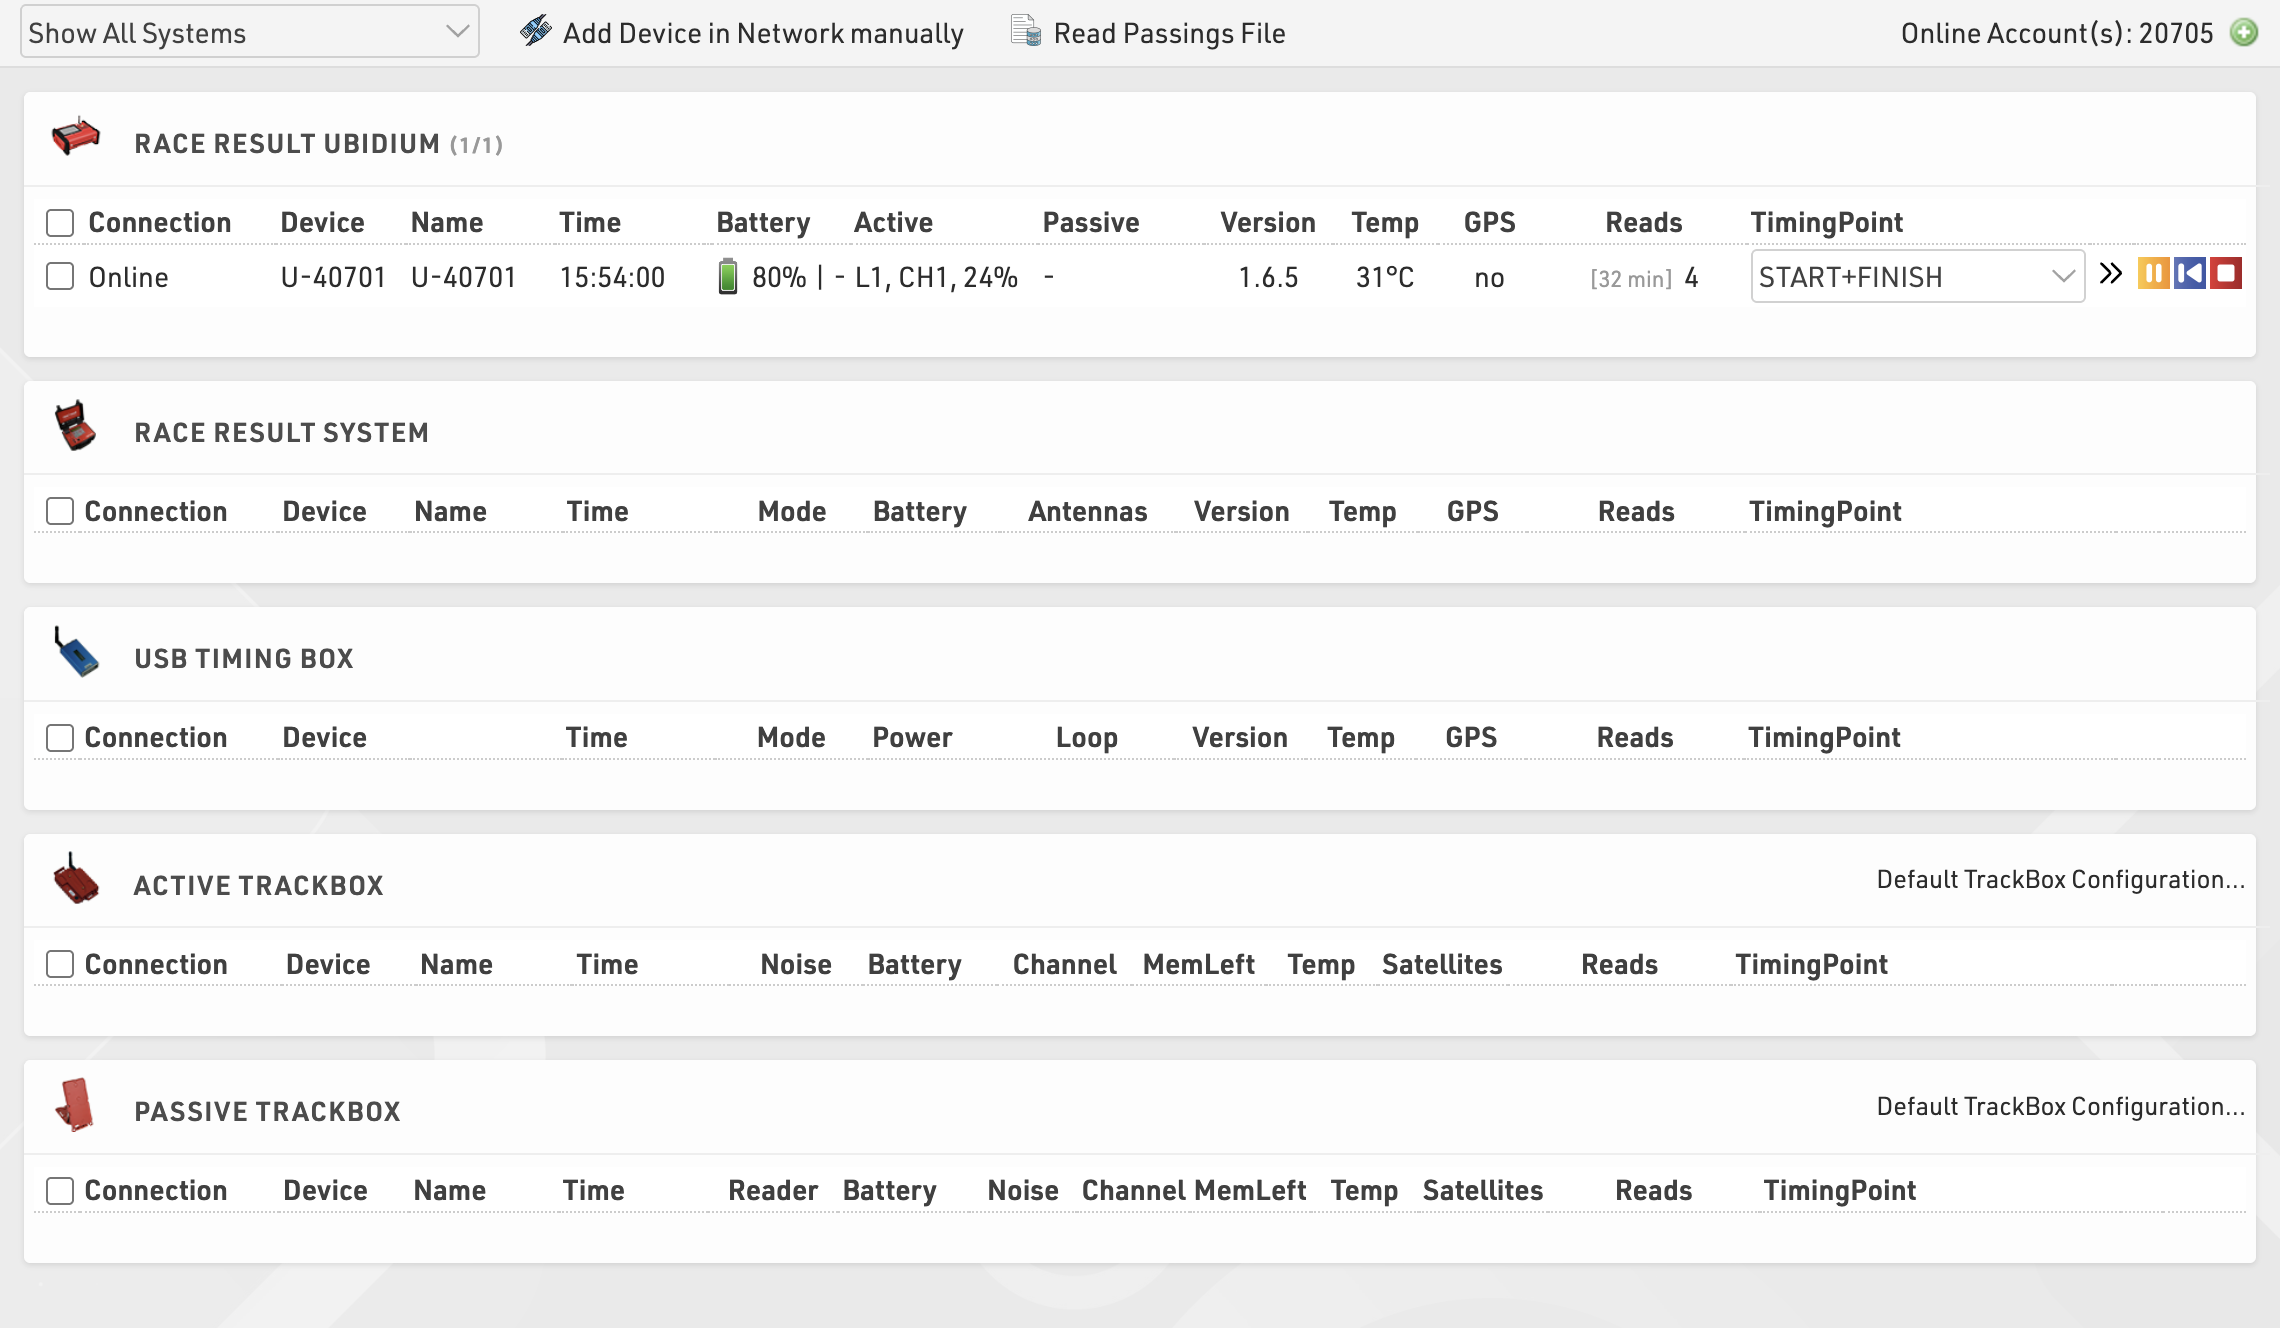
The Chip Timing view gives a compact view of your connected systems and some basic settings for timing the event.
Any available devices (via your local network or online) are listed automatically, grouped by device type, a window is always shown for both RACE RESULT Ubidium and RACE RESULT System, additional device types will be shown if available either locally or online.
Systems can be filtered to show only those to which you are Connected or those within a certain distance based on the Basic Settings and the system GPS location.
Critical information about your systems is displayed here including connection, location, device name, device time, device mode, battery remaining and information about your antennas or loop settings, clicking on a Device ID will also open the System Control window with additional control settings and functions for the system.
If the system is reporting an error then the erroneous element may be shown in red to highlight any potential errors, errors will be cleared once acknowledged or cleared on the system.


If you are timing using RACE RESULT online and wish to connect to a locally networked decoder or USB Timing Box you will need to run the RACE RESULT Web Server on your computer as this will create the connection between the browser and your local devices.
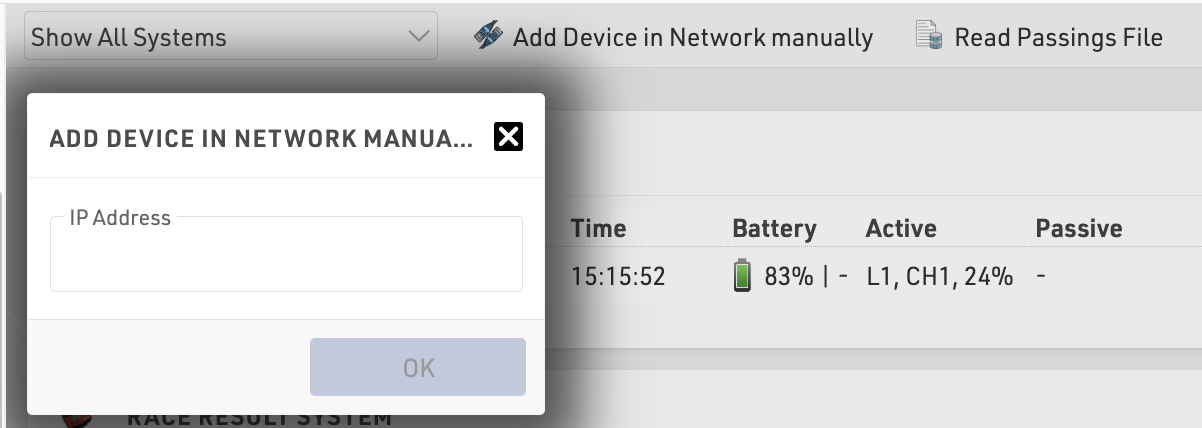
If your locally connected system is not shown you can press Add Decoder in Network Manually in the top right corner to connect via the IP address of your decoder.
Passings files from systems can also be read in manually, see the below article for more information on how to obtain and handle the passings files.
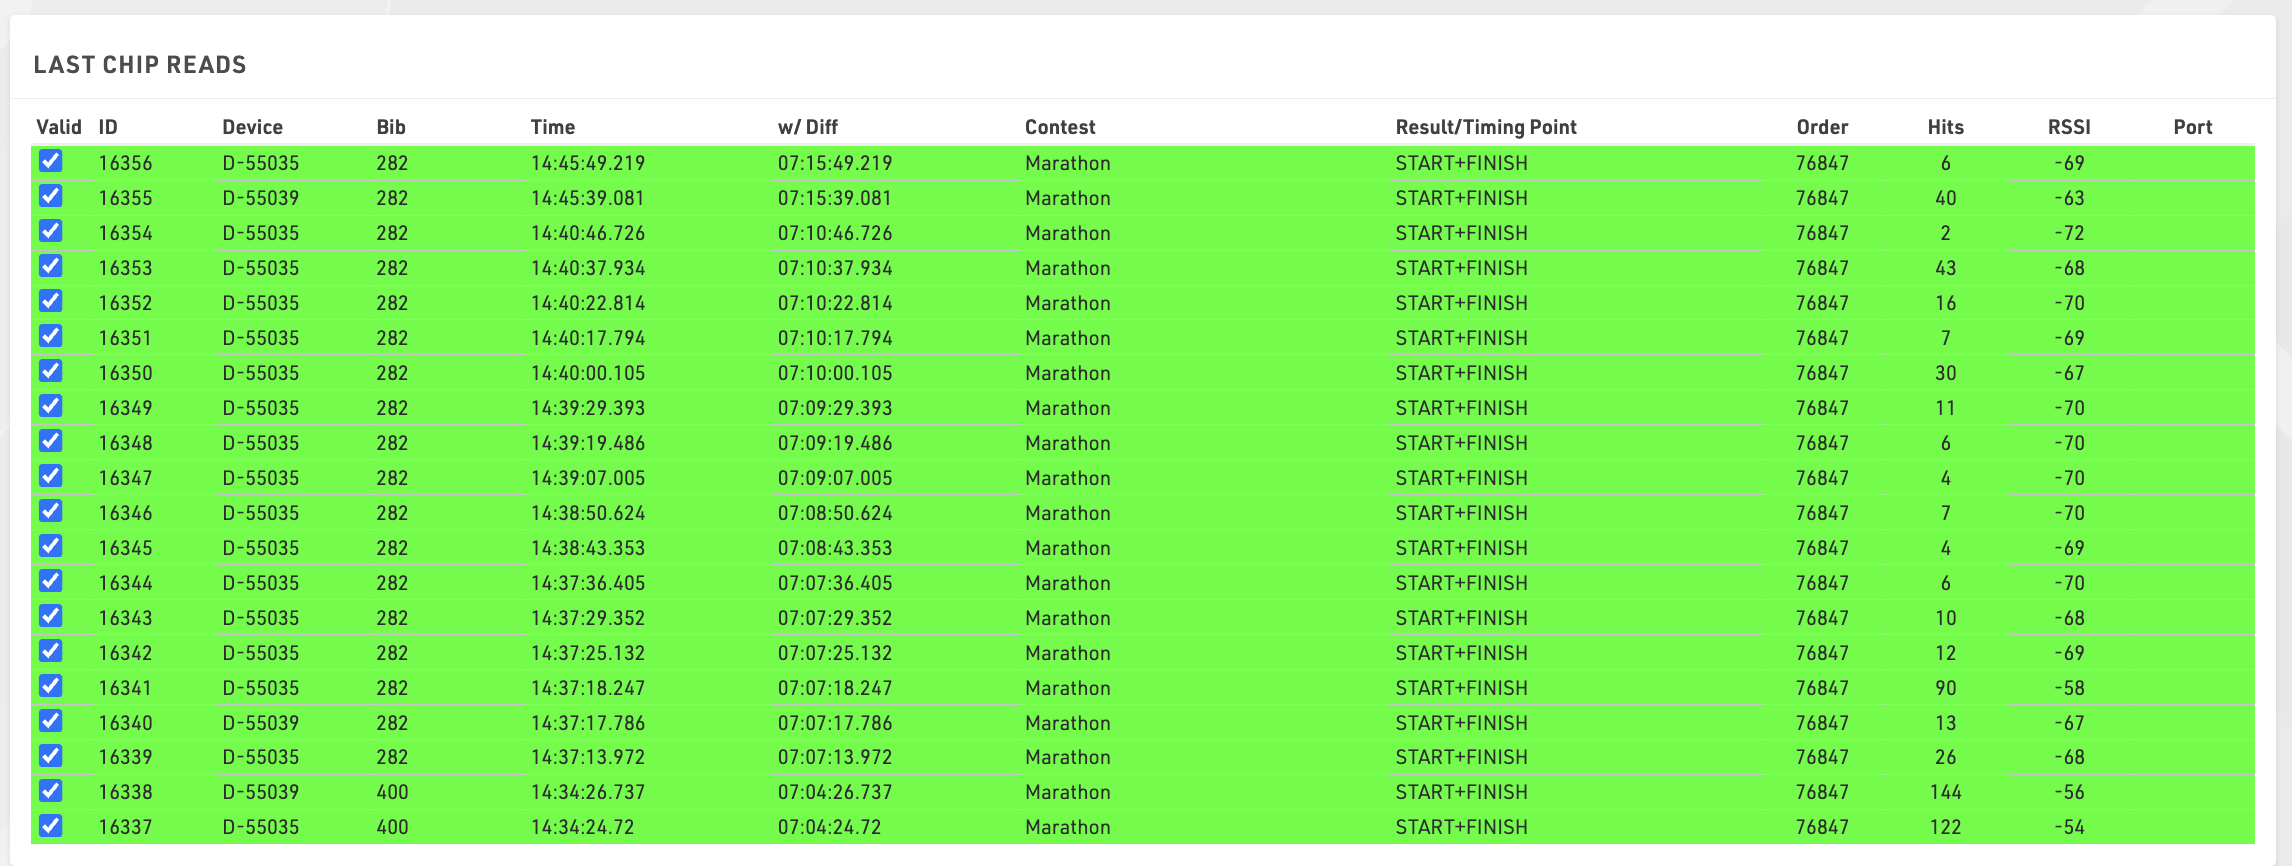
The chip timing view also has a window of the last chip reads which will automatically populate with the latest times received from all systems, the information shown is the standard columns from the Chip Reads screen.
Systems
The systems view shows a complete view of all systems including Ubidium, RACE RESULT Decoders, USB Timing Box and Track Boxes.
This has the same functionality as the main Chip Timing view but only for handling timing systems.
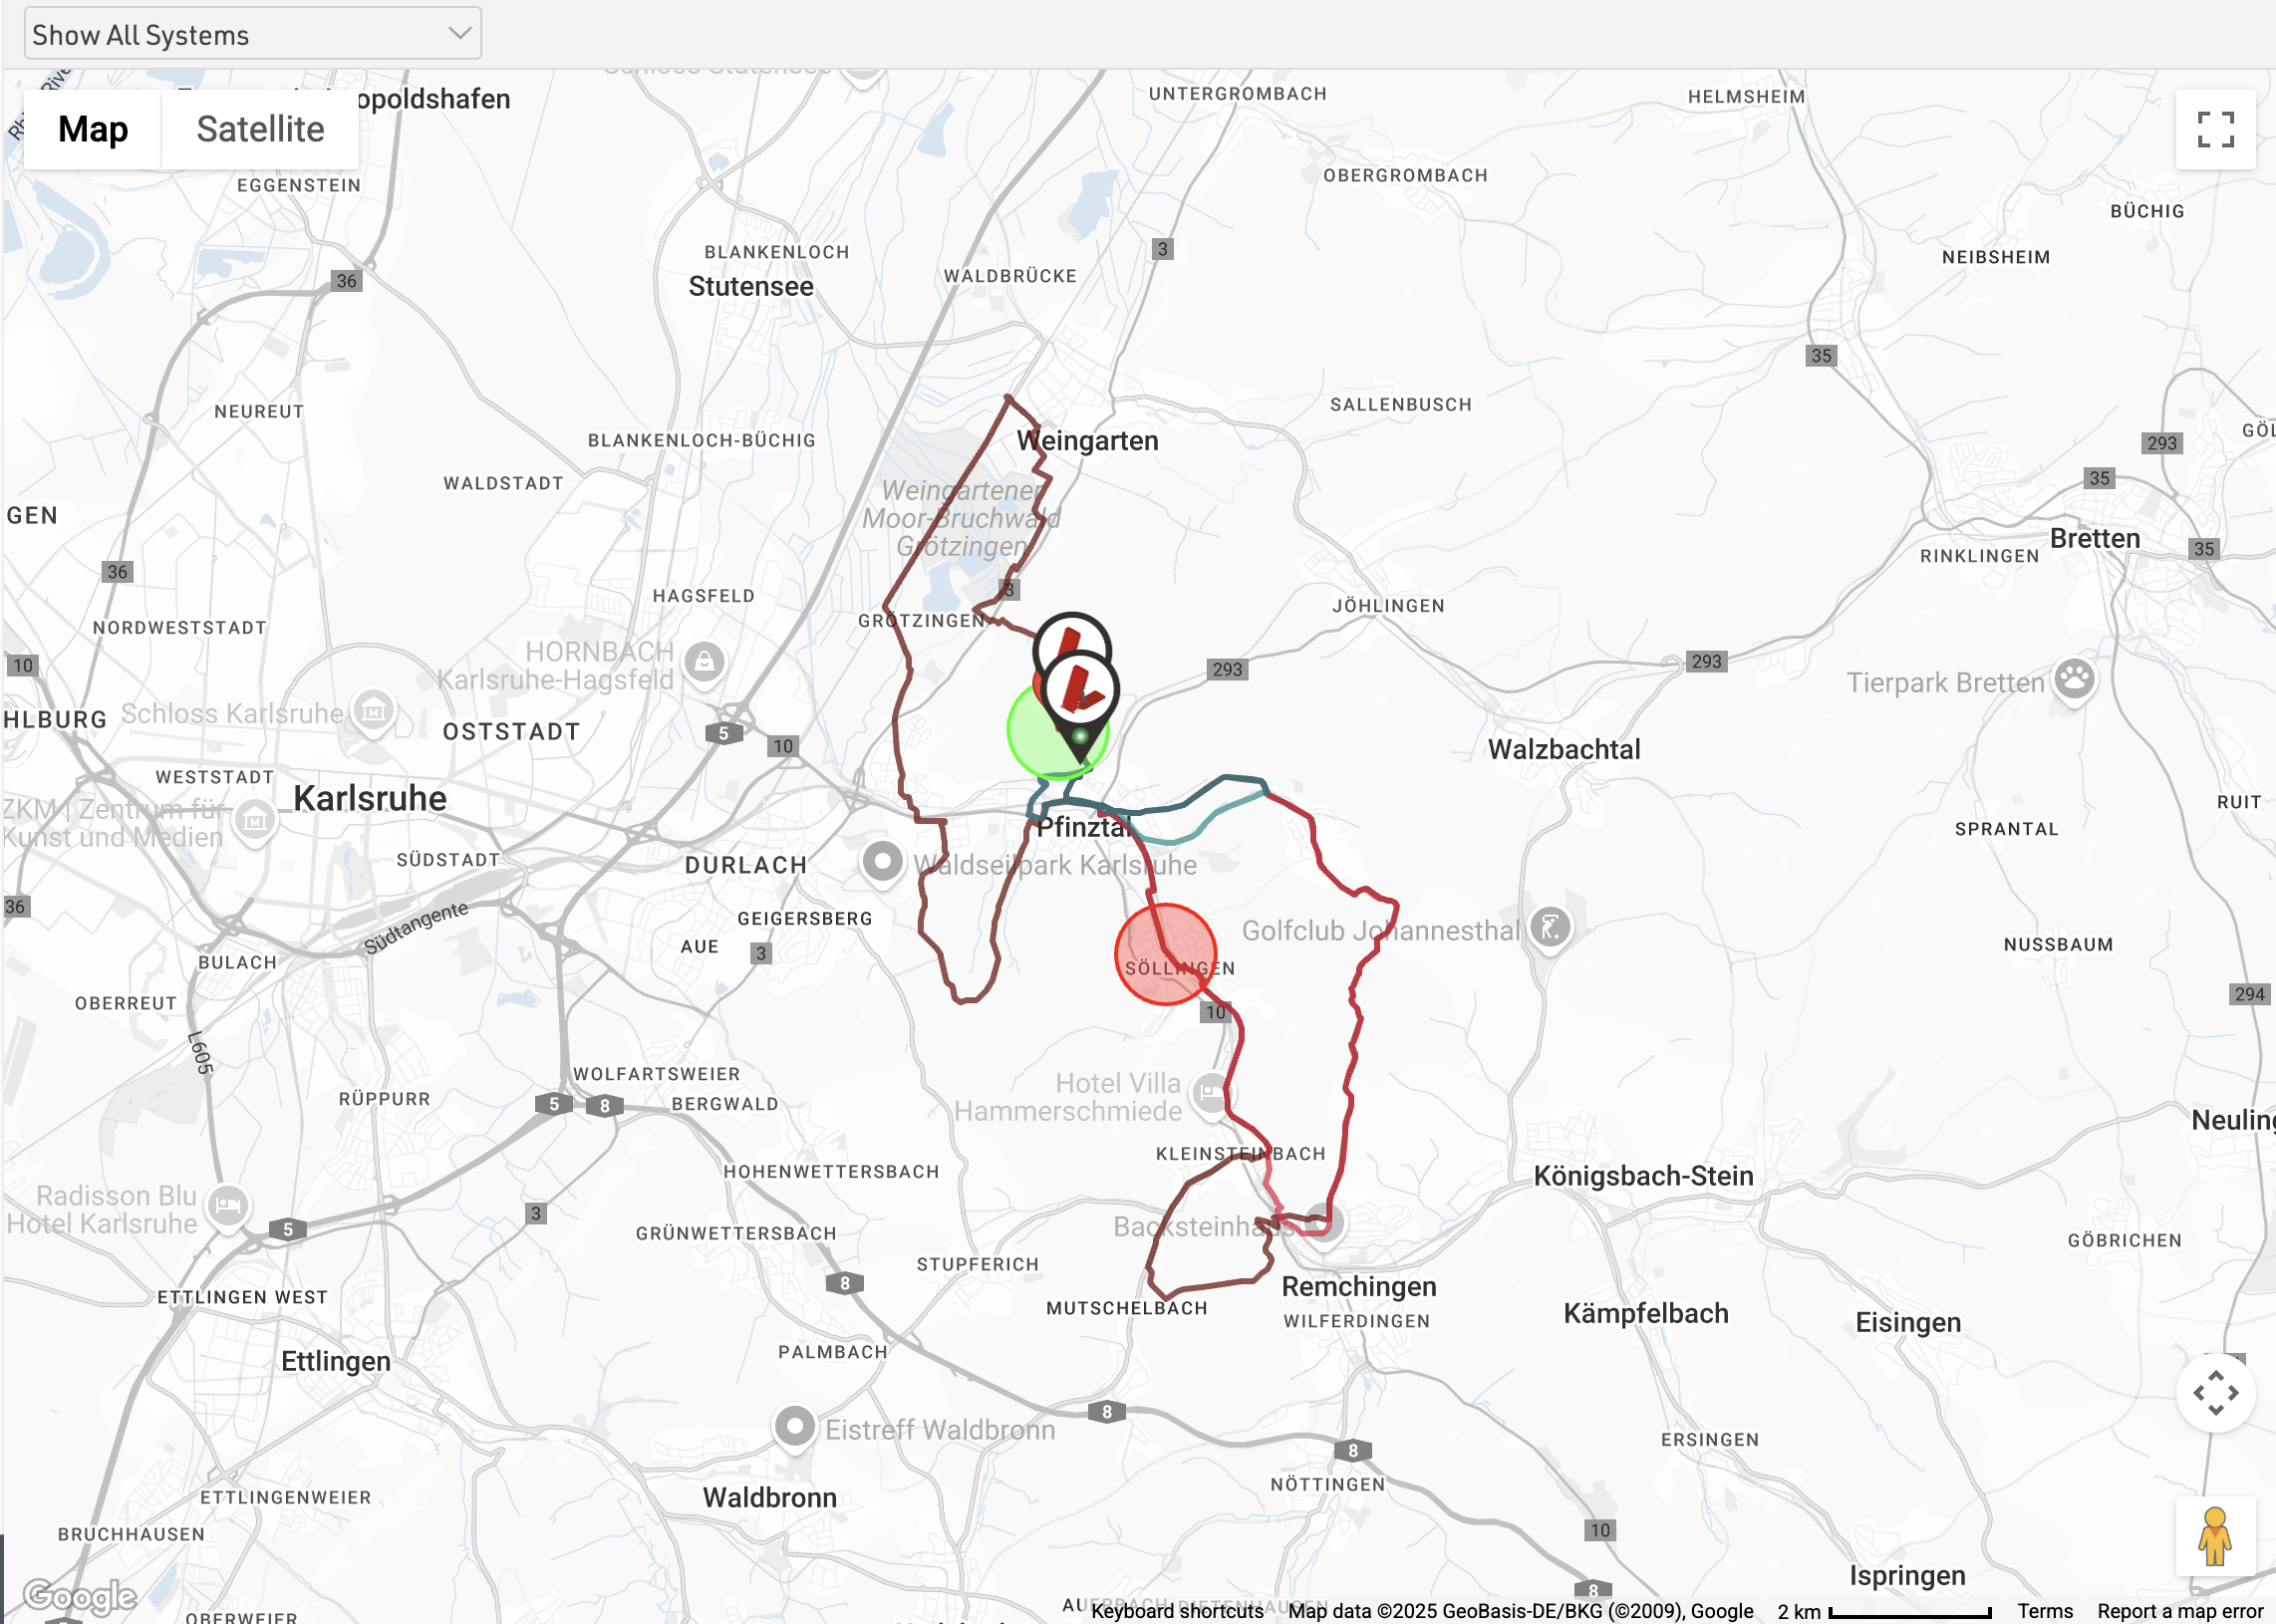
Map
The Map will show your GPX course if you have uploaded one, and the location of the RACE RESULT Systems and Track Boxes which are online and sending data to your Customer ID.
Chip Reads
Chip Reads
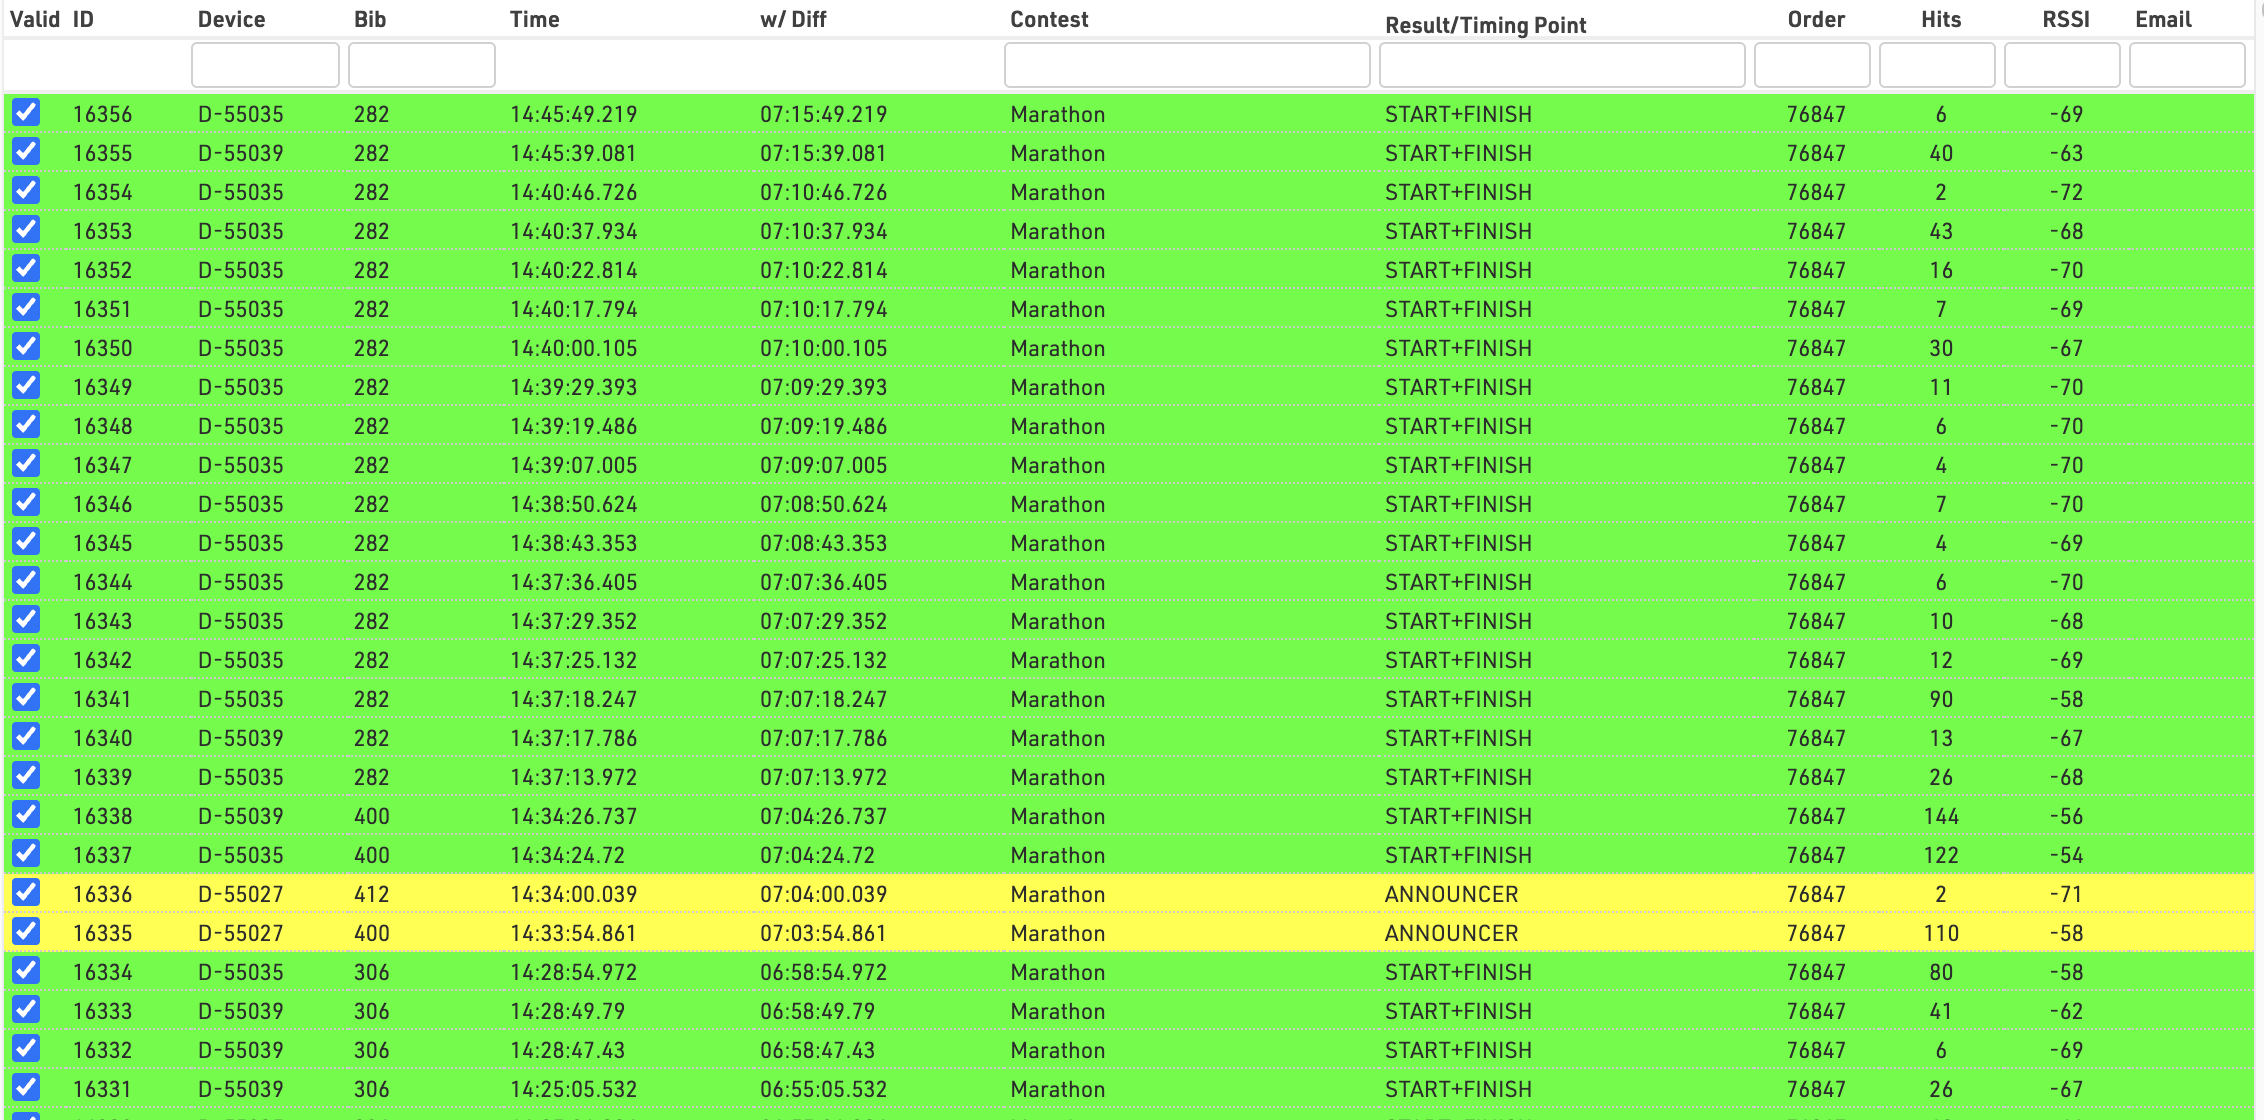
You can view all of your raw timing data from connected RACE RESULT systems under Chip Reads, by default all your raw data is sorted by the time ID (most recently received times at the top). You can see the connection (system name), Bib, Time (of day), Time With Difference (from gun), Contest, Result / Timing Point, Order (your order number for the chip), Hits (number of times the chip was recorded) and RSSI (strength of the chip read).
In the bottom left you can select and choose fields you want to display. When exporting, it will always export exactly those fields that are visible at the time of the export.
If you are using an Active Loop Setup then you will also see displayed the Loop ID, Channel ID, Transponder Wake Up Count, Transponder Battery and Temperature.
Clicking on a column will sort the column by that field, which will allow you to sort times by time of day, bib or even battery for active transponders. Some columns can also be filtered to specific values.
Read more about how to understand this data in Ubidium Ground Antenna Detection Data / Decoder Passive Detection Data / Active Detection Data
Analysis
Under Analysis you will find some tools which are useful for analysing your event whilst it is ongoing, these are designed to aid you with Timing the event by identifying any erroneous data, most often caused by participant error.
Contest Overview
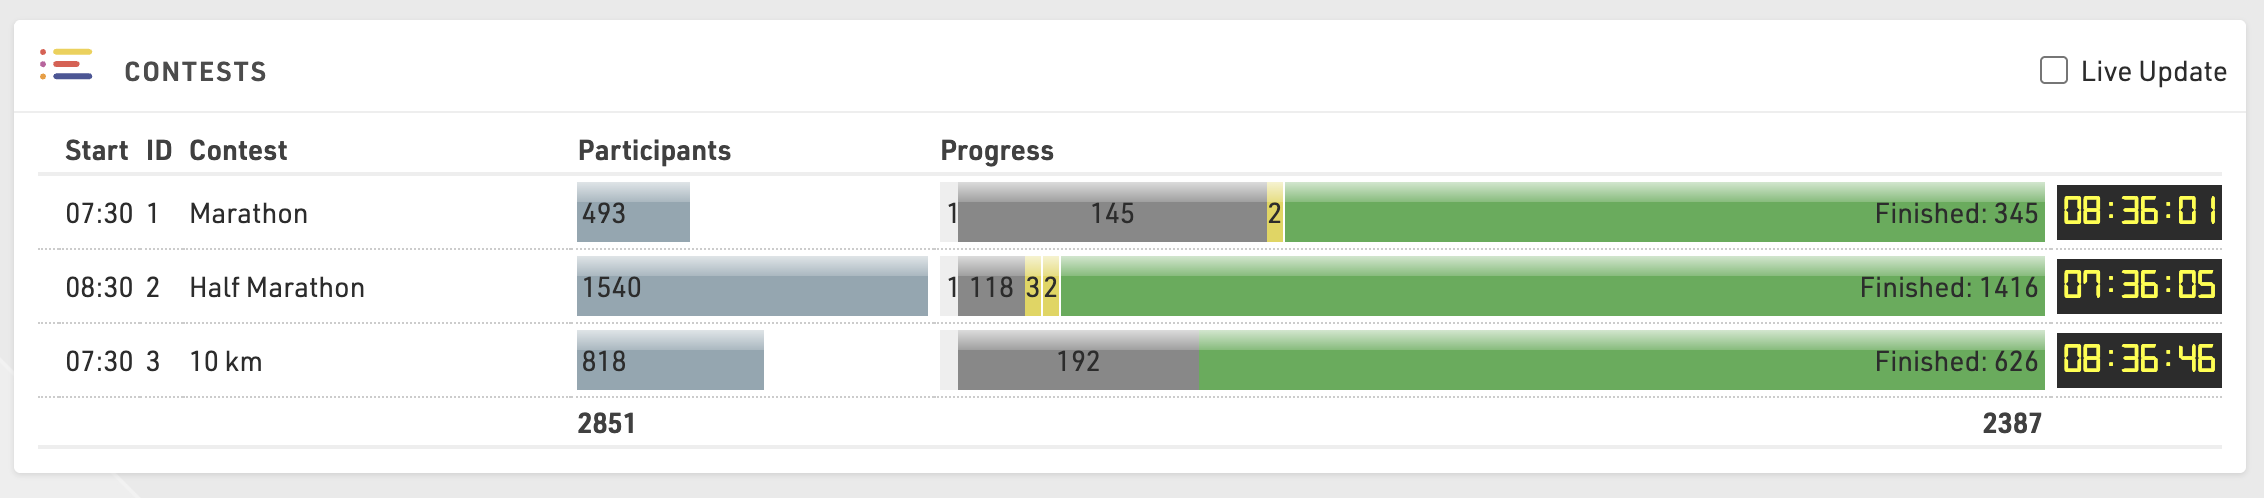
This gives you an overview of each contest, showing the number of participants signed up, started / on-course and finished in each contest. Hovering over any of the segments gives a breakdown by gender also. You will also see a running clock next to each Contest which shows the elapsed time since T0.
Time Visualisation
Time Visualisation is a very helpful tool to check if participants miss reads and if times are realistic, or in other words to identify potential errors in data.
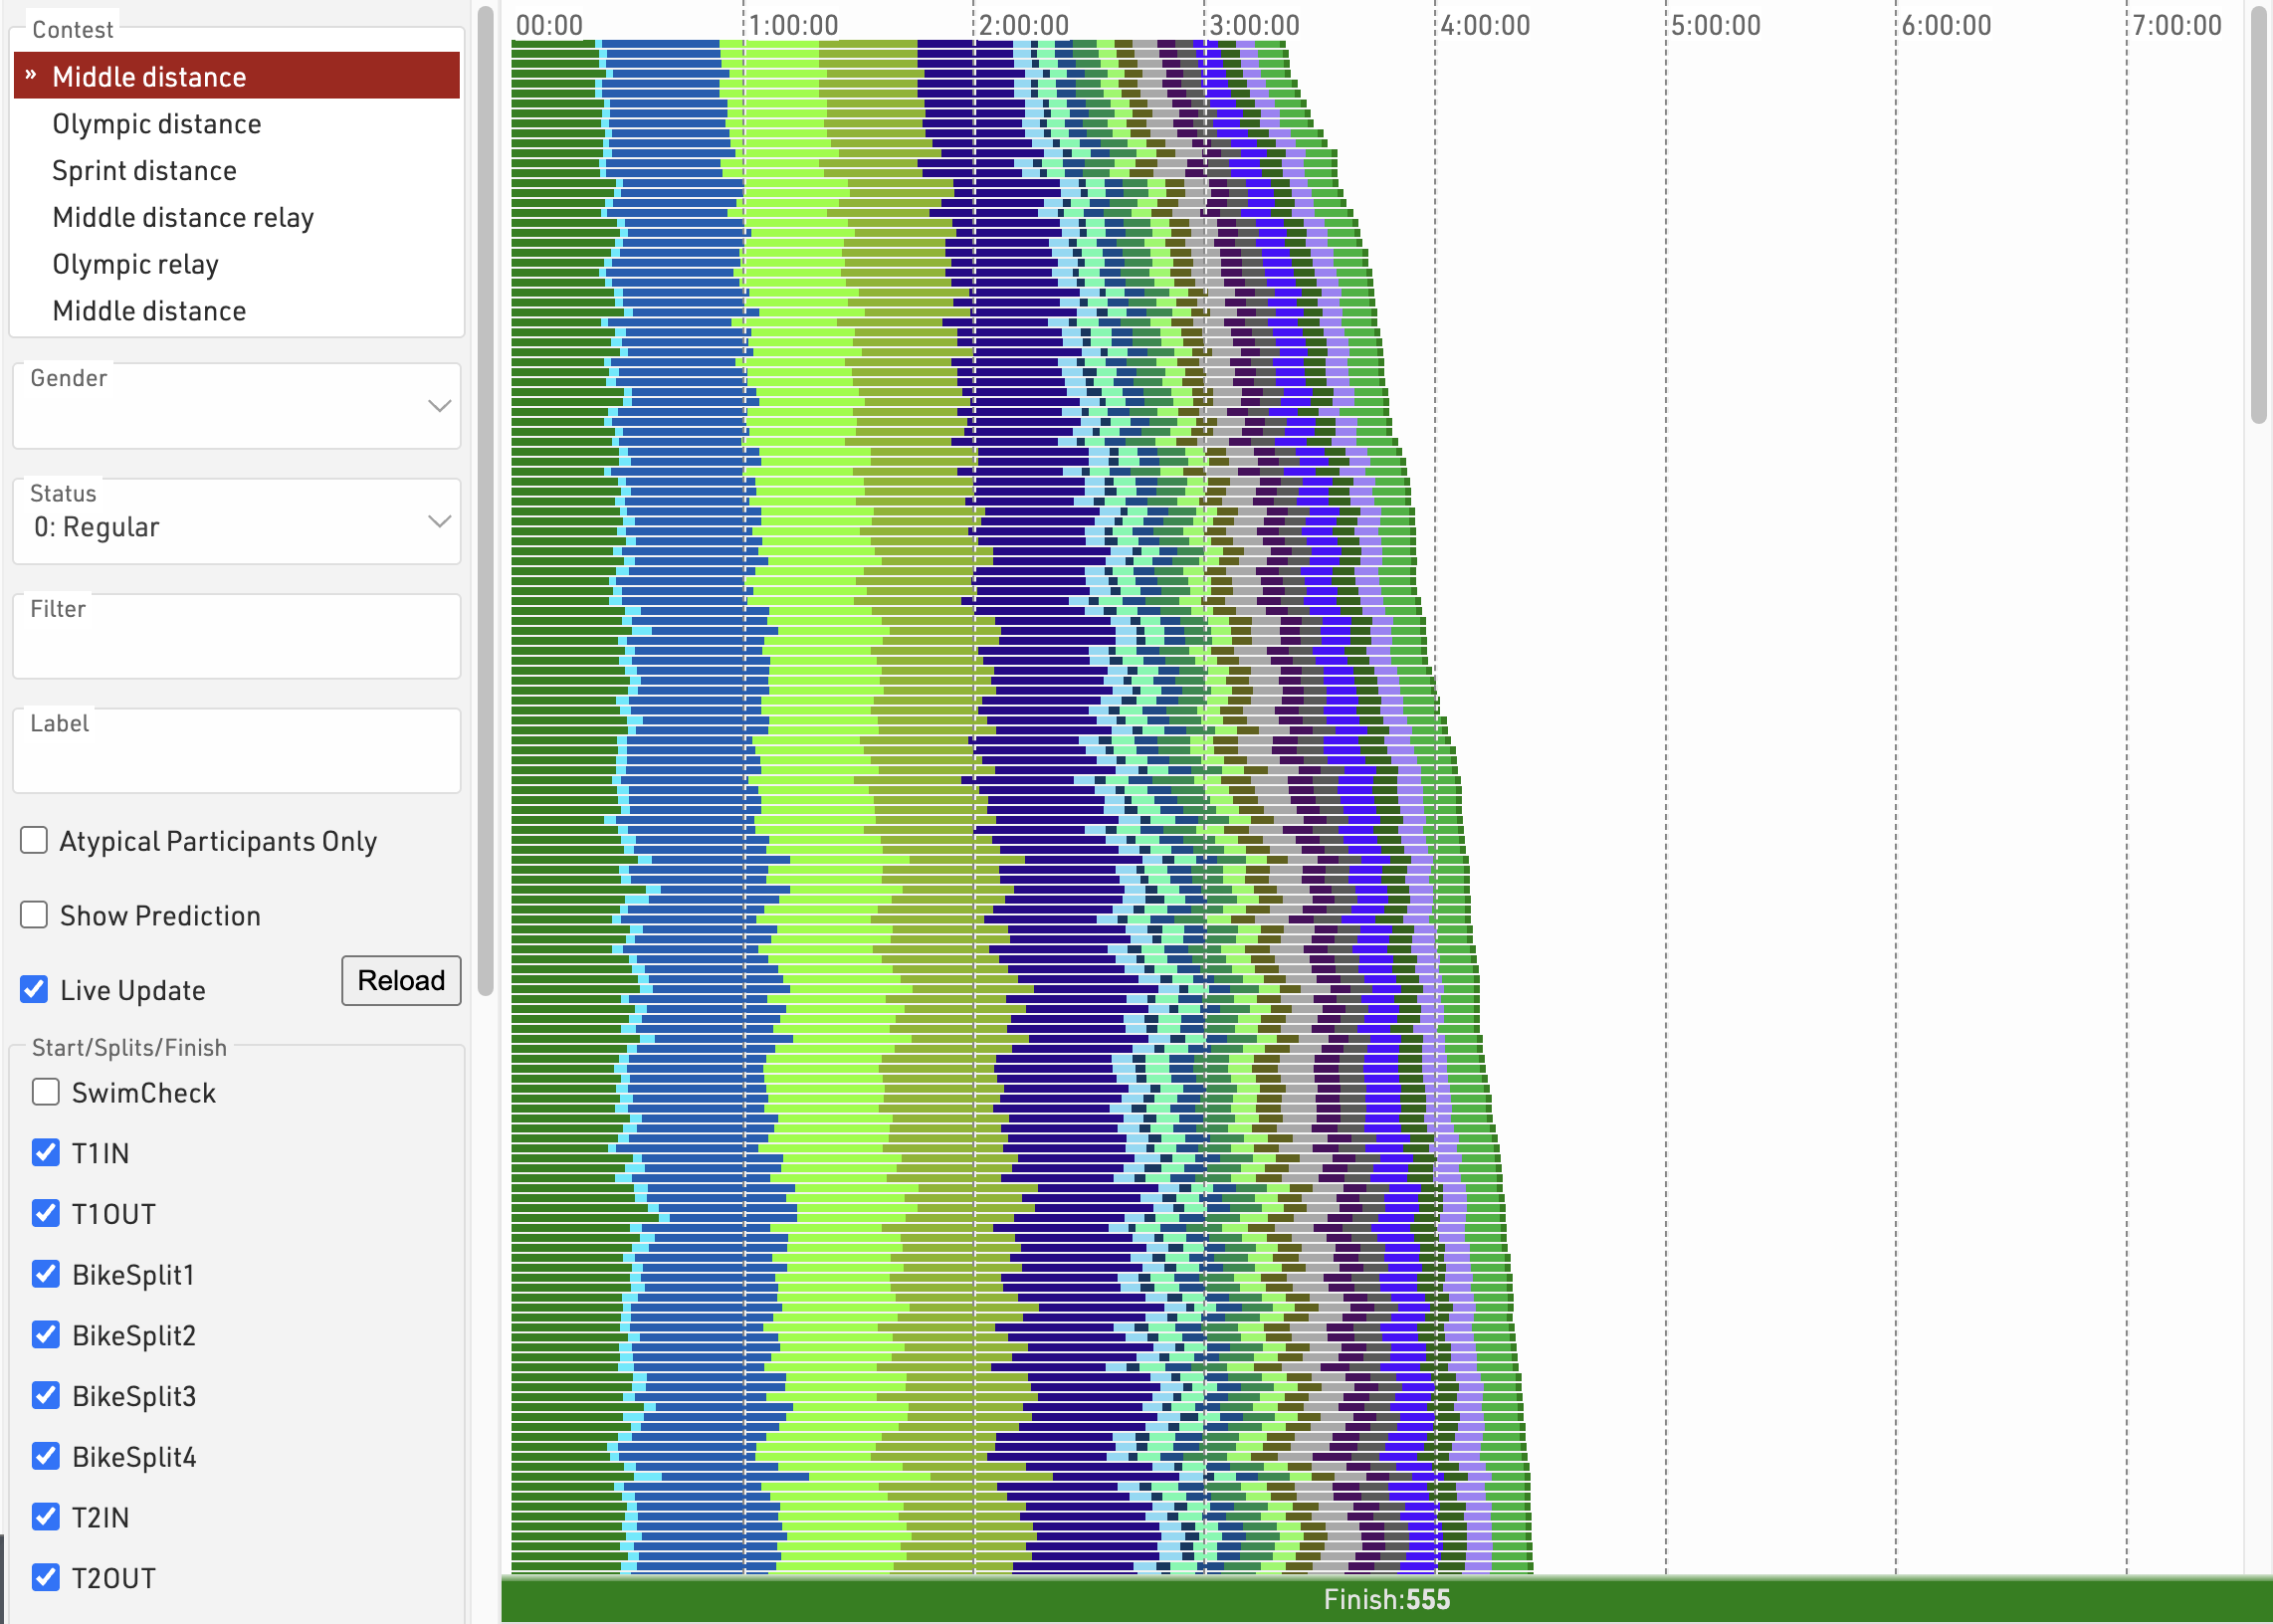
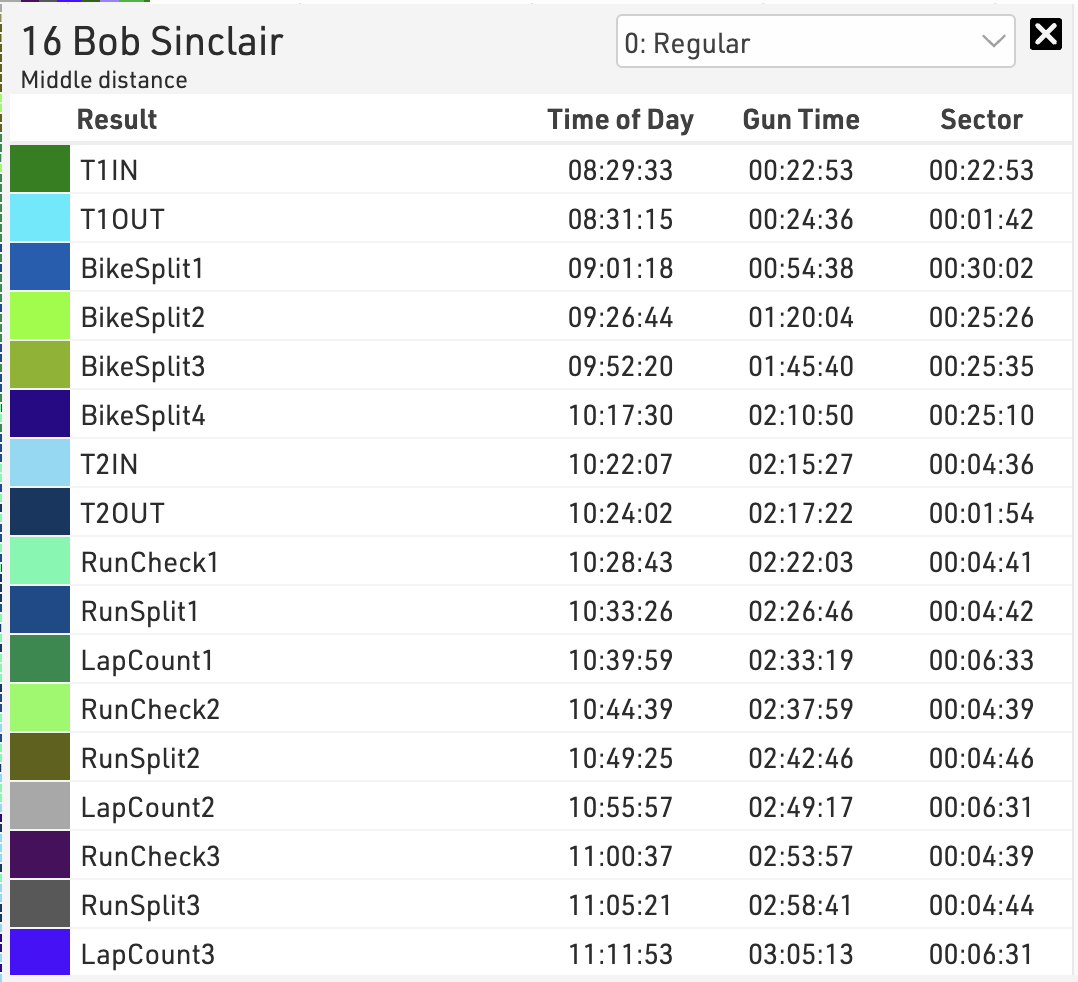
The tool shows one line for each participant. The different colors represent the section times between two split timing points. The length of the bar represents the time and the fastest athletes are at the top.
Clicking on a line will open a popup with the full details for that participant where you can additionally change their status.
Use the settings bar on the left to select the contest(s), gender, status or apply any other filter, you should also select the splits or results that will be part of the visualisation. Sometimes you may want to exclude certain times. Usually you will want to see just the key timing data for each Timing Point, not the intermediate split times.
A label can be applied to each line, which can be useful when comparing multiple contests together.
If you only want to see participants who are missing data then click "Atypical Participants Only", the view also has a live update checkbox which will refresh the visualisation as new Results are calculated, this is useful for monitoring a race whilst it is in progress.
Read Rates
Read rates offers additional analysis of Splits to compare detection rates across the Primary & Backup timing points and also considering any manual raw data entries.
For each Split the expected number of participants is calculated, either based on the number of finishers (if Finishers only is ticked) or by the number of participants seen at this Split or a later one. This is then used to calculate the percentage of participants detected at the main timing point, backup timing point, a combined rate across both, the number of manual reads and the total participants detected at this point across all.
A table is generated for each Contest independently and the total read rates across all Splits is also shown at the bottom of the table.
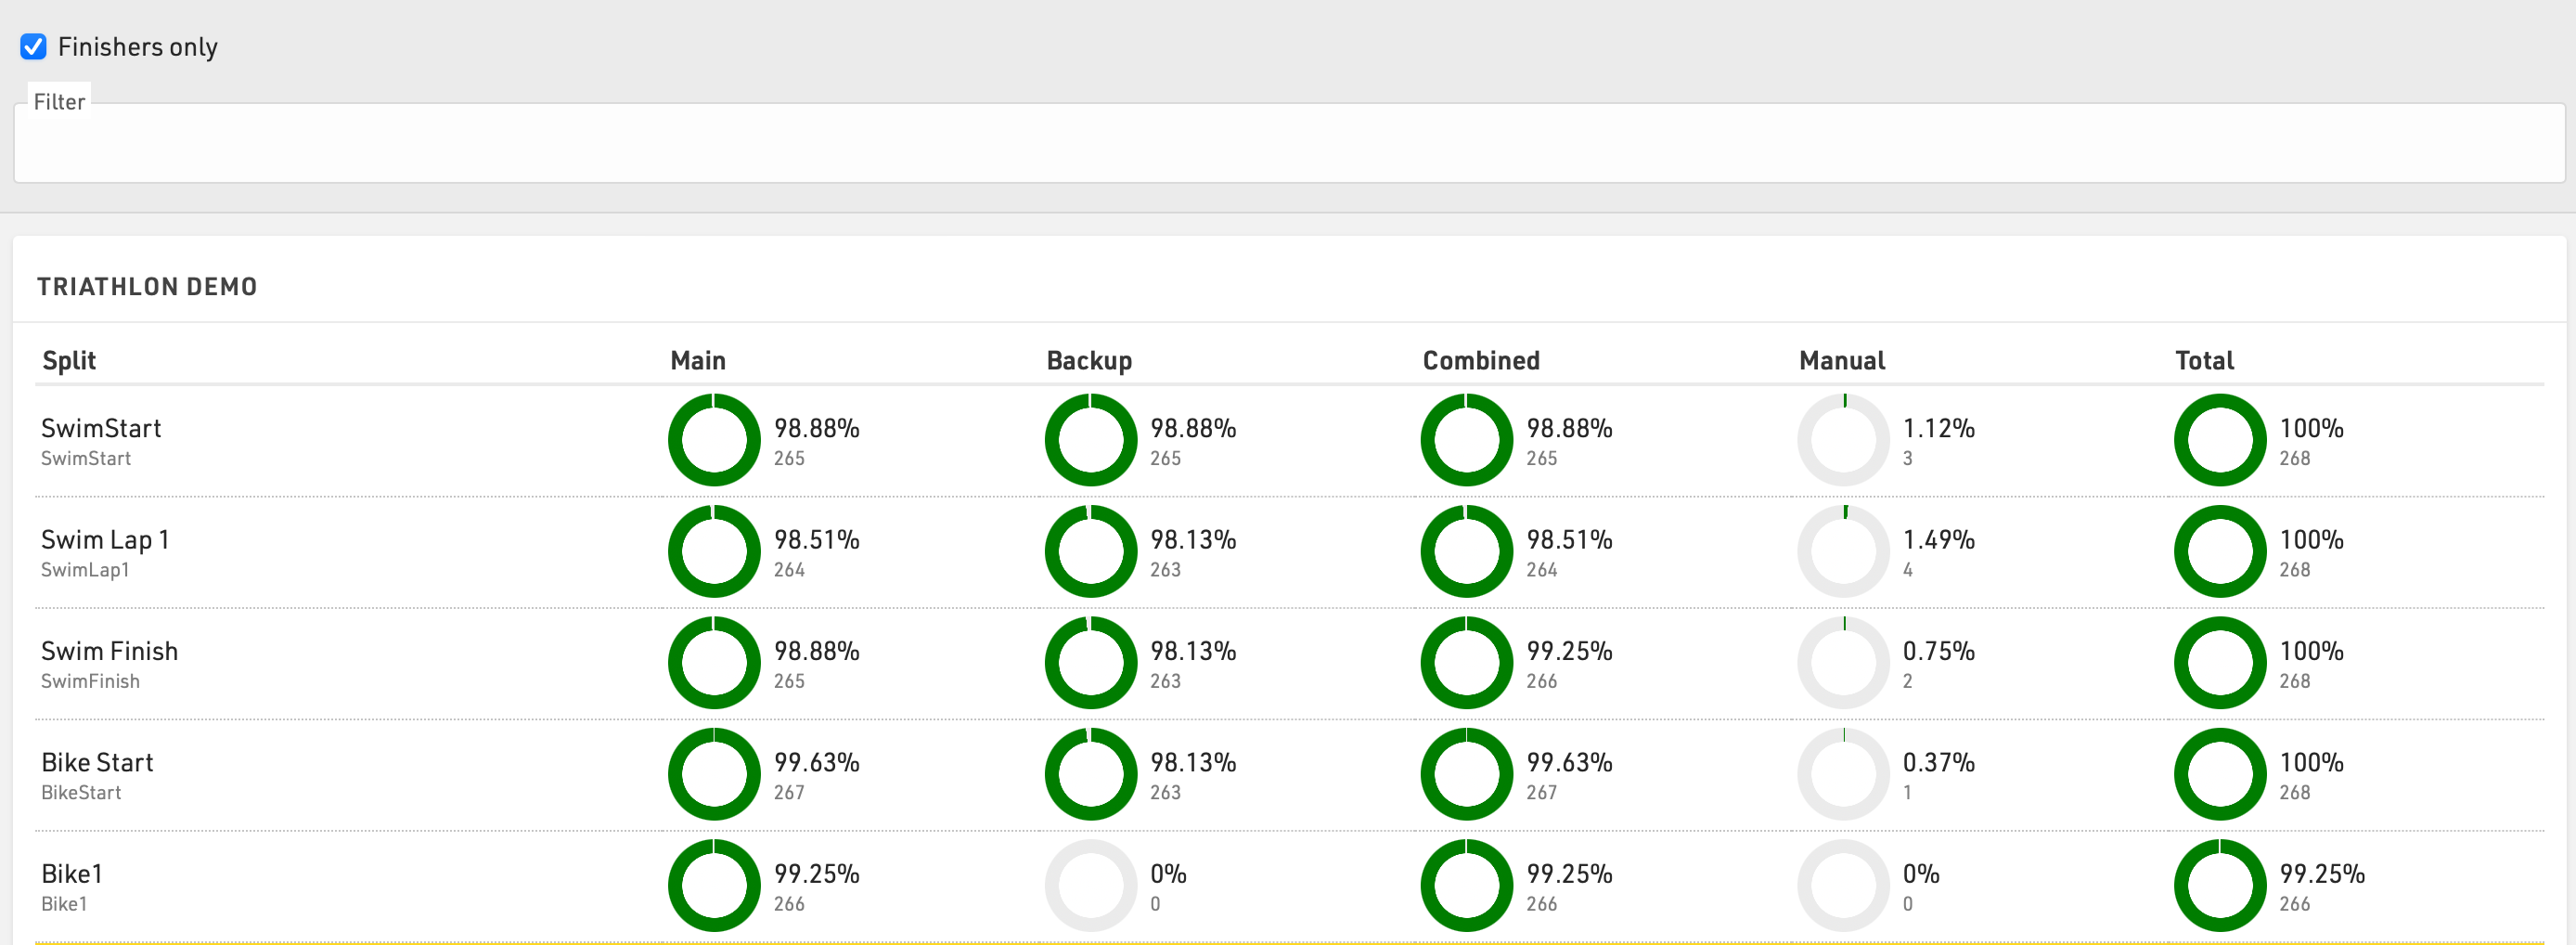
An additional optional filter can be applied.
Check Start Times
Check Start Times vs. Contest is a helpful tool to find participants who started in a contest other than the one they registered for. In particular when using Raw Data Mode, these may have no times in their results at all because all raw data detections are filtered due to the wrong contest. In consequence it would be difficult without this tool to find these participants.
Preconditions
Please consider the following preconditions for the tool to work:
- Only works with advanced Results at this time
- The timing system is running on time of day
- Start times will be kept
- The result that holds the start time is selected as Start Result in the Contest Settings.
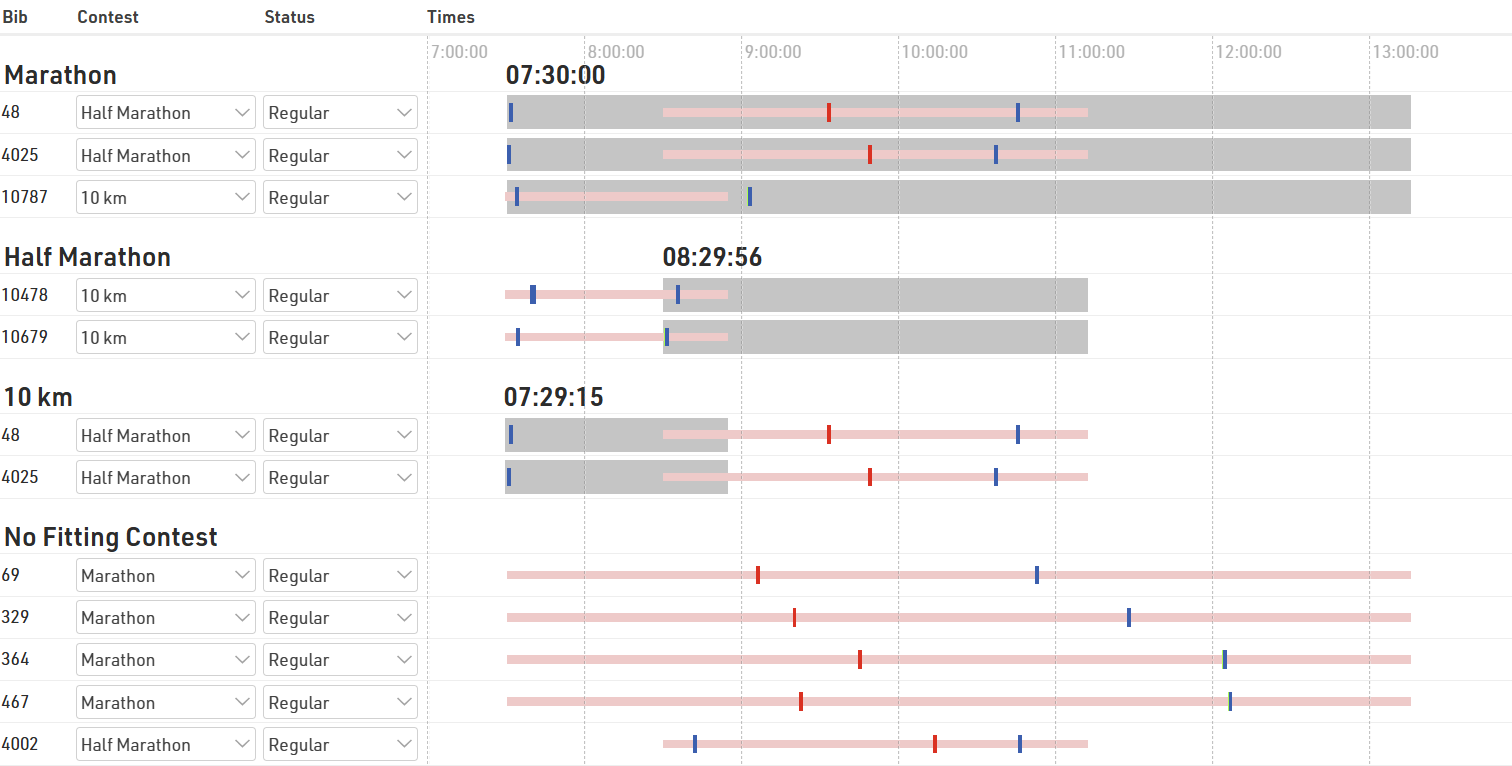
What you see
- Underneath the headline with the name of the contest, those participants are listed that are registered for that contest, but started probably in another contest.
- The area with gray background color shows the time span the majority of participants needed to complete the proposed contest.
- The red bar, on the contrary, shows the time span of the contest the participant is actually registered for.
- The vertical lines show the participants' chip reads. The legend at the bottom of the screen shows which color belongs to which timing point.
- If there are many reads of the same chip with only small gaps in between, the reads may appear like a bar.
Making changes
You can either change the contest of the participant or change the status (for example to DSQ). When clicking on the bib number, the Participants Window shows on the right side of the screen and you can check the Raw Data in detail before making any changes.
Splits Analysis
Splits analysis provides a breakdown of the fastest and slowest times for each split which can be used to help ensure your Splits setup is accurate.

Race Simulation
This tool serves to simulate the race before race day to make sure all your settings are correct. You can either generate all times all at once (so you basically get the final results after race day) or you can simulate the times live. The latter is helpful to test functions like announcer screens or result screens.
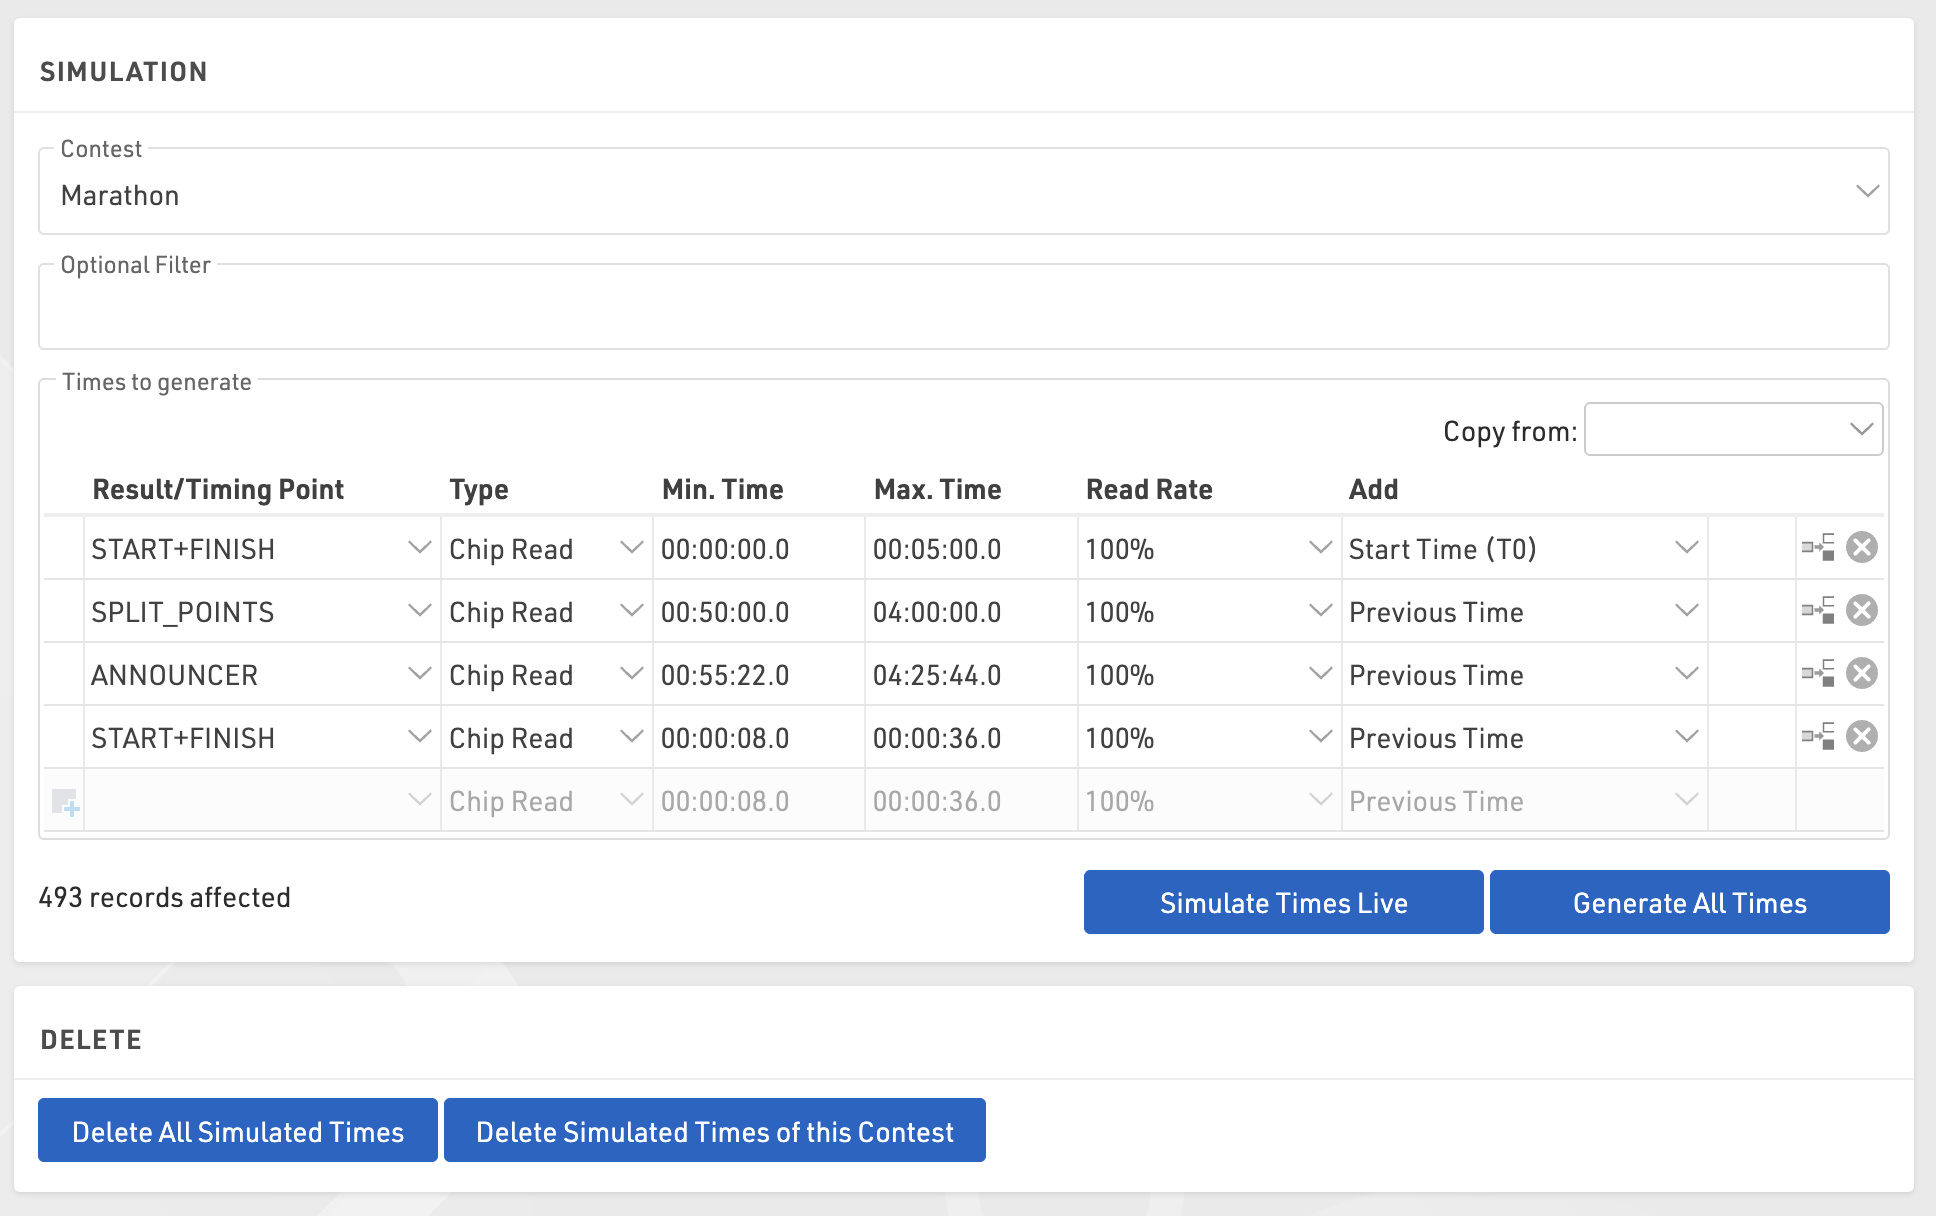
To use the function first select a contest for which times shall be generated and optionally enter a filter if not all participants shall be part of the simulation.
Manual configuration
Select which timing points should be used and enter a minimum and maximum time for each passing you want to simulate. In most cases, you will use the Add function to add the previous time in order to make sure that the time is greater than the previous time. Add T0 to your start detection. For realistic timestamps, set T0 to a realistic time as well. Your minimum/maximum time will then be the sector times. Example:
- Start: min 0:00, max 5:00, Add T0
- 10K: min 30:00, max 60:00, Add Previous Time
- 20K: min 30:00, max 60:00, Add Previous Time
- 30K: min 30:00, max 60:00, Add Previous Time
- 40K: min 30:00, max 60:00, Add Previous Time
- Finish: min 5:00, max 10:00, Add Previous Time
Copy from Splits
If you are using splits you can generate your race simulation based on the splits you configured under Scoring > Splits. To copy your split setup use the Copy from dropdown menu. Under the section labeled Splits select the contest you want to copy settings from.
Generate Times
Then click Generate All Times to generate all times all at once or Simulate Times Live to simulate the times live. In the latter case, you can see the clock running next to the button and you can also increase the speed of the clock. In most cases, you will open another browser tab or window to check the results of the live simulation while the Race Simulation tool remains open and running.
You can also select a Read Rate less than 100% if you want to simulate some missed reads at the start or if some timing points will not be passed by everyone (for example an optional timing line to donate a certain amount).
Cronometraje Manual
La herramienta Cronometraje Manual se puede utilizar para registrar tiempos manualmente para cada participante, ya sea como una hora de Split primaria o finalización o como una copia de seguridad manual. También se puede para conectarse a dispositivos seriales que transmiten datos.
Setup
When loading the Manual Timing module there are some initial options to set.
- Accept times for this contest: Choose whether times should be accepted for a single contest only or for all contests
- Save times in: This setting to select a timing point or result only shows if you have more than one timing point or static result, otherwise times will be saved in the only available option.
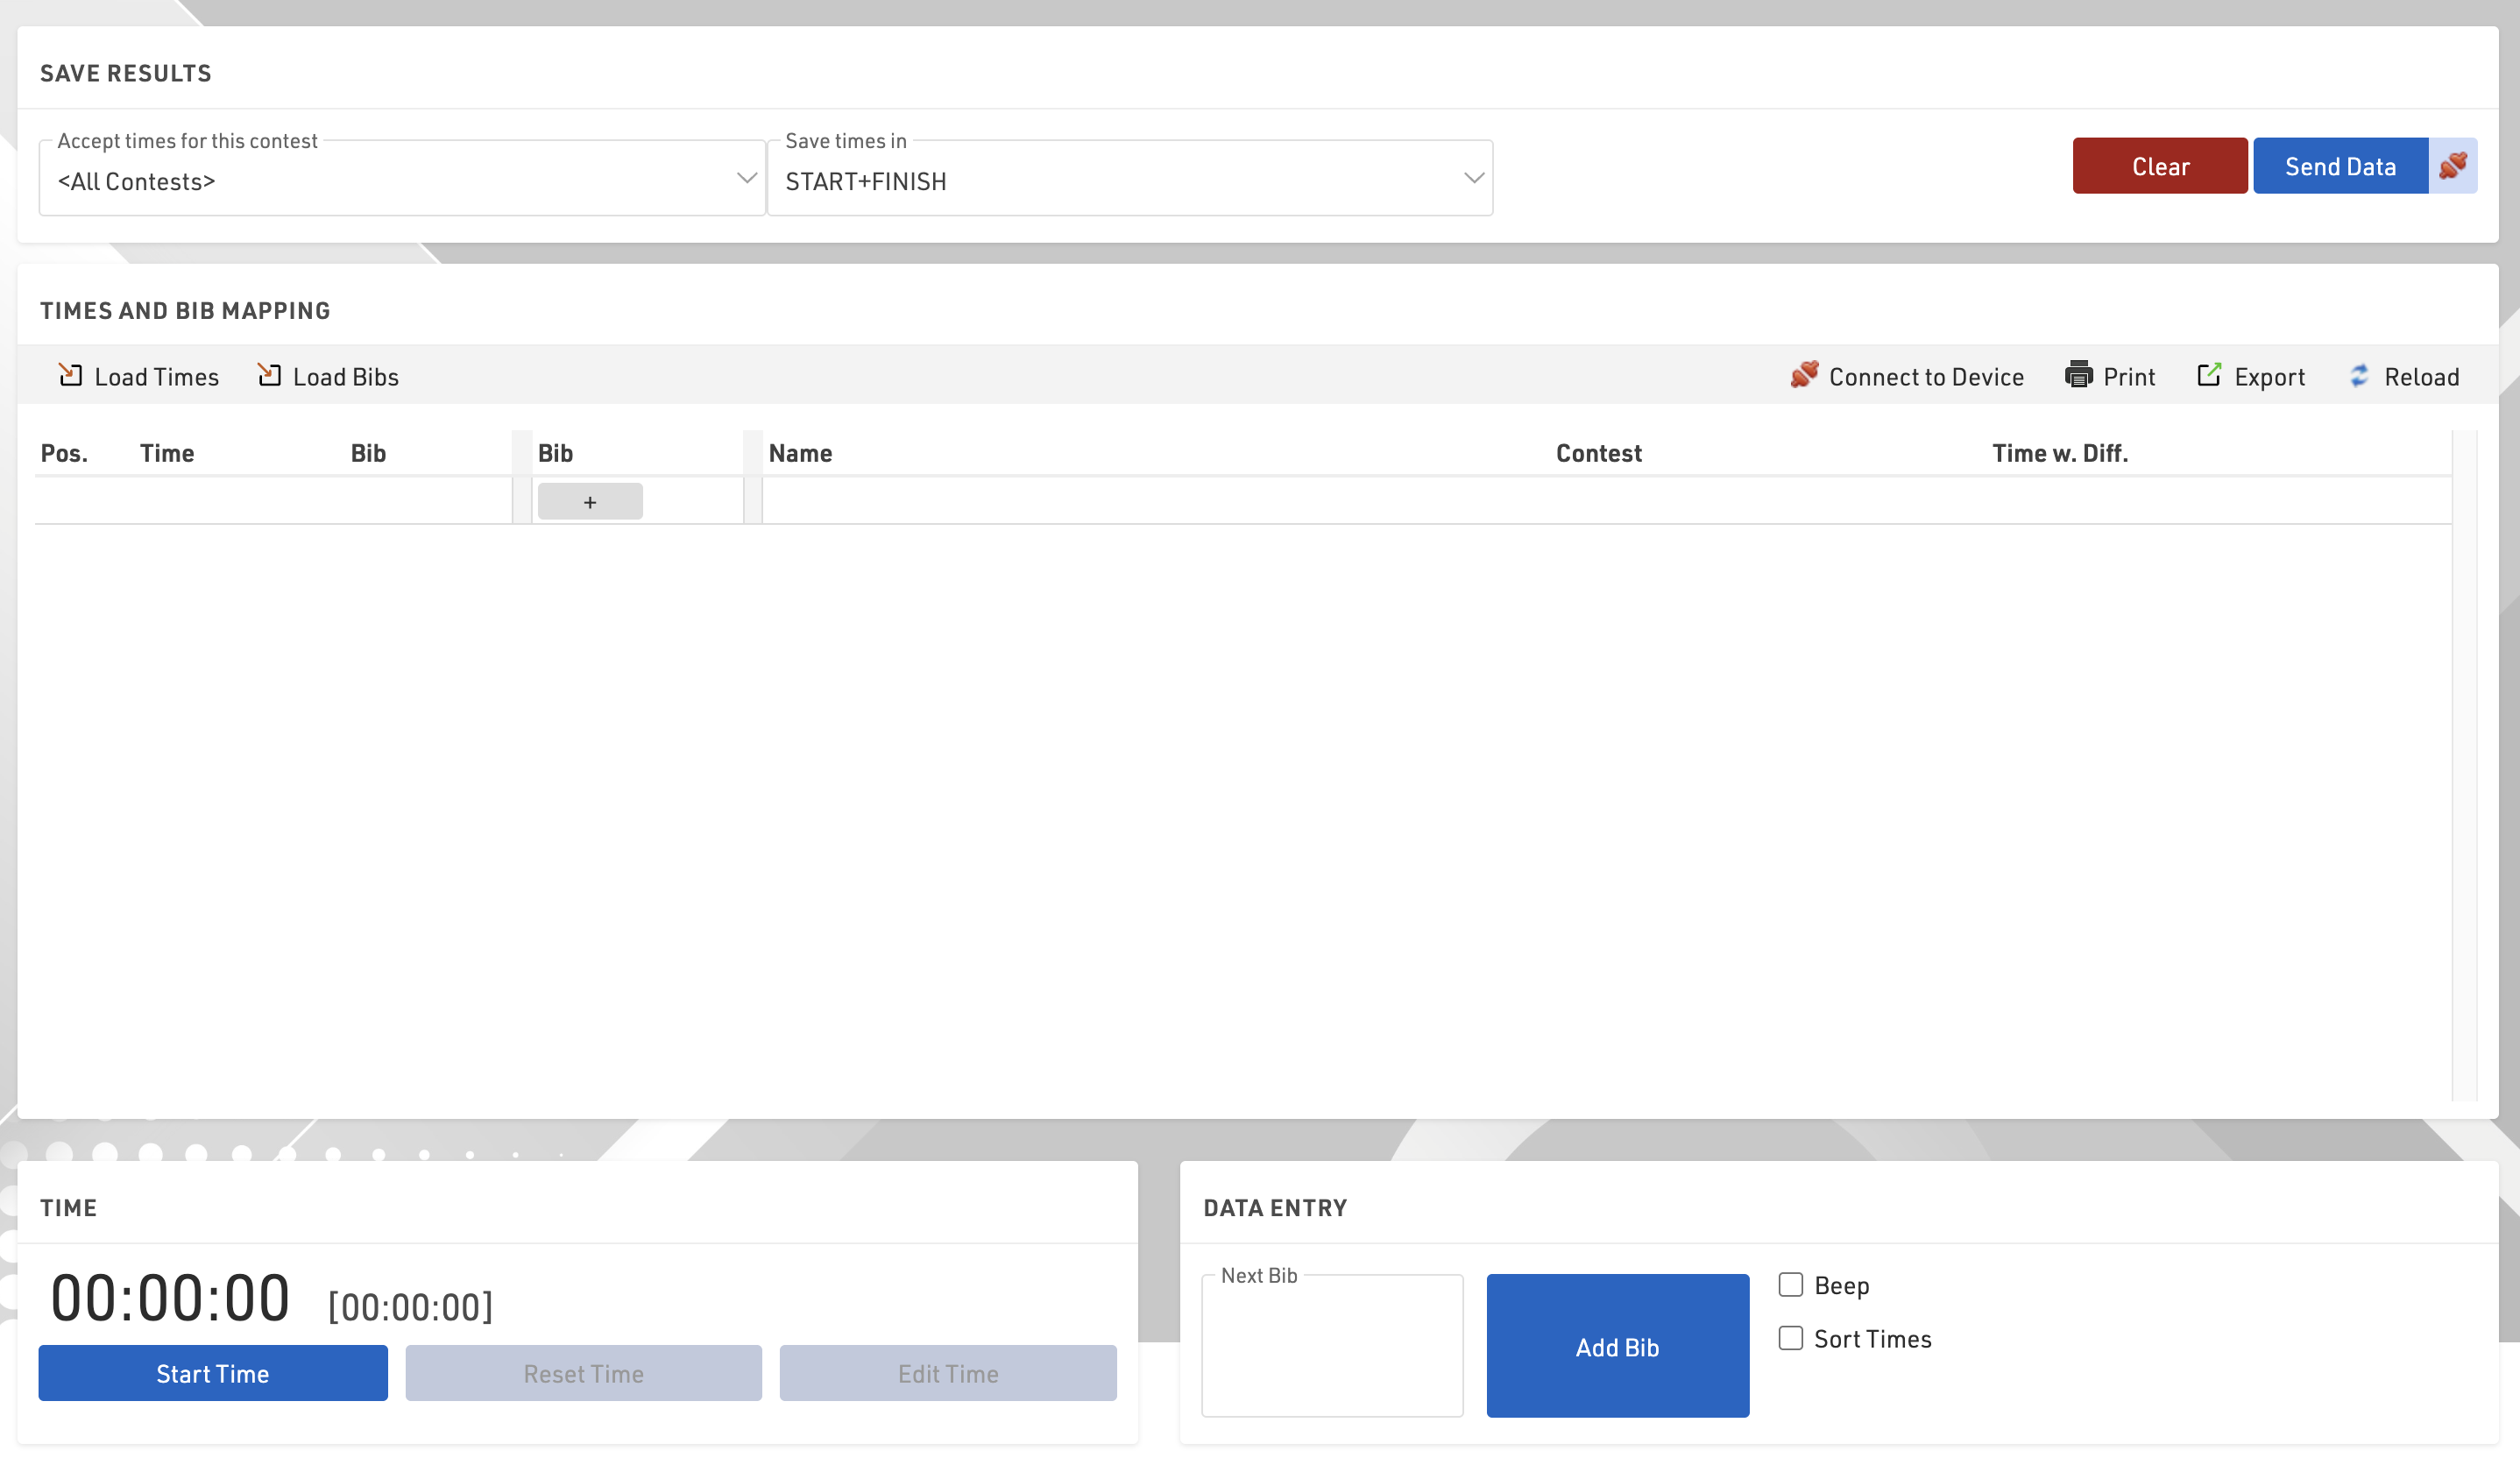
Time
Time is not set or started when opening, you can Start Time as running time, or once started click Edit Time to open additional options.
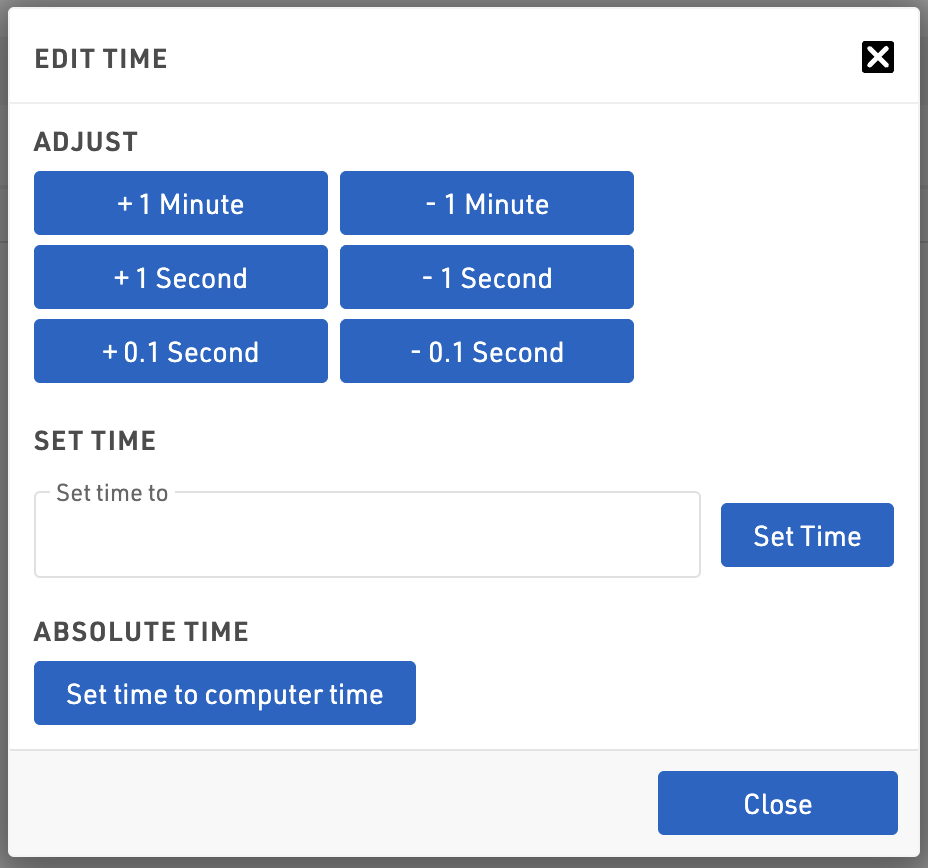
From here you can adjust the time in small increments, set the time to a certain time or set to computer time. Click the Black X to close the dialog.
Send Data
The manual timing module does not send data directly to your event file automatically, clicking Send Data will send the currently recorded data, or clicking the connection symbol next to this will activate live forwarding where all data is then automatically sent to the event file as it's recorded.

Registro de Datos
Los datos se capturan mediante la entrada de datos en la parte inferior derecha.
Normalmente introducirá el número de dorsal del participante y precionara enter para grabar un tiempo a medida que cruzan el punto de cronometraje, si se acercan varios finalistas o el dorsal no se puede ver, entonces también puede simplemente pulsar enter para grabar un tiempo (los números de dorsales se puede llenar más adelante).
Al capturar un tiempo, el tiempo se enumerará en la sección anterior, normalmente con la información de Tiempo, dorsal y participante. El registro también se resaltará con un color dependiendo del estado:
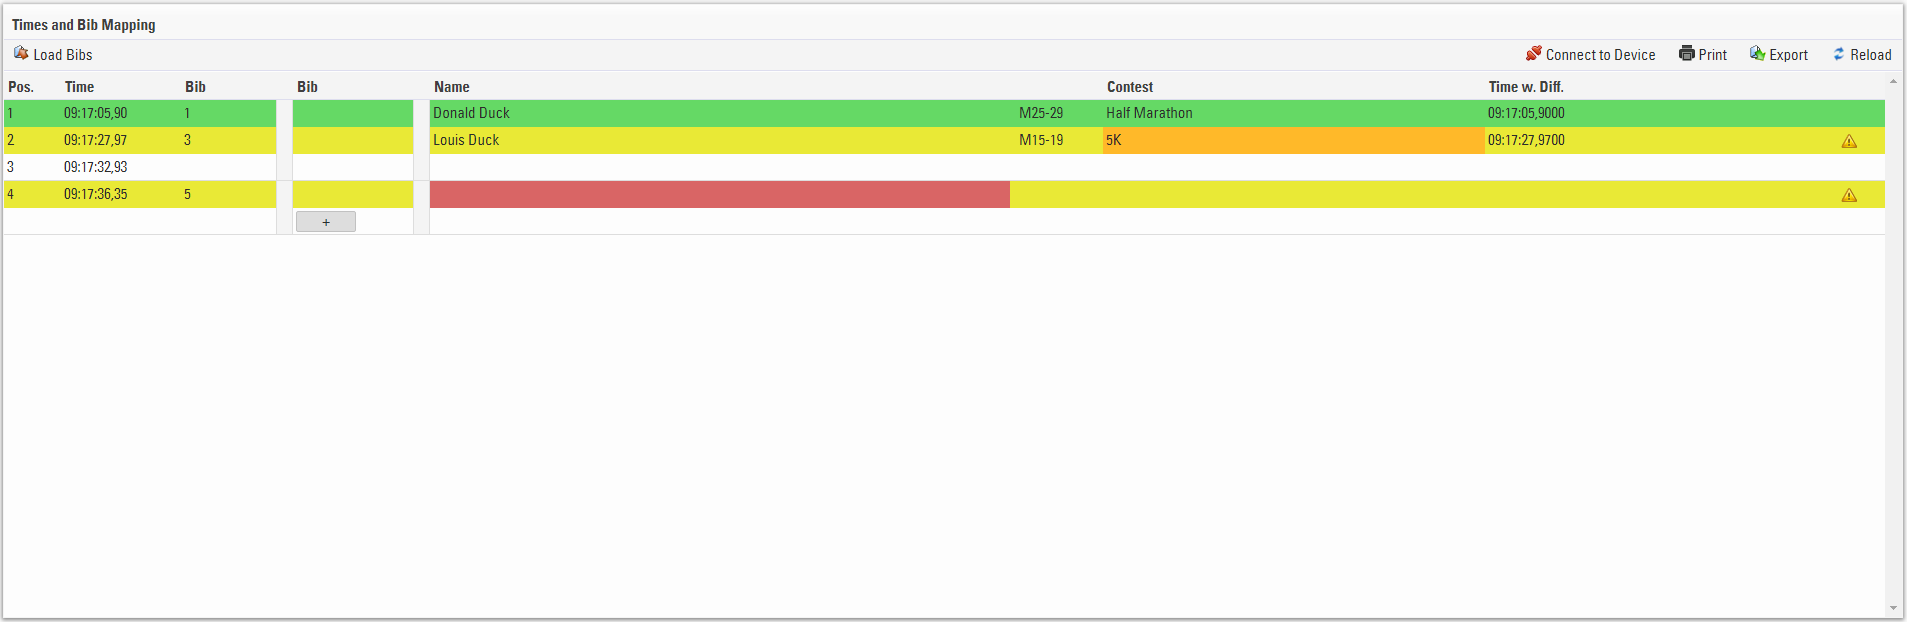
- Verde - El dorsal es reconocido y el participante es válido / aceptado
- Amarillo - El dorsal no esta en la competencia aceptada
- Blanco - No se regitró ningun dorsal para el momento
- Rojo - No se reconoce el dorsal
Si no se capturó ningún dorsal durante un tiempo o necesita cambiar el dorsal y, a continuación, hacer clic en la primera columna de dorsal le permite editar este valor, guardar el campo presionando la tecla de flecha hacia abajo, los tiempos también se pueden editar de esta manera.

También es posible que desee capturar los tiempos y dorsales por separado, por ello puede utilizar la función Cargar Número Dorsal / Cargar Tiempos, que es donde se utiliza la segunda columna de dorsal, consulte el Guia de Cronometraje Manual para más información al respecto.
Los registros se pueden insertar o eliminar manualmente, al pasar el cursor sobre los tiempos se mostrará la línea de inserción y eliminarán las opciones de registro.

Connecting to Devices
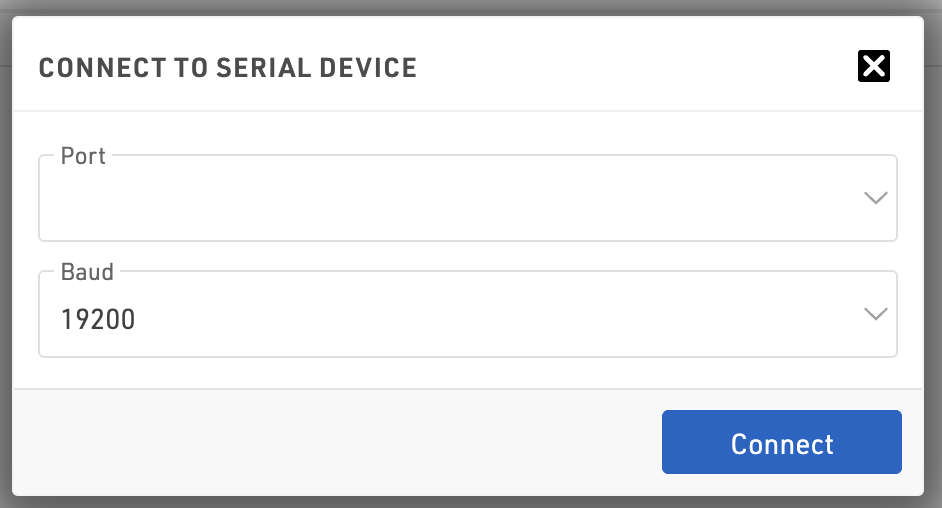
The Manual Timing module supports the ability to receive data from serial connections from manual timing devices, such as Time Machines.
To connect to devices click Connect to Device, in the following window you will need to enter the correct COM port number for your device and the Baud rate. Note that this will be specific according to your device.
Not all devices are supported as it depends on the data which is being transmitted, with a sample of the data format we may be able to include support for other common devices.