The my.raceresult.com page is used to configure the registration and results platform my.raceresult.com and to handle inquires from my.raceresult.com

Activate my.raceresult.com
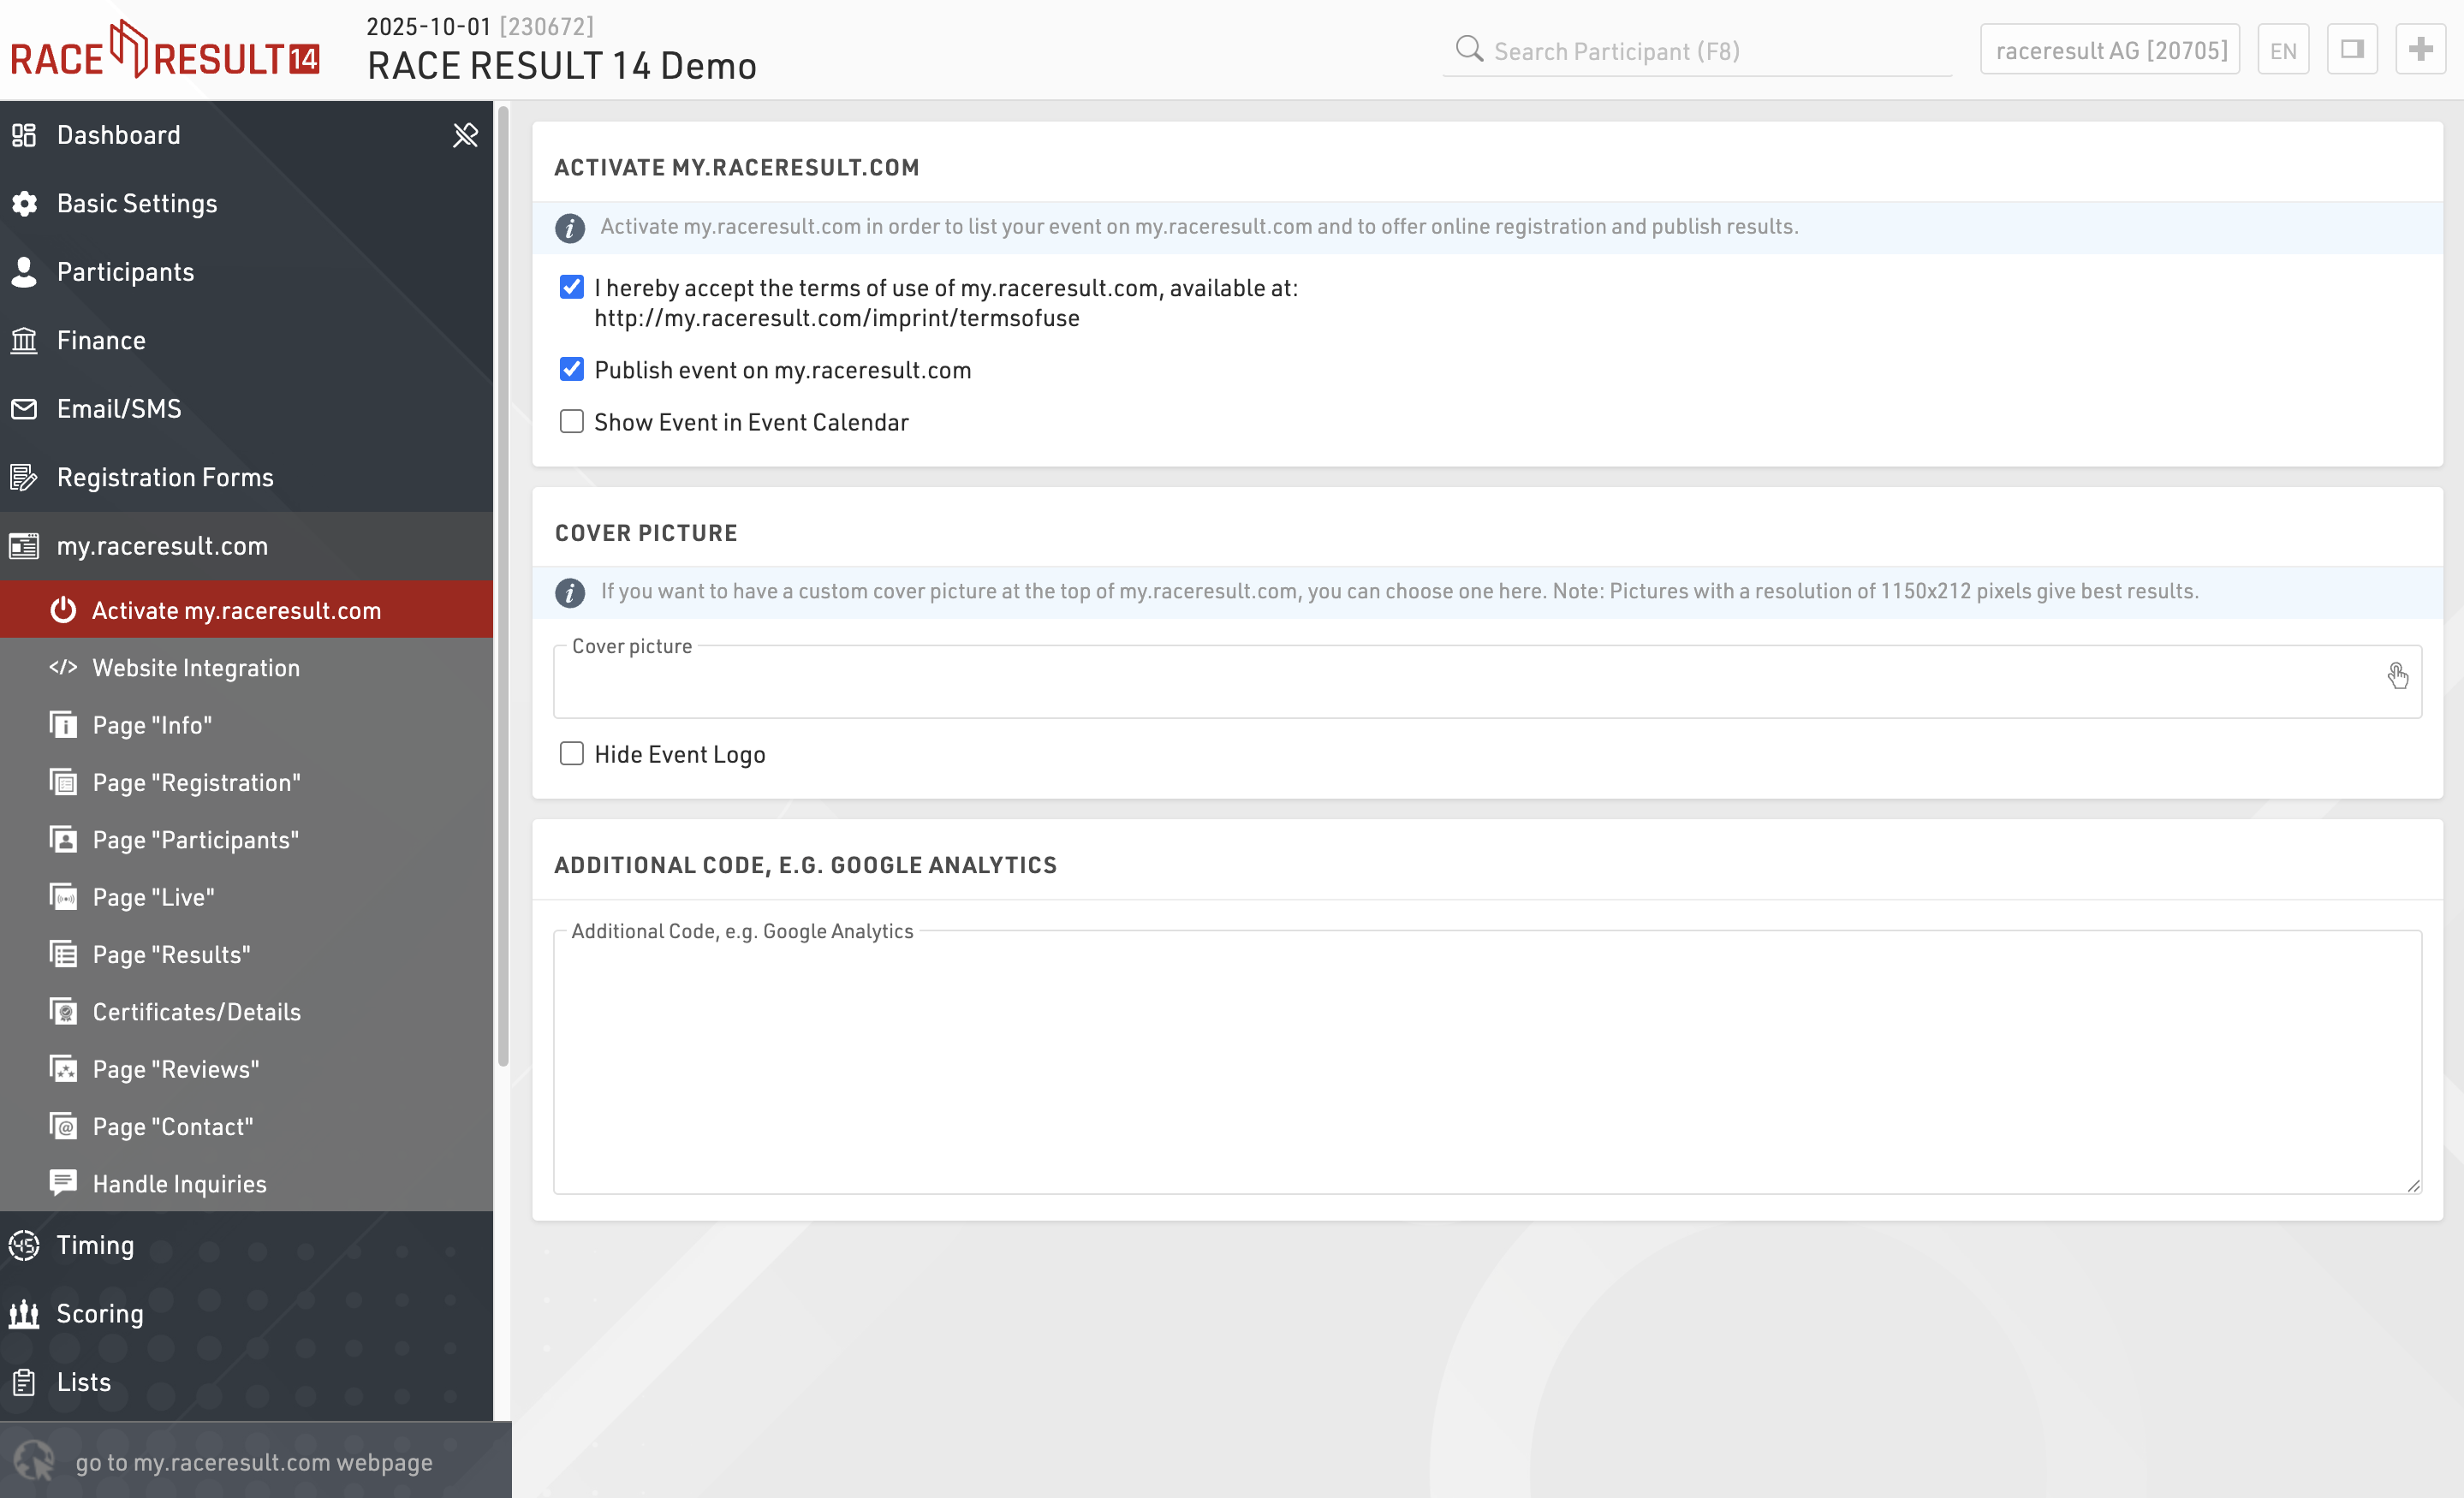
In order to show your event in the calendar on my.raceresult.com, to use the online registration, and to publish results, you need to first accept the terms of use as advertised and then publish the event using the checkboxes.

By default the event will be published in the main event calendar on my.raceresult.com, if you wish to hide it from these lists you can untick the box to show the event in the event calendar.
When viewing the event a banner is shown at the top of the page, by default a standard cover picture is used, depending on the type of event you have selected in Basic Settings > Event settings.
You can choose to upload your own banner image to use here instead, the size of the banner 1150x212px, images which do not conform to this size may be stretched or compressed in order to fit.

If you uploaded an event logo, it will display. As the event logo will overlap with the banner, you can hide it by ticking the box to "hide event logo".
Note that the cover picture is cached by your browser, if the image does not change after updating this then you may need to clear your browser cache, or alternatively try to open the page in a private/incognito window or a different browser.
Website Integration
RACE RESULT offers numerous options to embed online registration and results seamlessly in your event website.

This is done through small Javascript snippets that load the results directly into your website (no iframes). All CSS styles from your website will be applied to the online registration and results as well. Where needed, you can add CSS to fine-tune the appearance.
The Javascript code that needs to be copied and pasted to your website can be found in Basic Settings->Website Integration.
The below articles explain the different types of embed code in more detail.
For the results this may look like this:
<div id="divRRPublish" class="RRPublish"></div>
<script type="text/javascript" src="//my.raceresult.com/RRPublish/load.js.php?lang=en"></script>
<script type="text/javascript">
<!--
   var rrp=new RRPublish(document.getElementById("divRRPublish"), 58385, "results");
-->
</script>
<style>
   /* Add custom CSS here or elsewhere to change the design */
</style>
In the screenshot above, some of the colors of the results frame have been modified, this is done using custom CSS in the style tags.
Embed Participants, Results, and Live Lists
In order to embed the Participants, Results, or Live lists you need to copy the corresponding source code. You might notice that all three of these are very similar. There are a few key things to note that make them different and some features that allow you to customize these lists.
Here is the source code for reference.
<div id="divRRPublish" class="RRPublish"></div>
<script type="text/javascript" src="https://my.raceresult.com/RRPublish/load.js.php?lang=en"></script>
<script type="text/javascript">
<!--
    var rrp=new RRPublish(document.getElementById("divRRPublish"), 123456, "results");
    rrp.ShowTimerLogo=true;
    rrp.ShowInfoText=false;
-->
</script>
<style>
  /* Add custom CSS here or elsewhere to change the design */
</style>
This source code loads data based on the Event ID specified and the page specified. All of the sections in red are variables you can change to customize the embedded code. The above example will load the Results list for event 123456. If you want to load the Participants or Live lists you will need to change "results" in red to either "participants" or "live".
There are also two boolean options to turn on and off features.
- rrp.ShowTimerLogo - when set to true will show the timers logo at the bottom of the results.
- rrp.ShowInfoText - when set to true will show the info text defined for the specified page.
Embed Registration and Online Self-Service
The online registration source code allows you to embed the registration portal directly on your site. This also allows you to link the ChangeLink for Online Self Service directly to your site when using the ChangeLink() function.
To start you will need to embed the online registration source code on your site, the same code will enable both standard registration and online self service.
<div id="divRRRegStart" class="RRRegStart"></div>
<script type="text/javascript" src="https://my.raceresult.com/RRRegStart/load.js.php?lang=en"></script>
<script type="text/javascript">
<!--
  var rrp=new RRRegStart(document.getElementById("divRRRegStart"), 230672);
  rrp.ShowInfoText=false;
-->
</script>
<style>
  /* Add custom CSS here or elsewhere to change the design */
</style>
There are 2 variables here as highlighted in red.
- EventID - the ID of the event to be embedded.
- rrp.ShowInfoText - Either true or false to define whether the info text of the registration page should also be included.
Pages
my.raceresult.com contains multiple sub pages for each event which can be used for different purposes, and can be hidden / displayed separately.
Info
Events on my.raceresult.com can have an "Info" tab that can display text, HTML or embed a website, this is the default landing page for the event if configured.
Inside the Info text it is possible to use a limited set of specific fields for dynamically displaying data, the supported fields are as follows:
- [Event.Name]
- [Event.Location]
- [Event.Zip]
- [Event.State]
- [Event.Street]
- [Event.Date]
- [Event.AttributeName] - The user-defined attributes for the Event.
- [CounterX] - Where X should be replaced by a Contest ID to display the number of participants currently registered for that Contest.
These fields can also be used in the Info text on the Registration page.
Note that some websites may not permit embedding and so will not load, you will need to check the hosting settings for your website in this case.
Registration
Your Registration Forms can be included in the my.raceresult event to accept registrations and payment online.
Basic Settings
The registration page must be activated by checking Activate Online Registration, and a date range can be entered to define when the registration page should be available, according to the time zone set in your event file basic settings. Note that this is separate from the inidividual Registration Form active date range.
Info Text
The Info Text is displayed at the top of the registration page to provide additional information to participants looking to register, this can be entered as HTML allowing for complete customisation.
Registration Forms
Multiple Registration forms can be added to the registration page, each of which already defines the available dates and contests for the form.

For each form you can define some additional info text to be displayed below the form title.
Ticking show contest will show a summary of the applicable entry fees for each available contest in that form.
You can also optionally relabel the button to start registration for each form.
If Login is activated then an additional dropdown will control which forms should be shown always, only when logged in, or only when not logged in.
Test Mode
Test mode allows you, or a third-party to test a registration form before the registration period, when in test mode the payment will not be captured.
It is advised to enter a date up to which the test mode is active to prevent this link from being used for an actual registration.
A link is available to open the registration page in test mode so this page can be accessed even before it is available according to the date range, note that it must first be activated still.
When in test mode it is possible to simulate specific dates by adding the query parameter &testDate= to the URL, this is useful for validating entry fees or active date ranges for specific fields.
e.g. &testDate=2023-12-25 would simulate registration on 25th December 2023.
Publicar Participantes y Resultados
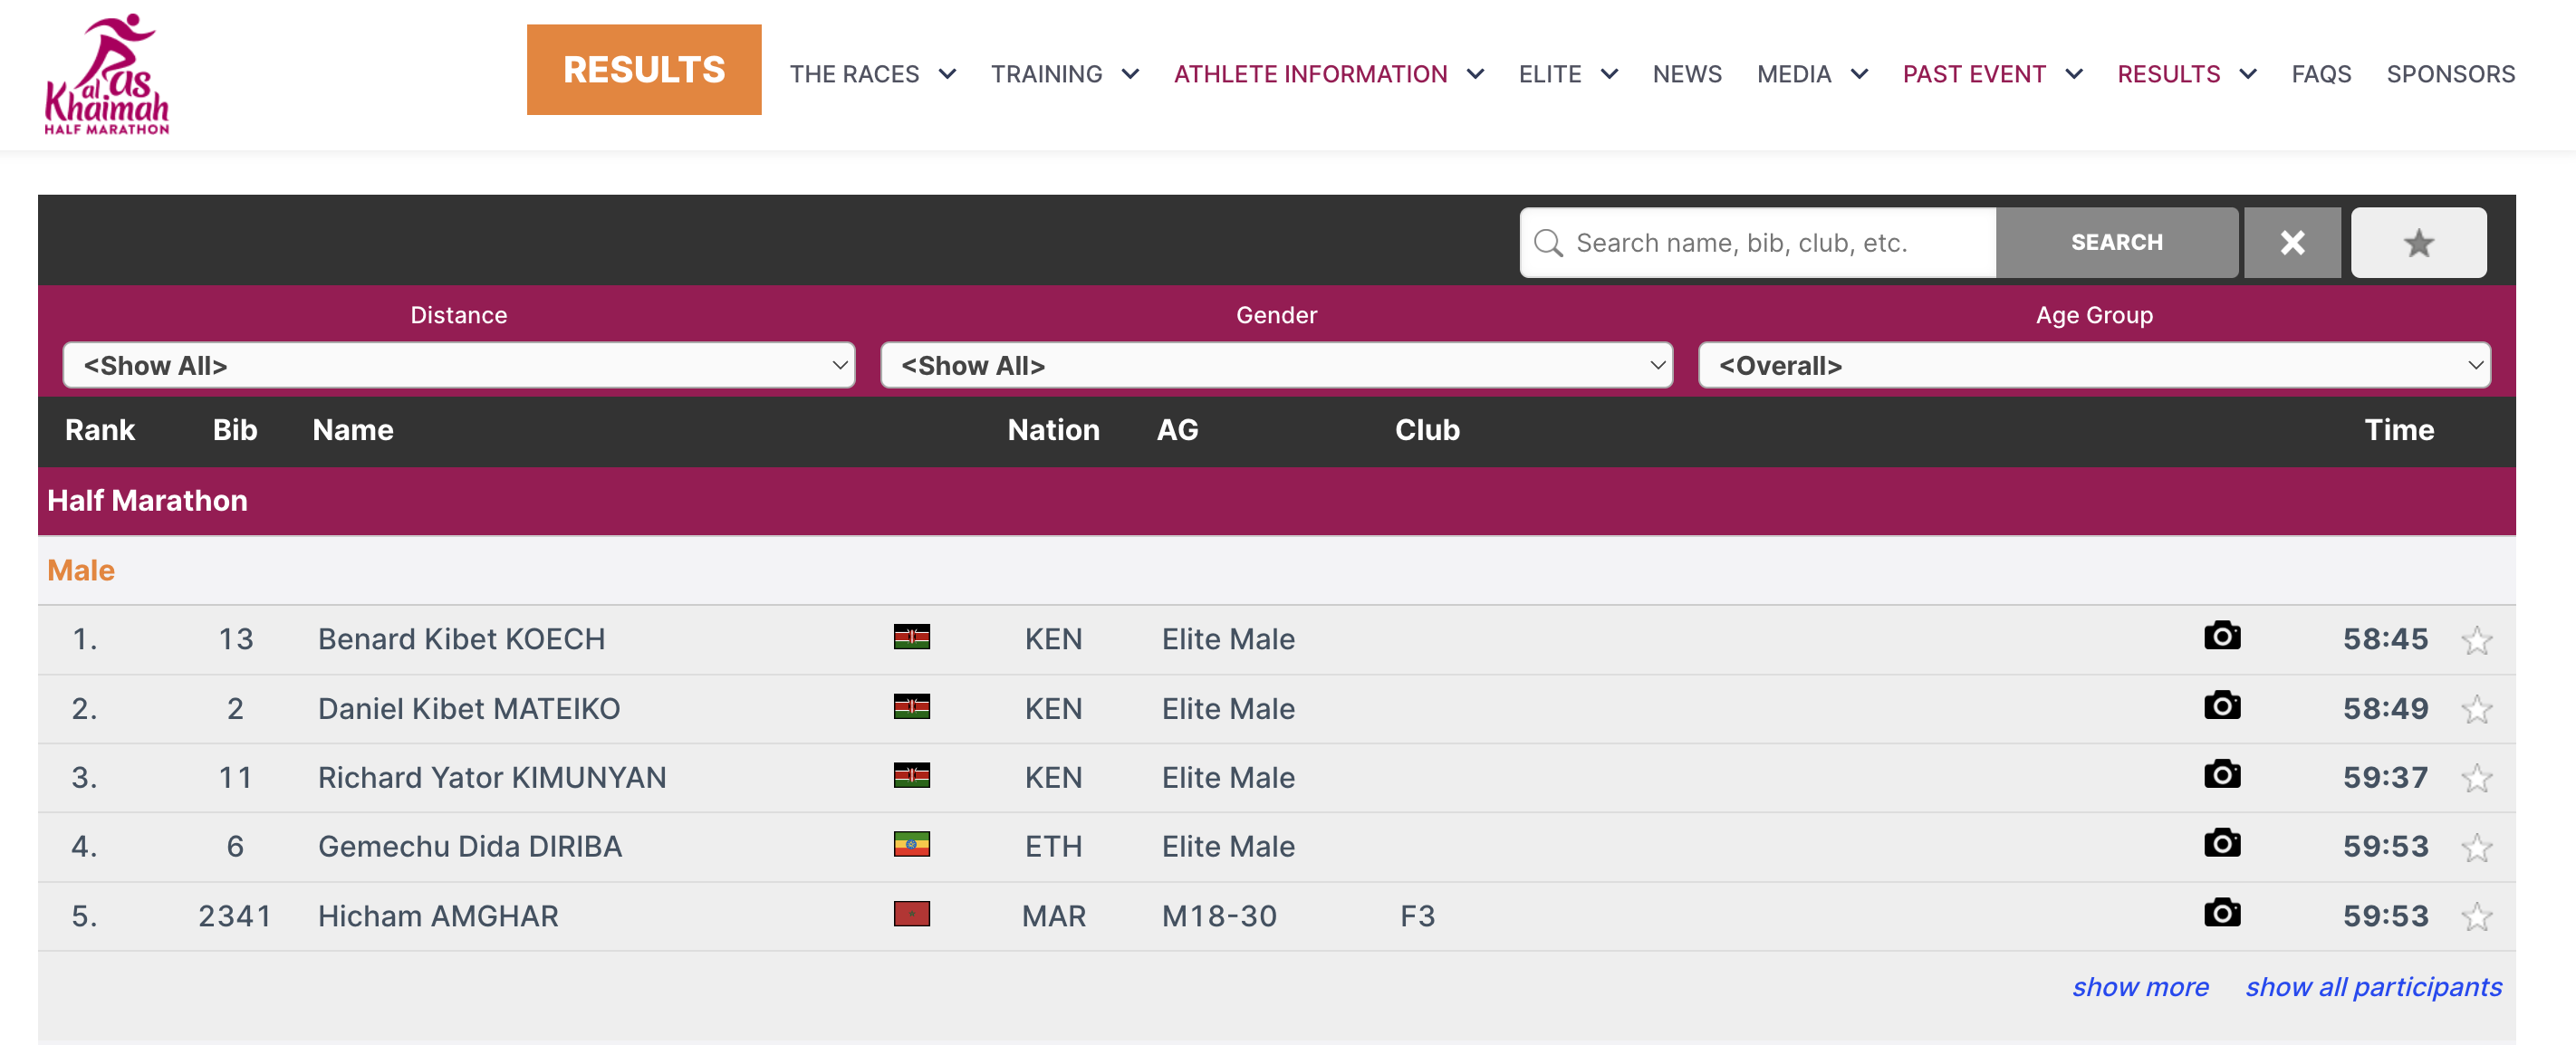
Las páginas de Participantes, En Vivo y Resultados permiten publicar listas en my.raceresult.com. Cada página está diseñada para facilitar que los espectadores encuentren lo que necesitan.
El uso general de cada caso para cada pagina es:
- Participantes - Destinado para las listas de salida/información antes de la carrera.
- En Vivo - Diseñado para resultados En Vivo DURANTE la carrera, para mostrar tablas de posiciones, etc.
- Resultados - Diseñado para listas completas de resultados después de una carrera.
Configuración
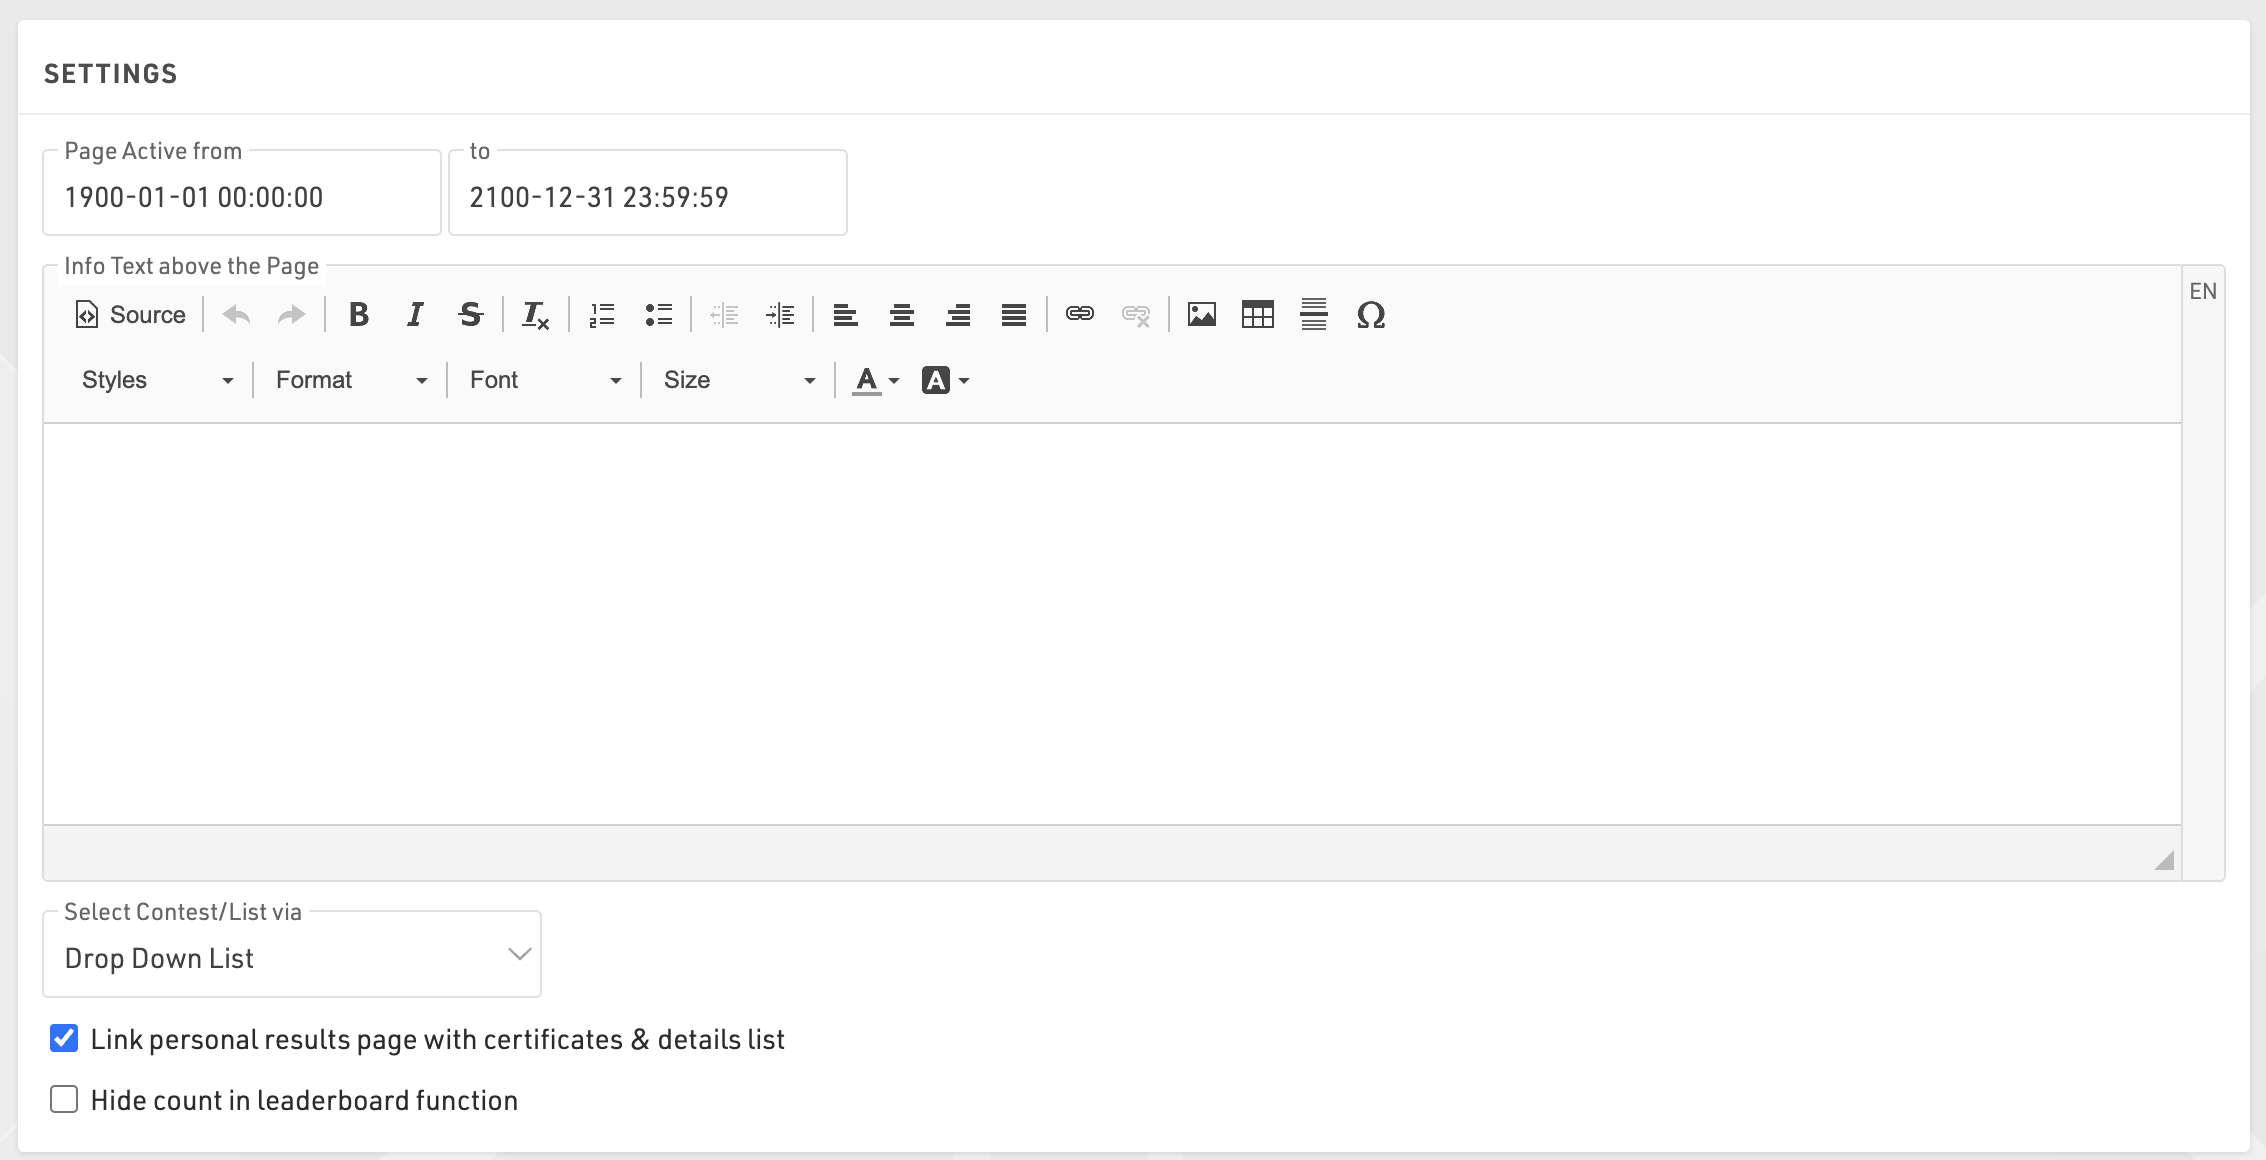
Cada página puede configurarse para activarse únicamente desde o hasta una fecha/hora específica. Fuera de ese período, las páginas permanecerán deshabilitadas y no podrán abrirse directamente desde my.raceresult.com.
El texto informativo se mostrará encima de tus listas y puede contener contenido adicional en HTML.
Las listas pueden mostrarse o seleccionarse mediante un menú desplegable o cajas de selección. Las dos opciones se explican en el artículo que aparece más abajo.
Activar la opción "Enlazar página de resultados personales" permitirá que se abra una ventana emergente al hacer clic en un participante dentro de una lista. Esta ventana emergente contiene la lista de detalles del participante y detalles adicionales configurados en los ajustes de Certificados / Detalles.
Al utilizar la función de clasificación (Leaderboard) para una lista, se mostrará una opción “Mostrar X participantes”, donde X representa el número total de participantes dentro del grupo. Si se oculta esta opción, X será reemplazado por “todos”.

Publicar Listas
Puedes publicar múltiples listas a través de my.raceresult.com, sin embargo, en la mayoría de los casos se recomienda publicar una única lista que contenga toda la información necesaria, ya que esto simplifica la experiencia del usuario.
Cuando se publican varias listas, el usuario podrá seleccionar la lista mediante menús desplegables o cajas de selección, según la configuración de la página principal. El nombre de la lista puede adaptarse utilizando una etiqueta opcional.

Las listas pueden activarse o desactivarse individualmente, lo que permite ocultarlas hasta que se necesiten. Al hacer clic en el enlace para abrir una lista, se abrirá la página directamente con esa lista visible. Esto funcionará incluso si la lista o la página no están activas según las fechas de publicación, lo que permite previsualizar una lista antes de publicarla.
Puedes aplicar filtros de Competencia (Contest) a las listas. Si tienes múltiples opciones seleccionadas para las competencias, los filtros o el selector de cajas incluirán también las opciones de competencia antes de mostrar la lista.
Si la previsualización de una lista está deshabilitada, al seleccionar dicha lista se abrirá automáticamente un archivo PDF de la misma. De manera similar, si el PDF está habilitado, se mostrará un enlace en la parte superior que permitirá a los usuarios abrir la lista en formato PDF.
La función de Leaderboard (clasificación) para las listas reducirá cada grupo dentro de la lista al número correspondiente de registros. Se mostrarán botones debajo de cada grupo para ver más o ver todos los registros.

Cuando la opción de actualización en vivo está habilitada, las listas se actualizarán automáticamente en tiempo real, lo cual es especialmente útil para las clasificaciones en vivo (live leaderboards). Ten en cuenta que esta función solo estará activa dentro del rango de fechas del evento, según la configuración de Configuración Básica.
Cuando la opción Ordenable (Sortable) está habilitada, los usuarios podrán ordenar cada columna en orden ascendente o descendente haciendo clic en los encabezados de las columnas.
Reviews
Visitors can leave comments in two places on my.raceresult.com:
- On the Reviews tab they can leave longer texts and rate the event with a 5-star-system.
- Comments can be left for specific participants in the participant details window. If there are comments for a participant then the comment icon on the left side of the Output list will be solid.


Comments and Reviews can be disabled if you choose, and you can also moderate comments through the Reviews settings page too.

Note that new comments are checked on a daily basis by RACE RESULT and comments deemed improper will be removed.
Contact
Specific Contact Details for the race organizer, timer or payment processor can be listed in the Contact page, it is strongly advised to update these to ensure participants know who to contact for any queries - otherwise some may contact RACE RESULT who are unable to answer event specific queries.
The page also shows a Contact form through which participants can submit Inquiries or report missing/incorrect data, this can optionally be disabled if not wanted.
Certificates / Details
As part of the personal results page under Participants / Live / Results pages you can additionally show a customised header for each participant and publish certificate sets.
Header Area
The Header Line shoudl be written as an Expression and can contain text and fields. This is displayed at the top of the popup window and is always shown even when scrolling.
Header Text allows you to enter custom text or HTML to be displayed as a header, this is displayed above the Splits details or any published details list.

Start/Splits/Finish
The Splits settings are consistent across all published lists when enabled, see Detailed Results.
Publish Certificates

Select which certificate sets should be published and for which contests, individual sets can be enabled or disabled as required, or a general active date range can also be defined.
By default a preview of the certificate is shown as visible in the designer, you can alternatively upload a custom image preview to be shown instead. Similarly the name of the certificate set will be shown or a custom label can be defined.
Links

In the popup window, you can also publish personal links to other websites which you can define here. Customize the URL by using an expression to forward participants to a custom landing page, such as their personal race photos or videos.
Photos
You can link directly to an individual participant's event photos with one of the below-listed integrations. Select the platform to link to, enter the platform's Event ID, and it will show samples of the first 5 photos for that participant which also link to a unique gallery for that participant. If matching is done on an alpha-numeric bib number you can match this using the optional field.
Available Photo Integrations
Handle Inquiries
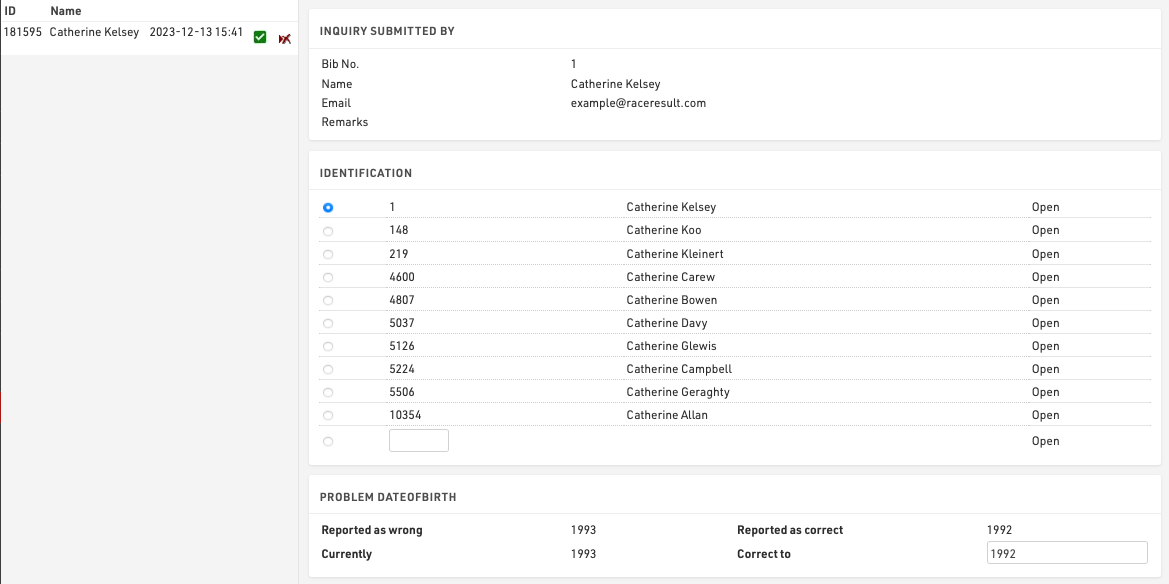
Athlete can file inquiries by filling out the inquiry form on the Contact page of an event on my.raceresult.com]. It serves to standardize communication between participant and race director/timer.

On the left side you can see all the inquiries which were submitted for this event. By clicking on an entry in the list the inquiry is shown on the right side. By clicking on the delete-icon in the list you can remove the inquiry completely or mark it as 'done' (in case you have already responded to it by email or phone).
There are five steps to handle an inquiry.
- Determine which participant sent the inquiry. Under Identification you can find some suggestions.
- The reported problems are displayed. Determine how to correct these.
- Optionally choose to send a response email and fill up the text.
- Optionally enter some notes (for internal reference)
- Click on Correct to finish editing, correct the problem and send the response email.
