The settings primarily control how raw timing data should be handled by RACE RESULT 14.
Timing Points - Each raw data record should be assigned to a timing point which identifies where it was recorded, for example the START, FINISH or your Split Timing Points on course.
Chip File - A chip file helps to identify to which participant a raw data record should be assigned.
Start Times / Finish Time Limits - The official start time (T0) to be used for timing the race, this is used by your Splits or Special Results setup to calculate race times. Optionally, a maximum time can be set.
Exporters / Forwarding - Trigger the sending of e-mails / SMS or to export/forward data to third party platforms if required.
Timing Points
A Timing Point is a location where one or more timing systems are placed. If you have a main and a backup line at a timing point, it is usually only one timing point unless you want to run statistics over the performance of main and backup.
Timing Points can be set up in Main Window->Timing Points.
Learn more about these settings in the sub-sections.
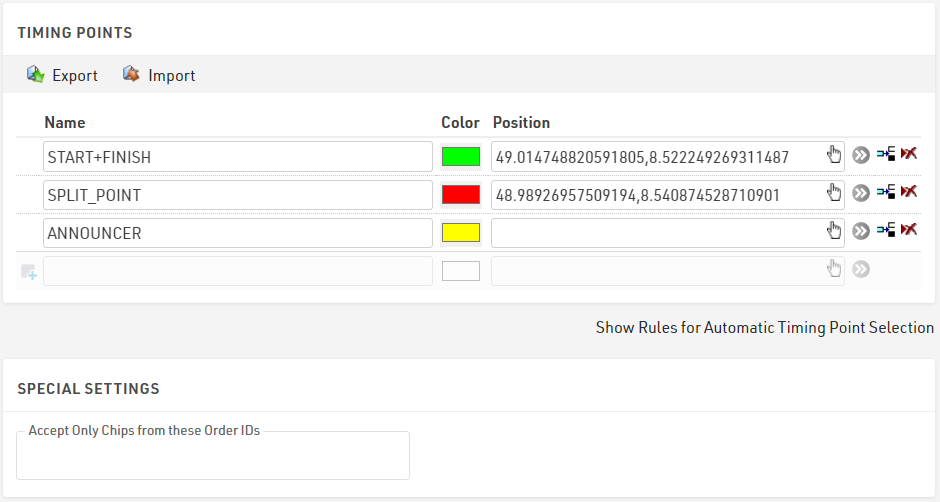
Timing Point Settings
Set the following parameters for a timing point:
Name
Convention is to write these in UPPER CASE. The name should describe precisely what the timing point measures. It can be START, FINISH, START+FINISH, ANNOUNCER or 10K SPLIT. Sometimes, one timing point has different functions for different contests. Maybe you want to name it "M_10K HM_15K" if it is the 10K split for the marathon and the 15K split for the half marathon. It may also be "10K+30K" if it is a turning point course and the timing point will be passed after 10 and 30 kilometers.
Color
You can assign a color for each timing point, raw timing records will be highlighted accordingly where listed.
Position
You can select a GPS position of that timing point. This is helpful later on to validate that the timing system is set up where it is supposed to be and is also used for some Tracking Visualisation platforms.
Extended Settings (Timing Point Details)
Subtract Start Time (T0) - The global setting (as part of Special Results) can be overridden. If needed, this can be set differently for individual timing points.
Ignore Pre-Start Detections - The global setting (as part of Special Results) can be overridden. If needed, this can be set differently for individual timing points.
Automatic Timing Point Selection
Automatic Timing Point Selection can be configured in Timing ⇒ Settings ⇒ Timing Points. It is especially important when working with Loop Boxes: Detections from different timing points (Loop Boxes) will be received through one timing system. That means you have to assign different timing points for different detections from one timing system.
On an event with several splits using the active system, we also recommend to use a unique channel and loop ID combination for each timing point, and to use the automatic timing point selection rules. This way, if a detection is stored on the transponder instead of being transmitted to the timing system on one split, it will be entered in the right timing point when the chip reaches the next timing system.
No matter which Timing Point is selected for a timing system, if one of the Automatic Timing Point Selection rules applies, then that Timing Point will be used. In most cases, you need to select only the Timing Point and the Loop ID.
If you choose to use the device ID as criteria, remember to include the letter prefix, for example D-4898 for a decoder, or T-20255 for a Track Box.

Special Settings
Accept Only Chips from these Order IDs
All passive bib transponders (except A-Z Tags) are encoded with the Order ID during production, this can also be seen in the raw data record in RACE RESULT 14. Sometimes you may want to prevent old chips from being used, to filter to only to relevant Order(s) simply enter the Order ID here, multiple Order IDs can be entered separated by commas. This will apply dynamically and unrecognised chip reads will be ignored for results.
Chip File
Depending on your setup and type of transponders used it may be necessary to assign transponders to participants to ensure timing data is assigned to the correct participant.
By default, when using Passive RACE RESULT Transponders where the bib number is equal to chip number then it is not necessary to use a chip file or any transponder assignment. In most cases, when working with passive transponders the chip number (or chip code) is the same as bib number and so times are automatically allocated.
When working with reusable transponders such as the RACE RESULT HuTag or the Active Transponders, or when chip number is NOT equal to the bib number then you will need to use a chip file or alternative transponder assignment method.
A chip file can be entered or imported in Timing ⇒ Settings ⇒ Chip File. Simply enter chip code and bib number in the table, or import an Excel, TXT or CSV file with the corresponding Bib and Chip Code fields.
You can also search the chip file by Chip Code or Bib to look up specific participants.
If you are using passive transponders with a chip file and need to map a different chip and bib numbers then you should pay attention to the Chip File Settings.
You can also create a two-step mapping for transponders which may be pre-labelled but where chip label is not necessarily equal to bib number.
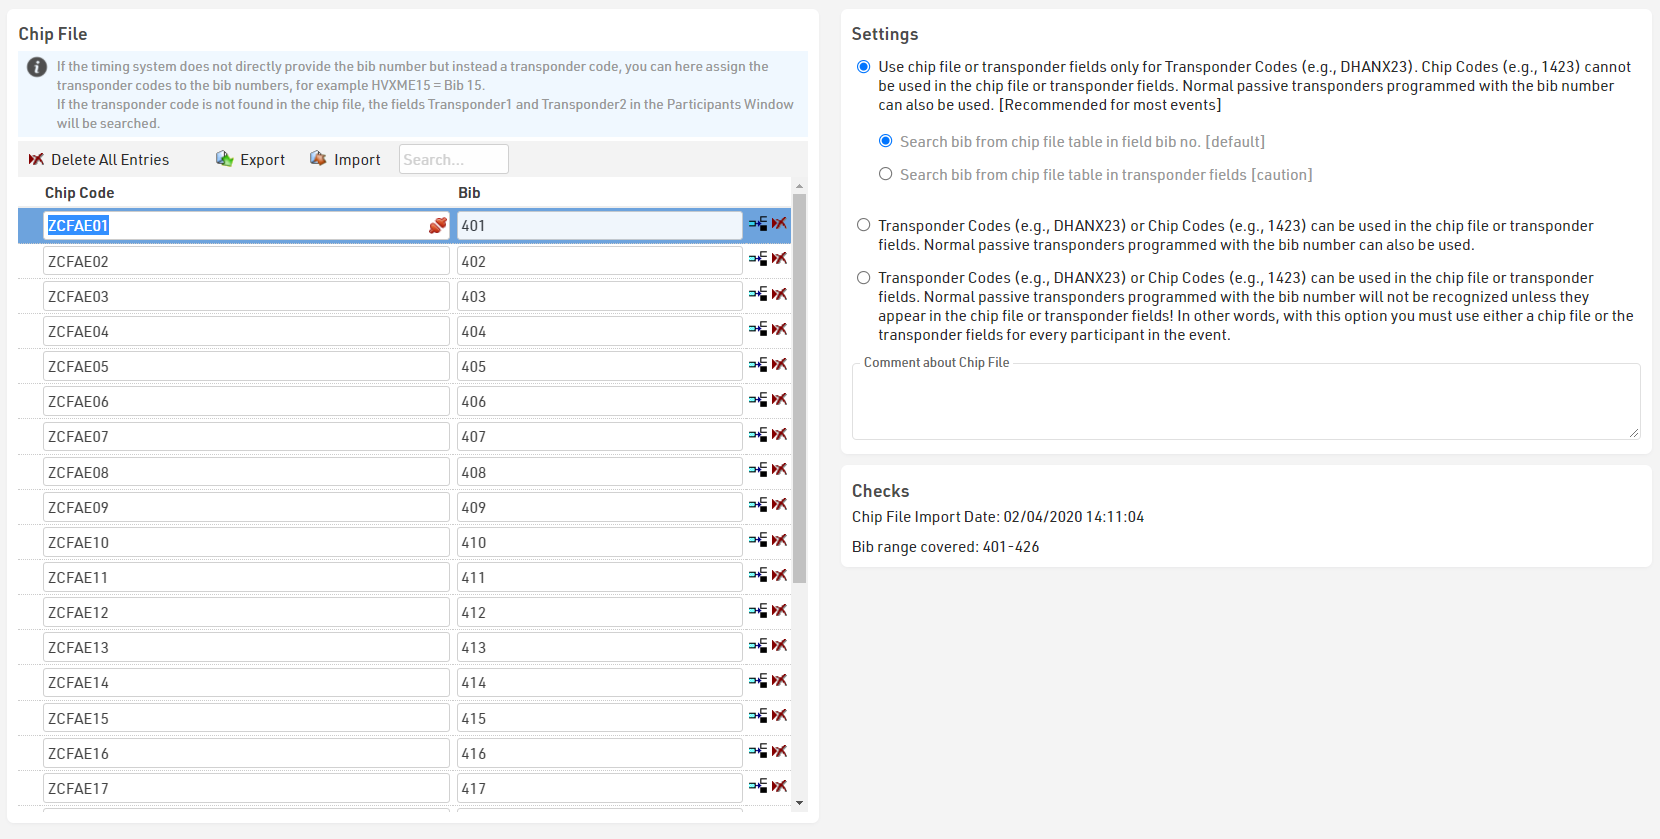
Chip File Settings
There are 3 options for Chip File settings which affect how the chip file or Transponder1 / Transponder 2 fields are used.
"Use chip file or transponder fields only for Transponder Codes (e.g., DHANX23). Chip Codes (e.g., 1423) cannot be used in the chip file or transponder fields. Normal passive transponders programmed with the bib number can also be used. [Recommended for most events]"
This is the most common option, it allows you to use Transponders with alpha-numeric codes (Active Transponders, HuTags, Reusable ShoeTags or A-Z Transponders) or assumes that if a numerical chip code is received then Chip Number = Bib Number.
Below this are 2 options for how transponder codes are then mapped to a participant.
"Search bib from chip file table in field bib no. [default]" - The bib number in the chip file table will be matched against the bib field of the participants.
Chip Code -> Bib Number
(for example: ZDXED44 -> 44)
Alternatively, you can create a two-step mapping using "Search bib from chip file table in transponder fields [caution]"
Chip Code -> Chip Number -> Bib Number
(for example: ZDXED44 -> 744 -> 44)
The chip ZDXED44 has a sticker with its chip number 744. ZDXED44 and 744 will be entered in the chip file table. In the participants Transponder 1 or Transponder 2 field the chip number should be entered. In the example above, bib number 44 has chip number 744.
The main advantage is that you can more easily assign chip numbers to participants. Instead of handling complex chip codes such as ZDXED44, you only need to enter 744.
"Transponder Codes (e.g., DHANX23) or Chip Codes (e.g. 1423) can be used in the chip file or transponder fields. Normal passive transponders programmed with the bib number can also be used."
In this mode you can use transponders with alpha-numeric codes, and can also map non-matching bib and chip codes. In this mode if a passive transponder with a chip number is scanned it is first checked against the chip file, and assigned to the corresponding bib, if there is no mapping for this chip to a bib then it is assumed that for this chip the Chip Number = Bib Number.
"Transponder Codes (e.g., DHANX23) or Chip Codes (e.g., 1423) can be used in the chip file or transponder fields. Normal passive transponders programmed with the bib number will not be recognized unless they appear in the chip file or transponder fields! In other words, with this option you must use either a chip file or the transponder fields for every participant in the event."
In this mode you can use transponders with alpha-numeric codes, but if you use normal passive transponders then the chip code must be mapped to a bib number. Any chips which are not allocated in the chip file or transponder fields will be treated as unknown transponders.
Methods to Assign Transponders
There are three options to assign transponders to participants, the handling of all options is identical and multiple methods may be used simultaneously.
Chip File
The chip file is the simplest way to assign transponders when you have a known, pre-allocated transponder for each bib.
Transponder1 / Transponder2 Fields
The default transponder fields can be enabled in the Participant Data default fields. When enabled these fields will then be displayed in the participants window.
Values for these fields may be imported with your participant data or may be assigned using a check-in kiosk for example.
Additional Fields - Transponder Type
If you require multiple transponder assignments for participants you can create any number of Additional Fields with the type Transponder.
Values for these fields may be imported with your participant data or may be assigned using a check-in kiosk for example.
Start Times (T0) / Finish Time Limit
Start Time (T0)
The Start Time (T0) is a special result which is relied upon by several other parts of the timing setup. Start Times will be defined in Timing ⇒ Settings ⇒ Start Times/Finish Time Limit either per contest, per bib range or based on any other field (Wave Start) and then automatically calculated for each participant.
Start Times are very important, because normally we want to ignore any detections before the start. Splits will only be calculated for times which occur after the Start Time, unless using a rule which overrides this, and when working with results the Start Time can be subtracted from the Time of Day for a simpler setup.
Finish Time Limits
Finish Time Limits on the other hand are used to define a time limit for an event, and how times should be handled after this time limit. They can also be defined either per contest, bib range or based on any other field / expression which is usually the same as your Start Times.
There are three options on how to handle Finish Time Limits, as different types of event may have different rules / requirements.
- Ignore chip reads after finish time limit
- Accept one last chip read after finish time limit
- Accept chip reads after finish time limit
For example - in some cycling events, the option Allow one last detection is important: before the winner arrives at the finish, the finish time limit is set to the current time and everyone can complete the current lap.
Setting Start Times / Finish Time Limits
Start Times and Finish Time Limits must be set according to the same reference as your timing system is running, if you are using GPS Time / Time of Day then these times should also be entered as a Time of Day. These values can also be updated at a later point in time and all results or calculations which rely on these values will automatically be updated.
If a timing system is connected to your event file, you will see the time running in the top right corner. You can then click the Set Start Time / Set Time button to save the current time for the corresponding Start Time or Finish Time Limit. Otherwise, the top right corner will show No Decoder Time Available and you can enter the start time manually.
For Start Times, if two or more contests start at the same time, you can select them using the checkbox on the left and then click the Set Start Time link at the bottom of the box to start all checked contests at the same time.
It may happen once in a while that you accidentally overwrite a start time. By clicking the Show History link in the top right hand corner of the box, you can still find the old value.
Markers
Markers/Impulses are timestamps from the timing system that are created for example by pressing a button or through an impulse device such as a photo cell. These are most commonly used to capture an accurate T0 synced to the decoder time, but can have other applications in timing.
The timestamps are saved according to the assigned Timing Point along with all other chip reads, the list of markers stored in the event file is shown below the Finish Time Limits.
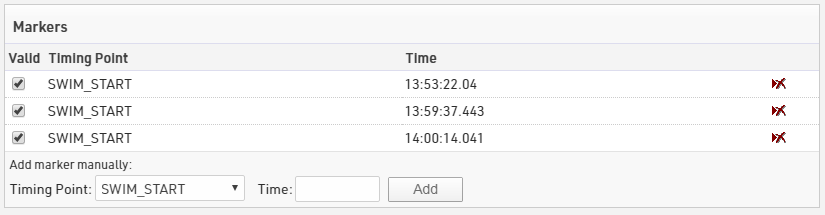
Markers are stored with the same Bib number as the Marker number set on the decoder, you should ensure that you use a marker number which does not appear in your bib number range.
Markers can also be created manually using the input below by selecting the timing point and entering the time.
Exporters / Forwarding
Exporters can be used to trigger the sending of data to external sources, this can be used to either send E-mail / SMS templates or export timing data to other systems such as third party timing software, tracking partners, LED clocks and more.
Exporters include some built-in functionality for specific partners but it is designed to be fully flexible to support a wide range of uses.
The exporter runs on both online and offline versions of RACE RESULT 14, if you are working online and you are exporting to a local destination (e.g. local network IP address, Serial or File) then ensure to start the RACE RESULT Web Server on your computer.
Settings
Exporters
When started an exporter will automatically send the corresponding data when a valid trigger is received, multiple exporters can be setup and run simultaneously. Exporters are sent for individual participants and so the trigger, filter and data always refer to the individual participant record.
|
Name |
A name for the exporter |
| Timing Point/Split |
The trigger for the exporter. Timing Point - when a raw data record is received for the selected timing point Split - whenever that split is calculated (including subsequent re-calculations for any reason) All - whenever any raw data record is received or any split calculated |
| Filter | A filter to be applied, this can also use the Raw Data Fields |
| Destination | The export type and additional settings according to the type |
| Export Data | Which data should be sent, either a default format or any custom expression |
| Line End | The line ending to be appended to each record sent |
The additional Extended Settings control the flow of data.

If you wish to write a custom output data format using the raw data then you can use the Raw Data Fields, additionally any standard fields / functions can be used in the custom export data.
If using FILE export then the file name should be the full destination address and file type for example: C:\Users\Timer\Documents\Export.csv
Tracking
Tracking forwarding is supported for a number of specific third-party platforms, these work similarly to exporters but forward the data in a pre-specified format according to the platform.

Some platforms additionally require a customer ID to process data.
Sending E-mail / SMS
Exporters can be setup to send E-mail / SMS templates, for example sending finisher e-mails or SMS when a participant finishes. This functionality has replaced that of the Instant Push tool.
E-mail and SMS exporters can be triggered by either a Timing Point or a Split. When a time is received or calculated for the selected Timing Point or Split then the exporter will be triggered (if the filter is also valid).
When sending E-mails / SMS via exporters the default filter for the template will be pre-loaded into the exporter filter and the Set Checkbox Field will be set when the template is sent.
Setup
Setting up an Exporter to send an E-mail / SMS template requires a name for the Exporter, a selected Timing Point or Split and the template to be sent. Optionally a filter can be applied which must also be true for the participant in order to send.

Once created the Exporter will be shown in the Chip Timing and Systems tabs where the exporter can be started, paused or stopped. When starting an exporter which is sending an SMS template you will be required to enter the username and password for your account as the sending of SMS will automatically deduct the credits from your account.

When running Exporters can also be replayed, so this can be started even after the first data to be sent or replayed if an issue prevents messages from being sent. Exporters also observe the setting for Keep Timing Active, meaning that for long-running events they can be started and will remain running until the end of the event.
Filters
Particularly when using a Timing Point trigger for exporters you may wish to setup a filter to ensure the time which is received should really trigger the sending of the data. For example if using the Finish Timing Point then you may wish to filter on [Finished].
For more complex filters you may wish to use the Raw Data Data Fields.
Raw Data Fields
You can create any combination of data for the destination according to your requirements. You can use any of the standard data fields from RACE RESULT 14 or the custom fields below which are related directly to the passing which triggered the exporter. Data fields should be enclosed in square brackets, to join data fields you should use '&', for example to join just Transponder and Time separated by a semi-colon you would enter - [RD_Transponder] & ";" & [RD_Time] .
- [RD_ID] - A Unique ID for that passing
- [RD_IDBib] - If using standard passive tags then this is the chip code of the tag.
- [RD_Transponder] - If using non-standard passive tags or active transponders then this will return the transponder code.
- [RD_Time] - The raw time of the passing in seconds. You can use the Time Format function to display this in the required format.
- [RD_OrderID] - The OrderID of the chip. (Passive Only)
- [RD_Hits] - The number of hits on the transponder for the passing. (Number of times the transponder was seen).
- [RD_RSSI] - The max RSSI (strength) of the signal received from the transponder.
- [RD_ChannelID] - The active Channel ID from the timing point (Active Only)
- [RD_LoopID] - The active Loop ID from the timing point. (Active Only)
- [RD_WakeupCounter] - The wake-up count from the transponder. (Active Only)
- [RD_Battery] - The battery voltage of the transponder. (Active Only)
- [RD_Temperature] - Internal temperature of the transponder. (Active Only)
- [RD_StatusFlags] - The status flag indicates if the passing was a stored passing on the transponder.
- [RD_TimingPoint] - The TimingPoint name in RACE RESULT 14.
- [RD_DecoderName] - The name of the decoder if it has been assigned.
- [RD_DecoderID] - The device ID
- [RD_Port] - The antenna port with max. RSSI during a passing (Passive Only)
- [RD_Latitude] / [RD_Longitude] - The coordinates of the detection, provided the device it comes from delivers GPS coordinates.
- [RD_IsMarker] - whether or not this passing is treated as a Marker
- [RD_FileNo] - indicates the file number from a Ubidium or decoder
- [RD_PassingNo] - the passing number as saved in a passings file
- [RD_Customer] - the customer ID to which the passing has been uploaded
- [RD_Received] - the timestamp with timezone when the passing has been received by RACE RESULT 14
- [RD_UTCTime] - the timestamp of the passing converted to UTC time
Markers return a transponder code of -1 regardless of the decoder settings.
Exporter Commands
For TCP/IP exporters you can additionally send commands to the TCP socket to control exporters remotely when connected.