Having gained first insights into RACE RESULT 14, we'll now show you how to create and configure your own event. First, go to the main menu in RACE RESULT 14 by clicking the logo in the top left corner.
How to create a new event
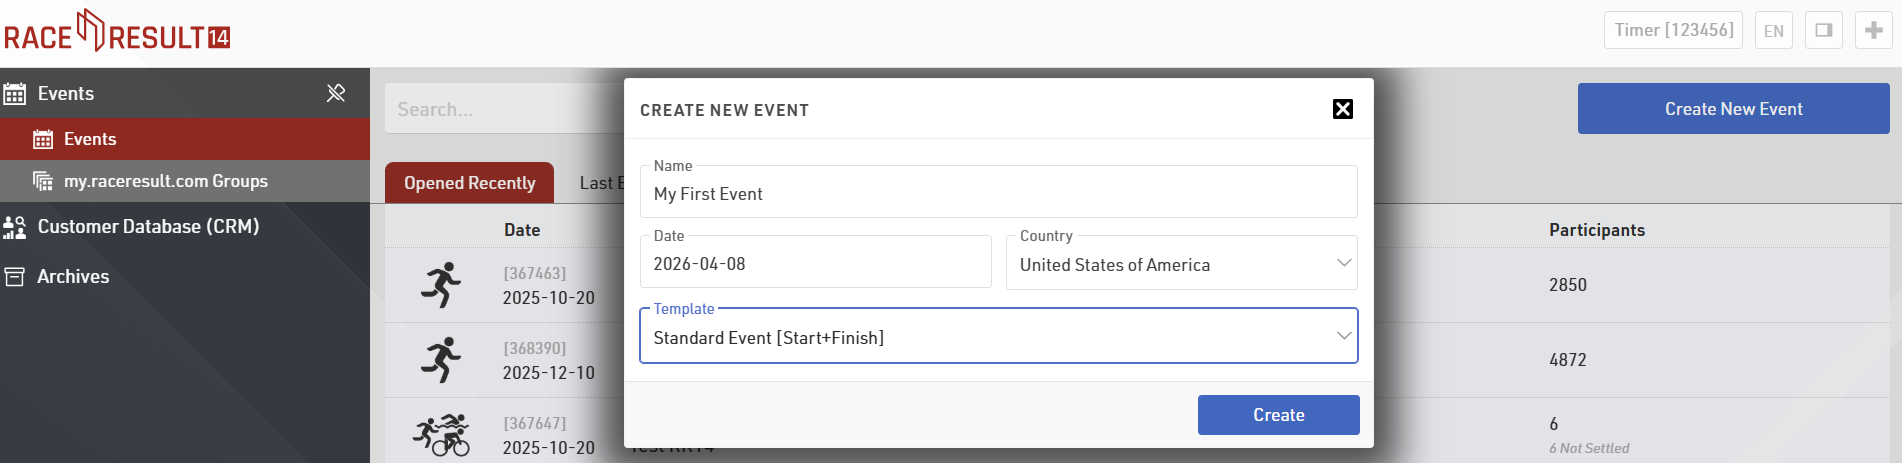
Click on Create New Event and enter your event name and the event date. Use the format “yyyy-mm-dd” (for example, use “2026-04-08” for an event on April 08, 2026). Optionally, you can also choose a pre-configured event type (e.g. a lap race) or create a copy of an existing event file:
How to configure events
Once again, you will be directed to the Dashboard Summary window. In the navigation bar on the left, you find the category Basic Settings, which specifies all options for your event.
Event
First, click on Basic Settings in order to set all general settings for your event:
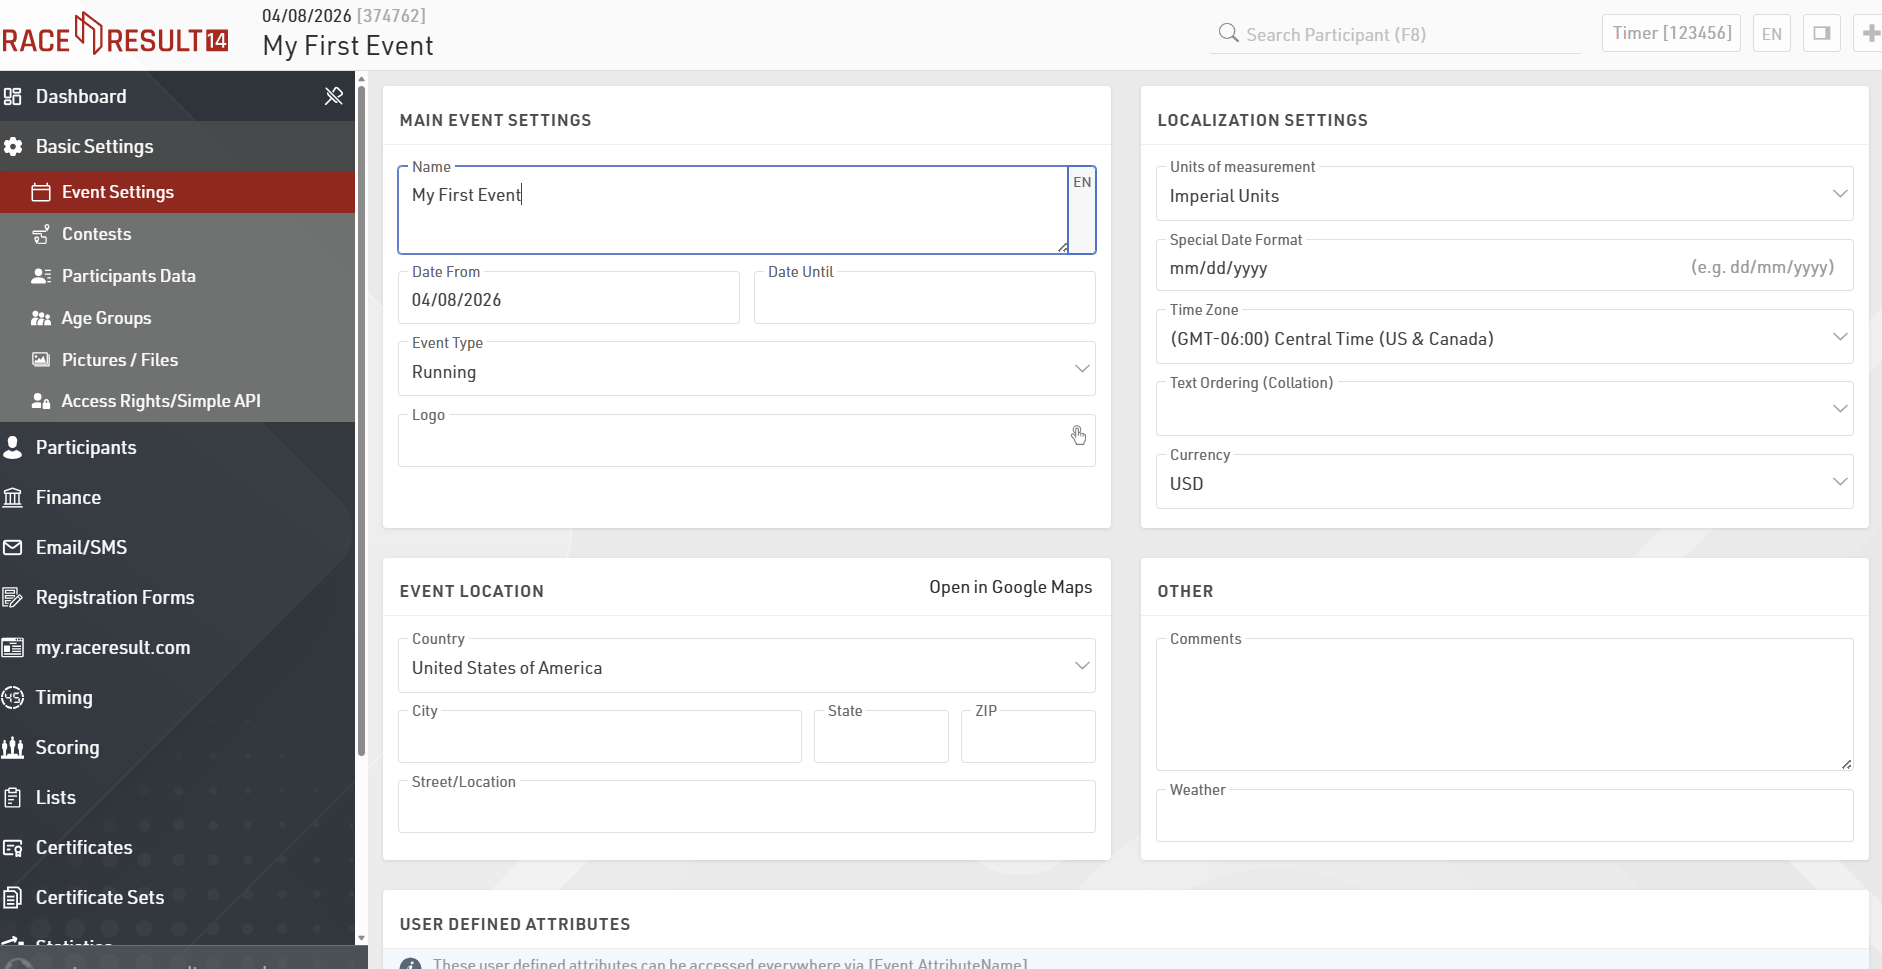
You can still change the name and date of your event. Also, specify the Event Type and where the event takes place (Zip, City, Street / Location). If your event is longer than a single day, you can also define a time period for your event. Other options in this area include inserting general comments and weather conditions.
Contests
Next, click on Contests where you can specify the individual contests/races included in your event. You may, for example, define a 5k, Half Marathon, and a Marathon. Two contests have been predefined and inserted by default. If you plan on offering more than two contests, you can add more by clicking on Create New Contest. You may also delete an unnecessary contest by clicking the tab for that contest and then clicking Delete.
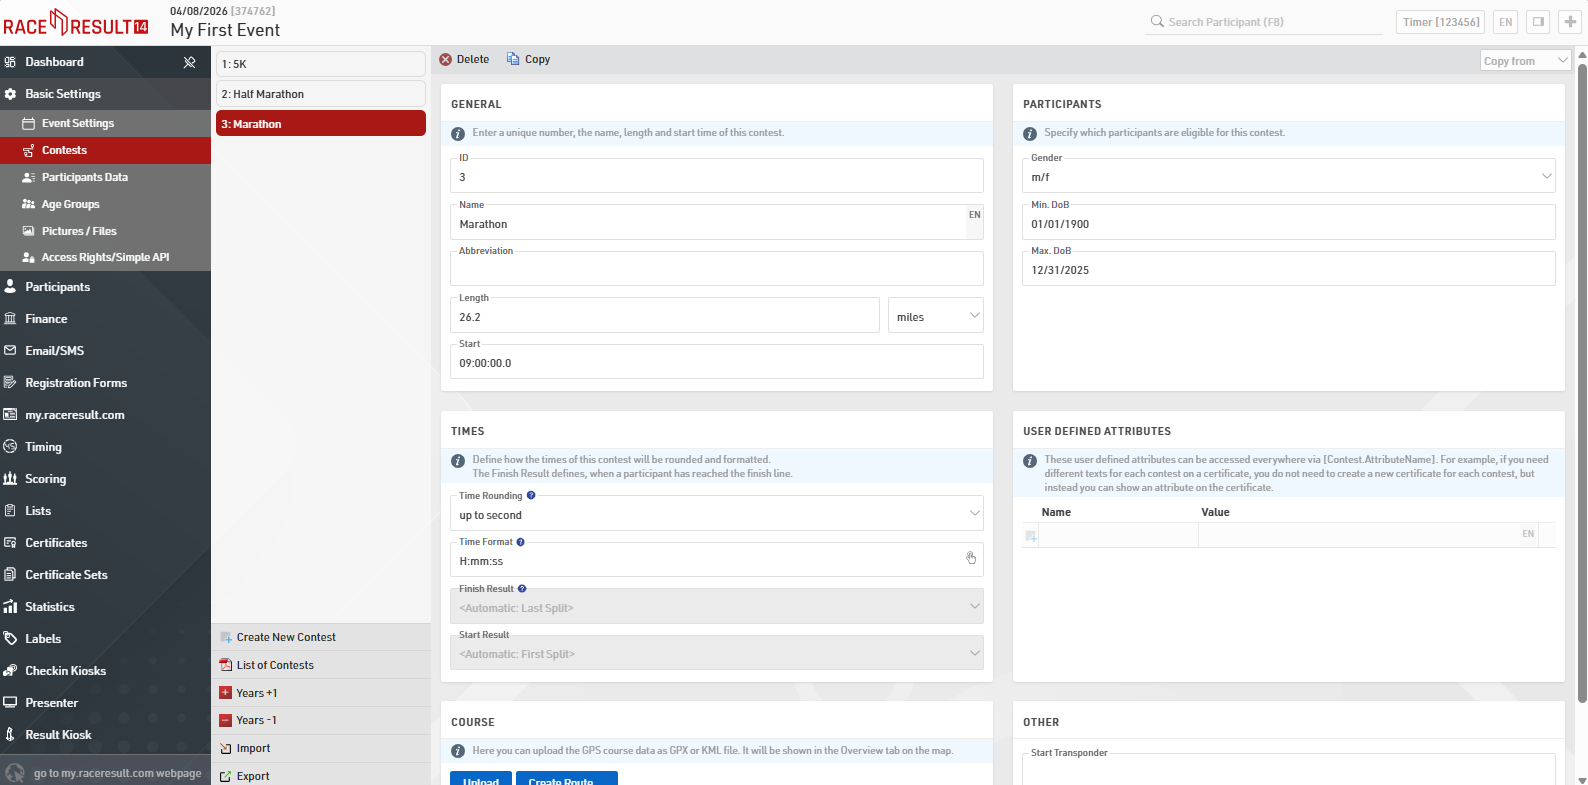
In the first section (General), you should specify the contest's identification number (ID), name, distance, and finally the start time. The Participants section on the right determines who is eligible. This part has, for instance, an effect on who is allowed to register for the event using the online registration on my.raceresult.com. If you add non-eligible participants manually, you will receive a warning.
Times defines how to deal with the race times of this contest, how to round and format individual times. Finish Result only needs to be modified if you require a special result setup or using a non-template setup.
If you want to view the race map in the overview window you can upload a gpx file or map it using the create route tool under Course.
Participant Configuration
The Participant Window contains a large number of input- and text fields. Most likely, you will not need all of them, but sometimes additional fields may be required. In Basic Settings->Participants Data you specify the input- and text fields which are displayed when adding and editing participants.
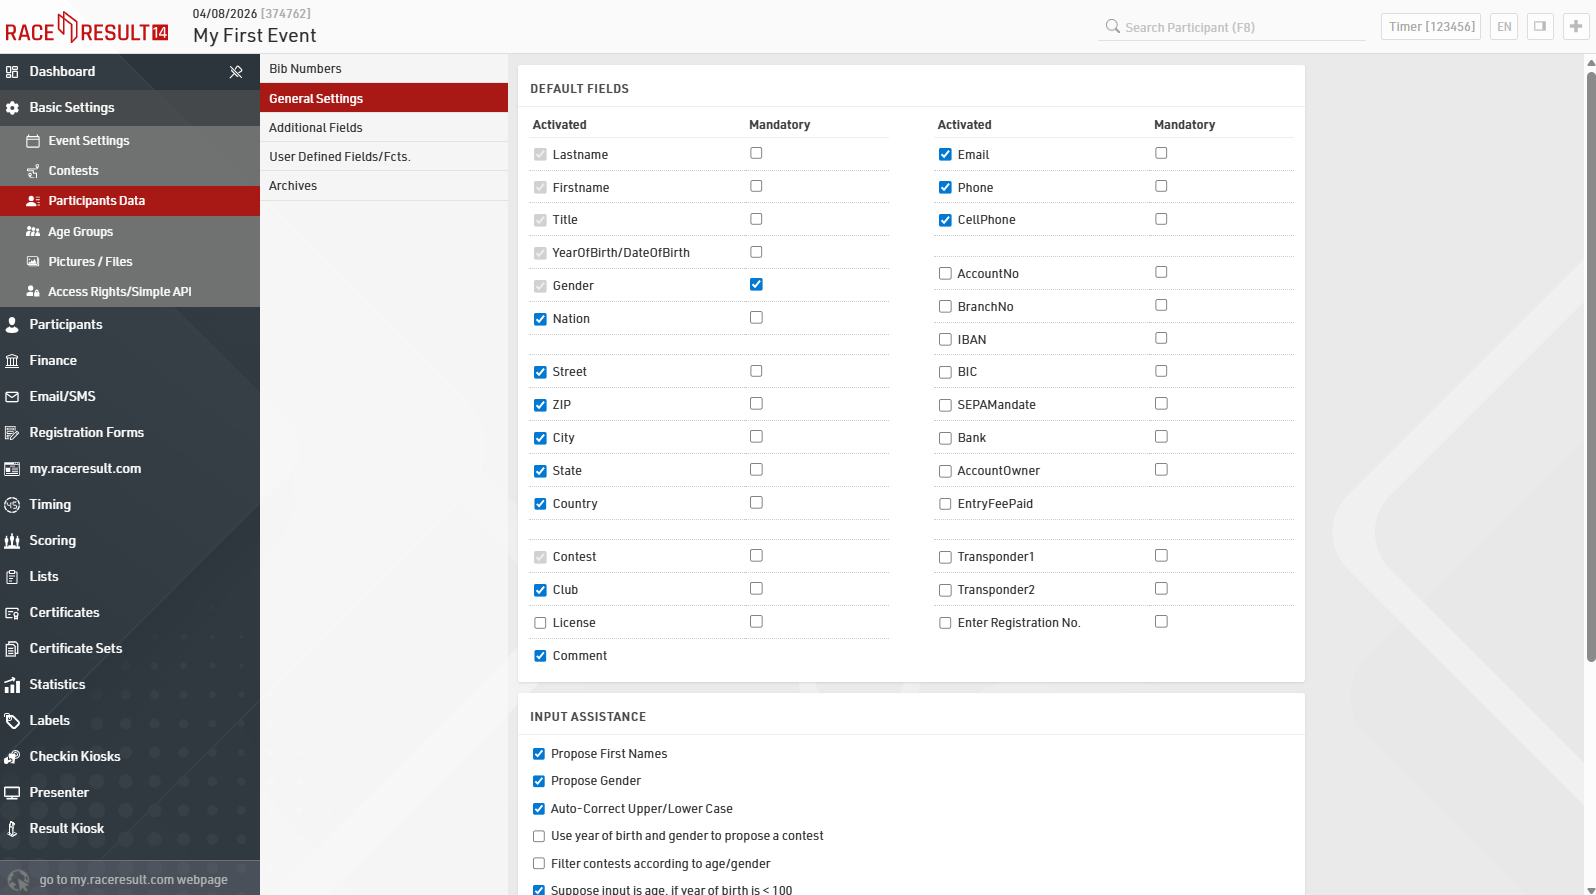
Default Fields shows the default fields that you can either activate or deactivate (e.g. Nationality, Street, etc.). In case you need additional input fields, you can create an unlimited number of Additional Fields. Chose from a number of different pre-defined field types to match your requirements best. Find out more on Additional Fields.
In the User Defined Fields/Fcts. you can write your own fields and functions, which may relate on other data and change dynamically. Learn more about User Defined Fields.
When opening the Participant Window, you will now find only those input and text fields tailored to your requirements.
Bib Ranges
The next section allows you to define certain bib ranges for each contest. You can even define several bib ranges for one contest, e.g. Half Marathon: 3000-4000 and 4500-6000.
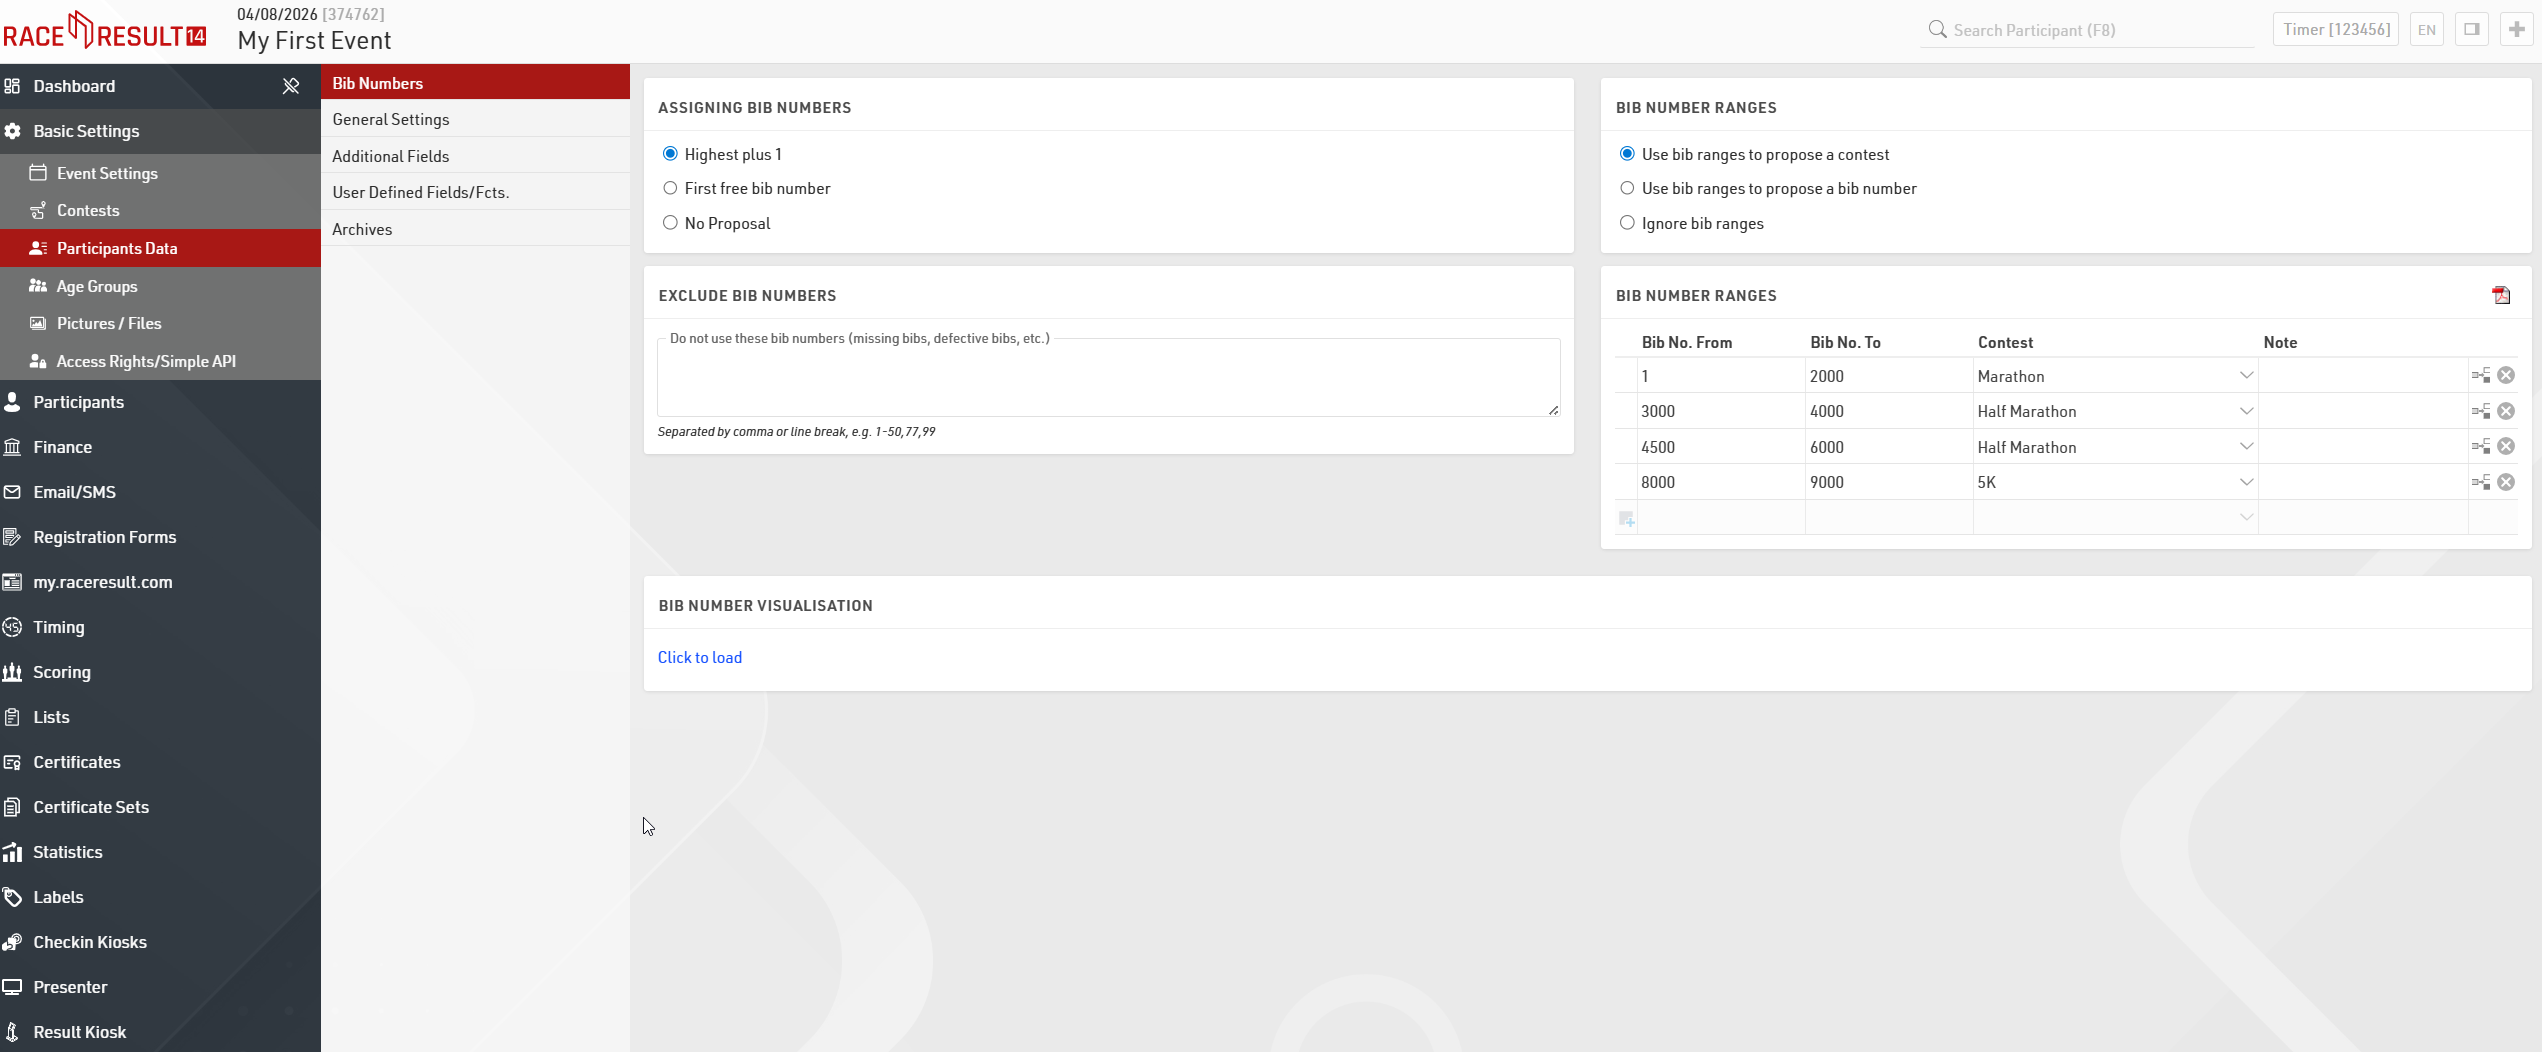
Defining bib ranges for each contest is optional, but having a clearer structure for your bib numbers can make adding participants much easier later on. You then have two options to deal with new entries based on bib ranges: Use bib ranges to propose a contest and Use bib ranges to propose a bib number. In the first case, the contest will be set automatically when entering the bib number for a new participant. This scenario is most suitable for late entries during the event. The latter case searches for an available bib number after choosing the contest the new participant will compete in. This option should be chosen during pre-registration before the event.
Under Bib Number Visualisation the software creates a table with all bib numbers available for each Contest according to the Bib Ranges setup.
Age Groups
In the Basic Settings menu, Age Groups defines all age categories / groups.
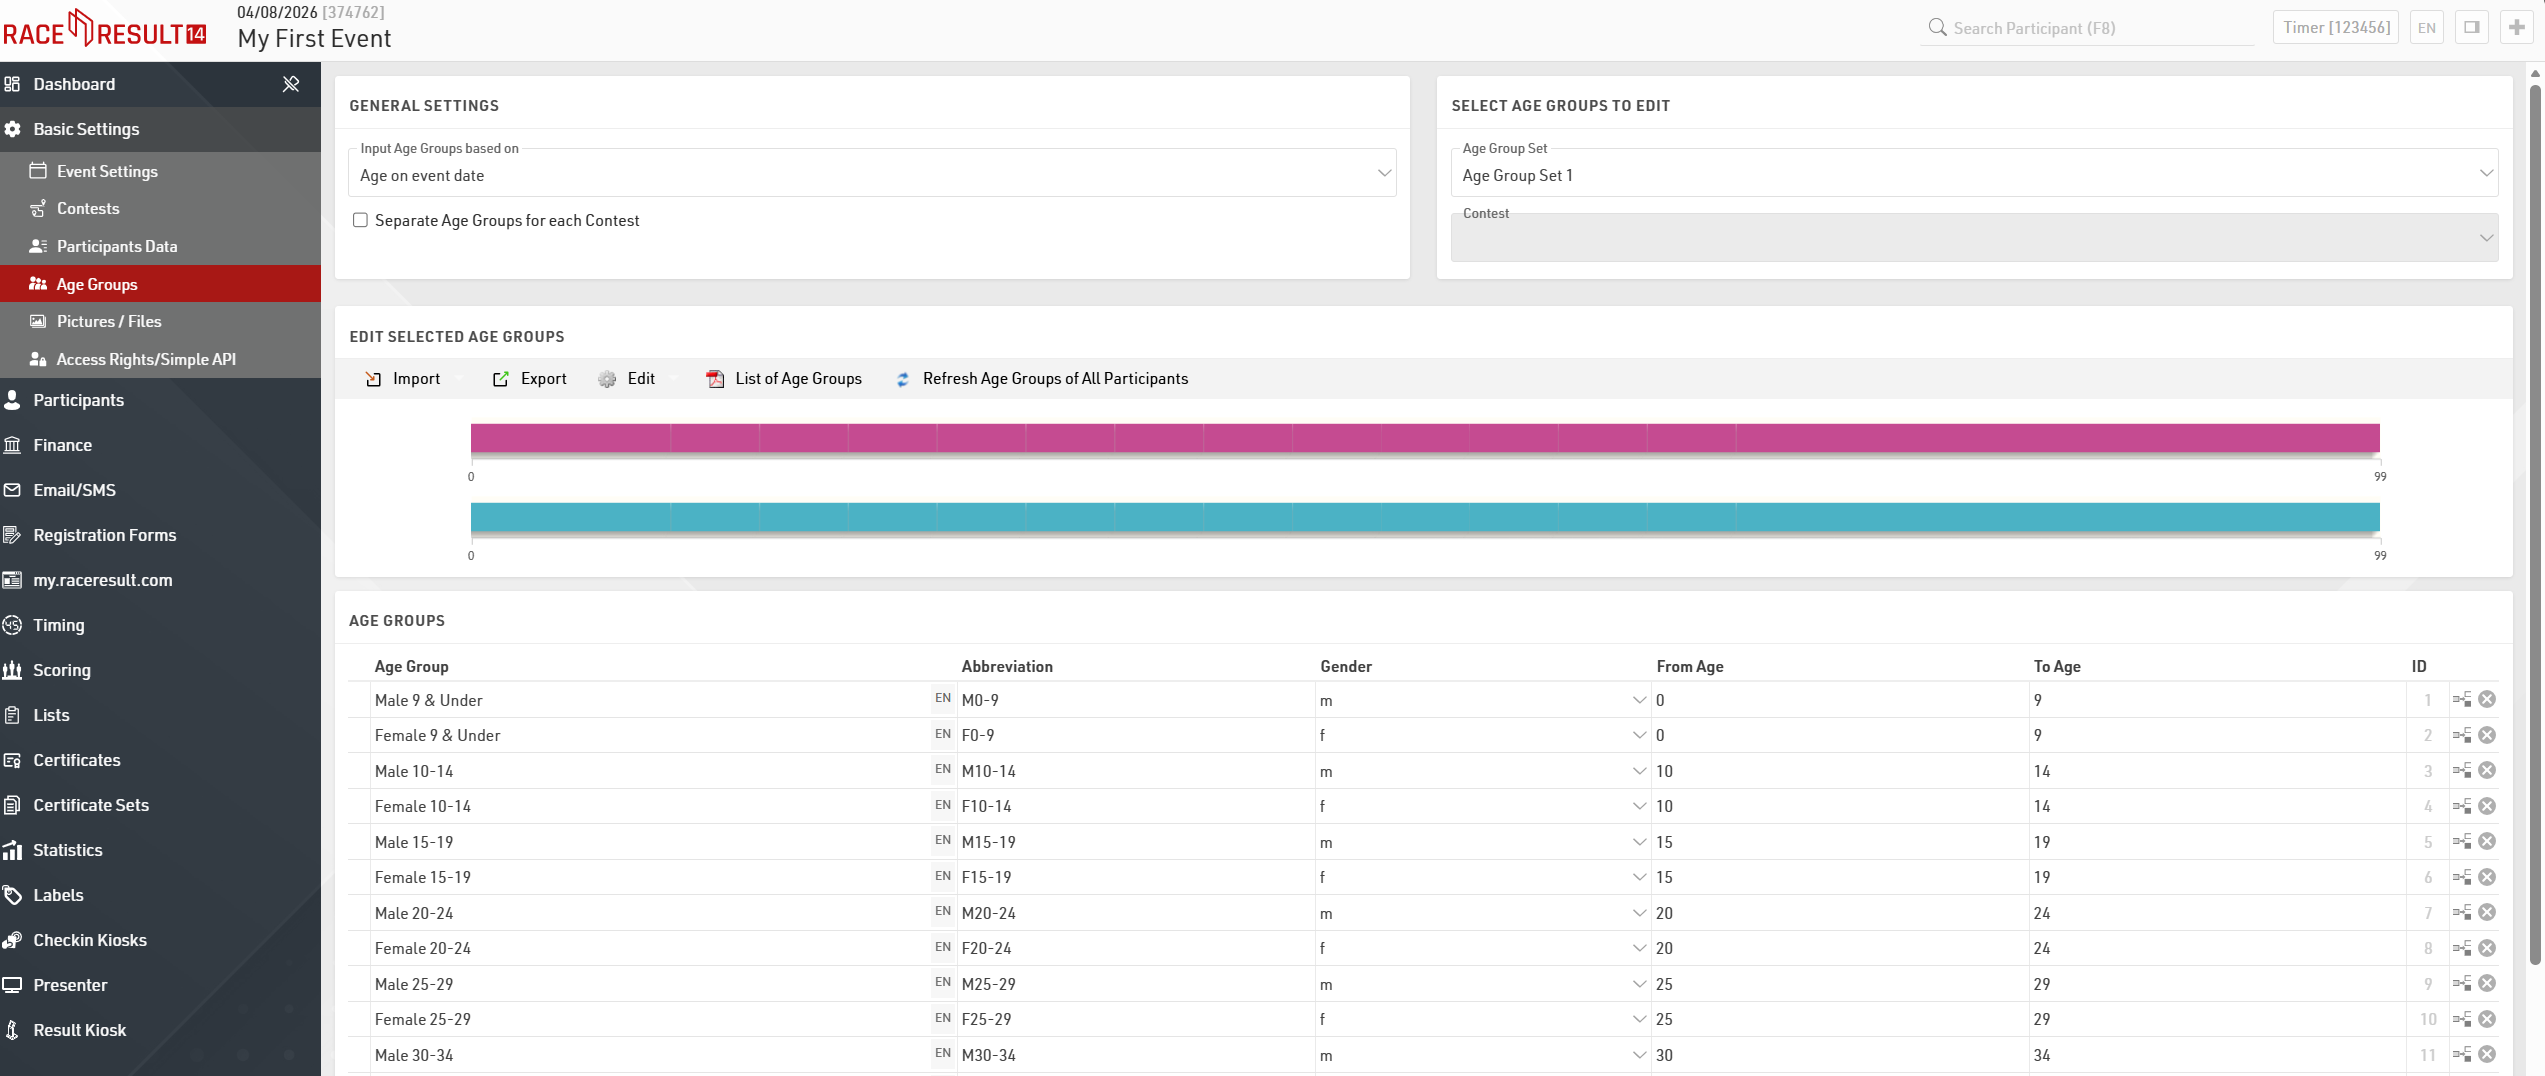
You will need to define on which criteria you will enter and with which age groups are set, this will usually depend on the type of event you are timing:
- Date of birth - Age groups are set by a defined date range.
- Age on event date - Participants' age on the day of the event set in the event Event Settings.
- Age on 12/31 (Previous Year) - Age on 31st December of the previous year based on the event date.
- Age on 12/31 (current year) - Age on 31st December of the current year based on the event date.
- Age on arbitrary date - Age on a specific date, to be defined below.
By default some age groups are already created, but you can always change the predefined categories and customize them to your specific needs. It is possible to define common age groups for all contests, or different age groups for each contest. For the latter activate the checkbox Separate Age Groups for each Contest.
In case you require two different age group scores for each participant, you can define a second Age Group Set. In order to enter the second Age Group Set, simply choose Age Group Set 2 from the drop down menu.
Entry Fees
Next, we'll look at settings for the entry fees, Finance → Entry Fees . Defining entry fees is important for payment during online registration. Additionally, you can print the entry fee on lists, labels, etc.
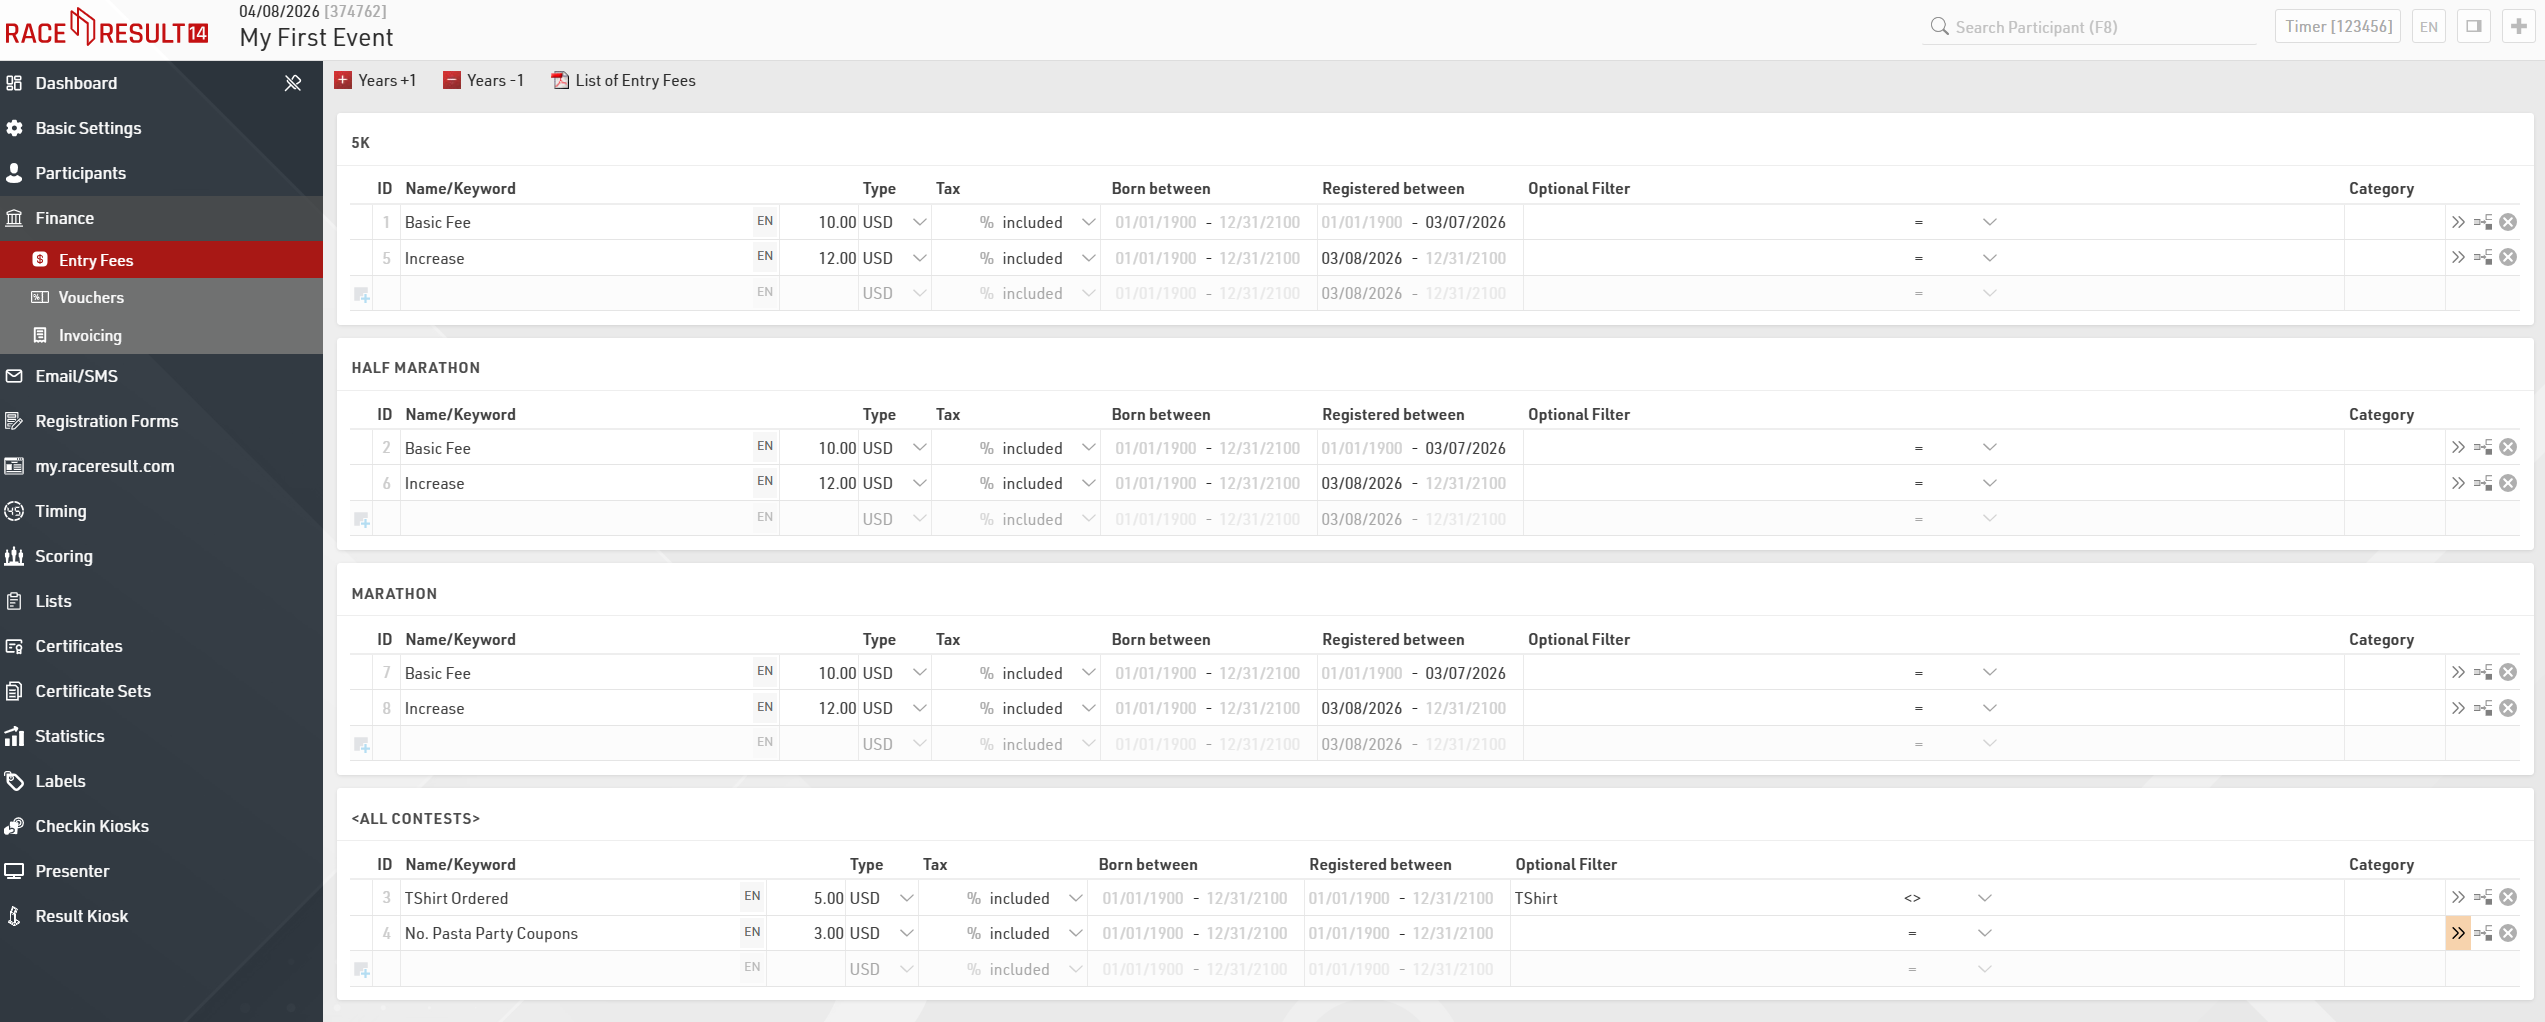
You can define a variety of fees for each contest, which can be charged either for all participants or only those who registered in a certain time period or those of a certain age or those fulling certain criteria (for example TShirt ordered). The total entry fee will be calculated by summing up all applicable entry fees.
Here some examples:
- Entry fee of $10 for all participants: Name the entry fee e.g. "General Entry Fee", enter the value of $10 and make sure that 01/01/1900 - 12/31/2100 is entered as "Born Between" and "Registered between".
- Increase by $2 from 03/08/2026 on: define the entry fee as above, but enter "01/01/1900 - 03/07/2026" in "Registered between". Then, define a second entry fee with value $12 and set "03/08/2026-31/12/2100" as "Registered between". Make sure that the date spans do not overlap and that there are no gaps (otherwise you may register for free for one day).
- Additional $5 for everyone who ordered a TShirt (if a TShirt was ordered, the size is in Additional Field [TShirt]): Create a new entry fee with value $5 and enter the Optional Filter: [TShirt]<> (empty)
- Number of pasta party coupons saved in Additional Field [PastaCoupon], $3 per coupon: Create a new entry fee with value $3 and use Val([PastaCoupon]) in Multiply with (in the advanced settings >>).
Other (Advanced) Options / Settings
As you work through Navigating / Using RACE RESULT 14 you will find other relevant settings such as:
Timing Settings
If you have more than one timing point, you will have to set up and configure timing points.
Results and Ranks
If your event is more complex than just start and finish time, and overall/gender/age group rank, you need dive into the scoring settings. It is possible to save or calculate several times for each participant, e.g. a start time, interim result(s), and a finish time. RACE RESULT 14 also enables you to calculate any type of special ranking.
Team Scores
A Team Score is used to group several participants (e.g. from the same club or company) to build one team, and subsequently rank each team.
Archives
You can archive all data of your event. Using the archives, you can then add new participants very quickly by simply importing individual athletes from the archives.
Online Registration
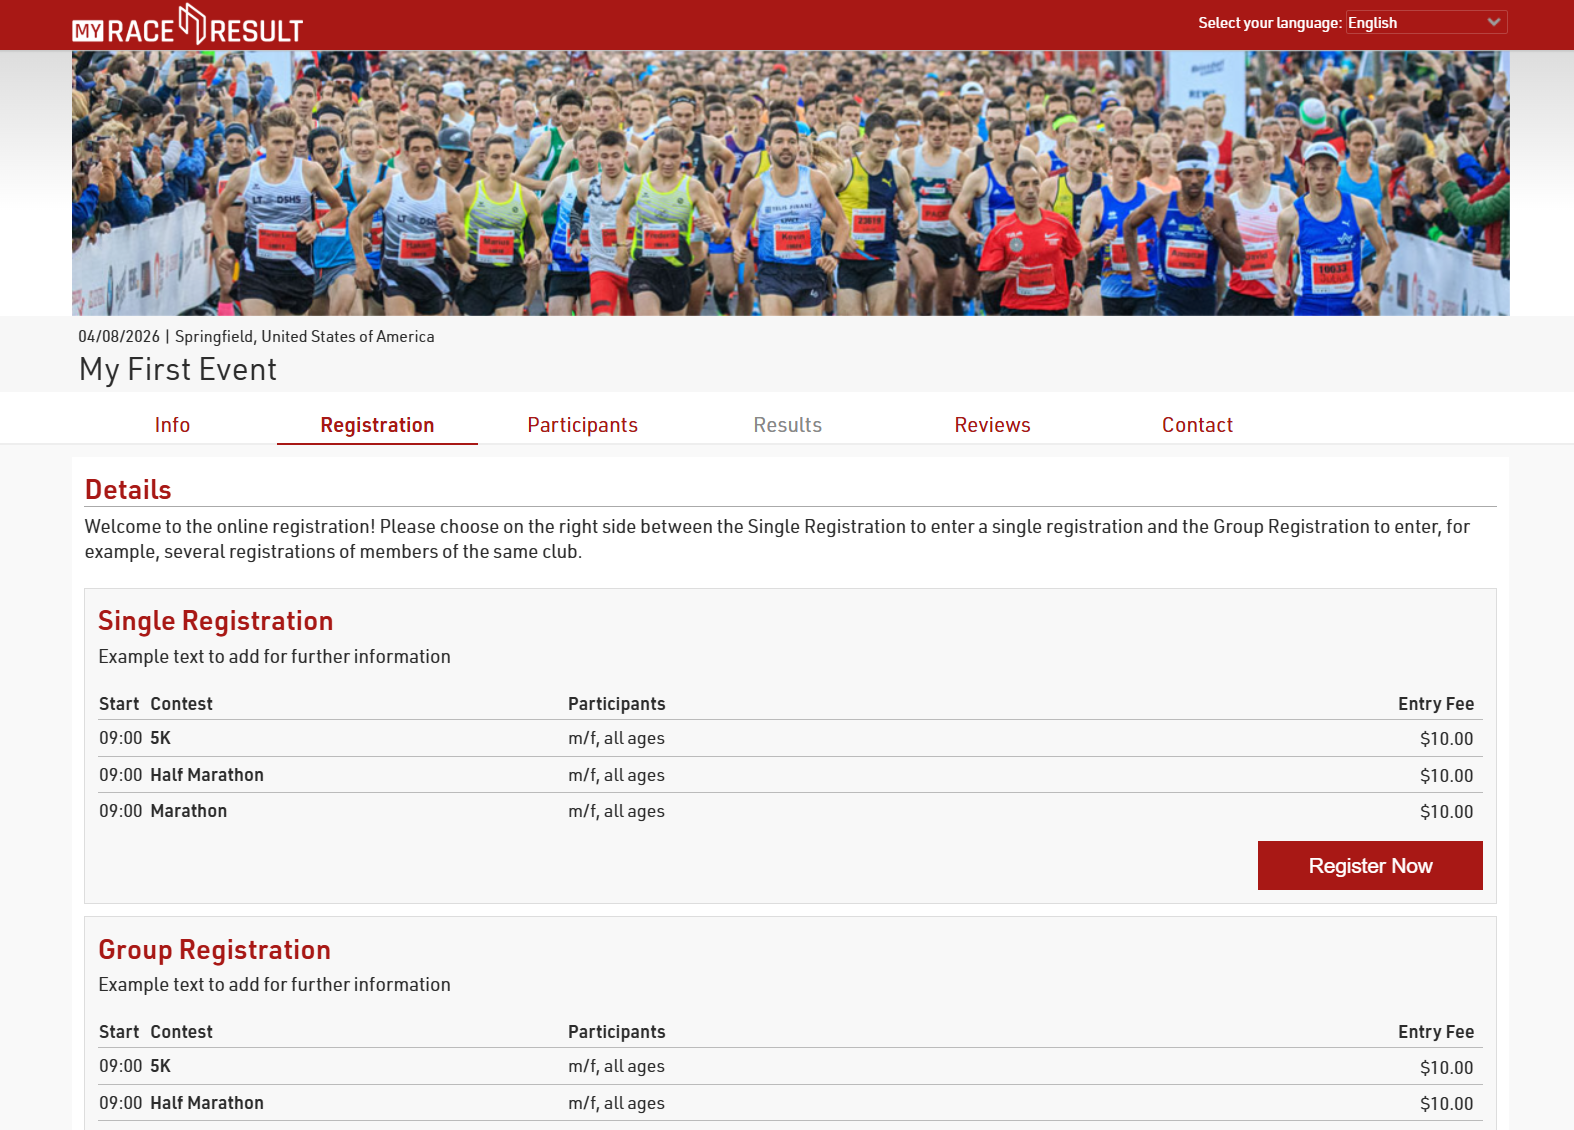
Most likely, to save time and money you will want to offer online registration for your event. Included in our service, is free usage of our sports portal my.raceresult (http://my.raceresult.com) which lists your event so that race participants can find you quickly and easily.
Your event page on my.raceresult.com contains the pages Info (for general information), Registration (for online registration), Participants (in order to publish participant lists), Live (active during the race day for live results), Results (for the publication of result lists and certificates), Reviews (for comments), and Contact (to contact the event organizer or timekeeper).
All pages can be customized through the my.raceresult.com Window in RACE RESULT 14. We will now address each setting in more detail.
Basic Settings
In order to publish your event on my.raceresult.com, click on the tab my.raceresult.com at the top of the general window. Then, accept the general terms of use and activate the checkbox Publish event on my.raceresult.com.
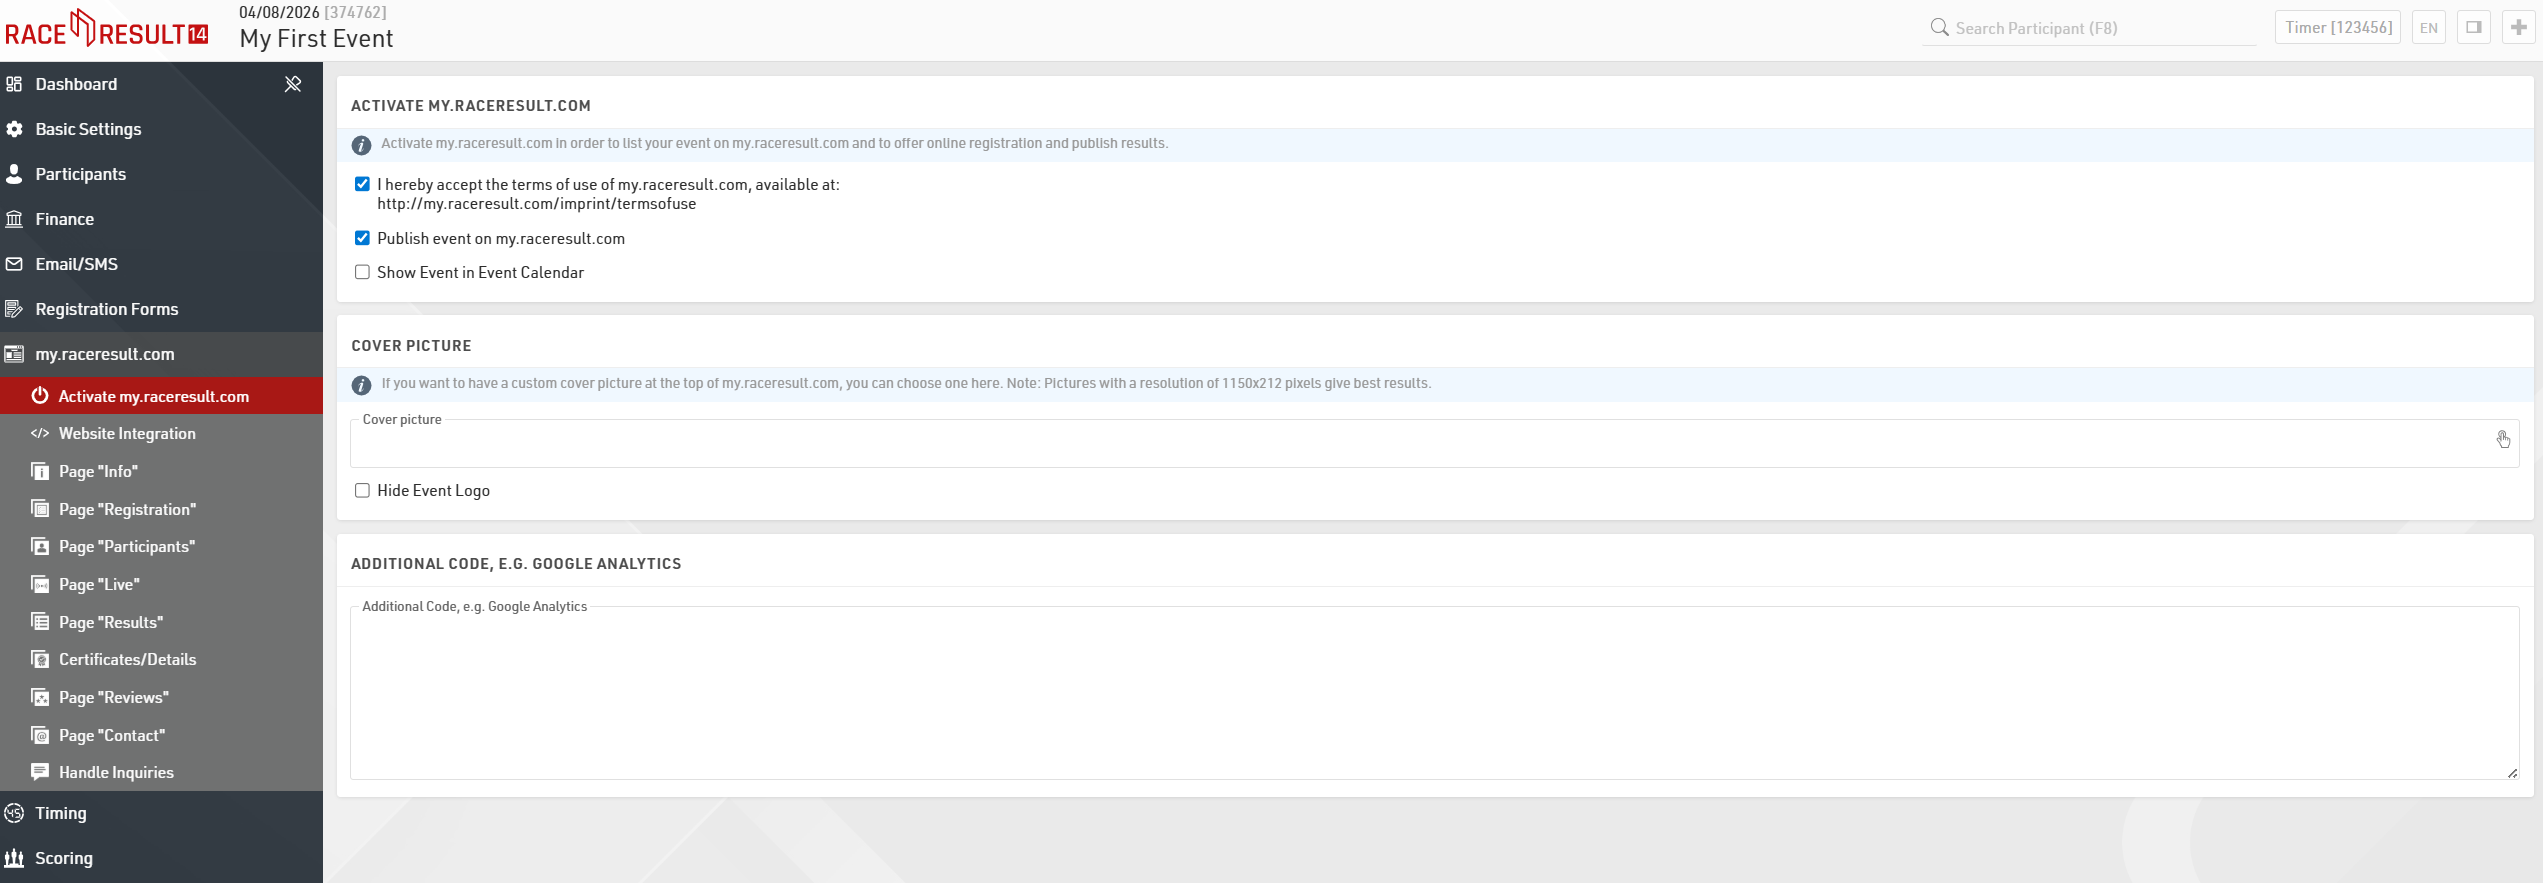
An individual cover picture is recommended and gives your event a special touch.
In the rest of the my.raceresult.com menu it's possible to make changes to all the relevant pages of the platform.
Online Registration
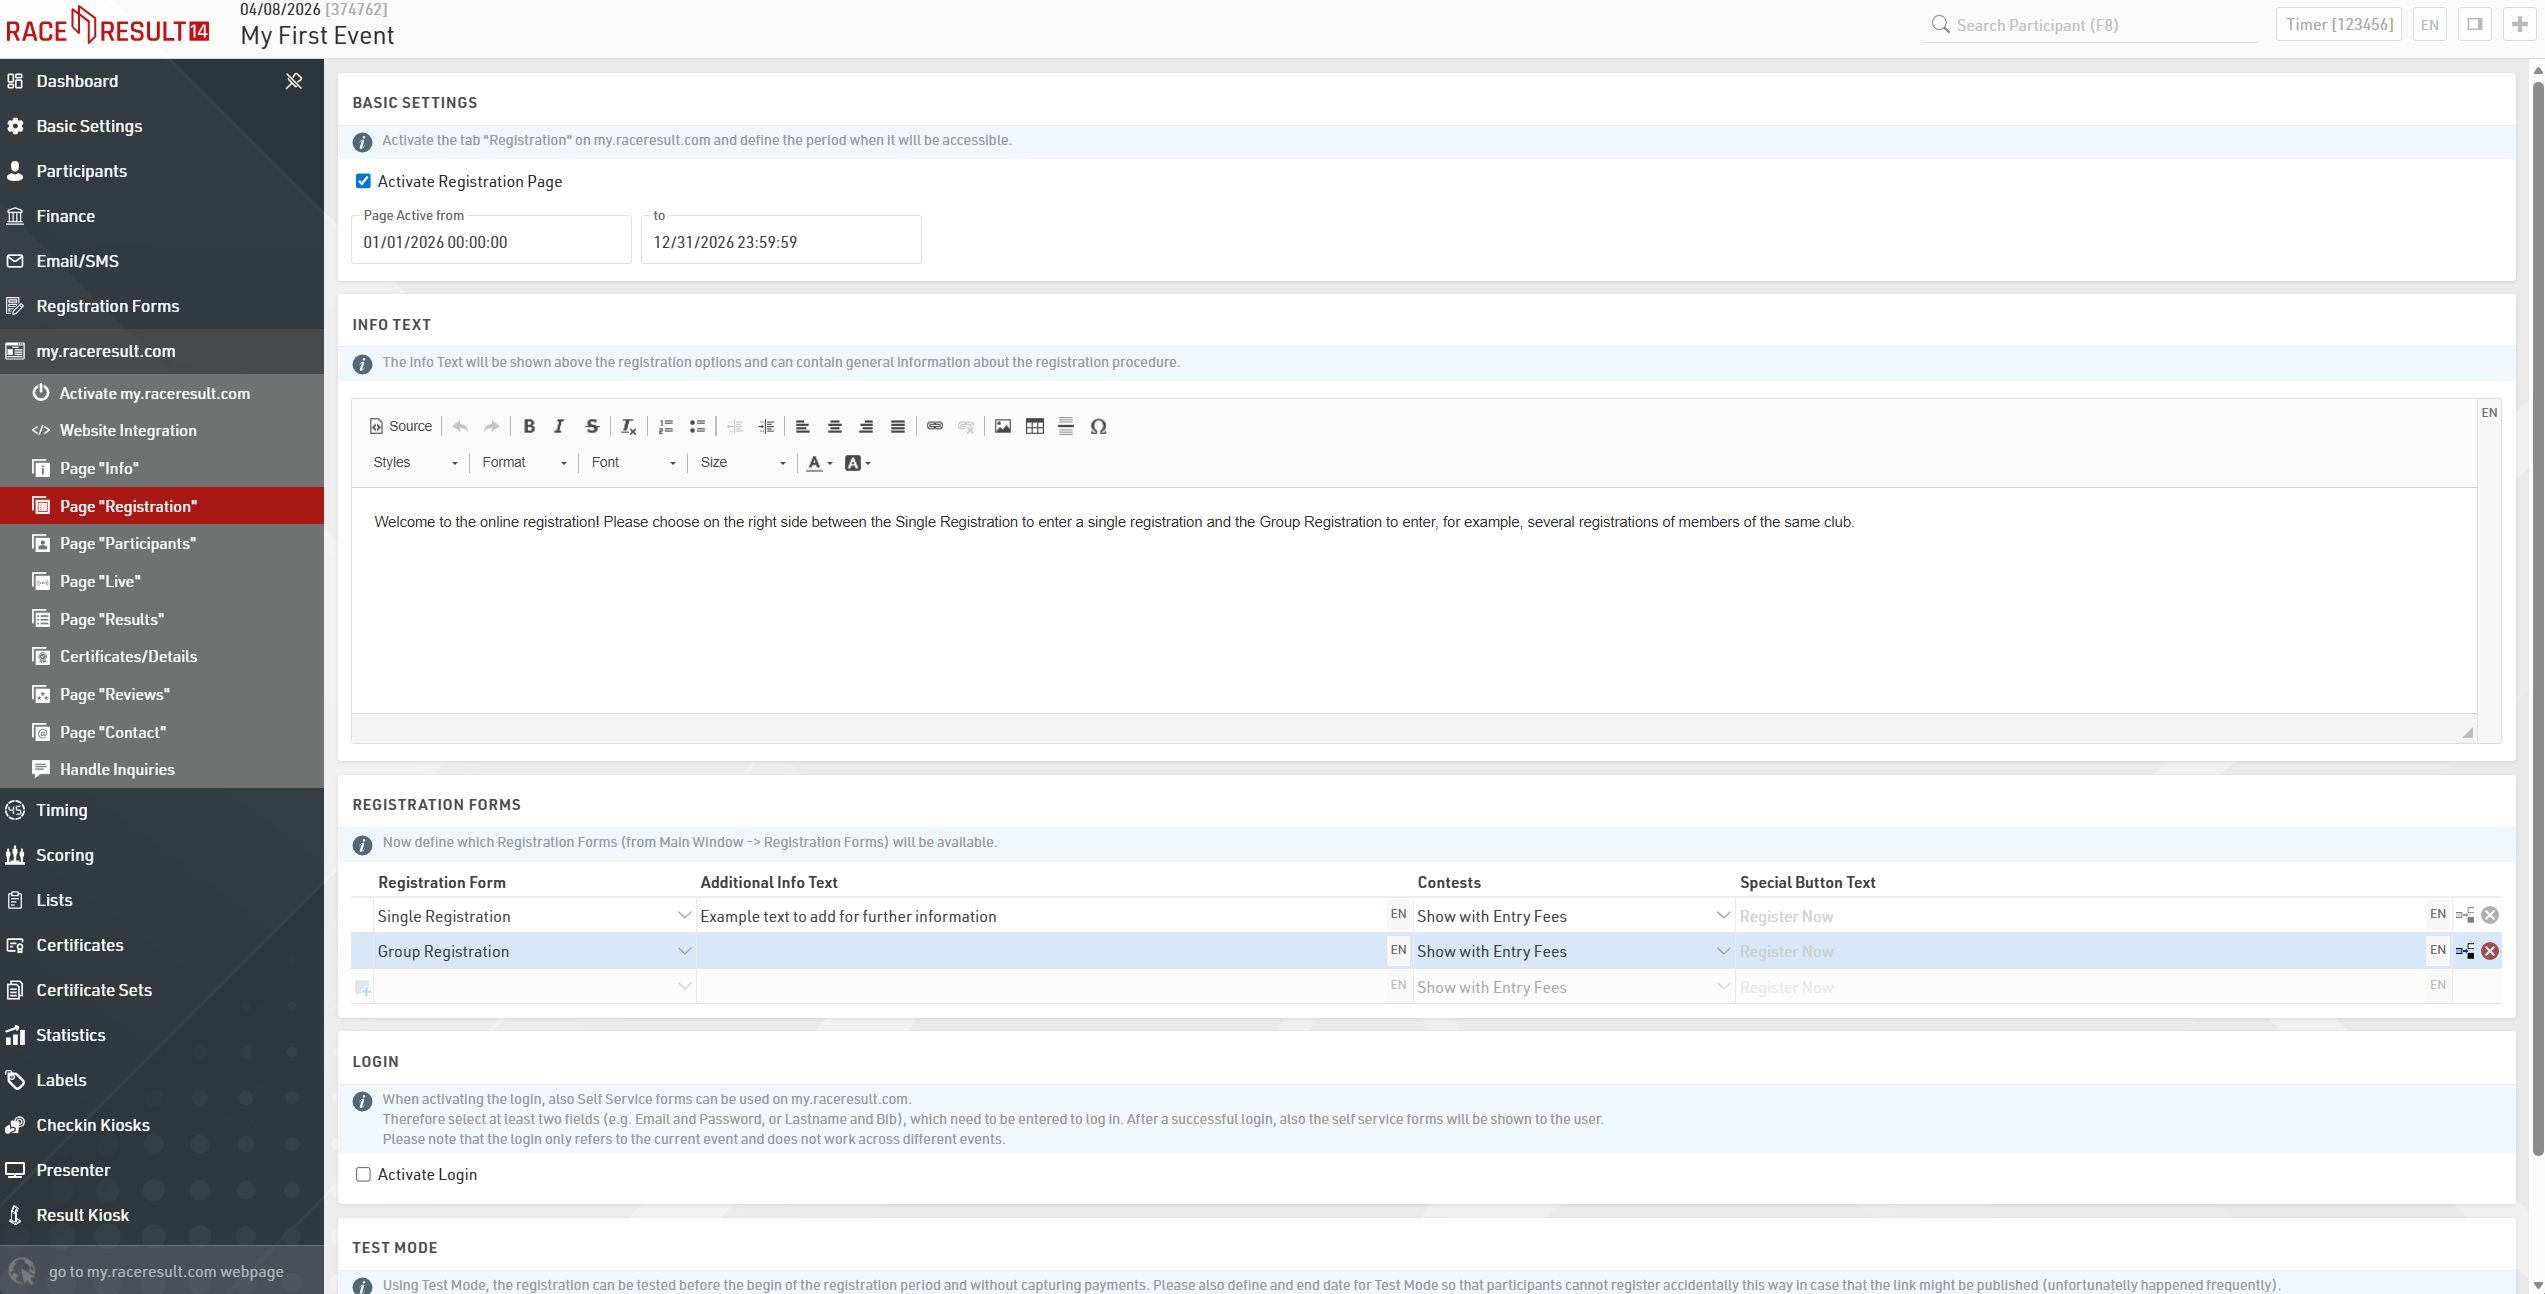
The options that refer to the online registration can be set in the page Registration. Activate the checkbox Activate Registration in the Basic Settings overview in order to enable online registration on my.raceresult.com and adjust the registration period.
Scrolling down in the Registration Forms section, you can define which Form to publish on the page, add additional Info Text and decide either to show the entry fees or not.
For testing purposes, at the bottom of the page you can find the TEST MODE where registration can be tested before the beginning of the registration period, without capturing payments. In this case we highly recommend setting the end date of test mode, for avoiding participants registering without paying fees.
The creation of the Registration Forms can be done under Main Window > Registration Forms. Here you can define all the steps like the form fields, the payment method, the confirmation page and the confirmation email to be sent at the end of each registration. More detailed information can be found here.
Publishing List and Certificates
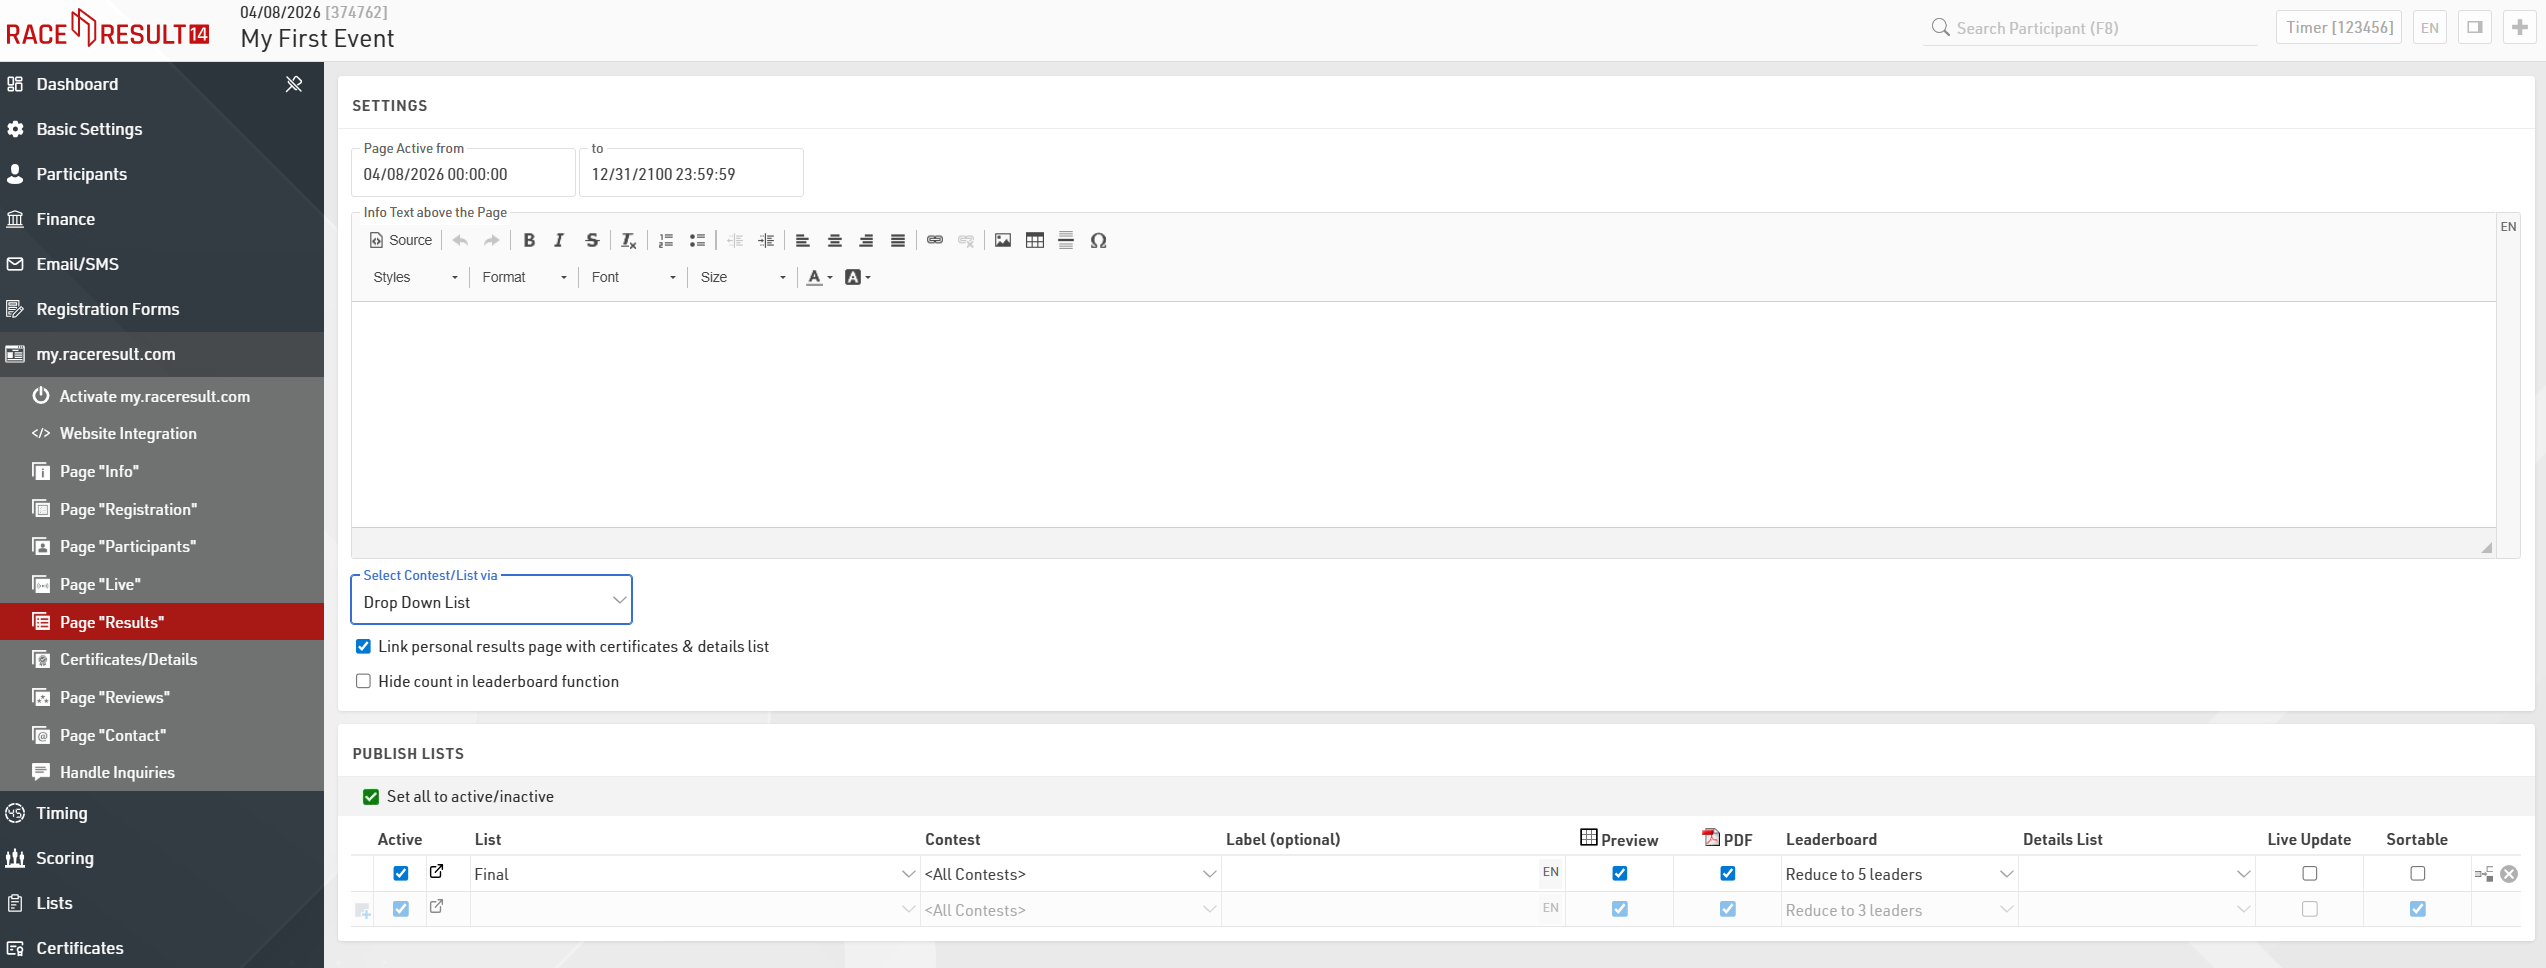
In the pages Participants, Live and Results you can define which lists from the Output Window, and which race certificates and links will be published on my.raceresult.com. The certificates and links can then be accessed by clicking on a participant's name in a result list. You can setup and configure pages for the Participants with an entry list e.g., a Live page with live results direcly from the track and a Result page for publishing the results after the race. For each page you have different settings, and you can vary the date when the certain page has to be active.
In order to publish a list or a certificate, simply select it in the drop-down box and define for which contest it shall be published.
How to Create Race Certificates
If you want to print race certificates for your event and/or offer certificates online for participants to download, you need to configure your certificates first. This is done in the Certificates window, first create a layout in the Certificate Tool and then configure the Certificate Sets
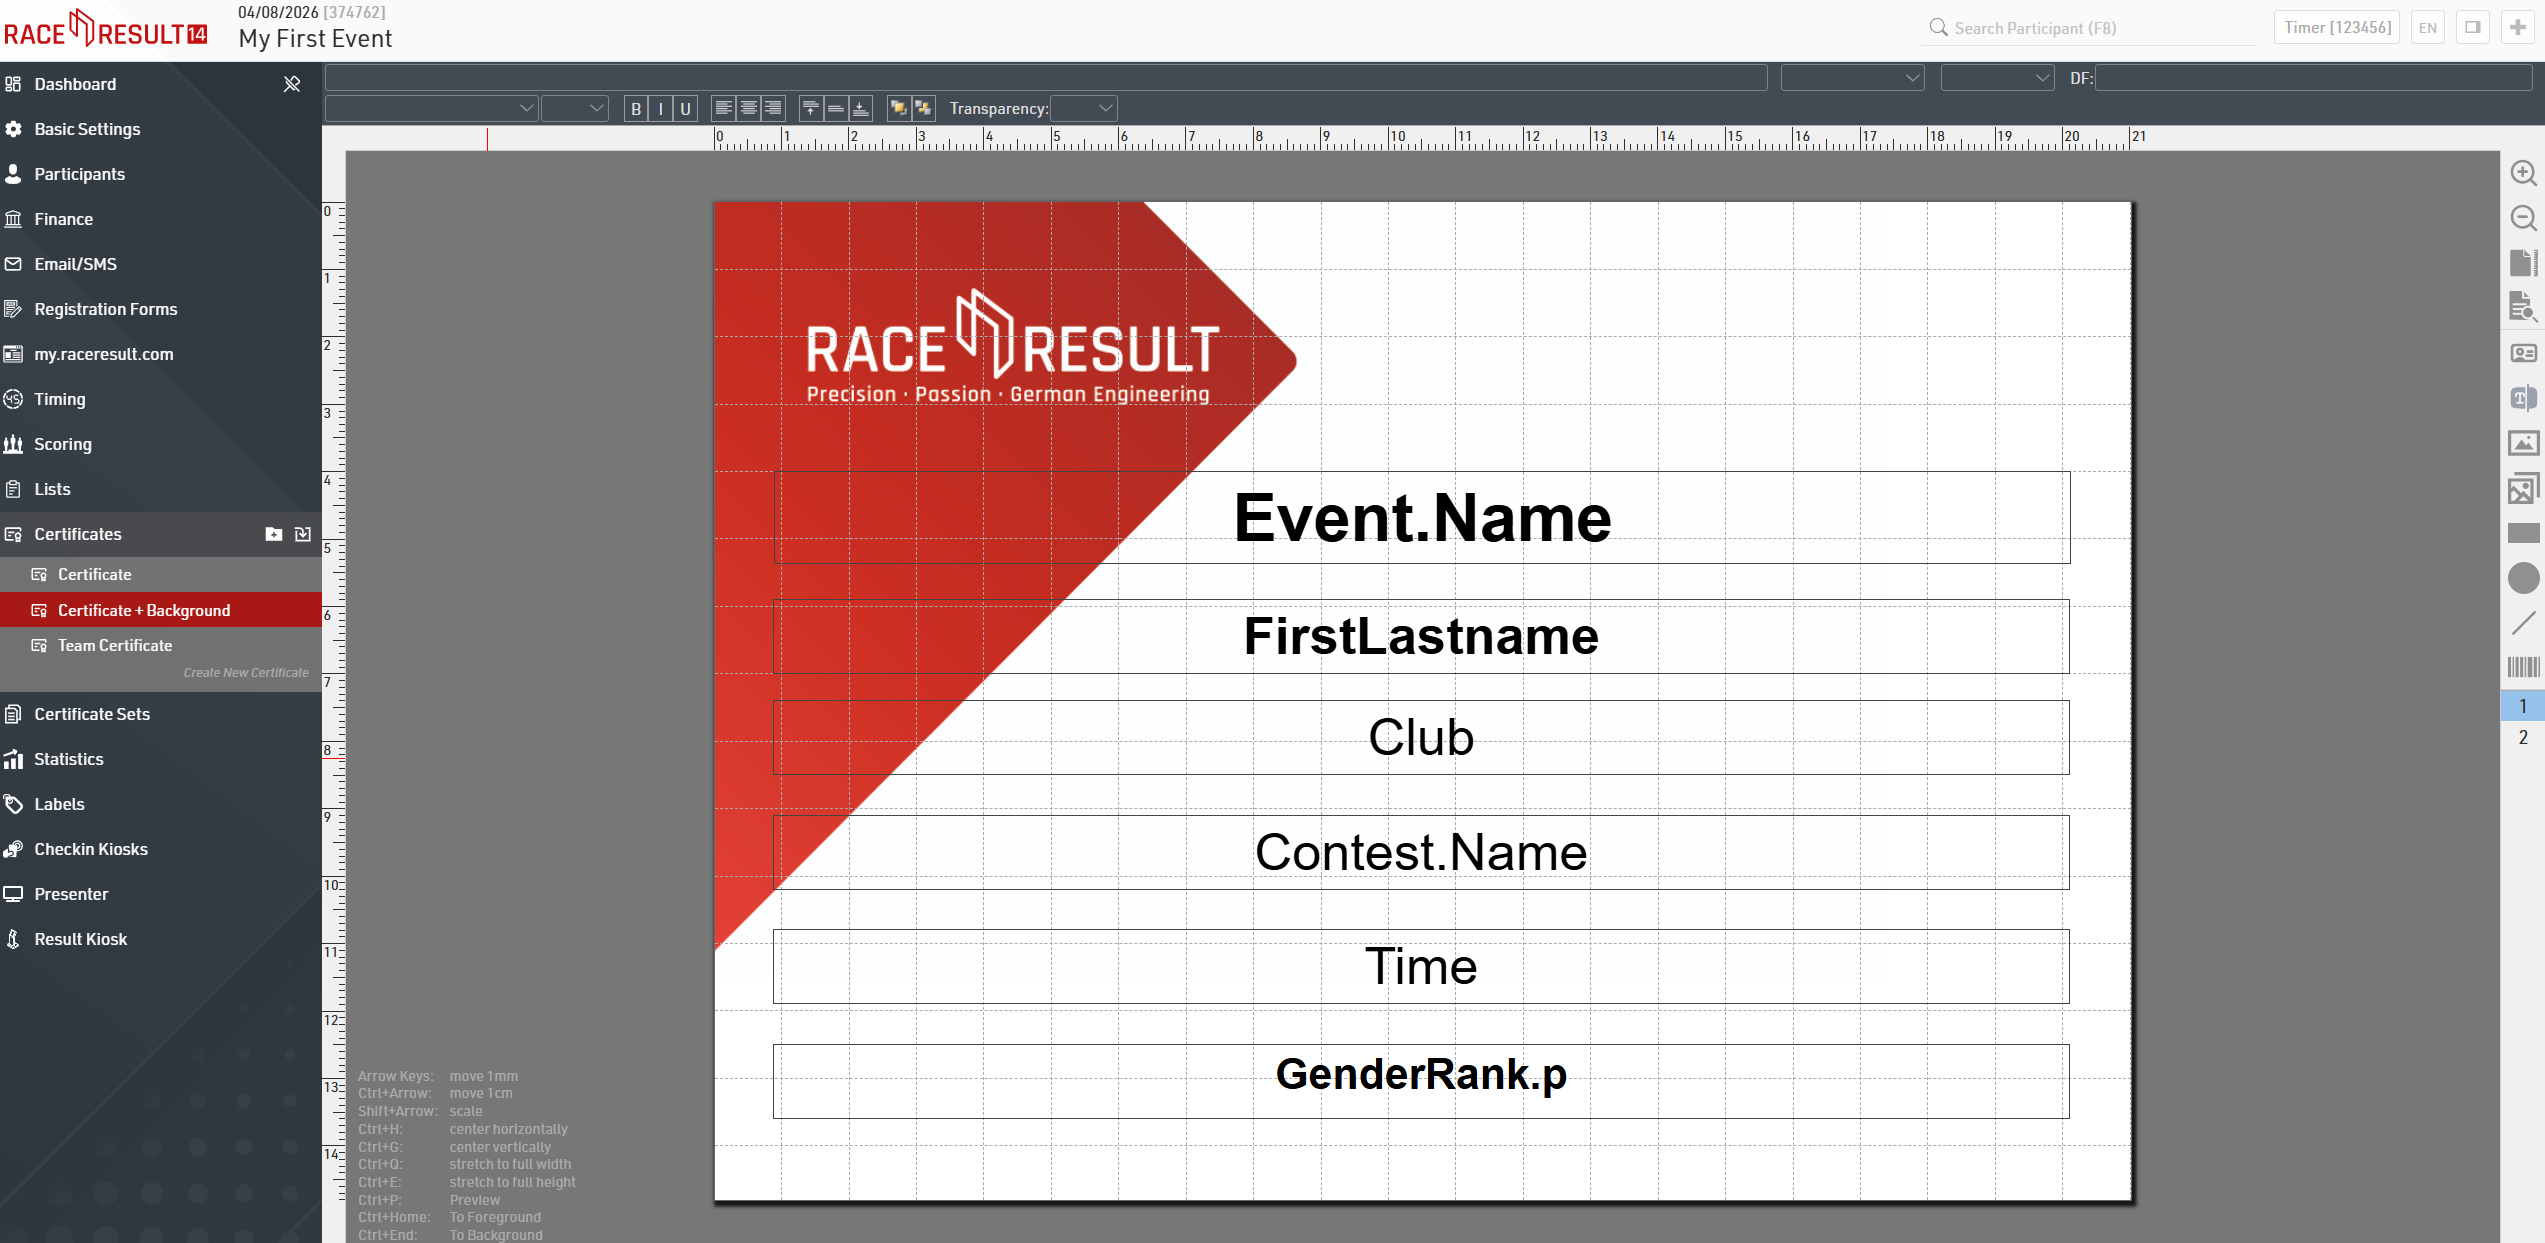
You can choose from three types of pre-defined certificates on the left: Team Certificate, Certificate + Background, and Certificate. The simple and standard Certificate is intended for prints on pre-printed paper. Certificate + Background is intended to contain a background picture and will be offered to participants online for download.
More detailed information about how to create and configure your own certificates can be found here.
Further Options
Your event has now been configured. Of course, you can add details and special options to your event by:
- Creating new and customized lists for your event
- Customizing the existing lists: e.g. by inserting pictures, formatting font style and size, changing page frames, etc.
- Creating certificate sets that you may want to print during your event
- etc.
If you would like to learn more, please read the RACE RESULT 14 Details.