Mounting of Track Boxes
The integrated mount of the Track Box allows for a variety of mounting methods for both temporary and permanent installations. Please note that the Track Box reads all passive transponders in a radius of ~1m (3ft), even behind the Track Box. Make sure to place the Track Box in a good location.
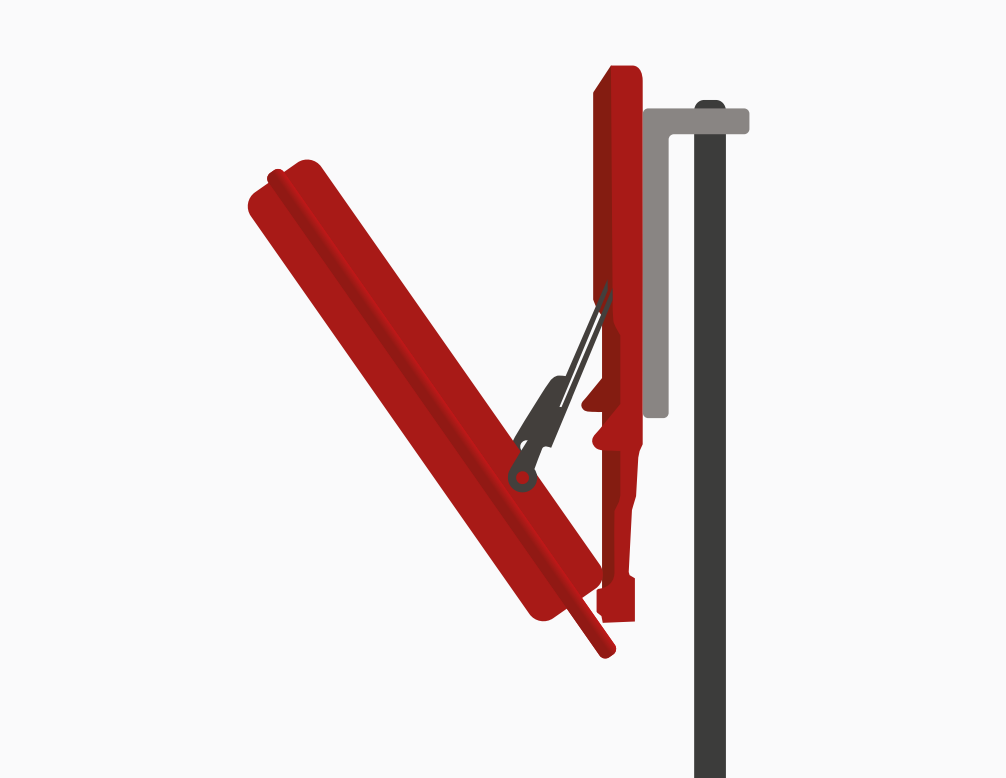
Vertical Mounting
Track Boxes can be mounted vertically using the integrated magnetics or screw mounting / VESA mount holes. It is also possible to secure the Track Box using cable ties and the existing mounting holes when it's not possible to secure in another way.
When mounted vertically the mount offers 4 different hanging angles to ensure maximum coverage of the read area depending on the height of the mounting point.
| 0 Degrees |  |
12 Degrees |  |
| 24 Degrees |  |
36 Degrees | 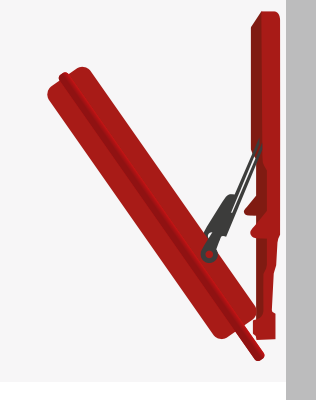 |
Overhead Mounting
The integrated magnets of the Track Box are strong enough to hold the Track Box even when mounted hanging from an overhead surface. When hanging inverted like this then the hook bar must use the 12, 24, or 36 degree hanging slots, it is not possible to hang overhead at 0 degrees.
Tripod Mount
The Track Box includes a metal bracket that can be fitted to a standard UNC thread of a tripod. The Track Box can then be mounted to this using the upper 2 magnets, which provide enough hold to secure the Track Box to the tripod mount.
Depending on the tripod design it may be necessary to secure or weigh down the tripod in some way.
Free Standing
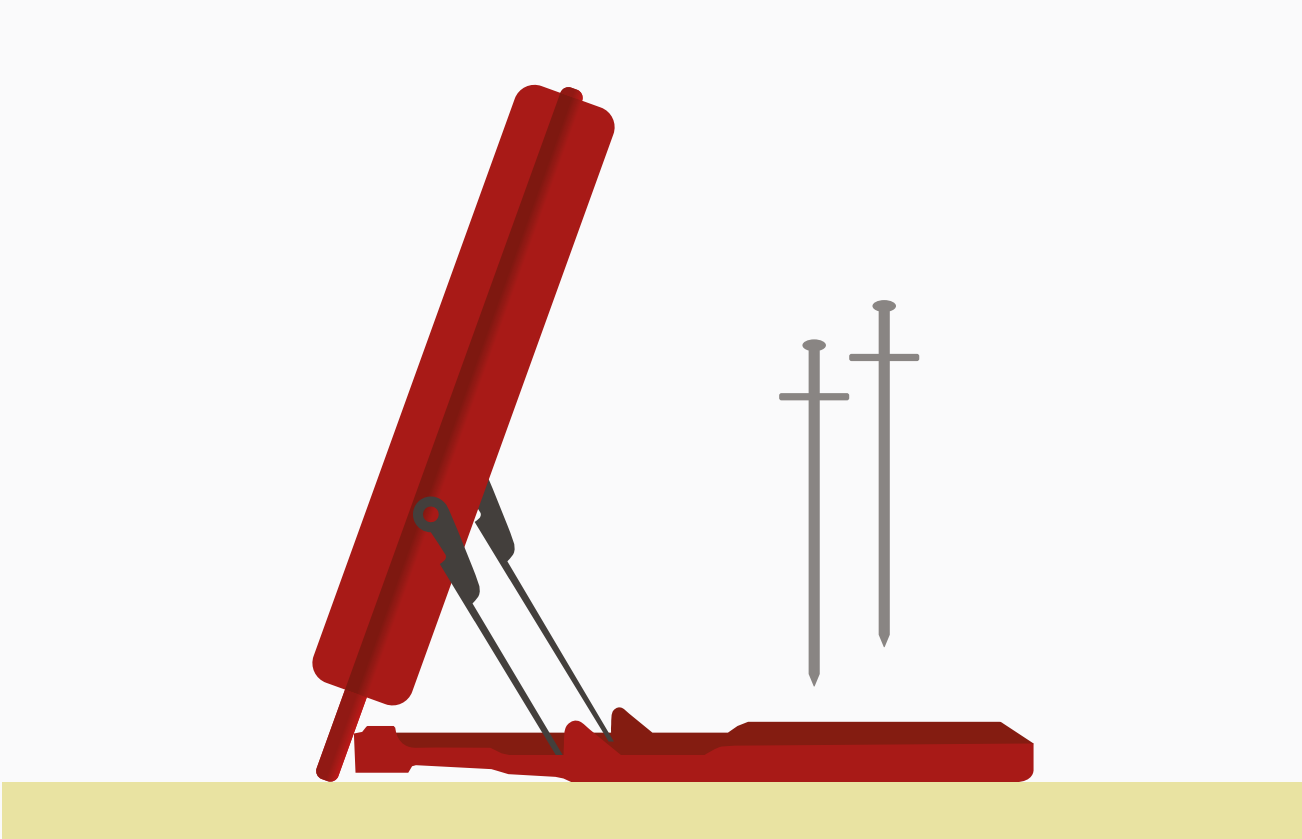
The mount can also be used as a stand with the Track Box standing on the ground angled upwards.
On soft / uneven ground it may be necessary to use the supplied stakes to secure the Track Box in position, these can be pushed slotted through the stake holes and then pushed into the ground.
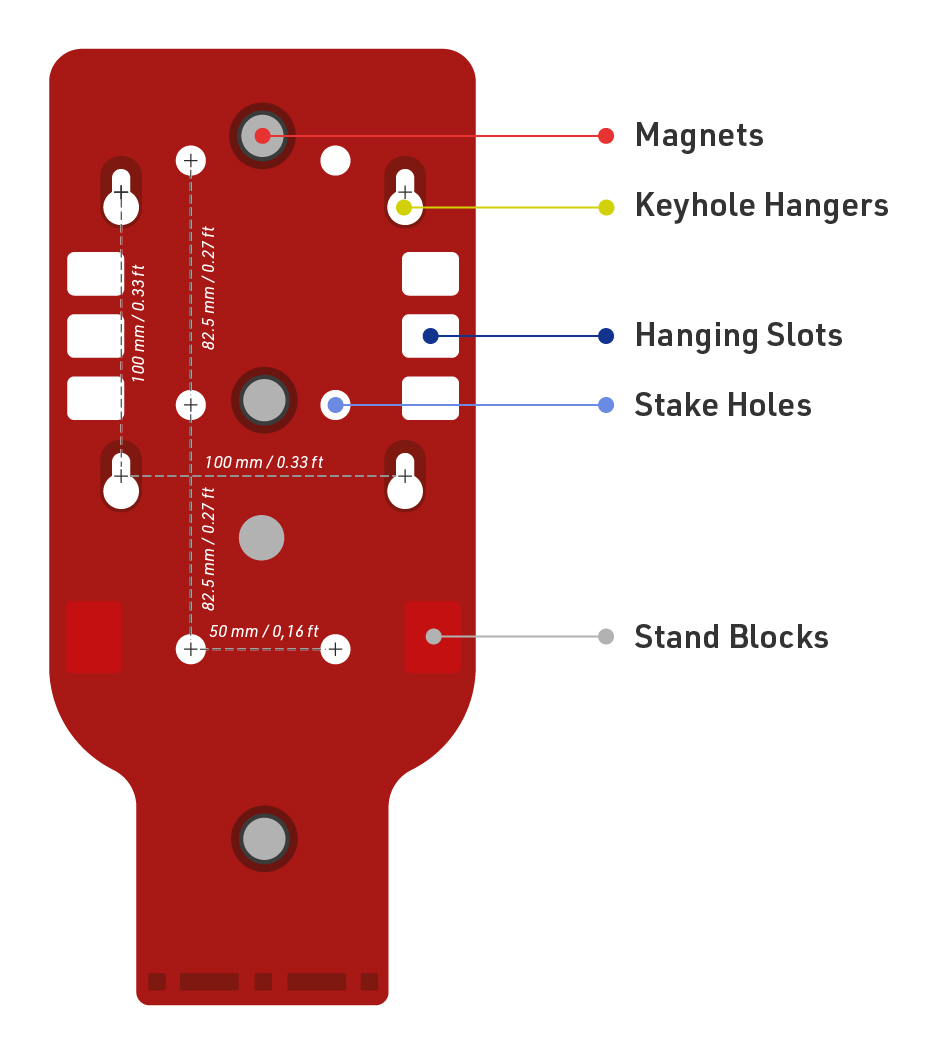
Mount Plate Diagram
Optimising Read Rates
Transponders
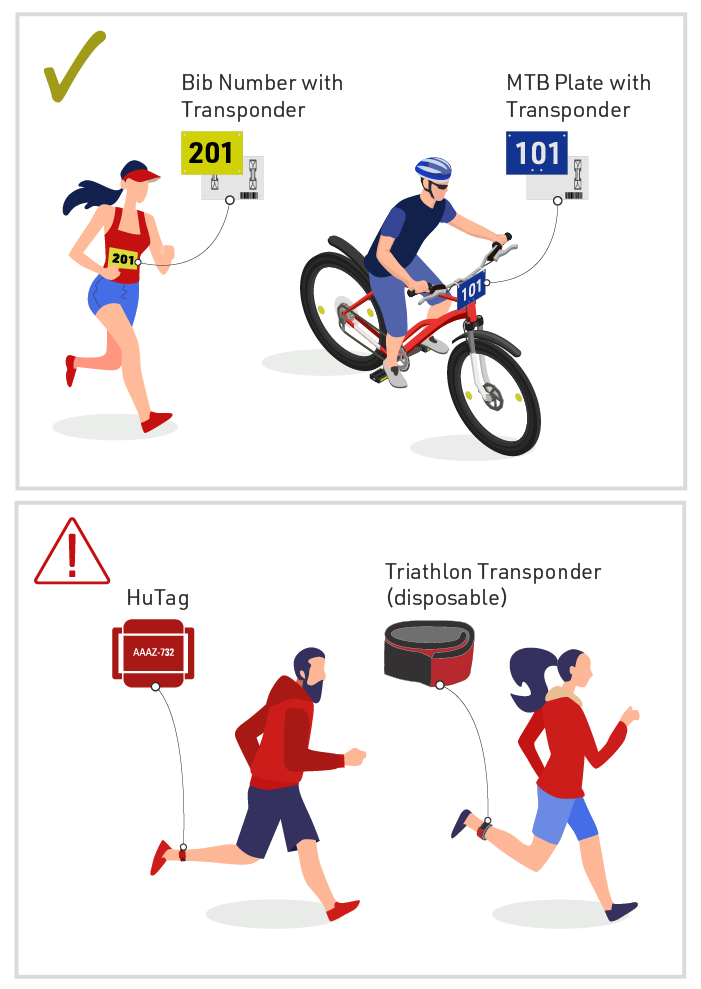
Track Boxes will only perform according to specification when participants' transponders are worn correctly. When using bib transponders this means that the bib is worn on the front of the torso and is not covered.
Higher performance can be expected when transponders are in free air, such as when using MTB number plates or seatpost stickers. Weaker or more restricted transponders, such as HuTags or Disposable Triathlon Transponders, will result in reduced performance and are not recommended to be used.
Please note that old transponder types or models may not work with the Track Box, the device is optimized to work with the RACE RESULT passive transponder.
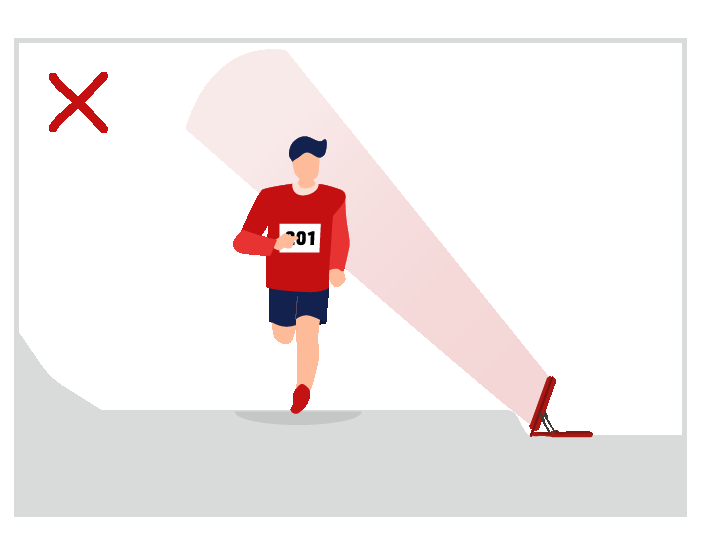
Angle of Antenna
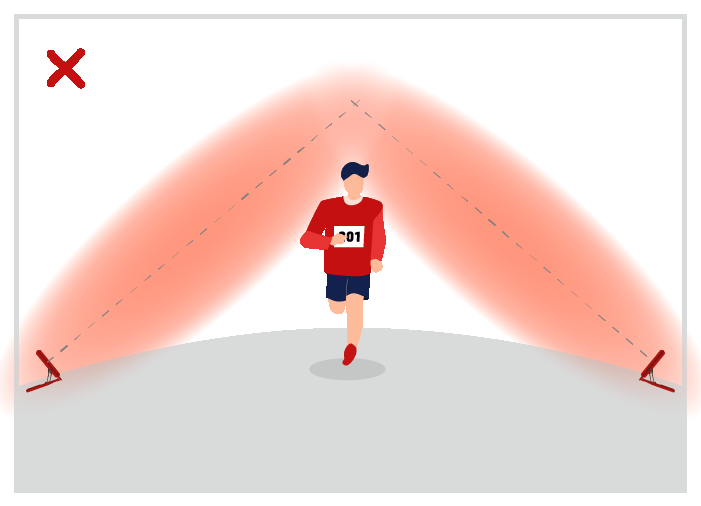
To maximize the opportunity to detect transponders, Track Boxes should be setup perpendicular (90 degrees) to the direction of travel. This increases the opportunity to detect transponders which may be worn incorrectly and also helps to ensure transponders are detected regardless of the direction of travel.
If Track Boxes are angled to face participants then the transponder can only be detected when worn visibly on the front, this also increases the distance between antenna and transponders which may reduce read rates.
Free Standing vs Hanging Boxes
Real-life data shows that hanging a Track Box Passive higher up will give you better read rates. Hanging boxes higher up avoids some of the risks of free-standing boxes such as blockages from spectators or uneven ground which may impact the detection field.
Particularly as split points may often be set up by lesser experienced timers it is important to ensure they are familiar with the setup precautions which may impact the different setup methods.
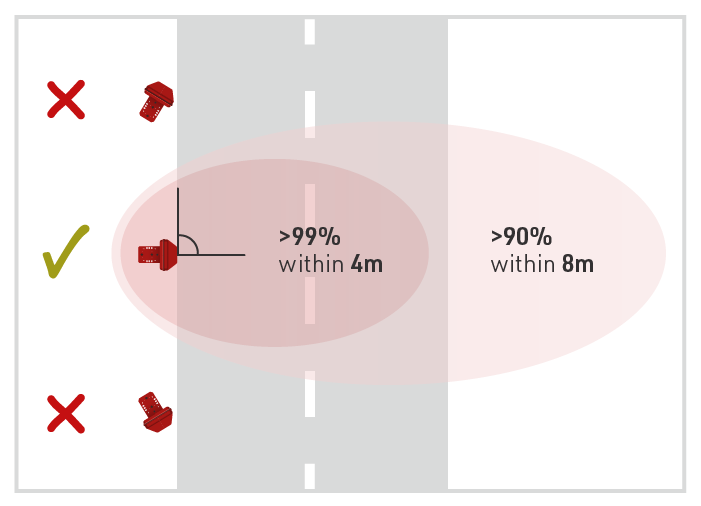
Single Box Performance
Although the Track Box may detect passive transponders up to 25m away, long distances will result in reduced read rates.
When using a single Track Box then the maximum width should be restricted to 4m, this can offer read rates >99% when setup correctly.

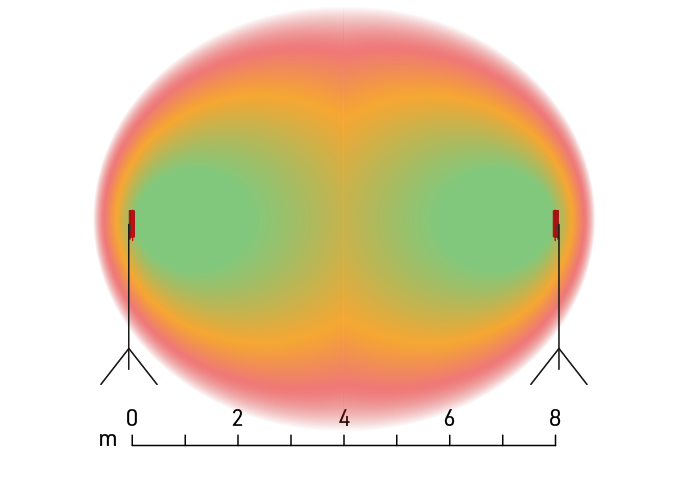
Dual Box Performance
Track Boxes are optimised to be used in pairs with boxes set up on opposing sides of the timing point using Dual Track Box Synchronisation.
Nearby boxes communicate with each other using the built-in 2.4Ghz and automatically synchronise their readers to prevent interference between them.
In this setup then >99% read rate can be achieved at up to 8m wide.
Setup Precautions
Reader Warning
The Track Box Passive will report a reader Warning or Error if the noise and interference is too high, when this is reported you should expect a reduction in read rates. The warning is also indicated by the LED Blink Codes and when using RACE RESULT 12, will be shown in the Timing Tab.
Upon receiving a warning it is advised to immediately check for any source of interference, this may be as simple as somebody standing in front of the box or you may need to address the mounting position of the box.
Setup of Multiple Systems
Track Boxes should not be set up in close proximity to other timing systems such as other Track Boxes (which are not paired using Dual Box Synchronisation) or Decoders with folding ground antenna / high-gain antennas.
When set up with overlapping read zones then you should expect a severe reduction in read rates, for this reason a minimum distance of 20m should be observed between multiple systems.
Mounting Surroundings
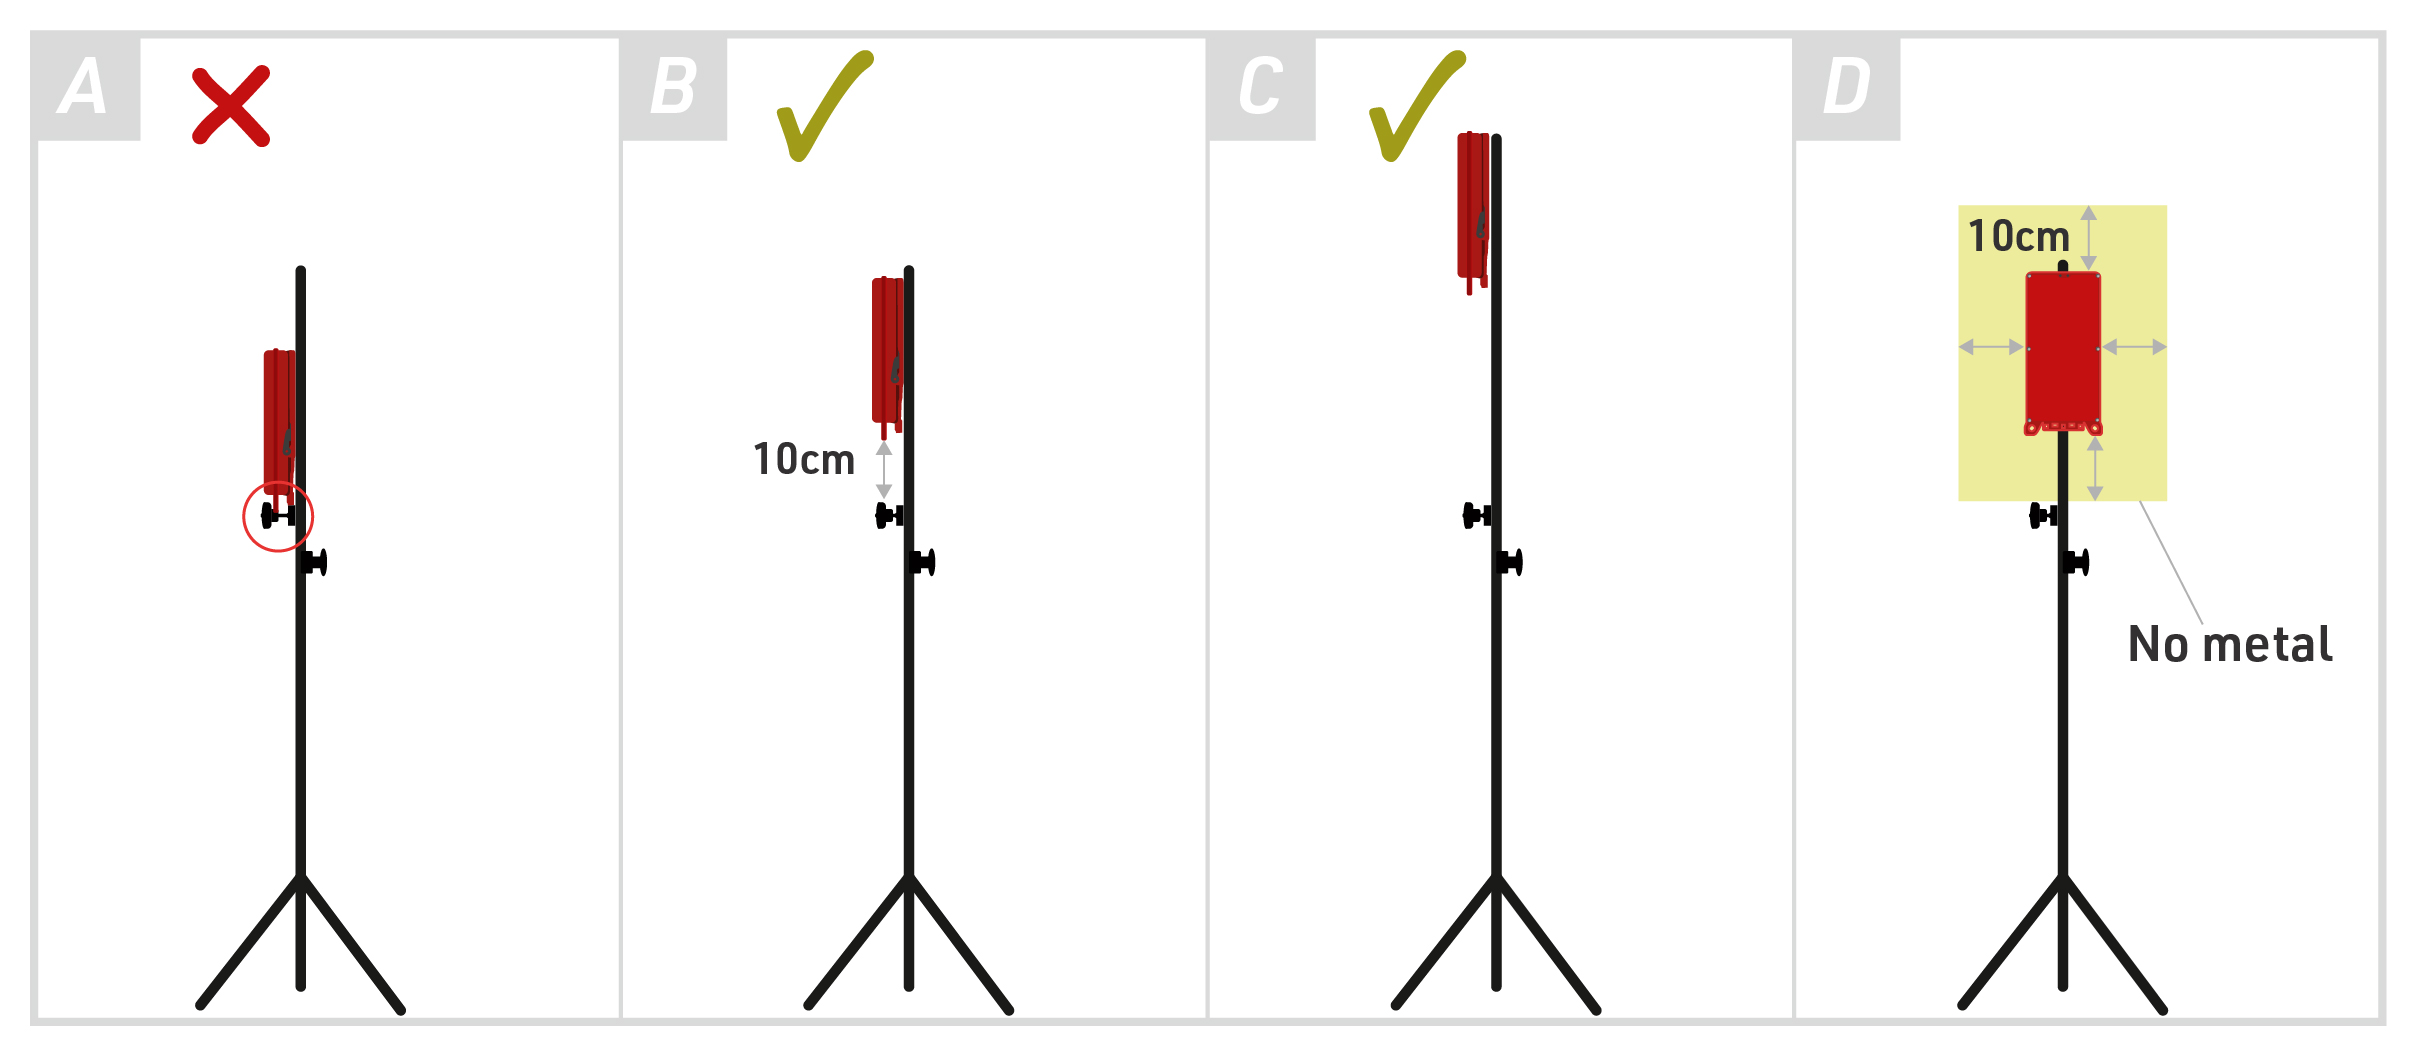
The Track Box Passive is sensitive to any materials placed close to the box, especially metal.
The front and sides of the Track Box should be kept completely clear of any material with a minimum radius of 10cm, as shown in diagram D below. The more free space around the box, the better.
For example, when mounting on a tripod the metal screw of the tripod if positioned incorrectly may cause interference on the reader. Raising the Track Box at least 10cm above this point will reduce the interference.
Track Boxes on the Ground
When setting up Track Boxes on the ground, ensure the lower section of the box has an unobstructed view of transponders. Any obstruction such as wet grass, leaves, or branches will limit the field of view of the lower internal antenna significantly!
Similarly, the Track Box should not be below the surface of the road, in this setup, the lower antenna has a partially restricted field of vision and creates a zone in which the transponder cannot be read.
 |
 |
In the diagrams above, we can see that when the Track Box is below the surface of the road the field of detection is restricted. The lower antenna can only transmit above the surface of the road thus the field is much higher up, this has an even greater impact when transponders are further from the Track Box.
Additionally, it is important to ensure the ground is flat, on cambered roads for example the Track Boxes may be angled higher up. Over wider timing points, this may result in an area in the middle where transponders cannot be detected.
Other common mistakes include:
- Not expecting spectators/assistants to stand in front
- Not using stakes or heavy weights to secure the stand
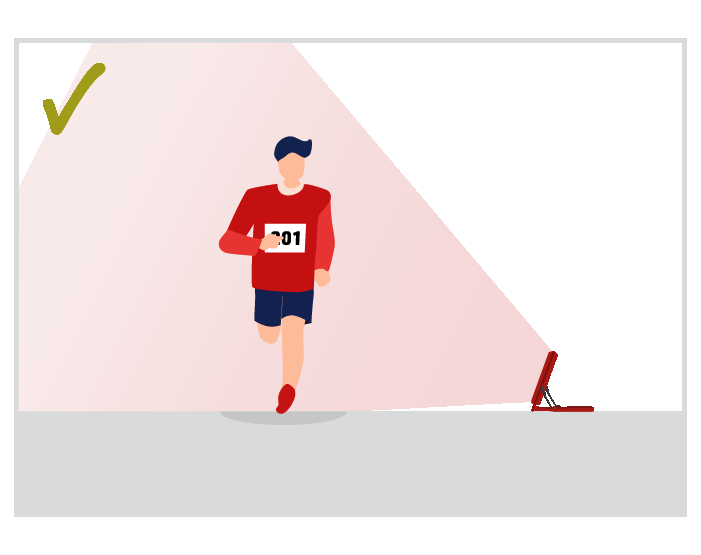
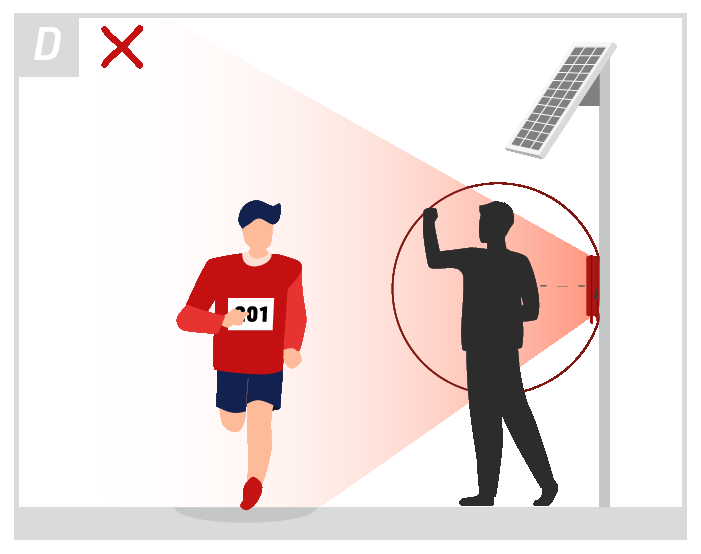
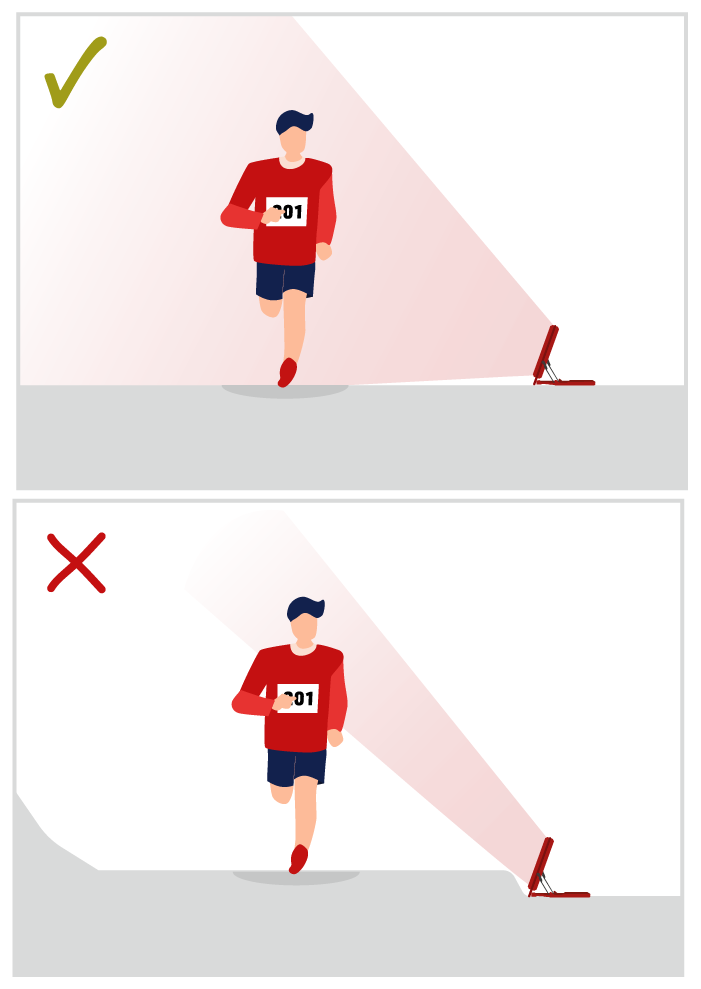
Mounting Under Covers
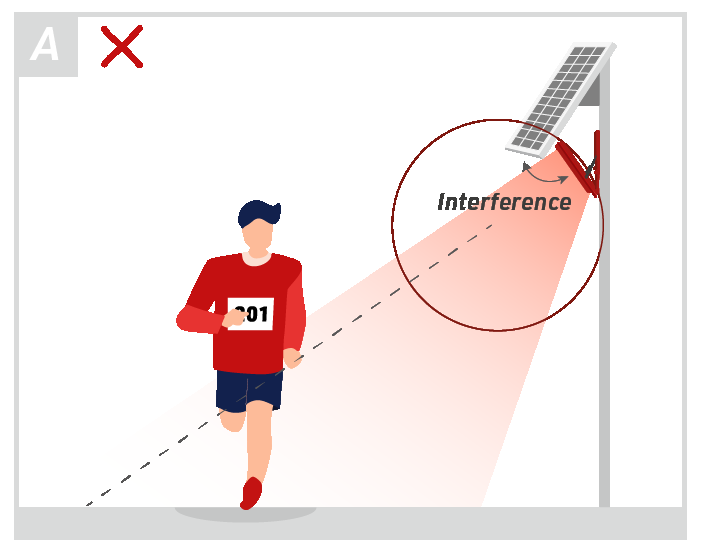
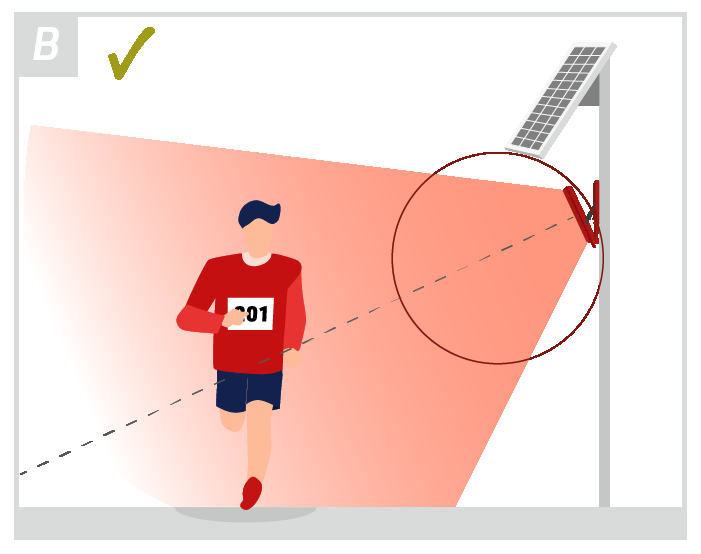
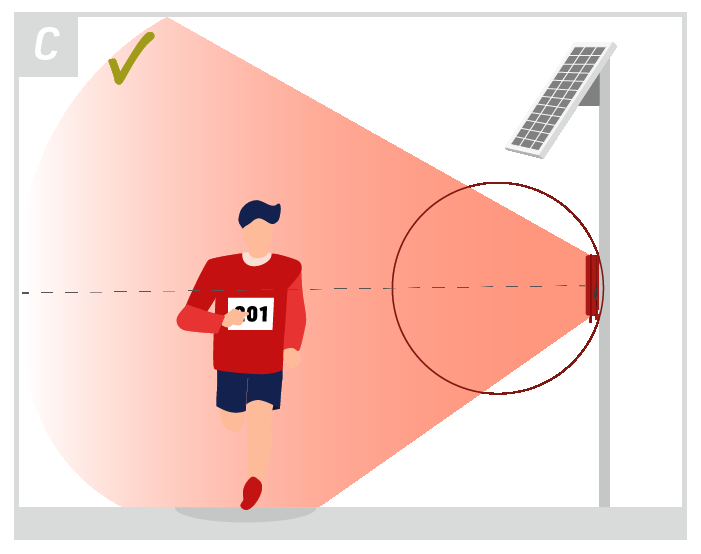
In particular for long-term installations, it is recommended to mount the box under a cover, such as a solar panel, for sun and weather protection.
When doing so ensure not to have any part of the cover (especially metal) close to the antenna. In the diagrams below the red circle indicates the range which should be kept clear of any interference, example A shows the solar panel too close to the Track Box which may cause interference.
The antenna's peak signal should be facing where you expect to have transponders at the furthest distance, as indicated by the dashed line.
In the diagrams below example B would be a better setup offering good range, example C would be even better but comes with a higher risk of being blocked by something or somebody as shown in example D.
 |
 |
 |
 |
Labeling Devices
We do not recommend placing a sticker on the front of the device as this can cause radio interference. Some inks contain carbon particles that can affect radio signals and paper stickers can absorb water which will also reduce signal strength.
Simple Setup Guide
To maximize the Track Box Passive performances there are few simple rules to follow which define how to position the device to avoid obstructions or reduced read rates. The Track Box can be stood up, or hung. You will find more information about the different options here.
 |
When setting up Track Boxes on the ground, ensure the lower section of the box has an unobstructed view of transponders.
Any obstruction such as wet grass, leaves or branches will limit the field of view of the lower internal antenna significantly which will reduce read rates! |
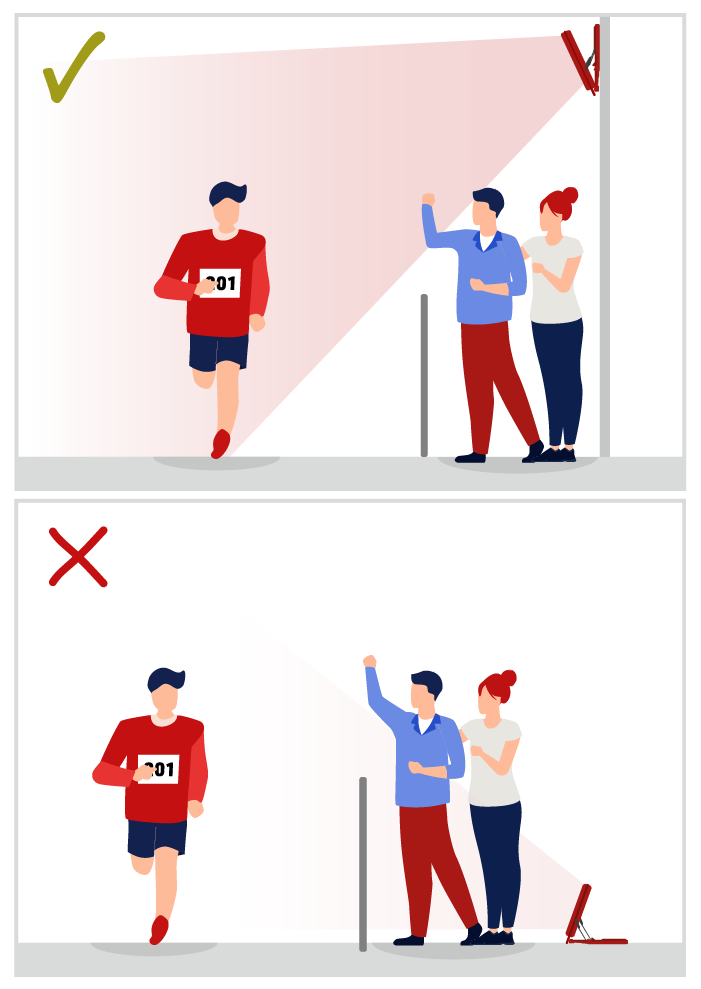 |
When setting up Track Boxes on the ground, be aware that the antennas may be blocked by spectators/assistants accidentally standing in front of the device or even barriers being setup, which will of course reduce read rates. This is particularly true with unattended boxes, so mounting boxes above head height is recommended where possible.
|
 |
To maximize the opportunity to detect transponders, Track Boxes should be setup perpendicular (90 degrees) to the direction of travel.
Although the Track Box may detect passive transponders up to 25m away, long distances will result in reduced read rates.
|
Additional considerations
There are some other considerations to make to maximize the Track Box Passive performances.
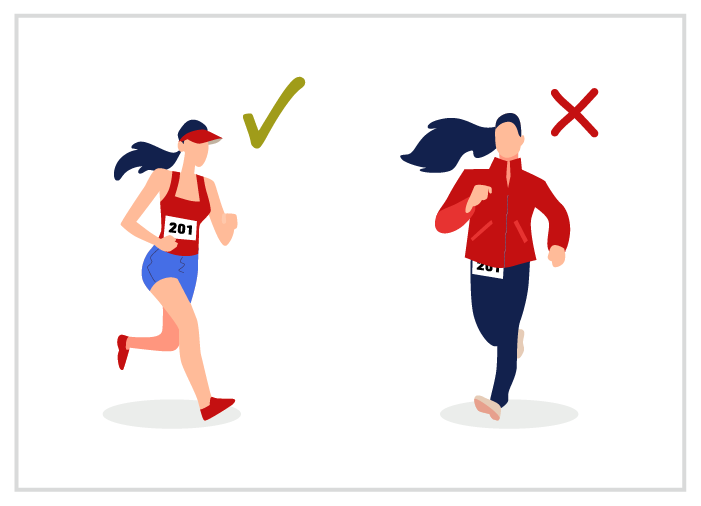 |
Bibs must be worn correctly, on the front of the torso, and not covered. |
|
|
Bibs and Transponders in free air such as when using MTB number plates or seatpost stickers have higher performance.
HuTags, Shoe Transponders and Disposable Triathlon Transponders are not recommended for use with PTB due to their form factor and reduced sensitivity. |
 |
Adding a sticker to the front of a Track Box can affect the read rates if the ink used is black and could possibly contain Carbon particles.
Best Practice: Don't put any sticker on the front of a Track Box. Some stickers also have a metal surface which will cause interference. If you want to label the box, please use the back side or a tag. |