The Basic Settings define core settings of your event file.
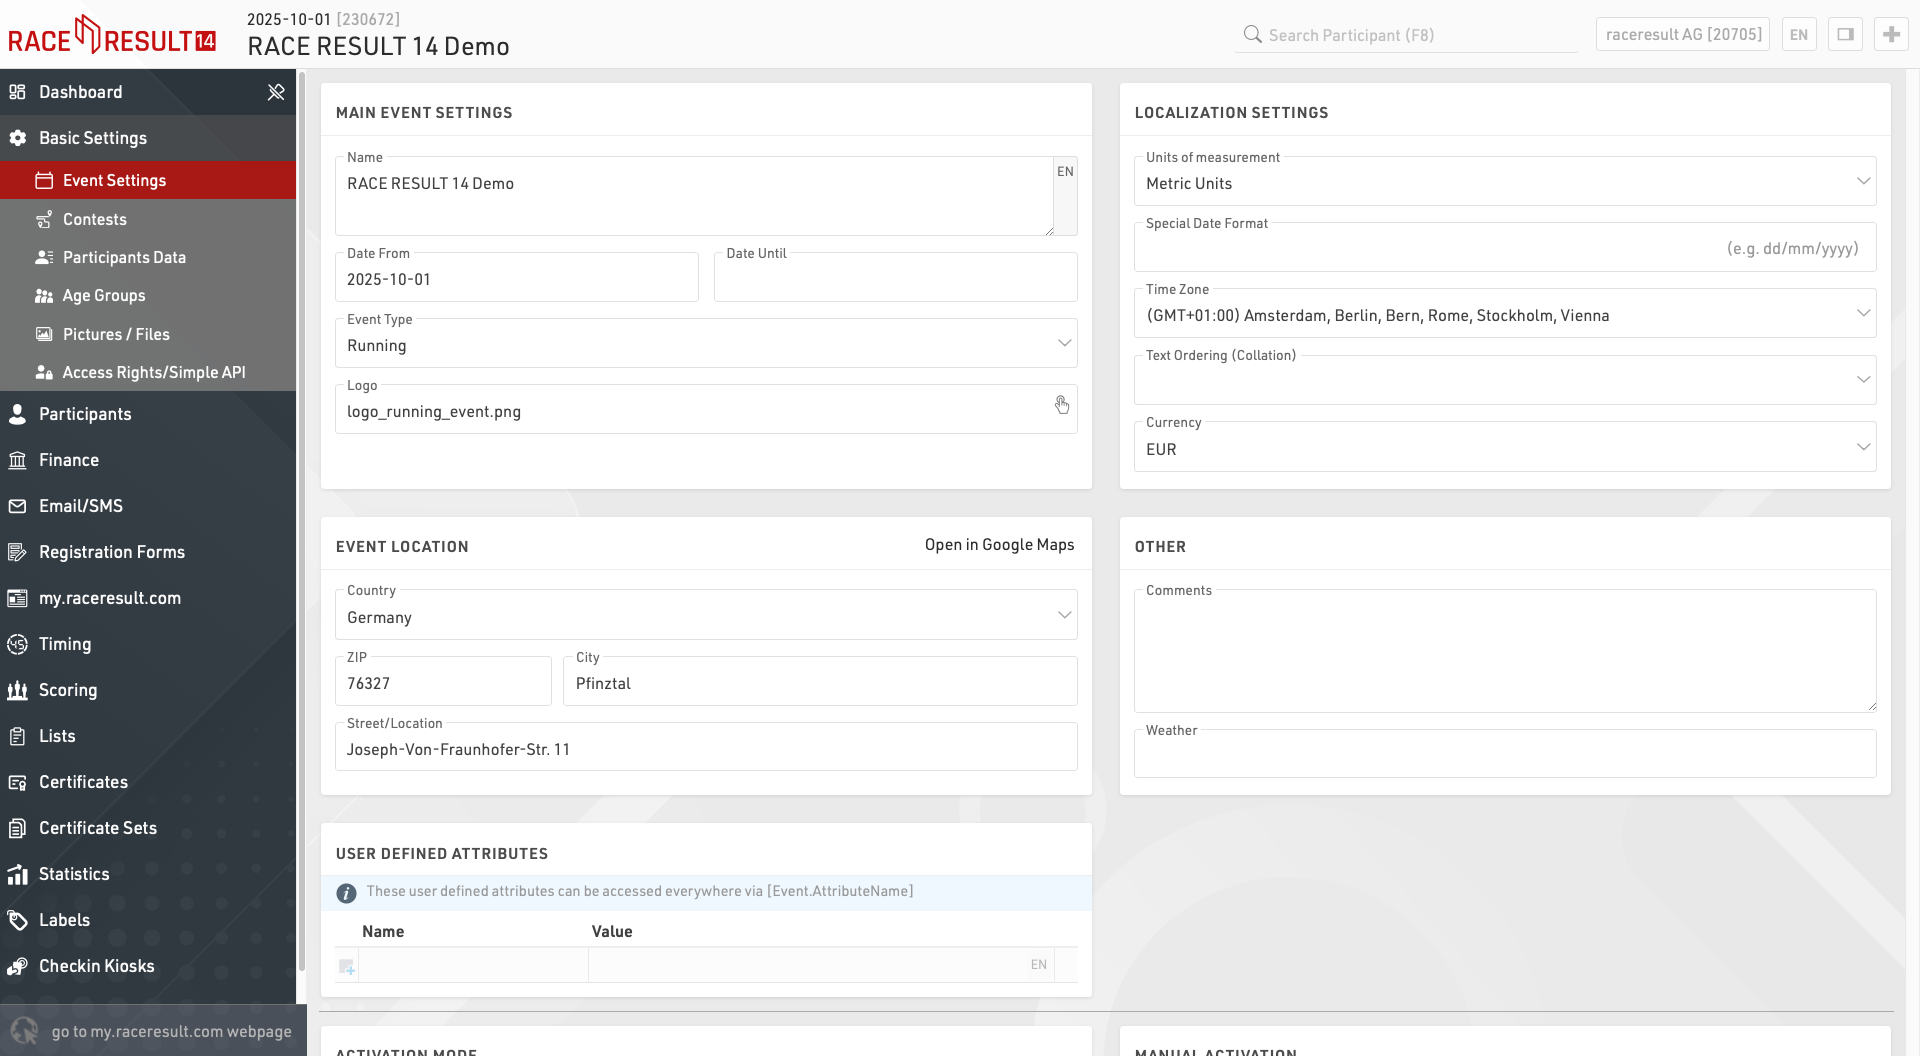
Event Settings
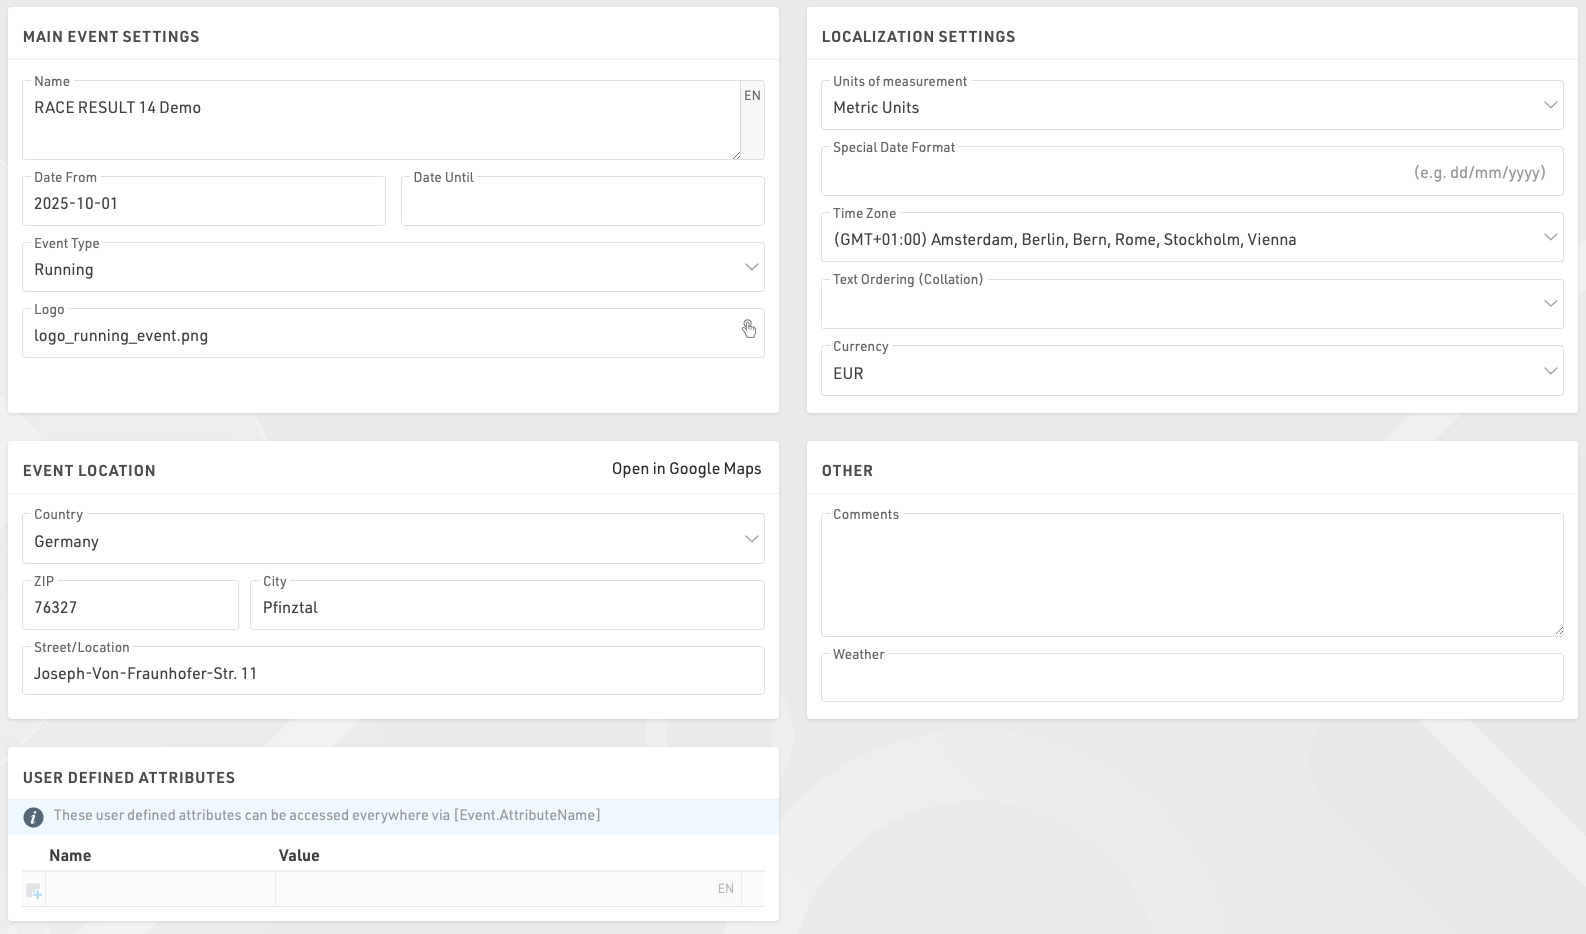
Main Event Settings
These are the most basic settings of an event including the Event Name and Date, the type and logo (150x150px) are used for the event listing on the my.raceresult.com platform.
Localization Settings
The localization settings are used to set specific values for the event.
Units of measurement determine whether the default values should be shown / calculated in metric or imperial units, this is used by for example the Splits setup and default functions for speed and pace (which return Km/h and Min/Km or Mph and Min/Mile accordingly).
The special date format allows you to enter and display dates according to your local standard or a required format.
Time zone is used for calculating the current time for the event, this is used when setting a date / time for which elements of the online platform (such as registration) should be available. This is also used to convert the UTC times from Track Boxes to the correct local time.
The Text Ordering (Collation) allows you to define the mode of alphabetic ordering as different languages sort special characters in different ways.
The currency which should be used to calculate entry fees and to capture payment through the registration module.
Event Location
The location is used by the my.raceresult.com platform to help users find events, it also sets the centre point of maps for elements within the software.
Other
Enter comments or weather information about the event, these can be later referenced in output lists for headers and footers so could be to note important changes to the event which may occur.
User Defined Attributes
Attributes allow you to define custom fields for the Event which can be used anywhere using [Event.AttributeName].
Contests
Contests are used to define groups of participants, for example in a running event with a Marathon and Half-Marathon, each distance would be a unique Contest. Every participant in your event should be assigned to a Contest.
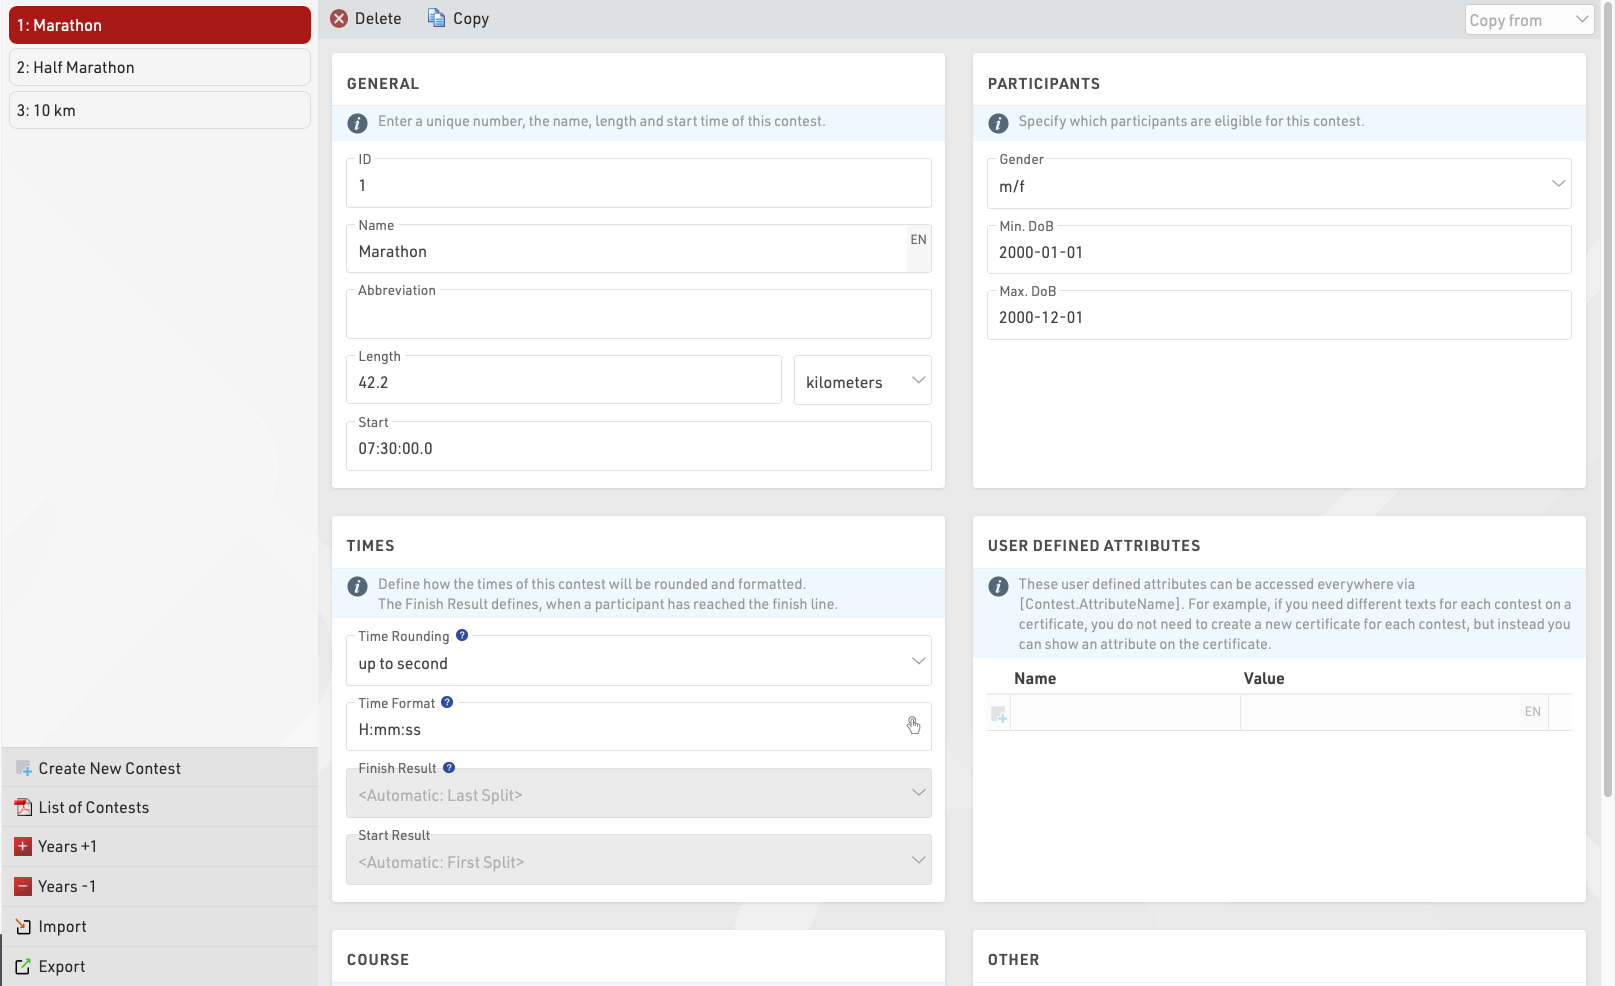
The setup of a contest has several effects:
- Participants of different contests are usually ranked separately (i.e. there is a first place for the 5k and a first place for the 10k).
- Define per contest how the times are rounded and formatted.
- Define different Age Groups and Entry Fees per contest.
The individual settings are explained in the following:
General
Simply enter the name, distance/length and start time of the contest and assign a unique number (ID).
Participants
Define which participants are eligible for the contest. This has the following effects:
- Non-eligible participants will not be accepted in the online registration and on-site registration.
- When entering a non-eligible participant in the Participants Window, a warning message will show.
- The Data Analysis will show non-eligible participants.
Times
These settings define how the times of the participants of this contest will be rounded and formatted by default. Note that the Time Format settings in General Result Settings will take priority if set.
Additionally, select the Finish Result. The Finish Result will be highly relevant for Scoring, the selection of the Finish Result has two effects:
- The fields Time and DecimalTime refer to the formatted/decimal time in the respective result. For example, Time can refer to the field Time2 for participants in one contest while it refers to Time5 for participants in another contest.
- The field Finished is true for every participant if there is a time entered into the corresponding finish result, and the participant is counted as finished in the Overview Window.
By default, Finished is used as a filter for the rankings and DecimalTime for the sorting of the rankings. In other words, the Finish Result is used for the most important scorings. When using Splits, the Finish Result can automatically use the Last Split, this will be used as either Gun Time or Chip time according to the Time Mode selected in the Splits setup for that contest.
Similarly, you can select the Start Result, if you have a timing line at the start, select to either automatically use the first Split or the result that contains the start time. The field Started will be true if the participant has a time in the start result and the participant will be counted as started in the Overview Window.
User-Defined Attributes
Attributes allow you to define custom fields for each Contest and allow you to show different texts for each Contest, you can use the Attributes anywhere using [Contest.AttributeName].
You can define attributes with the same name for different Contests and then call this field in the relevant output / certificate.
Course
Upload a GPX file with the course or draw the course on the map by clicking the Create Route button. The courses will be shown on all maps in RACE RESULT 14 which is helpful for example to validate that the timing systems are set up at the right spot.
Other
Each Contest can be assigned a specific color identifier. This color can be called on lists for dynamic formatting using Contest.Color or applied to customize my.raceresult.com result list boxes and favorites lists.
When the Start Transponder is being detected, this is usually a marker from your timing system which is recorded as a transponder code such as 99999, the time will be saved as Start Time (T0).
Set the contest to inactive to hide it in the Overview Window. Use this function for example if one contest does not take place this year, but at next year's race again.
Participants Data
One of the most important aspects of managing an event is the handling of participant data, this includes a range of default fields and functions but also allows you to store or calculate your own custom fields and functions. To simplify the work flow you can enable / disable certain default fields and also control how these fields behave when editing through the Participants Window.
Default Fields
Define some general settings for data handling in the Participants Window. Activate or deactivate standard fields and define if these are mandatory or not. If mandatory fields are not filled in the Participants Window, they are highlighted with a red bar and a warning will show when trying to save. Note that for the Online Registration mandatory fields can be defined separately.
Input Assistance / Settings
Control how data should be handled when entering/editing participants directly in the Participants window. When Age Group changeable is enabled then the Age Group can be manually changed, which can be useful if working with overlapping Age Groups - but note that this will be overridden if the Age Groups are recalculated at a later time. You can also disable Agender if that shouldn't be used throughout the event file.
User Defined Boxes in Results Tab
It is possible to set an output list to show at the top a participant window. This can be useful for events with a large number of results that are difficult to scroll through or show additional data not shown in the main participant window. 
Bib Numbers
These settings decide how the system handles bib numbers.
Assigning Bib Numbers
By default, the highest bib number +1 will be proposed when entering a new participant. However, there are two more options: First free bib number proposes the smallest unused bib number and No Proposal forces you to enter a bib number manually before entering the participant's data in the Participants Window.
If you do not want to allow certain bib numbers, enter these in the input box Exclude Bib Numbers. Then, these will not be proposed.
Bib Ranges
A Bib Range assigns a certain range of bib numbers to one contest. Having defined bib ranges, there are two options:
- After entering a bib number for a new record in the Participants Window, the contest according to the bib range settings will be selected. For this option select Use bib ranges to propose contest.
- After selecting a contest for a new participant in the Participants Window, a bib number from the bib range will be assigned to the participant. Therefore select the option Use bib ranges to propose bib number.
- You can also temporarily ignore bib ranges.
Also, you can define different start times per bib range.
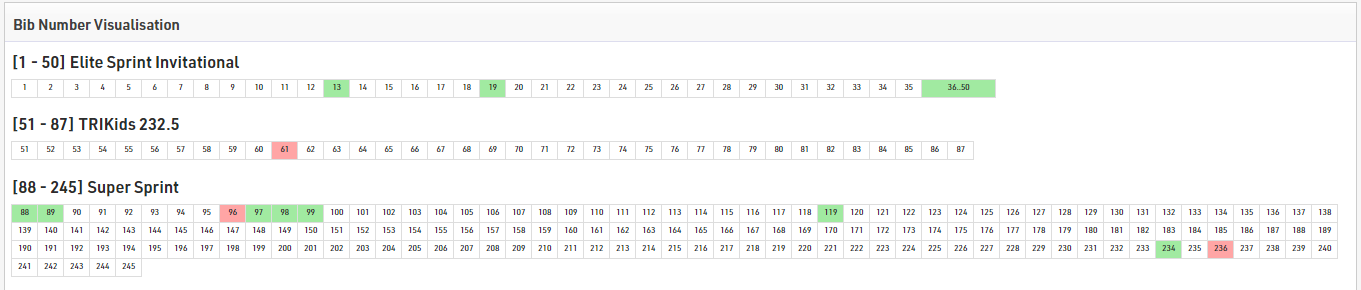
Bib Number Visualisation
The bib number visualisation creates a table with all bib numbers available for each Contest according to the Bib Ranges setup. The bib numbers may be shown in 3 different colours.
White - The bib number is already assigned
Green - The bib number is not assigned yet
Red - The bib number is assigned but the participants Contest does not match the Bib Ranges set
Additional Fields
If you want to collect additional data, you can define an unlimited number of additional fields to store participant data. Additional fields can be grouped together with custom group labels, each group will be displayed in a separate box in the participants tab.

Additional fields require a unique field name, and can additionally have a separate label which will be displayed in the participants window and registration forms.
Field Type
Each additional field has a type which changes the input and display characteristics of the field, or how the field is to be used.
| Text Field | Creates a text box for typing any text value |
|
Drop Down |
Creates a drop-down field to select a pre-defined value from the provided selection values. Selection values should be entered as a list of semi-colon separated values, the first of which can be empty to offer an option for no value or to prevent pre-filling of the field (e.g. ;S;M;L;XL) |
| Check Box | Creates a check box to mark a value as true or false, returned as either 1 or 0 |
| Number (Integer) | Allows only numerical input of whole numbers |
| Number (Decimal) | Allows only numerical input of any decimal value |
| Date | Creates a date entry field in registration forms / kiosks, only accepts date values which should be formatted according to your date format settings |
| Currency | Allows only numerical input with a maximum of 2 decimal places |
| Country |
Creates a drop-down pre-filled with a list of available countries |
| Only allows correctly formatted e-mail addresses to be entered | |
| Phone Number |
Upon completion formats numbers only as phone numbers Values entered without an international dialling prefix will be prepended with the dialling code of the event country |
| Transponder | Values entered will be handled as transponder assignments in place of the Chip File or default Transponder fields |
Extended Settings
| Active | Whether the field is activated and should be displayed in the Participants window |
| Mandatory | If the field should be considered mandatory |
| Default Value | The default value in the field when creating new participants |
| Placeholder | A placeholder text displayed in the input when empty |
| Min Length | The minimum length of the value for the field |
| Max Length | The maximum length of the value for the field |
User-Defined Fields / Functions
Creating your own Fields and Functions allows you to quickly and easily call specific data without creating a long expression each time. User-Defined Fields/Functions are normally used with other data fields, or are used to return the same for every participant.

Some default User-Defined fields are available when creating a new file, such as MaleFemale which converts Gender to the full gender label. These default fields can be updated as you prefer.
When creating User-Defined fields the Expression must be formatted as a RACE RESULT 14 Expression.
When writing functions which should take additional parameters then the field name should use brackets around a semi-colon separated list of identifiers (e.g. Function(x;y) creates a function with 2 parameters x and y).
Parameters can be accessed inside the function by wrapping them in square brackets (e.g. [x] and [y]).
e.g. YesNo(x) - if([x];"Yes";"No") is normally used with Check Box values to return "Yes" or "No" in an Output List if the value of [x] is 1 or 0.
It can also be useful to write a note for each function to describe its purpose or how it should be used.
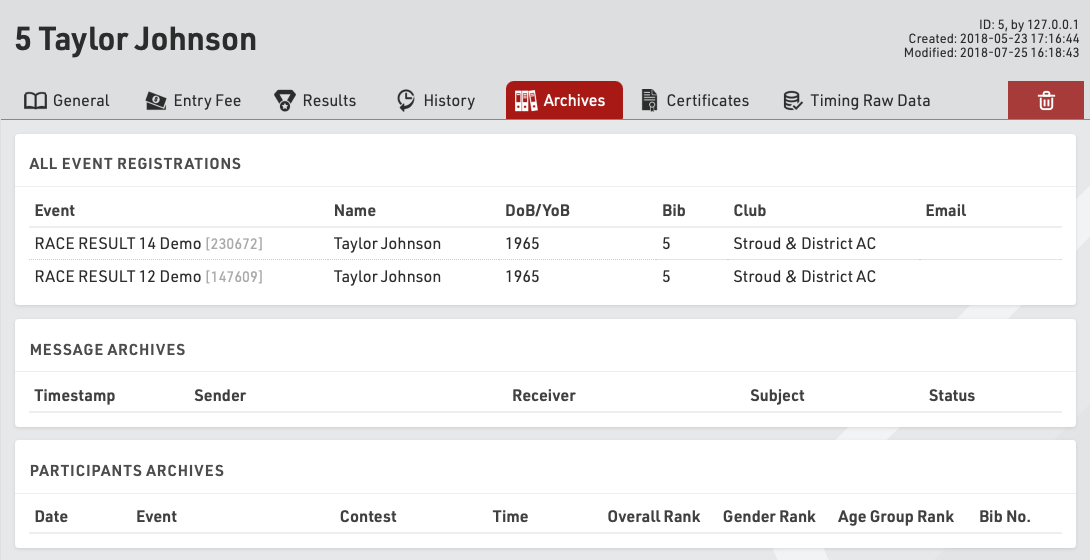
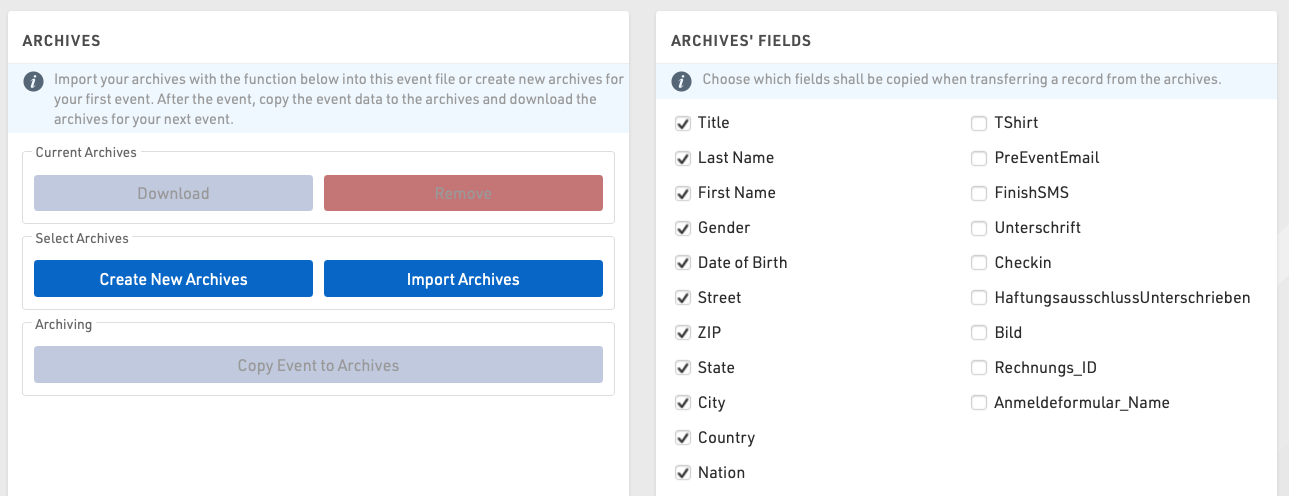
Archives
Using Archives, you can access data from previous events in the Participants Window:
- When manually entering a new participant, the records from the Archives will be suggested, so that you can import the record including attributes from the Archives.
- Results from previous events will be available in the Archives tab.
Procedure for Using Archives
After the event, go to the Archives settings. When using the archives function for the first time, create a new archives file and then write the data into it (button Copy Event to Archives).
For next year's event you can create a copy of the event file which then still includes the archives file.
If you already have an event file for the upcoming event, you can proceed as follows:
- Open last year's event and create a new archives file in the Main Window. Copy the event data to the new archives file and then download it to your local PC.
- Open next year's event and import the archives file from your local PC. If there already is an archives file in the new event, it needs to be deleted first.
Age Groups
An Age Group (short AG) is a group of athletes with roughly the same age. Usually, events have an age group score where the athletes of each group will be ranked independently from the athletes of other groups. Age Group definitions often vary according to the type of sport and also your local governing body regulations.
When creating a new Event File, default age groups will be set up automatically which can be changed freely according to your needs.
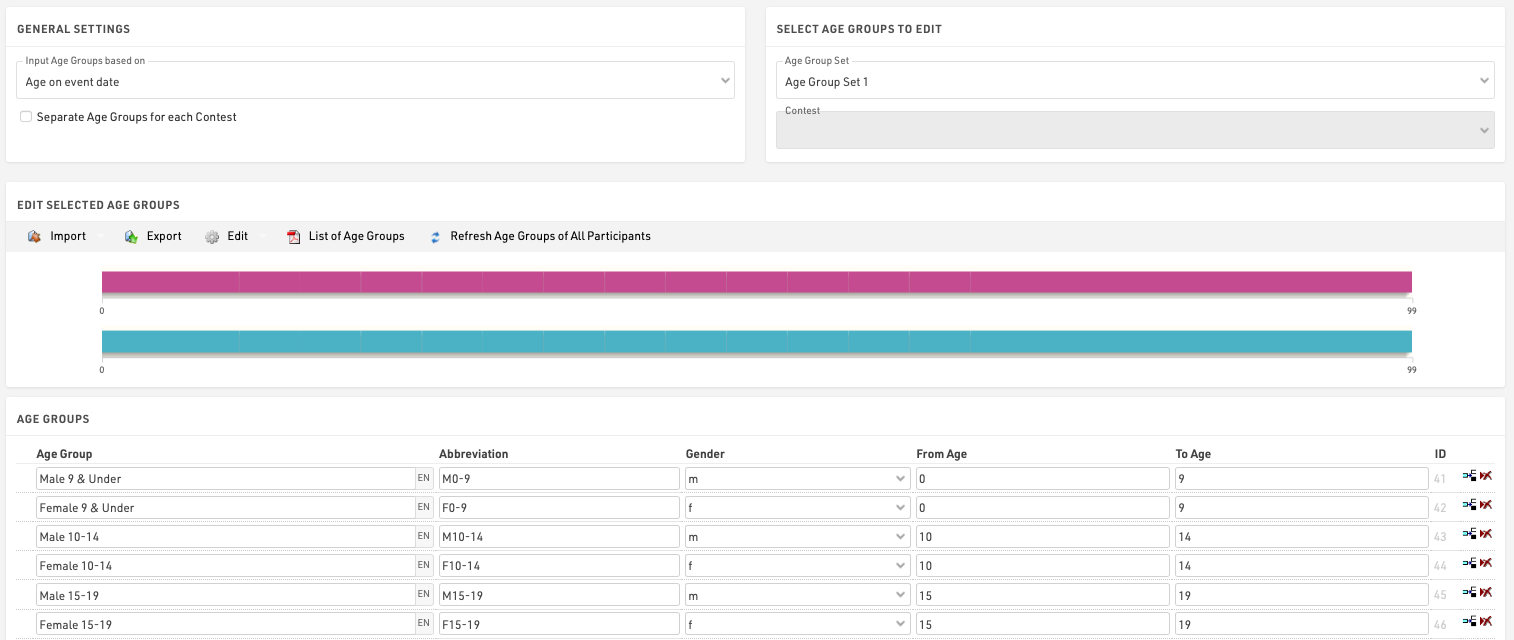
General/ Import of Age Groups
Via the Import button you have the opportunity to import age groups from different sources. For example, you can load standard age groups or import age groups from a file which you created via Export.
Should you have made a copy of the previous year's event file, you can adjust the age groups with the functions Edit->Years +1 and Years -1.
If you need different age groups for different contests, activate the option Separate Age Groups for Each Contest under General Settings. Either enter different age groups for each contest or import them with the function Import->From Contest from another contest and then make necessary changes.
Second/Third Age Group Set
Maybe it is necessary to set up two or three different age group sets so that each participant is assigned two or three age groups. The second age group can be used for an additional score like a team score where for example the age groups M40, M45 and M50 are combined in the age group Masters.
Input Age Groups Based On
You will need to define on which criteria you will enter and with which age groups are set, this will usually depend on the type of event you are timing. Under Input Age Groups Based On you can select:
Date of birth - Age groups are set by a defined date range rather than age ranges.
Age on event date - Participants' age on the day of the event set in the event Basic Settings.
Age on 12/31 (Previous Year) - Age on 31st December of the previous year.
Age on 12/31 (current year) - Age on 31st December of the current year.
Age on arbitrary date - Age on a specific date, to be defined below.
Updating Age Groups
In the Participants Window, the age group will be assigned automatically, based on gender and date of birth. However, you can manually change the age group if needed. That is why age groups will not be updated automatically, when changing the age group settings.
To update the assigned age groups after changing the age group settings, click on Refresh Age Groups of All Participants.
Useful Hints
Accessing Age Groups
On lists and certificates you can access the name of the age group selected for the participants via the fields [AgeGroup.Name] / [AgeGroup1.Name] (and [AgeGroup2.Name], [AgeGroup3.Name]).
Sorting of Age Groups
Often the age groups are to be handed out in a certain order, for example because an age group is first in the award ceremony. Therefore you can change the order of the age groups by moving the arrow icon on the left to the desired position. The order of the age groups influences the fields [AgeGroup1.OrderPos] ([AgeGroup2.OrderPos], [AgeGroup3.OrderPos]) which create ascending numbers according to the entry order in the age group settings. These fields can be used for sorting on lists. The default list Result List AG also uses this procedure.
Age Group Abbreviation
Aside from the name for the age group you can also enter an abbreviation. If not much space is left on a list, you can access it via the field [AgeGroup.NameShort] / [AgeGroup1.NameShort] ([AgeGroup2.NameShort], [AgeGroup3.NameShort]).
Age Group ID
Each age group has a unique ID which does not change if the name of the age group is changed. It can be accessed via the field [AgeGroup.ID] / [AgeGroup1.ID] ([AgeGroup2.ID], [AgeGroup3.ID]).
The age group ID is well suited for the grouping at the calculation of rankings as age groups are distinguished even if they have the same name. If you set up two groups named Kids (for boys and girls separately) and group the ranking by AgeGroup.Name, boys and girls would be ranked together. However, if you use AgeGroup / AgeGroup.ID instead, the two age groups will be ranked separately.
Pictures / Files
Images and other files can be imported into your event file for use in other parts of the software, most commonly for the my.raceresult.com header.
Files can be imported under Basic Settings ⇒ Pictures / Files

Files which are not stored in any folder will be saved directly to the event file and will be downloaded if the event file is checked out.
Files stored inside the my folder will be available across all event files under your account when working online.
Files stored inside the common folder are stored online and can be accessed by any RACE RESULT user, inside here exists some alternative flags which use the Country / Nation Alpha-2 abbreviation for the file name.
To access files stored inside folders the image name works as a standard file storage system, for example an image named "header.png" stored inside the common folder would use the image name "common\header.png".
See our How To guide on how to use your images and files in different parts of the software.
Access Rights / Simple API
Access Rights
An event file always belongs to a single customer account, and only the account owner can access the access rights settings for security reasons.
Through the access rights you can grant access to another RACE RESULT account either by username or customer ID, you can additionally control the access to certain areas of the software for that specific event by clicking the Edit Icon.

Simple API
The Simple API serves to make data from your event file accessible through a static link without logging in to your customer account, this may be to publish results on another website.
Settings can be accessed through Basic Settings ⇒ Access Rights/Simple API. Simply select what type of data you would like to make accessible and then select the list name or enter the setting name. The details for each API type are below.

The icon in the column Link then leads to the static link.
When calling APIs you should consider that they will be cached for between 10-30 seconds, therefore calling them more often may not result in data updating correctly.
The Simple API applies rate limiting of 1 call per second per each unique API URL from each unique address. If your client script is calling an API more than once per second then it will receive a 406 error code. If you require more frequent calls please contact support.
Webhooks
RACE RESULT 14 can send webhooks upon certain triggers, these are predominantly used to ensure the synchronization of data between 2 separate data stores, for example if you are using your own registration platform and want to ensure participant data is updated if it is changed in the Event File.

Webhooks are configured under Basic Settings ⇒ Access Rights / Simple API.
Each webhook needs to define the trigger, the destination URL, and for certain triggers a filter and fields can be defined.
When setup and activated the webhooks will automatically be sent according to the triggers defined, there is no time limit to how long webhooks will be activated for.
All webhooks are sent as a POST request with data in the POST body as JSON, by default the body will always contain Event ID, Webhook ID, Timestamp, additional values depend on the trigger being used.
A call is considered successfully sent if a response code <500 is received, even if the status code is an error code it is still considered received by the destination. If a call is unsuccessful then the server will attempt to resend it with an increased delay between or until the Server queue limit is reached at which point the message will be dropped.
Webhooks are sent by the SES which is running the event file, if you are timing offline, even with online forwarding enabled, the webhooks will only be sent by your local SES.
Triggers
New Participant
A call will be sent when a new participant is added, this can be either through import participants, online registration, on-site registration or directly through the participants window.
A filter can be applied to only send the webhook if a certain filter is true, for example if a participant has selected a specific option during registration.
The post body can also include any fields which are defined as a list of semi-colon separated values.
Participant Update
Similar to the new participant trigger the participant update will send whenever the data fields of a participant record are changed, this will not be triggered by changes to Splits, Results calculations or User-Defined Fields.
A filter can also be applied to participant updates and the post body can be configured to include fields as well.
New Raw Data
The new raw data trigger will be sent whenever a new raw data record is added, the record is linked to a participant record so you can optionally define a filter and fields to be included in the POST body.
When using the New Raw Data it is recommended to link the filter to a specific result or the Finish result, for example - only send the webhook if the participant is Finished. Any calculations which depend on the raw data record will be completed first so it will send even if that time is used for the specific result you are looking at.
Settings Changed
This applies to any event file settings which are changed, this includes for example all Event, Chip Timing and Scoring settings, updates to Output Lists, my.rr settings and more.
Since the settings apply to the Event file and not a participant record it cannot be filtered or include additional fields. The Post body will include the ModJobID in the Values field to allow you to track the changes.
The ModJob ID is an integer which represents the last calculation cycle run by the SES. Whenever something is changed in an event file a unique job is run which calculates what should be updated in the database. This ID will increase for every change no matter how big or small.
All Changes
All changes means any change to the event file.
Since the all changes applies to the Event file and not a participant record it cannot be filtered or include additional fields. The Post body will include the ModJobID in the Values field to allow you to track the changes.