Detections
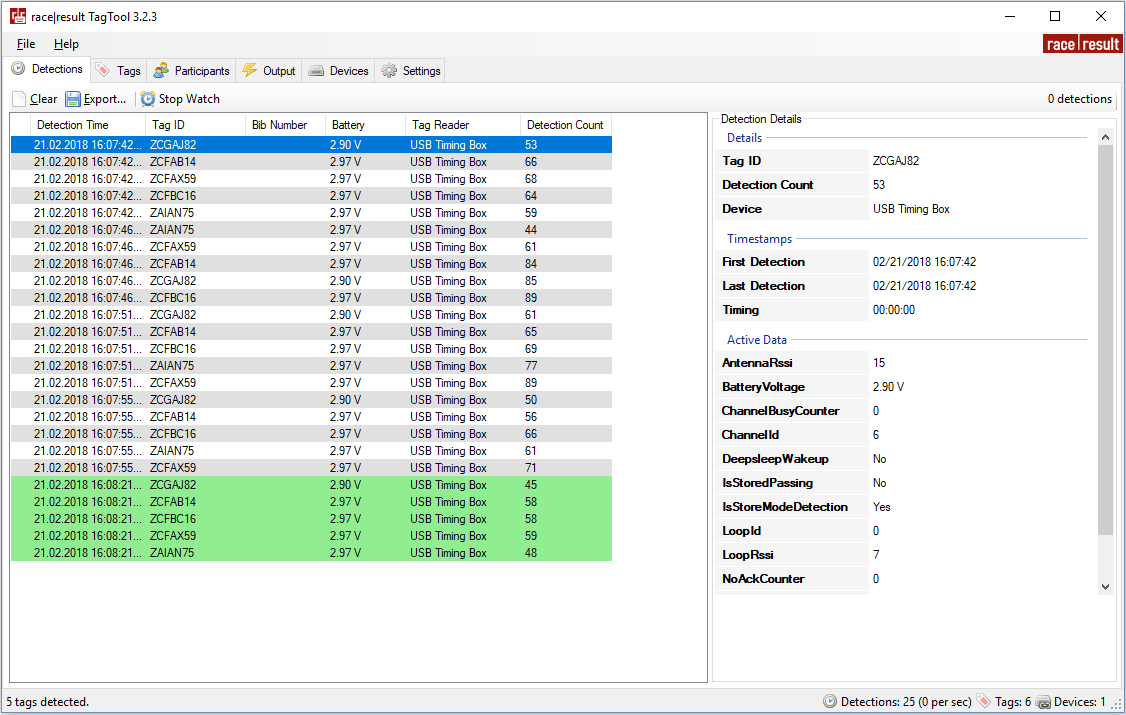
Here you see all tag detections your connected readers have received, new chip reads will be highlighted in green for 1 second.
- Click on a detection to see details on the right pane.
- You can sort the list by clicking on the column headers.
- The list can be saved as a text or CSV file by clicking "Export".
- Active Transponders will display a warning if the internal battery is below the threshold set in the Settings Tab
Tags
This list shows you tag inventory. Contrary to the detection list, all tags only appear once in the list with the total number of times that chip has been seen.
Details, sorting and exporting are similar to the Detections tab but will also show participant information if you have linked this to a participant in the Participants Tab.

Participants
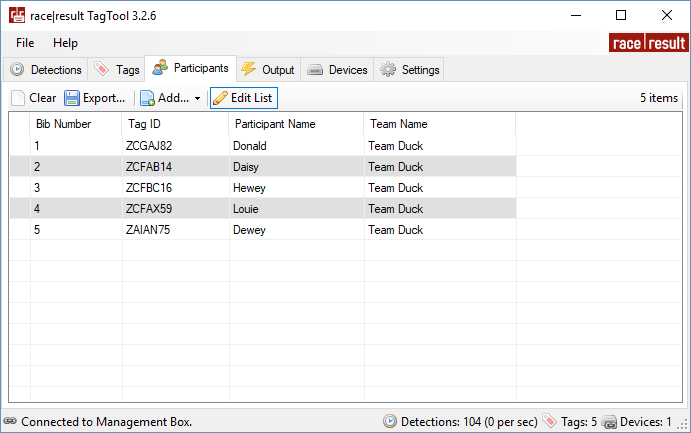
Here you can assign participants and bib numbers to individual tag IDs. The assignments will be shown in the Detections/Tags tabs.
- Add items to the list by clicking on "Add..". You can either import from a text or CSV file, or create a bib number range with the generator.
- You can edit the list directly by clicking "Edit List" above the table then directly editing fields.
- Export the chip file by clicking on "Export...", you can chose between Tab separated, semi-colon separated or comma separated values.
- Sorting by the column Tag ID will group transponders by the prefix for easy sorting of transponder groups.
Column headers can be re-ordered by clicking and dragging the column header and moving it to your desired order. Your import file should be in the same order as your column headers, and exported files will be in the same column order.
Output
On this tab, you can setup different automated outputs that will be executed whenever a tag registers a new detection such as emulating a keyboard and typing the transponder code or sending the data to a file. You can define the output format individually.
- Click on "Add Output" to create either a new file or virtual keyboard output.
- The checkbox of each item enables or disables the output.
- You can freely define the desired output data format. Tag data is inserted via placeholders. See available data placeholders below.
- For file outputs, you need to define the output file name in the "File Name" setting.
- For virtual keyboard outputs, you can define a "Target Window Title". The output is only executed when the title of the currently focused window starts with the defined text.
Data Format Placeholders
All data of a Tag object and its sub-objects can be accessed by using placeholders in the output's Data Format.
Placeholders are marked by leading {{ and trailing }} brackets and ignore spaces. So in order to access the Transponder ID of a tag, you can write {{TransponderID}}, {{Transponder ID}} or {{ Transponder ID }}.
All placeholders start at tag level. Sub-object data can be accessed by using the dot, so {{Participant.Field1}} is accessing Field1 of the assigned Participant. In case you have the participant names in Field1 of the participant list, this example will output the assigned participant name. If no participant was assigned to the tag, the placeholder will output no text.
Some data is available for active tags only, such as Battery Voltage and Temperature. For those, a placeholder will output no text for passive tags.
You can look up available placeholders below. Alternatively, you can check the available data in the Tag Details panel by clicking on a list item in the Tags tab.
Available Placeholders
Frequently used placeholders are written in bold.
- {{TransponderID}}
- {{BatteryVoltage}}
- {{Temperature}}
- {{LastSeen}}
- {{TotalDetections}}
- {{OrderID}}
- {{Participant.Bib}}
- {{Participant.Field1}}
- {{Participant.Field2}}
- {{Participant.Field3}}
- {{Participant.Field4}}
Special keys for Virtual keyboard outputs
For Virtual Keyboard outputs, special characters can be inserted with the following placeholders.
Please note that unlike data placeholders, they are marked with single brackets only, and cannot contain spaces.
- {ENTER}
- {TAB}
- {UP}
- {DOWN}
- {LEFT}
- {RIGHT}
- {ESC}
Devices
This tab lists all devices that are or have been connected to the computer. You can sort the list by clicking on a column header. Listed devices with the status "Not Present" are disconnected from the computer. You can remove them with "Clear Absent Devices".
Devices running firmware 2.5 or older are not compatible with TagTool 4.1.0 and newer, the status column will display an error that the firmware is outdated. The firmware can be updated using TagTool in the right side panel when clicking on a device.
When a Management Box is connected, you can click "Scan Wireless Devices" to search active Track Boxes. Wireless communication is done over the connected Management Box, so make sure the Track Boxes are within reach.
You can view device details of one or more selected devices on the right pane. For connected devices, device settings can be edited directly in the details pane by clicking on the value, for more information on settings for the Track Box see here.

The latest firmware for USB Timing Boxes and Management Boxes is included in the latest release of TagTool, to update a device simply click "Update" in the right pane and select the most recent firmware version (the highest value). It is important that you do not unplug the device during the update.
Settings
Here you can edit global application settings by clicking on the corresponding value, most importantly, when using the TagTool as a keyboard emulator you should ensure that "Start as Administrator" is set to "Yes", this ensures that the TagTool can insert text to another program.
You can also chose whether to start TagTool when Windows starts and whether or not this should be minimised upon loading.
You have the option to change the threshold for the Active Tag Battery Warning, however 2.4 is the recommended value for monitoring of Active Transponders.