The following articles show different ways to manage and customize the registration process.
Managing Online Payments
Accounting for Payouts of Online-Payment
RACE RESULT is often asked about the correct accounting rules for the online payment payouts. This article provides a proposal. RACE RESULT does not take any liability for the correctness of this information. Please consult a local tax consultant for open questions.
How should I account for the payouts of the online-payment?
The registration of a participant creates accounts receivable. By receiving the payout these cumulated accounts are reduced.
Account regularly for new sales (e.g. weekly or monthly). The function "Sales List" under "Overview > Online-Payment" lists all sales for the given period.
| DEBIT | CREDIT | ||
|
Accounts Receivable |
1,190 EUR | Revenues at 19% VAT | 1,000 EUR |
| 19% VAT | 190 EUR | ||
Is the payout 500 EUR worth of entry fees and 11.90 EUR payment fees are deducted, book the accounts as follows:
| DEBIT | CREDIT | ||
| Bank | 488.10 EUR | Accounts Receivable | 500 EUR |
| Costs of money transfer | 10.00 EUR | ||
| Input VAT 19% | 1.90 EUR | ||
Please note that RACE RESULT 12 tracks when a sale is created. In case you use the online self-service and athletes can book chargeable services after the initial registration - e.g. by booking a shirt - this may result in different creation dates of the sales items.
Set Entry Fee Based on Group Size
Events may offer discounted entry fees for group registrations, typically calculated in one of the following three ways:
-
Discount Starting from the n-th Participant: The discount is applied only to the n-th participant and any additional participants thereafter.
-
Discount for the Entire Group: The discounted entry fee applies to all participants in the group, provided the group meets a minimum size requirement.
-
Fixed Price for Group Registration: A set price is applied for the group registration, regardless of the number of participants in the group.
Starting From the n-th Participant
This method is based on the default [GroupRegPos] field, which is calculated for each participant in a group registration.
During a Group Registration all participants will be assigned the same value for [GroupID] and then are numbered starting from 1 in the [GroupRegPos], corresponding to the order in which participants are entered in the form.
To assign different entry fees based on [GroupRegPos], use the filter in the entry fee settings.

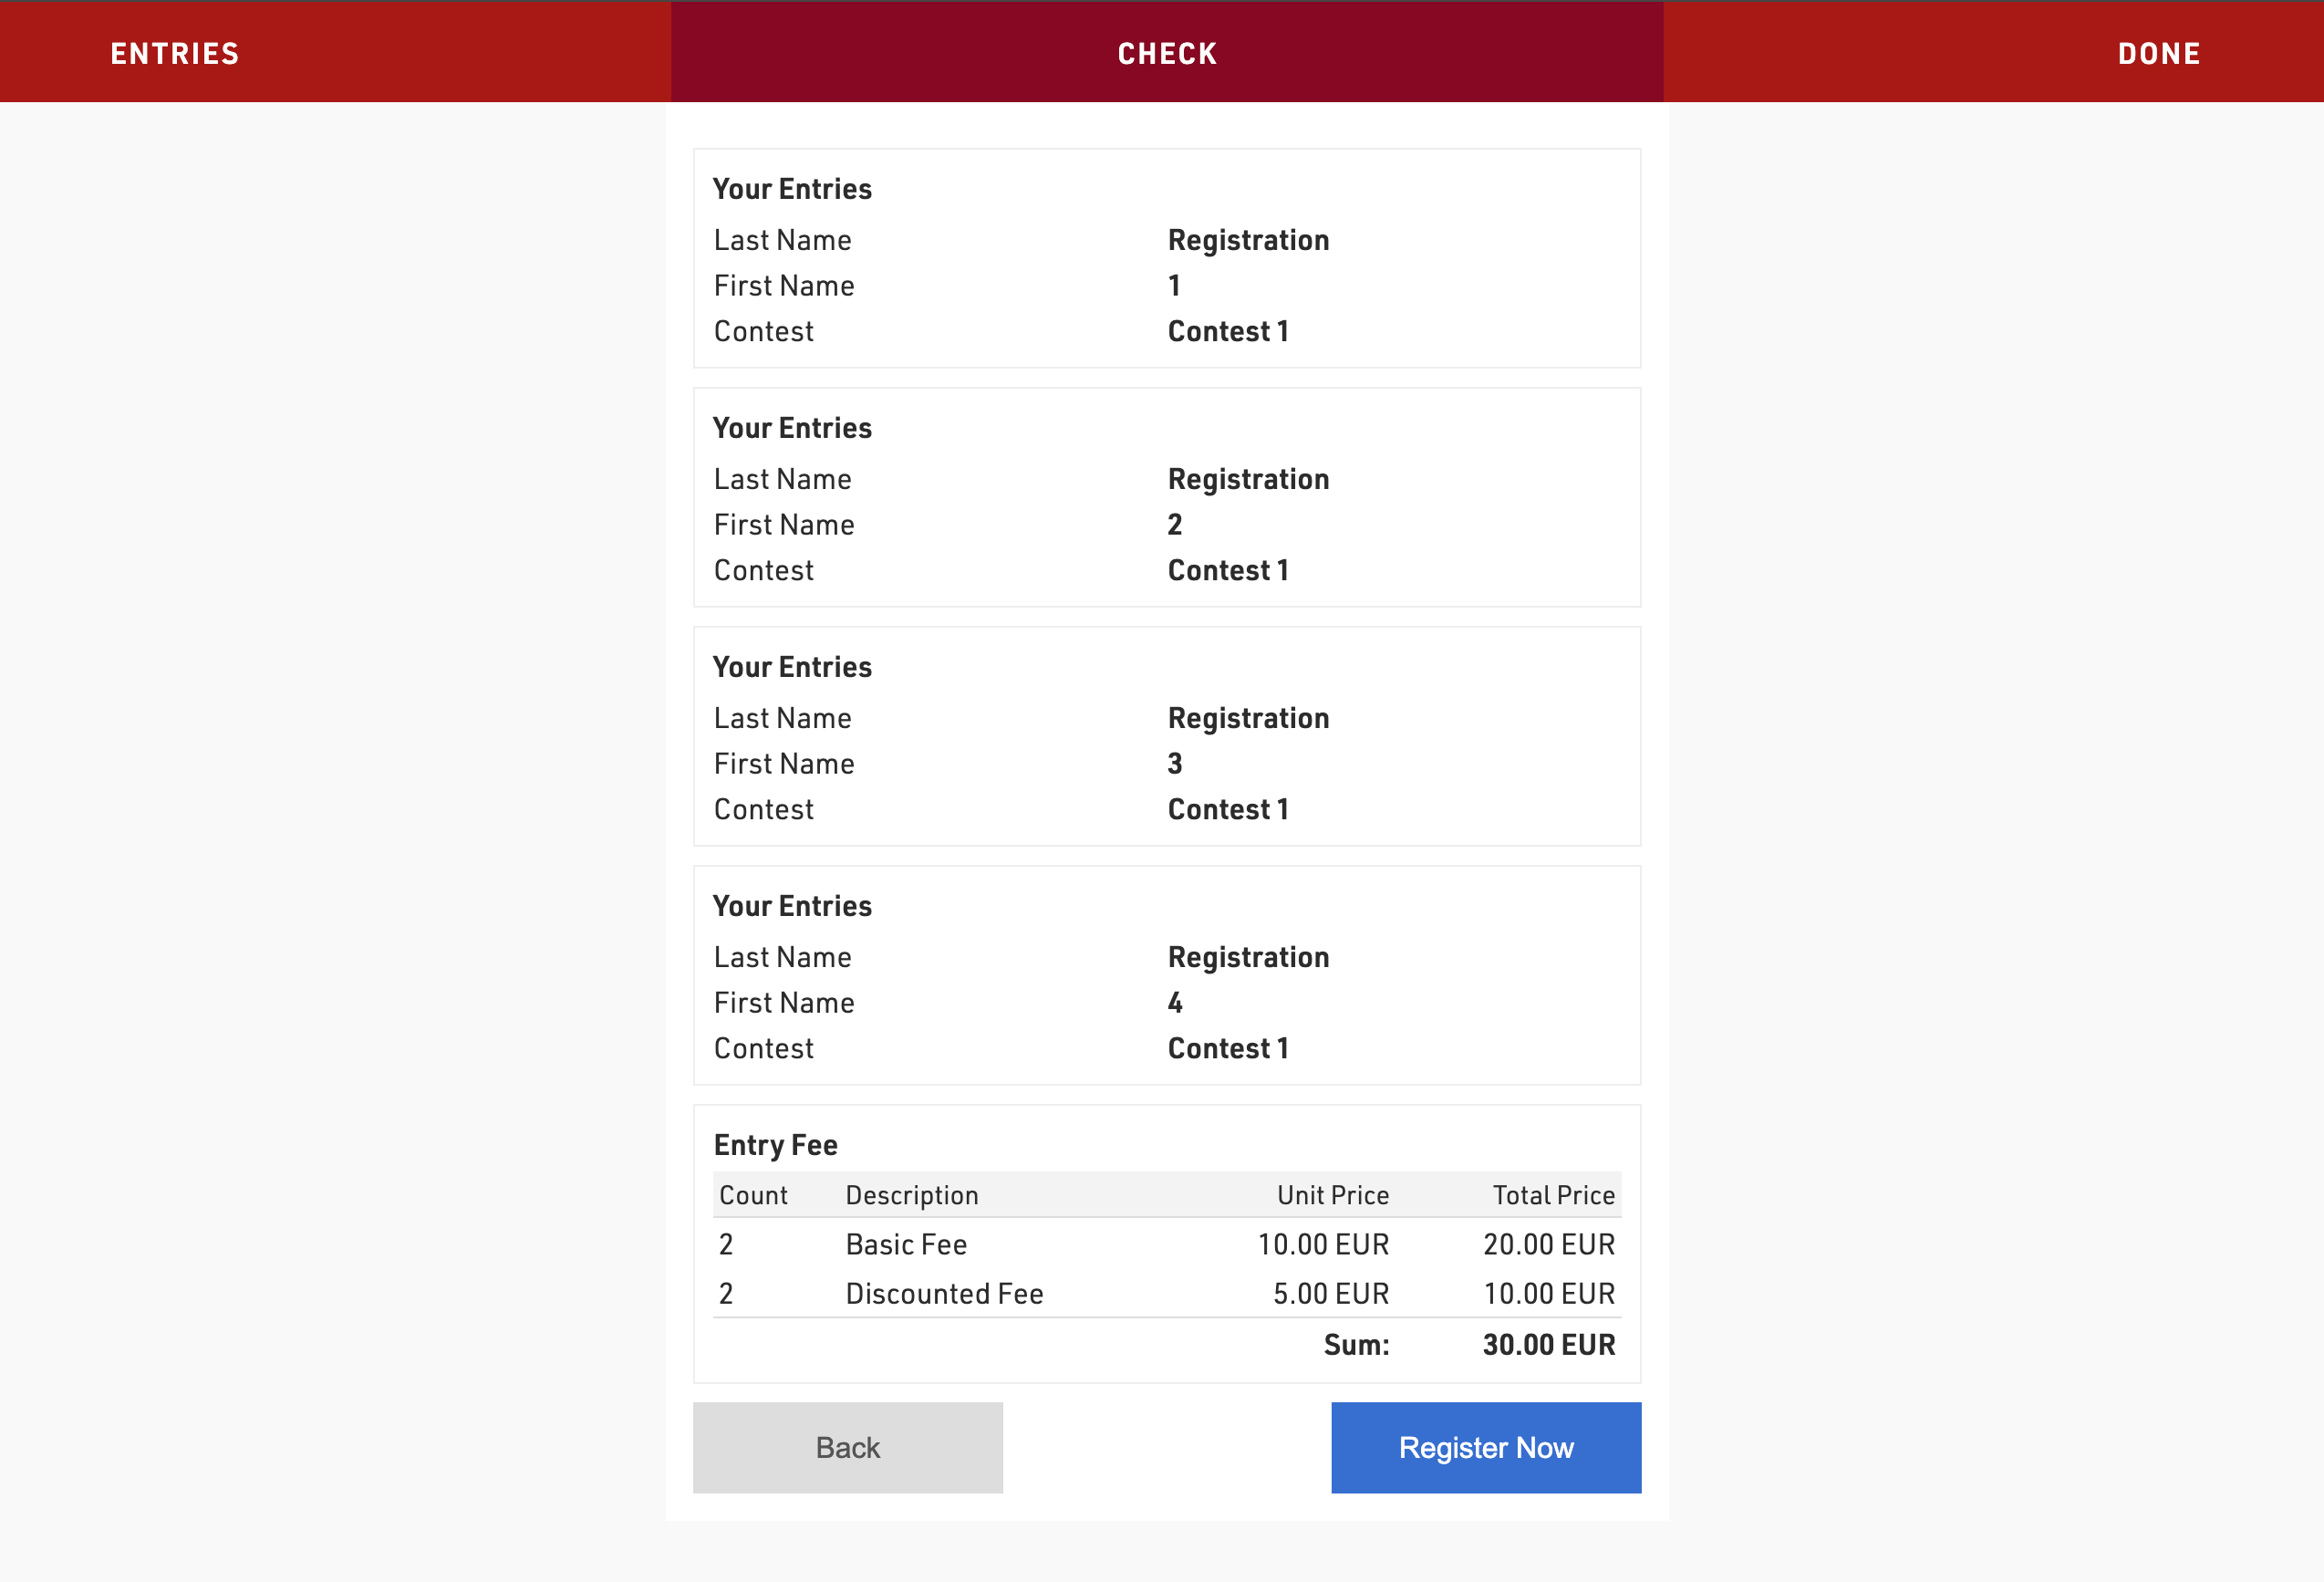
In this example - an entry fee of 10 EUR will be applied to the first two participants in the group, and then for the third participant and above an entry fee of 5 EUR is applied.
Whole Group
This method is based on the Group Registration Count, a source in the Advanced Settings of the registration form.
Create an additional field set as a number (integer) which will be used to store the group size for each participant, in this example it is called GroupRegSize.

In the advanced settings of your Group Registration form add the field to the Store Additional Values settings with the source Group Registration Count.
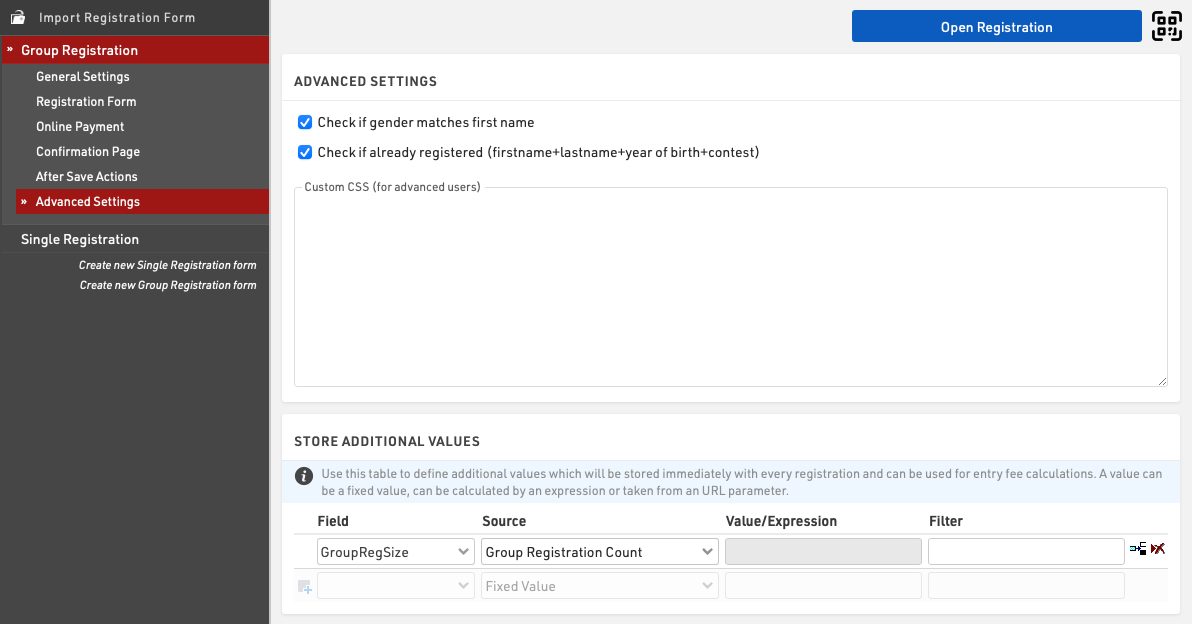
To assign different entry fees based on [GroupRegSize] use the filter in the entry fee settings.

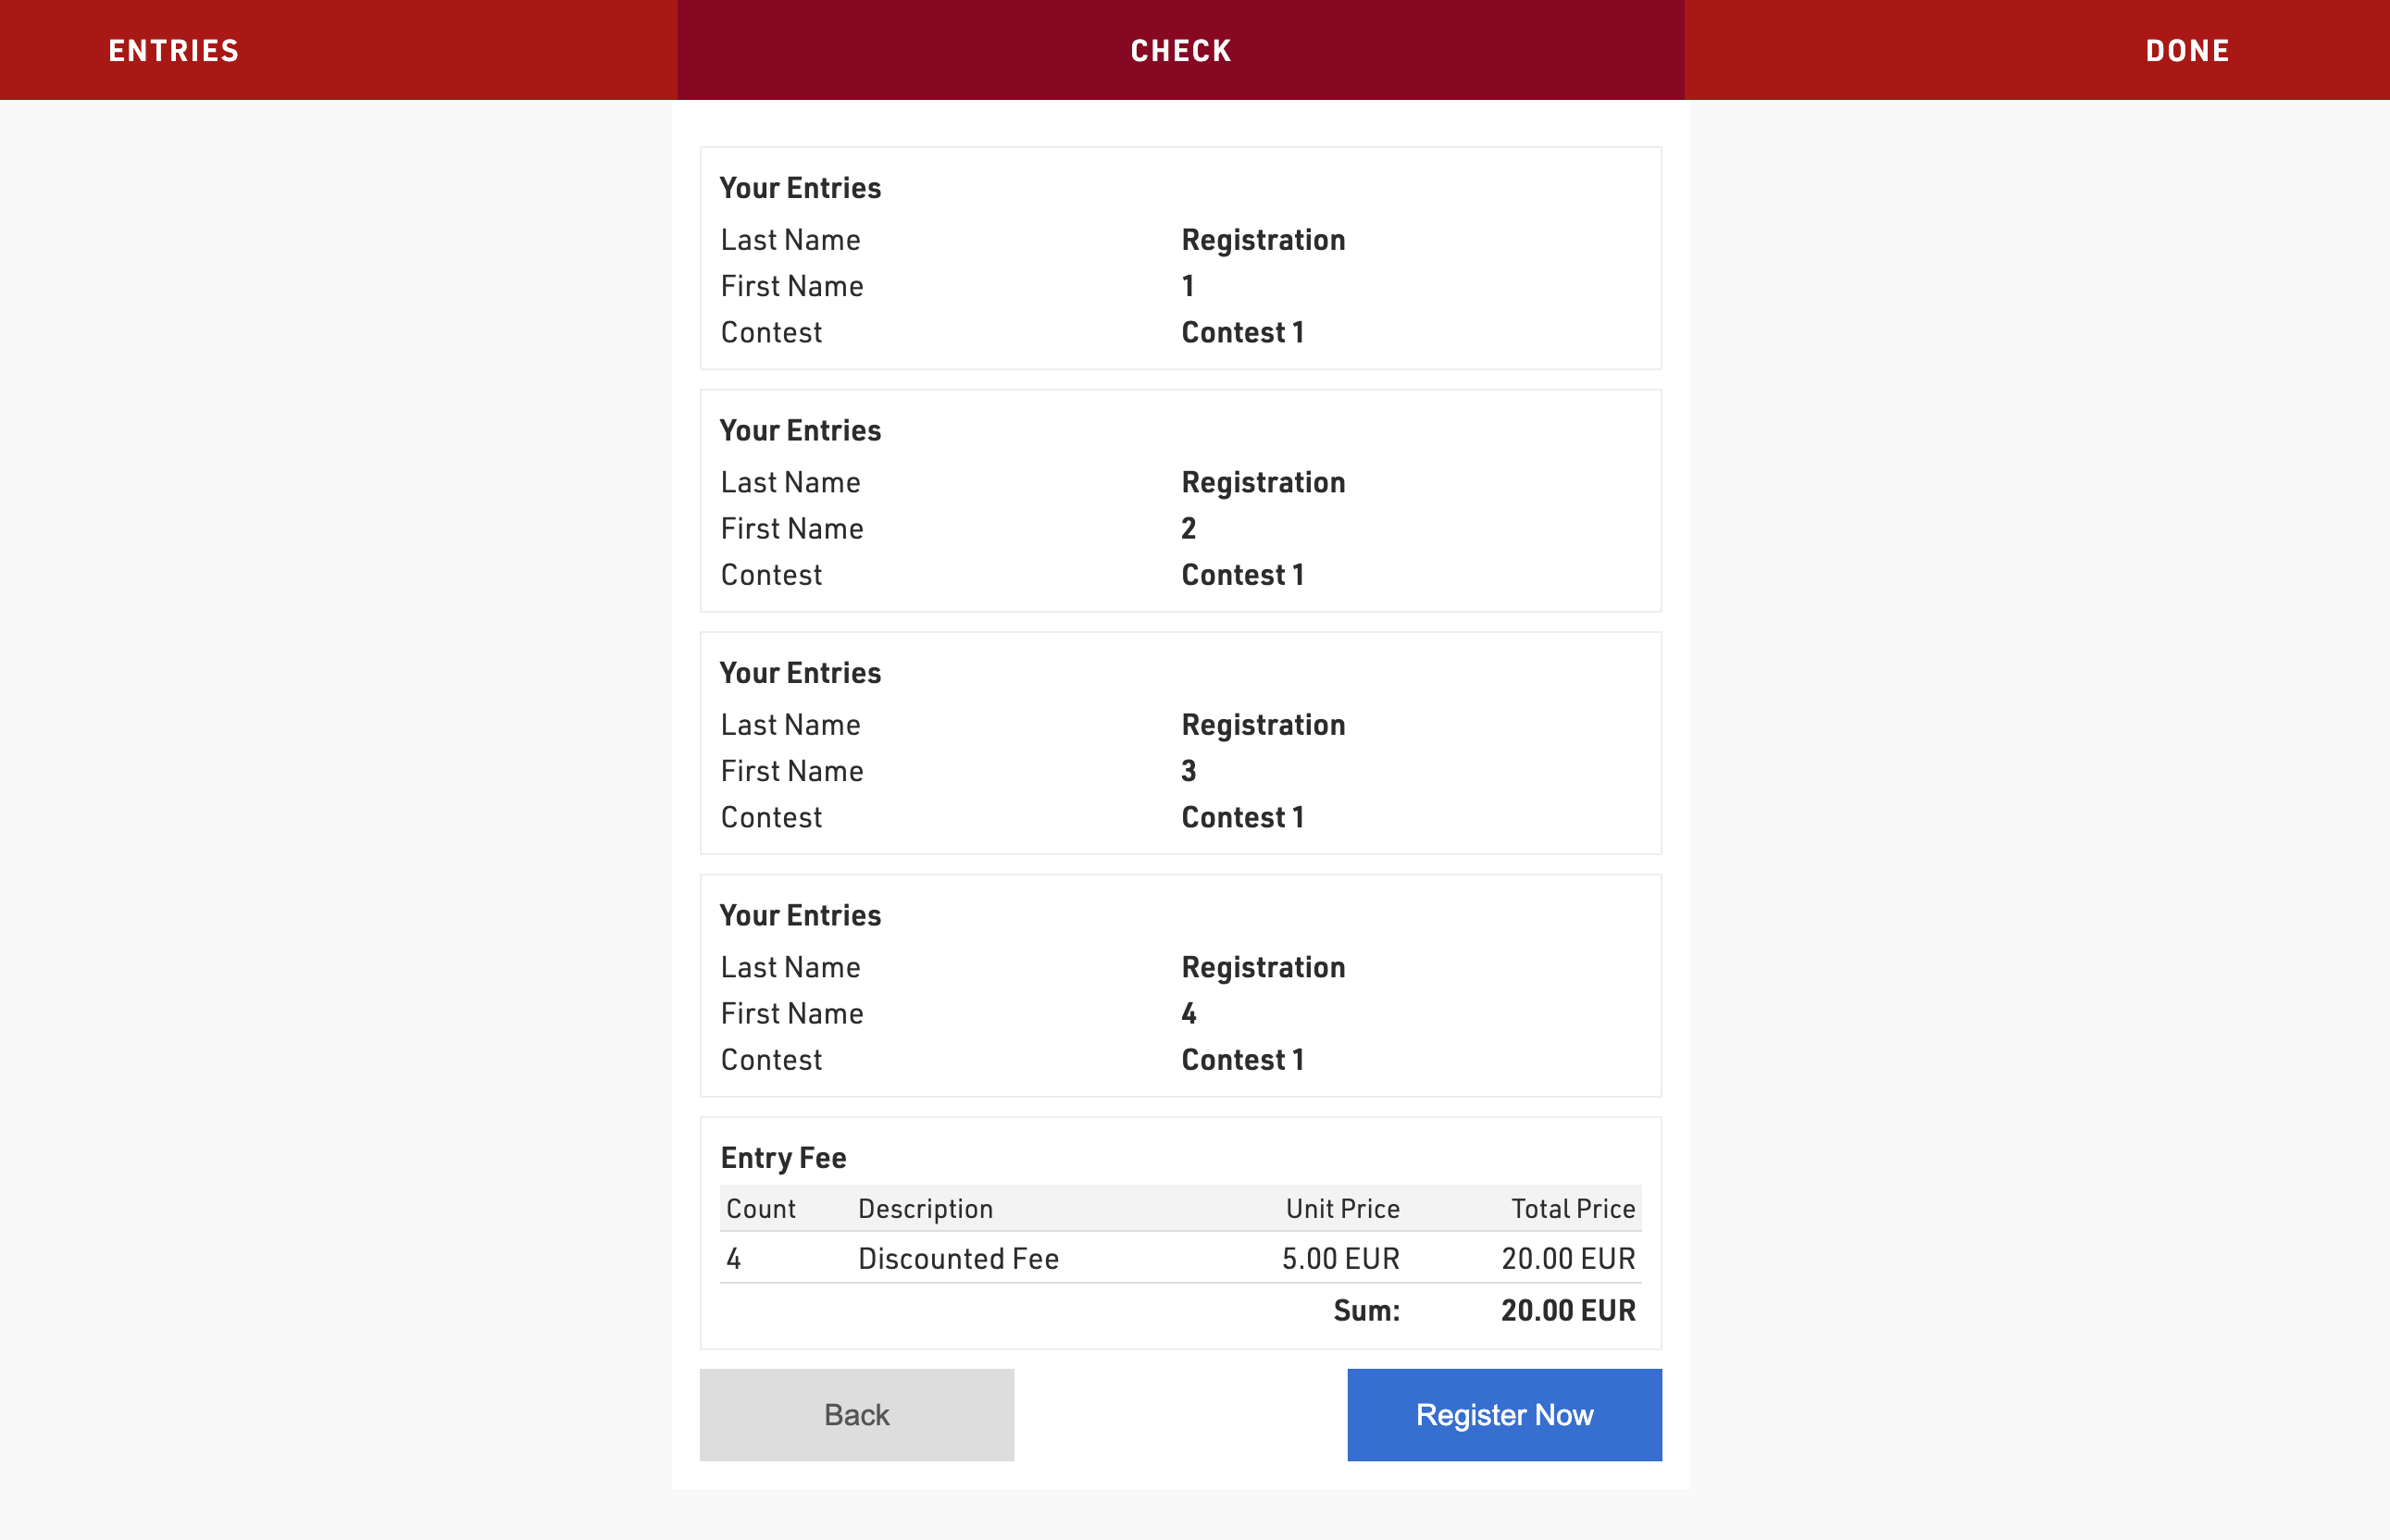
In this example groups of 3 or less will pay an entry fee of 10 EUR per participant, whereas groups with more than 3 participants will pay an entry fee of 5 EUR per participant.
Fixed Price for Group
This method is based on the default [GroupRegPos] field, which is calculated for each participant in a group registration.
In a Group Registration, all participants are assigned the same value for [GroupID] and are sequentially numbered starting from 1 in the [GroupRegPos] field, based on the order of entry in the registration form.
In a Single Registration, [GroupRegPos] is set to 0.
To assign a fixed entry fee to the group, apply the entry fee only to participants with [GroupRegPos]=1.
For single registrants, the entry fee is applied when [GroupRegPos]=0.

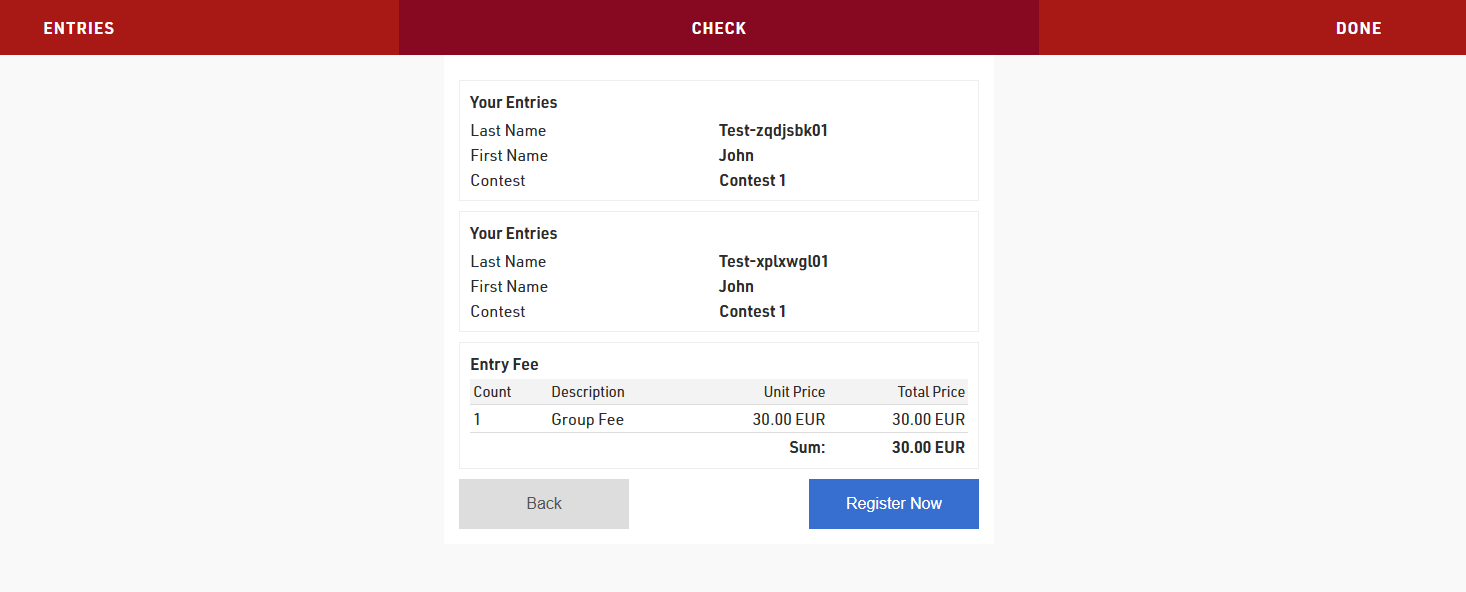
In this example groups will pay an entry fee of 30 EUR, and the fee is charged virtually only to the first member of the Group Registration.
Setting up a Registration form of type Self Service
It is often useful that participants are able to change their own data online. For this you can provide participants a unique individual link to a Self Service form (What is a Self Service form?) where they can adapt their data.
Registration Form Setup
The form is setup as a Registration Form, create a new form and select the type Single Self Service.

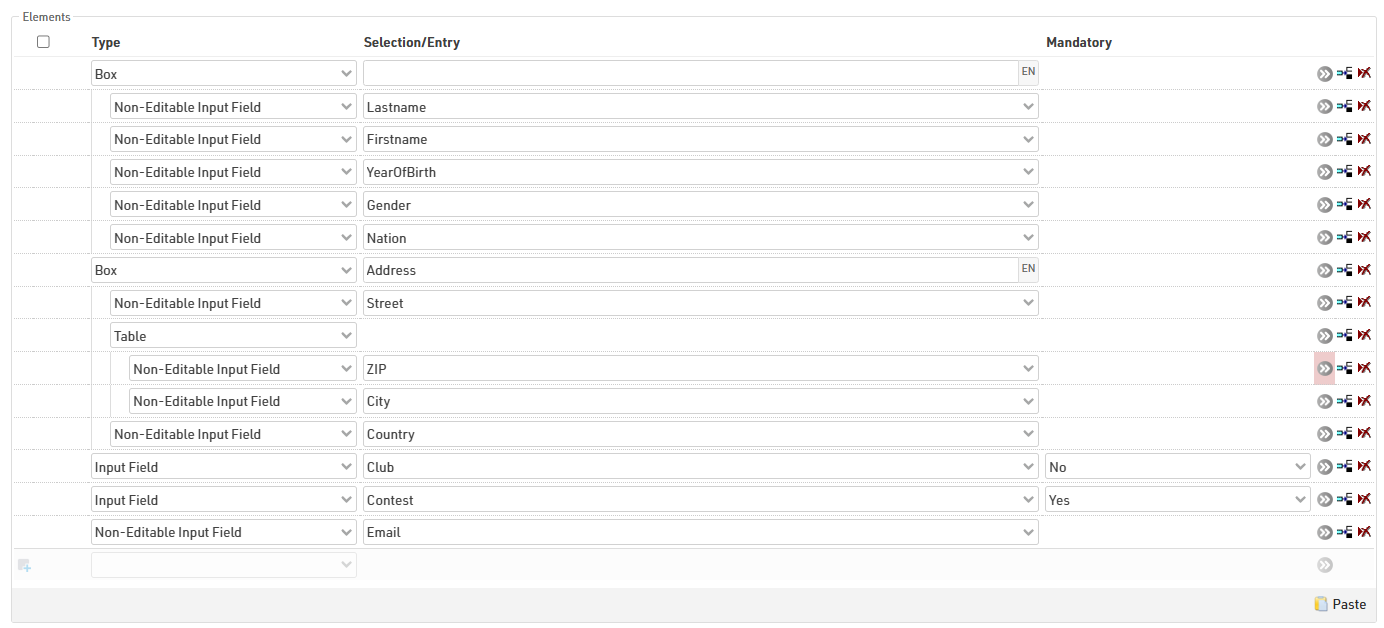
The form type Self Service allows a special element type in the formfields:

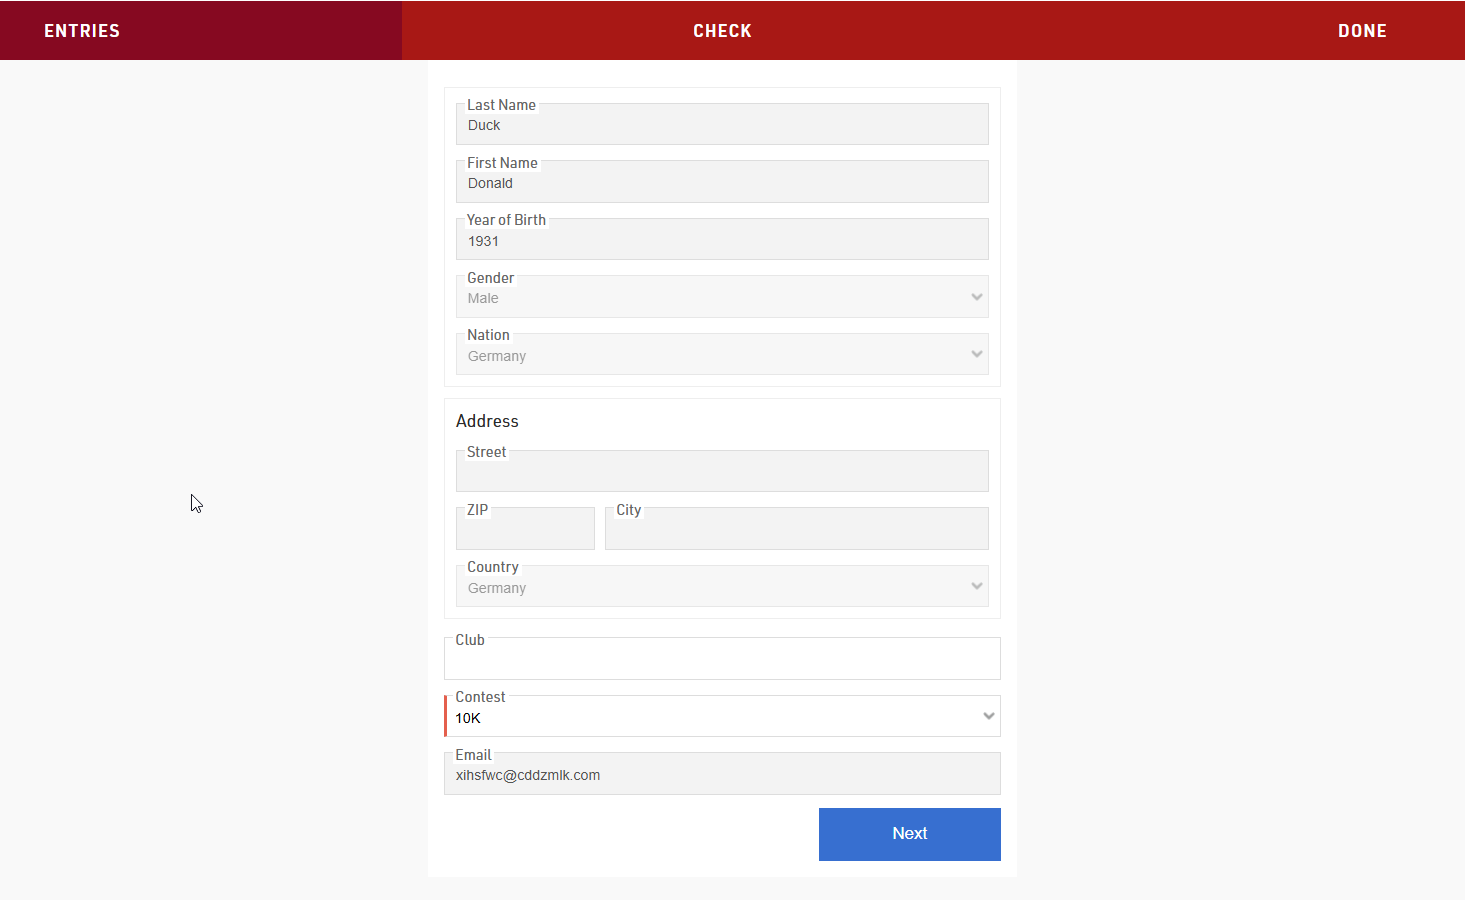
This field type is used to show pre-existing data which should not be editable. For example in this case the participant would only be allowed to change his contest or the club name, as these fields are still set as Input Fields.
The URL to the participant's personal Self Service form is generated using the Changelink() function, this can be sent in an e-mail template, to see how check our Knowledge Base guide on Adding a URL-Link for a Self Service form in an Email template.
When the participant opens the Self Service form via the link he received through the Email, he will see his pre-entered data and be able to adapt the data that is editable for him.
Sending a Payment Link with a Self Service Form
In some cases participants may have to pay additional fees after their initial registration either for additional services or because the fees were not captured originally. These fees can be captured using the same Online Payment methods as used in the Registration Forms, and can be sent to participants by creating a Self-Service form with the online payment enabled.
Registration Form Setup
The payment form is setup as a Registration Form, create a new form and select the type Single Self Service.
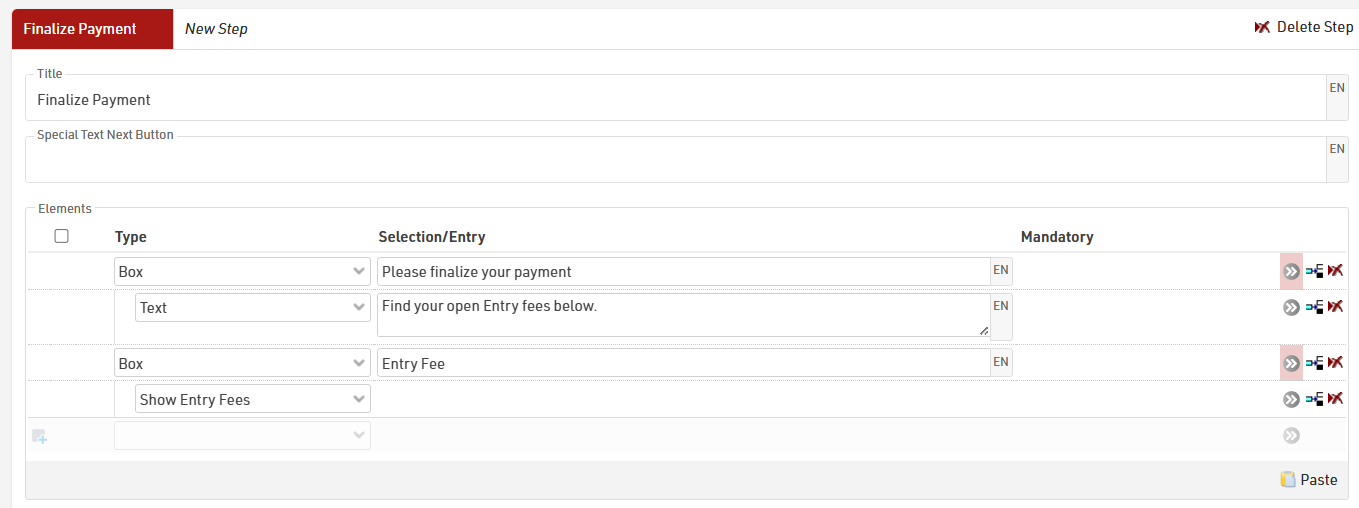
In this case it is not necessary to have a step in the registration form where the participant is able to adapt any data, therefore, we add only a very basic "Finalize Payment" step in the self service form, where only the Entry Fees are shown:
To then enable the payment in the form, activate the Online Payment in the form settings. See here for detailed information: Online Payment.
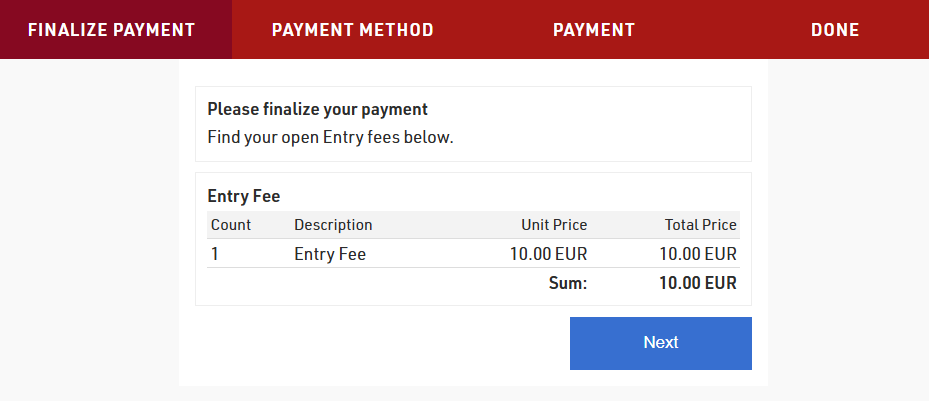
When the participant opens their Self Service form, they will see the summary of entry fees that are due, and the second step will then allow them to complete the online payment.
The URL to the participant's personal Self Service form is generated using the Changelink() function, this can be sent in an e-mail template, to see how check our Knowledge Base guide on Adding a URL-Link for a Self Service form in an Email template.
Adding a URL-Link for a Self Service form in an Email template
When using self-service form it is most common to send these in an e-mail either through to the E-mail / SMS Module or as an e-mail confirmation during registration.
To do so the e-mail format must be set to HTML, then It is possible to insert a URL link by clicking the link icon (  ) and using the Changelink() function.
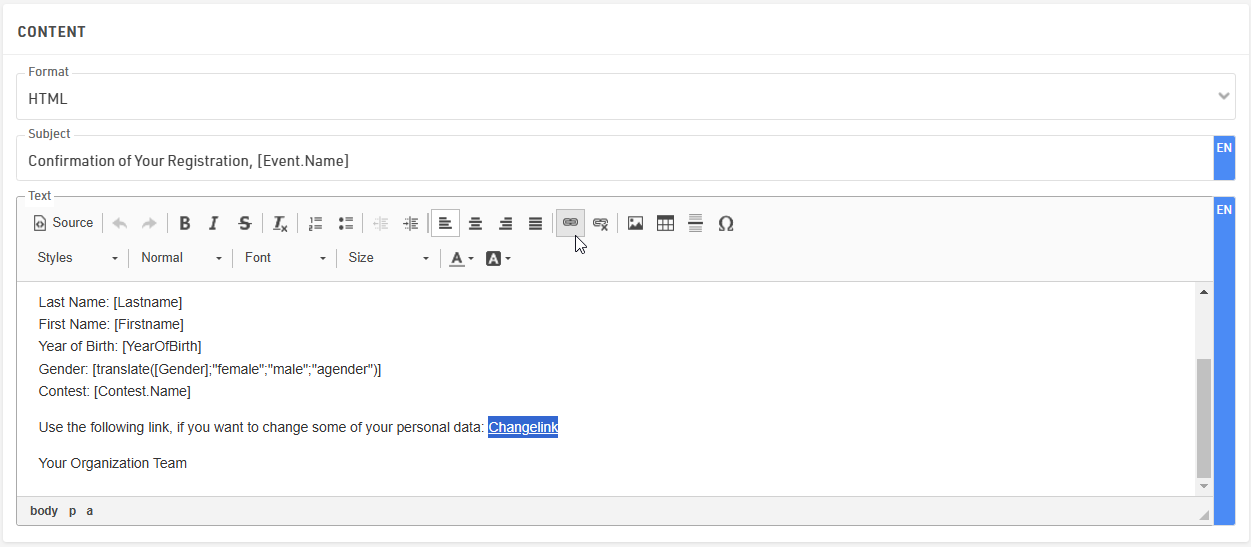
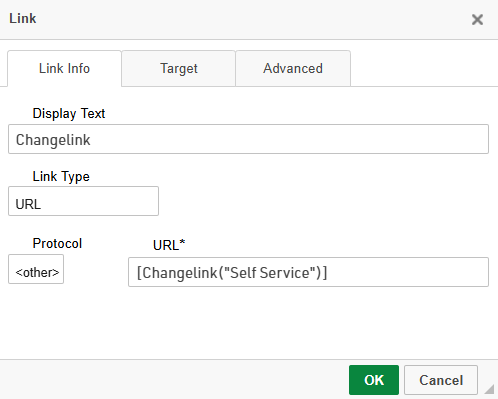
When clicking the link icon, a small window pops up where the Display Text can be adapted, this is the text that will be shown in the email instead of the whole URL link. In the URL section we call the Changelink() function in square brackets. Inside the ChangeLink() function you need to then type the name of the registration form in quotation marks.
It is very important to select the Protocol type <other> as the ChangeLink() function will already create the https:// prefix.
In order to send out the confirmation Email automatically, the template needs to be added in the After Save Actions of the regular registration form.
Send an Email Notification After X New Registrations
To enable automatic notifications after every X new registrations through the Registration Forms, it is necessary to include an additional field (e.g., [RegCount]) where the total number of registered participants is stored.
Additionally, an email template must be created with the appropriate recipient's email address.
Creating an Additional Field to store Registered Participants
Under Main Window > Participants Data > Additional Fields, create a Field type Number (Integer) called, for example, RegCount.

Configuring RegCount in the Registration Form
To track the number of registered participants, select the "Max. Value +1" option in the Store Additional Values section, available under the Advanced Settings of the registration form.
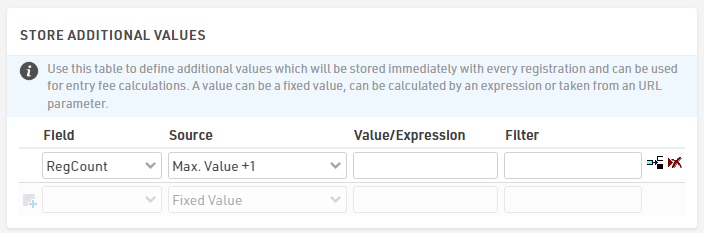
This configuration will automatically populate the [RegCount] field with the current total of registered participants for each new registration.
Creating an Email Template for Notification
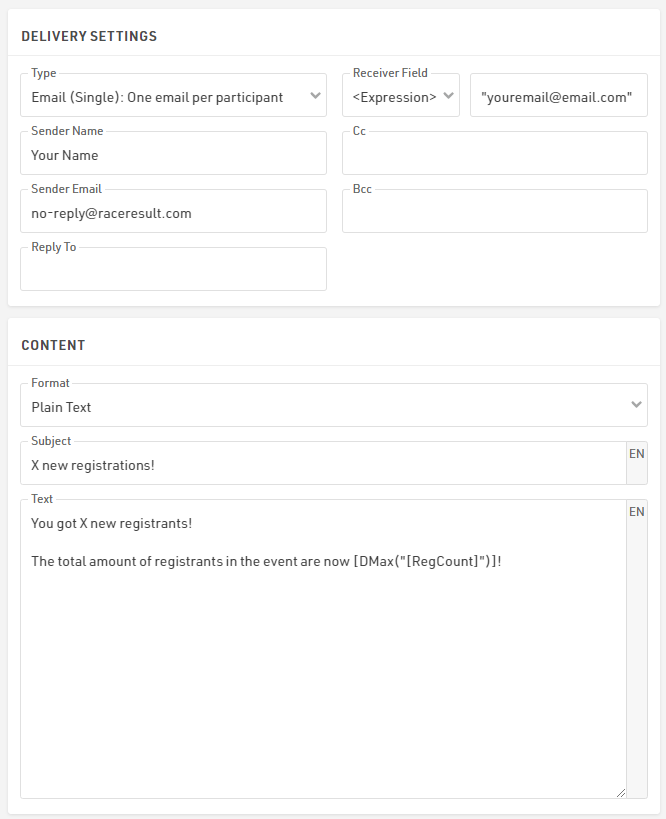
The email template is designed to notify the recipient when X new participants have registered, including the total number of registrants. The function DMax() can be used to calculate the total number of participants.
Since the email will always be sent to the same address, the recipient’s email can be entered directly as an expression in the Receiver Field.
Triggering the Notification After Every X Registrations
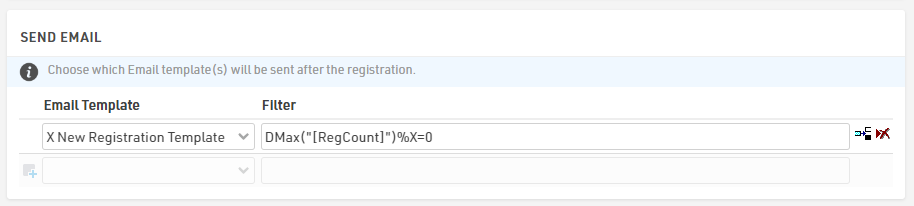
To trigger the email notification after every X new registrants, apply the following filter in the Send Email module under the After Save Actions of the Registration Form:
DMax("[RegCount]")%X=0
This formula checks if [RegCount] is a multiple of X. When the remainder of the division is zero, the system sends the email notification.
Assign Entry Fees Based on the Number of Registered Participants
Some events offer tiered pricing for registrations: the earlier you register, the cheaper the entry fee. Although RACE RESULT 12 does not provide this as a built-in feature, such a pricing structure can be implemented by combining Additional Fields, conditional Entry Fee filters, and expressions in the Online Registration Form.
Example Scenario
Consider a tiered pricing model where the first 100 participants pay 10 EUR, participants 101 to 200 pay 15 EUR, and all subsequent participants pay 20 EUR. Implementing this model requires assigning a dynamic registration number at the time of form submission and using this value to determine the appropriate entry fee.
Create an Additional Field to Store Registration Order
To track the order of registration, an additional field must be added to the participant dataset.
In Basic Settings ⇒ Participants Data ⇒ Additional Fields, create a new field of type Number (integer), for example named RegCount. This field will store each participant's position in the registration order.

Define Entry Fees Using Conditional Filters
Once the RegCount field is in place, define the entry fees based on this value.
Under Finance ⇒ Entry Fees, create three separate fee entries and assign filters as follows:
- A 10 EUR fee applies when [RegCount] IN "1-100"
- A 15 EUR fee applies when [RegCount] IN "101-200"
- A 20 EUR fee applies when [RegCount] > 200
These filters ensure that the correct fee is applied automatically based on the stored registration count. The participant will see and pay the appropriate price during registration, based on the data at the time of submission.

Calculate and Store the Registration Count
The next step is to calculate and store the correct value in the RegCount field during the registration process.
Open the Registration Form, go to Advanced Settings > Store Additional Values, and add the RegCount field. Set the Source to Expression, and use the following formula:
DCount("[Contest]=" & [Contest]) + 1
This expression counts the number of participants already registered for the same contest and adds one, assigning the next available number to the incoming registration.

Handling Group Registrations
When using Group Registration instead of single registration, the calculation must account for the position of each participant within the group. In this case, the following expression should be used instead:
DCount("[Contest]=" & [Contest]) + [GroupRegPos]
This ensures that each member of the group receives a unique and incremented value for RegCount. The field [GroupRegPos] indicates the sequence of the participant within the group registration. It starts at 1 for the first person and increases for each additional group member. In single registrations, this value is 0, which is why the +1 expression is required instead.
Limitations and Considerations
The [RegCount] value is only saved after a registration is submitted. This means that if multiple users register simultaneously - especially near a pricing tier threshold - they may receive the same RegCount and be charged the same fee, even if one should fall into the next tier.
This can happen during periods of high demand or when tier ranges are very narrow compared to the registration volume. While such overlaps are rare and self-correcting, they should be considered when configuring the pricing model.
Transferring Registrations Using Vouchers
At times, participants may need to transfer their registration to another person while maintaining data privacy and avoiding the exchange of personal information.
A convenient and secure solution is to let a registered participant generate a Voucher (via SimpleAPI). This Voucher can then be used by a new participant as a discount code when registering for the event.
Prerequisites
Before setting up the process, make sure you are familiar with how to use:
- Web Service Calls in RACE RESULT 14
- Self-Service Registration Forms
- User Defined Fields (UDFs)
Voucher Structure
When parsing Voucher data via the API, the JSON structure is as follows. Not all fields are required:
{
  "Code": "EnterVoucherCode",
  "Type": EnterType,
  "Amount": EnterAmount,
  "Tax": EnterTaxValue,
  "Contest": EnterContestID,
  "Category": "",
  "ValidUntil": "",
  "ValidFrom": "",
  "Reusable": 1,
  "UseCounter": 0,
  "Remark": ""
}
* Type Values:
- 0 - Fixed Amount
- 1 - Percentage (1-100)
API Endpoint
To save a Voucher in RACE RESULT 14, use the following API endpoint:
vouchers/save
Set up a Web Service Call with the parameters below.
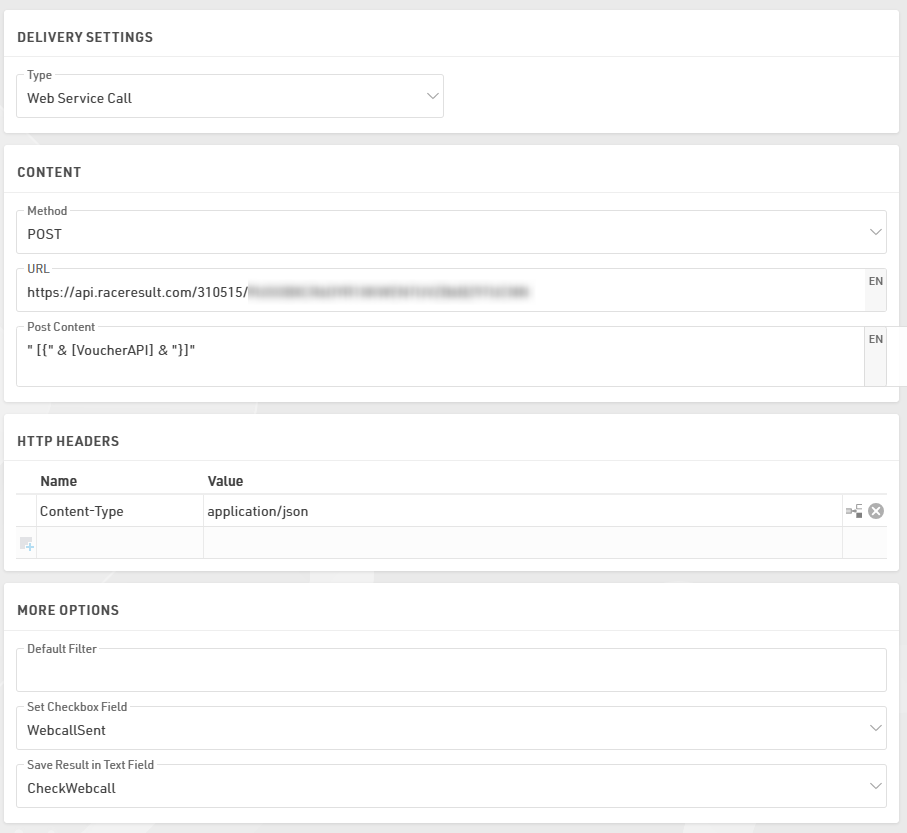
Post Content
Make sure there is a space after the first quotation mark:
Post Content: " [{" & [VoucherAPI] & "}]"
Create the UDF [VoucherAPI]
First, create a set of Additional Fields:
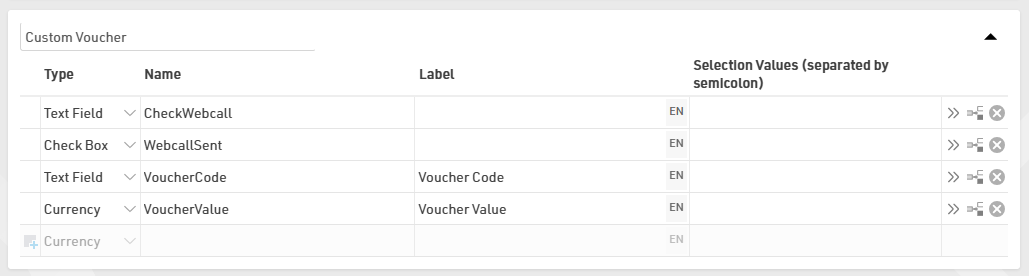
Then proceed with the creation of the User Defined Field VoucherAPI
VoucherAPI: #"Code": "[VoucherCode]", "Remark": "", "Type": 0, "Amount": [VoucherValue], "UseCounter": 0, "Reusable": 1, "Category": "", "ValidUntil": "", "Contest": 0, "OrderPos": 0, "ValidFrom": "", "Tax": 0
Generate the Voucher Code via the Self-Service

To generate the VoucherCode, use Store Additional Values under the Advanced Settings of your Self-Service Registration Form.

Expression - This expression ensures each Voucher can be traced back to the participant ID who created it:
[ID] & "V" & UCase(left(md5([Random]);6))
Automate the API Call
In your After Save Action, select the Voucher Web Call to make the POST request. To prevent multiple API calls for the same participant, add the filter [WebcallSent]=0
Send the Voucher via Email
You can allow participants to enter a receiver email address during the process. This way, the Voucher Code and its value are automatically sent to the recipient via email.
Restrict Additional Voucher Creation
To prevent misuse, use Show if (Old Values) conditions in your Self-Service Form to ensure that once a Voucher is created, the original participant:
- Cannot create additional Voucher Codes.
- Can still view the created Voucher Code and its value

This setup allows a participant to safely transfer their registration by generating a Voucher that another participant can redeem.
It ensures:
- Data privacy (no sharing of personal details)
- Controlled and traceable transfers
- Automation through the RACE RESULT API and Self-Service features
Automatically Creating & Sending Invoices
Especially for events including corporate registrations, you may be asked to issue invoices, regardless of the used payment method.
Example Scenario
In the registration form, we ask whether an invoice is required and if so, in the next step ask for the invoice details. After completing the registration, the invoice will be filled with payment terms from the online payment and is automatically sent to a dedicated invoice receiver address.
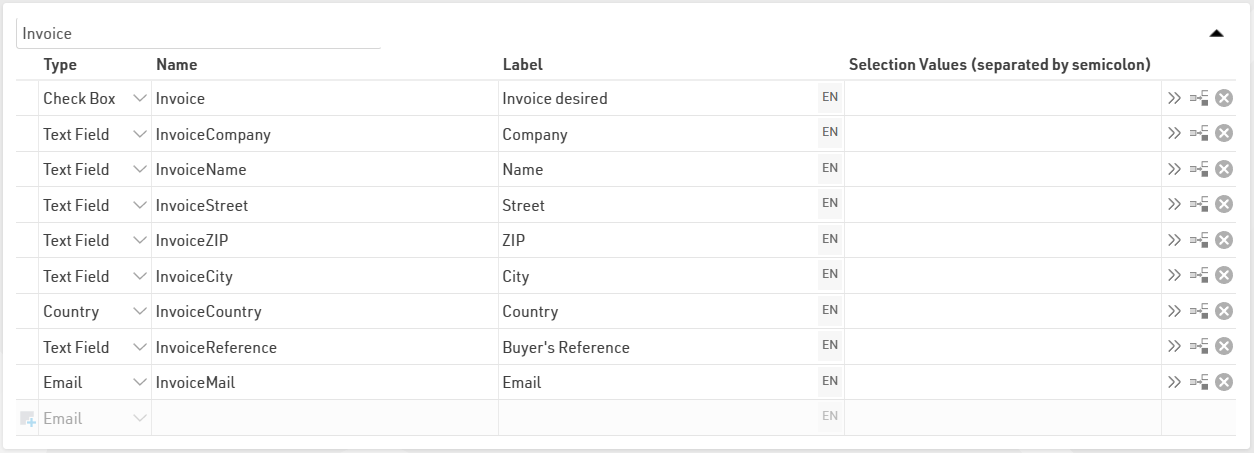
Create Additional Fields to Store Invoice Receiver Data
To fill the invoice with the correct receiver information, additional fields must be added to the participant dataset.
In Basic Settings > Participants Data > Additional Fields, create a new group with the required invoice fields. In addition to the invoice address, in the checkbox field [Invoice] we define whether an invoice shall be created and sent.
Define the Invoice Settings and Prepare the Invoice Layout
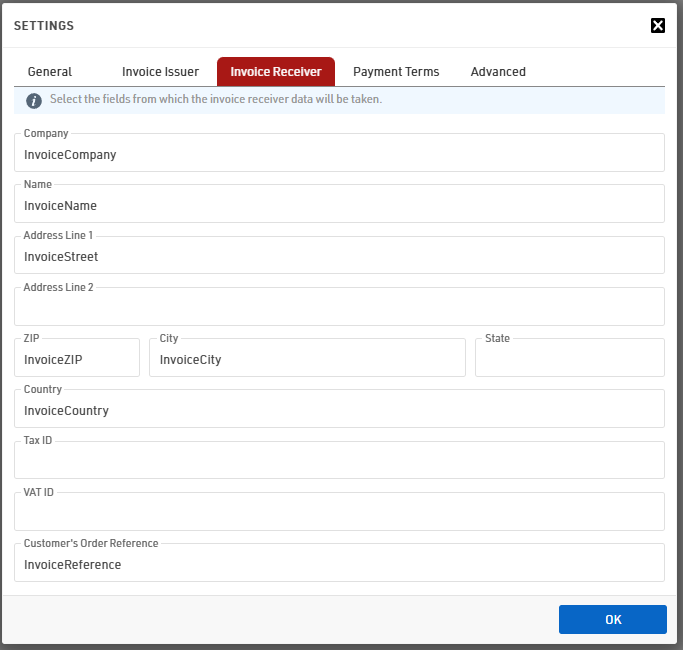
Under Finance > Invoicing open the Settings and define the details for the invoice creation, such as the invoice numbering, your company details as invoice issuer, . Lastly, navigate to Invoice Receiver. In here, assign the Additional Fields created for the Invoice Details to the respective Invoice Receiver Fields.
Prepare the invoice layout as outlined in this article.
Prepare dedicated Invoice Email
Under Email/SMS, create a new Email template. For the Receiver Field, select [InvoiceMail] to ensure the invoice email is sent to the dedicated invoice email address.

If required, you can add your companies' accounting email address as a BCC receiver to stream invoices immediately in your accounting tool.
At the very bottom of the template add an attachment of type Unsent Invoice. If the attachment name is left empty, it will automatically use [Invoice.Number].pdf as the file name.
Add Invoice Query to Registration Form and Define Auto-Send of Invoice
In the last regular registration step we add an Input Field for the field [Invoice]. In the extended settings we define the Deviating Field Label as "Yes, please issue an invoice".
Next, we add another step after the query to issue an invoice. For better formatting we put the Invoice Fields in a Box. Additionally, we define a "Show If" for the whole box to show only if [Invoice]=1. By doing so, the whole step will be skipped if no invoice shall be issued.
The table for ZIP and City can easily be copied from the "Entries" step and the fields be adapted. This ensures a proper width of the fields side-by-side.
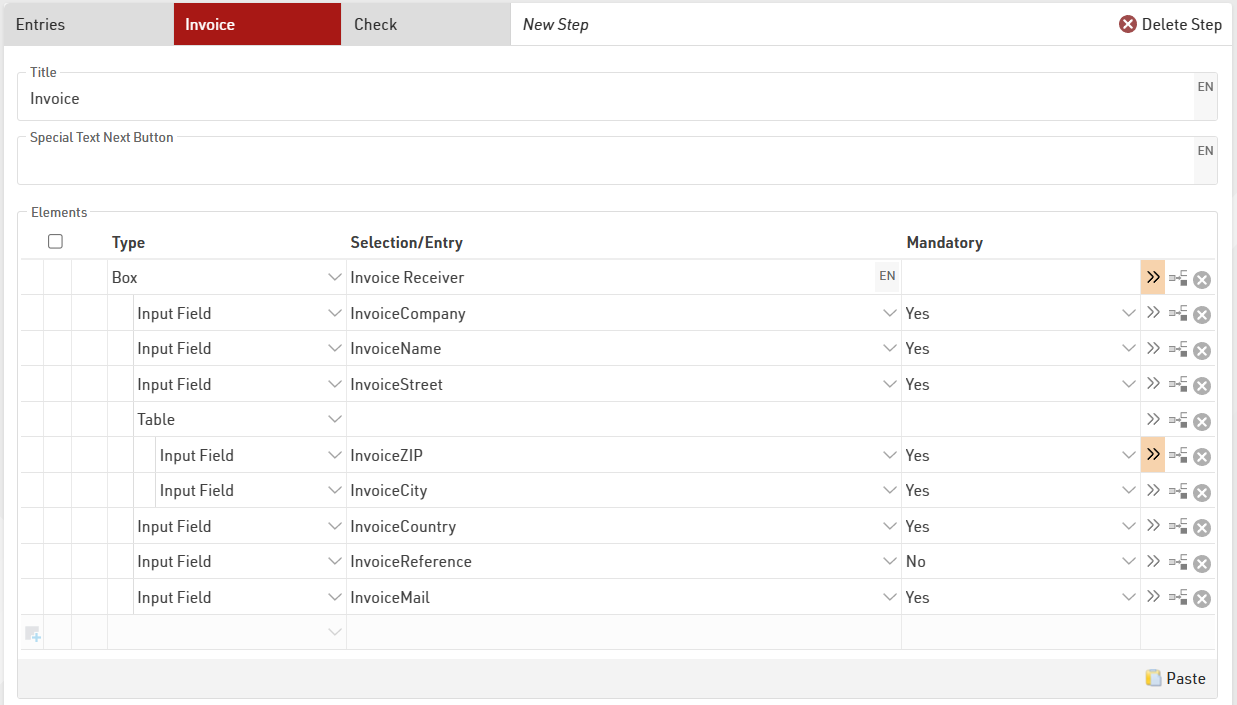
For Group Registrations, make sure ALL invoice related fields are defined as common fields.
Automatic Sending of Invoice
Under After Save Actions tick the box to automatically create invoice after registration with the following filter:
Under SEND EMAIL add the previously configured Invoice template and provide the exact same filter as above.
Slot Transfer Platform
Disclaimer: This solution is an advanced setup. Only trained customers who understand the different functionalities in use should use this solution.
This article will briefly explain how it is possible to set up a Slot Transfer Platform with different tools that are available in RACE RESULT 14.
Reason behind such a platform is offering the participants a possibility to transfer their slots to other participants.
Knowledge of all the functions mentioned is required. Of course, this is not a final and the only possible solution. Feel free to adapt different settings to your needs and see also the "Further Ideas" section at the end of the article.
General situation
- Contest / Event fully booked, but still interested Participants.
- Registered participants that cannot attend.
Idea
- Registered Participants can offer their slot for sale.
- Interested Participants can buy these starting slots on a “official page”.
Requirements
- Easy workflow for Buyer & Seller.
- (Automatic) Refund-System.
- No contact between Buyer & Seller.
- minimize fraud
- Data privacy
Attached to this article you will find an .ses file where everything is pre set. Note, that there is no further explanation and support offered for any CSS stylings that can be found in the eventfile.
In the Registaion Forms section you'll find two foldes named "Changeforms" and "Registrations". Depending on the type of form it is talked about, you'll find the form in the dedicated folder.
For a general overview see the flow-diagramm (picture) attached to this article.
General Procedure (see flow-diagramm)
- Participant A ("Seller") registers to the event and receives the usual E-Mail-Confirmation
- E-Mail contains two Changelinks
- Usual Changeform to allow changes / buy merchandise etc.
- Link to a "Selling-Form" which allows to put the Slot on the official Slot Transfer Platform
- E-Mail contains two Changelinks
- Participant B ("Buyer") cannot register anymore to the usual registration as e.g. the event is fully booked, but there are slots available on the Slot Transfer Platform.
- "Buyer" selects a Slot and does a "normal" registration and receives an E-Mail-Confirmation only with the usual link to his changeform
- In this example case the buyer is not allowed to sell his slot again.
- After the "Buyer's" registration the "Seller" is moved to different contest. This way contest-capacities are always leveled and contest do not get overbooked. The "Seller" receives an E-Mail with the confirmation that the slot has been bought and he now can ask for a refund of the Entry-Fee.
- E-Mail contains a link to a changeform called "Refund-Form" to trigger the (automatic) refund.
Additional Fields
Within the eventfile a bunch of Additional Fields is used, which are some key-elements in the whole process of selling and buying a slot on the platform. The fields are either used to save personal data automatically during different steps in registrations / change-forms, or for actions that participants need to make in registrations / change-forms.

Registration-Form ("Registration")
- In the eventfile is a dedicated registration-form which is used for the initial registrations to the event.
- In the After Save Actions the E-Mail-Confirmation "Single Registration" is send out
- The E-Mail contains two changelinks:
- Link to usual Changeform ("C-Changeform")
- Link to a Changeform where the participant can put his slot on the Platform ("A_Selling-Form")
Selling-Form
- Use: Participant can actively offer starting slot for sale.
- General settings >> Filter: Only participants that haven't put their slot on the platform yet and did not buy a slot from the platform can open the form.

- In this form the participants needs to tick a Checkbox (Additional-Field [SlotSold]) in order to confirm he wants to transfer the starting slot

- After Save Actions:
- Save a unique String in the field [URLID].
- Save the ToD when the form was done.
- Save the Changelink to the Refund-Form ("B_Refund-Form") in an additional field
- Send E-Mail -Confirmation

Slot Transfer Platform
The Platform is in the end a list in RACE RESULT 14. The list can be found in the folder "A_Slot Transfer Platform" and is called "B_Slots for Sale". You can find also other lists in the folder. Familiarize yourself how they are set up.

The list "B_Slots for Sale" has a specific filter in order to only show participants that have ticked the Checkbox in the Selling-Form and who's [URLID] is only once avaiable in the event:
[SlotSold]=1 AND DCount("[URLID]=""" & [URLID] & """")=1
The list itself shows not much data:
- Bib of selling participant
- "> Buy" Link
- ToD when the Slot was offered

Behind the "> Buy" link is a HTML-Expression which is
- The URL of a Registration Form called "Buying-Form"
- with an added URL-Parameter called "URLID" followed by a string which is the pre-calculated [URLID] of the selling participant, which was calculated in the "Selling-Form".
As an example, such a link could look like the following (in bold a calculated [URLID] of the selling participant):
https://events.raceresult.com/registrations/?event=378986&n=Registrations%7CBuying-Form&k=GG5bV1V3YZkX&lang=en&URLID=E9A9A99989657DC8B8F8FE690B60EC34- Make sure to change the URL, if you upload the file to your account. Remember, the event will receive a different Event-ID!

Buying-Form
The Buying-Form is a Registration Form, you can find it in the corresponding folder. It's almost a copy of the usual registration in the front-end but has some hidden functionalities.

URLID
Cruicial - the URLID is the field and String which is used to map the two participants.
- At the bottom of the first step you can find the Input Field [URLID] with additional Details:
- The Default Value of the field is from Type URL Parameter and the value itself is "URLID". In this way, it is possible to call the URLID-string which is in the URL of the opened form into the [URLID] Input field of the current "buying" registration.
- A certain CSS-Class "URLID" which is used to hide the field in the front-end of the registration via CSS. The CSS code can be found in the Advanced Settings of the "Buying-Form":
.URLID{
display: none;
}
If this CSS codelines are removed you would see the following in the frontend of the form:

The Registration is calling automatically the string from the URL into the addtional field [URLID] of the "Buyer". "Seller" and "Buyer" will have the same URLID-string in the additional field [URLID] which allows to map those two participants.

- This way it is now possible to store values/data from the "Seller" in corresponding "Buyer's" additional fields with the functionalities in the Advanced Settings >> Store Additional Values like:
- We are using here the DFirst() Function. The Bib, Firstname, Email etc. of the FIRST participant within the Eventfile, that has the same URLID-string in the field [URLID] as the "Buyer" has, will be stored in the selected field.

- We are using here the DFirst() Function. The Bib, Firstname, Email etc. of the FIRST participant within the Eventfile, that has the same URLID-string in the field [URLID] as the "Buyer" has, will be stored in the selected field.
- Important is to store the Changelink for the Refund-Form for the selling customer and his firstname in an corresponding additional field.
- In the After Save Actions three Email templates are sent:
- "Singel Registration" >> E-Mail-Confirmation for the Buyer
- "B2_Webservicecall" >> Web Service Call in order to move the Seller in another Contest
- POST Method calling an API-URL

- API comes from the Simple API section in Access Rights/Simple API.

- POST Method calling an API-URL
- "C_Request for finalisation of sale" >> E-Mail-Confirmation for the Seller that the slot has been bought and he can now ask for a refund via the Refund-Form.
- Important in this Email-Template:
- Receiver Field: [MailSeller] --> calculated in Store Additional Values.
- Salutation with [NameSeller] --> calculated in Store Additional Values.
- Changelink for Refund-Form from additional Field [RefundLink_Buyer] --> calculated in Store Additional Value.
- Important in this Email-Template:

Security-Features within the Buying-Form
There is a Box at the top of the Form with three HTML elements:

These are "Error-Messages" that popup in different scenarios and block the current registration. This is done by the use of the Show If and Validation Rule in the Details of each HTML element:
- "Slot already bought" >> is shown when there are already 2 participants in the Eventfile with that particicular URLID that also the new registration gets
- "Link in use by someone else" >> Is shown when there are currently more than 3 participants with the same URLID. Here the funciton DCount(;true) is used. This function counts also participants that are not yet registered and are in the process of the registration.
- "Link invalid" >> is shown when the URLID of the ongoing registration is not at all existing in the Eventfile currently. So if someone modifies the link, it is not possible for him to register.
The popup in the Buying-Form could for example look like this:

Refund-Form ("B_Refund-Form")
- Use: Seller can request a refund.
- General Settings Filer >> Considers only participants:
- that have not requested a Refund yet.
- Participantas that sold their slot.
- Where the URLID is only existing twice in the Eventfile

- Online Payment: Activate Refunds and select a Payment Method according to your needs

- After the Slot has been bought on the Platform, the Seller will be moved to a contest without any Entry-Fees set, therefore he will have a positive balance which can be payed back as a refund:

- After Save Actions: E-Mail-Confirmation is send out.
After going trough the Refund-Form the whole Slot-Transfer is completed.
The "Slot Transfer Platform" on my.raceresult.com
The platform itself can be configured as a dedicated tab on the my.raceresult.com page of the event:

Ideas of Improvement and further development
Of course there is room for improvement in the presented process, ideas could be:
-
Swap the Bib, so the buying participant is also receiving the Bib-Number of the selling participant
- Use the "selling option" directly in the usual changeform and not in a dedicated Selling-Form
- Make sure that the "selling option" is not visible for participants that have bought their slot on the Platform
- Give the oppurtunity to particpants, that have bought their slot on the platform, to sell it again.