The RACE RESULT USB Timing Box is an active system for timing small events. This guide explains how to start using the USB Timing Box and the tools provided by RACE RESULT 12.
The following chapters will help you in setting up your timing system, connecting it to the software and start the timing.
To perform all necessary actions in this guide, make sure you meet the following requirements:
- You need to have a basic knowledge and an installed version of the software RACE RESULT 12.
- You need to have set up your event in the software.
- You need to have a RACE RESULT USB Timing Box and a loop cable.
In case you never worked with RACE RESULT equipment either hardware or software, please check the RACE RESULT 12 Introduction first.
Setting up the loop cable
To start setting up the timing system, you need to lay out the loop cable.
- Lay out the loop cable on the ground and form a rectangle with 30 - 60 cm (1 - 2 ft.) width. To ensure accuracy, make sure the edges which are perpendicular to the direction of timing, should be as parallel as possible.
As a rough guide: If you require a very high precision (e.g. for a cycling event), you need to lay out the loop cable narrower. If you require less precision but a high read height, you need to lay out the loop cable wider. - Fix the loop cable on the ground, either using duct tape or a mat.

| Do not run other electrical sources over the loop cable. |
| Timing with the USB Timing Box can be very precise. To get the best results you also need to work precisely as well, and carefully follow all instructions. As an example, fixing the loop cable a few centimeters askew will have a negative effect on precision. |
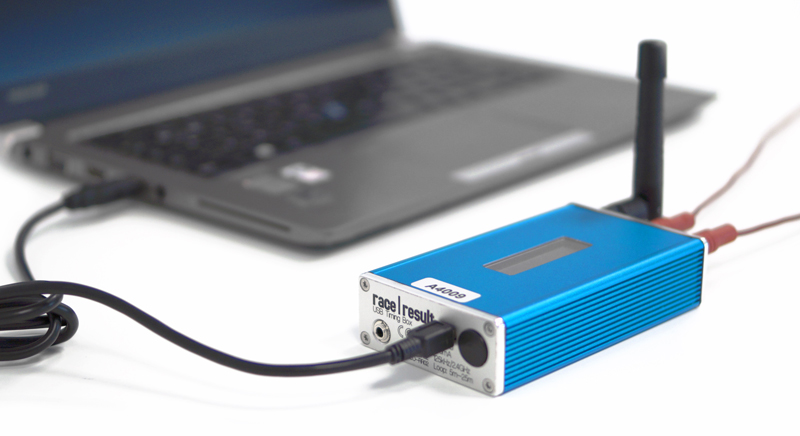
Connecting the loop and 2.4 GHz antenna
Please perform the following actions to complete the hardware setup:
- Place the USB Timing Box next to the plugs of the loop cable.
- Plug the loop cable into the red circular ports on the USB Timing Box. Either cable end can be placed into either port. The loop cable is used to activate the transponder.
- Screw in the black antenna into the USB Timing Box. The antenna is used to receive the signal back from the transponder.
- Plug in the provided USB cable into the USB Timing Box and connect it with your computer.
The USB Timing Box will automatically turn on.
 Using other USB cables with increased length or poor quality may cause errors.
The transponders need direct line of sight to the 2.4 GHz antenna to transmit detections. Make sure there are no obstacles between the finish line and the USB Timing Box, or use a Range Extender.
Connecting to your laptop
Install the Drivers
When you connect the USB Timing Box with your computer, all necessary drivers will be installed automatically. After the drivers have been installed, you will receive a notification in your task bar.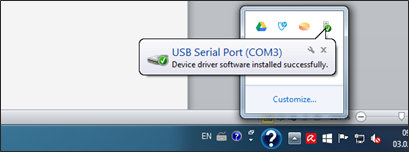
Troubleshooting
If you receive a notification that the driver installation has failed, or if you do not manage to use the USB Timing Box with any software, you need to check the connection first.
For this, look for the Device Manager in your Windows Start menu. Under Ports (COM & LPT), you should see a device connected to USB Serial Port (COMx).

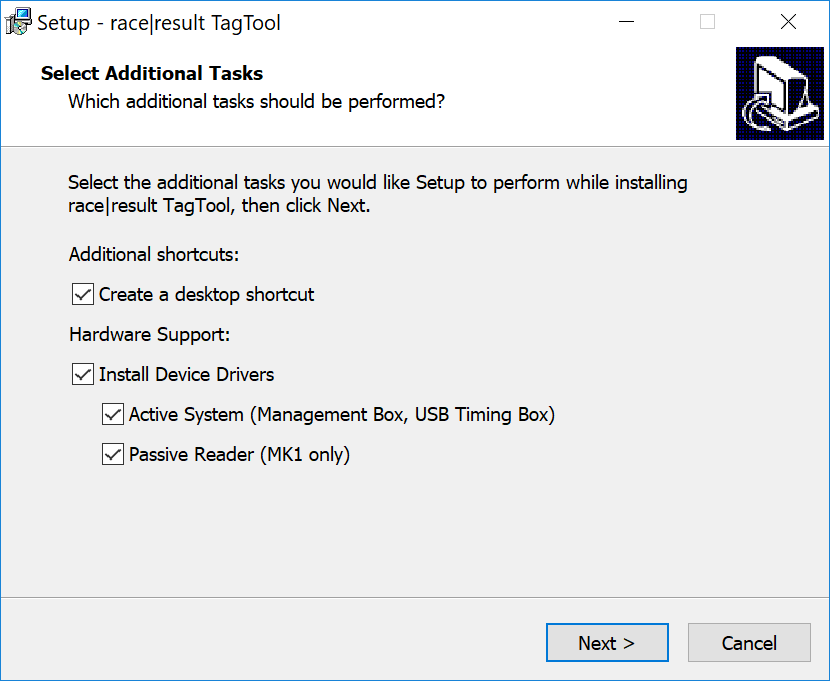
If that is not the case, you need to install the drivers manually. Proceed as follows:
- Unplug the USB Timing Box from your computer.
- Download the "TagTool" from the RACE RESULT website. Select the setup version, as the portable version does not include the drivers.
- In the first screen of the wizard, tick the box "Active System (Management Box, USB Timing Box)" under "Install Device Drivers". You can deactivate the option "Passive Reader" if you want, it is not needed for the USB Timing Box.
After the installation, connect the USB Timing Box and go back to the Device Manager to check whether the installation was successful this time.
Configuring the USB Timing Box
Using the button
The USB Timing Box has a single button to perform different functions. Find out here how to use it.
Selecting the right mode
The USB Timing Box can run in three modes: TIME, STORE & COPY and KIOSK. To configure the USB Timing for race timing, you need to ensure it is running in TIME Mode.
Check the display of the USB Timing Box:
TIME
If the display shows a T next to the battery stand, the USB Timing Box is already running in TIME mode. You can skip the next step and go on to set Loop ID, Channel ID or Loop Power.
| Loop# 1 050%< |
|
CH# 8 T █████ |
KIOSK
If the display shows a K next to the battery stand, the USB Timing Box is running in KIOSK mode, which is designed for chip check or chip assignment, not for timing. You need to switch to TIME.
| 0000 020%< |
|
K █████ |
STORE & COPY
If the display shows an S next to the battery stand, the USB Timing Box is running in STORE & COPY mode, this is a special mode in which the transponder delivers its time to the USB Timing Box, but also stores it to deliver it at the next timing point. This is only useful in very special cases, we recommend you switch to TIME.
|
Loop# 1 050%< |
|
CH# 8 S █████ |
Setting the Loop Power
Depending on the type of sport, you may need to adjust the value for Loop Power. For example for cycling, where a high precision is needed and the transponder is fixed on the fork of the bike close to the loop, you need to choose a low value like 30%. In case participants wear the transponder on their wrist and can finish with their arms raised, choose a high loop power like 80% or 100%.
The environment near the finish line can have an influence on the read height. Always check with a transponder that you get the expected read height from your loop. Read more on this in Checking Read Height
Setting Loop ID and Channel ID
For simple, single point timing at small scale events you can go on with the default settings. A change of Loop ID or Channel ID is only required for races with multiple timing points.
For more information on when to change these settings, please check the detailled Active Loop Setup.
Checking Read Height
To confirm your settings, you need to check the read height by using one of your transponders. Therefore proceed as follows:
- Stand in the middle of your loop, holding a transponder high above the loop.
- Slowly bring the transponder down, until the USB Timing Box blinks, indicating a read.
Make sure that you start detecting transponders slightly higher than required. For example, on a cycling event with transponders at the fork, you need to detect at least at knee height, so you should setup your loop power to start detecting mid-thigh.
If you do not get the expected read height, increase or decrease the loop power.
Splits - The Newest Way to Time
Splits are the newest way to time races in RACE RESULT 12, they simplify the setup of the timing and scoring requirements making it easier than ever to time a race. All splits in RACE RESULT 12 are calculated dynamically, so if any data changes such as your Start Time or Contest the participant is taking part in then the times and ranks are all automatically recalculated.
RACE RESULT 12 has some simple templates built in, from which you can time a simple race or use as a base to build your setup. When timing with Splits there are 3 parts to the setup which should be considered.
Timing Points
If you have a single shared Start / Finish line then this can be setup as a single timing point. The Timing Point Type must be set to Save Raw Data Only.
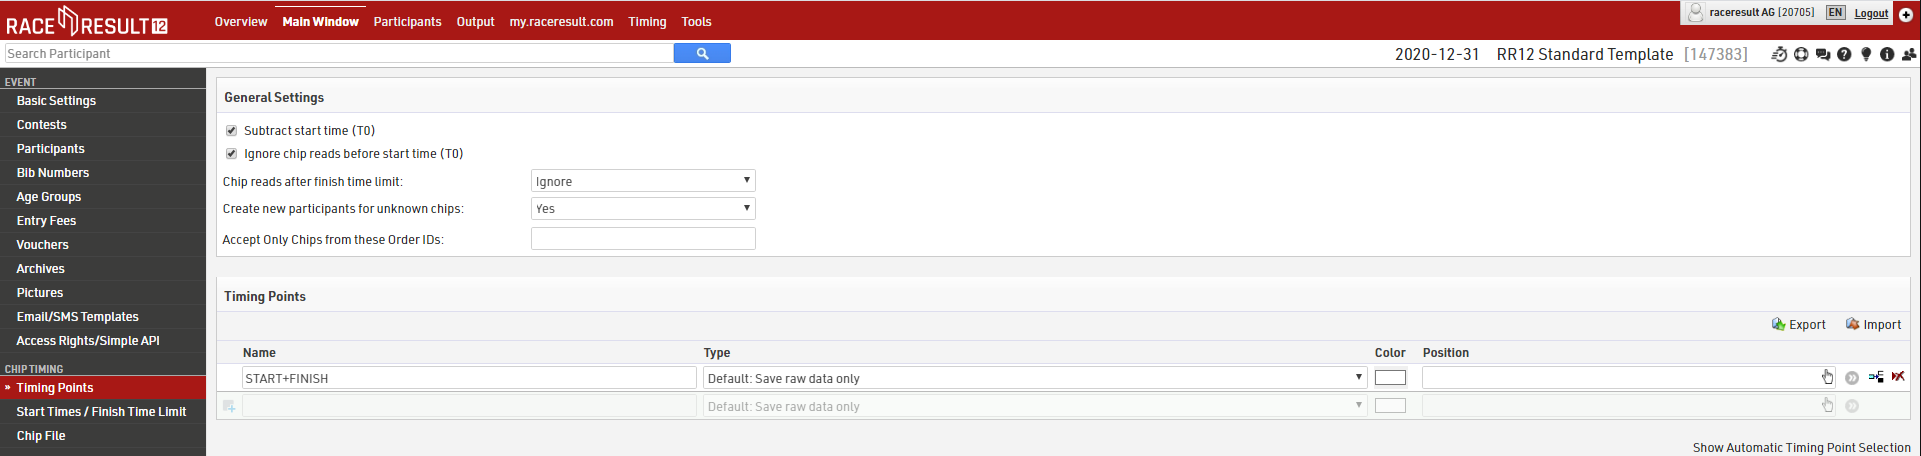
The settings above are only applicable if using the advanced Results setup.
Splits
Splits setup only requires one Split for each time the participant will be recorded (Start and Finish). Time Mode should be set according to whether the race is ranked based on Gun Time or Chip Time
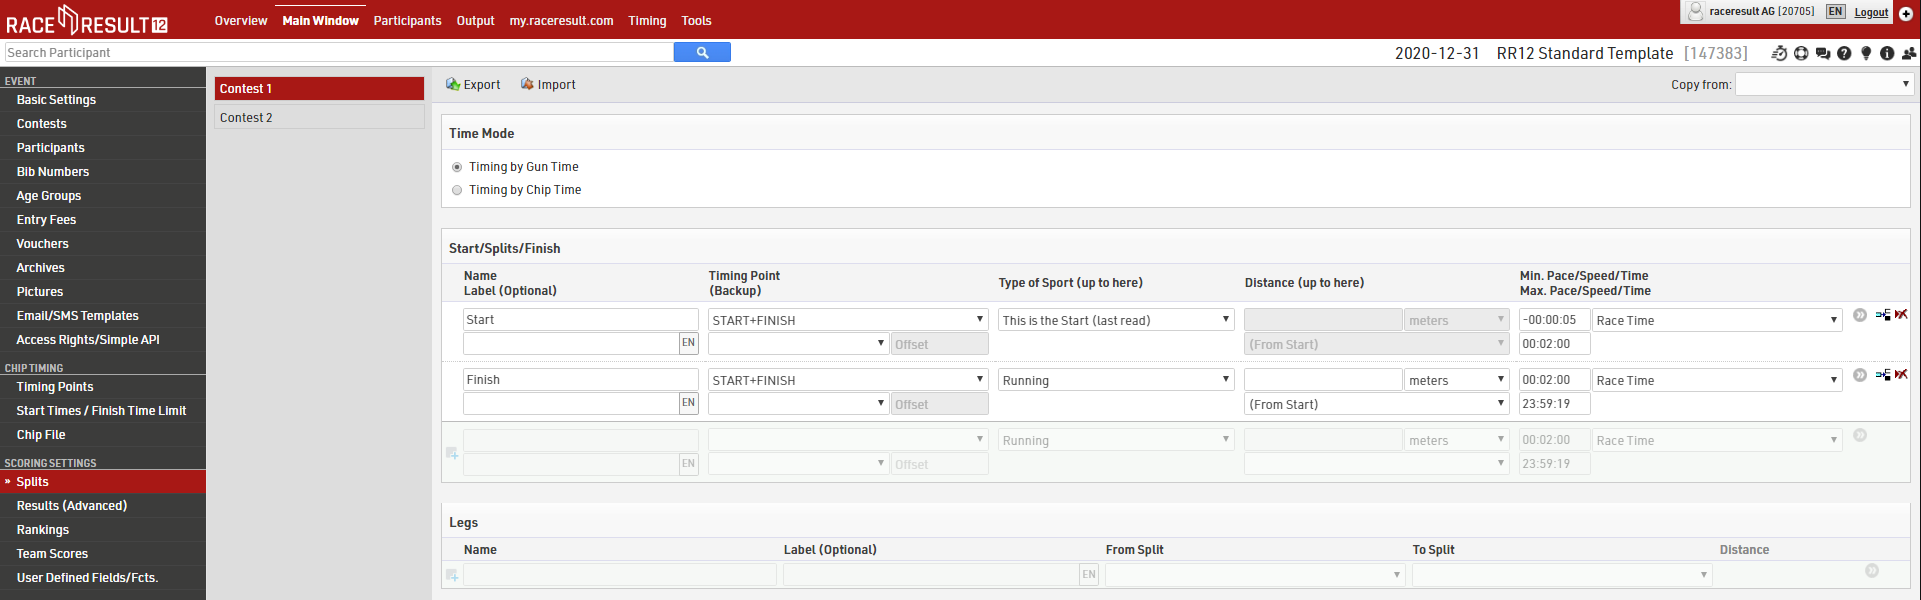
Make sure to set the Max. Time for Start and Min. Time for Finish, this will depend on how many athletes you have and the length of your race.
If your setup is more complex then you may wish to look at a more advanced template or read more about how to setup Splits or Results in Raw Data Mode.
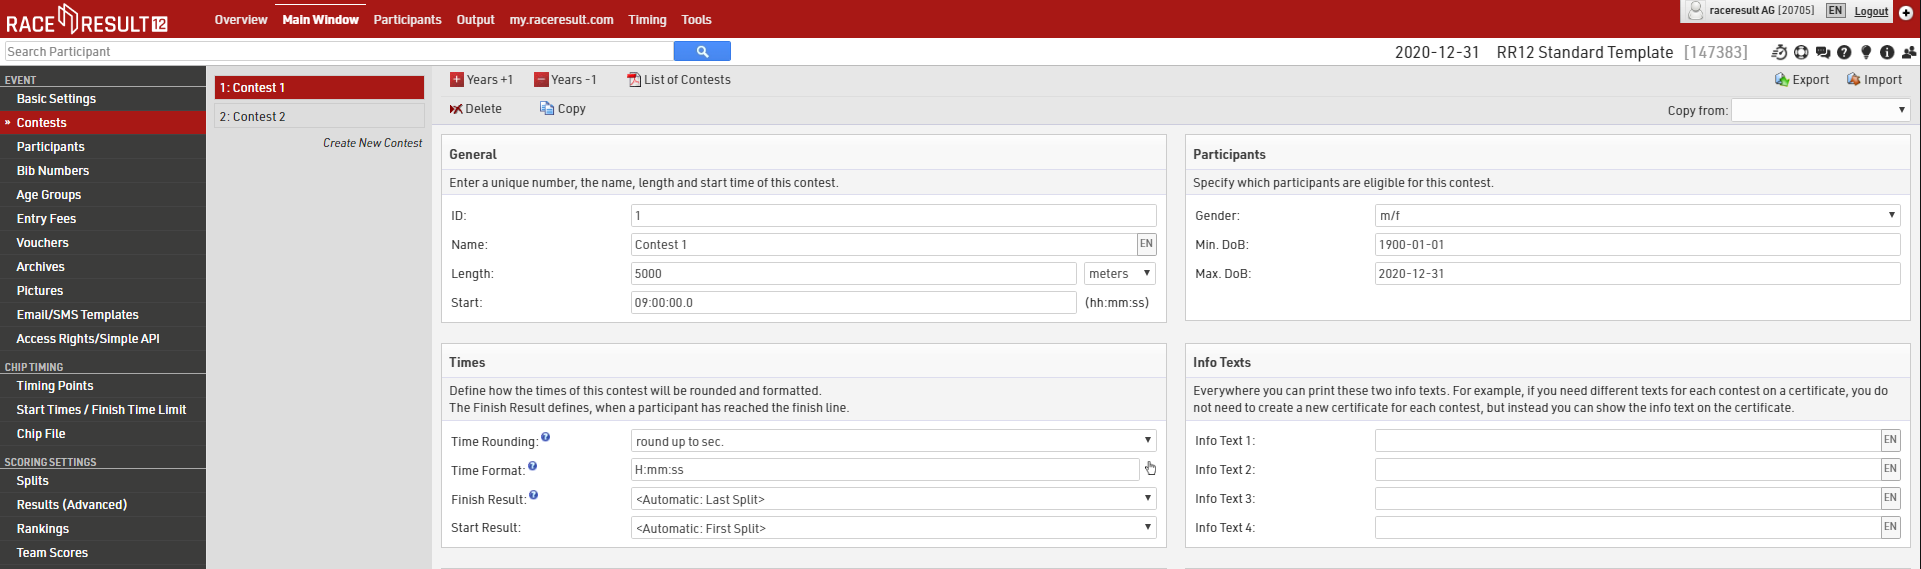
Contest Settings
Each Contest should be setup accordingly. The Finish Result defines what time should be used for the 'official' time which is then used in results lists etc. This should be set to automatically use the Last Split.
Timing the event with RACE RESULT 12
Setting Up Your Computer
The USB Timing Box will be read out in real-time while athletes pass over the loop cable. Therefore, a laptop should be positioned within reach of the system.
We recommend following these best practices for active timing with the USB Timing Box:
- Ensure an unobstructed view of the finish line.
- Use a laptop (instead of a desktop computer) to be safe in case of possible power outages.
- Place the laptop behind the finish line so that the bib numbers can still be read after the athlete has passed the finish line.
- Protect laptop and USB Timing Box from direct sunlight and rain.
- Protect the USB connection of the USB Timing Box against rain, e.g. on the desk away from the ground. All other inputs are sealed against the weather.
Timing Tab
Use the Timing tab of RACE RESULT 12 in your browser to connect to your decoder and read all of your timing data.
Open your event in RACE RESULT 12 and navigate to the Timing window from the top navigation bar. The first screen you will see is Chip Timing, which gives you a simple overview of your timing setup. If you are working online, you need to run the RACE RESULT Web Server which creates a connection between any devices connected to your computer and RACE RESULT 12.
As soon as USB Timing Box communicates with the Timing tab, the internal clock is automatically synchronised to the computer time of day.
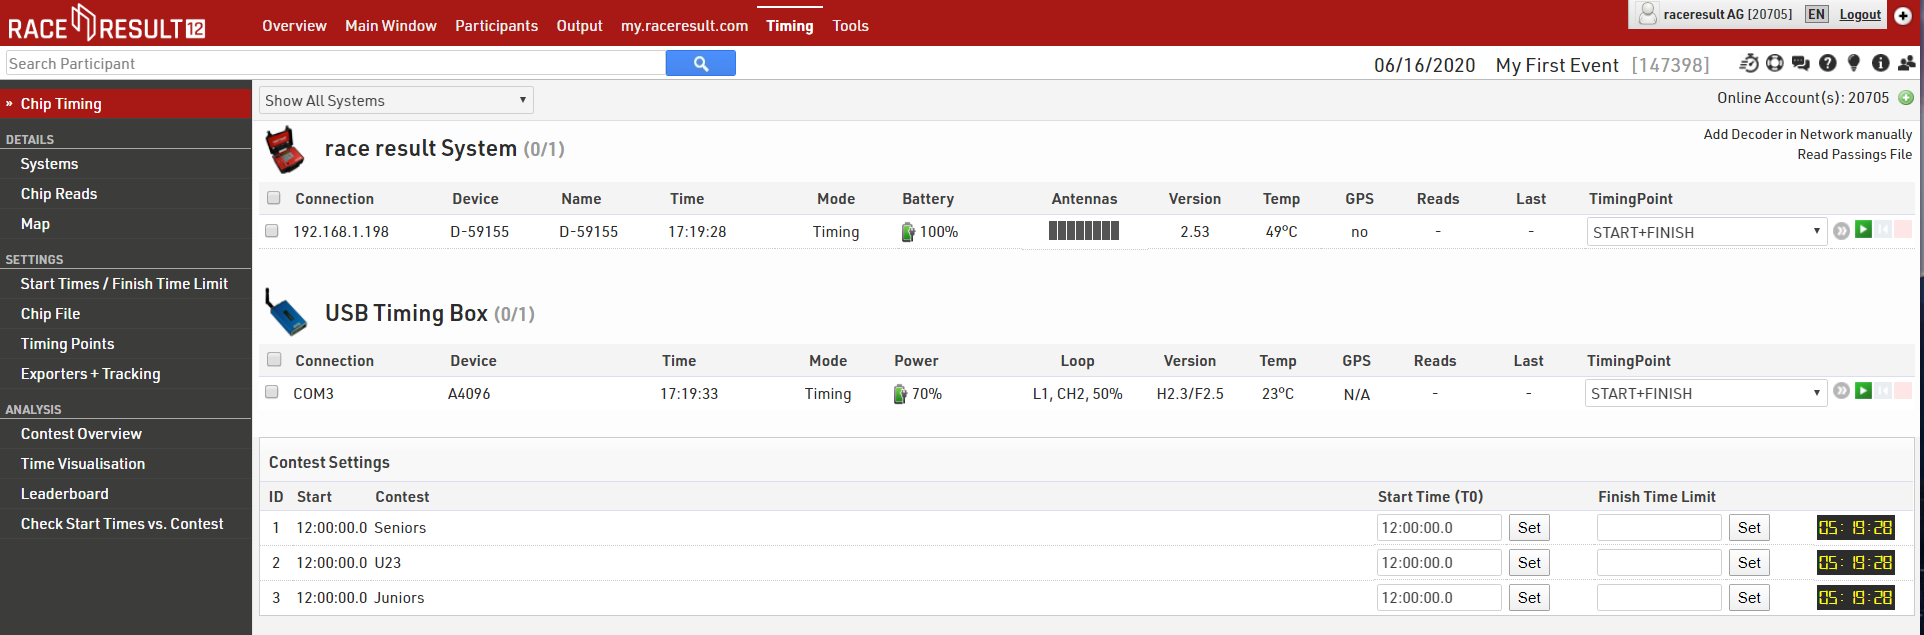
Your USB Timing Box should automatically show in the systems list with the Device ID, current time and some additional information about your device. If you cannot see the device you should see the previous section to configure your USB Timing Box and ensure that the drivers are installed correctly.
To read the timing data from the USB Timing Box, simply select a timing point and click the green play button. Any existing reads are then written in the raw data, and incoming reads are written in real time.
If you are using the Automatic Timing Point Selection rules, make sure that your devices are set to the correct loop and channel ID, and leave the timing point field in the connection settings blank.
Importing your Chip File
Each transponder has a unique identifier which is a combination of letters and numbers. This identifier needs to be mapped with the correct bib number of the participant in RACE RESULT 12. To assign all chips to participants, import your chip file in the Timing tab, under Settings > Chip File.
Make sure to do that before you receive any detections, otherwise the reads may come up as UNKNOWN or create participants with a random bib such as 50001.
Timing the Race
Now everything is set up you can start timing the race, the following looks at a race where we just want the FINISH time for everyone.
The Chip Timing Window can be used for most types of races, alternatively there is an Advanced Timing menu which gives you more controls for specific cases (such as if you have multiple timing points to monitor).
Using the Chip Timing view, you simply need to click Set, next to the Start Time of the contest which is to be started, when the race is started. This will have the following effects:
- The Start Time (T0) for that contest is set based on the USB Timing Box internal time which is synchronised to Time Of Day.
- Results start calculating for athletes in the started contest according to your Splits setup.
- A running clock is displayed next to the Finish Time Limit which is the elapsed time since T0.
- Any times for athletes in other contests are still recorded but because these are before the start time no results are affected.
If multiple contests start together you can press start for one of them and then type in the same time to the Start Time of the other(s), because data is all handled dynamically these will re-calculate whenever the Start Time is updated.
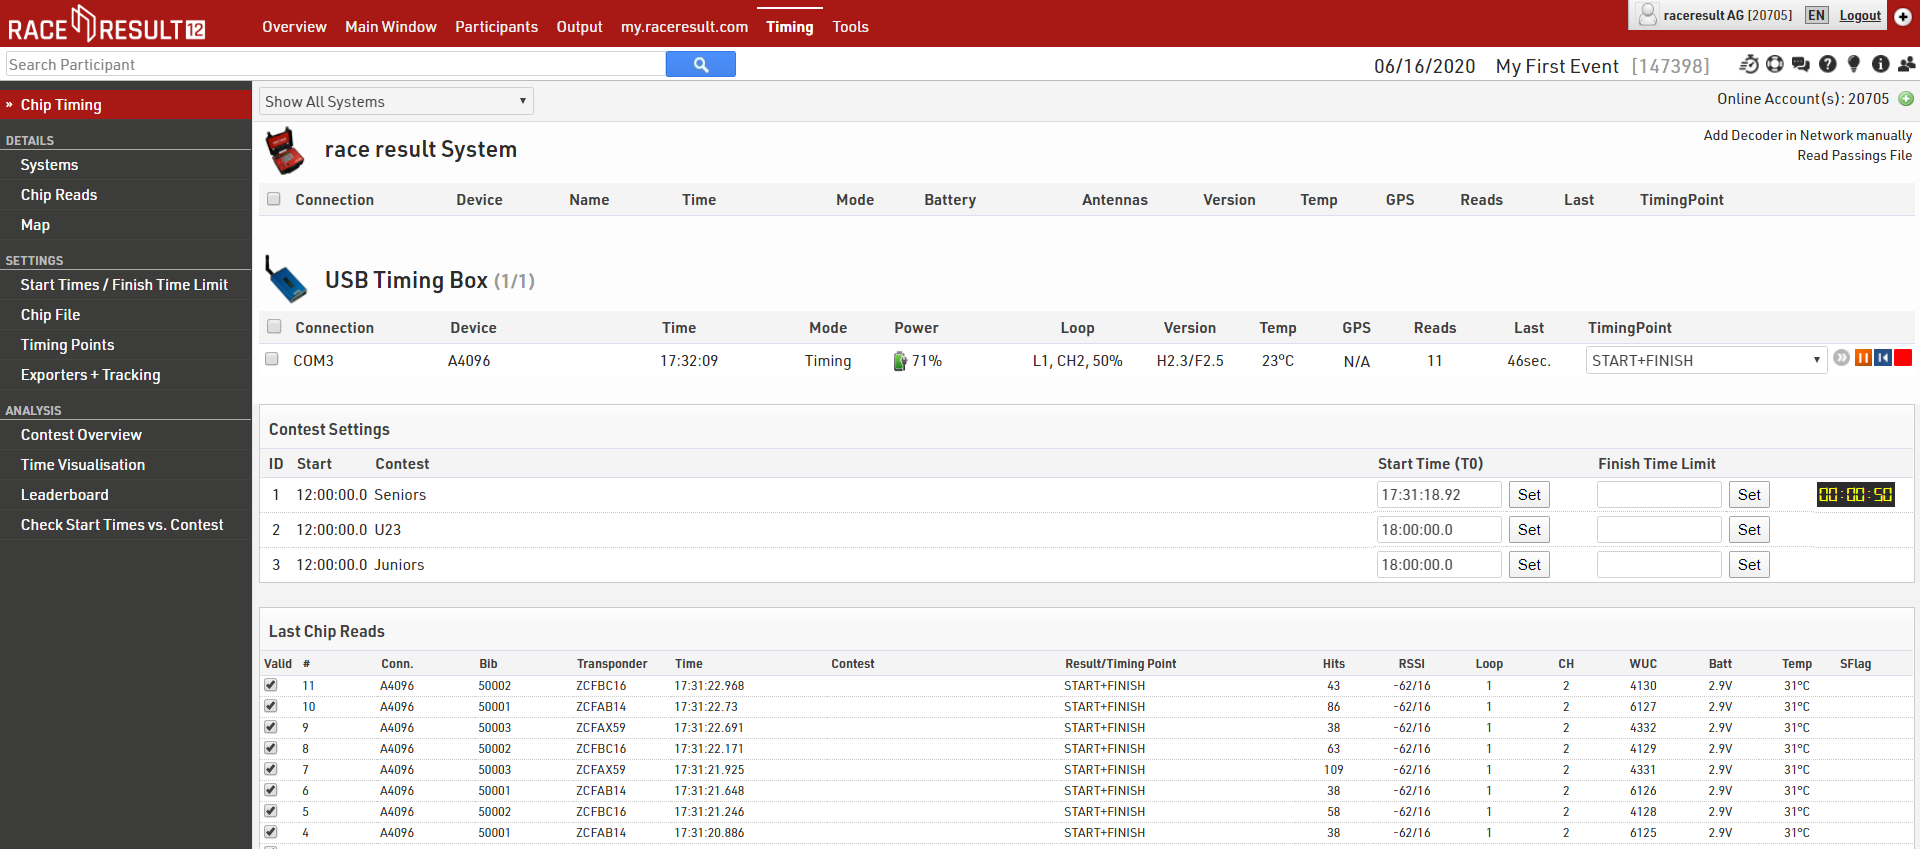
Once all athletes are finished you can set the Finish Time Limit, this lets the system know that it does not need to try and calculate any Finish results recorded after this time, the raw data is still saved so if you do make a mistake you can simply update this and it will re-calculate automatically.
Frequently Asked Questions
The USB Timing Box was unplugged during the race, did I lose all my detections?
No. Reconnect the USB Timing Box to your computer and the Timing Tab will reconnect automatically and read all detections recorded while the USB Timing Box was unplugged.
Participants are crossing the line, and I am missing detections
With the active system, you should always expect 100% detections. If you miss detections, something is definitely wrong.
First, check the loop power, and increase it if needed. If the loop power was too low and the chips have not been activated, you will unfortunately not be able to retrieve the detections.
Then, check that the black antenna is securely fastened to the USB Timing Box, and has direct line of sight to the transponders. If not, screw it on, and remove any obstacle. If the transponders have been activated but could not transmit data because of a wrong antenna placement, they probably stored the detection. On a lap course, simply wait for the next lap and you should get all missing detections. Otherwise, run the chips across the line again.
The USB Timing Box displays LOOP ERROR in the Timing tab or on the display.
Check that the loop is correctly connected to the USB Timing Box and has not been damaged. If detections come in anyway, you can ignore the warning. The message can wrongly appear if you are using loops shorter than our recommended minimum of 2 m.
Chip reads are coming up as UNKNOWN or creating participants with random number like 50001
This means that the chips detected are not mapped to any existing participant. If all chips come up like this, you probably forgot to load your chip file. Load it in the Timing tab, and the next reads should come up with the correct number. If only a few chips have this issue, you probably made a mistake in the chip file, which you can correct manually.
Once the chip file mistake has been corrected, click the stop button on your connection and delete the unknown participants. Then, press play again. This should rewind all previous detections and assign them to the correct participant this time.
I forgot to set the Start Time and don't know what it was.
When the first person crosses the finish line or if you know who it was navigate to that athlete's record in the Participant's window, then browse to Timing Raw Data, look for the last time you saw them at the approximate start time then set the Start Time to the nearest second before. In most races the winner will be on the front row at the start.
The times have not been saved to the correct lap number
This usually happens when your Minimum Lap Time is either too long or too short. Check your minimum Lap Time settings.
Unwanted Detections
By working with Raw Data you do not need to worry about too many detections, provided that your setup follows the guidelines given, unnecessary times will be automatically ignored by the system.
If you do need to invalidate a chip read, you can do so in the Chip Reads section of the Timing tab, or in the Timing Raw Data tab of a participant's entry in the Participants window.
What is the Kiosk mode used for?
This mode is only used for managing Transponders before or after the race, and not for timing.
In Chip Timing Window I cannot connect to the USB Timing Box. What's the problem?
Please ensure that you have closed the "TagReaderKeyboard" and "TagTool". The Timing cannot connect to the USB Timing Box at the same time as additional software.
What loop size and loop power is the best choice for a cycling event?
We recommend a width of 30-40cm (1.0 - 1.3 ft.) and a loop power of 30%. But do not take this as face value, and check your read height!
What loop size and loop power is the best choice for a horse race event?
We recommend using the max size of 60cm (2 ft.) and the max power of 100%.