If you are using 3rd party software such as RunScore or The Race Director which does not support direct connection to race result or you want to use some of the features of RACE RESULT 12 but without switching over fully then you can use our Raw Data Exporters.
If using the Raw Data Exporters then you will need to setup some basic settings in RACE RESULT 12 and the Quick Start guide below can help you to do this.
Quick Start Guide
This is a simple quick start guide for using the raw data exporters with third-party software. It covers the basics to get started and some common use cases.
You will need to download the latest version of RACE RESULT 12 from our website, it is also recommended to keep this updated as updates will bring new features and enhancements. This guide will also work in offline mode, the software is completely free to use in this way.
Create Event
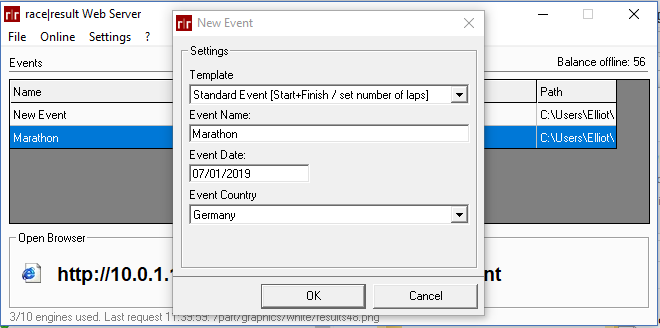
Open the race result web server and create a new event through the File menu, you can use the standard template for this or if you are timing a triathlon with multiple timing points then it may be useful to use the triathlon template which has some additional timing points already built-in. You should also set the Event Name, Date, and Country.
It is a good idea to have a new event file for each race you will be timing since all the raw data will be saved in the event file as well, this way you can easily recover any data if necessary.
You can also copy other event files and update settings / delete timing data as required, to delete raw data of a copied event navigate to the Main Window->Delete Data->Delete Timing Raw Data.
Once you have your file then click Open Event, this will open RACE RESULT 12 which runs in your web browser.
Basic Event Settings
It is important to ensure that some basic settings for the event are set, in the top navigation bar open Main Window, this should open the Basic Settings from the left hand menu.
Your Main Event Settings including Event name, Date From, Date Until (Especially if timing an event over multiple days) should be set, it is a good idea to ensure that your time zone is correct but this is not critical unless timing an event over multiple days.
Timing Point Setup
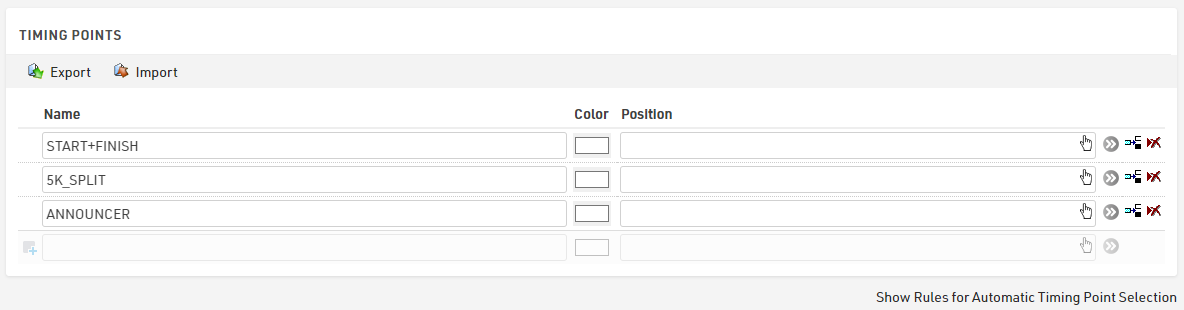
A timing point in RACE RESULT 12 is a unique location where times are recorded, e.g. "START" or "TRANSITION EXIT", each system can send data to one timing point at any one time. The exporter forwards data from specific timing points, therefore you must setup a Timing Point for each unique location.
You can name these however you like, but note that the default exporters will send the data with the same Timing Point name as set here.
In the standard template, there is a single timing point setup called "START+FINISH", you can rename this if you desire, and you can add in here as many Timing Points as required.
If you are using the Active System with Loop Boxes then you should setup Automatic Timing Point Selection below by clicking Show Automatic Timing Point Selection, this is used to assign data coming into the correct timing point.
Once you have filled in your timing points then select Timing Points again from the left menu to populate the data for the Automatic Timing Point Selection, select the relevant timing point from the drop down and then the rules which apply, normally just Loop ID and Channel ID. You can also use this to assign by device ID and set minimum and maximum time rules.

More information about Timing Point setup is available Here.
Exporter Setup
Raw Data Exporters are setup in the Timing Module, found in the top navigation menu, then select Exporters+Tracking from the left side menu. You can setup multiple exporters, with one for each timing point or specific rule sets or most cases would allow you to have a single exporter for all your data.
For each exporter set a Name, select which Timing Point, or use <All>, Export Data is the format of data being sent and the Destination (TCP/IP, HTTP(S) Post/Get, Serial, File, MS-SQL, MY-SQL, PostgreSQL, ODBC).
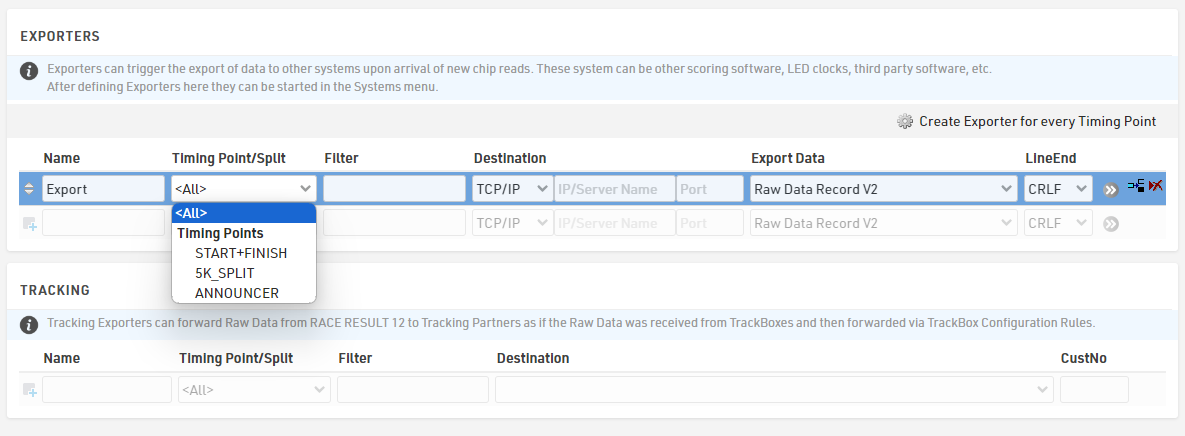
Filters can be used to additionally filter data, this is a more advanced use and requires some knowledge of Expressions, a simple filter could be used to resend all data for a particular bib number, this would use something such as [Bib]=10 .
TCP/IP: When using TCP/IP communication you will most likely use the localhost to send data, or the IP address of your timing computer, the port number depends on your software so you should check this first.
File: For files then the full file location, name, and file type is required. The easiest way to fill this is, navigate to the desired folder in the Windows Explorer, right click and select properties, this then shows the location which can be copied and pasted then appended with the file name. For example: C:\Users\Timer\Documents\Export.txt
SQL: To send data to an SQL database requires the database settings and the insert string, there is more information about this available SQL Database Insert
Custom Export Data
If you require a custom format for your export data then the easiest method is to select the default format which is most similar, then click the drop down again and change the selection to Custom, this will pre-populate the field with the full text expression for the previously selected option. You can then edit the expression as necessary. For example, if you wanted to send data to a location different from the timing point name then you would replace [RD_TimingPoint] with "TimerName" in the expression.
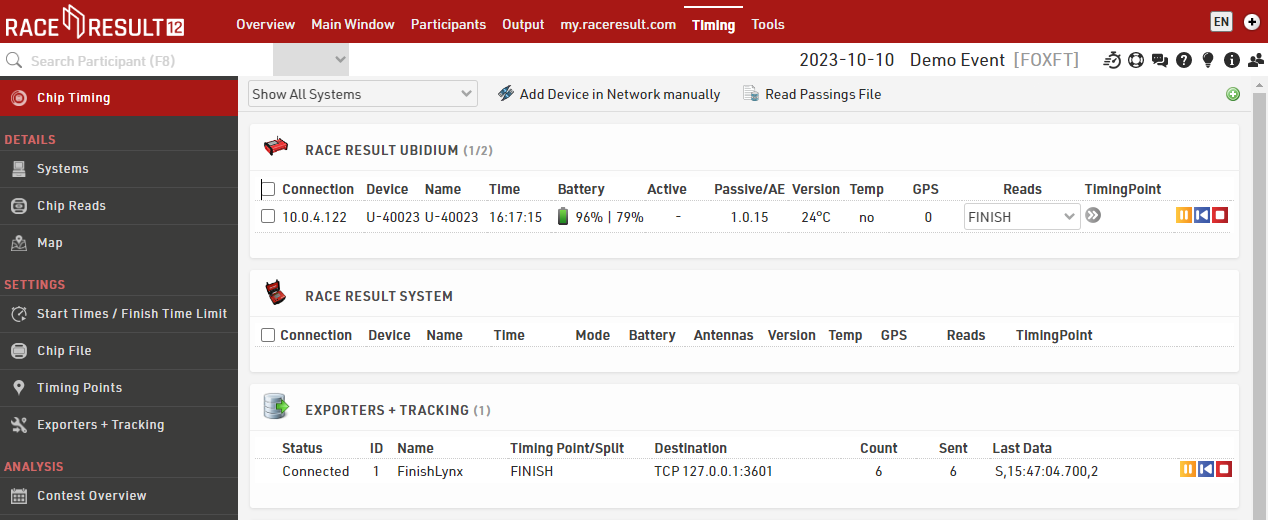
Connecting to Systems
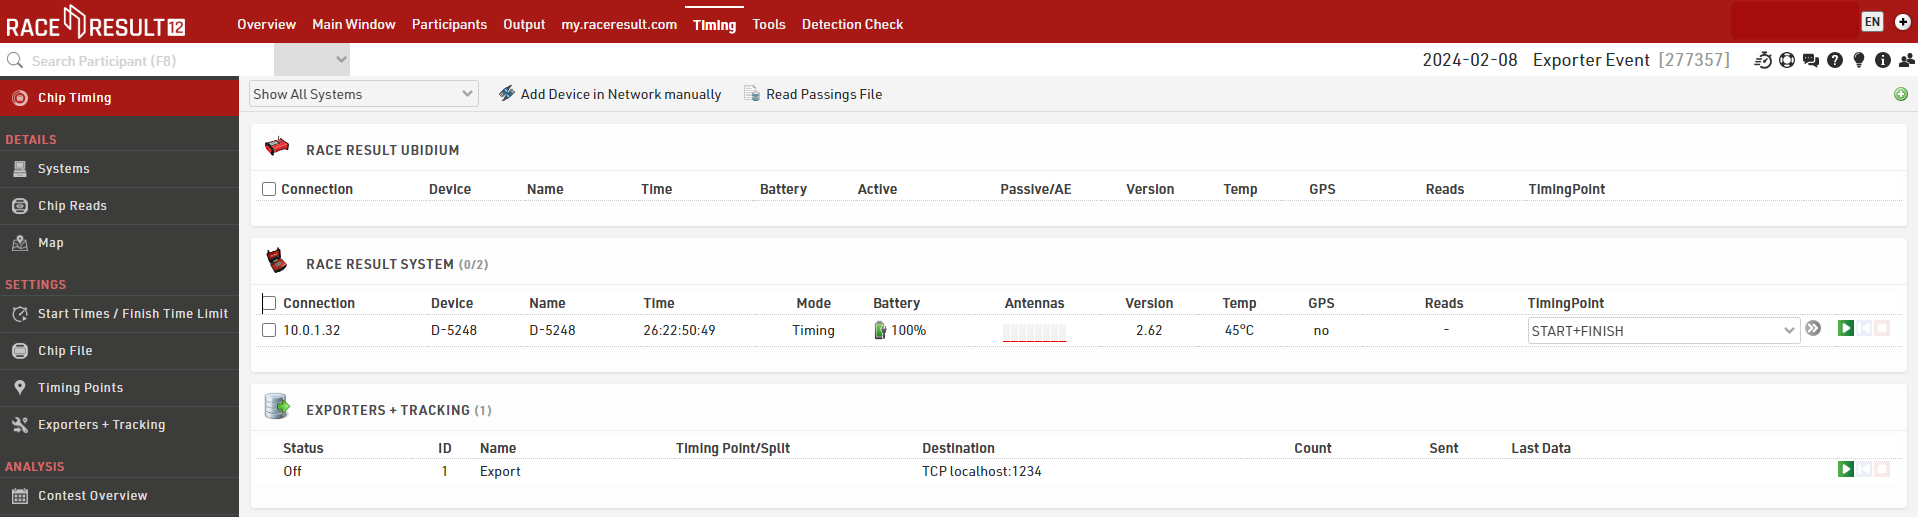
Data is pulled in from your timing systems and sent to the exporters through the Systems/Chip Timing page of the Timing tab.
Systems that are connected locally to your network will appear automatically under their respective header or can be added by clicking Add Decoder in Network manually in the top right which uses the IP address of the system. Active systems will also show any Loop Boxes which are on the same channel and sending their data to the Active Extension or USB Timing Box.
For online devices you need to link the event to your online account, this is done by clicking the Green plus in the top right and entering your login credentials. Online systems that are using TCP Upload and your customer ID will be automatically shown here.
Receiving / Sending Data
Next to the relevant device select which timing point this should be assigned to, or leave it blank if using Automatic Timing Point Selection and press the green play button to connect to the system.

That system will now send any data it records to the software. If you need data recorded before the connection was made, then the blue button will replay all data from that file.
Exporters are connected and replayed in the same way using the green play button and blue rewind button, once connected all data which meets the criteria of your exporter will be sent immediately.
When data is being received or sent, then there is a count of the data next to the relevant device or exporter.
If you wish to close a connection, then click the red stop button.
FinishLynx
Decoders
Guidelines courtesy of Event Timing.
Transponder Integration (Hardware):
Ensure the laptop, decoder and camera are on the same network.
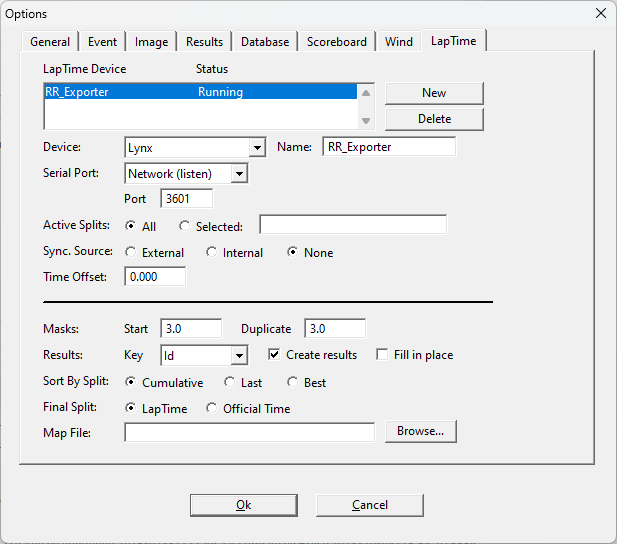
Set the LapTime as in the screnshoot below
If you want to create the map file, note that the bib number must be in the first column and the transponder code in the second. Open the XLS file in Excel and reorder the columns, as outlined above, if necessary. Save the file as a .csv
Change the extension to .txt and ensure that all letters in the transponder codes are capitalized.
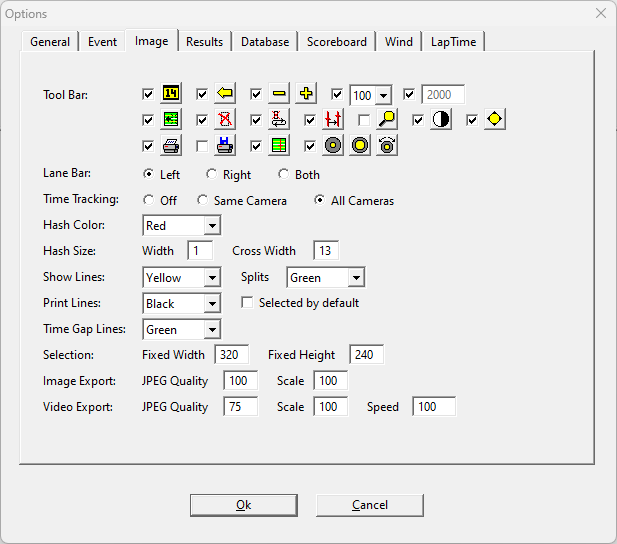
For enabling image overlay, go to Image >Print Lines and set a color.
To test if the transponder passage is showing on the image, use manual capture and take one long picture while passing the transponder.
If there is no passing visible on the image, check that a line colour is set for splits in the Image>Options menu.
Split times will be generated on the image and in the results window when a passing is detected
The competitors will be ordered in the results window based on split time, you may then go through and visually confirm the placing and rider ID with the transponder information.
The transponder split will not place the riders, typing in the rider number and placing it on the image will confirm that placing.
The transponder information can be used to determine the bib number of a rider where their number is not visible in the image.
Connecting RACE RESULT Devices to Finishlynx via RR14
No matter which RACE RESULT Timing Device you connect to RACE RESULT 14, with the Exporter function you can send the timing detections from RACE RESULT 14 directly to FinishLynx.
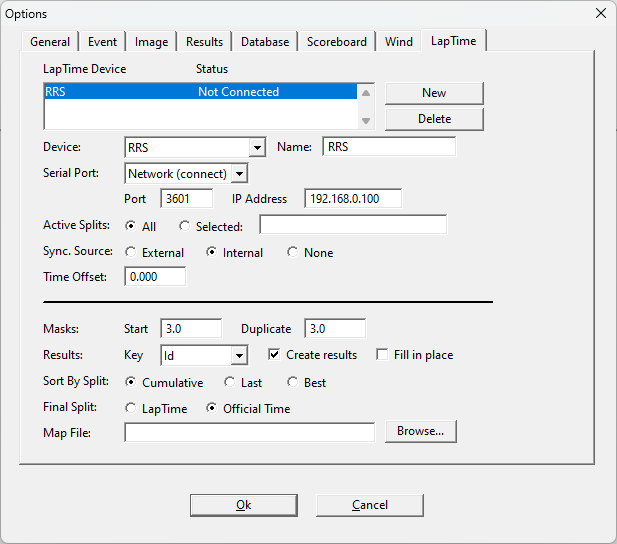
Setup LapTime option in Finishlynx
Choose the device Lynx, set the port into Network (listen) with port 3601 and set the Sync.Source as None.
Use as a key the ID and flag the Create results checkbox, to automatically create records in your Lynx Capturing Window with the BIB of the participant.
If the Status of your exporter is not set as Running, close and re-open FinishLynx and check it again.
Setup the Exporter in RR14
Under Timing > Exporters+Tracking, set an exporter with the following settings.
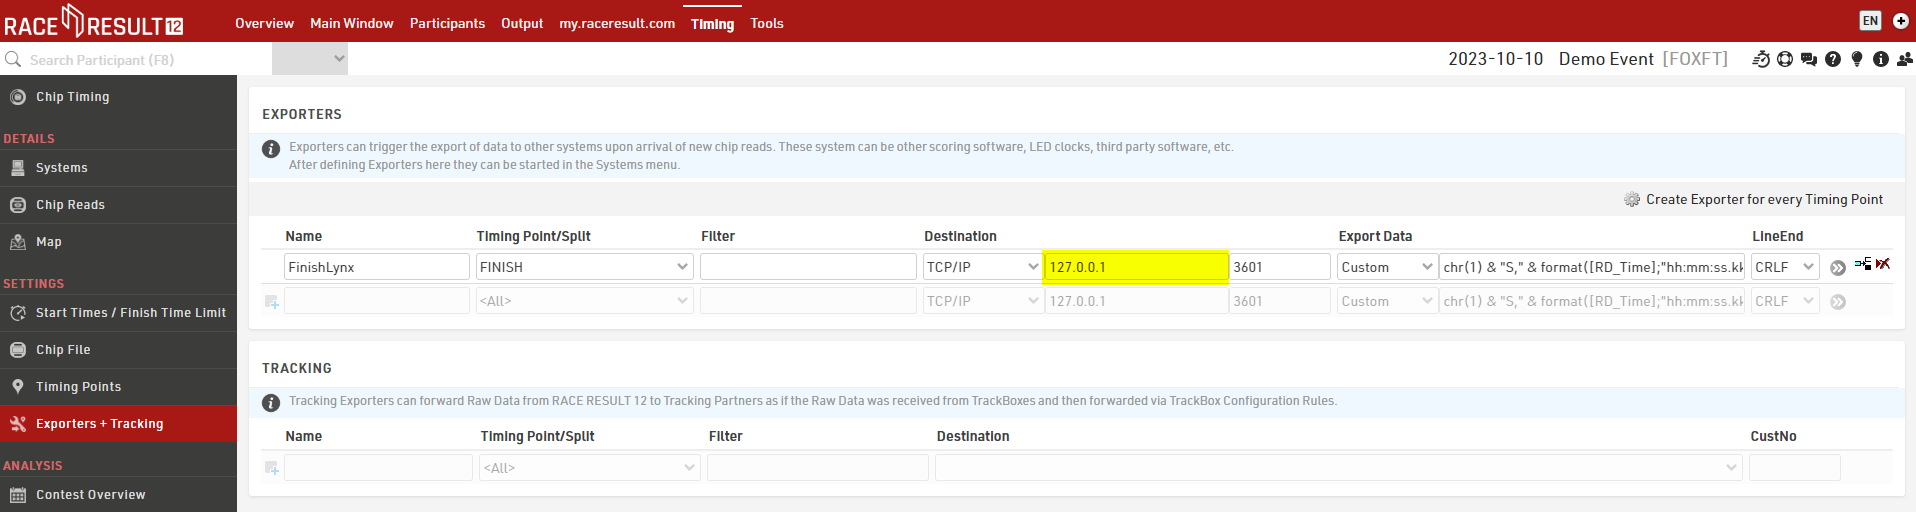
Under Timing Point, choose the timing point where you collect your lap detections, and under Destination enter the IP address of the machine where Finishlynx is running, with the port 3601.
If FinishLynx and RR14 are running on the same machine, then enter the localhost 127.0.0.1 to open the internal communication between the two software.
Set the exporter as Custom with the following string.
Connect the Timing Device and Start the Exporter
Connecting to Systems
Data is pulled in from your timing systems and sent to the exporters through the Systems/Chip Timing page of the Timing tab.
Receiving / Sending Data
Next to the relevant device, select which timing point this should be assigned to, or leave it blank if using Automatic Timing Point Selection and press the green play button to connect to the system.
That system will now send any data it records to the software. If you need data recorded before the connection was made, then the blue button will replay all data from that file.
Exporters are connected and replayed in the same way using the green play button and blue rewind button, once connected all data which meets the criteria of your exporter will be sent immediately.
When data is being received or sent, then there is a count of the data next to the relevant device or exporter.
If you wish to close a connection, then click the red stop button.
Race Day Scoring & Run Sign Up
Run Sign Up Bi-Directional Participant Sync
Run Sign Up has built an integration that offer bi-directional particiapnt data sync between Run Sign Up and RACE RESULT 12. For more information you can check out the article provided by RSU on their website.
Race Day Scoring Exporter
This is a quick start guide for connecting a RACE RESULT system to Race Day Scoring using RACE RESULT14 as a middleware. For the purposes of this article, you will only need to focus on the Timing Tab of the event file.
Download RACE RESULT 14 and RDS template event file
- Download RACE RESULT 14 from our downloads page and install the program.
- Download the sample event file at the bottom of this page (RDS_Exporters.ses).
Open RACE RESULT 14
 From your computer's start menu, open the RACE RESULT Web Server application.
- Navigate to File > Open Event...
- Navigate to your Downloads folder and select the RDS_Exporters.ses file you downloaded.
- In the lower right hand corner of the software, click Open Event. This will open your event file in your browser.
Configure Exporter settings
- The provided template is configured, except for the file path for your backup file exporter.
- Navigate to the left hand menu, and go to Timing> Chip Timing then select Exporters + Tracking on the left
- Update the File path for the RDS_File Exporter
- Don't forget to include the file name and the .txt extension
- An example file path would be C:\Desktop\RDS.txt