Time Trials are a common race format in which participants start individually at different times, rather than all at once. These events require a different timing setup than mass start races, and RACE RESULT 14 offers two main approaches to handle them: using Splits or using Special Results.
While both methods ultimately give you each participant’s net time, the way they handle start times differs significantly. Choosing the right method depends mostly on how your event is structured — whether you have scheduled start times, use a light barrier, or simply let participants start freely, one by one.
To help you get started, a sample event file demonstrating both methods is available for download at the bottom of this article.
When to Use Splits vs. Special Results
The simplest and fastest method is to use Splits. This setup is ideal if participants start at their own discretion, and you're using chip detections to mark both the start and the finish. It’s quick to set up and works well in informal or smaller-scale time trials.
However, if your event requires precise control over start times — for example, if each participant has a scheduled start time, or you’re using a light barrier or a manual trigger at the start — then you’ll need to use Special Results. This method gives you much more flexibility and accuracy but involves a slightly more advanced setup.
Timing a Time Trial Using Splits
Using Splits is straightforward. In this approach, the system simply looks for a chip detection at the start line and one at the finish line. The participant's net time is calculated as the difference between the two.
To make this work, you'll need to create two Split Points in your RACE RESULT 14 event file: one for the start, and one for the finish. The start split should be configured with an open detection window, usually about an hour, to allow participants to start at any moment within that time frame. The finish split functions like any other chip-based finish detection.
Once those two split times are recorded, RACE RESULT can calculate the time each participant took to complete the course — no further configuration needed. This is the go-to solution when start times don’t have to be exact or scheduled.
Start and Finish at the Same Point
In this scenario, both start and finish are recorded using the same timing point — for example, a 20 km loop where participants start and finish at the same line.
The Start Split uses the same timing point as the finish but is configured with the type “This is the start (first read)”. The method is Time of Day, with the time window restricted from 10:00:00 to 12:00:00. This ensures that the last valid detection in that interval is taken as the official start time. Alternatively, it's possible to refer to T0 and use race time, with a minimum of 0 and a maximum of 2:00:00 or more hours.

The Finish Split also uses the same timing point, and take the first valid detection matching the expected speed range (e.g. 5 km/h to 60 km/h), based on the course distance.

Since the start detection is based on the first read, it is essential that participants do not wait around the timing point before beginning. The setup assumes a “flying start”, where participants wait at least 10 meters before the timing line and cross it only when they actively start their effort.
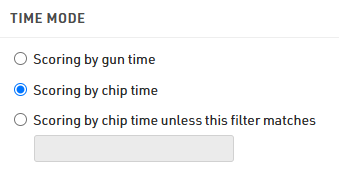
To ensure correct net time calculation, the Time Mode in the splits must be set to Chip Time, not Gun Time.
Timing a Time Trial Using Special Results
In more formal or structured time trials, you might need to assign each participant a specific start time — either scheduled manually or triggered precisely at the start line. This is where Special Results come into play.
The setup involves a few more components, but allows for much finer control. Here’s how it works:
First, you define a scheduled start time for each participant. This is done using the Single Start tool in RACE RESULT 12, where you can assign start times based on bib numbers or other criteria. This scheduled time is then saved in a dedicated result field, in this case inside the PlannedStartTime special result.
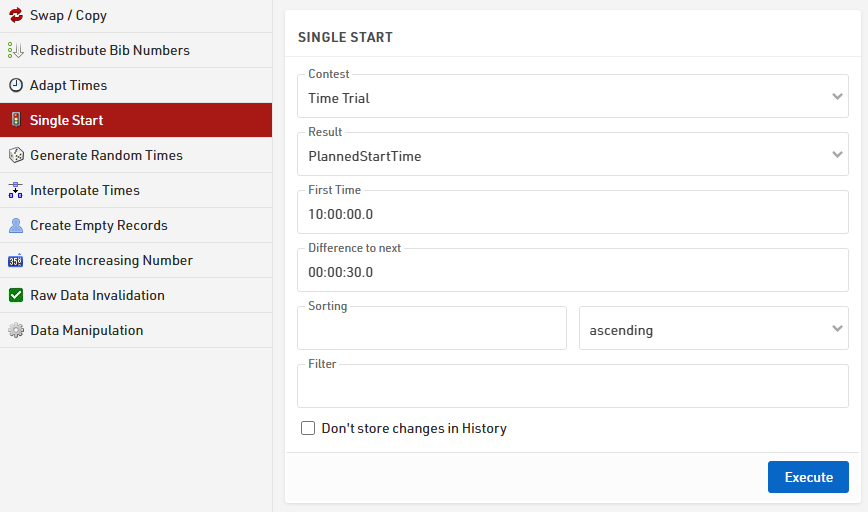
If start times are already assigned in an Excel list, they can be imported directly by naming the corresponding column as the Special Result field designated to store the start times.

Next, a start detection result is created to record when each participant actually starts. This result is typically linked to the scheduled start time, allowing comparison between planned and actual starts. For example, the StartDetection result can be configured to capture the last detection at the START Timing Point that occurs between 5 seconds before and 10 minutes after the participant’s PlannedStartTime.

If a lightbarrier is used to catch times of participants and it's connected to your device, you can store the detection in a Special Result by using the advanced setting "First Marker" linked to the StartDetection — in this way, for each transponder detection, the right marker will be taken and assigned to that specific participant.

To ensure a fallback in case of missed start detection or missing marker, a special result using the function TLast() can be created, which defaults to the PlannedStartTime when no actual start is recorded.

The finish detection is then set up similarly using a Special Result, linked to the recorded start time. It typically accepts the first detection at the FINISH Timing Point that occurs, in this example, at least 10 minutes after the StartTime.

Optionally, if a light barrier or manual trigger is used to start participants, it is important to ensure detections are correctly matched to each athlete. This may require adding a light-barrier-specific marker or hardware input configuration, depending on the timing system in use.
Finally, a FinishTime special result is created to calculate the net time by subtracting the StartTime from the FinishDetection time.

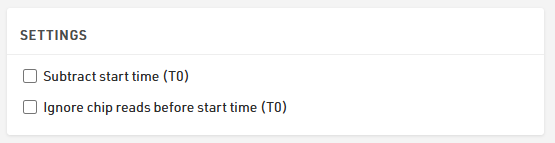
It is important to note that both options under the Settings are disabled, in order to completely ignore the T0 of the event.