RACE RESULT 14 is designed to be incredibly flexible to cover any type of event, it is unlikely you will ever need to use every single setting or feature within the software.
Here we cover the basic setup which should be considered for any event, including how to create and setup your event, how the timing will be handled, and how to then publish your results.
It is expected that you have already read the RACE RESULT 14 Introduction and you are familiar with how to access and navigate RACE RESULT 14.
Create an Event
Within RACE RESULT 14 each event is handled as an individual file, note that one event may still contain multiple Contests which may be different distances or even different disciplines all in one file.
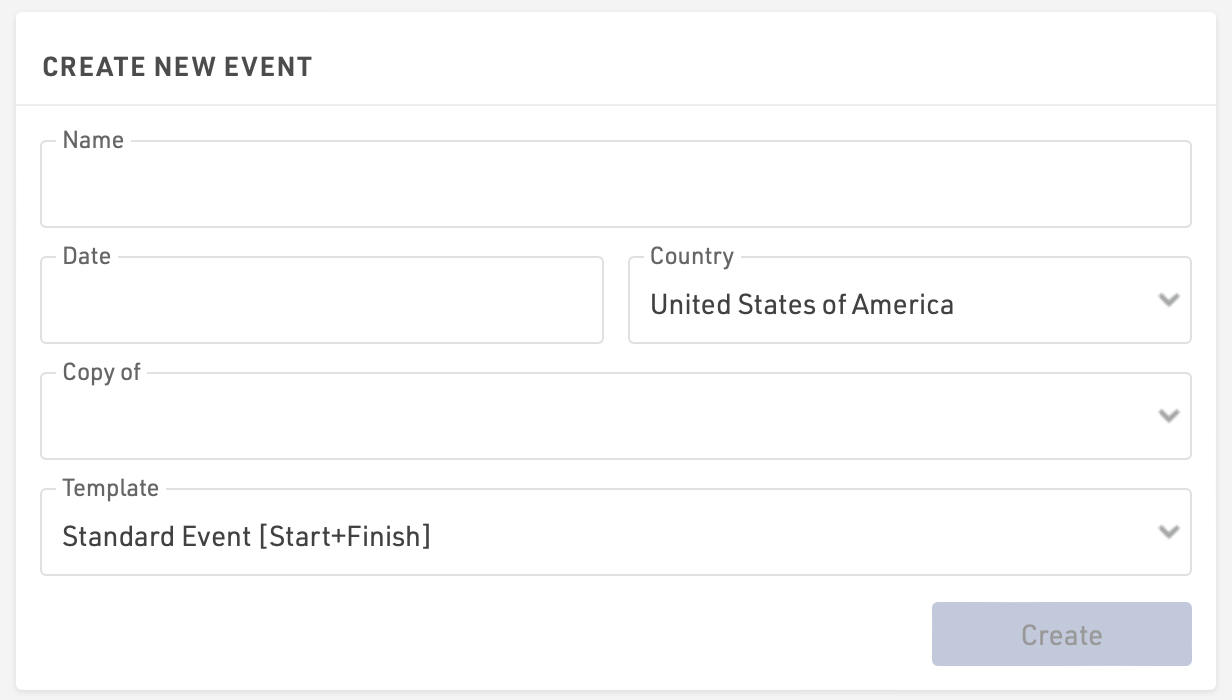
Click Create New Event from the RACE RESULT 14 Start Menu to create your event, you will need to enter some basic details including the event name, date (formatted as yyyy-mm-dd) and country.
You can choose to copy a previous event file, for example if you are running the same event again in a following year, or choose from one of the available templates. Note that when copying an event then the data will all be copied into the new file including participants data, you should check any fixed dates such as Contest Eligibility, Age Groups, my.raceresult.com publishing dates.
Event Templates
All templates contain some basic setup to make the initial file setup easier, this includes Timing Points, Splits or Results calculations and Output lists.
All templates can be adapted to your needs but act as a starting point for reference.
Standard Event [Start+Finish]
This is a simple event with a single Start+Finish timing point with no additional splits in between.
Two contests are defined: 10 Km and Half Marathon.
Major Event with Start+Splits+Finish
A more advanced setup for a typical marathon with separate start and finish timing points, a timing point for each 5 Km split and an additional timing point for an announcer at the finish.
Three contests are defined: Marathon, Half Marathon and 10 Km.
Lap Race [Variable Number of Laps]
With this setup a maximum number of laps is defined, but participants are still ranked in results even if they do not complete the full number of laps. For example in cycling criterium races where lapped riders all finish on the same lap as the leader.
A single timing point is used, and special results are used for results calculations. For events with up to 100 laps a result is created for each individual lap, beyond this only the primary calculations for lap count are setup in results, but each participant's individual laps can still be accessed directly through the details output list.
Triathlon
A simple triathlon setup with the finish and a single timing point for transition. An additional timing point and split is defined for a start check (before the start).
Two contests are defined: Sprint Distance and Olympic Distance.
Biathlon
Two options are available for different skiing biathlon formats, either Einzel (Single) or Sprint.
Timing is calculated using a single timing point for the start and finish, special results are used to enter penalties which are then used to calculate a final time which is used for scoring.
Team Lap Race [e.g. 24h]
For events where participants aim to complete the most number of laps in a given time period in a team format where only one team member may be on the course for any given lap.
This format uses the team lap race Team Score mode for all scoring automatically, and uses a single timing point for the lap point.
Cross Country
For events using standard Cross Country scoring. Individual points are calculated using special results and a Team Score is created using the Cross Country calculations.
Individual contests are created for males and females.
Event Settings
Basic Settings
The basic event settings are found in the first menu of the Main Window. Here it is still possible to adjust the event name, date and other basic information.
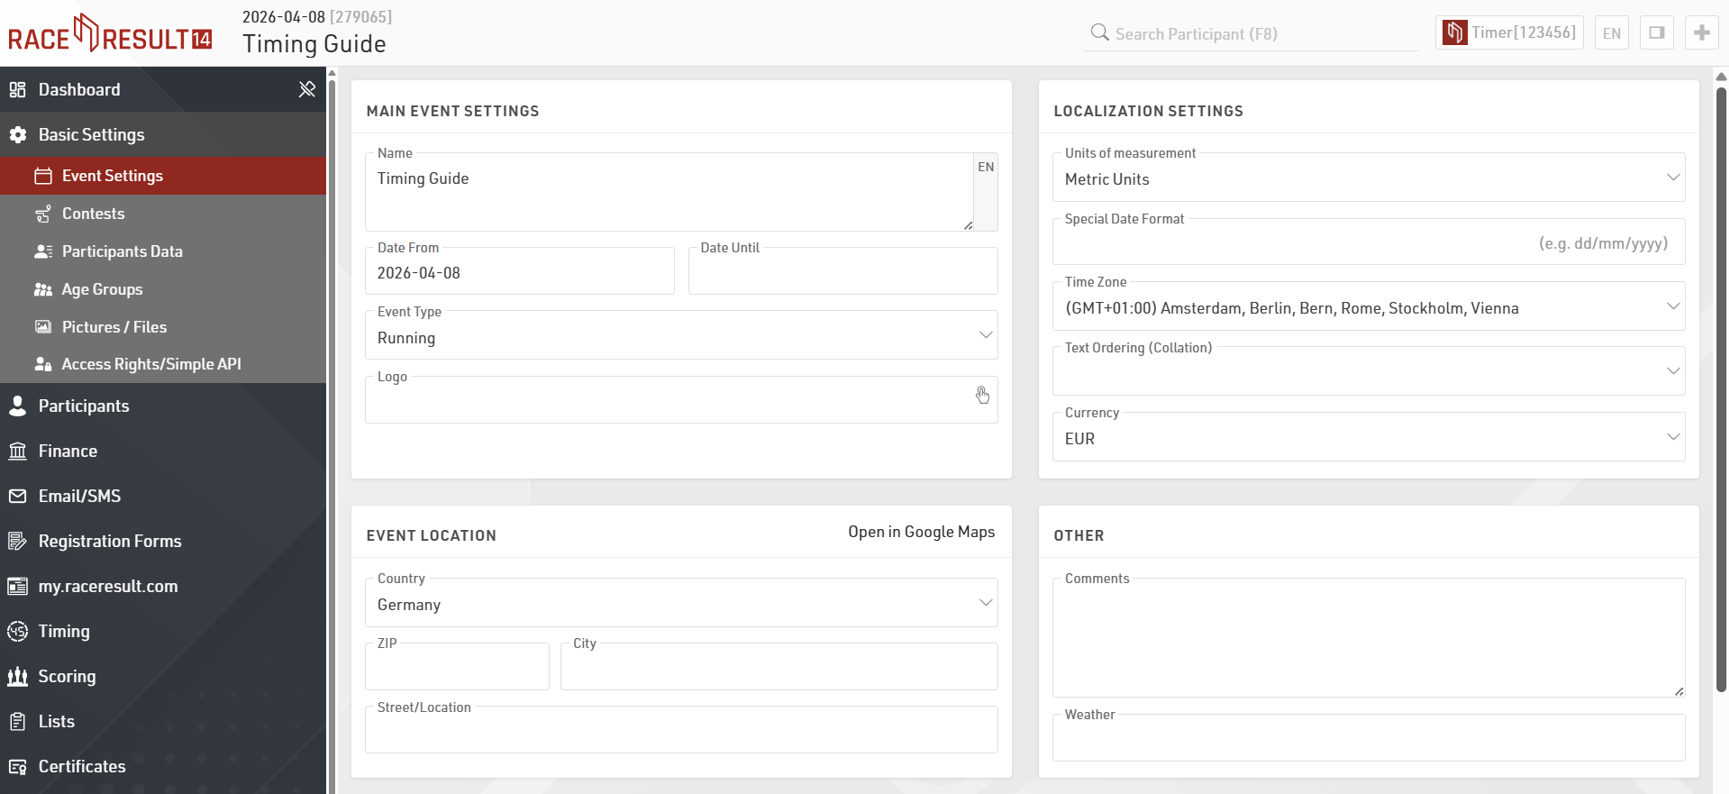
You can also set the event location to make it easier for participants to find your event through the my.raceresult.com platform.
It is advisable to check the settings for Units of Measurement (metric or imperial), Time Zone and Currency (if using registration) and set these according to your locale.
Contests
Contests are an important part of your event setup, every participant should be assigned to a Contest and if using Splits for timing then these are defined for each Contest.
A Contest is usually described as a group of participants who are all competing on the same course, at the same time (multiple wave starts are still considered the same time), and who should be ranked against each other.

Contests can be added and deleted in the left hand menu.
Each Contest must have an ID, which is a unique identifier for each Contest, and a Name. You can additionally define an abbreviated name, the Contest length, and the scheduled start time.
If you wish to limit a Contest to a specific gender or by age then you can define the eligibility using the Gender, Min DoB, and Max Dob fields. These settings will be used by registration forms to check participant eligibility and adding a participant manually will give a warning if the participant is ineligible.
The Times section allows you to define how times should be rounded and the default formatting which should be used when displaying times. The Start and Finish results are used as part of the scoring and normally only need to be modified if you are using a non-standard format.
Age Groups
RACE RESULT 14 will always attempt to assign a participant to an Age Group, these Age Groups are used in the default Rankings and Outputs.

By default each template contains some default Age Groups or these can be adjusted to your requirements. It is possible to define age groups individually for each Contest, or create up to 3 Age Group Sets if you require additional Age Group Scoring definitions.
When setting Age Groups you should first define how the Age Groups should be calculated.
- Date of Birth - Enter specific date ranges for each Age Group
- Age on Event Date - Enter the age ranges which should be calculated according to the Event Date defined in the Basic Settings.
- Age on 12/31 (Previous Year) - Age calculated on 31st December of the previous year, according to the Event Date.
- Age on 12/31 (Current Year) - Age calculated on 31st December of the year of the Event, according to the Event Date.
- Age on Arbitrary Date - Define a specific date on which ages should be calculated.
Each Age Group should be given a Name and can be assigned to a specific gender, or all genders. Each Age Group additionally has an ID however this is automatically assigned and cannot be edited.
If copying an Event file from a previous year you can increase and decrease the Age Groups by 1 year at a time in the edit button, this is useful when using entry by Date of Birth.
Participant Data
Data management is a critical part of RACE RESULT 14 and ensuring a logical data structure is an important step when managing your event.
RACE RESULT 14 already contains some basic default fields for storing participant data, if you wish to store additional participant data fields then you may need to create some additional fields for this.
Other fields
You can create as many additional fields as required for storing participant data, these fields may be used for example to record a t-shirt size, emergency contact information or relay team member information.

Additional fields must first be given a type, this controls how the data should be entered and what values are accepted. Each field must also be given a name, this is the internal which must be unique throughout the whole event file and must be entered without any spaces or special characters, the label is the field label which will be displayed publicly.
For additional fields of type Drop Down you should then also enter the values which will be available or accepted.
It is also possible to have these additional fields automatically generated by RACE RESULT 12 when manually importing participants.
Participant Registration
Registration through RACE RESULT 14 is handled through registration forms. Registration forms can be used to capture participant data, receive payment, and send an automated e-mail confirmation. These registration forms can be used for both online registration and on-site registration, even when working offline.
There are two main types of registration:
- Single Registration - A single participant registering at a time
- Group Registration - A group of participants all registering together
By default one of each type of registration forms is created in each template but you can create multiple forms for different purposes if required.
You will need to define when a registration form is active, and tick the box to enable it.
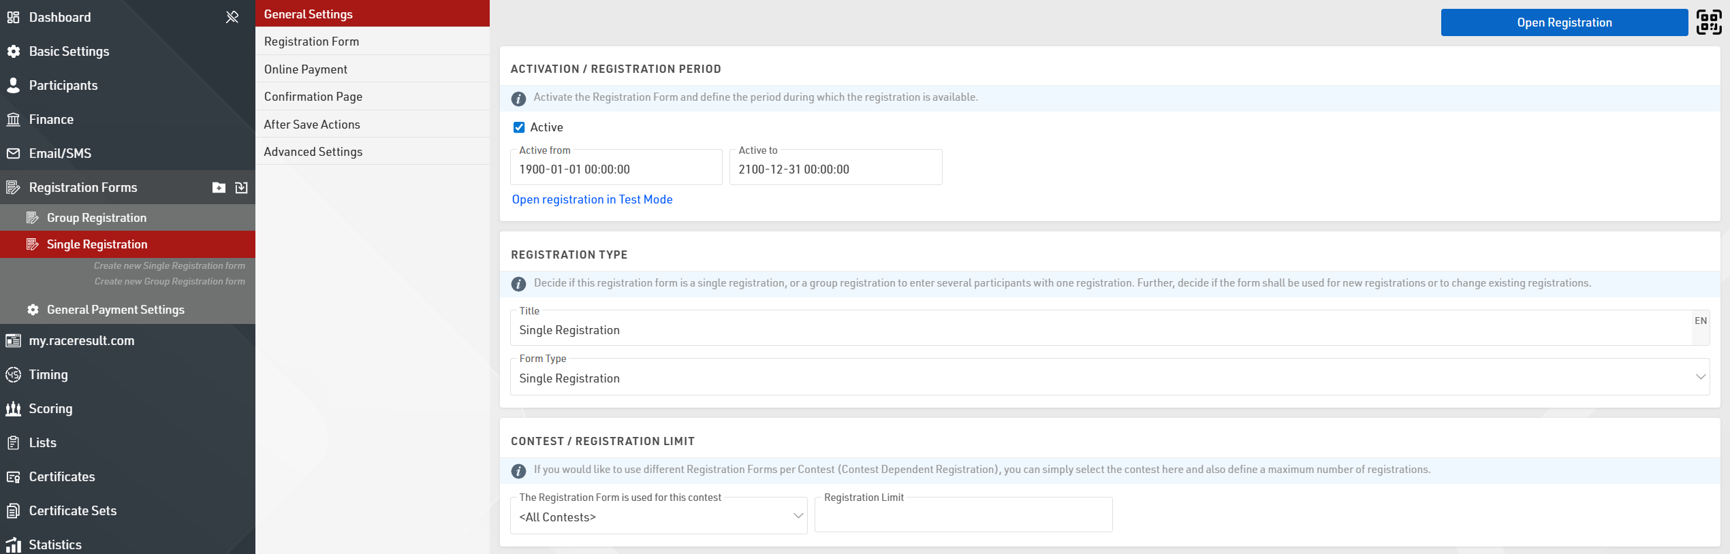
At a basic level these default forms have two steps, the first for recording the participant information and the second is for the participant to check their information and accept the terms and conditions of registration.
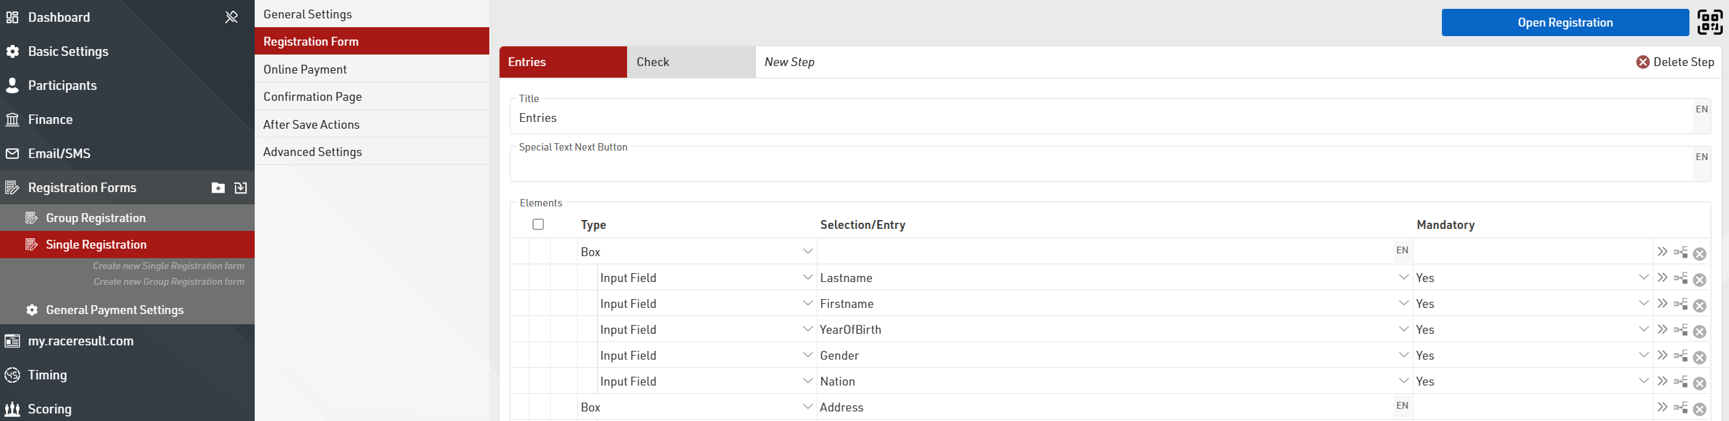
You can easily add additional Input fields to capture additional data in the form.
When capturing payment it is important to additionally setup the entry fees for your event. A default Email Template is also setup for each type of registration form which will be sent when the registration is completed as per the After Save Actions settings.
Due to the complex nature of registration forms - if you wish to create more complex registration forms please read the main Registration Forms guide.
Importing Participants
If you are not utilising the registration through RACE RESULT 14 it is also possible to import participants from an Excel or CSV file.
When importing participants you need to ensure that the column names match the field names you are importing, an example excel file is available.
If you have more than one Contest setup in your Event File then the Contest for each participant should also be imported. The value for the Contest must exactly match the name of the Contest in your file, alternatively you can assign the Contest using the Contest ID as the value.
When importing ages you should either use DateOfBirth or Age, not both.
Your file should not contain any empty lines or columns between data, any data after an empty line or column will be ignored.
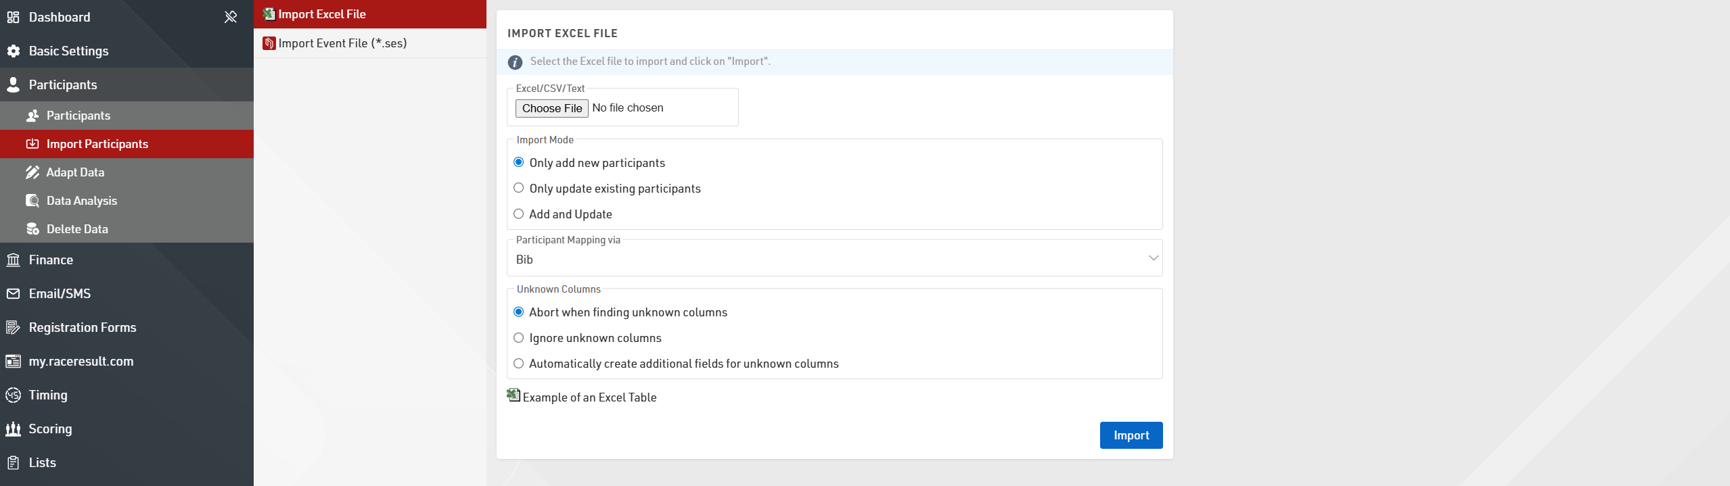
Once you have selected the file to import, choose whether you are only adding new participants, only updating existing participants or both adding and updating participants.
If you are updating participants you can choose how participants should be matched to the data, normally this will be done using the Bib number.
The handling of unknown columns defines how the import handles fields with an unknown name. This can either abort (recommended) the entire import, ignore the unknown columns or use the column headers to automatically create additional fields.
If you receive an error during the import then see the possible import errors for further explanation.
Timing Basics
There are 2 parts to calculating times and subsequently results within RACE RESULT 14, firstly the collection of raw timing data - which is then assigned to a Timing Point, and secondly the calculations which define how this raw data is used either through Splits or Special Results.
Even if you only have a single timing point for the finish, you will still need at least one Split or Special Result setup in order to calculate the actual race times.
Whether you use Splits or Special Results depends on the type of event you are timing and the complexity of any additional requirements you may have for scoring. In some cases, such as the Biathlon template, you may even combine Splits and Results.
Both Splits and Special Results reference to T0, this is the official start time which will be used for calculations, this will be covered more when looking at Timing an Event.
When timing there are two possible methods to score participants, which you use may depend on the type of event you are timing or how the start is handled. It is still possible to display both Gun Time and Chip Time in your results, but the rankings will be based on one of the two options.
Gun Time - Times are calculated from the official start (T0) to when participants cross the finish line for all participants.
Chip Time - Times for each participant are calculated from when they cross the start line, their individual chip start, to when they cross the finish line.
Splits and Special Results are always calculated dynamically, so it is even possible to make changes during the event. When doing so everything will be automatically recalculated for all participants.
Timing Points
A timing point defines the location at which times will be recorded, all raw timing data from your timing systems will be assigned to a timing point.
For simple races with a shared start and finish line only a single timing point is required, for complex events with multiple timing locations then you may need to create additional timing points.
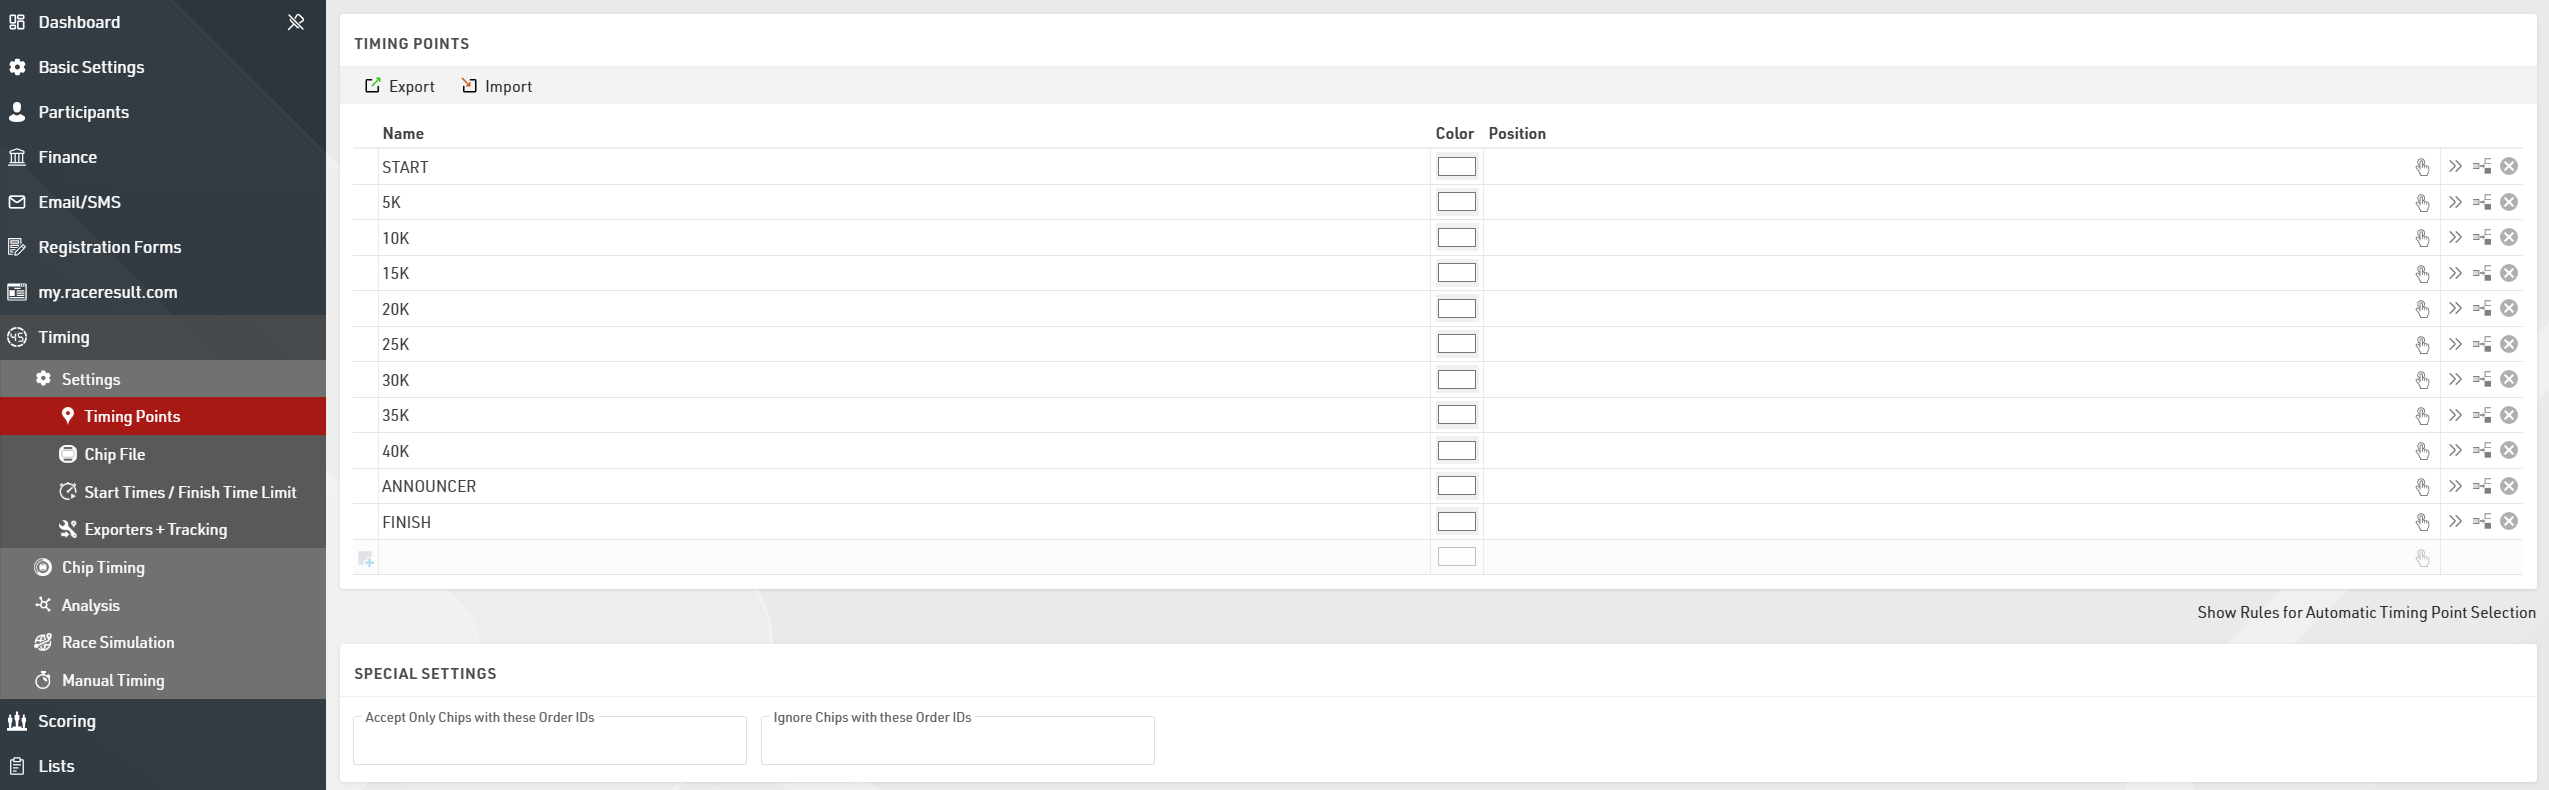
The recommended naming convention for timing points is to name them in upper case and identify the physical location or distance of the timing point rather than a generic name.
Splits
Splits are the simplest way to time a race and should be used for races where all participants within the same contest complete a fixed course with a defined finish.
Splits are defined for each Contest individually.
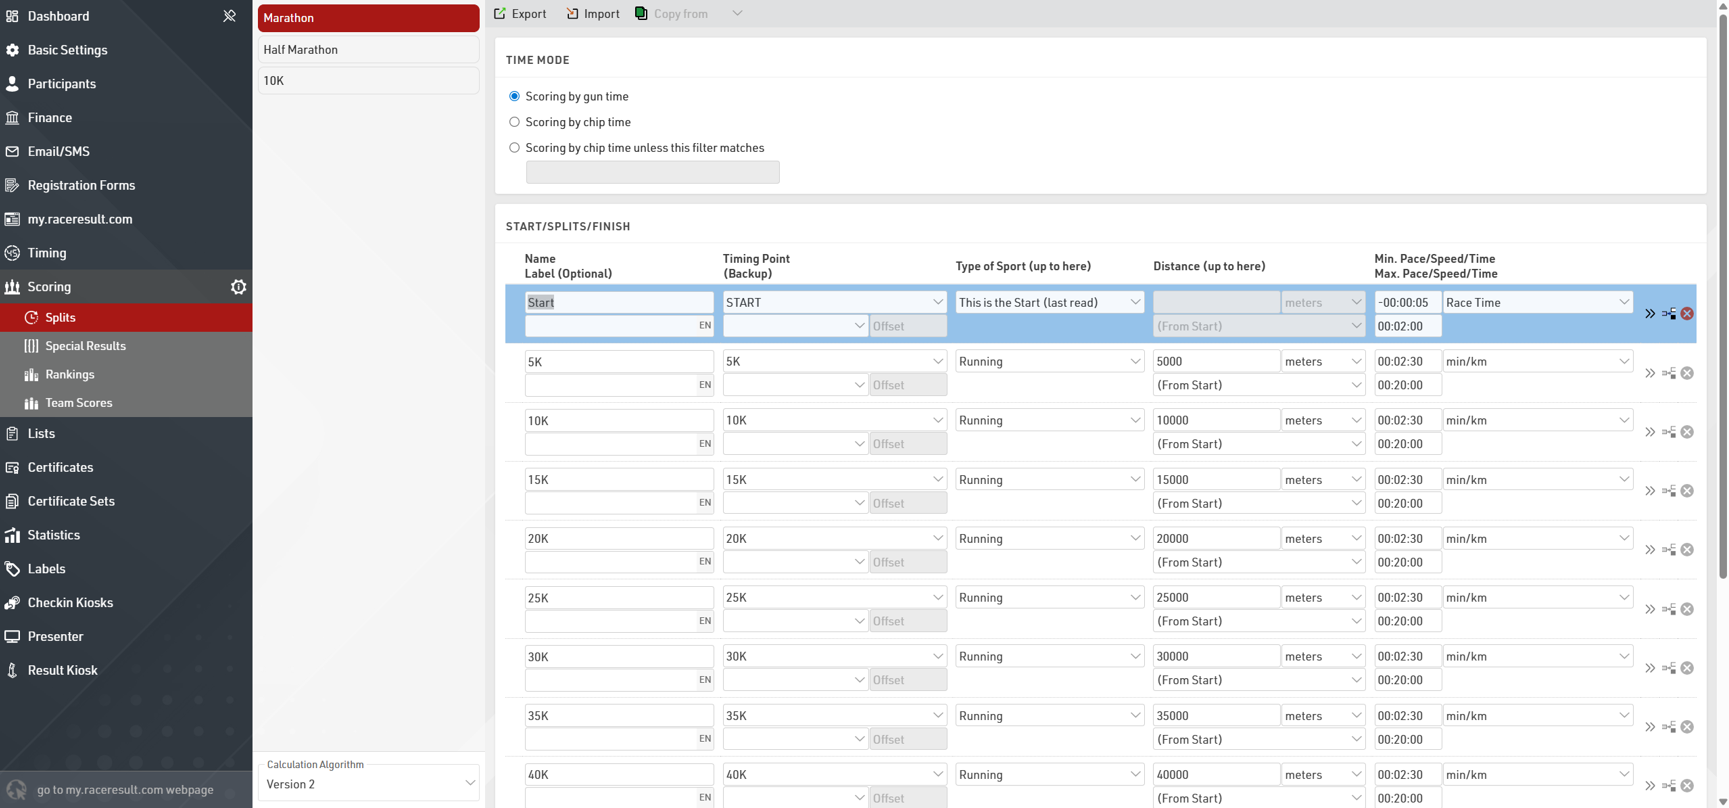
For each Contest you need to define the Time Mode, this determines whether the race should be scored on Gun Time or Chip (Net) Time.
You should then setup a Split for each time you expect to detect a participant, if a participant will pass a Timing Point multiple times then multiple Splits should be setup, one for each passing.
In a simple setup this could be just a single Split for the finish which could be defined with a minimum race time.
For each Split it is first important to define the Split Name and Timing Point which should be used to select times from. Then define some minimum and maximum values for each Split, these create the rules for which times are valid for each Split.
If you are recording a start Split to be used for Chip Time then you must ensure that the Type of Sport is set to This is the Start (last read), as this indicates that this Split should be used for the Chip Time calculation.
Below is an explanation of the Splits in some of the basic templates, for more complex setups you may need to dive deeper into Splits or consider using Special Results.
Standard Template
If using the Standard Event template then you may wish to check the maximum and minimum values for the start and finish.

By default the Start Split has a maximum time of 2 minutes, meaning every passing at the STARTFINISH up to 2 minutes from the race start will be considered to be the Start.
The Finish Split then has a minimum time of 2 minutes, meaning every passing at the STARTFINISH after 2 minutes from the race start will be considered to be the Finish.
Major Event Template
The major event template uses minimum and maximum pace values for each Split after the Start. This can be useful when the Split distances are known as it does not require calculations of minimum or maximum times. The Start Split uses the same rule as explained in the standard template.
(Half Marathon)
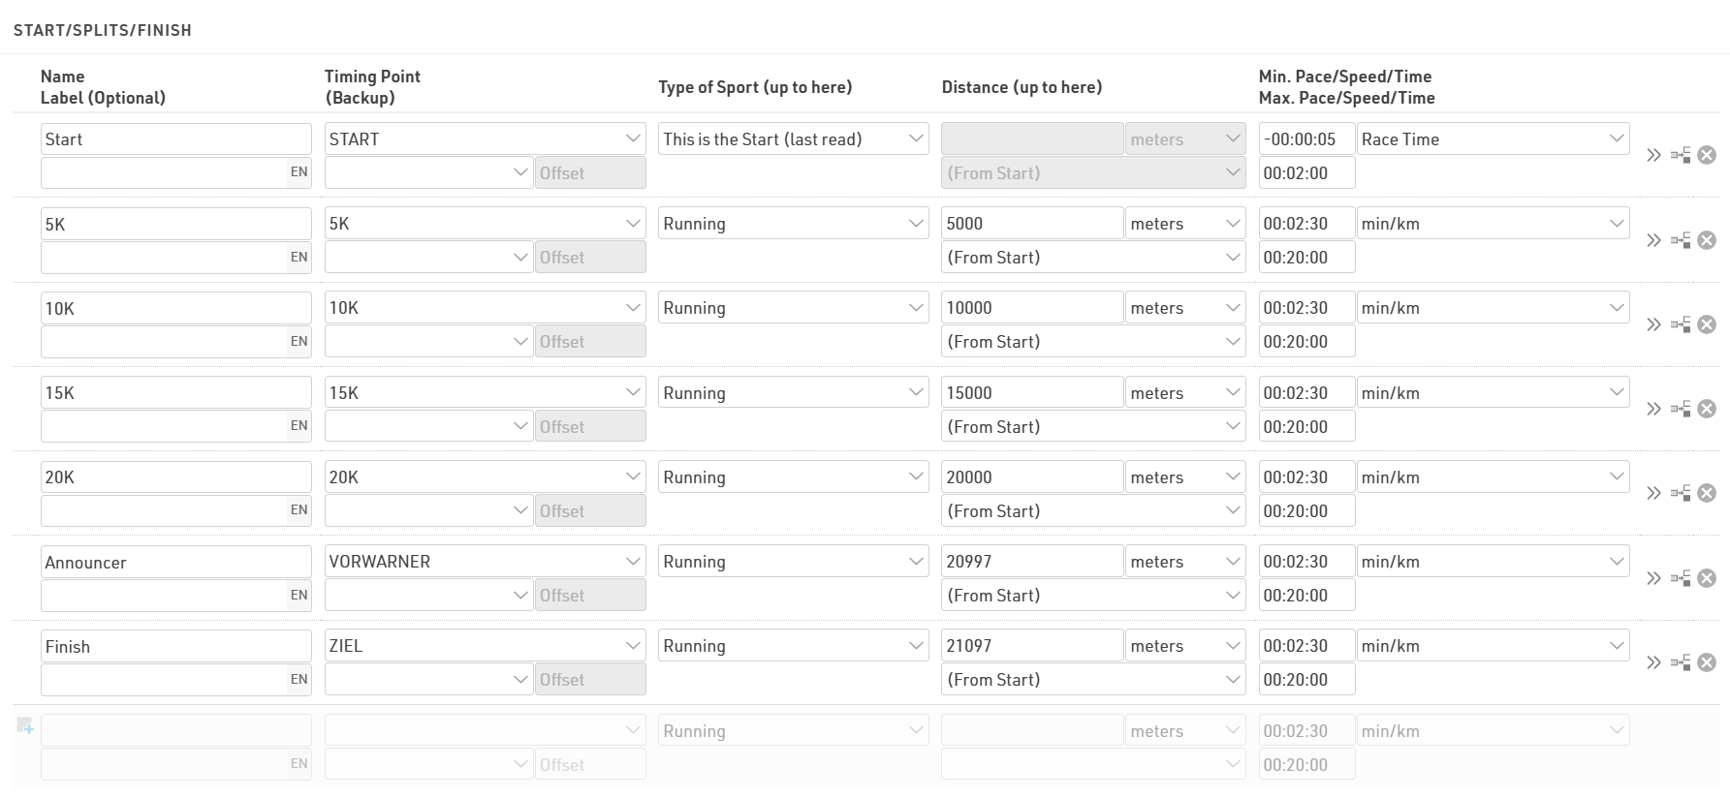
Note that these pace values are standard expected values based on road running events, for trail runs or track events you may need to use different values. It is also important that the distances are accurately defined, particularly when considering the Announcer and Finish line due to the short distance (100m) between these two Splits.
Special Results
Special Results are used when a more complex ruleset may be required for calculating times, or for other custom calculations. Special Results also provide some additional functionality for lap races, with specific settings to define minimum lap times or automatically calculate lap counts, fastest laps and more.
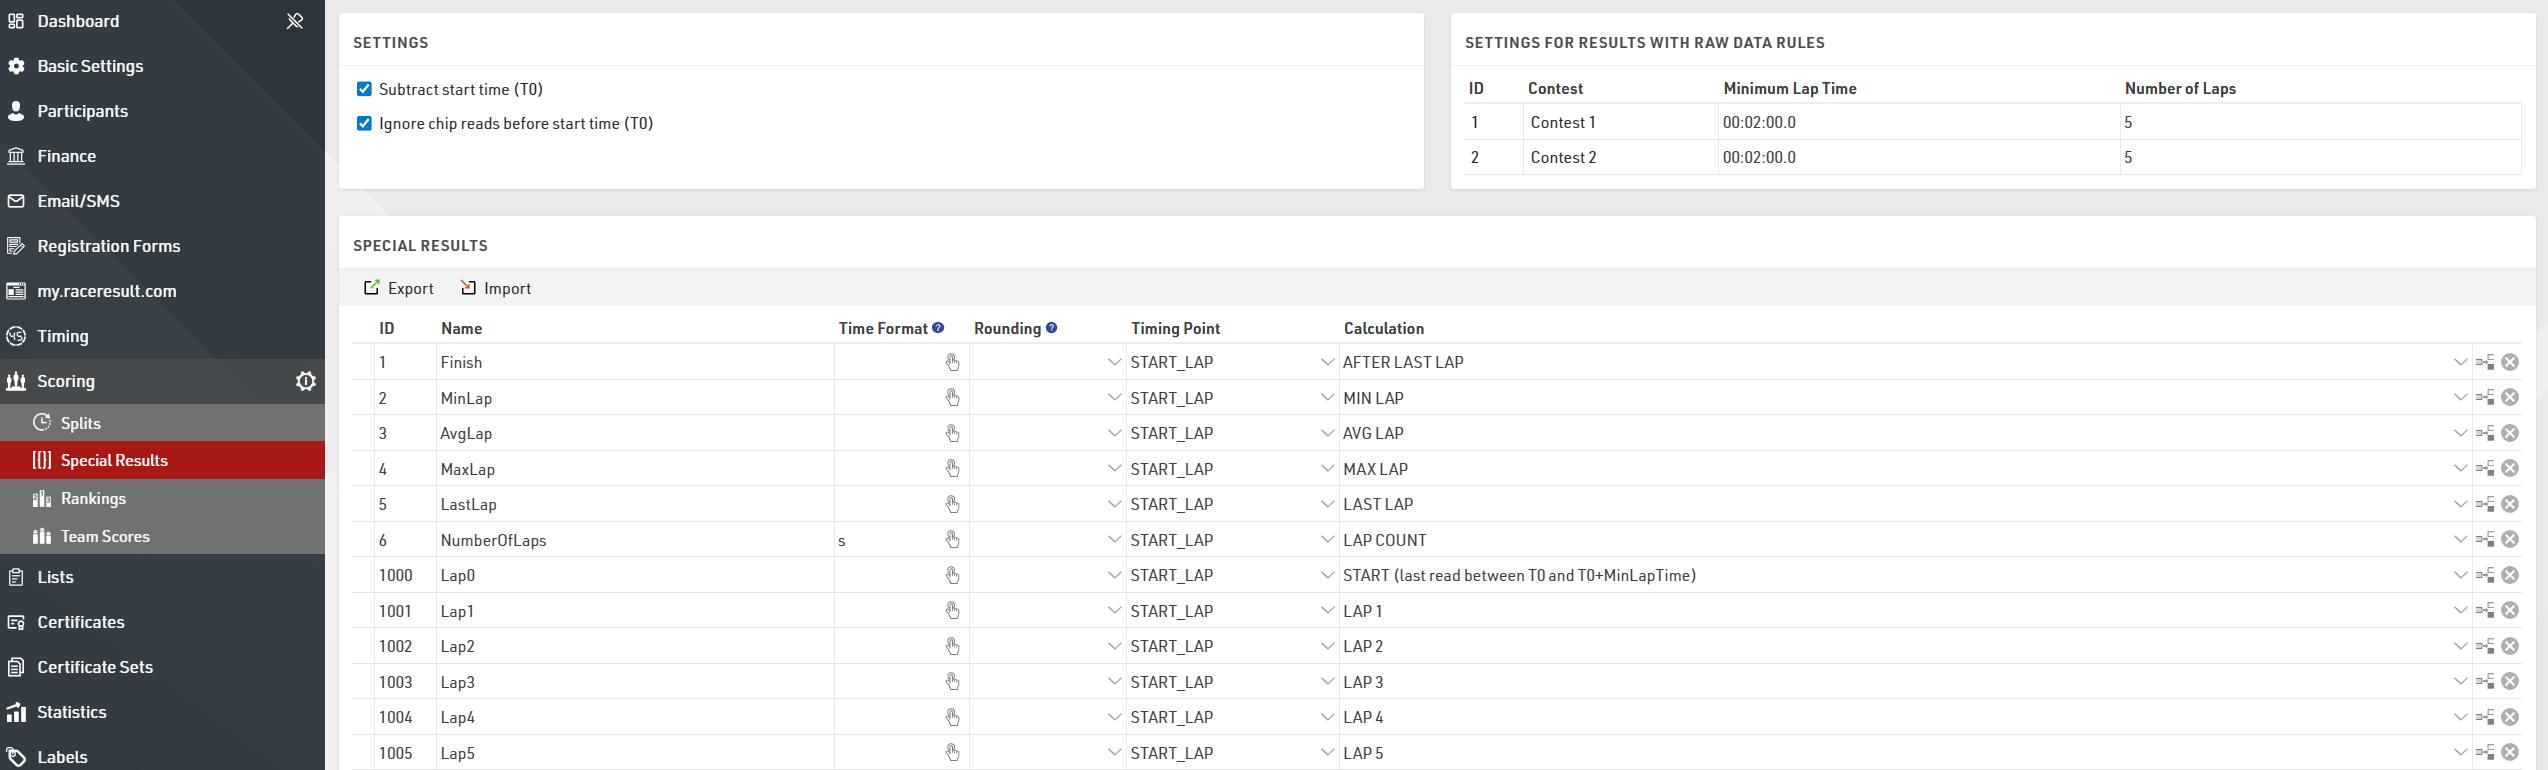
Special Results are applied to all Contests, however the Minimum Lap Time and Number of Laps can be defined for each Contest individually where required. If using advanced Raw Data Calculations then the rules can be set for either All Contests or each Contest individually.
The Calculations for Laps are only available when the Number of Laps value for at least one Contest is greater than 0.
Each result requires a unique ID and a Name.
Results can then either be a Raw Data Calculation - which then uses a Timing Point to call the raw data and calculate the corresponding time, or a standard calculation in which case no Timing Point is selected and the calculation is written manually which can reference any other result, field or function within the event.
Variable Lap Race Template
When creating an event using the Variable Lap Race Templates you will need to enter the maximum number of laps for the event.
This value will be assigned to the Number of Laps setting for each Contest, if different Contests will complete a different number of laps then you should set this accordingly. The minimum lap time by default is 2 minutes for all Contests and again you may need to adjust this.
 The first result uses the Lap Rule AFTER LAST LAP which uses the time from the end of the last lap the participant has completed. With this any participant who has completed at least 1 lap will be ranked and displayed in the final results. If you only wish to rank participants who complete the full number of laps then this calculation can be changed to FINISH (Read after end of last lap).
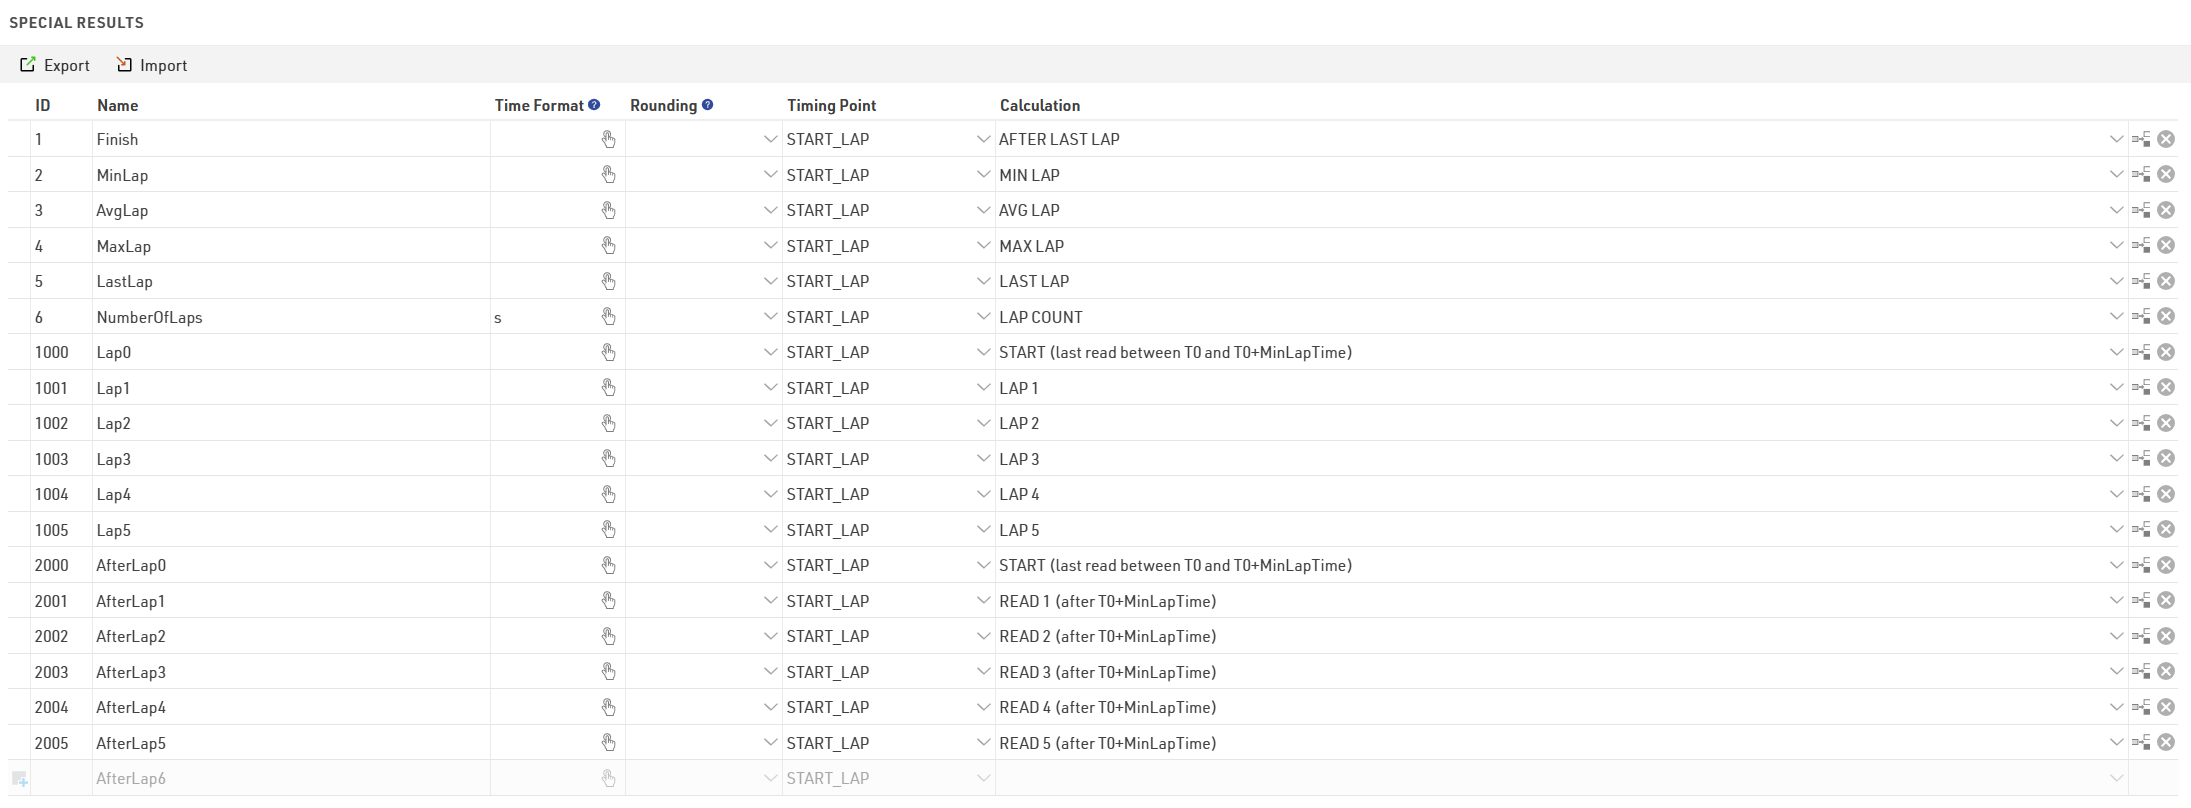
Additional results are created for the Minimum (Fastest), Average and Max (Slowest) Laps, as well as the Last Lap and Number of Laps.
When the maximum number of laps is set to 100 or lower then for each lap a result will be created for each lap time (LapX) and additionally the cumulative time at the end of each lap (AfterLapX). When the maximum number of laps is over 100 these are not automatically generated in the Special Results however the individual lap times are still calculated internally and can still be referenced in outputs.
Biathlon (Einzel) Template
The Biathlon template is unique in that it combines both Splits and Special Results, in this setup the Special Results are used to enter penalties which are then summed and added to the Finish Split to calculate a total time.

When a result is created with no Timing Point or Calculation then a time can be entered manually in the Results tab of each participant. In this case there are 4 results created to enter a penalty for each Shooting discipline, each value should be entered as a time in minutes.
The result in ID 10 (Penalty) then calculates the sum of these times and multiplies by 60 to calculate the total time as a value in seconds (which is required for the final calculation).
Result ID 1 adds together [Finish.Decimal] which is the time in the Finish Split and the total Penalty time. This result is then used as the Finish Result in the Contest setup and is then used for the final rankings and results lists.
Chip File (Transponder Assignment)
The software needs to map the incoming raw timing data to a participant.
If you are using Bib Transponders where the bib number matches the transponder number, or you have ordered bibs with transponders from RACE RESULT then you do not need to take any additional steps. In this case, RACE RESULT 14 will automatically match each transponder to the corresponding bib number.
If you are using transponders with an alphanumeric code, such as active transponders or HuTags, then you will need to create a chip file to assign each transponder accordingly.
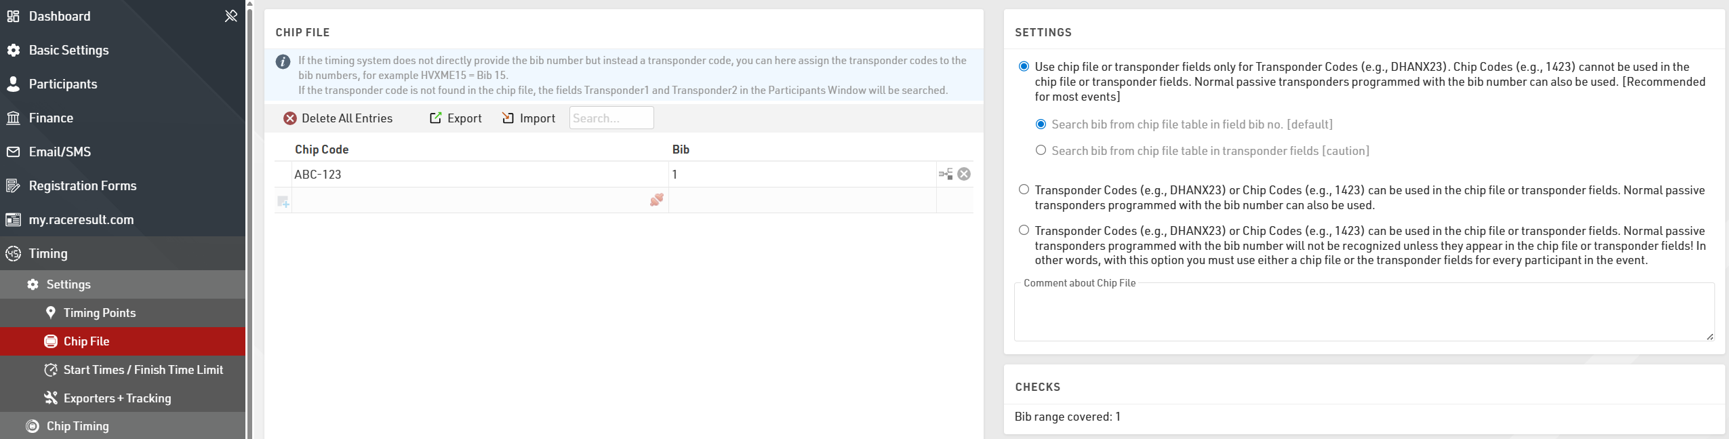
This is a simple list assigning a Chip (Transponder) Code to a bib, you can prepare this in an Excel or CSV file to be imported.
If you are using numeric Bib Transponders but the bib number does NOT match the transponder number then you may need to change the Chip File Settings.
Output Lists
Output lists serve to produce lists of data such as start lists or results lists, but can be used for any purpose you might need. Output lists can be printed, published online through my.raceresult.com as part of your Online Publishing, or used with other tools within RACE RESULT 14 such as Presenter for results displays.
Each of the event templates include some default templates for typical results lists that may be required, some of these are specific to the template but the same principles apply to all outputs.

To view or edit an Output List click the name of the list from the left hand menu, the data of the output can be modified in the Data/Format tab.
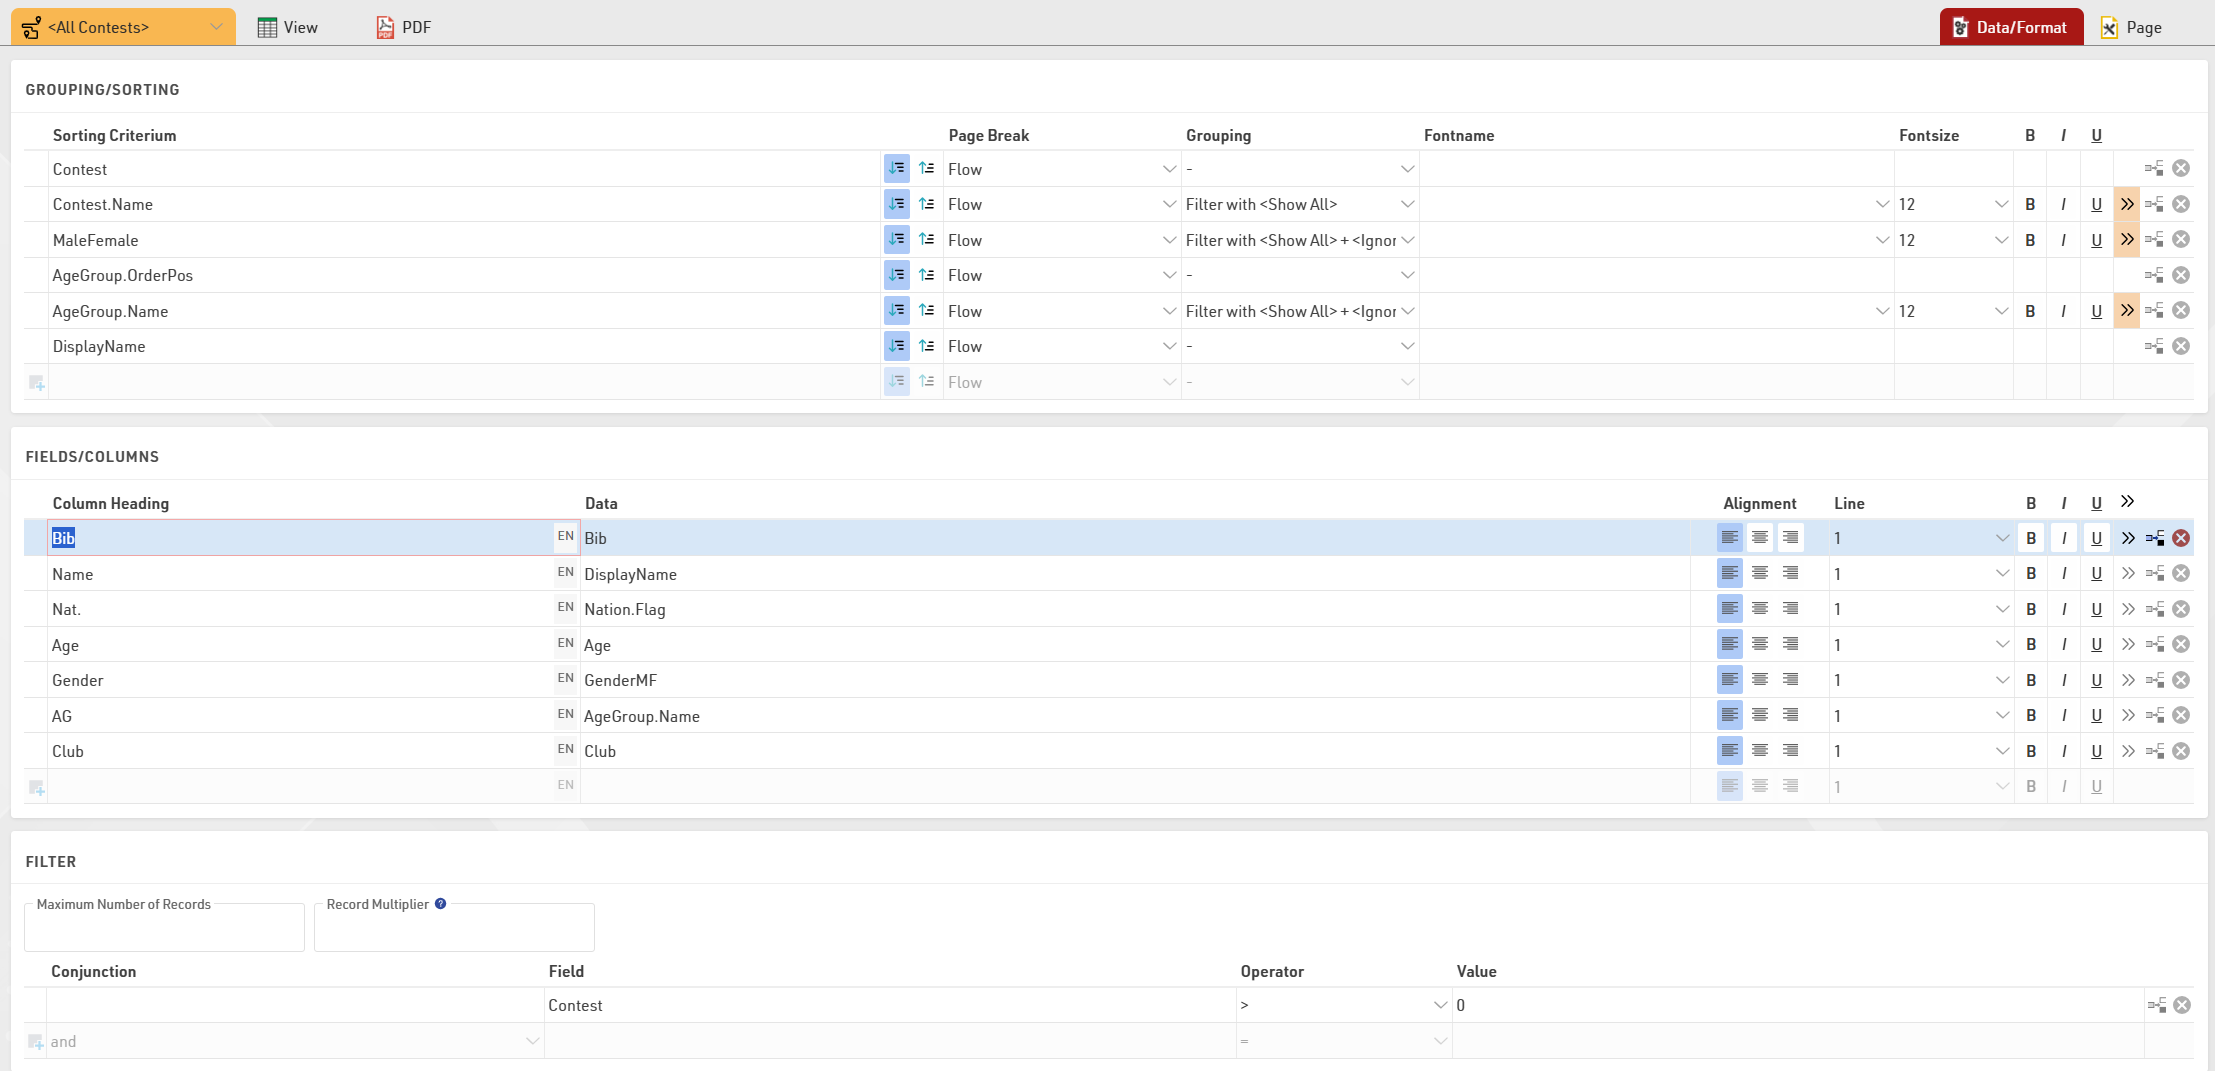
You can edit which fields are displayed in the Fields/Columns section, each column has a heading and the data value which is the field or function you wish to show.
The Grouping/Sorting defines how participants are sorted within a list, and the Filter defines which participants should be shown in the list. Additional formatting options are available to further customize lists, for a more detailed description see the main Output List guide.
Online Publishing
Working with RACE RESULT 14 online allows you to also publish your event through the my.raceresult.com platform at no additional charge.
With this you can list your event in the calendar for participants to find, create a landing page to provide additional event information, publish online registration, publish a startlist and results lists or even receive reviews and inquiries from your participants.
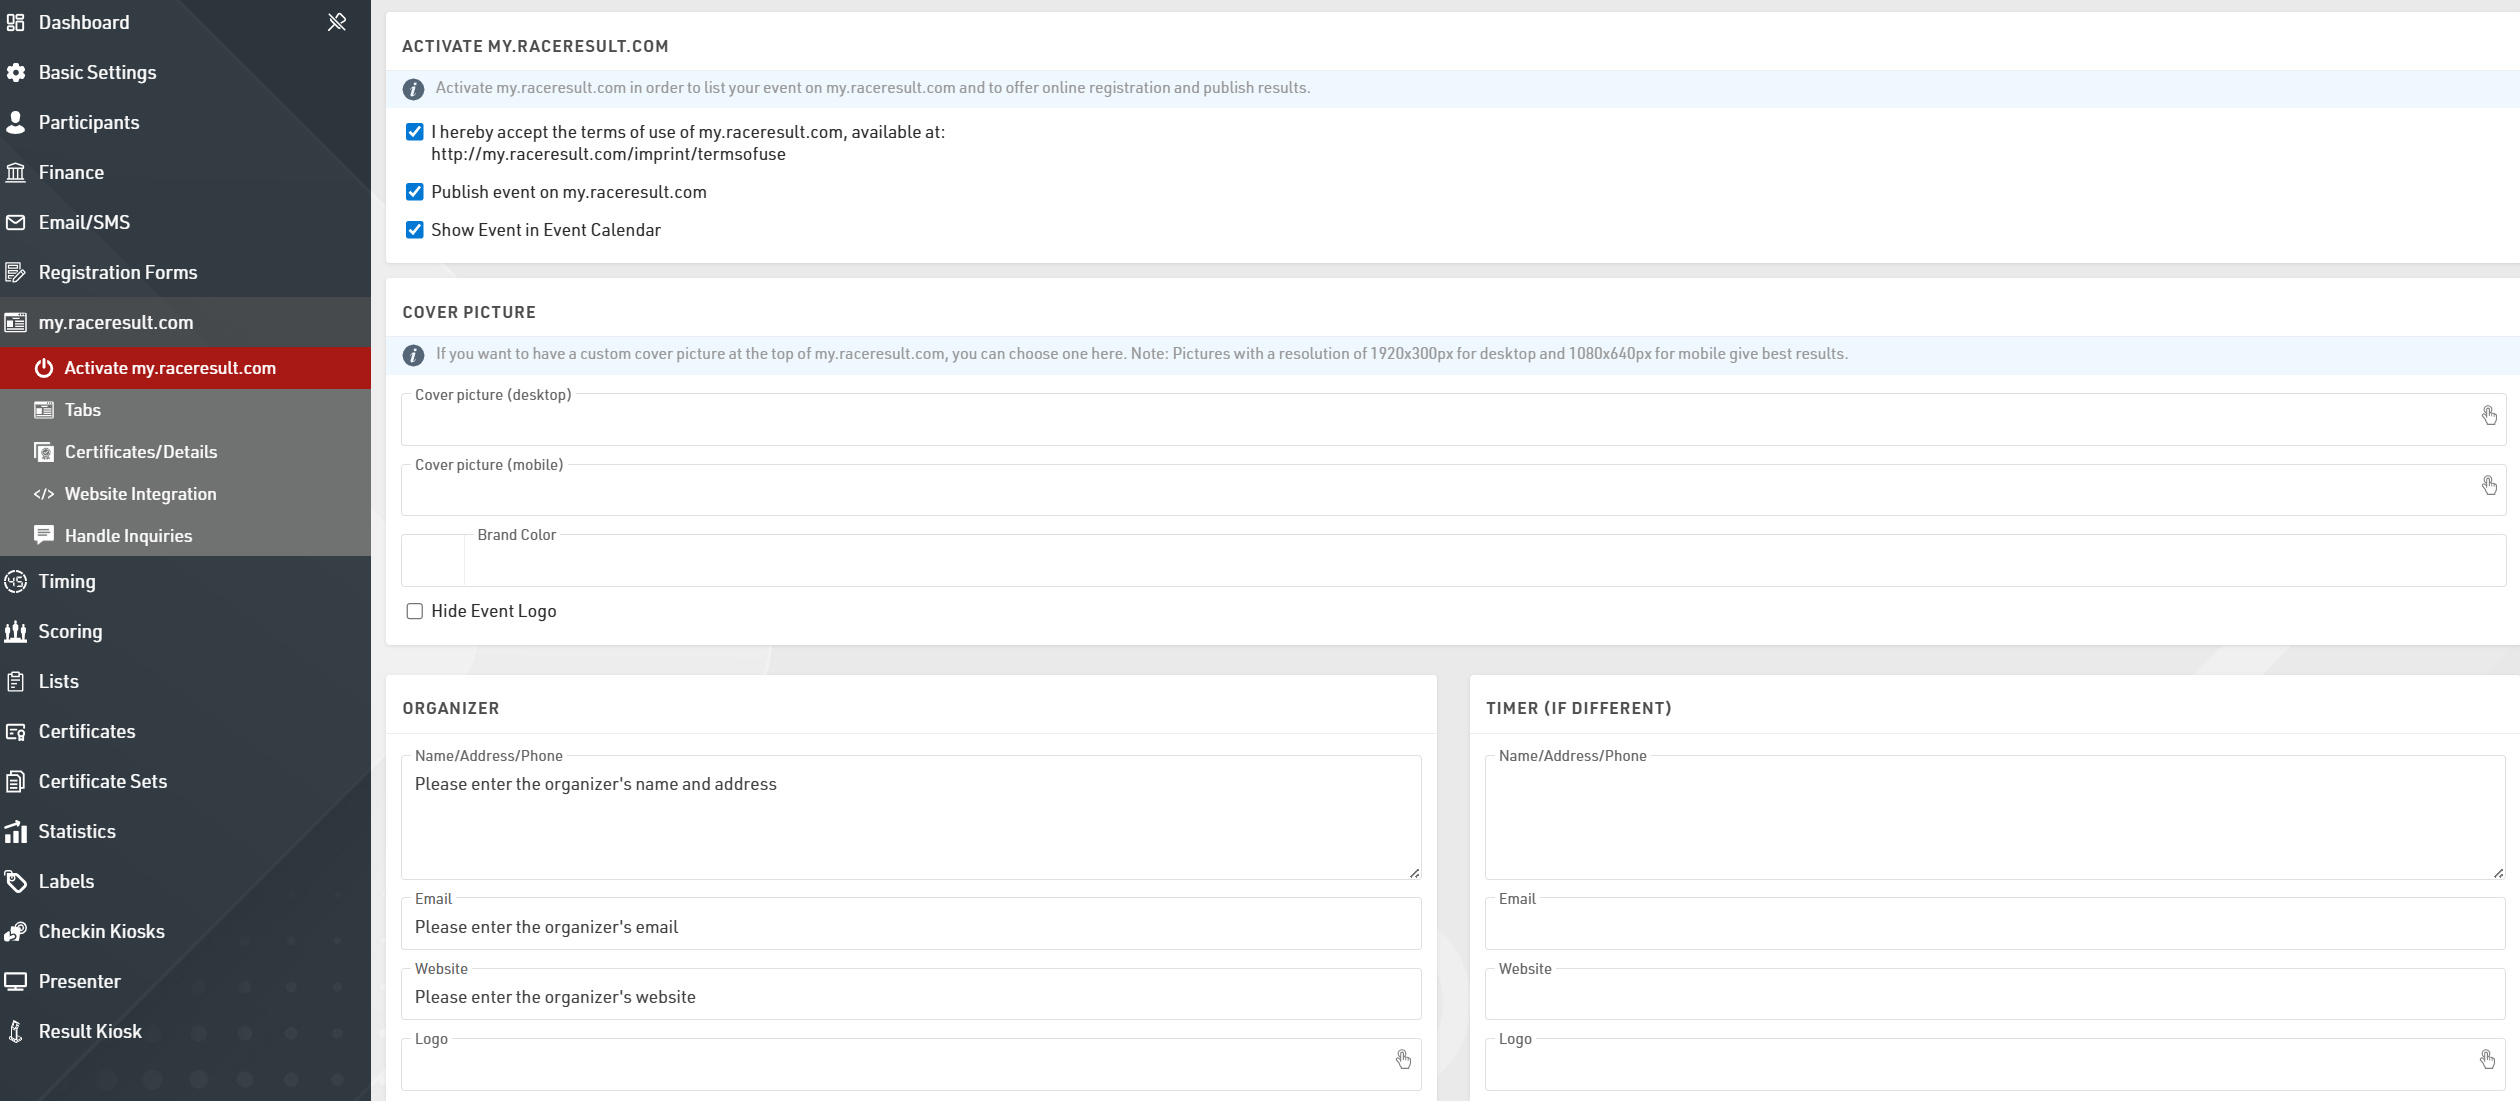
In order to publish your event online you first need to agree to the terms of use which are linked through the Avtivate my.raceresult.com page, you can then choose to publish the event and whether the event should be listed in the event calendar.
The cover picture is displayed at the top of the event page and can be customized with your own image, the event logo (as defined in the Basic Settings) is also displayed by default. If you want to change the menu text to match the events color scheme, you can also define that as the Brand Color.
The my.raceresult.com page for your event has a number of different sub pages which can be used and edited according to your requirements.
Below is a summary of some of the key points for publishing an event, for more advanced customisation please refer to the main my.raceresult.com guide.
Info
The info page acts as a landing page for the event, you can choose to embed a web page via a URL or create your own content using the text editor. The editor also allows for HTML content to be inserted so you can customize this further.
If embedding a web page you will need to ensure that the target site allows cross-site scripting, otherwise it will not be loaded.
Registration
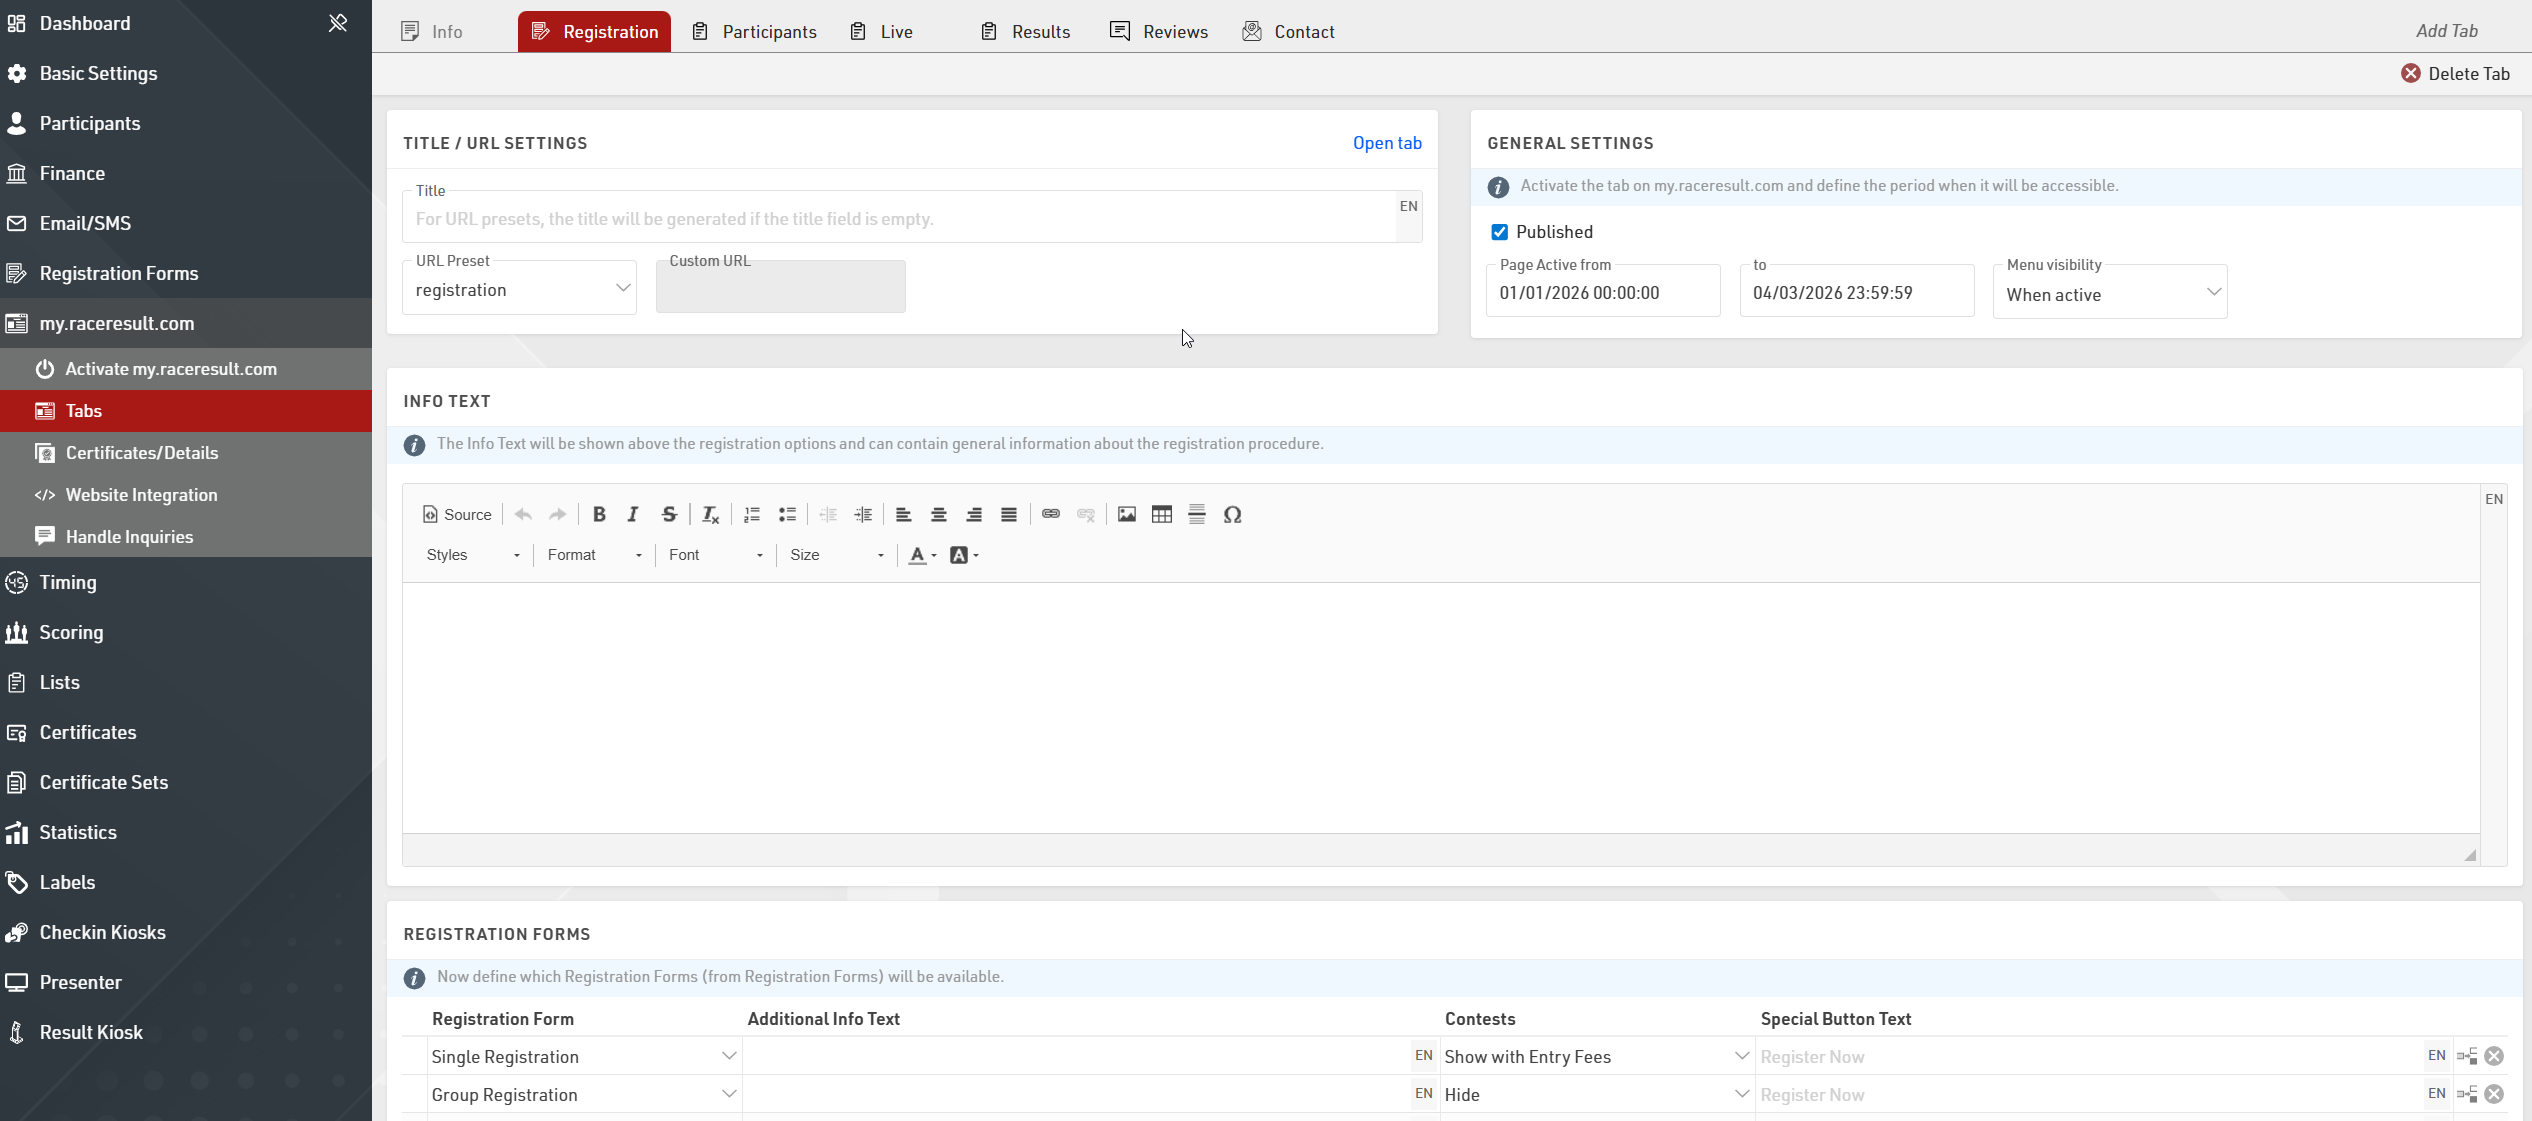
You can use the my.raceresult.com platform to offer online registration to your participants.
You will need to first setup the Registration Forms you wish to publish online, then you can activate a Registration tab and select the date range for which the Registration tab should be available.
An additional info text can be defined for the Registration page, and you can also customize the options for each registration form.
Lists
There are three pages which are default tabs used for publishing Output Lists online for your event. It is possible to configure these and additional list tabs to fit your requirements
Generally the Participants page is used to publish a start list before the event, Live is used for a live leaderboard during the event and Results is used for official results during and after the event. Each page has a setting of how it shows up in the menu and a date range which defines when the page is available online, the default settings for each page are based on these general guidelines using the Event Date when the file is created.
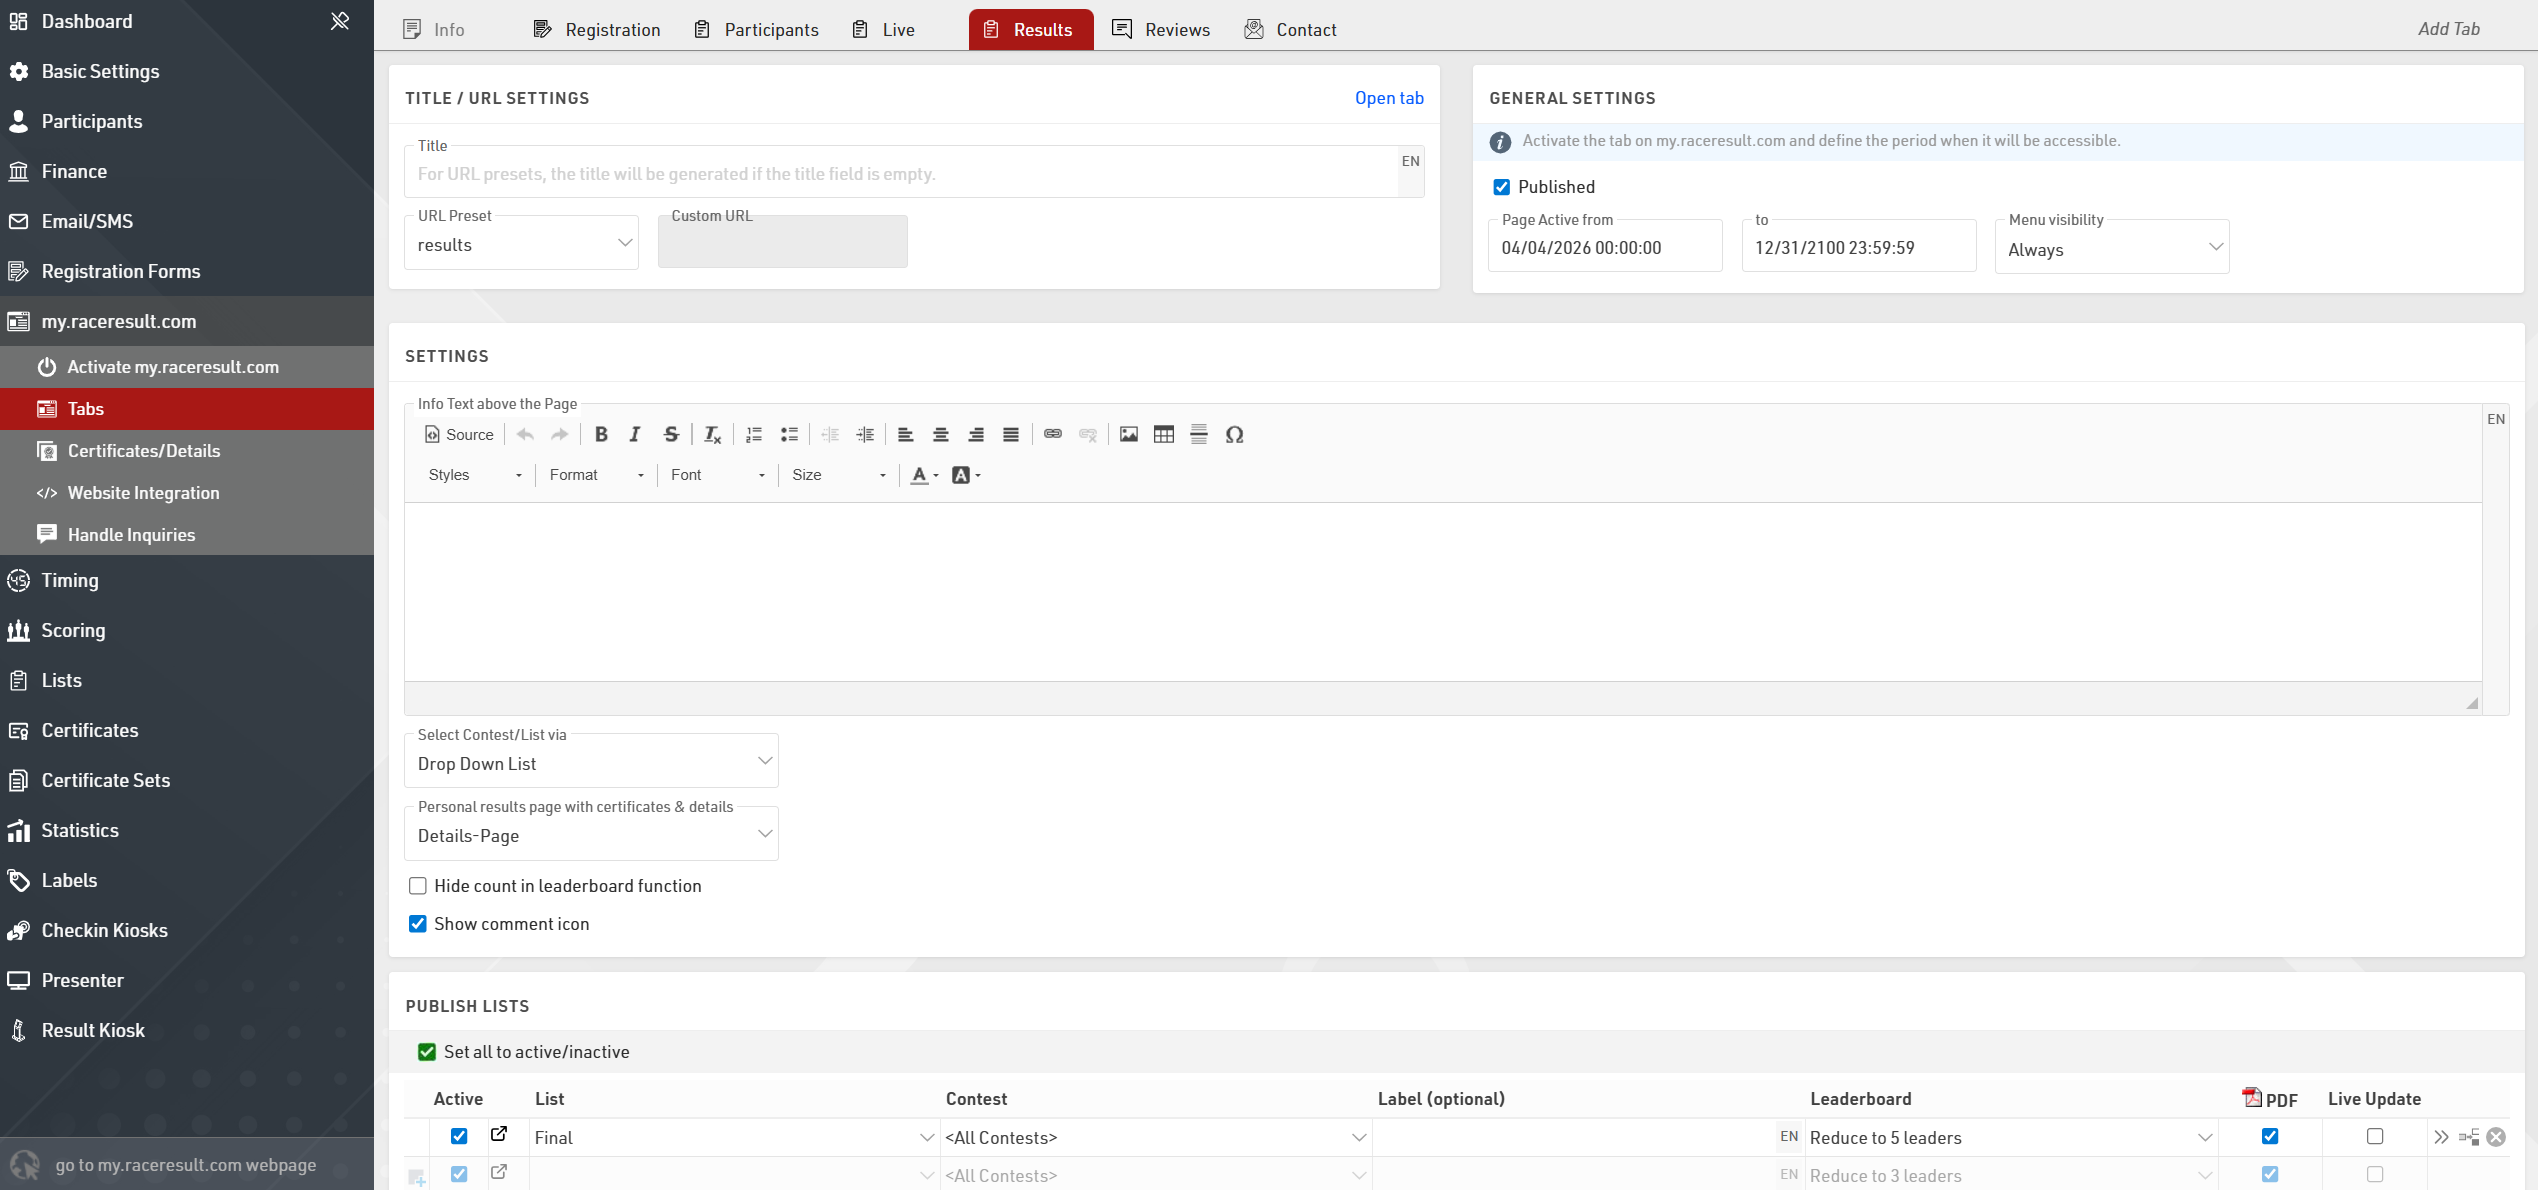
For each page you can choose which Output Lists should be published, if more than one list is published then a dropdown will allow the user to change between the different lists.